

مفاهیم و پیادهسازی Jetpack Compose
منبع رشتهای، رشتههای نوشتاری را با قالببندی و سبک نوشتاری اختیاری برای برنامهتان ارائه میدهد. سه نوع منبع وجود دارد که میتواند رشتهها را برای برنامه شما فراهم کند:
- رشته
- منبع XML که یک رشته ارائه میدهد.
- آرایه رشتهای
- منبع XML که آرایهای از رشتهها را ارائه میدهد.
- رشتههای کمیت (جمع)
- منبع XML که رشتههای مختلفی برای جمعبندی دارد.
همه رشتهها میتوانند برخی نشانهگذاریهای سبکبندی و آرگومانهای قالببندی را اعمال کنند. برای اطلاعات درباره رشتههای قالببندی و سبکبندی، به بخش مربوط به قالببندی و سبکبندی مراجعه کنید.
رشته
رشتهای تکی که میتوان از برنامه یا از دیگر فایلهای منبع (مثل چیدمان XML) به آن ارجاع داد.
- مکان فایل:
res/values/filename.xml
نام فایل اختیاری است.nameعنصر<string>بهعنوان شناسه منبع استفاده میشود.- نوع داده منبع کامپایلشده:
- اشارهگر منبع به
String. - مرجع منبع:
-
در Java:
R.string.string_name
در XML:@string/string_name - نحو:
-
<?xml version="1.0" encoding="utf-8"?>
<resources>
    <string
        name="string_name"
        >text_string</string>
</resources>
- عناصر:
- مثال:
- فایل XML در
res/values/strings.xmlذخیره شد:<?xml version="1.0" encoding="utf-8"?> <resources> <string name="hello">Hello!</string> </resources>
این XML چیدمان رشتهای را به «نما» اعمال میکند:
<TextView
    android:layout_width="fill_parent"
    android:layout_height="wrap_content"
    android:text="@string/hello" />
این کد برنامه رشتهای را بازیابی میکند:
میتوانید از
getString(int)یاgetText(int)برای بازیابی رشته استفاده کنید.getText(int)هرگونه سبک نوشتار غنیشده اعمالشده به رشته را حفظ میکند.
آرایه رشتهای
آرایهای از رشتهها که میتوان از برنامه به آنها ارجاع داد.
- مکان فایل:
res/values/filename.xml
نام فایل اختیاری است.nameعنصر<string-array>بهعنوان شناسه منبع استفاده میشود.- نوع داده منبع کامپایلشده:
- اشارهگر منبع به آرایهای از
String. - مرجع منبع:
-
در Java:
R.array.string_array_name
در XML:@[package:]array/string_array_name - نحو:
-
<?xml version="1.0" encoding="utf-8"?>
<resources>
    <string-array
        name="string_array_name">
        <item
            >text_string</item>
    </string-array>
</resources>
- عناصر:
- مثال:
- فایل XML در
res/values/strings.xmlذخیره شد:<?xml version="1.0" encoding="utf-8"?> <resources> <string-array name="planets_array"> <item>Mercury</item> <item>Venus</item> <item>Earth</item> <item>Mars</item> </string-array> </resources>
کاتلین
val array: Array<String> =
resources.getStringArray(R.array.planets_array)جاوا
Resources res = getResources();
String[] planets = res.getStringArray(R.array.planets_array);
رشتههای کمیت (جمع)
زبانهای مختلف قوانین متفاوتی برای مطابقت دستوری با
کمیت دارند. برای مثال، در زبان انگلیسی، مقدار ۱ یک مورد خاص است. مینویسیم
«۱ کتاب»، اما برای هر تعداد دیگری مینویسیم «n کتاب». این تمایز بین مفرد و جمع بسیار رایج است، اما زبانهای دیگر تمایزهای دقیقتری قائل میشوند. مجموعه کاملی که Android پشتیبانی میکند عبارت است از zero، one، two، few،
many، و other.
قوانین تصمیمگیری درباره اینکه از کدام حالت برای زبان و کمیت مشخصی استفاده شود میتواند بسیار پیچیده باشد، بنابراین Android روشهایی مانند getQuantityString() را برای انتخاب منبع مناسب برای شما ارائه میدهد.
در API 24+ میتوانید بهجای آن از کلاس ICU MessageFormat
که بسیار قدرتمندتر است استفاده کنید.
- مکان فایل:
res/values/filename.xml
نام فایل اختیاری است.nameعنصر<plurals>بهعنوان شناسه منبع استفاده میشود.- مرجع منبع:
-
در جاوا:
R.plurals.plural_name - نحو:
-
<?xml version="1.0" encoding="utf-8"?>
<resources>
    <plurals
        name="plural_name">
        <item
            quantity=["zero" | "one" | "two" | "few" | "many" | "other"]
            >text_string</item>
    </plurals>
</resources>
- عناصر:
- مثال:
- فایل XML در
res/values/strings.xmlذخیره شد:<?xml version="1.0" encoding="utf-8"?> <resources> <plurals name="numberOfSongsAvailable"> <!-- As a developer, you should always supply "one" and "other" strings. Your translators will know which strings are actually needed for their language. Always include %d in "one" because translators will need to use %d for languages where "one" doesn't mean 1 (as explained above). --> <item quantity="one">%d song found.</item> <item quantity="other">%d songs found.</item> </plurals> </resources>
فایل XML در
res/values-pl/strings.xmlذخیره شد:<?xml version="1.0" encoding="utf-8"?> <resources> <plurals name="numberOfSongsAvailable"> <item quantity="one">Znaleziono %d piosenkę.</item> <item quantity="few">Znaleziono %d piosenki.</item> <item quantity="other">Znaleziono %d piosenek.</item> </plurals> </resources>
موارد استفاده:
کاتلین
val count = getNumberOfSongsAvailable() val songsFound = resources.
getQuantityString(R.plurals.numberOfSongsAvailable, count, count)جاوا
int count = getNumberOfSongsAvailable();
Resources res = getResources();
String songsFound = res.getQuantityString(R.plurals.numberOfSongsAvailable, count, count);
هنگام استفاده از روش
getQuantityString()، اگر رشته شما شامل قالببندی رشته باشد، بایدcountرا دو بار ارسال کنید. برای مثال، برای رشته%d songs found، پارامترcountاول رشته جمع مناسب را انتخاب میکند و پارامترcountدوم در جایبان%dدرج میشود. اگر رشتههای جمع شما شامل قالببندی رشته نباشد، نیازی نیست پارامتر سوم را بهgetQuantityStringارسال کنید.
قالب و سبک
در اینجا چند نکته مهم درباره نحوه قالببندی و سبکدهی صحیح منابع رشتهای آورده شده است.
درحال قالببندی رشتهها
اگر لازم است رشتههایتان را قالببندی کنید، میتوانید این کار را با قرار دادن آرگومانهای قالببندی در منبع رشته انجام دهید، همانطور که در منبع نمونه زیر نشان داده شده است.
<string name="welcome_messages">Hello, %1$s! You have %2$d new messages.</string>
در این مثال، رشته قالب دو آرگومان دارد: %1$s یک رشته است و
%2$d یک عدد اعشاری است. سپس، رشته را با فراخوانی
getString(int, Object...) قالببندی کنید. برای مثال:
کاتلین
var text = getString(R.string.welcome_messages, username, mailCount)
جاوا
String text = getString(R.string.welcome_messages, username, mailCount);
سبکبندی با نشانهگذاری HTML
میتوانید با نشانهگذاری HTML به رشتههایتان سبک اضافه کنید. برای مثال:
<?xml version="1.0" encoding="utf-8"?>
<resources>
    <string name="welcome">Welcome to <b>Android</b>!</string>
</resources>
اگر قالببندی را اعمال نمیکنید، میتوانید نوشتار TextView را مستقیماً با فراخوانی setText(java.lang.CharSequence) تنظیم کنید. بااینحال، در برخی موارد ممکن است بخواهید منبع نوشتاری سبکی ایجاد کنید که بهعنوان رشته قالب نیز استفاده شود.
معمولاً این کار نمیکند زیرا روشهای format(String, Object...) و getString(int, Object...) همه اطلاعات سبک را از رشته حذف میکنند. راه حل این مشکل این است که تگهای HTML را با موجودیتهای گریز بنویسید، که سپس با fromHtml(String) بازیابی میشوند، پساز اینکه قالببندی انجام شد. برای مثال:
- منبع نوشتار سبکدارتان را بهعنوان رشته گریز HTML ذخیره کنید:
<resources> <string name="welcome_messages">Hello, %1$s! You have <b>%2$d new messages</b>.</string> </resources>
در این رشته قالببندیشده، عنصر
<b>اضافه شده است. توجه داشته باشید که براکت باز بااستفاده از نماد<، HTML-escaped است. - سپس رشته را مثل همیشه قالببندی کنید، اما
fromHtml(String)را نیز فراخوانی کنید تا نوشتار HTML را به نوشتار سبکدار تبدیل کنید:کاتلین
val text: String = getString(R.string.welcome_messages, username, mailCount)
val styledText: Spanned = Html.fromHtml(text, FROM_HTML_MODE_LEGACY)
جاوا
String text = getString(R.string.welcome_messages, username, mailCount);
Spanned styledText = Html.fromHtml(text, FROM_HTML_MODE_LEGACY);
چون روش fromHtml(String) همه موجودیتهای HTML را قالببندی میکند، حتماً
بااستفاده از htmlEncode(String)، از هر نویسه HTML احتمالی در رشتههایی که با نوشتار قالببندیشده
استفاده میکنید بگریزید. برای مثال، اگر رشتهای را قالببندی میکنید که حاوی نویسههایی مثل «<» یا «&» است، باید قبلاز قالببندی از آنها گریز شود تا وقتی رشته قالببندیشده از fromHtml(String) عبور میکند، نویسهها بههمان شکلی که در ابتدا نوشته شده بودند ظاهر شوند. برای مثال:
کاتلین
val escapedUsername: String = TextUtils.htmlEncode(username)

val text: String = getString(R.string.welcome_messages, escapedUsername, mailCount)
val styledText: Spanned = Html.fromHtml(text, FROM_HTML_MODE_LEGACY)
جاوا
String escapedUsername = TextUtils.htmlEncode(username);

String text = getString(R.string.welcome_messages, escapedUsername, mailCount);
Spanned styledText = Html.fromHtml(text);سبکپردازی با spannable
Spannable شیء نوشتاری است که میتوانید با ویژگیهای طرح حروف،
مثل رنگ و وزن قلم، به آن سبک بدهید. از SpannableStringBuilder برای ساختن
نوشتار استفاده میکنید و سپس سبکهای تعریفشده در بسته
android.text.style را روی نوشتار اعمال میکنید.
میتوانید از روشهای کمکی زیر برای راهاندازی بخش زیادی از کار ایجاد نوشتار قابلگسترش استفاده کنید:
کاتلین
/**
 * Returns a CharSequence that concatenates the specified array of CharSequence
 * objects and then applies a list of zero or more tags to the entire range.
 *
 * @param content an array of character sequences to apply a style to
 * @param tags the styled span objects to apply to the content
 *        such as android.text.style.StyleSpan
 */
private fun apply(content: Array<out CharSequence>, vararg tags: Any): CharSequence {
    return SpannableStringBuilder().apply {
        openTags(tags)
        content.forEach { charSequence ->
            append(charSequence)
        }
        closeTags(tags)
    }
}

/**
 * Iterates over an array of tags and applies them to the beginning of the specified
 * Spannable object so that future text appended to the text will have the styling
 * applied to it. Do not call this method directly.
 */
private fun Spannable.openTags(tags: Array<out Any>) {
    tags.forEach { tag ->
        setSpan(tag, 0, 0, Spannable.SPAN_MARK_MARK)
    }
}

/**
 * "Closes" the specified tags on a Spannable by updating the spans to be
 * endpoint-exclusive so that future text appended to the end will not take
 * on the same styling. Do not call this method directly.
 */
private fun Spannable.closeTags(tags: Array<out Any>) {
    tags.forEach { tag ->
    if (length > 0) {
            setSpan(tag, 0, length, Spanned.SPAN_EXCLUSIVE_EXCLUSIVE)
        } else {
            removeSpan(tag)
        }
    }
}
جاوا
/**
 * Returns a CharSequence that concatenates the specified array of CharSequence
 * objects and then applies a list of zero or more tags to the entire range.
 *
 * @param content an array of character sequences to apply a style to
 * @param tags the styled span objects to apply to the content
 *        such as android.text.style.StyleSpan
 *
 */
private static CharSequence applyStyles(CharSequence[] content, Object[] tags) {
    SpannableStringBuilder text = new SpannableStringBuilder();
    openTags(text, tags);
    for (CharSequence item : content) {
        text.append(item);
    }
    closeTags(text, tags);
    return text;
}

/**
 * Iterates over an array of tags and applies them to the beginning of the specified
 * Spannable object so that future text appended to the text will have the styling
 * applied to it. Do not call this method directly.
 */
private static void openTags(Spannable text, Object[] tags) {
    for (Object tag : tags) {
        text.setSpan(tag, 0, 0, Spannable.SPAN_MARK_MARK);
    }
}

/**
 * "Closes" the specified tags on a Spannable by updating the spans to be
 * endpoint-exclusive so that future text appended to the end will not take
 * on the same styling. Do not call this method directly.
 */
private static void closeTags(Spannable text, Object[] tags) {
    int len = text.length();
    for (Object tag : tags) {
        if (len > 0) {
            text.setSpan(tag, 0, len, Spanned.SPAN_EXCLUSIVE_EXCLUSIVE);
        } else {
            text.removeSpan(tag);
        }
    }
}
روشهای bold، italic، و color زیر روشهای کمکی بالا را دربرمیگیرند و نمونههای خاصی از اعمال سبکهای تعریفشده در بسته android.text.style را نشان میدهند. میتوانید روشهای مشابهی برای انجام انواع دیگر
سبکبندی نوشتار ایجاد کنید.
کاتلین
/**
 * Returns a CharSequence that applies boldface to the concatenation
 * of the specified CharSequence objects.
 */
fun bold(vararg content: CharSequence): CharSequence = apply(content, StyleSpan(Typeface.BOLD))

/**
 * Returns a CharSequence that applies italics to the concatenation
 * of the specified CharSequence objects.
 */
fun italic(vararg content: CharSequence): CharSequence = apply(content, StyleSpan(Typeface.ITALIC))

/**
 * Returns a CharSequence that applies a foreground color to the
 * concatenation of the specified CharSequence objects.
 */
fun color(color: Int, vararg content: CharSequence): CharSequence =
        apply(content, ForegroundColorSpan(color))
جاوا
/**
 * Returns a CharSequence that applies boldface to the concatenation
 * of the specified CharSequence objects.
 */
public static CharSequence bold(CharSequence... content) {
    return apply(content, new StyleSpan(Typeface.BOLD));
}

/**
 * Returns a CharSequence that applies italics to the concatenation
 * of the specified CharSequence objects.
 */
public static CharSequence italic(CharSequence... content) {
    return apply(content, new StyleSpan(Typeface.ITALIC));
}

/**
 * Returns a CharSequence that applies a foreground color to the
 * concatenation of the specified CharSequence objects.
 */
public static CharSequence color(int color, CharSequence... content) {
    return apply(content, new ForegroundColorSpan(color));
}
در اینجا مثالی از نحوه زنجیر کردن این روشها به یکدیگر برای اعمال سبکهای مختلف به کلمات جداگانه در یک عبارت آورده شده است:
کاتلین
// Create an italic "hello, " a red "world",
// and bold the entire sequence.
val text: CharSequence = bold(italic(getString(R.string.hello)),
        color(Color.RED, getString(R.string.world)))
جاوا
// Create an italic "hello, " a red "world",
// and bold the entire sequence.
CharSequence text = bold(italic(getString(R.string.hello)),
    color(Color.RED, getString(R.string.world)));
مدول core-ktx Kotlin همچنین حاوی توابع افزونهای است که کار کردن با فاصلهها را حتی آسانتر میکند. برای کسب اطلاعات بیشتر میتوانید به android.text
اسناد بسته در GitHub مراجعه کنید.
برای اطلاعات بیشتر درباره کار با بازهها، پیوندهای زیر را ببینید:
سبکپردازی با حاشیهنویسی
بااستفاده از کلاس Annotation همراه با برچسب <annotation> در فایلهای منبع strings.xml، میتوانید سبکبندی پیچیده یا سفارشی اعمال کنید. برچسب حاشیهنویسی به شما امکان میدهد بخشهایی از رشته را برای سبک سفارشی با تعریف جفتهای کلید-مقدار سفارشی در XML علامتگذاری کنید که سپس چارچوب آنها را به گسترههای Annotation تبدیل میکند. سپس میتوانید این حاشیهنویسیها را بازیابی کنید و از
کلید و مقدار برای اعمال سبک استفاده کنید.
هنگام ایجاد حاشیهنویسی، حتماً برچسب <annotation> را به همه ترجمههای رشته در هر فایل strings.xml اضافه کنید.
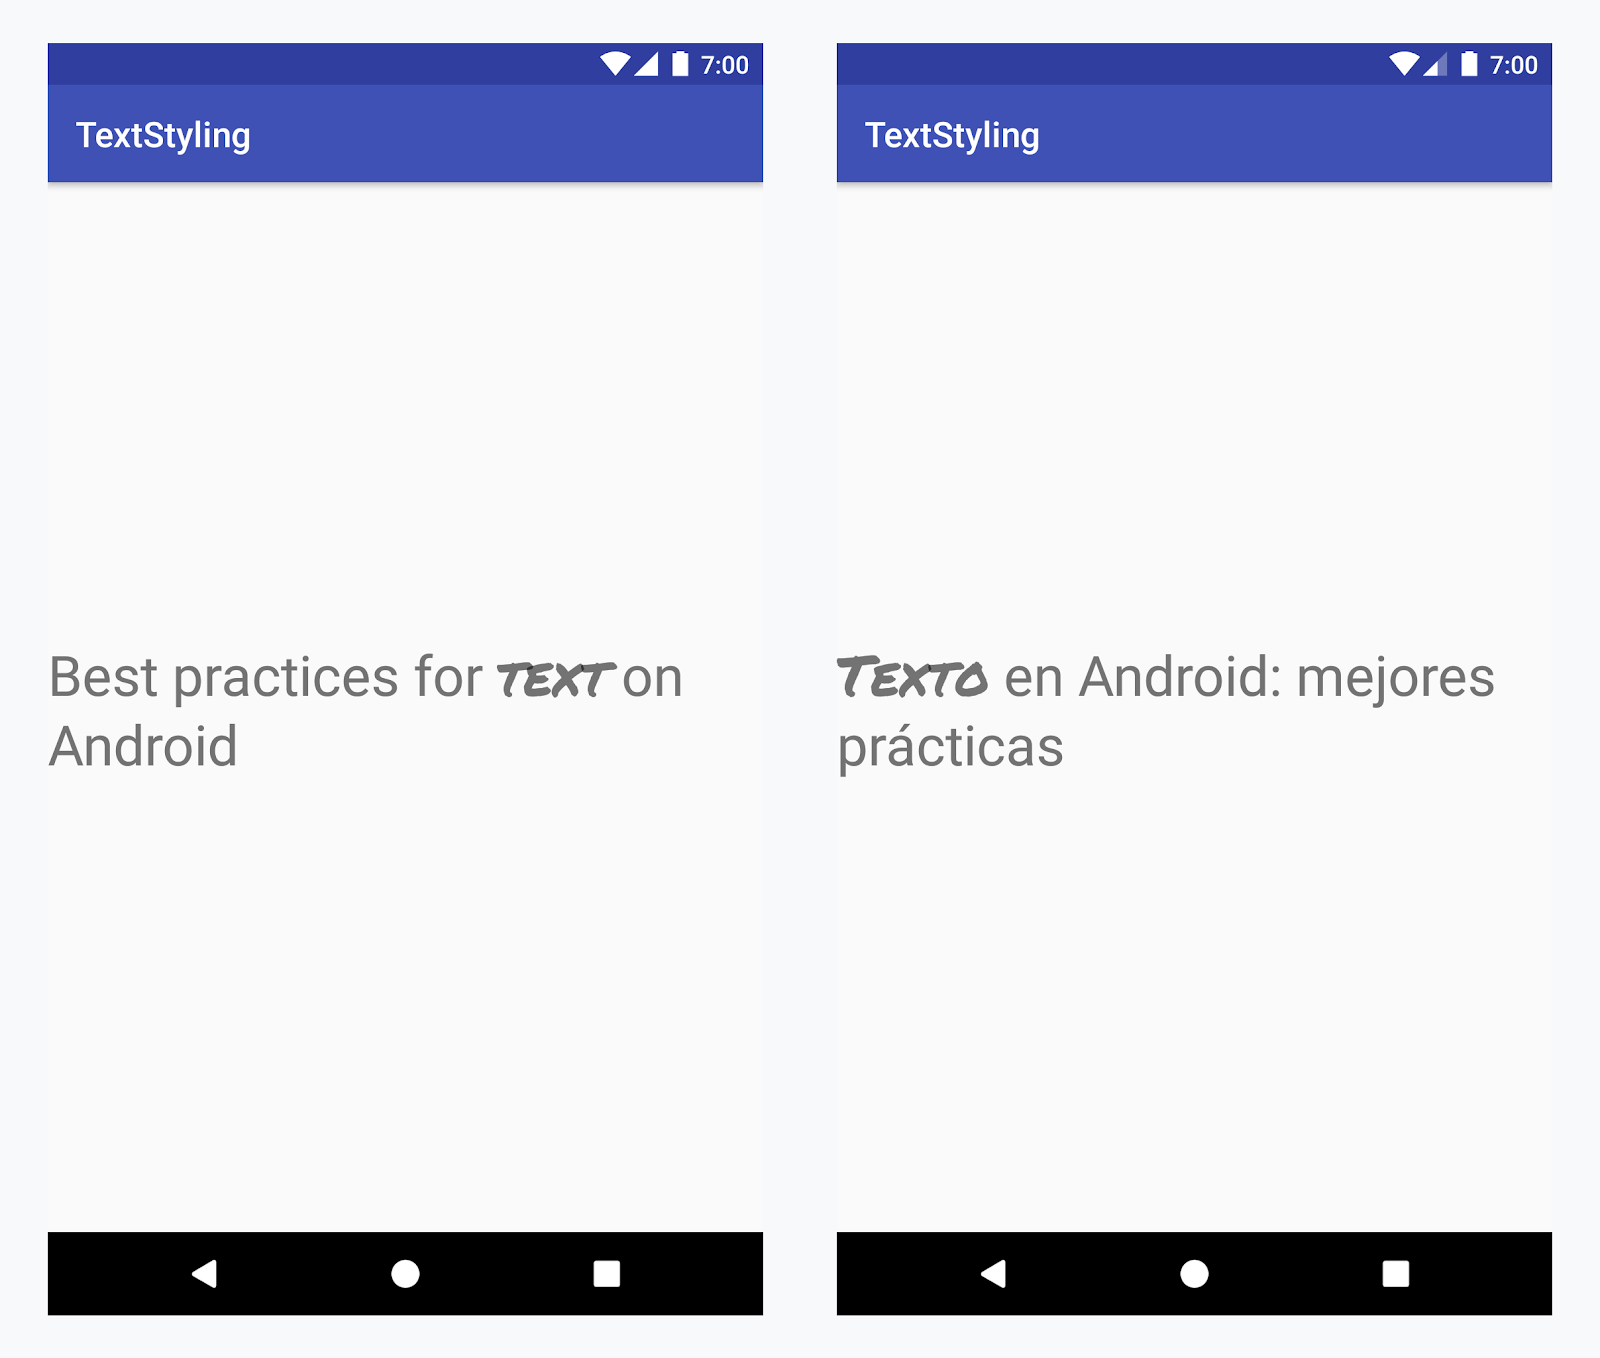
اعمال کردن طرح حروف سفارشی برای کلمه «نوشتار» در همه زبانها
مثال - افزودن طرح حروف سفارشی
-
برچسب
<annotation>را اضافه کنید و جفت کلید-مقدار را تعریف کنید. در این مورد، کلید font است و مقدار نوع قلمی است که میخواهیم استفاده کنیم: title_emphasis// values/strings.xml <string name="title">Best practices for <annotation font="title_emphasis">text</annotation> on Android</string> // values-es/strings.xml <string name="title"><annotation font="title_emphasis">Texto</annotation> en Android: mejores prácticas</string>
-
منبع رشته را بار کنید و حاشیهنویسیها را با کلید قلم پیدا کنید. سپس یک محدوده سفارشی ایجاد کنید و محدوده موجود را جایگزین کنید.
کاتلین
// get the text as SpannedString so we can get the spans attached to the text
val titleText = getText(R.string.title) as SpannedString

// get all the annotation spans from the text
val annotations = titleText.getSpans(0, titleText.length, Annotation::class.java)

// create a copy of the title text as a SpannableString.
// the constructor copies both the text and the spans. so we can add and remove spans
val spannableString = SpannableString(titleText)

// iterate through all the annotation spans
for (annotation in annotations) {
   // look for the span with the key font
   if (annotation.key == "font") {
      val fontName = annotation.value
      // check the value associated to the annotation key
      if (fontName == "title_emphasis") {
         // create the typeface
         val typeface = getFontCompat(R.font.permanent_marker)
         // set the span at the same indices as the annotation
         spannableString.setSpan(CustomTypefaceSpan(typeface),
            titleText.getSpanStart(annotation),
            titleText.getSpanEnd(annotation),
            Spannable.SPAN_EXCLUSIVE_EXCLUSIVE)
      }
   }
}

// now, the spannableString contains both the annotation spans and the CustomTypefaceSpan
styledText.text = spannableString
جاوا
// get the text as SpannedString so we can get the spans attached to the text
SpannedString titleText = (SpannedString) getText(R.string.title);

// get all the annotation spans from the text
Annotation[] annotations = titleText.getSpans(0, titleText.length(), Annotation.class);

// create a copy of the title text as a SpannableString.
// the constructor copies both the text and the spans. so we can add and remove spans
SpannableString spannableString = new SpannableString(titleText);

// iterate through all the annotation spans
for (Annotation annotation: annotations) {
  // look for the span with the key font
  if (annotation.getKey().equals("font")) {
    String fontName = annotation.getValue();
    // check the value associated to the annotation key
    if (fontName.equals("title_emphasis")) {
    // create the typeface
    Typeface typeface = ResourcesCompat.getFont(this, R.font.roboto_mono);
    // set the span at the same indices as the annotation
    spannableString.setSpan(new CustomTypefaceSpan(typeface),
      titleText.getSpanStart(annotation),
      titleText.getSpanEnd(annotation),
      Spannable.SPAN_EXCLUSIVE_EXCLUSIVE);
    }
  }
}

// now, the spannableString contains both the annotation spans and the CustomTypefaceSpan
styledText.text = spannableString;
اگر از یک نوشتار چندین بار استفاده میکنید، باید شیء SpannableString را یکبار بسازید و درصورت نیاز دوباره از آن استفاده کنید تا از مشکلات احتمالی عملکرد و حافظه جلوگیری شود.
برای نمونههای بیشتر از کاربرد حاشیهنویسی، به سبکبندی نوشتار بینالمللیشده در Android مراجعه کنید.
بستهبندی نوشتار و بازههای گزارمان
چون بازههای Annotation نیز ParcelableSpans هستند، جفتهای کلید-مقدار
بستهبندی و باز میشوند. As long as the receiver of the parcel knows how to
interpret the annotations, you can use Annotation spans to apply custom
styling to the parceled text.
برای حفظ سبک سفارشیتان هنگام ارسال نوشتار به «دسته هدف»، ابتدا باید
Annotation فاصله به نوشتارتان اضافه کنید. میتوانید این کار را در منابع XML ازطریق برچسب <annotation> (همانطور که در مثال بالا نشان داده شده است) یا در کد با ایجاد Annotation جدید و تنظیم آن بهعنوان span (همانطور که در زیر نشان داده شده است) انجام دهید:
کاتلین
val spannableString = SpannableString("My spantastic text")
val annotation = Annotation("font", "title_emphasis")
spannableString.setSpan(annotation, 3, 7, Spannable.SPAN_EXCLUSIVE_EXCLUSIVE)

// start Activity with text with spans
val intent = Intent(this, MainActivity::class.java)
intent.putExtra(TEXT_EXTRA, spannableString)
startActivity(intent)
جاوا
SpannableString spannableString = new SpannableString("My spantastic text");
Annotation annotation = new Annotation("font", "title_emphasis");
spannableString.setSpan(annotation, 3, 7, 33);

// start Activity with text with spans
Intent intent = new Intent(this, MainActivity.class);
intent.putExtra(TEXT_EXTRA, spannableString);
this.startActivity(intent);
نوشتار را از Bundle بهعنوان SpannableString بازیابی کنید و سپس حاشیهنویسیهای پیوستشده را تجزیه کنید، همانطور که در مثال بالا نشان داده شده است.
کاتلین
// read text with Spans
val intentCharSequence = intent.getCharSequenceExtra(TEXT_EXTRA) as SpannableString
جاوا
// read text with Spans
SpannableString intentCharSequence = (SpannableString)intent.getCharSequenceExtra(TEXT_EXTRA);
برای اطلاعات بیشتر درباره سبکبندی نوشتار، پیوندهای زیر را ببینید: