

แนวคิดและการใช้งาน Jetpack Compose
ทรัพยากรสตริงมีสตริงข้อความสำหรับแอปพลิเคชันของคุณพร้อมการจัดรูปแบบและจัดสไตล์ข้อความที่ไม่บังคับ มีทรัพยากร 3 ประเภทที่สามารถให้สตริงแก่แอปพลิเคชัน ของคุณได้
- สตริง
- ทรัพยากร XML ที่มีสตริงเดียว
- อาร์เรย์สตริง
- ทรัพยากร XML ที่มีอาร์เรย์ของสตริง
- สตริงจำนวน (คำนามพหูพจน์)
- ทรัพยากร XML ที่มีสตริงต่างๆ สำหรับการเปลี่ยนคำให้เป็นพหูพจน์
สตริงทั้งหมดสามารถใช้มาร์กอัปการจัดรูปแบบและอาร์กิวเมนต์ การจัดรูปแบบบางอย่างได้ ดูข้อมูลเกี่ยวกับการจัดรูปแบบและจัดรูปแบบสตริงได้ในส่วนการจัดรูปแบบและการจัดสไตล์
สตริง
สตริงเดียวที่อ้างอิงได้จากแอปพลิเคชันหรือจากไฟล์ทรัพยากรอื่นๆ (เช่น เลย์เอาต์ XML)
- ตำแหน่งไฟล์:
res/values/filename.xml
ชื่อไฟล์เป็นชื่อใดก็ได้ ระบบจะใช้nameขององค์ประกอบ<string>เป็น รหัสทรัพยากร- ประเภทข้อมูลทรัพยากรที่คอมไพล์แล้ว:
- ตัวชี้ทรัพยากรไปยัง
String - การอ้างอิงทรัพยากร
-
ใน Java:
R.string.string_name
ใน XML:@string/string_name - ไวยากรณ์:
-
<?xml version="1.0" encoding="utf-8"?>
<resources>
    <string
        name="string_name"
        >text_string</string>
</resources>
- องค์ประกอบ
- ตัวอย่าง:
- บันทึกไฟล์ XML ที่
res/values/strings.xmlแล้ว<?xml version="1.0" encoding="utf-8"?> <resources> <string name="hello">Hello!</string> </resources>
XML เลย์เอาต์นี้ใช้สตริงกับ View
<TextView
    android:layout_width="fill_parent"
    android:layout_height="wrap_content"
    android:text="@string/hello" />
โค้ดของแอปพลิเคชันนี้จะดึงข้อมูลสตริง
คุณใช้
getString(int)หรือgetText(int)เพื่อดึงข้อมูลสตริงได้getText(int)จะเก็บการจัดรูปแบบ Rich Text ที่ใช้กับสตริง
อาร์เรย์สตริง
อาร์เรย์ของสตริงที่อ้างอิงได้จากแอปพลิเคชัน
- ตำแหน่งไฟล์:
res/values/filename.xml
ชื่อไฟล์เป็นชื่อใดก็ได้ ระบบจะใช้nameขององค์ประกอบ<string-array>เป็น รหัสทรัพยากร- ประเภทข้อมูลทรัพยากรที่คอมไพล์แล้ว:
- ตัวชี้ทรัพยากรไปยังอาร์เรย์ของ
Strings - การอ้างอิงทรัพยากร
-
ใน Java:
R.array.string_array_name
ใน XML:@[package:]array/string_array_name - ไวยากรณ์:
-
<?xml version="1.0" encoding="utf-8"?>
<resources>
    <string-array
        name="string_array_name">
        <item
            >text_string</item>
    </string-array>
</resources>
- องค์ประกอบ
- ตัวอย่าง:
- บันทึกไฟล์ XML ที่
res/values/strings.xmlแล้ว<?xml version="1.0" encoding="utf-8"?> <resources> <string-array name="planets_array"> <item>Mercury</item> <item>Venus</item> <item>Earth</item> <item>Mars</item> </string-array> </resources>
Kotlin
val array: Array<String> =
resources.getStringArray(R.array.planets_array)Java
Resources res = getResources();
String[] planets = res.getStringArray(R.array.planets_array);
สตริงจำนวน (คำนามพหูพจน์)
ภาษาต่างๆ มีกฎที่แตกต่างกันสำหรับการตกลงทางไวยากรณ์กับปริมาณ เช่น ในภาษาอังกฤษ จำนวน 1 เป็นกรณีพิเศษ เราเขียนว่า "หนังสือ 1 เล่ม" แต่หากมีจำนวนอื่น เราจะเขียนว่า "หนังสือ n เล่ม" ความแตกต่าง
ระหว่างเอกพจน์และพหูพจน์เป็นเรื่องปกติมาก แต่ภาษาอื่นๆ มีความแตกต่างที่ละเอียดกว่า
ชุดอักขระทั้งหมดที่ Android รองรับคือ zero, one, two, few,
many และ other
กฎในการตัดสินใจว่าจะใช้รูปแบบใดสำหรับภาษาและจำนวนที่กำหนดอาจมีความซับซ้อนมาก ดังนั้น Android จึงมีวิธีการต่างๆ เช่น getQuantityString() เพื่อให้คุณเลือกทรัพยากรที่เหมาะสมได้
ใน API 24 ขึ้นไป คุณสามารถใช้คลาส MessageFormat ของ ICU ที่มีประสิทธิภาพมากกว่าแทนได้
- ตำแหน่งไฟล์:
res/values/filename.xml
ชื่อไฟล์เป็นชื่อใดก็ได้ ระบบจะใช้nameขององค์ประกอบ<plurals>เป็น รหัสทรัพยากร- การอ้างอิงทรัพยากร
-
ใน Java:
R.plurals.plural_name - ไวยากรณ์:
-
<?xml version="1.0" encoding="utf-8"?>
<resources>
    <plurals
        name="plural_name">
        <item
            quantity=["zero" | "one" | "two" | "few" | "many" | "other"]
            >text_string</item>
    </plurals>
</resources>
- องค์ประกอบ
- ตัวอย่าง:
- บันทึกไฟล์ XML ที่
res/values/strings.xmlแล้ว<?xml version="1.0" encoding="utf-8"?> <resources> <plurals name="numberOfSongsAvailable"> <!-- As a developer, you should always supply "one" and "other" strings. Your translators will know which strings are actually needed for their language. Always include %d in "one" because translators will need to use %d for languages where "one" doesn't mean 1 (as explained above). --> <item quantity="one">%d song found.</item> <item quantity="other">%d songs found.</item> </plurals> </resources>
บันทึกไฟล์ XML ไว้ที่
res/values-pl/strings.xml<?xml version="1.0" encoding="utf-8"?> <resources> <plurals name="numberOfSongsAvailable"> <item quantity="one">Znaleziono %d piosenkę.</item> <item quantity="few">Znaleziono %d piosenki.</item> <item quantity="other">Znaleziono %d piosenek.</item> </plurals> </resources>
การใช้งาน:
Kotlin
val count = getNumberOfSongsAvailable() val songsFound = resources.
getQuantityString(R.plurals.numberOfSongsAvailable, count, count)Java
int count = getNumberOfSongsAvailable();
Resources res = getResources();
String songsFound = res.getQuantityString(R.plurals.numberOfSongsAvailable, count, count);
เมื่อใช้วิธี
getQuantityString()คุณต้องส่งcount2 ครั้งหากสตริงมีการจัดรูปแบบสตริง เช่น สำหรับสตริง%d songs foundพารามิเตอร์countแรกจะเลือกสตริงพหูพจน์ที่เหมาะสม และพารามิเตอร์countที่ 2 จะแทรกลงในตัวยึดตำแหน่ง%dหากสตริงพหูพจน์ไม่มีการจัดรูปแบบสตริง คุณไม่ จำเป็นต้องส่งพารามิเตอร์ที่ 3 ไปยังgetQuantityString
รูปแบบและสไตล์
สิ่งสำคัญบางอย่างที่คุณควรทราบเกี่ยวกับวิธีจัดรูปแบบ และจัดรูปแบบทรัพยากรสตริงอย่างถูกต้องมีดังนี้
การจัดรูปแบบสตริง
หากต้องการจัดรูปแบบสตริง คุณสามารถทำได้โดยใส่รูปแบบ อาร์กิวเมนต์ในทรัพยากรสตริง ดังที่แสดงในตัวอย่าง ทรัพยากรต่อไปนี้
<string name="welcome_messages">Hello, %1$s! You have %2$d new messages.</string>
ในตัวอย่างนี้ สตริงรูปแบบมีอาร์กิวเมนต์ 2 รายการ ได้แก่ %1$s ซึ่งเป็นสตริง และ
%2$d ซึ่งเป็นตัวเลขทศนิยม จากนั้นจัดรูปแบบสตริงโดยเรียกใช้
getString(int, Object...) เช่น
Kotlin
var text = getString(R.string.welcome_messages, username, mailCount)
Java
String text = getString(R.string.welcome_messages, username, mailCount);
การจัดรูปแบบด้วยมาร์กอัป HTML
คุณเพิ่มสไตล์ให้กับสตริงได้ด้วยมาร์กอัป HTML เช่น
<?xml version="1.0" encoding="utf-8"?>
<resources>
    <string name="welcome">Welcome to <b>Android</b>!</string>
</resources>
หากไม่ได้ใช้การจัดรูปแบบ คุณสามารถตั้งค่าข้อความ TextView ได้โดยตรงโดย
เรียกใช้ setText(java.lang.CharSequence) อย่างไรก็ตาม ในบางกรณี คุณอาจ
ต้องการสร้างทรัพยากรข้อความที่มีสไตล์ซึ่งใช้เป็นสตริงรูปแบบด้วย
โดยปกติแล้ว วิธีนี้จะใช้ไม่ได้เนื่องจากเมธอด format(String, Object...) และ
getString(int, Object...) จะนำข้อมูลรูปแบบทั้งหมดออกจากสตริง
วิธีแก้ปัญหานี้คือการเขียนแท็ก HTML ด้วยเอนทิตีที่หลบหนี
ซึ่งจะกู้คืนด้วย fromHtml(String) หลังจาก
การจัดรูปแบบ เช่น
- จัดเก็บทรัพยากรข้อความที่มีการจัดรูปแบบเป็นสตริงที่หลีกเลี่ยง HTML ดังนี้
<resources> <string name="welcome_messages">Hello, %1$s! You have <b>%2$d new messages</b>.</string> </resources>
ในสตริงที่จัดรูปแบบนี้ ระบบจะเพิ่มองค์ประกอบ
<b>โปรดทราบว่าวงเล็บเปิดจะได้รับการหลีกเลี่ยง HTML โดยใช้สัญกรณ์< - จากนั้นจัดรูปแบบสตริงตามปกติ แต่ให้เรียกใช้
fromHtml(String)เพื่อ แปลงข้อความ HTML เป็นข้อความที่มีสไตล์ด้วยKotlin
val text: String = getString(R.string.welcome_messages, username, mailCount)
val styledText: Spanned = Html.fromHtml(text, FROM_HTML_MODE_LEGACY)
Java
String text = getString(R.string.welcome_messages, username, mailCount);
Spanned styledText = Html.fromHtml(text, FROM_HTML_MODE_LEGACY);
เนื่องจากวิธี fromHtml(String) จะจัดรูปแบบเอนทิตี HTML ทั้งหมด โปรดตรวจสอบ
ว่าได้กำหนดอักขระหลีกสำหรับอักขระ HTML ที่เป็นไปได้ในสตริงที่คุณใช้กับข้อความที่จัดรูปแบบ
โดยใช้ htmlEncode(String) เช่น หากคุณจัดรูปแบบสตริงที่มีอักขระอย่าง "<" หรือ "&" คุณต้องหลีกเลี่ยงอักขระเหล่านั้นก่อนจัดรูปแบบ เพื่อให้เมื่อส่งสตริงที่จัดรูปแบบผ่าน fromHtml(String) อักขระจะแสดงในลักษณะเดียวกับที่เขียนไว้แต่เดิม เช่น
Kotlin
val escapedUsername: String = TextUtils.htmlEncode(username)

val text: String = getString(R.string.welcome_messages, escapedUsername, mailCount)
val styledText: Spanned = Html.fromHtml(text, FROM_HTML_MODE_LEGACY)
Java
String escapedUsername = TextUtils.htmlEncode(username);

String text = getString(R.string.welcome_messages, escapedUsername, mailCount);
Spanned styledText = Html.fromHtml(text);
การจัดรูปแบบด้วย Spannable
Spannable คือออบเจ็กต์ข้อความที่คุณจัดรูปแบบได้ด้วยพร็อพเพอร์ตี้แบบอักษร
เช่น สีและความหนาของแบบอักษร คุณใช้ SpannableStringBuilder เพื่อสร้าง
ข้อความ แล้วใช้รูปแบบที่กำหนดไว้ในแพ็กเกจ android.text.style
กับข้อความ
คุณสามารถใช้วิธีการช่วยต่อไปนี้เพื่อตั้งค่าการสร้างข้อความที่ครอบคลุมได้
Kotlin
/**
 * Returns a CharSequence that concatenates the specified array of CharSequence
 * objects and then applies a list of zero or more tags to the entire range.
 *
 * @param content an array of character sequences to apply a style to
 * @param tags the styled span objects to apply to the content
 *        such as android.text.style.StyleSpan
 */
private fun apply(content: Array<out CharSequence>, vararg tags: Any): CharSequence {
    return SpannableStringBuilder().apply {
        openTags(tags)
        content.forEach { charSequence ->
            append(charSequence)
        }
        closeTags(tags)
    }
}

/**
 * Iterates over an array of tags and applies them to the beginning of the specified
 * Spannable object so that future text appended to the text will have the styling
 * applied to it. Do not call this method directly.
 */
private fun Spannable.openTags(tags: Array<out Any>) {
    tags.forEach { tag ->
        setSpan(tag, 0, 0, Spannable.SPAN_MARK_MARK)
    }
}

/**
 * "Closes" the specified tags on a Spannable by updating the spans to be
 * endpoint-exclusive so that future text appended to the end will not take
 * on the same styling. Do not call this method directly.
 */
private fun Spannable.closeTags(tags: Array<out Any>) {
    tags.forEach { tag ->
    if (length > 0) {
            setSpan(tag, 0, length, Spanned.SPAN_EXCLUSIVE_EXCLUSIVE)
        } else {
            removeSpan(tag)
        }
    }
}
Java
/**
 * Returns a CharSequence that concatenates the specified array of CharSequence
 * objects and then applies a list of zero or more tags to the entire range.
 *
 * @param content an array of character sequences to apply a style to
 * @param tags the styled span objects to apply to the content
 *        such as android.text.style.StyleSpan
 *
 */
private static CharSequence applyStyles(CharSequence[] content, Object[] tags) {
    SpannableStringBuilder text = new SpannableStringBuilder();
    openTags(text, tags);
    for (CharSequence item : content) {
        text.append(item);
    }
    closeTags(text, tags);
    return text;
}

/**
 * Iterates over an array of tags and applies them to the beginning of the specified
 * Spannable object so that future text appended to the text will have the styling
 * applied to it. Do not call this method directly.
 */
private static void openTags(Spannable text, Object[] tags) {
    for (Object tag : tags) {
        text.setSpan(tag, 0, 0, Spannable.SPAN_MARK_MARK);
    }
}

/**
 * "Closes" the specified tags on a Spannable by updating the spans to be
 * endpoint-exclusive so that future text appended to the end will not take
 * on the same styling. Do not call this method directly.
 */
private static void closeTags(Spannable text, Object[] tags) {
    int len = text.length();
    for (Object tag : tags) {
        if (len > 0) {
            text.setSpan(tag, 0, len, Spanned.SPAN_EXCLUSIVE_EXCLUSIVE);
        } else {
            text.removeSpan(tag);
        }
    }
}
เมธอด bold, italic และ color ต่อไปนี้จะรวมเมธอดตัวช่วย
ด้านบนและแสดงตัวอย่างการใช้สไตล์ที่กำหนดไว้ในแพ็กเกจ android.text.style คุณสามารถสร้างวิธีการที่คล้ายกันเพื่อจัดรูปแบบข้อความประเภทอื่นๆ ได้
Kotlin
/**
 * Returns a CharSequence that applies boldface to the concatenation
 * of the specified CharSequence objects.
 */
fun bold(vararg content: CharSequence): CharSequence = apply(content, StyleSpan(Typeface.BOLD))

/**
 * Returns a CharSequence that applies italics to the concatenation
 * of the specified CharSequence objects.
 */
fun italic(vararg content: CharSequence): CharSequence = apply(content, StyleSpan(Typeface.ITALIC))

/**
 * Returns a CharSequence that applies a foreground color to the
 * concatenation of the specified CharSequence objects.
 */
fun color(color: Int, vararg content: CharSequence): CharSequence =
        apply(content, ForegroundColorSpan(color))
Java
/**
 * Returns a CharSequence that applies boldface to the concatenation
 * of the specified CharSequence objects.
 */
public static CharSequence bold(CharSequence... content) {
    return apply(content, new StyleSpan(Typeface.BOLD));
}

/**
 * Returns a CharSequence that applies italics to the concatenation
 * of the specified CharSequence objects.
 */
public static CharSequence italic(CharSequence... content) {
    return apply(content, new StyleSpan(Typeface.ITALIC));
}

/**
 * Returns a CharSequence that applies a foreground color to the
 * concatenation of the specified CharSequence objects.
 */
public static CharSequence color(int color, CharSequence... content) {
    return apply(content, new ForegroundColorSpan(color));
}
ต่อไปนี้เป็นตัวอย่างวิธีเชื่อมโยงวิธีการเหล่านี้เข้าด้วยกันเพื่อใช้สไตล์ต่างๆ กับคำแต่ละคำภายในวลี
Kotlin
// Create an italic "hello, " a red "world",
// and bold the entire sequence.
val text: CharSequence = bold(italic(getString(R.string.hello)),
        color(Color.RED, getString(R.string.world)))
Java
// Create an italic "hello, " a red "world",
// and bold the entire sequence.
CharSequence text = bold(italic(getString(R.string.hello)),
    color(Color.RED, getString(R.string.world)));
นอกจากนี้ โมดูล Kotlin หลักของ KTX ยังมีฟังก์ชันส่วนขยายที่ช่วยให้การทำงานกับช่วงง่ายยิ่งขึ้นด้วย
คุณดูข้อมูลเพิ่มเติมได้ในandroid.text
เอกสารประกอบของแพ็กเกจใน GitHub
ดูข้อมูลเพิ่มเติมเกี่ยวกับการทำงานกับช่วงได้ที่ลิงก์ต่อไปนี้
การจัดรูปแบบด้วยคำอธิบายประกอบ
คุณสามารถใช้การจัดรูปแบบที่ซับซ้อนหรือกำหนดเองได้โดยใช้คลาส Annotation
ร่วมกับแท็ก <annotation> ในไฟล์ทรัพยากร strings.xml แท็ก
คำอธิบายประกอบช่วยให้คุณทำเครื่องหมายส่วนของสตริงสำหรับการจัดรูปแบบที่กำหนดเองได้โดย
การกำหนดคู่คีย์-ค่าที่กำหนดเองใน XML ซึ่งเฟรมเวิร์กจะแปลง
เป็น Annotation ช่วง จากนั้นคุณจะดึงข้อมูลคำอธิบายประกอบเหล่านี้และใช้
คีย์และค่าเพื่อใช้การจัดรูปแบบได้
เมื่อสร้างคำอธิบายประกอบ ให้ตรวจสอบว่าคุณได้เพิ่มแท็ก <annotation>
ลงในคำแปลทั้งหมดของสตริงในไฟล์ strings.xml ทุกไฟล์
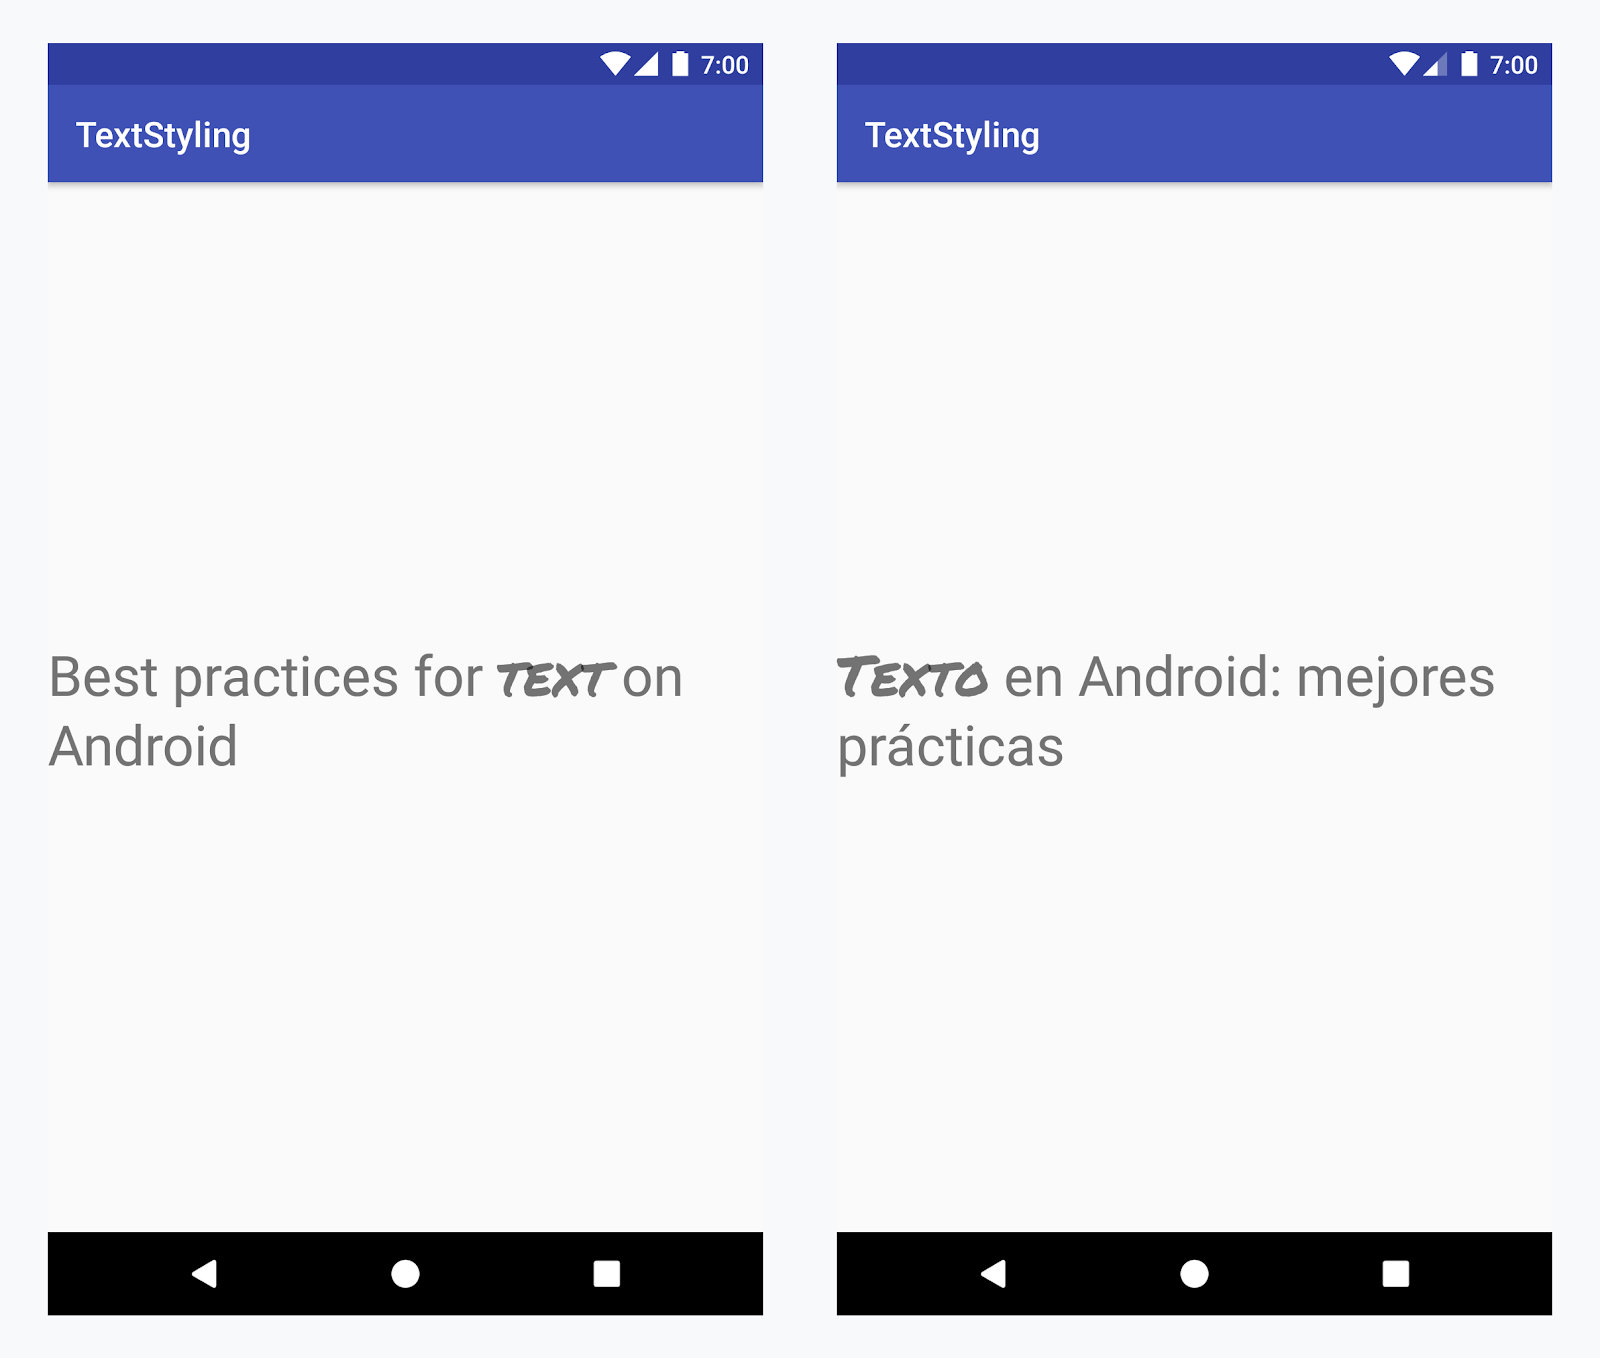
การใช้แบบอักษรที่กำหนดเองกับคำว่า "text" ในทุกภาษา
ตัวอย่าง - การเพิ่มแบบอักษรที่กำหนดเอง
-
เพิ่มแท็ก
<annotation>และกำหนดคู่คีย์-ค่า ในกรณีนี้ คีย์คือ font และค่าคือประเภทแบบอักษรที่เราต้องการใช้: title_emphasis// values/strings.xml <string name="title">Best practices for <annotation font="title_emphasis">text</annotation> on Android</string> // values-es/strings.xml <string name="title"><annotation font="title_emphasis">Texto</annotation> en Android: mejores prácticas</string>
-
โหลดทรัพยากรสตริงและค้นหาคำอธิบายประกอบที่มีคีย์ font จากนั้นสร้าง ช่วงที่กำหนดเองและแทนที่ช่วงที่มีอยู่
Kotlin
// get the text as SpannedString so we can get the spans attached to the text
val titleText = getText(R.string.title) as SpannedString

// get all the annotation spans from the text
val annotations = titleText.getSpans(0, titleText.length, Annotation::class.java)

// create a copy of the title text as a SpannableString.
// the constructor copies both the text and the spans. so we can add and remove spans
val spannableString = SpannableString(titleText)

// iterate through all the annotation spans
for (annotation in annotations) {
   // look for the span with the key font
   if (annotation.key == "font") {
      val fontName = annotation.value
      // check the value associated to the annotation key
      if (fontName == "title_emphasis") {
         // create the typeface
         val typeface = getFontCompat(R.font.permanent_marker)
         // set the span at the same indices as the annotation
         spannableString.setSpan(CustomTypefaceSpan(typeface),
            titleText.getSpanStart(annotation),
            titleText.getSpanEnd(annotation),
            Spannable.SPAN_EXCLUSIVE_EXCLUSIVE)
      }
   }
}

// now, the spannableString contains both the annotation spans and the CustomTypefaceSpan
styledText.text = spannableString
Java
// get the text as SpannedString so we can get the spans attached to the text
SpannedString titleText = (SpannedString) getText(R.string.title);

// get all the annotation spans from the text
Annotation[] annotations = titleText.getSpans(0, titleText.length(), Annotation.class);

// create a copy of the title text as a SpannableString.
// the constructor copies both the text and the spans. so we can add and remove spans
SpannableString spannableString = new SpannableString(titleText);

// iterate through all the annotation spans
for (Annotation annotation: annotations) {
  // look for the span with the key font
  if (annotation.getKey().equals("font")) {
    String fontName = annotation.getValue();
    // check the value associated to the annotation key
    if (fontName.equals("title_emphasis")) {
    // create the typeface
    Typeface typeface = ResourcesCompat.getFont(this, R.font.roboto_mono);
    // set the span at the same indices as the annotation
    spannableString.setSpan(new CustomTypefaceSpan(typeface),
      titleText.getSpanStart(annotation),
      titleText.getSpanEnd(annotation),
      Spannable.SPAN_EXCLUSIVE_EXCLUSIVE);
    }
  }
}

// now, the spannableString contains both the annotation spans and the CustomTypefaceSpan
styledText.text = spannableString;
หากใช้ข้อความเดียวกันหลายครั้ง คุณควรสร้างออบเจ็กต์ SpannableString เพียงครั้งเดียวและนำกลับมาใช้ใหม่ตามต้องการเพื่อหลีกเลี่ยงปัญหาด้านประสิทธิภาพและหน่วยความจำที่อาจเกิดขึ้น
ดูตัวอย่างการใช้คำอธิบายประกอบเพิ่มเติมได้ที่ การจัดรูปแบบข้อความที่แปลเป็นภาษาต่างๆ ใน Android
ช่วงคำอธิบายประกอบและการแยกข้อความ
เนื่องจากช่วง Annotation เป็น ParcelableSpans ด้วย ระบบจึงจัดแพ็กเกจและยกเลิกการจัดแพ็กเกจคู่คีย์-ค่า ตราบใดที่ผู้รับพัสดุทราบวิธีตีความหมายเหตุ คุณก็ใช้ช่วง Annotation เพื่อใช้การจัดรูปแบบที่กำหนดเองกับข้อความที่แยกเป็นพัสดุได้
หากต้องการคงรูปแบบที่กำหนดเองไว้เมื่อส่งข้อความไปยัง Intent Bundle คุณต้องเพิ่ม Annotation spans ลงในข้อความก่อน คุณทำได้ในทรัพยากร XML
ผ่านแท็ก <annotation> ดังที่แสดงในตัวอย่างด้านบน หรือในโค้ด
โดยการสร้าง Annotation ใหม่และตั้งค่าเป็นช่วง ดังที่แสดงด้านล่าง
Kotlin
val spannableString = SpannableString("My spantastic text")
val annotation = Annotation("font", "title_emphasis")
spannableString.setSpan(annotation, 3, 7, Spannable.SPAN_EXCLUSIVE_EXCLUSIVE)

// start Activity with text with spans
val intent = Intent(this, MainActivity::class.java)
intent.putExtra(TEXT_EXTRA, spannableString)
startActivity(intent)
Java
SpannableString spannableString = new SpannableString("My spantastic text");
Annotation annotation = new Annotation("font", "title_emphasis");
spannableString.setSpan(annotation, 3, 7, 33);

// start Activity with text with spans
Intent intent = new Intent(this, MainActivity.class);
intent.putExtra(TEXT_EXTRA, spannableString);
this.startActivity(intent);
ดึงข้อความจาก Bundle เป็น SpannableString แล้วแยกวิเคราะห์
คำอธิบายประกอบที่แนบมา ดังที่แสดงในตัวอย่างด้านบน
Kotlin
// read text with Spans
val intentCharSequence = intent.getCharSequenceExtra(TEXT_EXTRA) as SpannableString
Java
// read text with Spans
SpannableString intentCharSequence = (SpannableString)intent.getCharSequenceExtra(TEXT_EXTRA);
ดูข้อมูลเพิ่มเติมเกี่ยวกับการจัดรูปแบบข้อความได้ที่ลิงก์ต่อไปนี้