
1. 始める前に
この実践的な Codelab では、デュアル スクリーン デバイスと折りたたみ式デバイス向けの開発の基本について学習します。完了すると、アプリは Google Pixel Fold、Microsoft Surface Duo、Samsung Galaxy Z Fold 5 などの折りたたみ式デバイスをサポートできるようになります。
前提条件
この Codelab を完了するには、以下が必要です。
- Android アプリを作成した経験
- アクティビティ、フラグメント、ビュー バインディング、xml-layout を使用した経験
演習内容
次の機能がある簡単なアプリを作成します。
- デバイスの機能を表示する
- アプリが折りたたみ式デバイスまたはデュアル スクリーン デバイスで実行されていることを検知する
- デバイスの状態を判別する
- Jetpack WindowManager を使用して、新しいフォーム ファクタ デバイス向けの機能を追加します。
必要なもの
- Android Studio Arctic Fox 以降
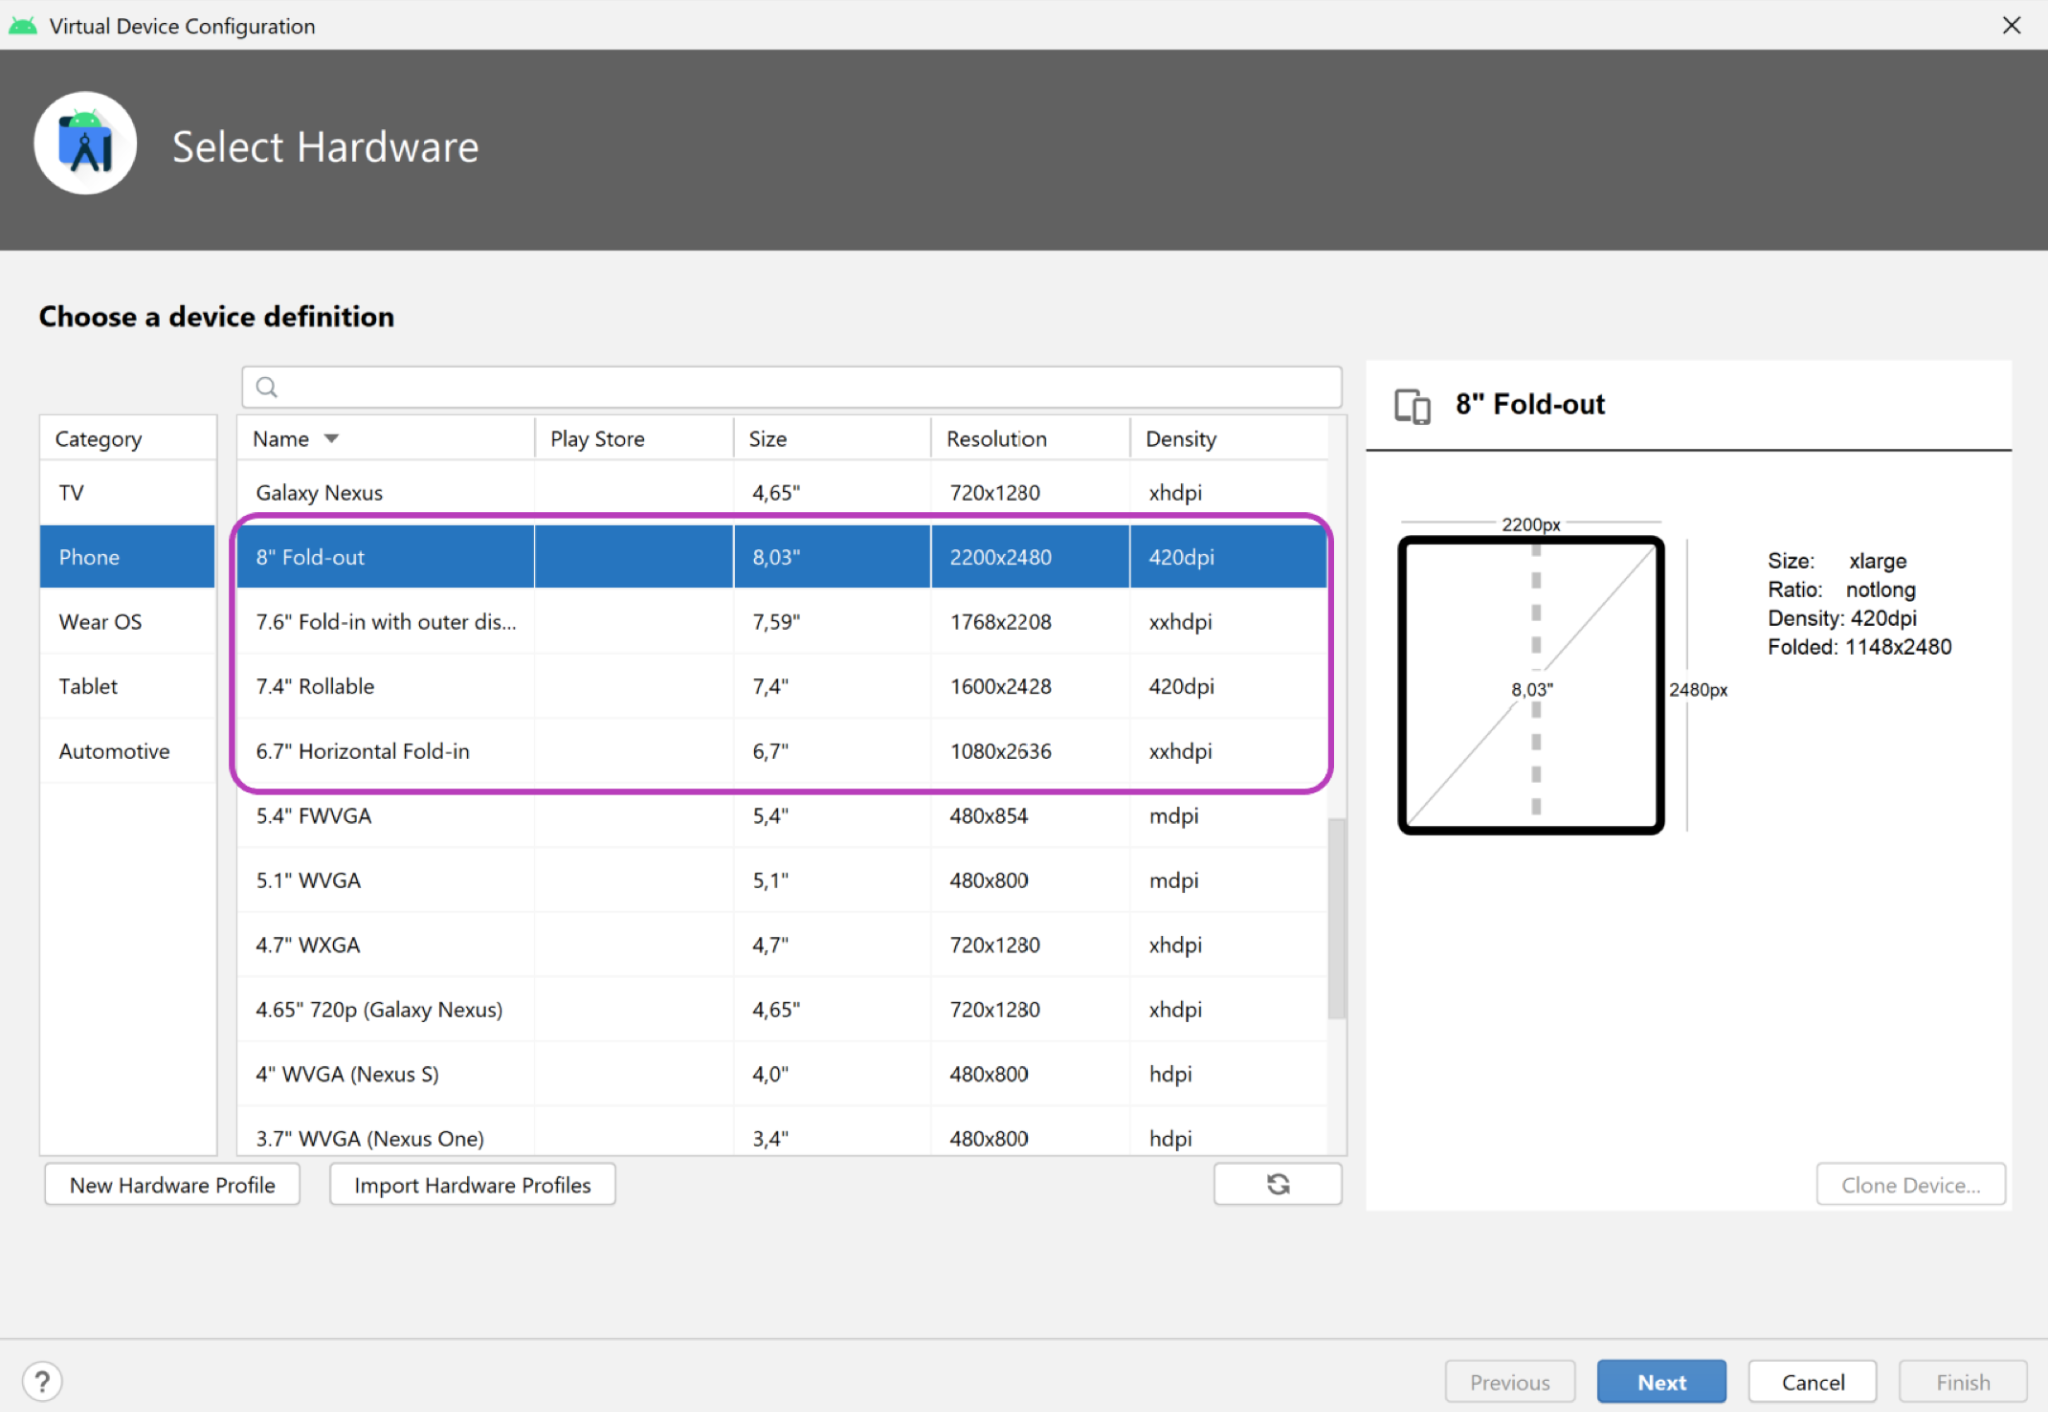
- 折りたたみ式デバイスまたはエミュレータ
Android Emulator v30.0.6 以降には、仮想ヒンジセンサーと 3D ビューを備えた折りたたみ式デバイスのサポートが含まれています。以下の画像に示すようないくつかの折りたたみ式エミュレータを使用できます。
- デュアル スクリーン エミュレータを使用する場合は、使用しているプラットフォーム(Windows、MacOS、GNU/Linux)向けの Microsoft Surface Duo エミュレータをダウンロードできます。
2. シングル スクリーン デバイスと折りたたみ式デバイス
折りたたみ式デバイスでは、従来のモバイル デバイスで利用できた画面よりも大きい画面と、より幅広い用途を持つユーザー インターフェースが提供されます。折りたたむと一般的なサイズのタブレットより小さくなるため、持ち運びが簡単で、実用的です。
現時点では、折りたたみ式デバイスには次の 2 つのタイプがあります。
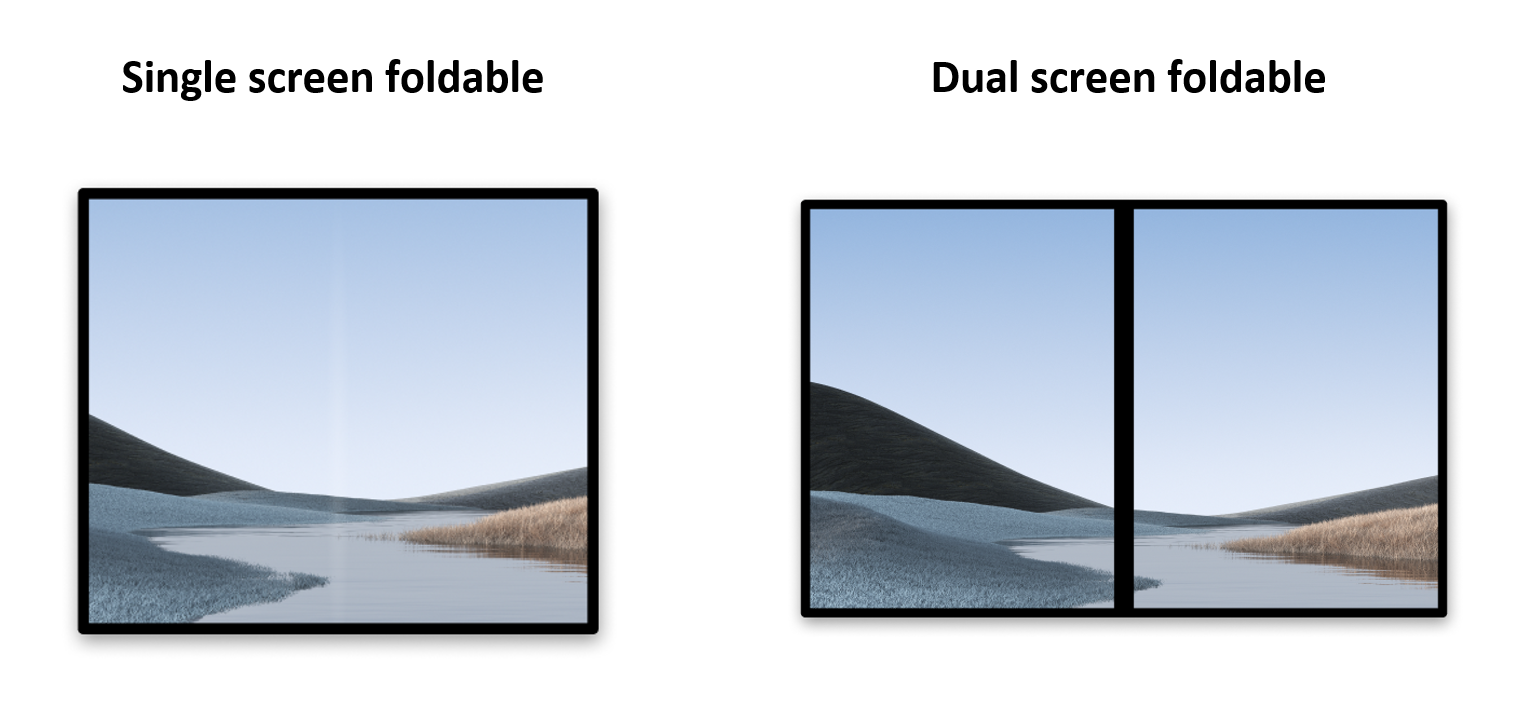
- シングル スクリーン折りたたみ式デバイス。折りたたみ可能なスクリーンが 1 つあります。ユーザーは
multi-windowモードを使用して、同じ画面で複数のアプリを同時に実行できます。 - デュアル スクリーン折りたたみ式デバイス。ヒンジで接合された 2 つのスクリーンがあります。このタイプのデバイスも折りたたみ可能ですが、2 つの異なる論理ディスプレイ領域があります。
折りたたみ式デバイスでは、タブレットや他のシングル スクリーン モバイル デバイスと同様に、以下のことが可能です。
- 一方のディスプレイ領域で 1 つのアプリを実行する。
- 2 つのアプリを並べて実行し、それぞれを別のディスプレイ領域に表示する(
multi-windowモードを使用)。
シングル スクリーン デバイスとは異なり、折りたたみ式デバイスではさまざまな形状もサポートされます。形状は、さまざまな方法でコンテンツを表示するために使用されます。
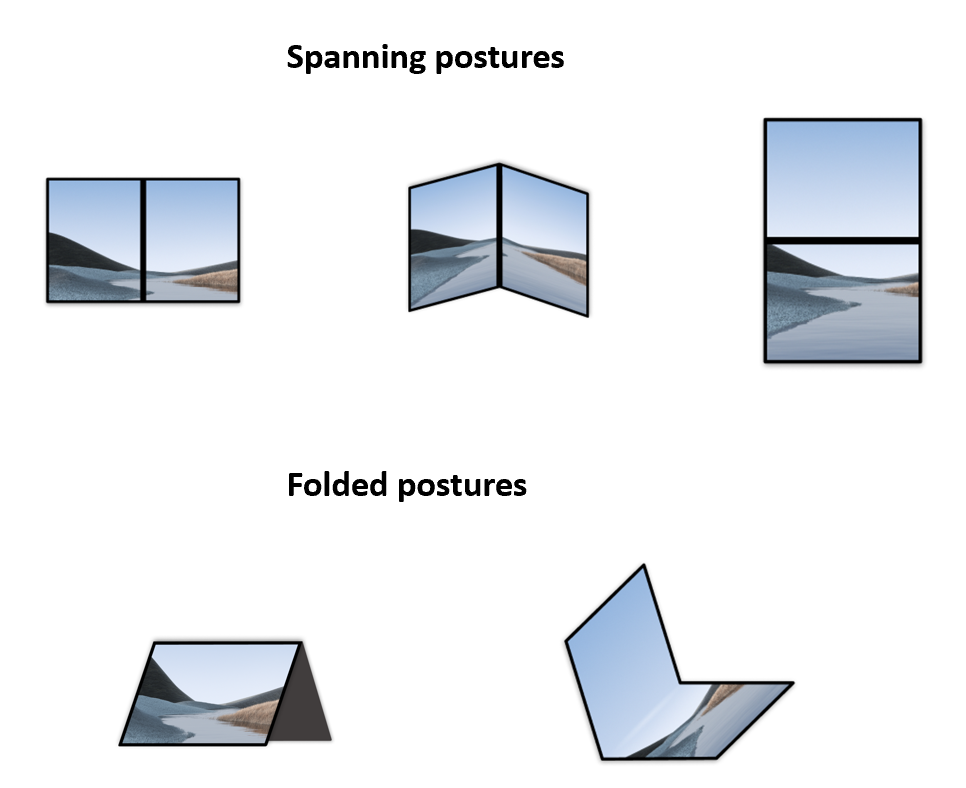
折りたたみ式デバイスは、アプリがディスプレイ領域全体にまたがって展開(表示)されるとき、(デュアル スクリーン折りたたみ式デバイスのすべてのディスプレイ領域を使用して)さまざまな展開形状を提供できます。
また、折りたたみ式デバイスは折りたたみ形状も提供できます。たとえば、テーブルトップ モードでは、平らに置いたスクリーンと見やすい角度に傾けたスクリーンを論理的に分割できます。テントモードでは、デバイスを卓上スタンドのように折り曲げてコンテンツを表示できます。
3. Jetpack WindowManager
アプリ デベロッパーは、Jetpack WindowManager ライブラリを使用して、新しいデバイスのフォーム ファクタをサポートできます。また、新旧両方のプラットフォーム バージョンで、WindowManager のさまざまな機能に共通の API サーフェスを利用できます。
主な機能
Jetpack WindowManager のバージョン 1.5.1 には、フレキシブル ディスプレイの折りたたみ領域、または 2 つの物理ディスプレイ パネルを接合するヒンジを記述する FoldingFeature クラスが含まれています。このクラスの API は、次のように、デバイスに関する重要な情報へのアクセスを提供します。
state(): 定義済みの形状のリスト(FLAT、HALF_OPENED)から、デバイスの現在の形状を提供します。isSeparating():FoldingFeatureがウィンドウを複数の物理的領域に分割して、論理的に分離しているようユーザーに見えるようにしているかどうかを計算します。occlusionType(): オクルージョン モードを計算して、FoldingFeatureがウィンドウの一部を占有しているかどうかを判断します。orientation():FoldingFeatureの幅が高さより大きい場合、FoldingFeature.Orientation.HORIZONTALを返します。それ以外の場合はFoldingFeature.Orientation.VERTICALを返します。bounds(): デバイス接合部の境界(たとえば、物理ヒンジの境界)を含むRectインスタンスを提供します。
WindowInfoTracker インターフェースを使用すると、windowLayoutInfo() にアクセスして、使用可能なすべての DisplayFeature が含まれる WindowLayoutInfo の Flow を収集できます。
4. 設定
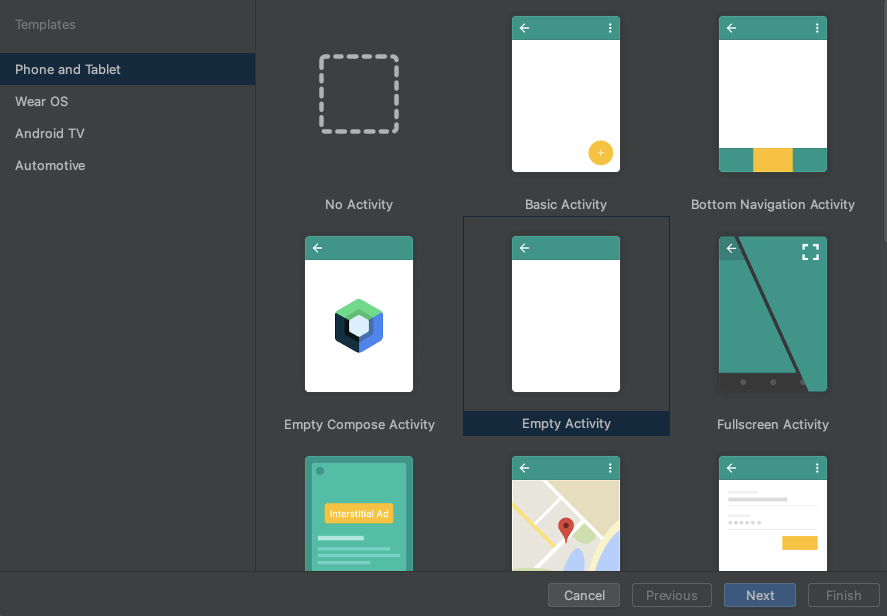
新しいプロジェクトを作成し、「Empty Activity」テンプレートを選択します。
すべてのパラメータをデフォルトのままにします。
依存関係の宣言
Jetpack WindowManager を使用するには、アプリまたはモジュールの build.gradle ファイルに依存関係を追加します。
app/build.gradle
dependencies {
    ext.windowmanager_version = "1.5.1"

    implementation "androidx.window:window:$windowmanager_version"
    androidTestImplementation "androidx.window:window-testing:$windowmanager_version"

    // Needed to use lifecycleScope to collect the WindowLayoutInfo flow
    implementation "androidx.lifecycle:lifecycle-runtime-ktx:2.6.2"
}
WindowManager を使用する
ウィンドウ機能には、WindowManager の WindowInfoTracker インターフェースからアクセスできます。
MainActivity.kt ソースファイルを開き、WindowInfoTracker.getOrCreate(this@MainActivity) を呼び出して、現在のアクティビティに関連付けられている WindowInfoTracker インスタンスを初期化します。
MainActivity.kt
import androidx.window.layout.WindowInfoTracker

private lateinit var windowInfoTracker: WindowInfoTracker

override fun onCreate(savedInstanceState: Bundle?) {
        super.onCreate(savedInstanceState)

        windowInfoTracker = WindowInfoTracker.getOrCreate(this@MainActivity)
}
WindowInfoTracker インスタンスを使用して、デバイスの現在のウィンドウ状態に関する情報を取得します。
5. アプリの UI を設定する
Jetpack WindowManager から、ウィンドウの指標、レイアウト、ディスプレイ設定に関する情報を取得します。これをメイン アクティビティ レイアウトで表示し、それぞれに TextView を使用します。
3 つの TextView を画面の中央に配置した ConstraintLayout を作成します。
activity_main.xml ファイルを開き、次の内容を貼り付けます。
activity_main.xml
<?xml version="1.0" encoding="utf-8"?>
<androidx.constraintlayout.widget.ConstraintLayout xmlns:android="http://schemas.android.com/apk/res/android"
   xmlns:app="http://schemas.android.com/apk/res-auto"
   xmlns:tools="http://schemas.android.com/tools"
   android:id="@+id/constraint_layout"
   android:layout_width="match_parent"
   android:layout_height="match_parent"
   tools:context=".MainActivity">

    <TextView
        android:id="@+id/window_metrics"
        android:layout_width="wrap_content"
        android:layout_height="wrap_content"
        android:padding="20dp"
        tools:text="Window metrics"
        android:textSize="20sp"
        app:layout_constraintBottom_toTopOf="@+id/layout_change"
        app:layout_constraintStart_toStartOf="parent"
        app:layout_constraintTop_toTopOf="parent"
        app:layout_constraintVertical_chainStyle="packed" />

    <TextView
        android:id="@+id/layout_change"
        android:layout_width="wrap_content"
        android:layout_height="wrap_content"
        android:padding="20dp"
        tools:text="Layout change"
        android:textSize="20sp"
        app:layout_constrainedWidth="true"
        app:layout_constraintBottom_toTopOf="@+id/configuration_changed"
        app:layout_constraintStart_toStartOf="parent"
        app:layout_constraintTop_toBottomOf="@+id/window_metrics" />

    <TextView
        android:id="@+id/configuration_changed"
        android:layout_width="wrap_content"
        android:layout_height="wrap_content"
        android:padding="20dp"
        tools:text="Using one logic/physical display - unspanned"
        android:textSize="20sp"
        app:layout_constraintBottom_toBottomOf="parent"
        app:layout_constraintStart_toStartOf="parent"
        app:layout_constraintTop_toBottomOf="@+id/layout_change" />

</androidx.constraintlayout.widget.ConstraintLayout>
次に、ビュー バインディングを使用して、コード内のこれらの UI 要素を接続します。そのためには、アプリケーションの build.gradle ファイルで次のように有効化します。
app/build.gradle
android {
   // Other configurations

   buildFeatures {
      viewBinding true
   }
}
Android Studio で推奨されているように Gradle プロジェクトを同期し、次のコードを使用して MainActivity.kt でビュー バインディングを使用します。
MainActivity.kt
class MainActivity : AppCompatActivity() {
    private lateinit var windowInfoTracker: WindowInfoTracker
    private lateinit var binding: ActivityMainBinding

    override fun onCreate(savedInstanceState: Bundle?) {
        super.onCreate(savedInstanceState)
        binding = ActivityMainBinding.inflate(layoutInflater)
        setContentView(binding.root)

        windowInfoTracker = WindowInfoTracker.getOrCreate(this@MainActivity)
    }
}
6. WindowMetrics 情報を視覚化する
MainActivity の onCreate メソッドで、WindowMetrics の情報を取得して表示する関数を呼び出します。onCreate メソッドに obtainWindowMetrics() の呼び出しを追加します。
MainActivity.kt
override fun onCreate(savedInstanceState: Bundle?) {
   super.onCreate(savedInstanceState)
   binding = ActivityMainBinding.inflate(layoutInflater)
   setContentView(binding.root)

   windowInfoTracker = WindowInfoTracker.getOrCreate(this@MainActivity)

   obtainWindowMetrics()
}
obtainWindowMetrics メソッドを実装します。
MainActivity.kt
import androidx.window.layout.WindowMetricsCalculator

private fun obtainWindowMetrics() {
   val wmc = WindowMetricsCalculator.getOrCreate()
   val currentWM = wmc.computeCurrentWindowMetrics(this).bounds.flattenToString()
   val maximumWM = wmc.computeMaximumWindowMetrics(this).bounds.flattenToString()
   binding.windowMetrics.text =
       "CurrentWindowMetrics: ${currentWM}\nMaximumWindowMetrics: ${maximumWM}"
}
コンパニオン関数 getOrCreate() を使用して WindowMetricsCalculator のインスタンスを取得します。
その WindowMetricsCalculator インスタンスを使用して、情報を windowMetrics TextView に設定します。関数 computeCurrentWindowMetrics.bounds と computeMaximumWindowMetrics.bounds が返す値を使用します。
これらの値は、ウィンドウが占有する領域の指標に関する有用な情報を提供します。
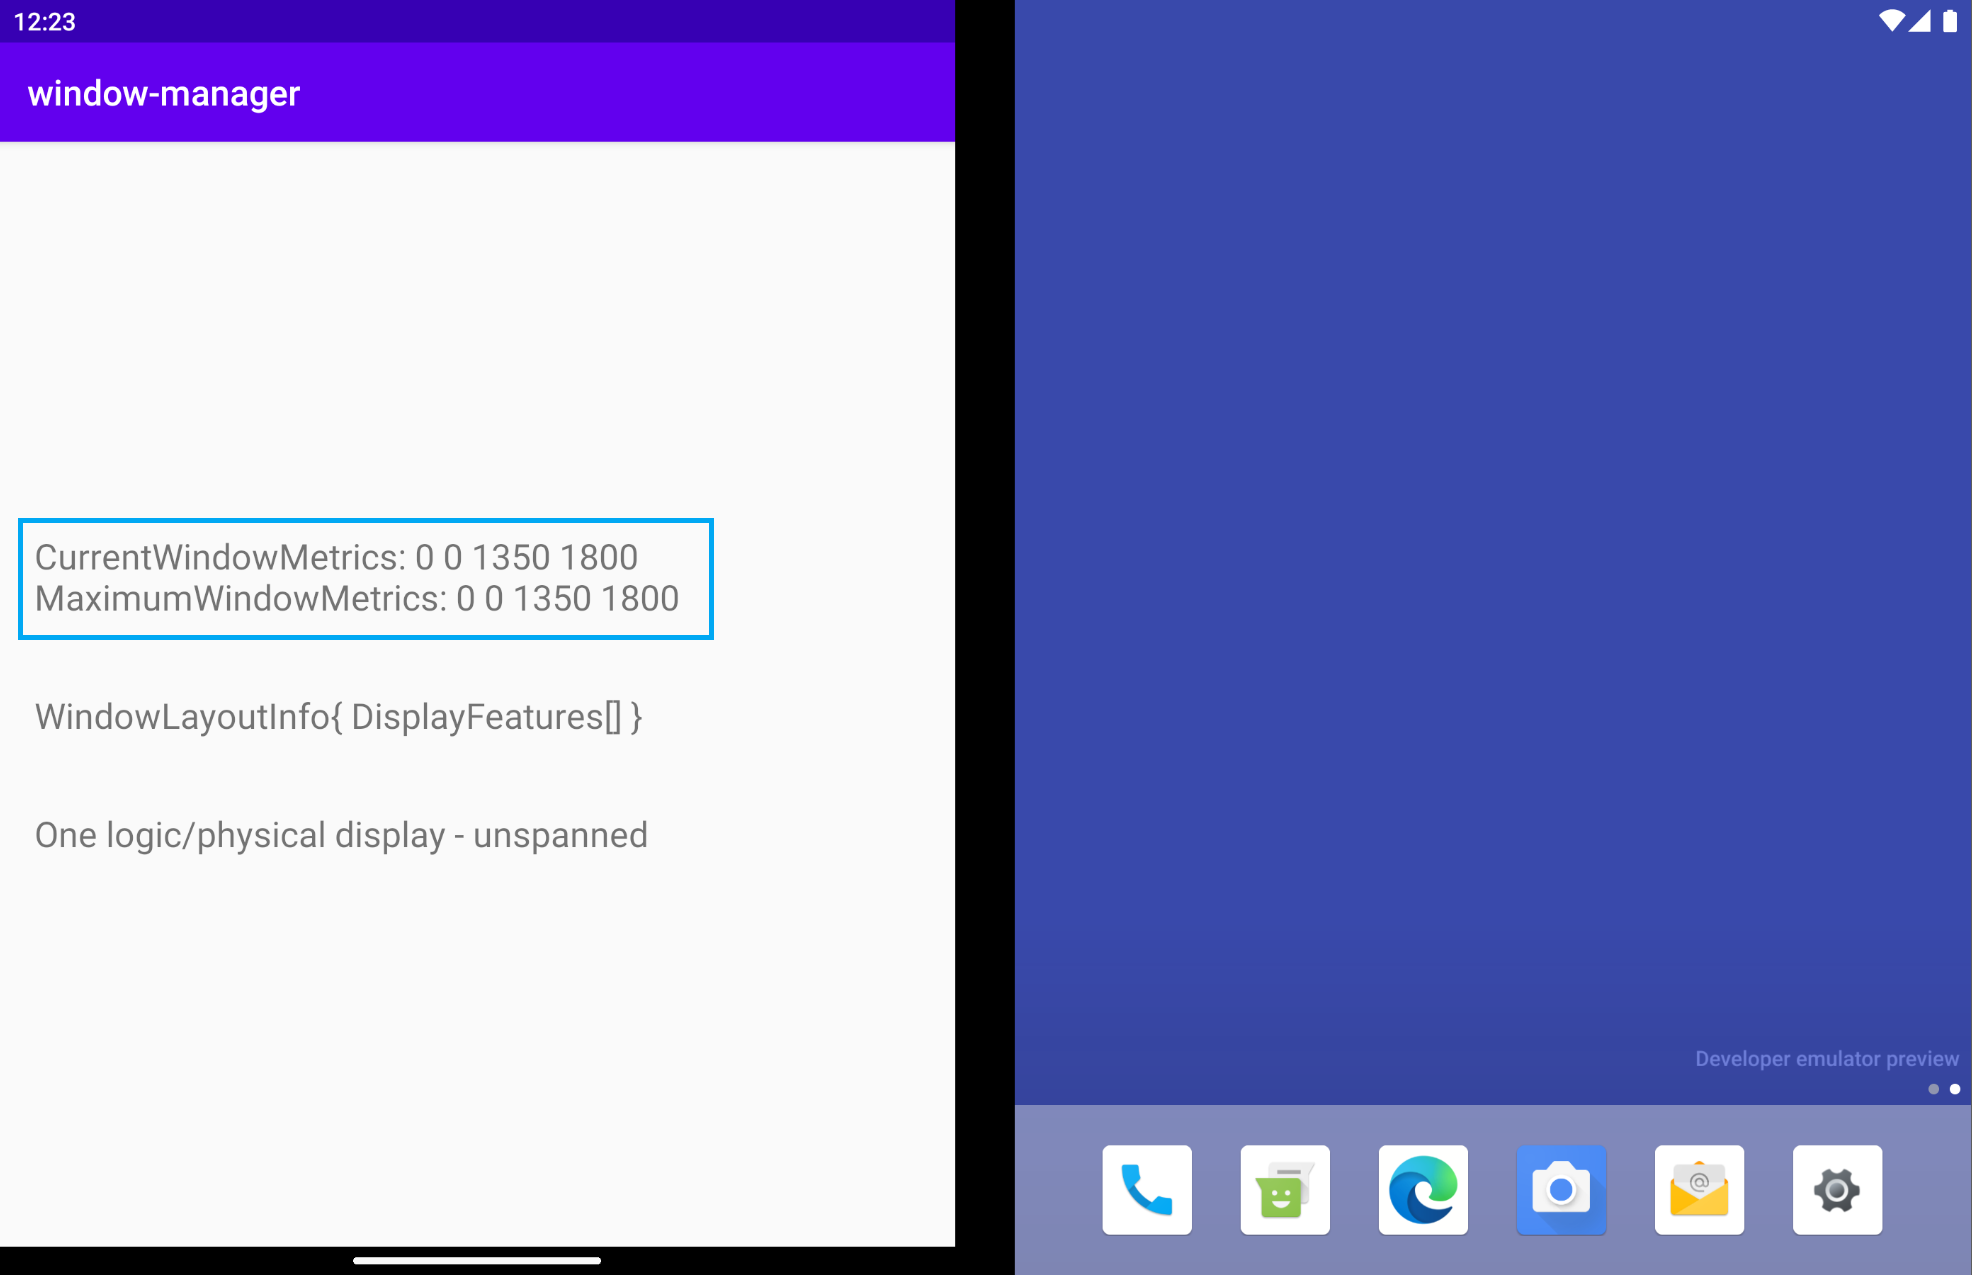
アプリを実行します。デュアル スクリーン エミュレータ(下図)では、エミュレータがミラーリングするデバイスの寸法に適合する CurrentWindowMetrics を取得します。また、アプリがシングル スクリーン モードで実行される場合の指標も確認できます。
アプリが複数のディスプレイにまたがっている場合、下の画像のようにウィンドウ指標が変化し、広いウィンドウ領域を反映します。
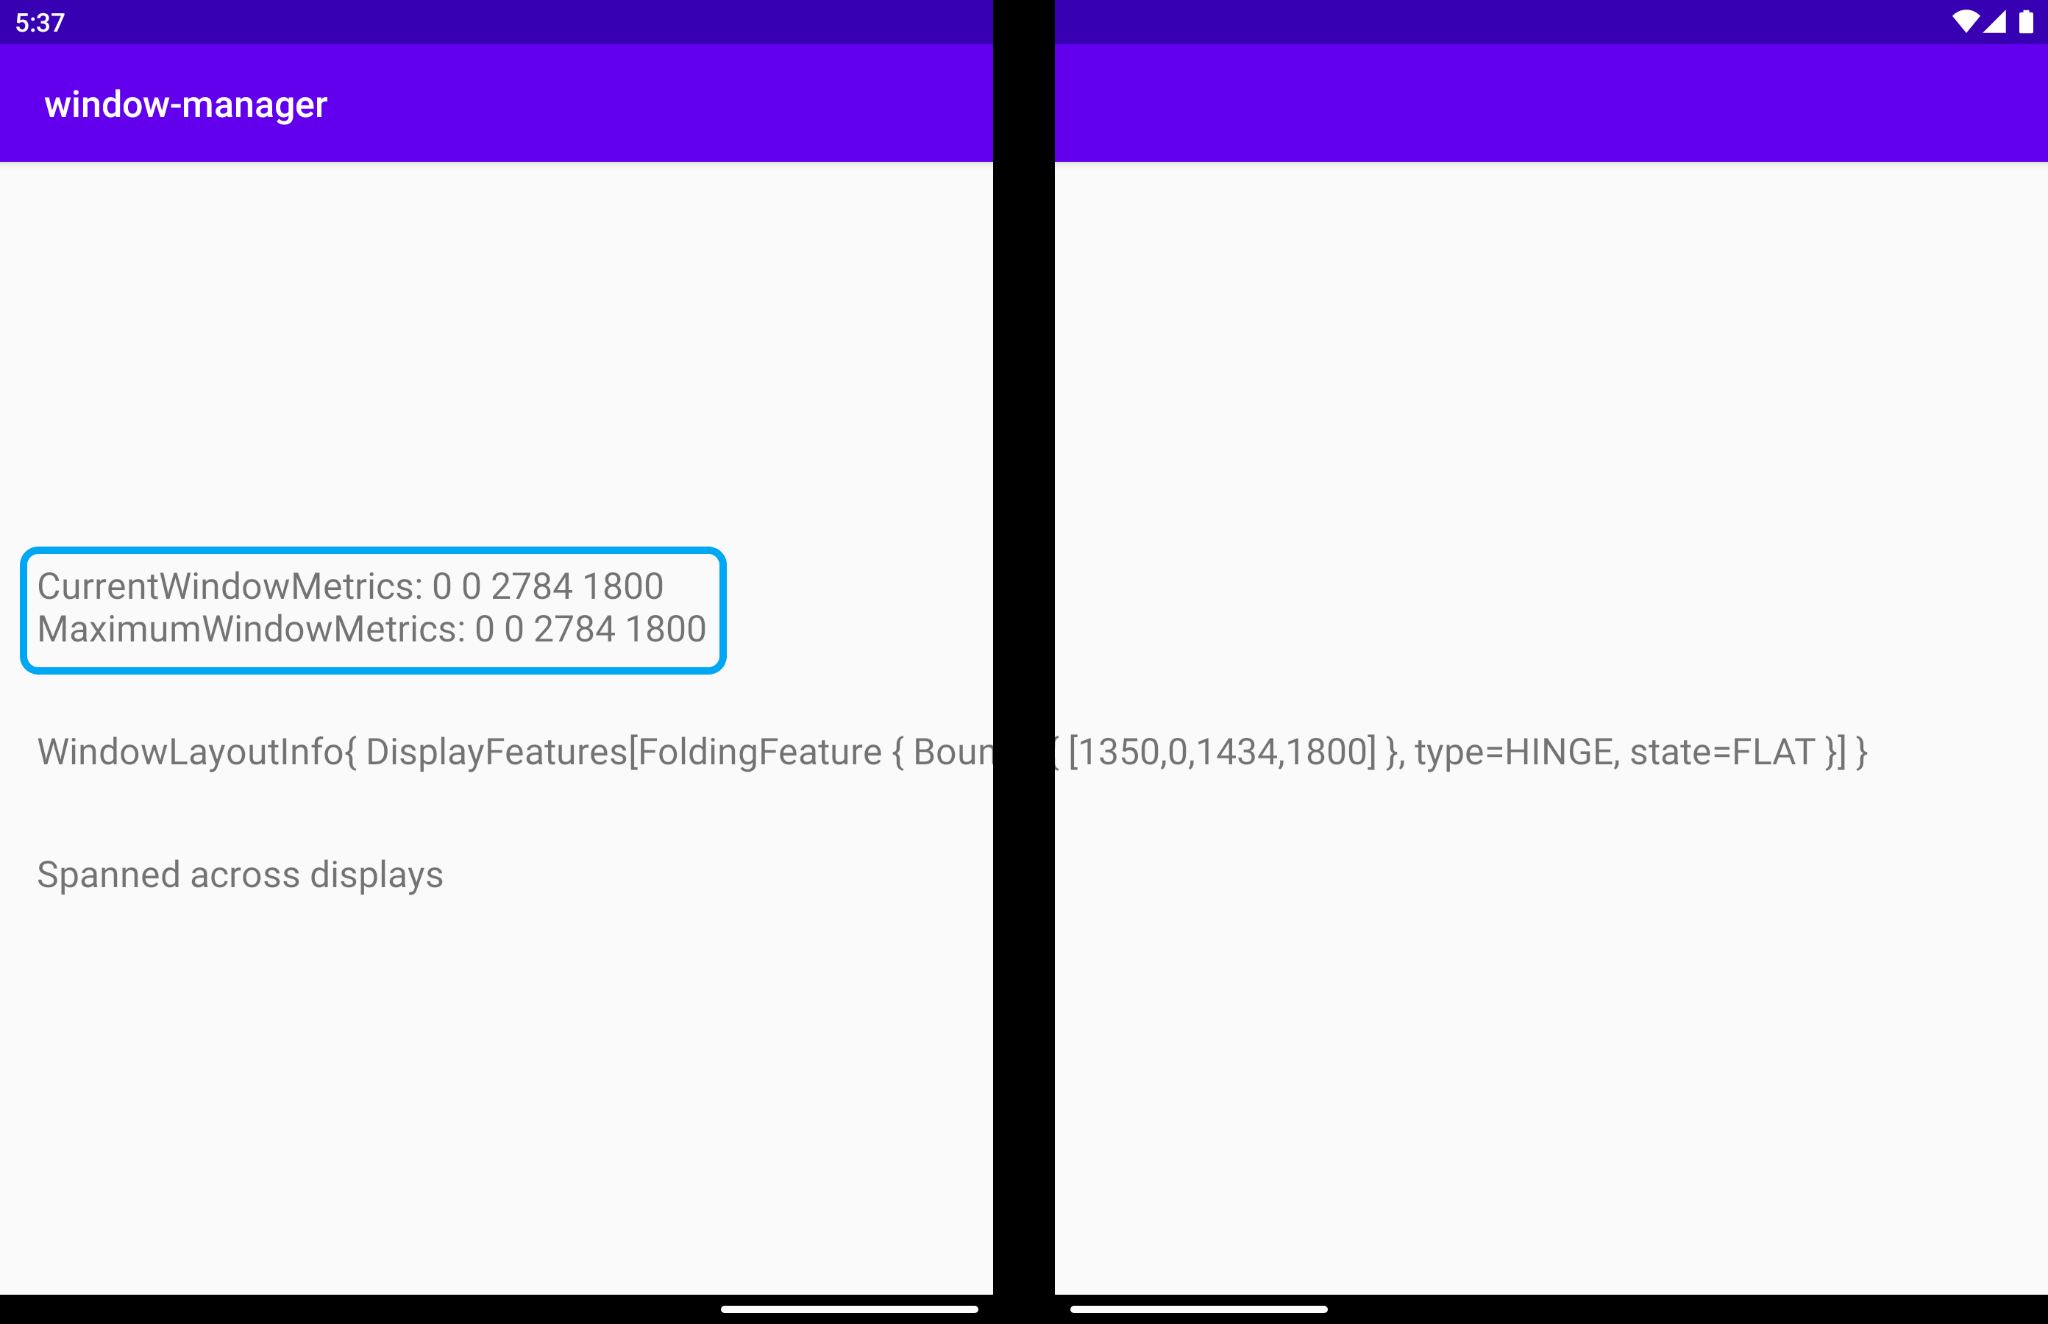
シングル スクリーンとデュアル スクリーンの両方で、アプリは常に使用可能なディスプレイ領域で実行されて領域全体を占有するため、現在のウィンドウ指標と最大のウィンドウ指標の値は同じになります。
水平折りたたみ領域を持つ折りたたみ式エミュレータでは、アプリが物理ディスプレイ全体に展開され、マルチウィンドウ モードで実行された場合、指標は異なる値になります。
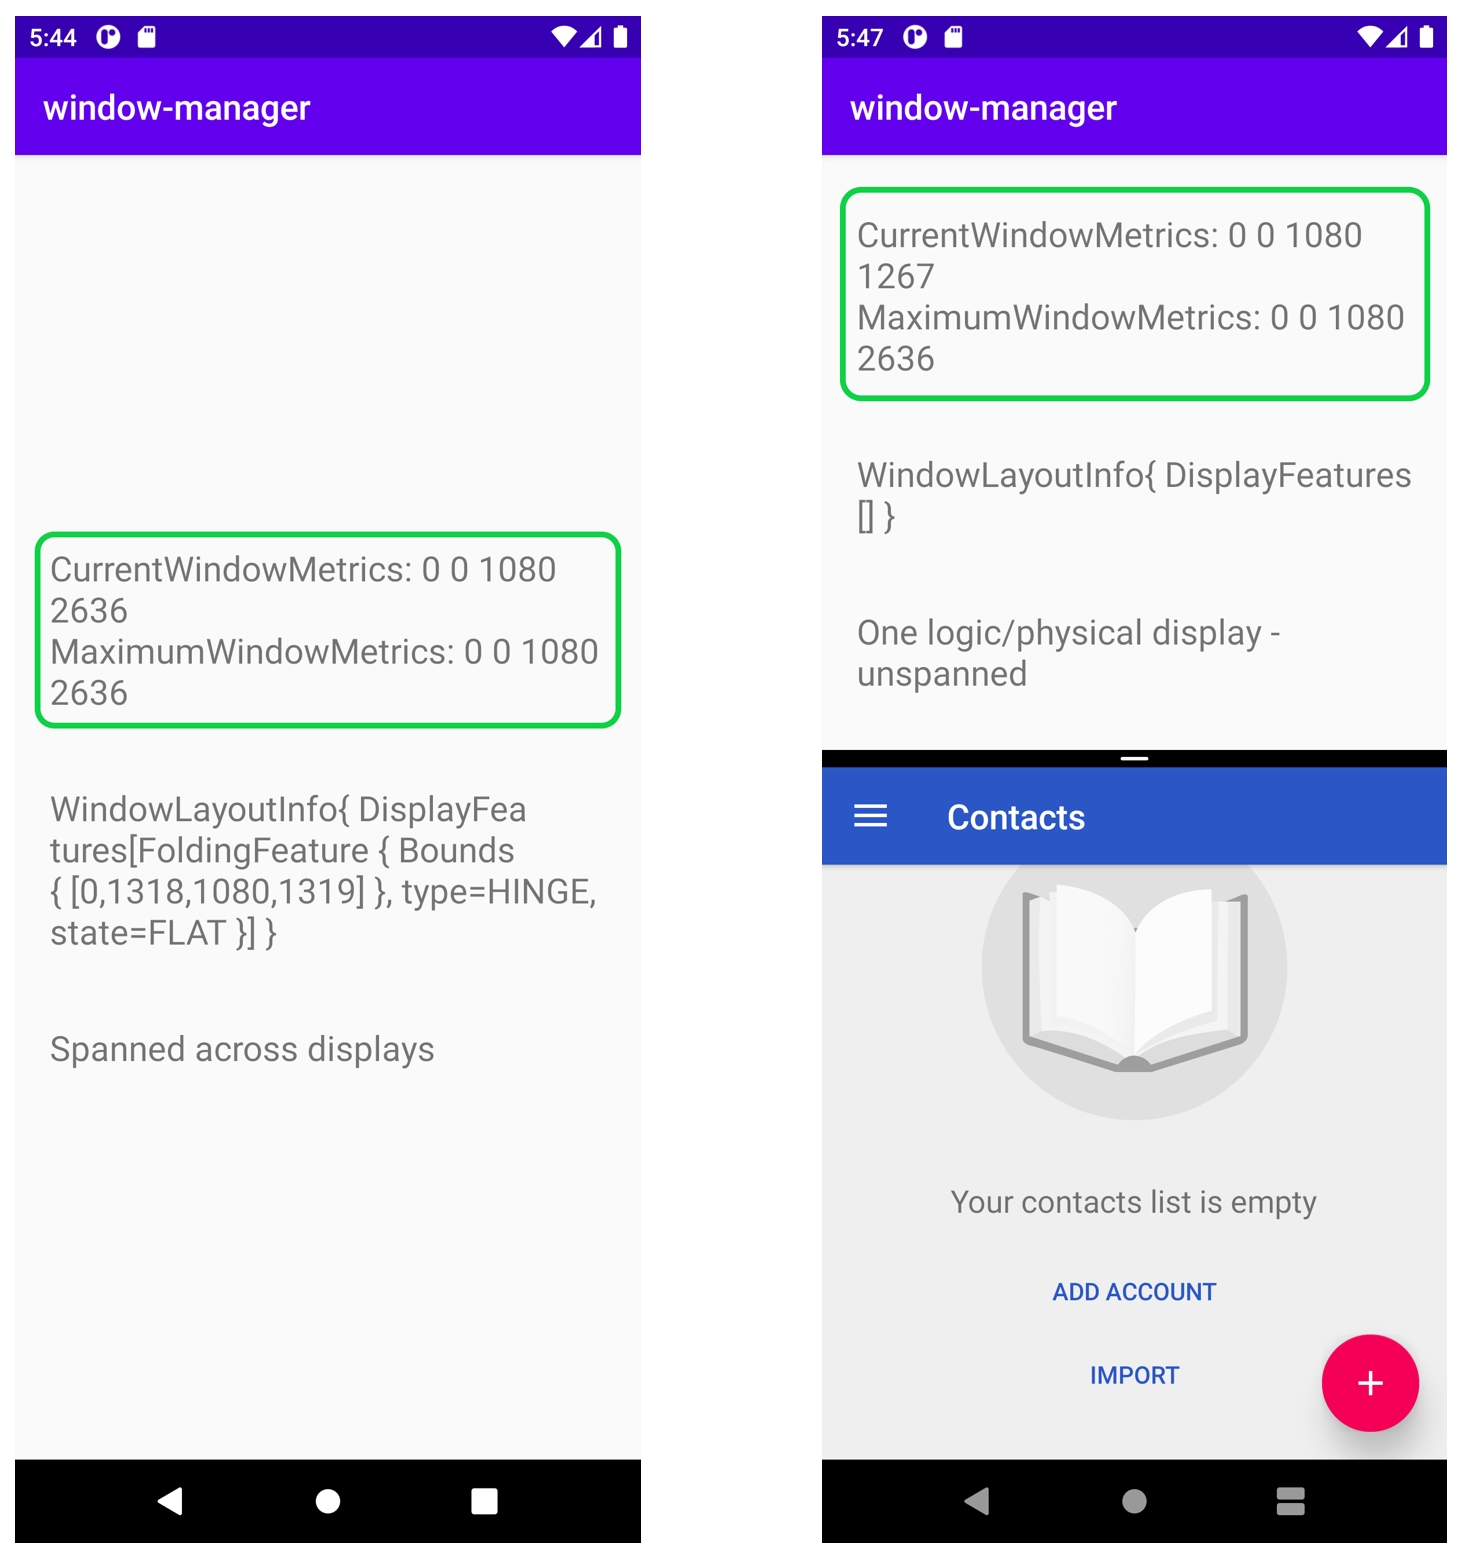
左側の画像を見ると、両方の指標が同じ値になっています。これは、実行中のアプリがディスプレイ領域全体(現在の領域であり、使用可能な最大領域でもあります)を使用しているためです。
一方、右側の画像では、アプリがマルチウィンドウ モードで実行されています。現在の指標は、マルチウィンドウ モードの特定の領域(上部)内のアプリが実行されている領域のサイズを示しており、最大の指標は、デバイスの最大ディスプレイ領域を示しています。
WindowMetricsCalculator が提供する指標は、アプリが使用しているウィンドウの領域とアプリが使用できるウィンドウの領域を把握するために大変役立ちます。
7. FoldingFeature 情報を視覚化する
次に、エミュレータまたはデバイスの DisplayFeatures の特性と境界とともに、ウィンドウ レイアウトの変更を受け取るよう登録します。
WindowInfoTracker#windowLayoutInfo() から情報を収集するには、Lifecycle オブジェクトごとに定義されている lifecycleScope を使用します。このスコープで開始されたコルーチンは、Lifecycle が破棄されるとすべてキャンセルされます。ライフサイクルのコルーチン スコープには、lifecycle.coroutineScope プロパティまたは lifecycleOwner.lifecycleScope プロパティからアクセスできます。
MainActivity の onCreate メソッドで、WindowInfoTracker の情報を取得して表示する関数を呼び出します。まず、onCreate メソッドに onWindowLayoutInfoChange() 呼び出しを追加します。
MainActivity.kt
override fun onCreate(savedInstanceState: Bundle?) {
   super.onCreate(savedInstanceState)
   binding = ActivityMainBinding.inflate(layoutInflater)
   setContentView(binding.root)

   windowInfoTracker = WindowInfoTracker.getOrCreate(this@MainActivity)

   obtainWindowMetrics()
   onWindowLayoutInfoChange()
}
この関数の実装を使用して、新しいレイアウト設定が変更されるたびに情報を取得します。
関数のシグネチャとスケルトンを定義します。
MainActivity.kt
private fun onWindowLayoutInfoChange() {
}
関数が受け取るパラメータ(WindowInfoTracker)を使用して、WindowLayoutInfo のデータを取得します。WindowLayoutInfo には、ウィンドウ内にある DisplayFeature のリストが含まれます。たとえば、ヒンジまたはディスプレイの折り目はウィンドウを横切って配置される場合があり、そのような場合は視覚コンテンツとインタラクティブな要素を 2 つのグループ(リストの詳細とビューのコントロールなど)に分けた方がよいことがあります。
現在のウィンドウ境界内に存在する機能のみが報告されます。画面上のウィンドウの位置やサイズを変更すると、機能の位置とサイズが変わることがあります。
lifecycle-runtime-ktx の依存関係で定義された lifecycleScope を使用して、すべてのディスプレイ機能のリストを含む WindowLayoutInfo の flow を取得します。onWindowLayoutInfoChange の本体を追加します。
MainActivity.kt
import androidx.lifecycle.Lifecycle
import androidx.lifecycle.lifecycleScope
import androidx.lifecycle.repeatOnLifecycle
import kotlinx.coroutines.Dispatchers
import kotlinx.coroutines.flow.collect
import kotlinx.coroutines.launch

private fun onWindowLayoutInfoChange() {
    lifecycleScope.launch(Dispatchers.Main) {
        lifecycle.repeatOnLifecycle(Lifecycle.State.STARTED) {
            windowInfoTracker.windowLayoutInfo(this@MainActivity)
                .collect { value ->
                    updateUI(value)
                }
        }
    }
}
updateUI 関数が collect から呼び出されます。この関数を実装して、WindowLayoutInfo の flow から受け取った情報を表示して出力します。WindowLayoutInfo データにディスプレイ機能があるかどうかを確認します。ある場合は、ディスプレイ機能はアプリの UI となんらかの形で連携しています。WindowLayoutInfo データにディスプレイ機能がない場合、アプリは単一画面のデバイスまたはモード、またはマルチウィンドウ モードで実行されます。
MainActivity.kt
import androidx.window.layout.WindowLayoutInfo

private fun updateUI(newLayoutInfo: WindowLayoutInfo) {
    binding.layoutChange.text = newLayoutInfo.toString()
    if (newLayoutInfo.displayFeatures.isNotEmpty()) {
        binding.configurationChanged.text = "Spanned across displays"
    } else {
        binding.configurationChanged.text = "One logic/physical display - unspanned"
    }
}
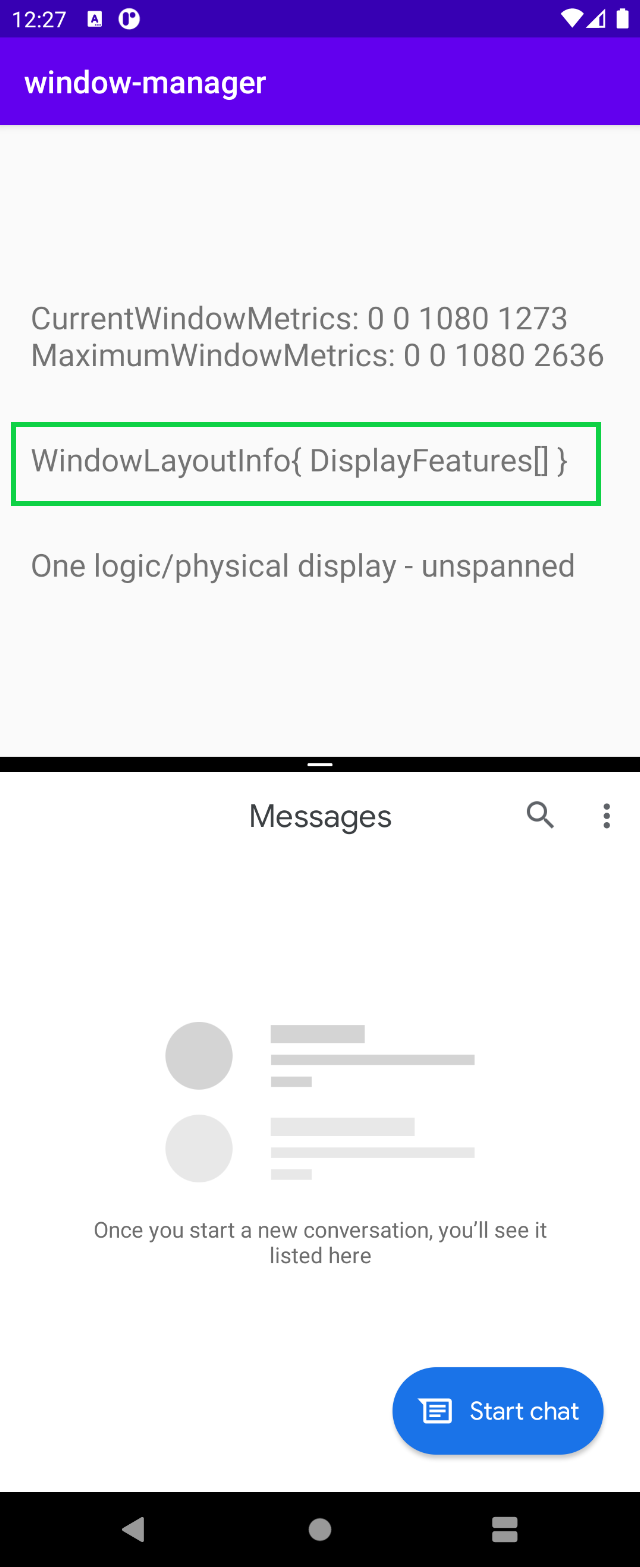
アプリを実行します。デュアル スクリーン エミュレータは次のようになります。

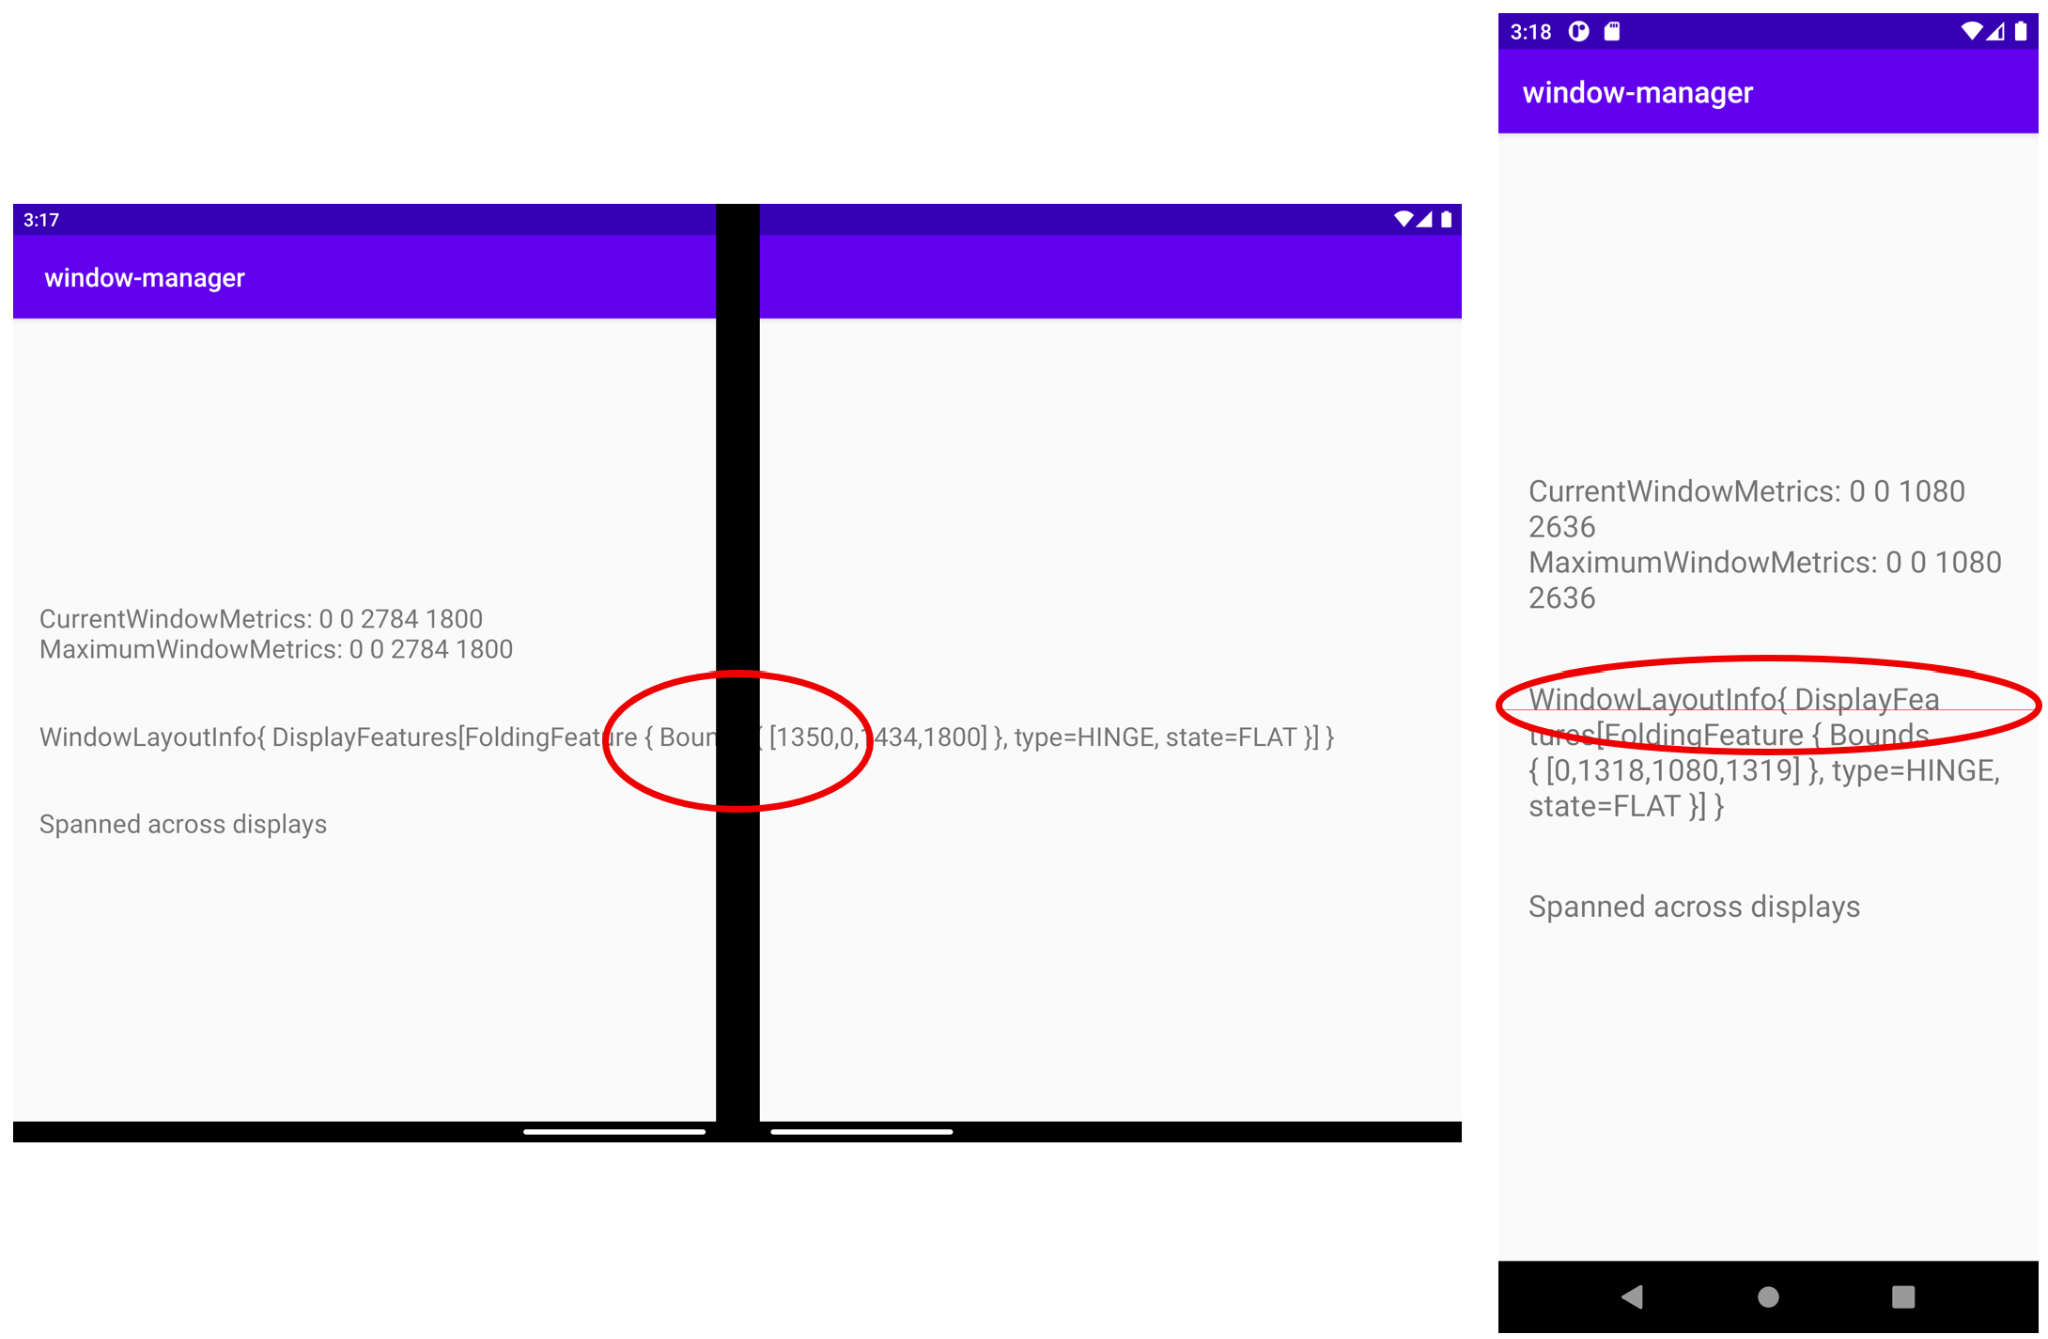
WindowLayoutInfo が空です。List<DisplayFeature> が空になっています。ただし、中央にヒンジがあるエミュレータを使用している場合は、WindowManager から情報を取得できます。
WindowManager は、アプリが両方のディスプレイ(物理ディスプレイかどうかを問わない)に展開されたときにのみ、(WindowInfoTracker を介して)WindowLayoutInfo データ(デバイス接合部タイプ、デバイス接合部の境界、デバイスの形状)を提供します。つまり、上の図では、アプリがシングル スクリーン モードで実行されており、WindowLayoutInfo は空です。
この情報により、アプリが実行されているモード(シングル スクリーン モード、またはディスプレイにまたがるモード)を把握できるため、UI / UX に変更を加えて、これらの特定の設定に合わせたユーザー エクスペリエンスを実現できます。
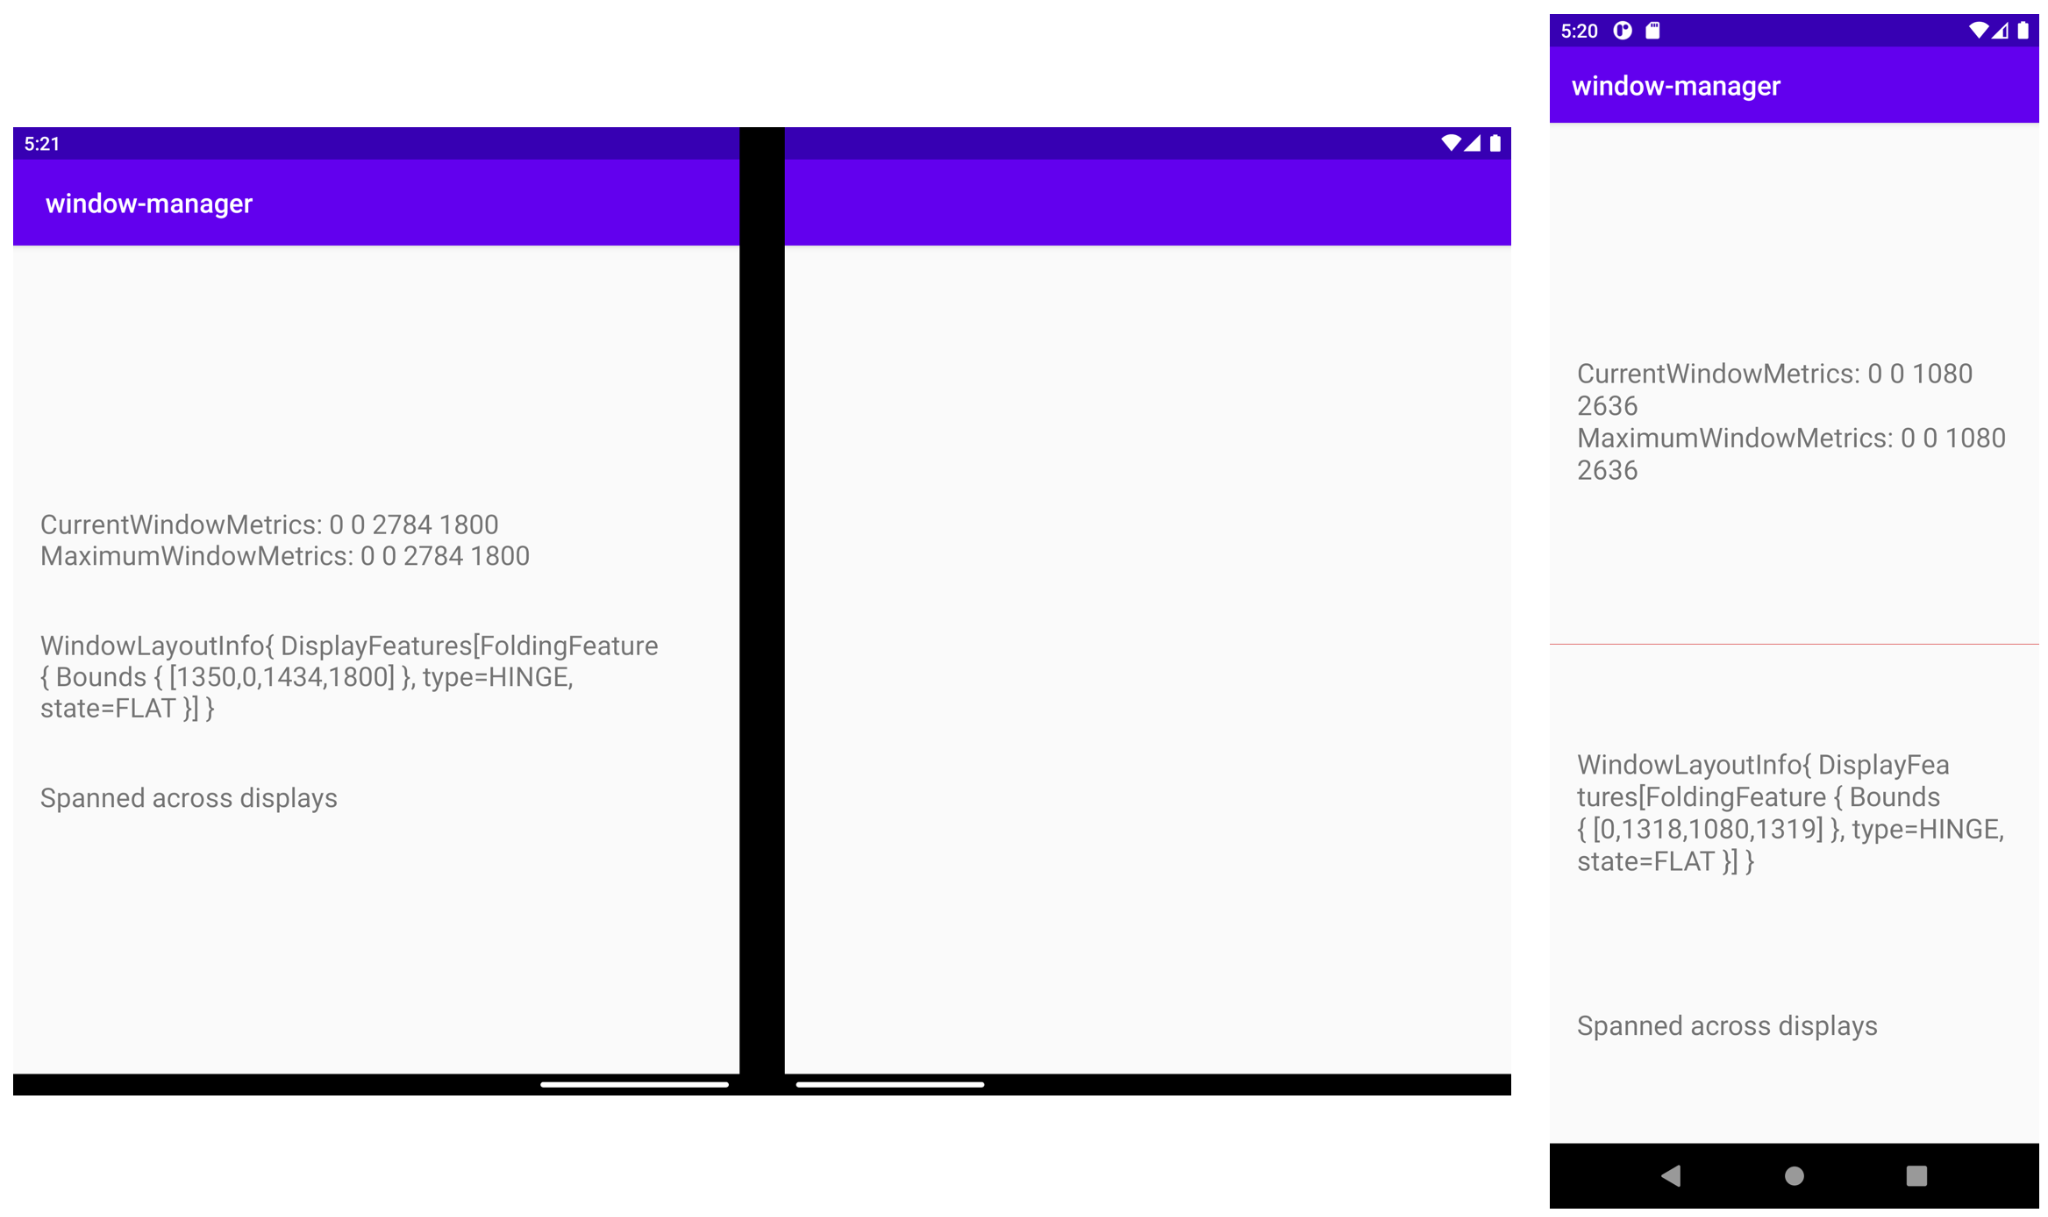
2 つの物理ディスプレイを持たない(通常は物理ヒンジがない)デバイスでは、マルチウィンドウ モードでアプリを並べて実行できます。このタイプのデバイスでは、アプリがマルチウィンドウで実行される場合、前述の例のようにアプリはシングル スクリーンで動作します。また、アプリがすべての論理ディスプレイを占有して動作する場合、アプリは展開されている場合と同様に動作します。次の図を参照してください。
アプリがマルチウィンドウ モードで実行されると、WindowManager は空の List<LayoutInfo> を提供します。
要約すると、アプリがデバイス接合部(折りたたみ領域またはヒンジ)を横断し、すべての論理ディスプレイを占有する場合にのみ、WindowLayoutInfo データが取得されます。それ以外の場合、どの情報も取得されません。
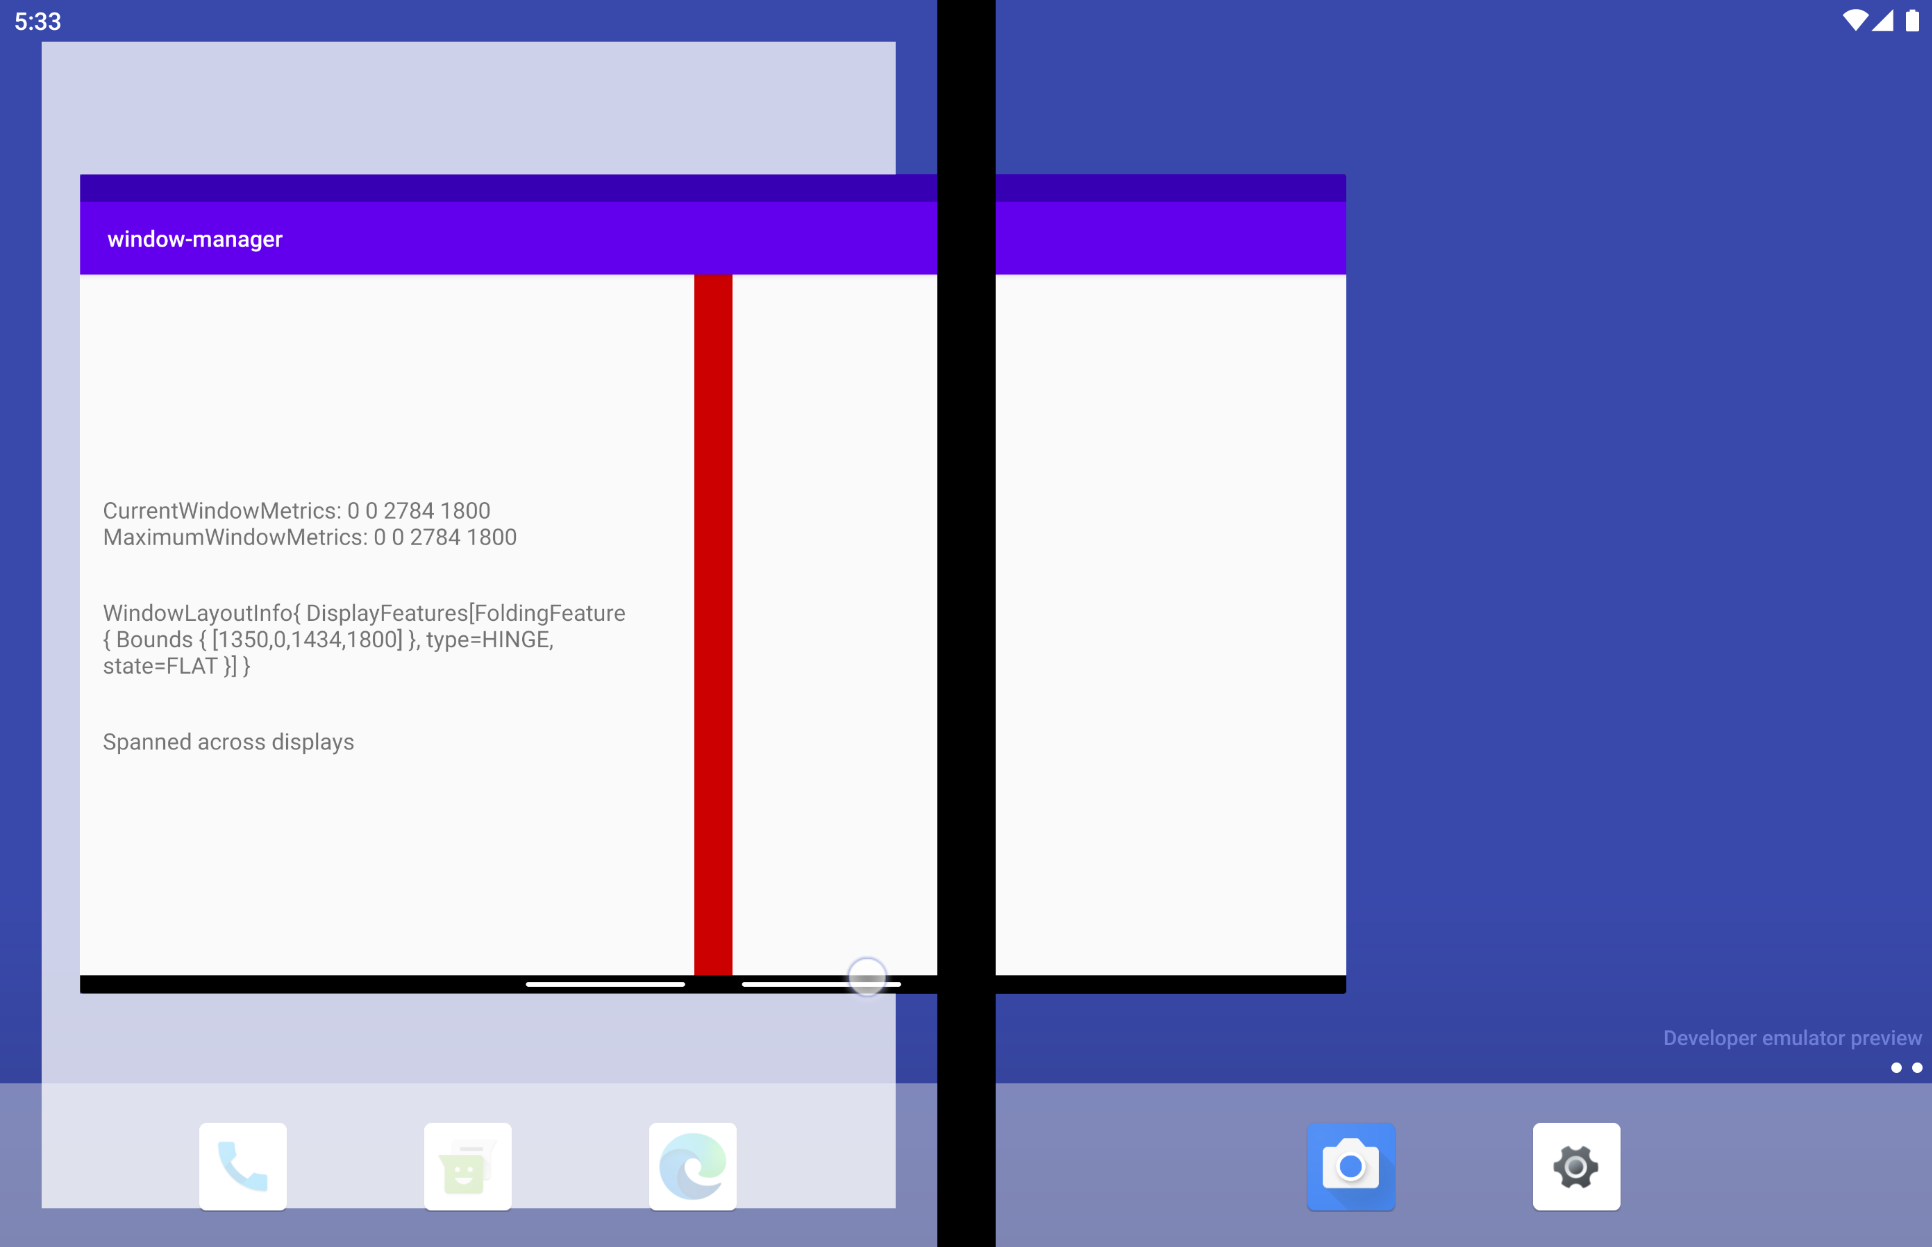
アプリを両方のディスプレイに展開するとどうなるでしょうか?デュアル スクリーン エミュレータでは、WindowLayoutInfo に含まれる FoldingFeature オブジェクトによってデバイスに関するデータが提供されます。次の例では、デバイス接合部は HINGE、接合部の境界は Rect (0, 0- 1434, 1800)、デバイスの形状(状態)は FLAT です。
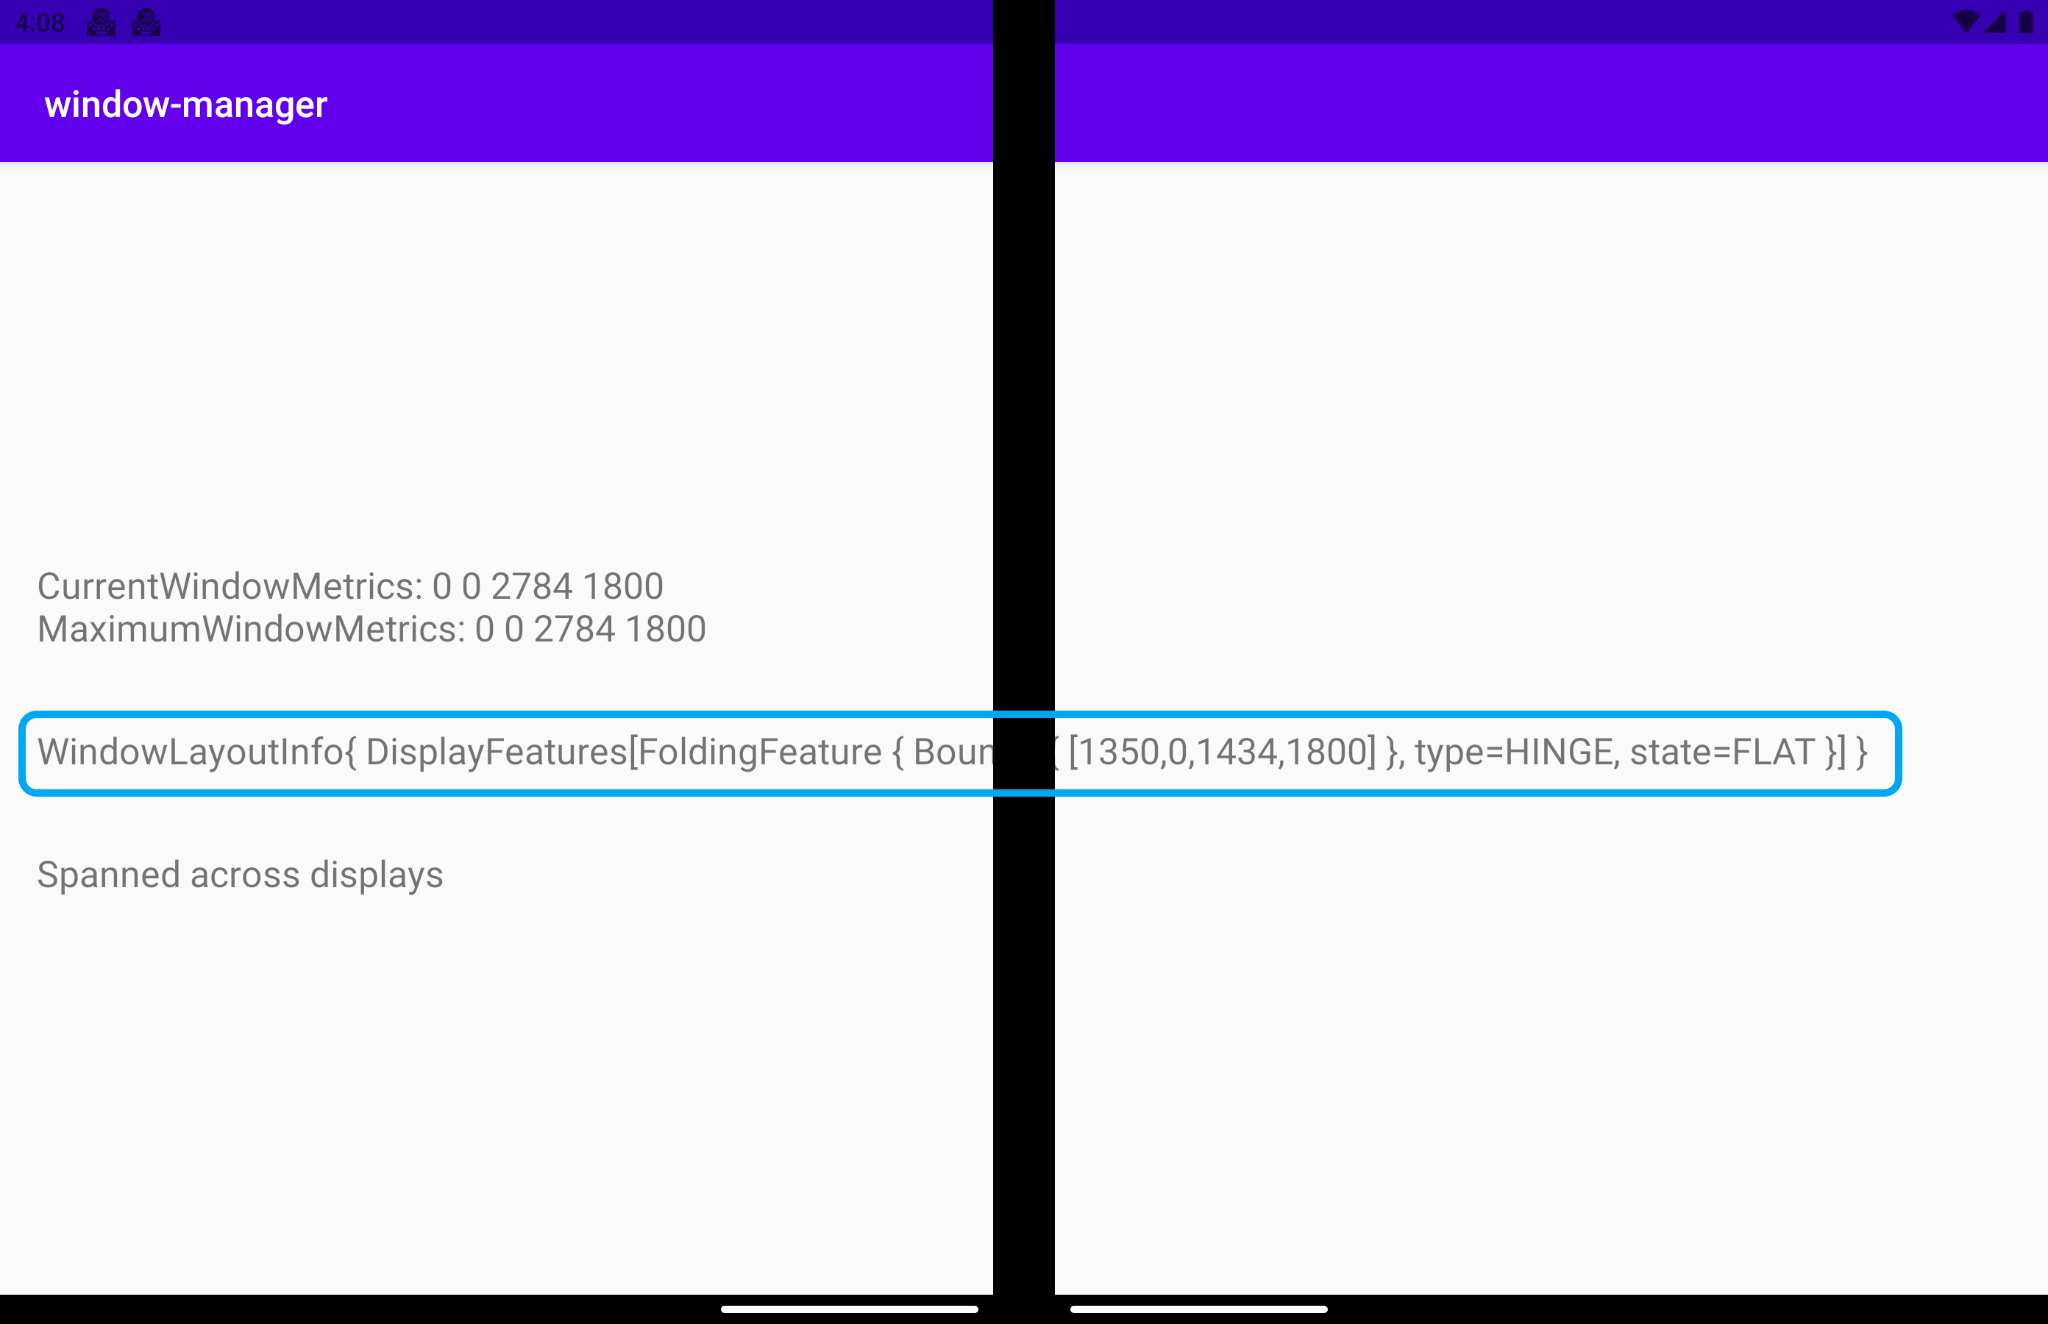
各フィールドの意味は次のとおりです。
type = TYPE_HINGE: このデュアル スクリーン エミュレータは物理ヒンジがある実際の Surface Duo デバイスを反映します。これが WindowManager による報告の内容です。Bounds[0, 0 - 1434, 1800]: ウィンドウ座標空間のアプリ ウィンドウ内にある接合部境界の長方形を表しています。Surface Duo デバイスのサイズ仕様を読むと、報告された境界(左、上、右、下)の位置のとおりにヒンジがあることがわかります。State: デバイスの形状(状態)を表す値は 2 つあります。HALF_OPENED: 折りたたみ式デバイスのヒンジは開いた状態と閉じた状態の中間にあり、フレキシブル スクリーンのパーツ間または物理スクリーン パネル間の角度は平らになっていません。FLAT: 折りたたみ式デバイスは完全に開いており、ユーザーに提示されるスクリーン領域は平らになっています。
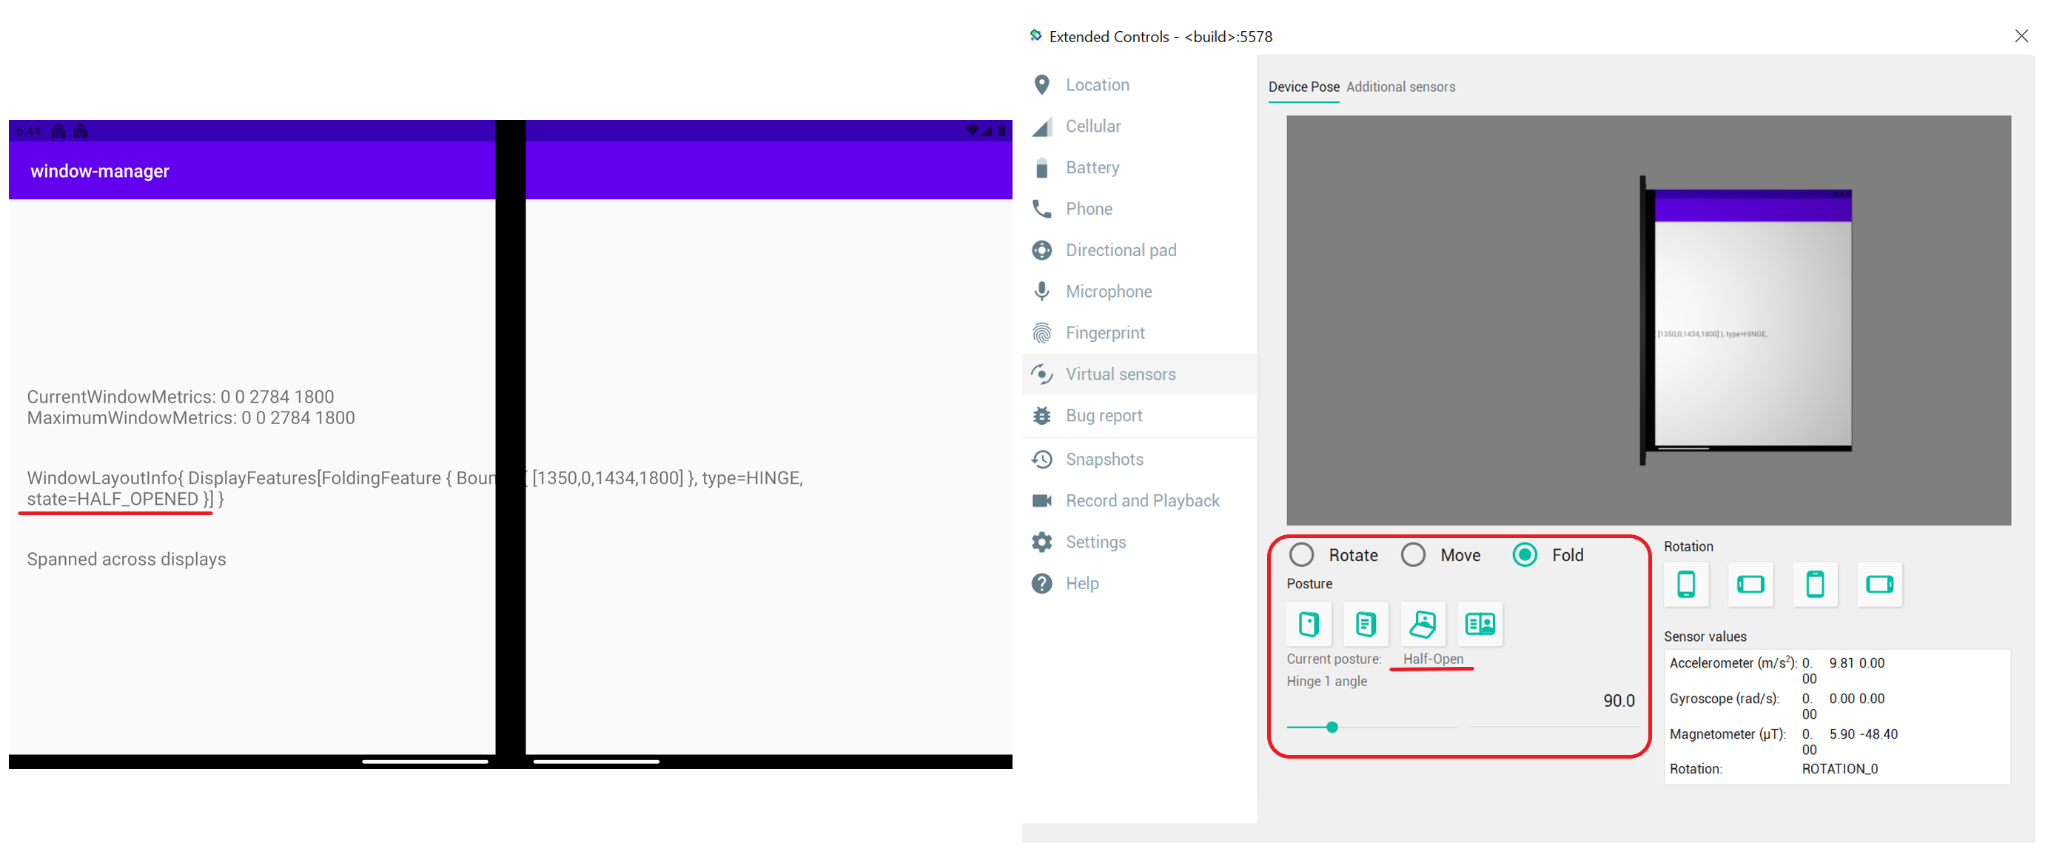
エミュレータはデフォルトでは 180 度開いた状態であり、したがって WindowManager が返す形状は FLAT です。
仮想センサー オプションを使用してエミュレータの形状を半開きに変更すると、WindowManager は新しい形状として HALF_OPENED を報告します。
WindowManager を使用して UI / UX を調整する
ウィンドウ レイアウト情報を示す図では、表示される情報がディスプレイ接合部によって切り取られていましたが、ここでも同じことが起きています。
これは最適なユーザー エクスペリエンスではありません。UI / UX を調整するために、WindowManager から提供される情報を利用できます。
前に見たように、アプリがすべての異なるディスプレイ領域に展開されている場合は、アプリがデバイス接合部を横断している場合でもあります。そのため、WindowManager はウィンドウ レイアウト情報をディスプレイ状態およびディスプレイ境界として提供します。そのため、アプリが展開されているときは、その情報を使用して UI / UX を調整する必要があります。
つまり、アプリが展開されている実行時に UI / UX を調整して、ディスプレイ接合部によって重要な情報が切り取られたり隠されたりしないようにします。デバイスのディスプレイ接合部を反映するビューを作成し、切り取られるか隠される TextView を制約するための参照として使用されるようにします。これにより、ユーザーに提示する情報の欠落を回避できます。
学習用に、この新しいビューに色を付けます。そうすれば、実際のデバイスのディスプレイ接合部と同じ位置に同じサイズで配置されていることがわかりやすくなります。
デバイス接合部の参照として使用する新しいビューを activity_main.xml に追加します。
activity_main.xml
<!-- It's not important where this view is placed by default, it will be positioned dynamically at runtime -->
<View
    android:id="@+id/folding_feature"
    android:layout_width="0dp"
    android:layout_height="0dp"
    android:background="@android:color/holo_red_dark"
    android:visibility="gone"
    tools:ignore="MissingConstraints" />
MainActivity.kt で、特定の WindowLayoutInfo からの情報を表示するために使用した updateUI() 関数に移動し、ディスプレイ接合部を含む if-else 処理に新しい関数呼び出しを追加します。
MainActivity.kt
private fun updateUI(newLayoutInfo: WindowLayoutInfo) {
   binding.layoutChange.text = newLayoutInfo.toString()
   if (newLayoutInfo.displayFeatures.isNotEmpty()) {
       binding.configurationChanged.text = "Spanned across displays"
       alignViewToFoldingFeatureBounds(newLayoutInfo)
   } else {
       binding.configurationChanged.text = "One logic/physical display - unspanned"
   }
}
ここでは、パラメータとして WindowLayoutInfo を受け取る関数 alignViewToFoldingFeatureBounds を追加しました。
その関数を作成します。この関数内で、ビューに新しい制約を適用するために ConstraintSet を作成します。次に、WindowLayoutInfo を使用してディスプレイ接合部の境界を取得します。WindowLayoutInfo は DisplayFeature のリストを返しますが、これは単なるインターフェースなので、必要な情報にアクセスするにはこれを FoldingFeature にキャストします。
MainActivity.kt
import androidx.constraintlayout.widget.ConstraintSet
import androidx.window.layout.FoldingFeature

private fun alignViewToFoldingFeatureBounds(newLayoutInfo: WindowLayoutInfo) {
   val constraintLayout = binding.constraintLayout
   val set = ConstraintSet()
   set.clone(constraintLayout)

   // Get and translate the feature bounds to the View's coordinate space and current
   // position in the window.
   val foldingFeature = newLayoutInfo.displayFeatures[0] as FoldingFeature
   val bounds = getFeatureBoundsInWindow(foldingFeature, binding.root)


   // Rest of the code to be added in the following steps
}
接合部の境界をビューの座標空間とウィンドウ内の現在位置に変換する getFeatureBoundsInWindow() 関数を定義します。
MainActivity.kt
import android.graphics.Rect
import android.view.View
import androidx.window.layout.DisplayFeature

/**
 * Get the bounds of the display feature translated to the View's coordinate space and current
 * position in the window. This will also include view padding in the calculations.
 */
private fun getFeatureBoundsInWindow(
    displayFeature: DisplayFeature,
    view: View,
    includePadding: Boolean = true
): Rect? {
    // Adjust the location of the view in the window to be in the same coordinate space as the feature.
    val viewLocationInWindow = IntArray(2)
    view.getLocationInWindow(viewLocationInWindow)

    // Intersect the feature rectangle in window with view rectangle to clip the bounds.
    val viewRect = Rect(
        viewLocationInWindow[0], viewLocationInWindow[1],
        viewLocationInWindow[0] + view.width, viewLocationInWindow[1] + view.height
    )

    // Include padding if needed
    if (includePadding) {
        viewRect.left += view.paddingLeft
        viewRect.top += view.paddingTop
        viewRect.right -= view.paddingRight
        viewRect.bottom -= view.paddingBottom
    }

    val featureRectInView = Rect(displayFeature.bounds)
    val intersects = featureRectInView.intersect(viewRect)

    // Checks to see if the display feature overlaps with our view at all
    if ((featureRectInView.width() == 0 && featureRectInView.height() == 0) ||
        !intersects
    ) {
        return null
    }

    // Offset the feature coordinates to view coordinate space start point
    featureRectInView.offset(-viewLocationInWindow[0], -viewLocationInWindow[1])

    return featureRectInView
}
ディスプレイ接合部の境界に関する情報を使用して、参照ビューに適切な高さを設定し、移動させることができます。
alignViewToFoldingFeatureBounds の完全なコードは次のようになります。
MainActivity.kt - alignViewToFoldingFeatureBounds
private fun alignViewToFoldingFeatureBounds(newLayoutInfo: WindowLayoutInfo) {
    val constraintLayout = binding.constraintLayout
    val set = ConstraintSet()
    set.clone(constraintLayout)

    // Get and Translate the feature bounds to the View's coordinate space and current
    // position in the window.
    val foldingFeature = newLayoutInfo.displayFeatures[0] as FoldingFeature
    val bounds = getFeatureBoundsInWindow(foldingFeature, binding.root)

    bounds?.let { rect ->
        // Some devices have a 0px width folding feature. We set a minimum of 1px so we
        // can show the view that mirrors the folding feature in the UI and use it as reference.
        val horizontalFoldingFeatureHeight = (rect.bottom - rect.top).coerceAtLeast(1)
        val verticalFoldingFeatureWidth = (rect.right - rect.left).coerceAtLeast(1)

        // Sets the view to match the height and width of the folding feature
        set.constrainHeight(
            R.id.folding_feature,
            horizontalFoldingFeatureHeight
        )
        set.constrainWidth(
            R.id.folding_feature,
            verticalFoldingFeatureWidth
        )

        set.connect(
            R.id.folding_feature, ConstraintSet.START,
            ConstraintSet.PARENT_ID, ConstraintSet.START, 0
        )
        set.connect(
            R.id.folding_feature, ConstraintSet.TOP,
            ConstraintSet.PARENT_ID, ConstraintSet.TOP, 0
        )

        if (foldingFeature.orientation == FoldingFeature.Orientation.VERTICAL) {
            set.setMargin(R.id.folding_feature, ConstraintSet.START, rect.left)
            set.connect(
                R.id.layout_change, ConstraintSet.END,
                R.id.folding_feature, ConstraintSet.START, 0
            )
        } else {
            // FoldingFeature is Horizontal
            set.setMargin(
                R.id.folding_feature, ConstraintSet.TOP,
                rect.top
            )
            set.connect(
                R.id.layout_change, ConstraintSet.TOP,
                R.id.folding_feature, ConstraintSet.BOTTOM, 0
            )
        }

        // Set the view to visible and apply constraints
        set.setVisibility(R.id.folding_feature, View.VISIBLE)
        set.applyTo(constraintLayout)
    }
}
以上により、デバイスのディスプレイ接合部と競合していた TextView で、その接合部が位置する場所が考慮されるようになり、コンテンツが切り取られたり隠されたりすることがなくなります。
デュアル スクリーン エミュレータ(左上)では、両方のディスプレイにまたがってコンテンツを表示する TextView が今ではヒンジによって切り取られておらず、情報の欠落が解消されています。
折りたたみ式エミュレータ(右上)では、折りたたみ領域(ディスプレイ接合部)の場所を表す明るい赤の線が表示されており、TextView は今では接合部の下に配置されているため、デバイスが折りたたまれたとき(たとえば、ノートパソコンの形状を 90 度開いた状態にしたとき)、情報は接合部による影響を受けません。
デュアル スクリーン エミュレータでディスプレイ接合部の場所が不明な場合、これはヒンジタイプのデバイスなので、接合部を表すビューはヒンジによって隠されています。しかし、アプリが両方のディスプレイに展開した状態を解除した場合は、接合部と同じ位置に正しい高さと幅で表示されます。
8. その他の Jetpack WindowManager アーティファクト
WindowManager には、メインのアーティファクト以外にも、便利なアーティファクトがあります。このアーティファクトは、アプリのビルド時に使用している現在の環境を考慮し、コンポーネントを個別に操作するために役立ちます。
Java アーティファクト
Kotlin の代わりに Java プログラミング言語を使用している場合、またはコールバックを介してイベントをリッスンする方がアーキテクチャに適している場合は、WindowManager の Java アーティファクトを使用すると便利な場合があります。このアーティファクトにより、Java 対応の API を使用して、コールバックを介するイベントのリスナーの登録や登録解除ができます。
RxJava アーティファクト
RxJava(バージョン 2 または 3)をすでに使用している場合は、Observables と Flowables のどちらを使用していても、特定のアーティファクトを使用してコードの整合性を維持できます。
9. Jetpack WindowManager を使用したテスト
FoldingFeature の周囲に UI 要素がどのように配置されるかをテストする場合、折りたたみ式デバイスの形状をエミュレータやデバイスでテストすると非常に便利です。
そのため、WindowManger にはインストルメンテーション テスト用の非常に便利なアーティファクトが用意されています。
使用方法を見ていきましょう。
WindowManager の主要な依存関係とあわせて、アプリの build.gradle ファイルにテスト用アーティファクト androidx.window:window-testing を追加しました。
window-testing アーティファクトには、WindowLayoutInfoPublisherRule という便利で新しい TestRule が含まれており、WindowLayoutInfo 値のストリームの使用をテストできます。WindowLayoutInfoPublisherRule を使用すると、さまざまな WindowLayoutInfo 値をオンデマンドでプッシュできます。
これを使用し、この新しいアーティファクトで UI をテストするためのサンプルを作成するため、Android Studio テンプレートによって作成されたテストクラスを更新します。ExampleInstrumentedTest クラスのコード全体を次のコードに置き換えます。
ExampleInstrumentedTest.kt
import androidx.test.ext.junit.rules.ActivityScenarioRule
import androidx.test.ext.junit.runners.AndroidJUnit4
import androidx.window.testing.layout.WindowLayoutInfoPublisherRule
import org.junit.Rule
import org.junit.rules.RuleChain
import org.junit.rules.TestRule
import org.junit.runner.RunWith

@RunWith(AndroidJUnit4::class)
class MainActivityTest {
    private val activityRule = ActivityScenarioRule(MainActivity::class.java)
    private val publisherRule = WindowLayoutInfoPublisherRule()

    @get:Rule
    val testRule: TestRule

    init {
        testRule = RuleChain.outerRule(publisherRule).around(activityRule)
    }
}
前述のルールは ActvityScenarioRule と連結されています。
FoldingFeature をモックアップするために、新しいアーティファクトには、これを行うための便利な関数がいくつか用意されています。これは、いくつかのデフォルト値を指定する最もシンプルなものです。
MainActivity では、TextView は折りたたみ機能の左側に配置されます。これが正しく実装されていることを確認するテストを作成します。
testText_is_left_of_Vertical_FoldingFeature というテストを作成します。
ExampleInstrumentedTest.kt
import androidx.window.layout.FoldingFeature.Orientation.Companion.VERTICAL
import androidx.window.layout.FoldingFeature.State.Companion.FLAT
import androidx.window.testing.layout.FoldingFeature
import androidx.window.testing.layout.TestWindowLayoutInfo
import org.junit.Test

@Test
fun testText_is_left_of_Vertical_FoldingFeature() {
   activityRule.scenario.onActivity { activity ->
       val hinge = FoldingFeature(
           activity = activity,
           state = FLAT,
           orientation = VERTICAL,
           size = 2
       )

       val expected = TestWindowLayoutInfo(listOf(hinge))
       publisherRule.overrideWindowLayoutInfo(expected)
   }

   // Add Assertion with EspressoMatcher here

}
テスト FoldingFeature の状態は FLAT で、向きは VERTICAL です。テストの UI に疑似 FoldingFeature を表示させて、デバイス内の位置を確認できるように、特定のサイズを定義しました。
前にインスタンス化した WindowLayoutInfoPublishRule を使用して疑似 FoldingFeaure を公開します。これは実際の WindowLayoutInfo データの場合と同じように取得できます。
最後のステップでは、UI 要素が FoldingFeature を避けて配置予定の場所に配置されているかをテストします。そのためには、EspressoMatchers を使用して、先ほど作成したテストの最後にアサーションを追加するだけです。
ExampleInstrumentedTest.kt
import androidx.test.espresso.assertion.PositionAssertions
import androidx.test.espresso.matcher.ViewMatchers.withId

onView(withId(R.id.layout_change)).check(
    PositionAssertions.isCompletelyLeftOf(withId(R.id.folding_feature))
)
完成したテストは次のようになります。
ExampleInstrumentedTest.kt
@Test
fun testText_is_left_of_Vertical_FoldingFeature() {
    activityRule.scenario.onActivity { activity ->
        val hinge = FoldingFeature(
            activity = activity,
            state = FoldingFeature.State.FLAT,
            orientation = FoldingFeature.Orientation.VERTICAL,
            size = 2
        )
        val expected = TestWindowLayoutInfo(listOf(hinge))
        publisherRule.overrideWindowLayoutInfo(expected)
    }
    onView(withId(R.id.layout_change)).check(
        PositionAssertions.isCompletelyLeftOf(withId(R.id.folding_feature))
    )
}
val horizontal_hinge = FoldingFeature(
   activity = activity,
   state = FLAT,
   orientation = HORIZONTAL,
   size = 2
)
これで、デバイスまたはエミュレータでテストを実行して、アプリが想定どおりに動作することを確認できるようになりました。このテストを実行するには、折りたたみ式デバイスやエミュレータは必要ありません。
10. 完了
Jetpack WindowManager は、折りたたみ式デバイスなどの新しいフォーム ファクタ デバイス向けの開発に便利です。
WindowManager が提供する情報は、Android アプリを折りたたみ式デバイスに適合させ、ユーザー エクスペリエンスを向上させるうえで非常に役立ちます。
この Codelab では、次のことを学習しました。
- 折りたたみ式デバイスとは何か
- 各種の折りたたみ式デバイスの相違
- 折りたたみ式デバイス、シングル スクリーン デバイス、タブレットの相違
- Jetpack WindowManager API
- Jetpack WindowManager を使用してアプリをデバイスの新しいフォーム ファクタに適応させる方法
- Jetpack WindowManager を使用したテスト