

สำหรับแอปพลิเคชันที่ต้องรองรับเสียงแบบเรียลไทม์และมีความหน่วงต่ำ เช่น แชทบอทหรือการโต้ตอบแบบเอเจนต์ Gemini Live API มีวิธีที่เหมาะที่สุด ในการสตรีมทั้งอินพุตและเอาต์พุตสำหรับโมเดล Gemini การใช้ตรรกะ AI ของ Firebase จะช่วยให้คุณเรียกใช้ Gemini Live API จากแอป Android ได้โดยตรงโดยไม่ต้อง ผสานรวมกับแบ็กเอนด์ คู่มือนี้จะแสดงวิธีใช้ Gemini Live API ในแอป Android ด้วย Firebase AI Logic
เริ่มต้นใช้งาน
ก่อนที่จะเริ่ม ให้ตรวจสอบว่าแอปของคุณกำหนดเป้าหมายเป็น API ระดับ 23 ขึ้นไป
หากยังไม่ได้ดำเนินการ ให้ตั้งค่าโปรเจ็กต์ Firebase และเชื่อมต่อแอปกับ Firebase โปรดดูรายละเอียดในเอกสารประกอบของ Firebase AI Logic
ตั้งค่าโปรเจ็กต์ Android
เพิ่มไลบรารี Firebase AI Logic และทรัพยากร Dependency ของ App Check ลงในไฟล์ build.gradle.kts หรือ build.gradle ระดับแอป ใช้ Firebase Android BoM เพื่อจัดการเวอร์ชันของไลบรารี
dependencies {
  // Import the Firebase BoM
  implementation(platform("com.google.firebase:firebase-bom:34.19.0"))

  // Add the dependencies for the Firebase AI Logic and App Check libraries
  // When using the BoM, you don't specify versions in Firebase library dependencies
  implementation("com.google.firebase:firebase-ai")
  implementation("com.google.firebase:firebase-appcheck-debug")
}
หลังจากเพิ่มการอ้างอิงแล้ว ให้ซิงค์โปรเจ็กต์ Android กับ Gradle
กำหนดค่าผู้ให้บริการแก้ไขข้อบกพร่องของ App Check สำหรับการพัฒนาในเครื่อง
ตั้งแต่ช่วงต้นเดือนกรกฎาคม 2026 เป็นต้นไป Firebase App Check จะบังคับใช้โดยอัตโนมัติเพื่อปกป้อง Gemini API ซึ่งเป็นส่วนหนึ่งของเวิร์กโฟลว์การตั้งค่าแบบมีคำแนะนำสำหรับตรรกะ AI ในคอนโซล Firebase สำหรับการพัฒนาในเครื่อง คุณต้องกำหนดค่าผู้ให้บริการแก้ไขข้อบกพร่องของ App Check เพื่อข้ามการรับรองในขณะที่ยังคงบังคับใช้ App Check
ในการสร้างการแก้ไขข้อบกพร่อง ให้กำหนดค่า App Check ให้ใช้ผู้ให้บริการแก้ไขข้อบกพร่อง factory ดังนี้
Kotlin
Firebase.initialize(context = this)
Firebase.appCheck.installAppCheckProviderFactory(
    DebugAppCheckProviderFactory.getInstance(),
)
Java
FirebaseApp.initializeApp(/*context=*/ this);
FirebaseAppCheck firebaseAppCheck = FirebaseAppCheck.getInstance();
firebaseAppCheck.installAppCheckProviderFactory(
        DebugAppCheckProviderFactory.getInstance());
รับโทเค็นการแก้ไขข้อบกพร่องโดยทำดังนี้
เรียกใช้แอปในโปรแกรมจำลองหรือในอุปกรณ์ทดสอบ
มองหาโทเค็นการแก้ไขข้อบกพร่องของ App Check ในบันทึก เช่น
D DebugAppCheckProvider: Enter this debug secret into the allow list
in the Firebase Console for your project: 123a4567-b89c-12d3-e456-789012345678
คัดลอกโทเค็น (เช่น
123a4567-b89c-12d3-e456-789012345678)
ลงทะเบียนโทเค็นการแก้ไขข้อบกพร่องกับ App Check โดยทำดังนี้
ในคอนโซล Firebase ให้ไปที่ ความปลอดภัย > App Check > แท็บแอป
ค้นหาแอปของคุณ คลิกเมนูรายการเพิ่มเติม () แล้วเลือก จัดการโทเค็นการแก้ไขข้อบกพร่อง
ทำตามวิธีการบนหน้าจอเพื่อลงทะเบียนโทเค็นการแก้ไขข้อบกพร่อง
ดูรายละเอียดเกี่ยวกับผู้ให้บริการแก้ไขข้อบกพร่อง (รวมถึงวิธีรับโทเค็นการแก้ไขข้อบกพร่องใหม่) ได้ในเอกสารอย่างเป็นทางการของ App Check
ผสานรวม Firebase AI Logic และเริ่มต้นโมเดล Generative
เพิ่มสิทธิ์ RECORD_AUDIO ลงในไฟล์ AndroidManifest.xml ของแอปพลิเคชัน
<uses-permission android:name="android.permission.RECORD_AUDIO" />
เริ่มต้นบริการแบ็กเอนด์ของ Gemini Developer API และเข้าถึง LiveModel
ใช้โมเดลที่รองรับ Live API เช่น
gemini-2.5-flash-native-audio-preview-12-2025
ดูเอกสารประกอบของ Firebase สำหรับโมเดล Live API ที่ใช้ได้
หากต้องการระบุเสียง ให้ตั้งค่าชื่อเสียงภายในออบเจ็กต์
speechConfig เป็นส่วนหนึ่งของการกำหนดค่าโมเดล หากไม่ได้ระบุเสียง ค่าเริ่มต้นจะเป็น Puck
Kotlin
// Initialize the `LiveModel` val model = Firebase.ai(backend = GenerativeBackend.googleAI()).liveModel( modelName = "gemini-2.5-flash-native-audio-preview-12-2025", generationConfig = liveGenerationConfig { responseModality = ResponseModality.AUDIO speechConfig = SpeechConfig(voice = Voice("FENRIR")) } )
Java
// Initialize the `LiveModel`
LiveGenerativeModel model = FirebaseAI
       .getInstance(GenerativeBackend.googleAI())
       .liveModel(
              "gemini-2.5-flash-native-audio-preview-12-2025",
              new LiveGenerationConfig.Builder()
                     .setResponseModality(ResponseModality.AUDIO)
                     .setSpeechConfig(new SpeechConfig(new Voice("FENRIR"))
              ).build(),
        null,
        null
);
คุณเลือกกำหนดลักษณะตัวตนหรือบทบาทที่โมเดลเล่นได้โดยตั้งค่าคำสั่งของระบบดังนี้
Kotlin
val systemInstruction = content { text("You are a helpful assistant, you main role is [...]") } val model = Firebase.ai(backend = GenerativeBackend.googleAI()).liveModel( modelName = "gemini-2.5-flash-native-audio-preview-12-2025", generationConfig = liveGenerationConfig { responseModality = ResponseModality.AUDIO speechConfig = SpeechConfig(voice = Voice("FENRIR")) }, systemInstruction = systemInstruction, )
Java
Content systemInstruction = new Content.Builder()
       .addText("You are a helpful assistant, you main role is [...]")
       .build();

LiveGenerativeModel model = FirebaseAI
       .getInstance(GenerativeBackend.googleAI())
       .liveModel(
              "gemini-2.5-flash-native-audio-preview-12-2025",
              new LiveGenerationConfig.Builder()
                     .setResponseModality(ResponseModality.AUDIO)
                     .setSpeechConfig(new SpeechConfig(new Voice("FENRIR"))
              ).build(),
        tools, // null if you don't want to use function calling
        systemInstruction
);
คุณสามารถปรับแต่งการสนทนากับโมเดลให้เฉพาะเจาะจงยิ่งขึ้นได้โดยใช้คำสั่งของระบบเพื่อระบุบริบทที่เฉพาะเจาะจงกับแอปของคุณ (เช่น ประวัติกิจกรรมในแอปของผู้ใช้)
เริ่มต้นเซสชัน Live API
เมื่อสร้างอินสแตนซ์ LiveModel แล้ว ให้เรียกใช้ model.connect() เพื่อสร้างออบเจ็กต์
LiveSession และสร้างการเชื่อมต่อแบบถาวรกับโมเดลด้วย
การสตรีมที่มีเวลาในการตอบสนองต่ำ LiveSession ช่วยให้คุณโต้ตอบกับโมเดลได้โดย
เริ่มและหยุดเซสชันเสียง รวมถึงส่งและรับข้อความ
จากนั้นคุณสามารถโทรหา startAudioConversation() เพื่อเริ่มการสนทนากับโมเดลได้โดยทำดังนี้
Kotlin
val session = model.connect() session.startAudioConversation()
Java
LiveModelFutures model = LiveModelFutures.from(liveModel);
ListenableFuture<LiveSession> sessionFuture = model.connect();

Futures.addCallback(sessionFuture, new FutureCallback<LiveSession>() {
    @Override
    public void onSuccess(LiveSession ses) {
        LiveSessionFutures session = LiveSessionFutures.from(ses);
        session.startAudioConversation();
    }
    @Override
    public void onFailure(Throwable t) {
        // Handle exceptions
    }
}, executor);
โปรดทราบว่าโมเดลจะไม่จัดการการหยุดชะงักในการสนทนากับโมเดล นอกจากนี้ Live API ยังเป็นแบบสองทาง คุณจึงใช้การเชื่อมต่อเดียวกันเพื่อส่ง และรับเนื้อหาได้
นอกจากนี้ คุณยังใช้ Gemini Live API เพื่อสร้างเสียงจากรูปแบบอินพุตต่างๆ ได้ด้วย
- ส่งข้อความและเสียง
- ส่งอินพุตวิดีโอ (ดูแอปเริ่มต้นอย่างรวดเร็วของ Firebase)
การเรียกฟังก์ชัน: เชื่อมต่อ Gemini Live API กับแอปของคุณ
หากต้องการก้าวไปอีกขั้น คุณยังเปิดใช้โมเดลเพื่อโต้ตอบกับ ตรรกะของแอปได้โดยตรงโดยใช้การเรียกใช้ฟังก์ชัน
การเรียกใช้ฟังก์ชัน (หรือการเรียกใช้เครื่องมือ) เป็นฟีเจอร์ของการติดตั้งใช้งาน Generative AI ที่ช่วยให้โมเดลเรียกใช้ฟังก์ชันได้ด้วยตนเองเพื่อดำเนินการ หากฟังก์ชันมีเอาต์พุต โมเดลจะเพิ่มเอาต์พุตนั้นลงในบริบทและ ใช้สำหรับการสร้างในภายหลัง
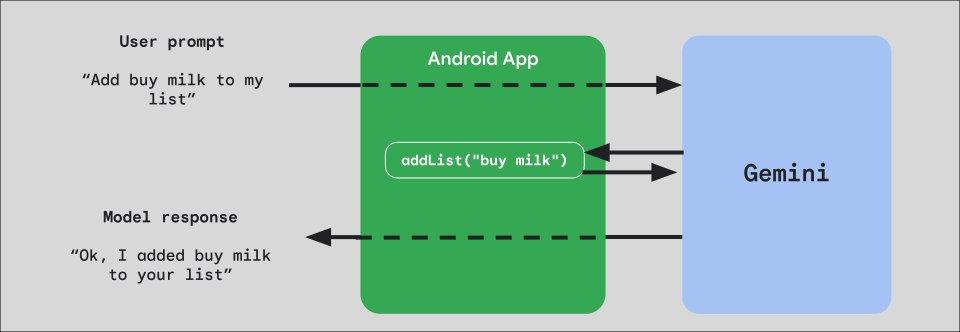
หากต้องการใช้การเรียกฟังก์ชันในแอป ให้เริ่มต้นด้วยการสร้างออบเจ็กต์ FunctionDeclaration สำหรับแต่ละฟังก์ชันที่ต้องการแสดงต่อโมเดล
เช่น หากต้องการแสดงaddListฟังก์ชันที่ต่อสตริงกับรายการสตริง
ใน Gemini ให้เริ่มด้วยการสร้างFunctionDeclarationตัวแปรที่มี
ชื่อและคำอธิบายสั้นๆ เป็นภาษาอังกฤษธรรมดาของฟังก์ชันและพารามิเตอร์
Kotlin
val itemList = mutableListOf<String>() fun addList(item: String) { itemList.add(item) } val addListFunctionDeclaration = FunctionDeclaration( name = "addList", description = "Function adding an item the list", parameters = mapOf( "item" to Schema.string("A short string describing the item to add to the list") ) )
Java
HashMap<String, Schema> addListParams = new HashMap<String, Schema>(1);

addListParams.put("item", Schema.str("A short string describing the item to add to the list"));

FunctionDeclaration addListFunctionDeclaration = new FunctionDeclaration(
    "addList",
    "Function adding an item the list",
    addListParams,
    Collections.emptyList()
);
จากนั้นส่งFunctionDeclarationนี้เป็น Tool ไปยังโมเดลเมื่อคุณ
สร้างอินสแตนซ์
Kotlin
val addListTool = Tool.functionDeclarations(listOf(addListFunctionDeclaration)) val model = Firebase.ai(backend = GenerativeBackend.googleAI()).liveModel( modelName = "gemini-2.5-flash-native-audio-preview-12-2025", generationConfig = liveGenerationConfig { responseModality = ResponseModality.AUDIO speechConfig = SpeechConfig(voice = Voice("FENRIR")) }, systemInstruction = systemInstruction, tools = listOf(addListTool) )
Java
LiveGenerativeModel model = FirebaseAI.getInstance(
    GenerativeBackend.googleAI()).liveModel(
        "gemini-2.5-flash-native-audio-preview-12-2025",
  new LiveGenerationConfig.Builder()
        .setResponseModality(ResponseModality.AUDIO)
        .setSpeechConfig(new SpeechConfig(new Voice("FENRIR")))
        .build(),
  List.of(Tool.functionDeclarations(List.of(addListFunctionDeclaration))),
               null,
               systemInstruction
        );
สุดท้าย ให้ใช้ฟังก์ชันแฮนเดิลเพื่อจัดการการเรียกใช้เครื่องมือที่โมเดลสร้างขึ้น
และส่งการตอบกลับกลับไป ฟังก์ชันแฮนเดิลนี้ที่ระบุไว้ใน
LiveSession เมื่อคุณเรียกใช้ startAudioConversation จะใช้พารามิเตอร์ FunctionCallPart
และแสดงผล FunctionResponsePart
Kotlin
session.startAudioConversation(::functionCallHandler) // ... fun functionCallHandler(functionCall: FunctionCallPart): FunctionResponsePart { return when (functionCall.name) { "addList" -> { // Extract function parameter from functionCallPart val itemName = functionCall.args["item"]!!.jsonPrimitive.content // Call function with parameter addList(itemName) // Confirm the function call to the model val response = JsonObject( mapOf( "success" to JsonPrimitive(true), "message" to JsonPrimitive("Item $itemName added to the todo list") ) ) FunctionResponsePart(functionCall.name, response) } else -> { val response = JsonObject( mapOf( "error" to JsonPrimitive("Unknown function: ${functionCall.name}") ) ) FunctionResponsePart(functionCall.name, response) } } }
Java
Futures.addCallback(sessionFuture, new FutureCallback<LiveSessionFutures>() {

    @RequiresPermission(Manifest.permission.RECORD_AUDIO)
    @Override
    @OptIn(markerClass = PublicPreviewAPI.class)
    public void onSuccess(LiveSessionFutures ses) {
        ses.startAudioConversation(::handleFunctionCallFuture);
    }

    @Override
    public void onFailure(Throwable t) {
        // Handle exceptions
    }
}, executor);

// ...

ListenableFuture<JsonObject> handleFunctionCallFuture = Futures.transform(response, result -> {
    for (FunctionCallPart functionCall : result.getFunctionCalls()) {
        if (functionCall.getName().equals("addList")) {
            Map<String, JsonElement> args = functionCall.getArgs();
            String item =
                    JsonElementKt.getContentOrNull(
                            JsonElementKt.getJsonPrimitive(
                                    locationJsonObject.get("item")));
            return addList(item);
        }
    }
    return null;
}, Executors.newSingleThreadExecutor());
ขั้นตอนถัดไป
- ลองใช้ Gemini Live API ในแอปตัวอย่างแคตตาล็อก AI ของ Android
- อ่านเพิ่มเติมเกี่ยวกับ Gemini Live API ได้ในเอกสารประกอบของ Firebase AI Logic
- ดูข้อมูลเพิ่มเติมเกี่ยวกับโมเดล Gemini ที่พร้อมใช้งาน
- ดูข้อมูลเพิ่มเติมเกี่ยวกับการเรียกใช้ฟังก์ชัน
- สํารวจกลยุทธ์การออกแบบพรอมต์