
1. 事前準備
觸控筆是一種筆型工具,可協助使用者執行精確工作。在本程式碼研究室中,您可以瞭解如何使用 android.os 和 androidx 程式庫,打造自然的觸控筆體驗。您也會瞭解如何使用 MotionEvent 類別,支援偵測壓力、傾斜度、方向的功能,以及防手掌誤觸機制。此外,您還會學到如何使用 OpenGL 和 SurfaceView 類別,透過動作預測和低延遲繪圖機制,縮短觸控筆延遲時間。
必要條件
- 具備 Kotlin 和 lambda 的經驗。
- 具備使用 Android Studio 的基本知識。
- 具備 Jetpack Compose 的基本知識。
- 具備 OpenGL 低延遲繪圖的基本知識。
課程內容
- 如何使用
MotionEvent類別支援觸控筆。 - 如何實作觸控筆功能,包括支援偵測壓力、傾斜度和方向的功能。
- 如何在
Canvas類別中繪圖。 - 如何實作動作預測。
- 如何使用 OpenGL 和
SurfaceView類別算繪低延遲圖形。
軟硬體需求
- 最新版的 Android Studio。
- 具備 Kotlin 語法經驗 (包括 lambda)。
- 具備 Compose 的基本經驗。如果您不熟悉 Compose,請先完成「Jetpack Compose 基本概念」程式碼研究室。
- 支援觸控筆的裝置。
- 可使用的觸控筆。
- Git。
2. 取得範例程式碼
如要取得含有範例應用程式主題設定和基本設定的程式碼,請按照下列步驟操作:
- 複製這個 GitHub 存放區:
git clone https://github.com/android/large-screen-codelabs
- 開啟
advanced-stylus資料夾。start資料夾含有範例程式碼,end資料夾則含有解決方案程式碼。
3. 實作基本繪圖應用程式
首先,請為基本繪圖應用程式建構必要的版面配置,方便使用者繪圖,接著利用 Canvas Composable 函式在畫面上顯示觸控筆屬性,如下圖所示:
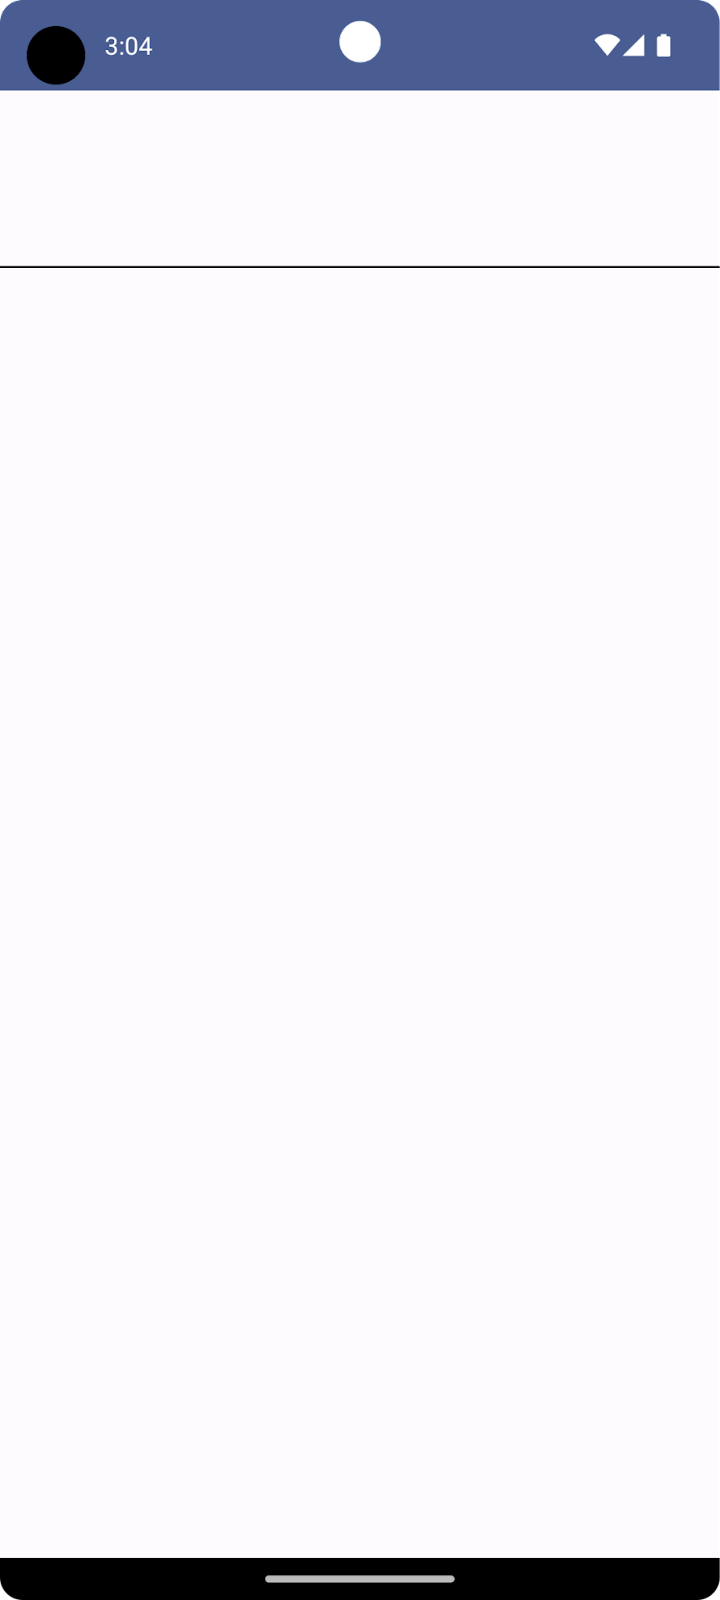
上半部是 Canvas Composable 函式,用來呈現觸控筆輸入內容,並顯示觸控筆的不同屬性,例如方向、傾斜度和壓力等。下半部則是另一個 Canvas Composable 函式,可接收觸控筆輸入內容,並呈現簡單的筆劃。
如要實作繪圖應用程式的基本版面配置,請按照下列步驟操作:
- 在 Android Studio 中開啟複製的存放區。
- 依序點選「
app」>「java」>「com.example.stylus」,然後按兩下「MainActivity」。MainActivity.kt檔案會隨即開啟。 - 請留意
MainActivity類別中的StylusVisualization和DrawAreaComposable函式。本節將重點說明DrawAreaComposable函式。
建立 StylusState 類別
- 在同一個
ui目錄中,依序點選「File」>「New」>「Kotlin/Class file」。 - 在文字方塊中,將「Name」預留位置替換為
StylusState.kt,然後按下Enter鍵 (macOS 為return鍵)。 - 在
StylusState.kt檔案中,建立StylusState資料類別,然後新增下表中的變數:
變數 | 類型 | 預設值 | 說明 |
|
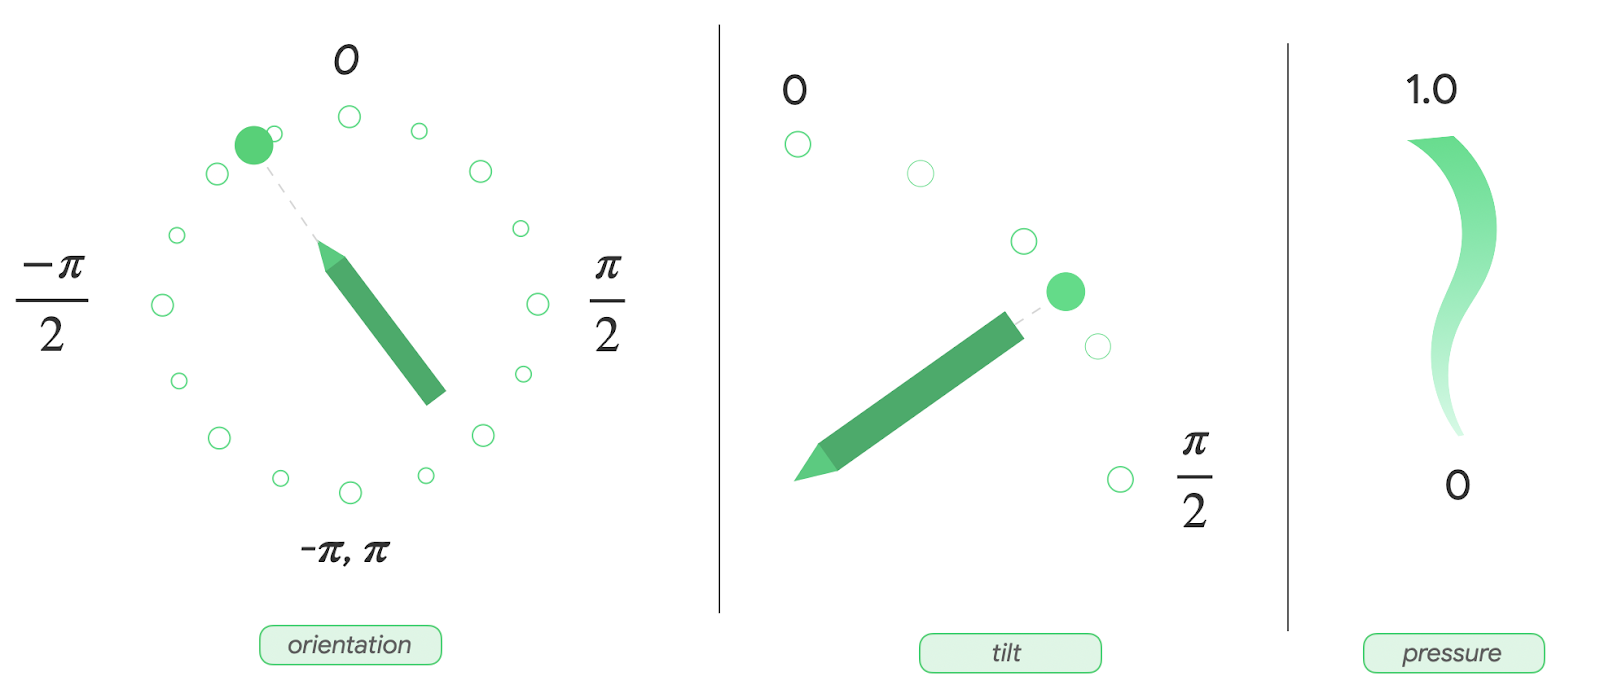
| 介於 0 到 1.0 的值。 | |
|
| 介於 -pi 到 pi 的弧度值。 | |
|
| 介於 0 到 pi/2 的弧度值。 | |
|
| 儲存 |
StylusState.kt
package com.example.stylus.ui
import androidx.compose.ui.graphics.Path

data class StylusState(
   var pressure: Float = 0F,
   var orientation: Float = 0F,
   var tilt: Float = 0F,
   var path: Path = Path(),
)
- 在
MainActivity.kt檔案中找出MainActivity類別,然後使用mutableStateOf()函式新增觸控筆狀態:
MainActivity.kt
import androidx.compose.runtime.setValue
import androidx.compose.runtime.getValue
import androidx.compose.runtime.mutableStateOf
import com.example.stylus.ui.StylusState

class MainActivity : ComponentActivity() {
    private var stylusState: StylusState by mutableStateOf(StylusState())
DrawPoint 類別
DrawPoint 類別會針對所有繪製在螢幕上的點儲存資料,連結這些點即可建立線條。此類別是模仿 Path 物件的運作方式。
DrawPoint 類別會擴充 PointF 類別,並包含以下資料:
參數 | 類型 | 說明 |
|
| 協調中心 |
|
| 協調中心 |
|
| 點的類型 |
DrawPoint 物件分為兩種,由 DrawPointType 列舉描述:
類型 | 說明 |
| 將線條的開頭移至特定位置。 |
| 從上一個點開始連結線條。 |
DrawPoint.kt
import android.graphics.PointF
class DrawPoint(x: Float, y: Float, val type: DrawPointType): PointF(x, y)
將資料點算繪為路徑
在這個應用程式中,StylusViewModel 類別會保留線條資料,做好算繪資料的準備,並在 Path 物件上執行作業來支援防手掌誤觸功能。
- 為保留線條的資料,請在
StylusViewModel類別中,為DrawPoint物件建立可變動清單:
StylusViewModel.kt
import androidx.lifecycle.ViewModel
import com.example.stylus.data.DrawPoint

class StylusViewModel : ViewModel() {private var currentPath = mutableListOf<DrawPoint>()
如要將資料點算繪為路徑,請按照下列步驟操作:
- 在
StylusViewModel.kt檔案的StylusViewModel類別中,新增createPath函式。 - 使用
Path()建構函式建立類型為Path的path變數。 - 建立
for迴圈,為currentPath變數中的每個資料點執行疊代作業。 - 如果資料點類型為
START,請呼叫moveTo方法,才能在指定的x和y座標開始算繪線條。 - 否則,請使用資料點的
x和y座標呼叫lineTo方法,連結至上一個點。 - 傳回
path物件。
StylusViewModel.kt
import androidx.compose.ui.graphics.Path
import com.example.stylus.data.DrawPoint
import com.example.stylus.data.DrawPointType


class StylusViewModel : ViewModel() {
   private var currentPath = mutableListOf<DrawPoint>()

   private fun createPath(): Path {
      val path = Path()

      for (point in currentPath) {
          if (point.type == DrawPointType.START) {
              path.moveTo(point.x, point.y)
          } else {
              path.lineTo(point.x, point.y)
          }
      }
      return path
   }

private fun cancelLastStroke() {
}
處理 MotionEvent 物件
觸控筆事件來自 MotionEvent 物件,該物件可提供所執行動作的資訊,以及與該動作相關聯的資料,例如指標位置和壓力。下表包含 MotionEvent 物件的一些常數及相關資料,可用於識別使用者在螢幕上執行的動作:
常數 | 資料 |
| 指標觸碰螢幕。這就是 |
| 指標在螢幕上移動。這就是繪製的線條。 |
| 指標停止觸碰螢幕。這就是線條的結尾。 |
| 偵測到不必要的觸碰。這會取消上一個筆劃。 |
應用程式收到新的 MotionEvent 物件時,畫面應隨之算繪,反映新的使用者輸入內容。
- 如要處理
StylusViewModel類別中的MotionEvent物件,請建立收集線條座標的函式:
StylusViewModel.kt
import android.view.MotionEvent

class StylusViewModel : ViewModel() {
   private var currentPath = mutableListOf<DrawPoint>()

   ...

   fun processMotionEvent(motionEvent: MotionEvent): Boolean {
      when (motionEvent.actionMasked) {
          MotionEvent.ACTION_DOWN -> {
              currentPath.add(
                  DrawPoint(motionEvent.x, motionEvent.y, DrawPointType.START)
              )
          }
          MotionEvent.ACTION_MOVE -> {
              currentPath.add(DrawPoint(motionEvent.x, motionEvent.y, DrawPointType.LINE))
          }
          MotionEvent.ACTION_UP -> {
              currentPath.add(DrawPoint(motionEvent.x, motionEvent.y, DrawPointType.LINE))
          }
          MotionEvent.ACTION_CANCEL -> {
              // Unwanted touch detected.
              cancelLastStroke()
          }
          else -> return false
      }

      return true
   }
將資料傳送至 UI
如要更新 StylusViewModel 類別,讓 UI 收集 StylusState 資料類別的變更,請按照下列步驟操作:
- 在
StylusViewModel類別中,建立類別為StylusState的MutableStateFlow類型變數_stylusState,以及類別為StylusState的StateFlow類型變數stylusState。每當StylusViewModel類別中的觸控筆狀態有所變更,且MainActivity類別中的 UI 使用stylusState變數時,系統就會修改_stylusState變數。
StylusViewModel.kt
import com.example.stylus.ui.StylusState
import kotlinx.coroutines.flow.MutableStateFlow
import kotlinx.coroutines.flow.StateFlow

class StylusViewModel : ViewModel() {

   private var _stylusState = MutableStateFlow(StylusState())
   val stylusState: StateFlow<StylusState> = _stylusState
- 建立可接受
StylusState物件參數的requestRendering函式:
StylusViewModel.kt
import kotlinx.coroutines.flow.update

...

class StylusViewModel : ViewModel() {
   private var _stylusState = MutableStateFlow(StylusState())
   val stylusState: StateFlow<StylusState> = _stylusState

   ...

    private fun requestRendering(stylusState: StylusState) {
      // Updates the stylusState, which triggers a flow.
      _stylusState.update {
          return@update stylusState
      }
   }
- 在
processMotionEvent函式的結尾,加入具有StylusState參數的requestRendering函式呼叫。 - 在
StylusState參數中,從motionEvent變數擷取傾斜度、壓力和方向值,然後使用createPath()函式建立路徑。這會觸發流程事件,您稍後會在 UI 中連結該事件。
StylusViewModel.kt
...

class StylusViewModel : ViewModel() {

   ...

   fun processMotionEvent(motionEvent: MotionEvent): Boolean {

      ...
         else -> return false
      }


      requestRendering(
         StylusState(
             tilt = motionEvent.getAxisValue(MotionEvent.AXIS_TILT),
             pressure = motionEvent.pressure,
             orientation = motionEvent.orientation,
             path = createPath()
         )
      )
連結 UI 與 StylusViewModel 類別
- 在
MainActivity類別中,找出onCreate函式的super.onCreate函式,然後新增狀態收集作業。如要進一步瞭解狀態收集作業,請觀看「以生命週期感知方式收集流程」影片。
MainActivity.kt
import androidx.lifecycle.lifecycleScope
import kotlinx.coroutines.launch
import androidx.lifecycle.repeatOnLifecycle
import kotlinx.coroutines.flow.onEach
import androidx.lifecycle.Lifecycle
import kotlinx.coroutines.flow.collect

...
class MainActivity : ComponentActivity() {
   override fun onCreate(savedInstanceState: Bundle?) {
      super.onCreate(savedInstanceState)

      lifecycleScope.launch {
          lifecycle.repeatOnLifecycle(Lifecycle.State.STARTED) {
              viewModel.stylusState
                  .onEach {
                      stylusState = it
                  }
                  .collect()
          }
      }
現在,每當 StylusViewModel 類別發布新的 StylusState 狀態,活動就會收到內容,而新的 StylusState 物件則會更新本機 MainActivity 類別的 stylusState 變數。
- 在
DrawAreaComposable函式的主體中,將pointerInteropFilter修飾符新增至CanvasComposable函式,藉此提供MotionEvent物件。
- 將
MotionEvent物件傳送至 StylusViewModel 的processMotionEvent函式進行處理:
MainActivity.kt
import androidx.compose.ui.ExperimentalComposeUiApi
import androidx.compose.ui.input.pointer.pointerInteropFilter

...
class MainActivity : ComponentActivity() {

   ...

@Composable
@OptIn(ExperimentalComposeUiApi::class)
fun DrawArea(modifier: Modifier = Modifier) {
   Canvas(modifier = modifier
       .clipToBounds()

 .pointerInteropFilter {
              viewModel.processMotionEvent(it)
          }

   ) {

   }
}
- 使用
stylusStatepath屬性呼叫drawPath函式,然後提供顏色和筆劃樣式。
MainActivity.kt
class MainActivity : ComponentActivity() {

...

   @Composable
   @OptIn(ExperimentalComposeUiApi::class)
   fun DrawArea(modifier: Modifier = Modifier) {
      Canvas(modifier = modifier
          .clipToBounds()
          .pointerInteropFilter {
              viewModel.processMotionEvent(it)
          }
      ) {
          with(stylusState) {
              drawPath(
                  path = this.path,
                  color = Color.Gray,
                  style = strokeStyle
              )
          }
      }
   }
- 執行應用程式,就會發現您可以在螢幕上繪圖。
4. 實作壓力、方向和傾斜度支援功能
在上一節中,您已瞭解如何從 MotionEvent 物件擷取觸控筆資訊,例如壓力、方向和傾斜度。
StylusViewModel.kt
tilt = motionEvent.getAxisValue(MotionEvent.AXIS_TILT),
pressure = motionEvent.pressure,
orientation = motionEvent.orientation,
不過,這個快速指令只適用於第一個指標。如果偵測到多點觸控,系統就會偵測到多個指標,而且這個快速指令只會傳回第一個指標的值,或是螢幕上的第一個指標。如果想要求特定指標的資料,您可以使用 pointerIndex 參數:
StylusViewModel.kt
tilt = motionEvent.getAxisValue(MotionEvent.AXIS_TILT, pointerIndex),
pressure = motionEvent.getPressure(pointerIndex),
orientation = motionEvent.getOrientation(pointerIndex)
如要進一步瞭解指標和多點觸控,請參閱「處理多點觸控手勢」。
新增壓力、方向和傾斜度的視覺化效果
- 在
MainActivity.kt檔案中找出StylusVisualizationComposable函式,然後使用StylusState流程物件的資訊算繪視覺化效果:
MainActivity.kt
import StylusVisualization.drawOrientation
import StylusVisualization.drawPressure
import StylusVisualization.drawTilt
...
class MainActivity : ComponentActivity() {

   ...

   @Composable
   fun StylusVisualization(modifier: Modifier = Modifier) {
      Canvas(
          modifier = modifier
      ) {
          with(stylusState) {
              drawOrientation(this.orientation)
              drawTilt(this.tilt)
              drawPressure(this.pressure)
          }
      }
   }
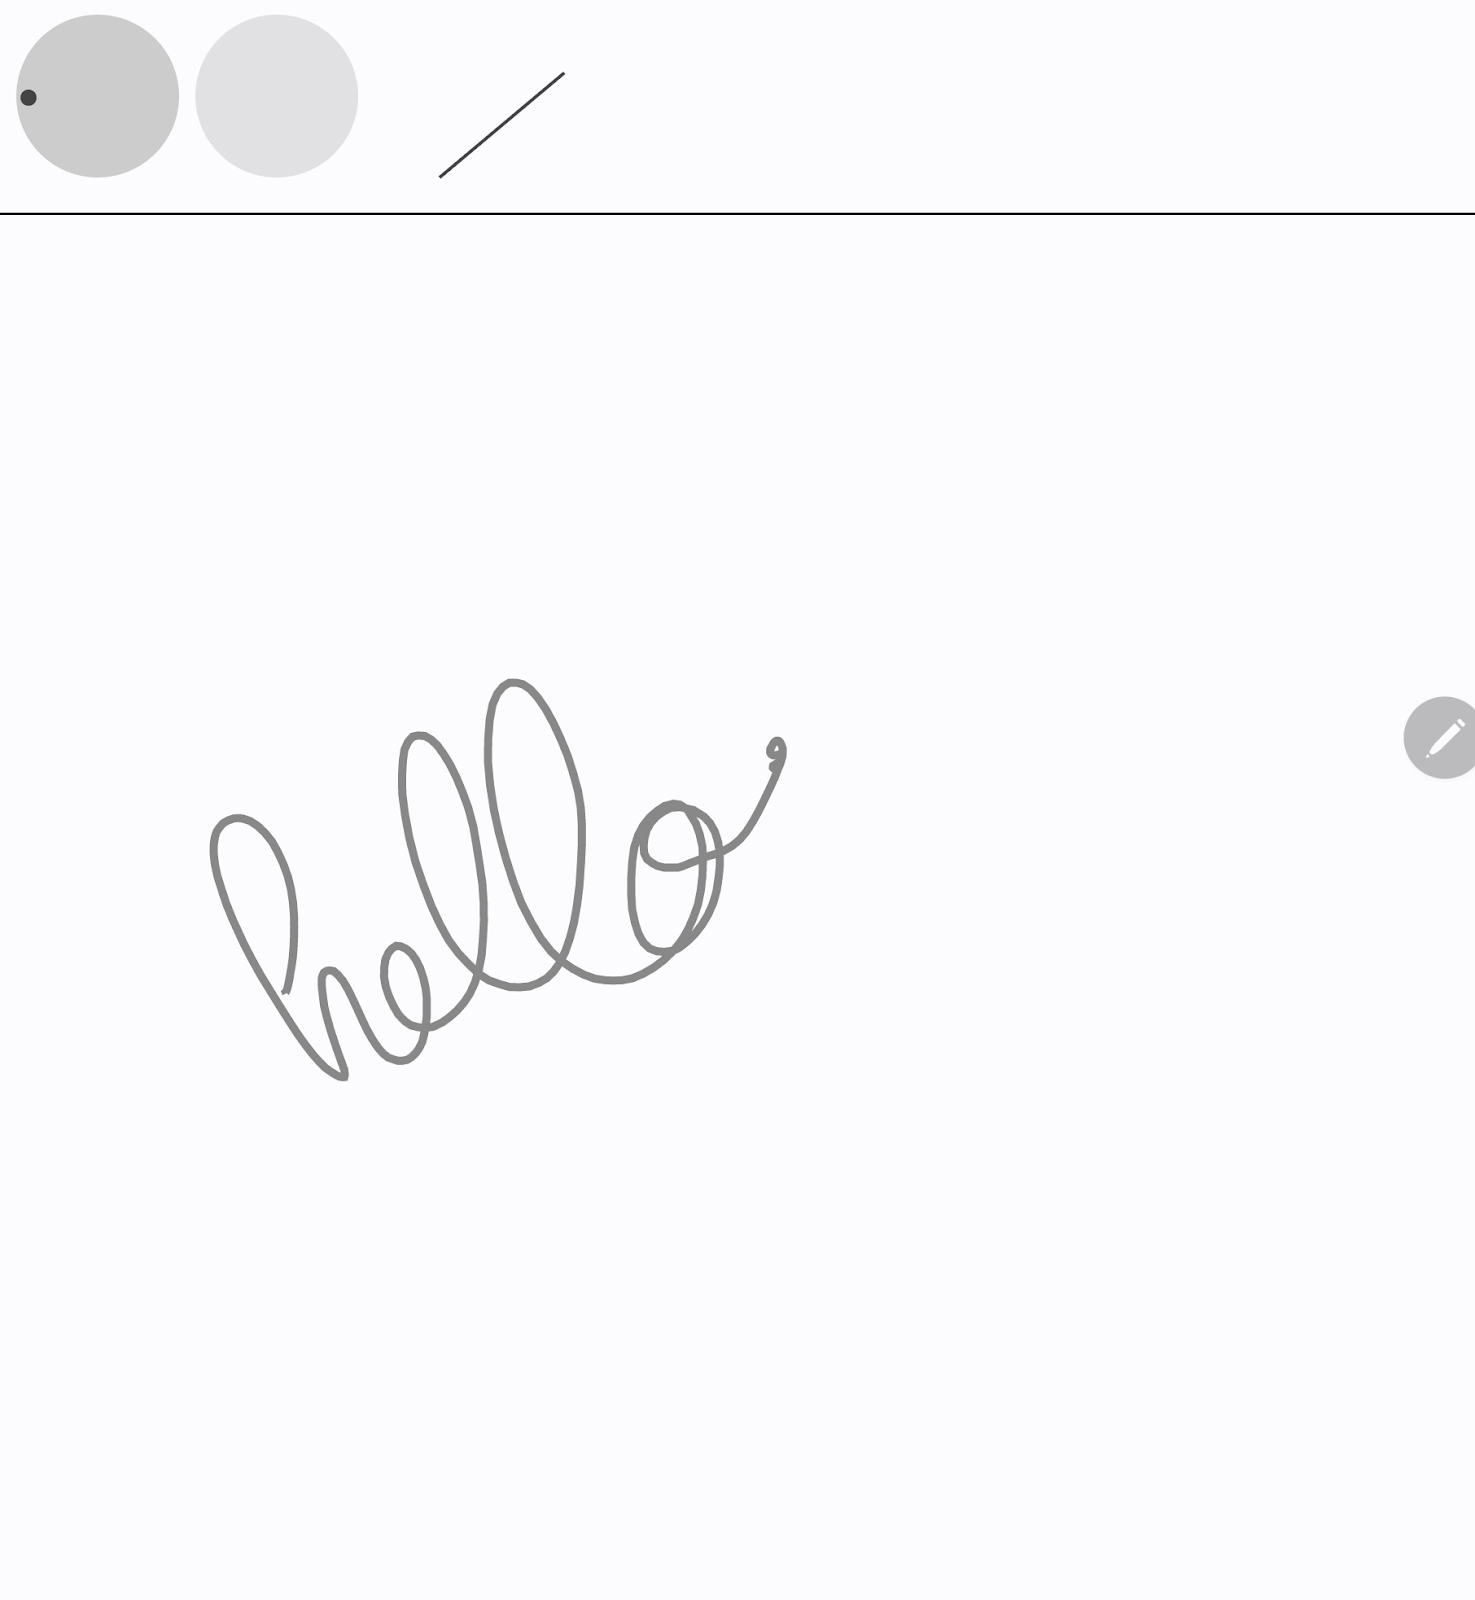
- 執行應用程式。畫面頂端會顯示三個指標,分別代表方向、壓力和傾斜度。
- 使用觸控筆在螢幕上塗鴉,觀察系統如何呈現輸入內容的視覺化效果。
- 檢查
StylusVisualization.kt檔案,瞭解每個視覺化效果的建構方式。
5. 實作防手掌誤觸功能
螢幕可能會註冊不必要的觸控動作,例如使用者在手寫時自然地將手靠在螢幕上,就會發生這種情況。
防手掌誤觸機制可偵測這種行為,並通知開發人員取消最後一組 MotionEvent 物件。這種 MotionEvent 物件組合的開頭為 ACTION_DOWN 常數。
也就是說,您必須保留輸入內容記錄,才能從螢幕上移除不必要的觸控內容,並重新算繪正確的使用者輸入內容。幸好,您已將這類記錄儲存在 StylusViewModel 類別中的 currentPath 變數。
Android 提供來自 MotionEvent 物件的 ACTION_CANCEL 常數,可通知開發人員有不必要的觸控動作。自 Android 13 起,MotionEvent 物件提供的 FLAG_CANCELED 常數應在 ACTION_POINTER_UP 常數上檢查。
實作 cancelLastStroke 函式
- 如要從最後一個
START資料點中移除資料點,請返回StylusViewModel類別,然後建立cancelLastStroke函式,找出最後一個START資料點的索引,並僅保留從第一個資料點到索引減一資料點的資料:
StylusViewModel.kt
...
class StylusViewModel : ViewModel() {
    ...

   private fun cancelLastStroke() {
      // Find the last START event.
      val lastIndex = currentPath.findLastIndex {
          it.type == DrawPointType.START
      }

      // If found, keep the element from 0 until the very last event before the last MOVE event.
      if (lastIndex > 0) {
          currentPath = currentPath.subList(0, lastIndex - 1)
      }
   }
新增 ACTION_CANCEL 和 FLAG_CANCELED 常數
- 在
StylusViewModel.kt檔案中,找到processMotionEvent函式。 - 在
ACTION_UP常數中建立canceled變數,檢查目前的 SDK 版本是否為 Android 13 以上版本,以及FLAG_CANCELED常數是否已啟用。 - 在下一行程式碼中建立條件式,檢查
canceled變數是否為 true。如果為 true,請呼叫cancelLastStroke函式,移除最後一組MotionEvent物件。如果為 false,請呼叫currentPath.add方法,新增最後一組MotionEvent物件。
StylusViewModel.kt
import android.os.Build
...
class StylusViewModel : ViewModel() {
    ...
    fun processMotionEvent(motionEvent: MotionEvent): Boolean {
    ...
        MotionEvent.ACTION_POINTER_UP,
        MotionEvent.ACTION_UP -> {
           val canceled = Build.VERSION.SDK_INT >= Build.VERSION_CODES.TIRAMISU &&
           (motionEvent.flags and MotionEvent.FLAG_CANCELED) == MotionEvent.FLAG_CANCELED

           if(canceled) {
               cancelLastStroke()
           } else {
               currentPath.add(DrawPoint(motionEvent.x, motionEvent.y, DrawPointType.LINE))
           }
        }
- 在
ACTION_CANCEL常數中,請留意cancelLastStroke函式:
StylusViewModel.kt
...
class StylusViewModel : ViewModel() {
    ...
    fun processMotionEvent(motionEvent: MotionEvent): Boolean {
        ...
        MotionEvent.ACTION_CANCEL -> {
           // unwanted touch detected
           cancelLastStroke()
        }
防手掌誤觸功能已實作完成!您可以在 palm-rejection 資料夾中找到有效程式碼。
6. 實作低延遲設計
在本節中,為改善效能,您將減少使用者輸入內容和畫面算繪作業之間的延遲時間。造成延遲的原因很多,其中一個是長繪圖管線。您可以利用「前緩衝區算繪」縮短繪圖管線。前緩衝區算繪功能可讓開發人員直接存取螢幕緩衝區,提供優質的手寫和素描結果。
androidx.graphics 程式庫提供的 GLFrontBufferedRenderer 類別會處理前緩衝區和雙緩衝區算繪。此類別會最佳化 SurfaceView 物件,使用 onDrawFrontBufferedLayer 回呼函式進行快速算繪,並利用 onDrawDoubleBufferedLayer 回呼函式進行一般算繪。GLFrontBufferedRenderer 類別和 GLFrontBufferedRenderer.Callback 介面運作時,可配合使用者提供的資料類型。在本程式碼研究室中,您會使用 Segment 類別。
如要開始使用,請按照下列步驟操作:
- 在 Android Studio 中開啟
low-latency資料夾,取得所有必要檔案: - 請留意專案中的下列新檔案:
- 在
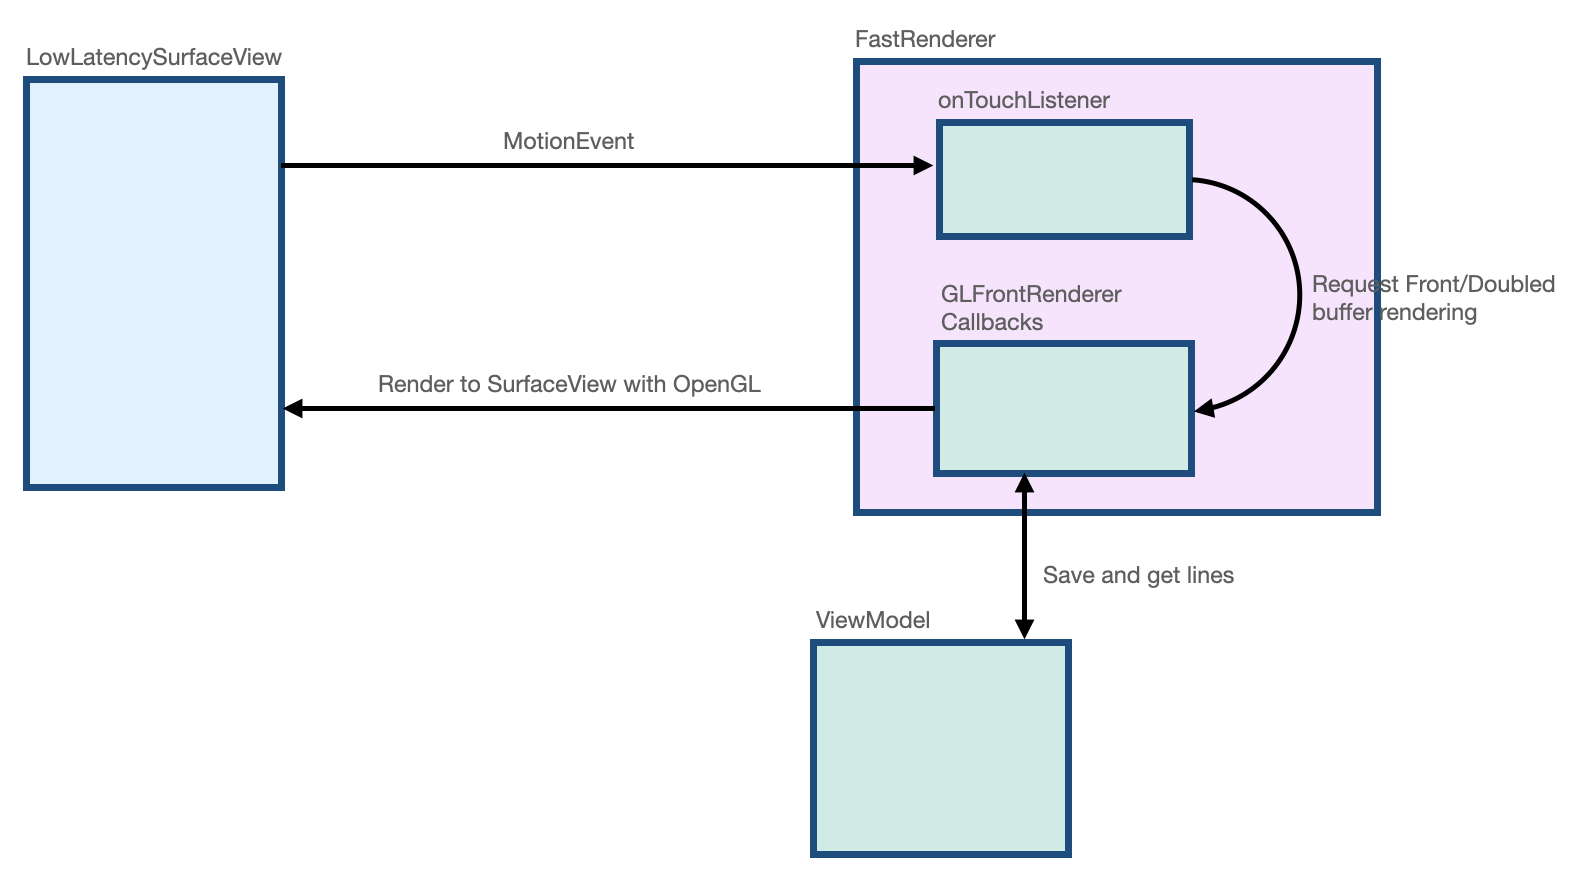
build.gradle檔案中,已使用implementation "androidx.graphics:graphics-core:1.0.0-alpha03"宣告匯入androidx.graphics程式庫。 LowLatencySurfaceView類別會擴充SurfaceView類別,將 OpenGL 程式碼算繪至螢幕畫面。LineRenderer類別會保留 OpenGL 程式碼,在螢幕上算繪線條。FastRenderer類別允許快速算繪,且會實作GLFrontBufferedRenderer.Callback介面。此類別也會攔截MotionEvent物件。StylusViewModel類別會使用LineManager介面保留資料點。Segment類別會定義線段,如下所示:x1、y1:第一個點的座標x2、y2:第二個點的座標
下圖顯示資料在各類別之間移動的方式:
建立低延遲介面和版面配置
- 在
MainActivity.kt檔案中,找出MainActivity類別的onCreate函式。 - 在
onCreate函式的主體中建立FastRenderer物件,然後傳入viewModel物件:
MainActivity.kt
class MainActivity : ComponentActivity() {
   ...
   override fun onCreate(savedInstanceState: Bundle?) {
      super.onCreate(savedInstanceState)

      fastRendering = FastRenderer(viewModel)

      lifecycleScope.launch {
      ...
- 在同一個檔案中,建立
DrawAreaLowLatencyComposable函式。 - 在此函式的主體中,使用
AndroidViewAPI 納入LowLatencySurfaceView檢視畫面,然後提供fastRendering物件:
MainActivity.kt
import androidx.compose.ui.viewinterop.AndroidView
import com.example.stylus.gl.LowLatencySurfaceView
class MainActivity : ComponentActivity() {
...
@Composable
fun DrawAreaLowLatency(modifier: Modifier = Modifier) {
AndroidView(factory = { context ->
LowLatencySurfaceView(context, fastRenderer = fastRendering)
}, modifier = modifier)
}
- 在
DividerComposable函式後方的onCreate函式,將DrawAreaLowLatencyComposable函式新增至版面配置:
MainActivity.kt
class MainActivity : ComponentActivity() {
   ...
   override fun onCreate(savedInstanceState: Bundle?) {
   ...
   Surface(
      modifier = Modifier
          .fillMaxSize(),
      color = MaterialTheme.colorScheme.background
   ) {
      Column {
          StylusVisualization(
              modifier = Modifier
                  .fillMaxWidth()
                  .height(100.dp)
          )
          Divider(
              thickness = 1.dp,
              color = Color.Black,
          )
          DrawAreaLowLatency()
      }
   }
- 在
gl目錄中開啟LowLatencySurfaceView.kt檔案,然後留意LowLatencySurfaceView類別中的下列內容:
LowLatencySurfaceView類別會擴充SurfaceView類別。這會使用fastRenderer物件的onTouchListener方法。- 呼叫
onAttachedToWindow函式時,請將透過fastRenderer類別提供的GLFrontBufferedRenderer.Callback介面附加至SurfaceView物件,這樣才能將回呼算繪至SurfaceView檢視畫面。 - 呼叫
onDetachedFromWindow函式時,請釋放透過fastRenderer類別提供的GLFrontBufferedRenderer.Callback介面。
LowLatencySurfaceView.kt
class LowLatencySurfaceView(context: Context, private val fastRenderer: FastRenderer) :
   SurfaceView(context) {

   init {
       setOnTouchListener(fastRenderer.onTouchListener)
   }

   override fun onAttachedToWindow() {
       super.onAttachedToWindow()
       fastRenderer.attachSurfaceView(this)
   }

   override fun onDetachedFromWindow() {
       fastRenderer.release()
       super.onDetachedFromWindow()
   }
}
使用 onTouchListener 介面處理 MotionEvent 物件
如要在偵測到 ACTION_DOWN 常數時處理 MotionEvent 物件,請按照下列步驟操作:
- 在
gl目錄中,開啟FastRenderer.kt檔案。 - 在
ACTION_DOWN常數的主體中,建立currentX變數來儲存MotionEvent物件的x座標,以及建立可儲存y座標的currentY變數。 - 建立可儲存
Segment物件的Segment變數,該物件是線條的起點,因此可接受各兩個currentX參數和currentY參數的例項。 - 使用
segment參數呼叫renderFrontBufferedLayer方法,觸發對onDrawFrontBufferedLayer函式的回呼。
FastRenderer.kt
class FastRenderer ( ... ) {
   ...
   val onTouchListener = View.OnTouchListener { view, event ->
   ...
   MotionEvent.ACTION_DOWN -> {
      // Ask that the input system not batch MotionEvent objects,
      // but instead deliver them as soon as they're available.
      view.requestUnbufferedDispatch(event)

      currentX = event.x
      currentY = event.y

      // Create a single point.
      val segment = Segment(currentX, currentY, currentX, currentY)

      frontBufferRenderer?.renderFrontBufferedLayer(segment)
   }
如要在偵測到 ACTION_MOVE 常數時處理 MotionEvent 物件,請按照下列步驟操作:
- 在
ACTION_MOVE常數的主體中,建立可儲存currentX變數的previousX變數,以及可儲存currentY變數的previousY變數。 - 建立可儲存
MotionEvent物件目前x座標的currentX變數,以及可儲存目前y座標的currentY變數。 - 建立
Segment變數,用來儲存可接受previousX、previousY、currentX和currentY參數的Segment物件。 - 使用
segment參數呼叫renderFrontBufferedLayer方法,觸發對onDrawFrontBufferedLayer函式的回呼,並執行 OpenGL 程式碼。
FastRenderer.kt
class FastRenderer ( ... ) {
   ...
   val onTouchListener = View.OnTouchListener { view, event ->
   ...
   MotionEvent.ACTION_MOVE -> {
      previousX = currentX
      previousY = currentY
      currentX = event.x
      currentY = event.y

      val segment = Segment(previousX, previousY, currentX, currentY)

      // Send the short line to front buffered layer: fast rendering
      frontBufferRenderer?.renderFrontBufferedLayer(segment)
   }
- 如要在偵測到
ACTION_UP常數時處理MotionEvent物件,請呼叫commit方法,觸發對onDrawDoubleBufferedLayer函式的呼叫,並執行 OpenGL 程式碼:
FastRenderer.kt
class FastRenderer ( ... ) {
   ...
   val onTouchListener = View.OnTouchListener { view, event ->
   ...
   MotionEvent.ACTION_UP -> {
      frontBufferRenderer?.commit()
   }
實作 GLFrontBufferedRenderer 回呼函式
在 FastRenderer.kt 檔案中,onDrawFrontBufferedLayer 和 onDrawDoubleBufferedLayer 回呼函式會執行 OpenGL 程式碼。在每個回呼函式的開頭,下列 OpenGL 函式會將 Android 資料對應至 OpenGL 工作區:
GLES20.glViewport函式會定義矩形大小,用於算繪畫面。Matrix.orthoM函式會計算ModelViewProjection矩陣。Matrix.multiplyMM函式會執行矩陣乘法,將 Android 資料轉換為 OpenGL 參照,並提供projection矩陣的設定。
FastRenderer.kt
class FastRenderer( ... ) {
    ...
    override fun onDraw[Front/Double]BufferedLayer(
       eglManager: EGLManager,
       bufferInfo: BufferInfo,
       transform: FloatArray,
       params: Collection<Segment>
    ) {
        val bufferWidth = bufferInfo.width
        val bufferHeight = bufferInfo.height

        GLES20.glViewport(0, 0, bufferWidth, bufferHeight)
        // Map Android coordinates to OpenGL coordinates.
        Matrix.orthoM(
           mvpMatrix,
           0,
           0f,
           bufferWidth.toFloat(),
           0f,
           bufferHeight.toFloat(),
           -1f,
           1f
        )

        Matrix.multiplyMM(projection, 0, mvpMatrix, 0, transform, 0)
我們已為您設定好該部分的程式碼,因此您可以專注在執行實際算繪作業的程式碼。onDrawFrontBufferedLayer 回呼函式會算繪畫面中的小區域,並提供類型為 Segment 的 param 值,方便您快速算繪單一線段。LineRenderer 類別是筆刷的 OpenGL 轉譯器,可套用線條的顏色和大小。
如要實作 onDrawFrontBufferedLayer 回呼函式,請按照下列步驟操作:
- 在
FastRenderer.kt檔案中,找到onDrawFrontBufferedLayer回呼函式。 - 在
onDrawFrontBufferedLayer回呼函式的主體中,呼叫obtainRenderer函式來取得LineRenderer例項。 - 使用下列參數呼叫
LineRenderer函式的drawLine方法:
- 先前計算的
projection矩陣。 Segment物件清單,在本例中為單一線段。- 線條的
color。
FastRenderer.kt
import android.graphics.Color
import androidx.core.graphics.toColor

class FastRenderer( ... ) {
...
override fun onDrawFrontBufferedLayer(
   eglManager: EGLManager,
   bufferInfo: BufferInfo,
   transform: FloatArray,
   params: Collection<Segment>
) {
   ...

   Matrix.multiplyMM(projection, 0, mvpMatrix, 0, transform, 0)

   obtainRenderer().drawLine(projection, listOf(param), Color.GRAY.toColor())
}
- 執行應用程式。您會發現在螢幕上繪圖的延遲時間非常短。不過,您仍然需要實作
onDrawDoubleBufferedLayer回呼函式,因此應用程式不會保留該線條。
系統會在 commit 函式後方呼叫 onDrawDoubleBufferedLayer 回呼函式,藉此保留該線條。回呼提供 params 值,其中包含一組 Segment 物件。為保留線條,前緩衝區的所有線段會在雙緩衝區中重播。
如要實作 onDrawDoubleBufferedLayer 回呼函式,請按照下列步驟操作:
- 在
StylusViewModel.kt檔案中找出StylusViewModel類別,然後建立openGlLines變數,用於儲存Segment物件的可變動清單:
StylusViewModel.kt
import com.example.stylus.data.Segment

class StylusViewModel : ViewModel() {
    private var _stylusState = MutableStateFlow(StylusState())
    val stylusState: StateFlow<StylusState> = _stylusState

    val openGlLines = mutableListOf<List<Segment>>()

    private fun requestRendering(stylusState: StylusState) {
- 在
FastRenderer.kt檔案中,找出FastRenderer類別的onDrawDoubleBufferedLayer回呼函式。 - 在
onDrawDoubleBufferedLayer回呼函式的主體中,使用GLES20.glClearColor和GLES20.glClear方法清除螢幕內容,這樣就能從頭開始算繪畫面。接著,請將線條新增至viewModel物件,藉此保留線條:
FastRenderer.kt
class FastRenderer( ... ) {
   ...
   override fun onDrawDoubleBufferedLayer(
      eglManager: EGLManager,
      bufferInfo: BufferInfo,
      transform: FloatArray,
      params: Collection<Segment>
   ) {
      ...
      // Clear the screen with black.
      GLES20.glClearColor(0.0f, 0.0f, 0.0f, 1.0f)
      GLES20.glClear(GLES20.GL_COLOR_BUFFER_BIT)

      viewModel.openGlLines.add(params.toList())
- 建立
for迴圈,為viewModel物件中的每個線條執行疊代和算繪作業:
FastRenderer.kt
class FastRenderer( ... ) {
   ...
   override fun onDrawDoubleBufferedLayer(
      eglManager: EGLManager,
      bufferInfo: BufferInfo,
      transform: FloatArray,
      params: Collection<Segment>
   ) {
      ...
      // Clear the screen with black.
      GLES20.glClearColor(0.0f, 0.0f, 0.0f, 1.0f)
      GLES20.glClear(GLES20.GL_COLOR_BUFFER_BIT)

      viewModel.openGlLines.add(params.toList())

      // Render the entire scene (all lines).
      for (line in viewModel.openGlLines) {
         obtainRenderer().drawLine(projection, line, Color.GRAY.toColor())
      }
   }
- 執行應用程式。您會發現您可以在螢幕上繪圖,且線條會在觸發
ACTION_UP常數後保留。
7. 實作動作預測
您還可以使用 androidx.input 程式庫進一步改善觸控筆的延遲情形。該程式庫會分析觸控筆的軌跡,預測下一個點的位置,並插入該位置進行算繪。
如要設定動作預測功能,請按照下列步驟操作:
- 在
app/build.gradle檔案的依附元件區段中匯入程式庫:
app/build.gradle
...
dependencies {
    ...
    implementation"androidx.input:input-motionprediction:1.0.0-beta01"
- 依序點選「File」>「Sync project with Gradle files」。
- 在
FastRendering.kt檔案的FastRendering類別中,將motionEventPredictor物件宣告為屬性:
FastRenderer.kt
import androidx.input.motionprediction.MotionEventPredictor

class FastRenderer( ... ) {
   ...
   private var frontBufferRenderer: GLFrontBufferedRenderer<Segment>? = null
   private var motionEventPredictor: MotionEventPredictor? = null
- 在
attachSurfaceView函式中,初始化motionEventPredictor變數:
FastRenderer.kt
class FastRenderer( ... ) {
   ...
   fun attachSurfaceView(surfaceView: SurfaceView) {
      frontBufferRenderer = GLFrontBufferedRenderer(surfaceView, this)
      motionEventPredictor = MotionEventPredictor.newInstance(surfaceView)
   }
- 在
onTouchListener變數中呼叫motionEventPredictor?.record方法,讓motionEventPredictor物件取得動作資料:
FastRendering.kt
class FastRenderer( ... ) {
   ...
   val onTouchListener = View.OnTouchListener { view, event ->
      motionEventPredictor?.record(event)
      ...
      when (event?.action) {
下一步是使用 predict 函式預測 MotionEvent 物件。建議的預測時間為收到 ACTION_MOVE 常數時,以及記錄 MotionEvent 物件後。換句話說,您應事先預測筆劃。
- 使用
predict方法預測人工MotionEvent物件。 - 建立
Segment,採用目前的和預測的 x 和 y 座標。 - 使用
frontBufferRenderer?.renderFrontBufferedLayer(predictedSegment)方法,要求快速算繪預測的線段。
FastRendering.kt
class FastRenderer( ... ) {
   ...
   val onTouchListener = View.OnTouchListener { view, event ->
       motionEventPredictor?.record(event)
       ...
       when (event?.action) {
          ...
          MotionEvent.ACTION_MOVE -> {
              ...
              frontBufferRenderer?.renderFrontBufferedLayer(segment)

              val motionEventPredicted = motionEventPredictor?.predict()
              if(motionEventPredicted != null) {
                 val predictedSegment = Segment(currentX, currentY,
       motionEventPredicted.x, motionEventPredicted.y)
                 frontBufferRenderer?.renderFrontBufferedLayer(predictedSegment)
              }

          }
          ...
       }
系統會插入要算繪的預測事件,從而改善延遲情形。
- 執行應用程式,您會發現延遲時間縮短了。
改善延遲狀況後,就能為使用者提供更自然的觸控筆體驗。
8. 恭喜
恭喜!您知道如何專業地處理觸控筆了!
您已學到如何處理 MotionEvent 物件,擷取壓力、方向和傾斜度相關資訊。此外,您也學到如何實作 androidx.graphics 程式庫和 androidx.input 程式庫,從而改善延遲時間。同時實作這些強化功能後,就能打造更自然的觸控筆體驗。