

Gemini Developer API を使用すると、Google の Gemini モデルにアクセスして、会話型チャット、画像生成(Nano Banana を使用)、テキスト、画像、音声、動画の入力に基づくテキスト生成など、最先端の生成 AI 機能を Android アプリに組み込むことができます。
Gemini Pro モデルと Flash モデルにアクセスするには、Firebase AI Logic で Gemini Developer API を使用します。お支払い方法(クレジット カードなど)を登録しなくても利用を開始でき、十分な無料枠が提供されます。少数のユーザーで統合を検証したら、有料プランにアップグレードしてスケーリングできます。
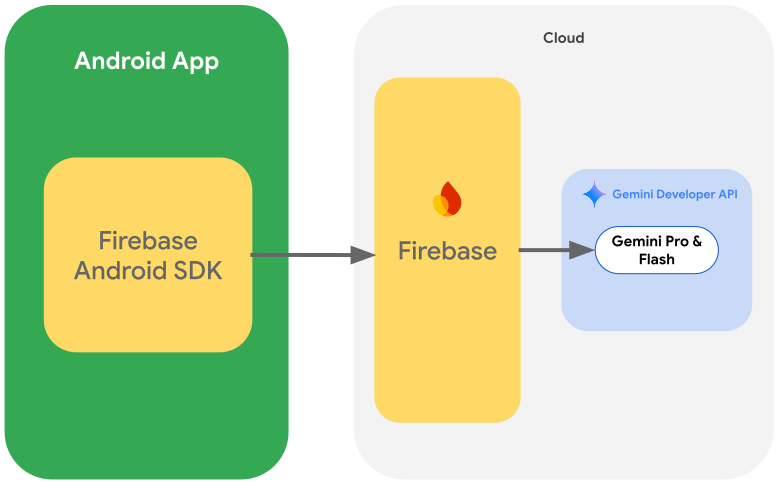
スタートガイド
アプリから Gemini API を直接操作する前に、プロンプトの理解、SDK を使用するための Firebase とアプリの設定など、いくつかの作業を行う必要があります。
プロンプトで試す
プロンプトを試すことで、Android アプリに最適な言い回し、コンテンツ、形式を見つけることができます。Google AI Studio は、アプリのユースケースのプロンプトのプロトタイピングと設計に使用できる統合開発環境(IDE)です。
ユースケースに効果的なプロンプトを作成するには、広範なテストが必要です。これはプロセスの重要な部分です。プロンプトの詳細については、 Firebase のドキュメントをご覧ください。
プロンプトに問題がなければ、<> ボタンをクリックして、コード に追加できるコード スニペットを取得します。
Firebase プロジェクトを設定し、アプリを Firebase に接続する
アプリから API を呼び出す準備ができたら、 Firebase AI Logic スタートガイドの「ステップ 1」の手順に沿って Firebase を設定し、必要な API とサービスを有効にします。
Gradle 依存関係を追加する
アプリ モジュールに次の Gradle 依存関係を追加します。
Kotlin
dependencies {
  // ... other androidx dependencies

  // Import the BoM for the Firebase platform
  implementation(platform("com.google.firebase:firebase-bom:34.19.0"))

  // Add the dependencies for the Firebase AI Logic and App Check libraries
  // When using the BoM, you don't specify versions in Firebase library dependencies
  implementation("com.google.firebase:firebase-ai")
  implementation("com.google.firebase:firebase-appcheck-debug")
}
Java
dependencies {
  // Import the BoM for the Firebase platform
  implementation(platform("com.google.firebase:34.19.0"))

  // Add the dependencies for the Firebase AI Logic and App Check libraries
  // When using the BoM, you don't specify versions in Firebase library dependencies
  implementation("com.google.firebase:firebase-ai")
  implementation("com.google.firebase:firebase-appcheck-debug")

  // Required for one-shot operations (to use `ListenableFuture` from Guava Android)
  implementation("com.google.guava:guava:31.0.1-android")

  // Required for streaming operations (to use `Publisher` from Reactive Streams)
  implementation("org.reactivestreams:reactive-streams:1.0.4")
}
ローカル開発用に App Check デバッグ プロバイダを構成する
2026 年 7 月上旬より、Firebase コンソールの AI Logic のガイド付き設定ワークフローの一環として、Gemini API を保護するために Firebase App Check が自動的に適用されます。ローカル開発では、App Check の適用を維持しながら構成証明をバイパスするように App Check デバッグ プロバイダ を構成する必要があります。
デバッグビルドで、デバッグ プロバイダ ファクトリを使用するように App Check を構成します。
Kotlin
Firebase.initialize(context = this)
Firebase.appCheck.installAppCheckProviderFactory(
    DebugAppCheckProviderFactory.getInstance(),
)
Java
FirebaseApp.initializeApp(/*context=*/ this);
FirebaseAppCheck firebaseAppCheck = FirebaseAppCheck.getInstance();
firebaseAppCheck.installAppCheckProviderFactory(
        DebugAppCheckProviderFactory.getInstance());
デバッグ トークンを取得します。
エミュレータまたはテスト デバイスでアプリを実行します。
ログで App Check デバッグ トークンを探します。例:
D DebugAppCheckProvider: Enter this debug secret into the allow list
in the Firebase Console for your project: 123a4567-b89c-12d3-e456-789012345678
トークンをコピーします(例:
123a4567-b89c-12d3-e456-789012345678)。
App Check にデバッグ トークンを登録します。
Firebase コンソールで、 [セキュリティ] > [App Check] > [アプリ] タブに移動します。
アプリを見つけて、オーバーフロー メニュー ()をクリックし、 [**デバッグ トークンを管理**]を選択します。
画面上の手順に沿ってデバッグ トークンを登録します。
デバッグ プロバイダの詳細(新しいデバッグ トークンを取得する方法など)については、 App Check の公式ドキュメントをご覧ください。
生成モデルを初期化する
まず、GenerativeModel をインスタンス化し、モデル名を指定します。
Kotlin
// Start by instantiating a GenerativeModel and specifying the model name: val model = Firebase.ai(backend = GenerativeBackend.googleAI()) .generativeModel("gemini-3.5-flash")
Java
GenerativeModel firebaseAI = FirebaseAI.getInstance(GenerativeBackend.googleAI()) .generativeModel("gemini-3.5-flash"); GenerativeModelFutures model = GenerativeModelFutures.from(firebaseAI);
Gemini Developer API で使用できるモデルの詳細をご覧ください。モデル パラメータの構成の詳細も併せてご覧ください。
アプリから Gemini Developer API を操作する
SDK を使用するように Firebase とアプリを設定したので、アプリから Gemini Developer API を操作できます。
テキストを生成
テキスト レスポンスを生成するには、プロンプトを指定して generateContent() を呼び出します。
Kotlin
scope.launch { val response = model.generateContent("Write a story about a magic backpack.") }
Java
Content prompt = new Content.Builder() .addText("Write a story about a magic backpack.") .build(); ListenableFuture<GenerateContentResponse> response = model.generateContent(prompt); Futures.addCallback(response, new FutureCallback<GenerateContentResponse>() { @Override public void onSuccess(GenerateContentResponse result) { String resultText = result.getText(); } @Override public void onFailure(Throwable t) { t.printStackTrace(); } }, executor);
画像やその他のメディアからテキストを生成する
テキストと画像やその他のメディアを含むプロンプトからテキストを生成することもできます。generateContent() を呼び出すときに、メディアをインライン データとして渡すことができます。
たとえば、ビットマップを使用するには、image コンテンツ タイプを使用します。
Kotlin
scope.launch { val response = model.generateContent( content { image(bitmap) text("what is the object in the picture?") } ) }
Java
Content content = new Content.Builder() .addImage(bitmap) .addText("what is the object in the picture?") .build(); ListenableFuture<GenerateContentResponse> response = model.generateContent(content); Futures.addCallback(response, new FutureCallback<GenerateContentResponse>() { @Override public void onSuccess(GenerateContentResponse result) { String resultText = result.getText(); } @Override public void onFailure(Throwable t) { t.printStackTrace(); } }, executor);
音声ファイルを渡すには、inlineData コンテンツ タイプを使用します。
Kotlin
scope.launch { val contentResolver = applicationContext.contentResolver contentResolver.openInputStream(audioUri).use { stream -> stream?.let { val bytes = it.readBytes() val prompt = content { inlineData(bytes, "audio/mpeg") // Specify the appropriate audio MIME type text("Transcribe this audio recording.") } val response = model.generateContent(prompt) } } }
Java
ContentResolver resolver = applicationContext.getContentResolver(); try (InputStream stream = resolver.openInputStream(audioUri)) { File audioFile = new File(new URI(audioUri.toString())); int audioSize = (int) audioFile.length(); byte[] audioBytes = new byte[audioSize]; if (stream != null) { stream.read(audioBytes, 0, audioBytes.length); stream.close(); // Provide a prompt that includes audio specified earlier and text Content prompt = new Content.Builder() .addInlineData(audioBytes, "audio/mpeg") // Specify the appropriate audio MIME type .addText("Transcribe what's said in this audio recording.") .build(); // To generate text output, call `generateContent` with the prompt ListenableFuture<GenerateContentResponse> response = model.generateContent(prompt); Futures.addCallback(response, new FutureCallback<GenerateContentResponse>() { @Override public void onSuccess(GenerateContentResponse result) { String text = result.getText(); Log.d(TAG, (text == null) ? "" : text); } @Override public void onFailure(Throwable t) { Log.e(TAG, "Failed to generate a response", t); } }, executor); } else { Log.e(TAG, "Error getting input stream for file."); // Handle the error appropriately } } catch (IOException e) { Log.e(TAG, "Failed to read the audio file", e); } catch (URISyntaxException e) { Log.e(TAG, "Invalid audio file", e); }
動画ファイルを提供するには、引き続き inlineData コンテンツ タイプを使用します。
Kotlin
scope.launch { val contentResolver = applicationContext.contentResolver contentResolver.openInputStream(videoUri).use { stream -> stream?.let { val bytes = it.readBytes() val prompt = content { inlineData(bytes, "video/mp4") // Specify the appropriate video MIME type text("Describe the content of this video") } val response = model.generateContent(prompt) } } }
Java
ContentResolver resolver = applicationContext.getContentResolver(); try (InputStream stream = resolver.openInputStream(videoUri)) { File videoFile = new File(new URI(videoUri.toString())); int videoSize = (int) videoFile.length(); byte[] videoBytes = new byte[videoSize]; if (stream != null) { stream.read(videoBytes, 0, videoBytes.length); stream.close(); // Provide a prompt that includes video specified earlier and text Content prompt = new Content.Builder() .addInlineData(videoBytes, "video/mp4") .addText("Describe the content of this video") .build(); // To generate text output, call generateContent with the prompt ListenableFuture<GenerateContentResponse> response = model.generateContent(prompt); Futures.addCallback(response, new FutureCallback<GenerateContentResponse>() { @Override public void onSuccess(GenerateContentResponse result) { String resultText = result.getText(); System.out.println(resultText); } @Override public void onFailure(Throwable t) { t.printStackTrace(); } }, executor); } } catch (IOException e) { e.printStackTrace(); } catch (URISyntaxException e) { e.printStackTrace(); }
同様に、PDF(application/pdf)ドキュメントとプレーン テキスト(text/plain)ドキュメントを、それぞれの MIME タイプをパラメータとして渡すことで渡すこともできます。
マルチターン チャット
マルチターンの会話もサポートできます。startChat() 関数を使用してチャットを初期化します。必要に応じて、モデルにメッセージ履歴を提供できます。次に、sendMessage() 関数を呼び出してチャット メッセージを送信します。
Kotlin
val chat = model.startChat( history = listOf( content(role = "user") { text("Hello, I have 2 dogs in my house.") }, content(role = "model") { text("Great to meet you. What would you like to know?") } ) ) scope.launch { val response = chat.sendMessage("How many paws are in my house?") }
Java
Content.Builder userContentBuilder = new Content.Builder(); userContentBuilder.setRole("user"); userContentBuilder.addText("Hello, I have 2 dogs in my house."); Content userContent = userContentBuilder.build(); Content.Builder modelContentBuilder = new Content.Builder(); modelContentBuilder.setRole("model"); modelContentBuilder.addText("Great to meet you. What would you like to know?"); Content modelContent = modelContentBuilder.build(); List<Content> history = Arrays.asList(userContent, modelContent); // Initialize the chat ChatFutures chat = model.startChat(history); // Create a new user message Content.Builder messageBuilder = new Content.Builder(); messageBuilder.setRole("user"); messageBuilder.addText("How many paws are in my house?"); Content message = messageBuilder.build(); // Send the message ListenableFuture<GenerateContentResponse> response = chat.sendMessage(message); Futures.addCallback(response, new FutureCallback<GenerateContentResponse>() { @Override public void onSuccess(GenerateContentResponse result) { String resultText = result.getText(); System.out.println(resultText); } @Override public void onFailure(Throwable t) { t.printStackTrace(); } }, executor);
Nano Banana を使用して Android で画像を生成する
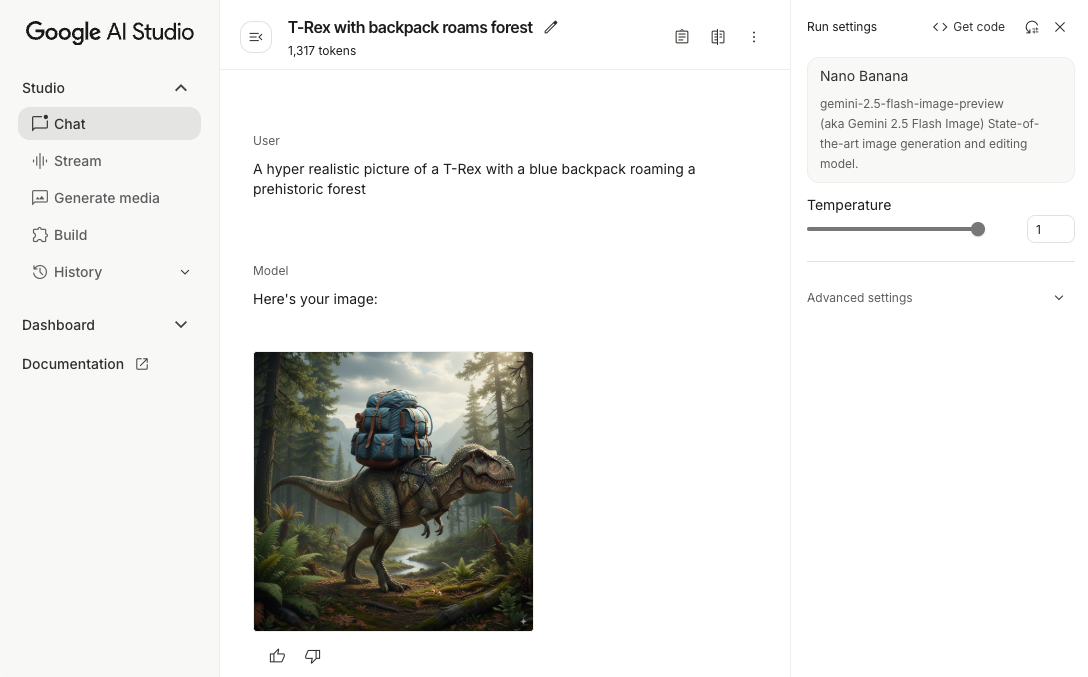
Gemini Image モデル(Nano Banana モデル)は、世界に関する知識と推論を活用して画像を生成、編集できます。コンテキストに関連する画像を生成し、テキストと画像の出力をシームレスにブレンドまたはインターリーブします。 また、長いテキスト シーケンスで正確なビジュアルを生成し、コンテキストを維持しながら会話型の画像編集をサポートします。
このガイドでは、Android 用 Firebase AI Logic SDK を使用して Gemini Image モデル(Nano Banana モデル)を使用する方法について説明します。Gemini で画像を生成する方法の詳細については、 Firebase のドキュメントをご覧ください。
生成モデルを初期化する
GenerativeModel をインスタンス化し、Gemini Image モデル名(gemini-3.1-flash-image など)を指定します。次に、responseModalities を構成して TEXT と IMAGE の両方を含め、インターリーブされたテキストと画像を生成します。TEXT を除外すると、モデルは画像のみを返します。
Kotlin
val model = Firebase.ai(backend = GenerativeBackend.googleAI()).generativeModel( modelName = "gemini-3.1-flash-image", // Configure the model to respond with images (required) and text (optional) generationConfig = generationConfig { responseModalities = listOf( ResponseModality.TEXT, ResponseModality.IMAGE ) } )
Java
GenerativeModel ai = FirebaseAI.getInstance(GenerativeBackend.googleAI()).generativeModel( "gemini-3.1-flash-image", // Configure the model to respond with text and images (required) new GenerationConfig.Builder() .setResponseModalities(Arrays.asList(ResponseModality.TEXT, ResponseModality.IMAGE)) .build() ); GenerativeModelFutures model = GenerativeModelFutures.from(ai);
画像を生成する(テキストのみの入力)
テキストのみのプロンプトを指定して、Gemini モデルに画像を生成するよう指示できます。
Kotlin
scope.launch { // Provide a text prompt instructing the model to generate an image val prompt = "A hyper realistic picture of a t-rex with a blue bag pack roaming a pre-historic forest." // To generate image output, call `generateContent` with the text input val generatedImageAsBitmap: Bitmap? = model.generateContent(prompt) .candidates.first().content.parts.filterIsInstance<ImagePart>() .firstOrNull()?.image }
Java
// Provide a text prompt instructing the model to generate an image Content prompt = new Content.Builder() .addText("Generate an image of the Eiffel Tower with fireworks in the background.") .build(); // To generate an image, call `generateContent` with the text input ListenableFuture<GenerateContentResponse> response = model.generateContent(prompt); Futures.addCallback(response, new FutureCallback<GenerateContentResponse>() { @Override public void onSuccess(GenerateContentResponse result) { // iterate over all the parts in the first candidate in the result object for (Part part : result.getCandidates().get(0).getContent().getParts()) { if (part instanceof ImagePart) { ImagePart imagePart = (ImagePart) part; // The returned image as a bitmap Bitmap generatedImageAsBitmap = imagePart.getImage(); break; } } } @Override public void onFailure(Throwable t) { t.printStackTrace(); } }, executor);
画像を編集する(テキストと画像の入力)
プロンプトにテキストと 1 つ以上の画像を指定して、Gemini モデルに既存の画像を編集するようリクエストできます。
Kotlin
scope.launch { // Provide a text prompt instructing the model to edit the image val prompt = content { image(bitmap) text("Edit this image to make it look like a cartoon") } // To edit the image, call `generateContent` with the prompt (image and text input) val generatedImageAsBitmap: Bitmap? = model.generateContent(prompt) .candidates.first().content.parts.filterIsInstance<ImagePart>().firstOrNull()?.image // Handle the generated text and image }
Java
// Provide an image for the model to edit Bitmap bitmap = BitmapFactory.decodeResource(resources, R.drawable.scones); // Provide a text prompt instructing the model to edit the image Content promptcontent = new Content.Builder() .addImage(bitmap) .addText("Edit this image to make it look like a cartoon") .build(); // To edit the image, call `generateContent` with the prompt (image and text input) ListenableFuture<GenerateContentResponse> response = model.generateContent(promptcontent); Futures.addCallback(response, new FutureCallback<GenerateContentResponse>() { @Override public void onSuccess(GenerateContentResponse result) { // iterate over all the parts in the first candidate in the result object for (Part part : result.getCandidates().get(0).getContent().getParts()) { if (part instanceof ImagePart) { ImagePart imagePart = (ImagePart) part; Bitmap generatedImageAsBitmap = imagePart.getImage(); break; } } } @Override public void onFailure(Throwable t) { t.printStackTrace(); } }, executor);
マルチターン チャットで画像を反復処理して編集する
会話型の画像編集には、マルチターン チャットを使用できます。 これにより、元の画像を再送信しなくても、フォローアップ リクエストで編集を調整できます。
まず、startChat() でチャットを初期化します。必要に応じて、メッセージ履歴を指定します。次に、後続のメッセージに sendMessage() を使用します。
Kotlin
scope.launch { // Create the initial prompt instructing the model to edit the image val prompt = content { image(bitmap) text("Edit this image to make it look like a cartoon") } // Initialize the chat val chat = model.startChat() // To generate an initial response, send a user message with the image and text prompt var response = chat.sendMessage(prompt) // Inspect the returned image var generatedImageAsBitmap: Bitmap? = response .candidates.first().content.parts.filterIsInstance<ImagePart>().firstOrNull()?.image // Follow up requests do not need to specify the image again response = chat.sendMessage("But make it old-school line drawing style") generatedImageAsBitmap = response .candidates.first().content.parts.filterIsInstance<ImagePart>().firstOrNull()?.image }
Java
// Provide an image for the model to edit Bitmap bitmap = BitmapFactory.decodeResource(resources, R.drawable.scones); // Initialize the chat ChatFutures chat = model.startChat(); // Create the initial prompt instructing the model to edit the image Content prompt = new Content.Builder() .setRole("user") .addImage(bitmap) .addText("Edit this image to make it look like a cartoon") .build(); // To generate an initial response, send a user message with the image and text prompt ListenableFuture<GenerateContentResponse> response = chat.sendMessage(prompt); // Extract the image from the initial response ListenableFuture<Bitmap> initialRequest = Futures.transform(response, result -> { for (Part part : result.getCandidates().get(0).getContent().getParts()) { if (part instanceof ImagePart) { ImagePart imagePart = (ImagePart) part; return imagePart.getImage(); } } return null; }, executor); // Follow up requests do not need to specify the image again ListenableFuture<GenerateContentResponse> modelResponseFuture = Futures.transformAsync( initialRequest, generatedImage -> { Content followUpPrompt = new Content.Builder() .addText("But make it old-school line drawing style") .build(); return chat.sendMessage(followUpPrompt); }, executor); // Add a final callback to check the reworked image Futures.addCallback(modelResponseFuture, new FutureCallback<GenerateContentResponse>() { @Override public void onSuccess(GenerateContentResponse result) { for (Part part : result.getCandidates().get(0).getContent().getParts()) { if (part instanceof ImagePart) { ImagePart imagePart = (ImagePart) part; Bitmap generatedImageAsBitmap = imagePart.getImage(); break; } } } @Override public void onFailure(Throwable t) { t.printStackTrace(); } }, executor);
考慮事項と制限事項
次の考慮事項と制限事項に注意してください。
- 出力形式: 画像は PNG として生成され、最大サイズ は 1024 ピクセルです。
- 入力タイプ: モデルは、画像 生成の音声入力または動画入力をサポートしていません。
- 言語サポート: 最適なパフォーマンスを得るには、次の言語を使用してください:
英語 (
en)、メキシコ スペイン語 (es-mx)、日本語 (ja-jp)、中国語(簡体字) (zh-cn)、ヒンディー語 (hi-in)。 - 生成に関する問題:
- 画像生成がトリガーされない場合があり、テキストのみが出力されることがあります。画像出力を明示的に指示してみてください (例: 「画像を生成してください」、「作業時に画像を提供してください」、「画像を更新してください」)。
- モデルの生成が途中で停止することがあります。もう一度お試しいただくか、別のプロンプトをお試しください 。
- モデルがテキストを画像として生成する場合があります。テキスト出力を明示的に指示してみてください (例: 「イラスト付きの説明テキストを生成してください」)。
詳細については、Firebase のドキュメントをご覧ください。
次のステップ
アプリを設定したら、次のステップを検討してください。
- GitHub で Android クイックスタート Firebase サンプルアプリと Android AI サンプル カタログを確認する。
- アプリを本番環境向けに準備する。これには、 不正なクライアントによる Gemini API の不正使用を防ぐために Firebase App Check を設定することが含まれます。
- Firebase AI Logic の詳細については、 Firebase のドキュメントをご覧ください。