

챗봇 또는 에이전트 상호작용과 같이 실시간 및 지연 시간이 짧은 음성 지원이 필요한 애플리케이션의 경우 Gemini Live API 는 Gemini 모델의 입력과 출력을 모두 스트리밍하는 최적화된 방법을 제공합니다. Firebase AI Logic을 사용하면 백엔드 통합 없이 Android 앱에서 바로 Gemini Live API를 호출할 수 있습니다. 이 가이드에서는 Firebase AI Logic을 사용하여 Android 앱에서 Gemini Live API를 사용하는 방법을 보여줍니다.
시작하기
시작하기 전에 앱이 API 수준 23 이상 을 타겟팅하는지 확인하세요.
아직 Firebase 프로젝트를 설정하고 앱을 Firebase에 연결하지 않았다면 설정하세요. 자세한 내용은 Firebase AI Logic 문서를 참고하세요.
Android 프로젝트 설정
Firebase AI Logic 라이브러리 및 앱 체크 종속 항목을 앱 수준
build.gradle.kts 또는 build.gradle 파일에 추가합니다.
Firebase Android BoM을 사용하여 라이브러리 버전을 관리합니다.
dependencies {
  // Import the Firebase BoM
  implementation(platform("com.google.firebase:firebase-bom:34.18.0"))

  // Add the dependencies for the Firebase AI Logic and App Check libraries
  // When using the BoM, you don't specify versions in Firebase library dependencies
  implementation("com.google.firebase:firebase-ai")
  implementation("com.google.firebase:firebase-appcheck-debug")
}
종속 항목을 추가한 후 Android 프로젝트를 Gradle과 동기화합니다.
로컬 개발을 위한 앱 체크 디버그 제공자 구성
2026년 7월 초부터 Firebase Console의 AI Logic 안내 설정 워크플로의 일부로 Gemini API를 보호하기 위해 Firebase 앱 체크가 자동으로 적용됩니다. 로컬 개발의 경우 앱 체크 적용을 유지하면서 증명을 우회하도록 앱 체크 디버그 제공자 를 구성해야 합니다.
디버그 빌드에서 디버그 제공자 팩토리를 사용하도록 앱 체크를 구성합니다.
Kotlin
Firebase.initialize(context = this)
Firebase.appCheck.installAppCheckProviderFactory(
    DebugAppCheckProviderFactory.getInstance(),
)
Java
FirebaseApp.initializeApp(/*context=*/ this);
FirebaseAppCheck firebaseAppCheck = FirebaseAppCheck.getInstance();
firebaseAppCheck.installAppCheckProviderFactory(
        DebugAppCheckProviderFactory.getInstance());
디버그 토큰을 가져옵니다.
에뮬레이터 또는 테스트 기기에서 앱을 실행합니다.
로그에서 앱 체크 디버그 토큰을 찾습니다. 예를 들면 다음과 같습니다.
D DebugAppCheckProvider: Enter this debug secret into the allow list
in the Firebase Console for your project: 123a4567-b89c-12d3-e456-789012345678
토큰 (예:
123a4567-b89c-12d3-e456-789012345678)을 복사합니다.
앱 체크에 디버그 토큰을 등록합니다.
Firebase Console에서 보안 > 앱 체크 > 앱 탭으로 이동합니다.
앱을 찾고 더보기 메뉴 ()를 클릭한 다음 디버그 토큰 관리를 선택합니다.
화면에 표시된 안내에 따라 디버그 토큰을 등록합니다.
새 디버그 토큰을 가져오는 방법을 비롯한 디버그 제공자에 관한 자세한 내용은 공식 앱 체크 문서를 참고하세요.
Firebase AI Logic 통합 및 생성형 모델 초기화
애플리케이션의 AndroidManifest.xml 파일에 RECORD_AUDIO 권한을 추가합니다.
<uses-permission android:name="android.permission.RECORD_AUDIO" />
Gemini Developer API 백엔드 서비스를 초기화하고 LiveModel에 액세스합니다.
gemini-2.5-flash-native-audio-preview-12-2025와 같이 Live API를 지원하는 모델을 사용합니다.
사용 가능한 Live API 모델은 Firebase 문서를 참고하세요.
음성을 지정하려면 음성 이름을
speechConfig 개체 내에서 모델 구성의 일부로 설정합니다. 음성을 지정하지 않는 경우 기본값은 Puck입니다.
Kotlin
// Initialize the `LiveModel` val model = Firebase.ai(backend = GenerativeBackend.googleAI()).liveModel( modelName = "gemini-2.5-flash-native-audio-preview-12-2025", generationConfig = liveGenerationConfig { responseModality = ResponseModality.AUDIO speechConfig = SpeechConfig(voice = Voice("FENRIR")) } )
Java
// Initialize the `LiveModel`
LiveGenerativeModel model = FirebaseAI
       .getInstance(GenerativeBackend.googleAI())
       .liveModel(
              "gemini-2.5-flash-native-audio-preview-12-2025",
              new LiveGenerationConfig.Builder()
                     .setResponseModality(ResponseModality.AUDIO)
                     .setSpeechConfig(new SpeechConfig(new Voice("FENRIR"))
              ).build(),
        null,
        null
);
시스템 안내를 설정하여 모델이 재생하는 페르소나 또는 역할을 선택적으로 정의할 수 있습니다.
Kotlin
val systemInstruction = content { text("You are a helpful assistant, you main role is [...]") } val model = Firebase.ai(backend = GenerativeBackend.googleAI()).liveModel( modelName = "gemini-2.5-flash-native-audio-preview-12-2025", generationConfig = liveGenerationConfig { responseModality = ResponseModality.AUDIO speechConfig = SpeechConfig(voice = Voice("FENRIR")) }, systemInstruction = systemInstruction, )
Java
Content systemInstruction = new Content.Builder()
       .addText("You are a helpful assistant, you main role is [...]")
       .build();

LiveGenerativeModel model = FirebaseAI
       .getInstance(GenerativeBackend.googleAI())
       .liveModel(
              "gemini-2.5-flash-native-audio-preview-12-2025",
              new LiveGenerationConfig.Builder()
                     .setResponseModality(ResponseModality.AUDIO)
                     .setSpeechConfig(new SpeechConfig(new Voice("FENRIR"))
              ).build(),
        tools, // null if you don't want to use function calling
        systemInstruction
);
시스템 안내를 사용하여 앱과 관련된 컨텍스트 (예: 사용자 인앱 활동 내역)를 제공하여 모델과의 대화를 더욱 전문화할 수 있습니다.
Live API 세션 초기화
LiveModel 인스턴스를 만든 후 model.connect()를 호출하여 LiveSession 객체를 만들고 지연 시간이 짧은 스트리밍으로 모델과의 지속적인 연결을 설정합니다. LiveSession 을 사용하면 음성 세션을 시작하고 중지하며 텍스트를 보내고 받아 모델과 상호작용할 수 있습니다.
그런 다음 startAudioConversation()을 호출하여 모델과의 대화를 시작할 수 있습니다.
Kotlin
val session = model.connect() session.startAudioConversation()
Java
LiveModelFutures model = LiveModelFutures.from(liveModel);
ListenableFuture<LiveSession> sessionFuture = model.connect();

Futures.addCallback(sessionFuture, new FutureCallback<LiveSession>() {
    @Override
    public void onSuccess(LiveSession ses) {
        LiveSessionFutures session = LiveSessionFutures.from(ses);
        session.startAudioConversation();
    }
    @Override
    public void onFailure(Throwable t) {
        // Handle exceptions
    }
}, executor);
모델과의 대화에서는 모델이 중단을 처리하지 않습니다. 또한 Live API는 양방향 이므로 동일한 연결을 사용하여 콘텐츠를 보내고 받습니다.
Gemini Live API를 사용하여 다양한 입력 모드에서 오디오를 생성할 수도 있습니다.
- 텍스트 및 오디오 입력을 보냅니다.
- 동영상 입력을 보냅니다 (Firebase 빠른 시작 앱 참고).
함수 호출: Gemini Live API를 앱에 연결
한 단계 더 나아가 함수 호출을 사용하여 모델이 앱의 로직과 직접 상호작용하도록 할 수도 있습니다.
함수 호출 (또는 도구 호출)은 모델이 자체적으로 함수를 호출하여 작업을 실행할 수 있도록 하는 생성형 AI 구현의 기능입니다. 함수에 출력이 있는 경우 모델은 이를 컨텍스트에 추가하고 후속 생성에 사용합니다.
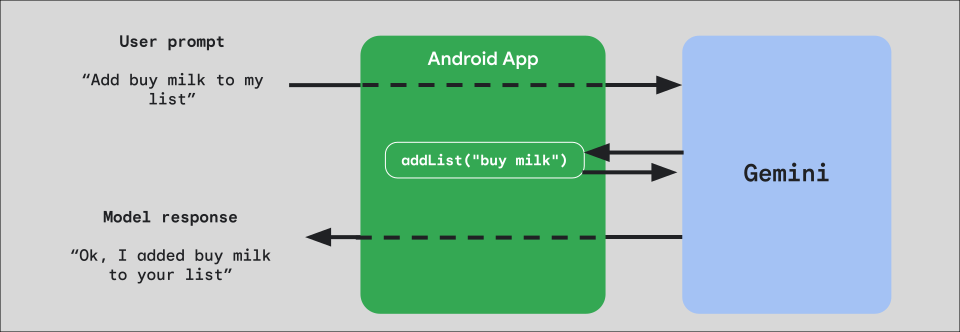
앱에서 함수 호출을 구현하려면 모델에 노출할 각 함수에 대해 FunctionDeclaration 객체를 만듭니다.
예를 들어 문자열 목록에 문자열을 추가하는 addList 함수를 Gemini에 노출하려면 먼저 함수와 매개변수의 이름과 간단한 영어 설명을 사용하여 FunctionDeclaration 변수를 만듭니다.
Kotlin
val itemList = mutableListOf<String>() fun addList(item: String) { itemList.add(item) } val addListFunctionDeclaration = FunctionDeclaration( name = "addList", description = "Function adding an item the list", parameters = mapOf( "item" to Schema.string("A short string describing the item to add to the list") ) )
Java
HashMap<String, Schema> addListParams = new HashMap<String, Schema>(1);

addListParams.put("item", Schema.str("A short string describing the item to add to the list"));

FunctionDeclaration addListFunctionDeclaration = new FunctionDeclaration(
    "addList",
    "Function adding an item the list",
    addListParams,
    Collections.emptyList()
);
그런 다음 인스턴스화할 때 이 FunctionDeclaration을 Tool로 모델에 전달합니다.
Kotlin
val addListTool = Tool.functionDeclarations(listOf(addListFunctionDeclaration)) val model = Firebase.ai(backend = GenerativeBackend.googleAI()).liveModel( modelName = "gemini-2.5-flash-native-audio-preview-12-2025", generationConfig = liveGenerationConfig { responseModality = ResponseModality.AUDIO speechConfig = SpeechConfig(voice = Voice("FENRIR")) }, systemInstruction = systemInstruction, tools = listOf(addListTool) )
Java
LiveGenerativeModel model = FirebaseAI.getInstance(
    GenerativeBackend.googleAI()).liveModel(
        "gemini-2.5-flash-native-audio-preview-12-2025",
  new LiveGenerationConfig.Builder()
        .setResponseModalities(ResponseModality.AUDIO)
        .setSpeechConfig(new SpeechConfig(new Voice("FENRIR")))
        .build(),
  List.of(Tool.functionDeclarations(List.of(addListFunctionDeclaration))),
               null,
               systemInstruction
        );
마지막으로 모델이 실행하는 도구 호출을 처리하고 응답을 다시 전달하는 핸들러 함수를 구현합니다. startAudioConversation을 호출할 때 LiveSession에 제공되는 이 핸들러 함수는 FunctionCallPart 매개변수를 사용하고 FunctionResponsePart를 반환합니다.
Kotlin
session.startAudioConversation(::functionCallHandler) // ... fun functionCallHandler(functionCall: FunctionCallPart): FunctionResponsePart { return when (functionCall.name) { "addList" -> { // Extract function parameter from functionCallPart val itemName = functionCall.args["item"]!!.jsonPrimitive.content // Call function with parameter addList(itemName) // Confirm the function call to the model val response = JsonObject( mapOf( "success" to JsonPrimitive(true), "message" to JsonPrimitive("Item $itemName added to the todo list") ) ) FunctionResponsePart(functionCall.name, response) } else -> { val response = JsonObject( mapOf( "error" to JsonPrimitive("Unknown function: ${functionCall.name}") ) ) FunctionResponsePart(functionCall.name, response) } } }
Java
Futures.addCallback(sessionFuture, new FutureCallback<LiveSessionFutures>() {

    @RequiresPermission(Manifest.permission.RECORD_AUDIO)
    @Override
    @OptIn(markerClass = PublicPreviewAPI.class)
    public void onSuccess(LiveSessionFutures ses) {
        ses.startAudioConversation(::handleFunctionCallFuture);
    }

    @Override
    public void onFailure(Throwable t) {
        // Handle exceptions
    }
}, executor);

// ...

ListenableFuture<JsonObject> handleFunctionCallFuture = Futures.transform(response, result -> {
    for (FunctionCallPart functionCall : result.getFunctionCalls()) {
        if (functionCall.getName().equals("addList")) {
            Map<String, JsonElement> args = functionCall.getArgs();
            String item =
                    JsonElementKt.getContentOrNull(
                            JsonElementKt.getJsonPrimitive(
                                    locationJsonObject.get("item")));
            return addList(item);
        }
    }
    return null;
}, Executors.newSingleThreadExecutor());
다음 단계
- Android AI 카탈로그 샘플 앱에서 Gemini Live API를 사용해 보세요.
- Firebase AI Logic 문서에서 Gemini Live API에 관해 자세히 알아보세요.
- 사용 가능한 Gemini 모델에 관해 자세히 알아보세요.
- 함수 호출에 관해 자세히 알아보세요.
- 프롬프트 디자인 전략을 살펴보세요.