
This document describes the basic NFC tasks you perform in Android. It explains how to send and receive NFC data in the form of NDEF messages and describes the Android framework APIs that support these features. For more advanced topics, including a discussion of working with non-NDEF data, see Advanced NFC.
There are two major use cases when working with NDEF data and Android:
- Reading NDEF data from an NFC tag
- Beaming NDEF messages from one device to another with Android Beam™
Reading NDEF data from an NFC tag is handled with the tag dispatch system, which analyzes discovered NFC tags, appropriately categorizes the data, and starts an application that is interested in the categorized data. An application that wants to handle the scanned NFC tag can declare an intent filter and request to handle the data.
The Android Beam™ feature allows a device to push an NDEF message onto another device by physically tapping the devices together. This interaction provides an easier way to send data than other wireless technologies like Bluetooth, because with NFC, no manual device discovery or pairing is required. The connection is automatically started when two devices come into range. Android Beam is available through a set of NFC APIs, so any application can transmit information between devices. For example, the Contacts, Browser, and YouTube applications use Android Beam to share contacts, web pages, and videos with other devices.
The tag dispatch system
Android-powered devices are usually looking for NFC tags when the screen is unlocked, unless NFC is disabled in the device's Settings menu. When an Android-powered device discovers an NFC tag, the desired behavior is to have the most appropriate activity handle the intent without asking the user what application to use. Because devices scan NFC tags at a very short range, it is likely that making users manually select an activity would force them to move the device away from the tag and break the connection. You should develop your activity to only handle the NFC tags that your activity cares about to prevent the Activity Chooser from appearing.
To help you with this goal, Android provides a special tag dispatch system that analyzes scanned NFC tags, parses them, and tries to locate applications that are interested in the scanned data. It does this by:
- Parsing the NFC tag and figuring out the MIME type or a URI that identifies the data payload in the tag.
- Encapsulating the MIME type or URI and the payload into an intent. These first two steps are described in How NFC tags are mapped to MIME types and URIs.
- Starts an activity based on the intent. This is described in How NFC Tags are Dispatched to Applications.
How NFC tags are mapped to MIME types and URIs
Before you begin writing your NFC applications, it is important to understand the different types of NFC tags, how the tag dispatch system parses NFC tags, and the special work that the tag dispatch system does when it detects an NDEF message. NFC tags come in a wide array of technologies and can also have data written to them in many different ways. Android has the most support for the NDEF standard, which is defined by the NFC Forum.
NDEF data is encapsulated inside a message (NdefMessage) that contains one
or more records (NdefRecord). Each NDEF record must be well-formed according to
the specification of the type of record that you want to create. Android
also supports other types of tags that do not contain NDEF data, which you can work with by using
the classes in the android.nfc.tech package. To learn more
about these technologies, see the Advanced NFC topic. Working with these other types of tags involves
writing your own protocol stack to communicate with the tags, so we recommend using NDEF when
possible for ease of development and maximum support for Android-powered devices.
Note: To download complete NDEF specifications, go to the NFC Forum Specifications & Application Documents site and see Creating common types of NDEF records for examples of how to construct NDEF records.
Now that you have some background in NFC tags, the following sections describe in more detail how
Android handles NDEF formatted tags. When an Android-powered device scans an NFC tag containing NDEF
formatted data, it parses the message and tries to figure out the data's MIME type or identifying
URI. To do this, the system reads the first NdefRecord inside the NdefMessage to determine how to interpret the entire NDEF message (an NDEF message can
have multiple NDEF records). In a well-formed NDEF message, the first NdefRecord
contains the following fields:
- 3-bit TNF (Type Name Format)
- Indicates how to interpret the variable length type field. Valid values are described in Table 1.
- Variable length type
- Describes the type of the record. If using
TNF_WELL_KNOWN, use this field to specify the Record Type Definition (RTD). Valid RTD values are described in Table 2. - Variable length ID
- A unique identifier for the record. This field is not used often, but if you need to uniquely identify a tag, you can create an ID for it.
- Variable length payload
- The actual data payload that you want to read or write. An NDEF message can contain multiple NDEF records, so don't assume the full payload is in the first NDEF record of the NDEF message.
The tag dispatch system uses the TNF and type fields to try to map a MIME type or URI to the
NDEF message. If successful, it encapsulates that information inside of a ACTION_NDEF_DISCOVERED intent along with the actual payload. However, there
are cases when the tag dispatch system cannot determine the type of data based on the first NDEF
record. This happens when the NDEF data cannot be mapped to a MIME type or URI, or when the
NFC tag does not contain NDEF data to begin with. In such cases, a Tag object that has information about the tag's technologies and the payload are
encapsulated inside of a ACTION_TECH_DISCOVERED intent instead.
Table 1 describes how the tag dispatch system maps TNF and type
fields to MIME types or URIs. It also describes which TNFs cannot be mapped to a MIME type or URI.
In these cases, the tag dispatch system falls back to
ACTION_TECH_DISCOVERED.
For example, if the tag dispatch system encounters a record of type TNF_ABSOLUTE_URI, it maps the variable length type field of that record
into a URI. The tag dispatch system encapsulates that URI in the data field of an ACTION_NDEF_DISCOVERED intent along with other information about the tag,
such as the payload. On the other hand, if it encounters a record of type TNF_UNKNOWN, it creates an intent that encapsulates the tag's technologies
instead.
Table 1. Supported TNFs and their mappings
| Type Name Format (TNF) | Mapping |
|---|---|
TNF_ABSOLUTE_URI |
URI based on the type field. | TNF_EMPTY |
Falls back to ACTION_TECH_DISCOVERED. |
TNF_EXTERNAL_TYPE |
URI based on the URN in the type field. The URN is encoded into the NDEF type field in
a shortened form: <domain_name>:<service_name>.
Android maps this to a URI in the form:
vnd.android.nfc://ext/<domain_name>:<service_name>. |
TNF_MIME_MEDIA |
MIME type based on the type field. | TNF_UNCHANGED |
Invalid in the first record, so falls back to
ACTION_TECH_DISCOVERED. |
TNF_UNKNOWN |
Falls back to ACTION_TECH_DISCOVERED. |
TNF_WELL_KNOWN |
MIME type or URI depending on the Record Type Definition (RTD), which you set in the type field. See Table 2 for more information on available RTDs and their mappings. |
Table 2. Supported RTDs for TNF_WELL_KNOWN and their mappings
| Record Type Definition (RTD) | Mapping |
|---|---|
RTD_ALTERNATIVE_CARRIER |
Falls back to ACTION_TECH_DISCOVERED. |
RTD_HANDOVER_CARRIER |
Falls back to ACTION_TECH_DISCOVERED. |
RTD_HANDOVER_REQUEST |
Falls back to ACTION_TECH_DISCOVERED. |
RTD_HANDOVER_SELECT |
Falls back to ACTION_TECH_DISCOVERED. |
RTD_SMART_POSTER |
URI based on parsing the payload. | RTD_TEXT |
MIME type of text/plain. |
RTD_URI |
URI based on payload. |
How NFC tags are dispatched to applications
When the tag dispatch system is done creating an intent that encapsulates the NFC tag and its identifying information, it sends the intent to an interested application that filters for the intent. If more than one application can handle the intent, the Activity Chooser is presented so the user can select the Activity. The tag dispatch system defines three intents, which are listed in order of highest to lowest priority:
-
ACTION_NDEF_DISCOVERED: This intent is used to start an Activity when a tag that contains an NDEF payload is scanned and is of a recognized type. This is the highest priority intent, and the tag dispatch system tries to start an Activity with this intent before any other intent, whenever possible. ACTION_TECH_DISCOVERED: If no activities register to handle theACTION_NDEF_DISCOVEREDintent, the tag dispatch system tries to start an application with this intent. This intent is also directly started (without startingACTION_NDEF_DISCOVEREDfirst) if the tag that is scanned contains NDEF data that cannot be mapped to a MIME type or URI, or if the tag does not contain NDEF data but is of a known tag technology.ACTION_TAG_DISCOVERED: This intent is started if no activities handle theACTION_NDEF_DISCOVEREDorACTION_TECH_DISCOVEREDintents.
The basic way the tag dispatch system works is as follows:
- Try to start an Activity with the intent that was created by the tag dispatch system
when parsing the NFC tag (either
ACTION_NDEF_DISCOVEREDorACTION_TECH_DISCOVERED). - If no activities filter for that intent, try to start an Activity with the next
lowest priority intent (either
ACTION_TECH_DISCOVEREDorACTION_TAG_DISCOVERED) until an application filters for the intent or until the tag dispatch system tries all possible intents. - If no applications filter for any of the intents, do nothing.
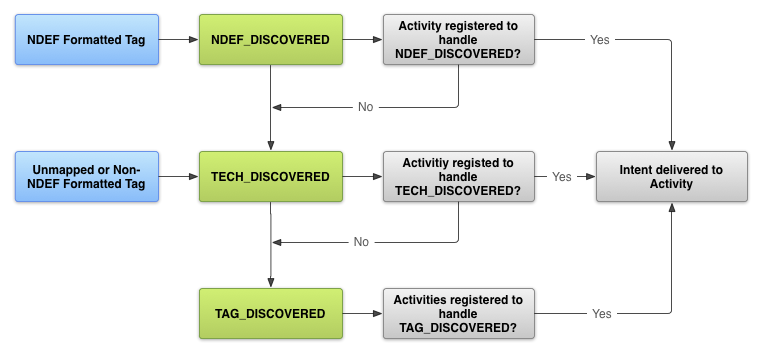
Whenever possible, work with NDEF messages and the ACTION_NDEF_DISCOVERED intent, because it is the most specific out of
the three. This intent allows you to start your application at a more appropriate time than the
other two intents, giving the user a better experience.
Request NFC access in the Android manifest
Before you can access a device's NFC hardware and properly handle NFC intents, declare these
items in your AndroidManifest.xml file:
- The NFC
<uses-permission>element to access the NFC hardware:<uses-permission android:name="android.permission.NFC" />
- The minimum SDK version that your application can support. API level 9 only supports
limited tag dispatch via
ACTION_TAG_DISCOVERED, and only gives access to NDEF messages via theEXTRA_NDEF_MESSAGESextra. No other tag properties or I/O operations are accessible. API level 10 includes comprehensive reader/writer support as well as foreground NDEF pushing, and API level 14 provides an easier way to push NDEF messages to other devices with Android Beam and extra convenience methods to create NDEF records.<uses-sdk android:minSdkVersion="10"/>
- The
uses-featureelement so that your application shows up in Google Play only for devices that have NFC hardware:<uses-feature android:name="android.hardware.nfc" android:required="true" />
If your application uses NFC functionality, but that functionality is not crucial to your application, you can omit the
uses-featureelement and check for NFC availability at runtime by checking to see ifgetDefaultAdapter()isnull.
Filter for NFC intents
To start your application when an NFC tag that you want to handle is scanned, your application
can filter for one, two, or all three of the NFC intents in the Android manifest. However, you
usually want to filter for the ACTION_NDEF_DISCOVERED intent for the
most control of when your application starts. The ACTION_TECH_DISCOVERED intent is a fallback for ACTION_NDEF_DISCOVERED when no applications filter for
ACTION_NDEF_DISCOVERED or for when the payload is not
NDEF. Filtering for ACTION_TAG_DISCOVERED is usually too general of a
category to filter on. Many applications will filter for ACTION_NDEF_DISCOVERED or ACTION_TECH_DISCOVERED before ACTION_TAG_DISCOVERED, so your application has a low probability of
starting. ACTION_TAG_DISCOVERED is only available as a last resort
for applications to filter for in the cases where no other applications are installed to handle the
ACTION_NDEF_DISCOVERED or ACTION_TECH_DISCOVERED intent.
Because NFC tag deployments vary and are many times not under your control, this is not always possible, which is why you can fallback to the other two intents when necessary. When you have control over the types of tags and data written, it is recommended that you use NDEF to format your tags. The following sections describe how to filter for each type of intent.
ACTION_NDEF_DISCOVERED
To filter for ACTION_NDEF_DISCOVERED intents, declare the
intent filter along with the type of data that you want to filter for. The
following example filters for ACTION_NDEF_DISCOVERED
intents with a MIME type of text/plain:
<intent-filter>
    <action android:name="android.nfc.action.NDEF_DISCOVERED"/>
    <category android:name="android.intent.category.DEFAULT"/>
    <data android:mimeType="text/plain" />
</intent-filter>
The following example filters for a URI in the form of
https://developer.android.com/index.html.
<intent-filter>
    <action android:name="android.nfc.action.NDEF_DISCOVERED"/>
    <category android:name="android.intent.category.DEFAULT"/>
   <data android:scheme="https"
              android:host="developer.android.com"
              android:pathPrefix="/index.html" />
</intent-filter>
ACTION_TECH_DISCOVERED
If your activity filters for the ACTION_TECH_DISCOVERED intent,
you must create an XML resource file that specifies the technologies that your activity supports
within a tech-list set. Your activity is
considered a match if a tech-list set is a subset of the technologies that are
supported by the tag, which you can obtain by calling getTechList().
For example, if the tag that is scanned supports MifareClassic, NdefFormatable, and NfcA, your
tech-list set must specify all three, two, or one of the technologies (and nothing
else) in order for your activity to be matched.
The following sample defines all of the technologies. You must remove the ones that are not
supported by your NFC tag. Save this file (you can name it anything you wish) in the
<project-root>/res/xml folder.
<resources xmlns:xliff="urn:oasis:names:tc:xliff:document:1.2">
    <tech-list>
        <tech>android.nfc.tech.IsoDep</tech>
        <tech>android.nfc.tech.NfcA</tech>
        <tech>android.nfc.tech.NfcB</tech>
        <tech>android.nfc.tech.NfcF</tech>
        <tech>android.nfc.tech.NfcV</tech>
        <tech>android.nfc.tech.Ndef</tech>
        <tech>android.nfc.tech.NdefFormatable</tech>
        <tech>android.nfc.tech.MifareClassic</tech>
        <tech>android.nfc.tech.MifareUltralight</tech>
    </tech-list>
</resources>
You can also specify multiple tech-list sets. Each of the tech-list
sets is considered independently, and your activity is considered a match if any single
tech-list set is a subset of the technologies that are returned by getTechList(). This provides AND and OR
semantics for matching technologies. The following example matches tags that can support the
NfcA and Ndef technologies or can support the NfcB and Ndef technologies:
<resources xmlns:xliff="urn:oasis:names:tc:xliff:document:1.2">
    <tech-list>
        <tech>android.nfc.tech.NfcA</tech>
        <tech>android.nfc.tech.Ndef</tech>
    </tech-list>
    <tech-list>
        <tech>android.nfc.tech.NfcB</tech>
        <tech>android.nfc.tech.Ndef</tech>
    </tech-list>
</resources>
In your AndroidManifest.xml file, specify the resource file that you just created
in the <meta-data> element inside the <activity>
element like in the following example:
<activity>
...
<intent-filter>
    <action android:name="android.nfc.action.TECH_DISCOVERED"/>
</intent-filter>

<meta-data android:name="android.nfc.action.TECH_DISCOVERED"
    android:resource="@xml/nfc_tech_filter" />
...
</activity>
For more information about working with tag technologies and the ACTION_TECH_DISCOVERED intent, see Working with Supported Tag
Technologies in the Advanced NFC document.
ACTION_TAG_DISCOVERED
To filter for ACTION_TAG_DISCOVERED use the following intent
filter:
<intent-filter>
    <action android:name="android.nfc.action.TAG_DISCOVERED"/>
</intent-filter>
Obtain information from intents
If an activity starts because of an NFC intent, you can obtain information about the scanned NFC tag from the intent. Intents can contain the following extras depending on the tag that was scanned:
EXTRA_TAG(required): ATagobject representing the scanned tag.EXTRA_NDEF_MESSAGES(optional): An array of NDEF messages parsed from the tag. This extra is mandatory onACTION_NDEF_DISCOVEREDintents.EXTRA_ID(optional): The low-level ID of the tag.
To obtain these extras, check to see if your activity was launched with one of
the NFC intents to ensure that a tag was scanned, and then obtain the extras out of the
intent. The following example checks for the ACTION_NDEF_DISCOVERED
intent and gets the NDEF messages from an intent extra.
Kotlin
override fun onNewIntent(intent: Intent) {
    super.onNewIntent(intent)
    ...
    if (NfcAdapter.ACTION_NDEF_DISCOVERED == intent.action) {
        intent.getParcelableArrayExtra(NfcAdapter.EXTRA_NDEF_MESSAGES)?.also { rawMessages ->
            val messages: List<NdefMessage> = rawMessages.map { it as NdefMessage }
            // Process the messages array.
            ...
        }
    }
}
Java
@Override
protected void onNewIntent(Intent intent) {
    super.onNewIntent(intent);
    ...
    if (NfcAdapter.ACTION_NDEF_DISCOVERED.equals(intent.getAction())) {
        Parcelable[] rawMessages =
            intent.getParcelableArrayExtra(NfcAdapter.EXTRA_NDEF_MESSAGES);
        if (rawMessages != null) {
            NdefMessage[] messages = new NdefMessage[rawMessages.length];
            for (int i = 0; i < rawMessages.length; i++) {
                messages[i] = (NdefMessage) rawMessages[i];
            }
            // Process the messages array.
            ...
        }
    }
}
Alternatively, you can obtain a Tag object from the intent, which will
contain the payload and allow you to enumerate the tag's technologies:
Kotlin
val tag: Tag = intent.getParcelableExtra(NfcAdapter.EXTRA_TAG)
Java
Tag tag = intent.getParcelableExtra(NfcAdapter.EXTRA_TAG);
Create common types of NDEF records
This section describes how to create common types of NDEF records to help you when writing to
NFC tags or sending data with Android Beam. Starting with Android 4.0 (API level 14), the
createUri() method is available to help you create
URI records automatically. Starting in Android 4.1 (API level 16),
createExternal()
and createMime() are available to help you create
MIME and external type NDEF records. Use these helper methods whenever possible to avoid mistakes
when manually creating NDEF records.
This section also describes how to create the corresponding intent filter for the record. All of these NDEF record examples should be in the first NDEF record of the NDEF message that you are writing to a tag or beaming.
TNF_ABSOLUTE_URI
Note: We recommend that you use the
RTD_URI type instead
of TNF_ABSOLUTE_URI, because it is more efficient.
You can create a TNF_ABSOLUTE_URI NDEF record in the following way
:
Kotlin
val uriRecord = ByteArray(0).let { emptyByteArray ->
    NdefRecord(
            TNF_ABSOLUTE_URI,
            "https://developer.android.com/index.html".toByteArray(Charset.forName("US-ASCII")),
            emptyByteArray,
            emptyByteArray
    )
}
Java
NdefRecord uriRecord = new NdefRecord(
    NdefRecord.TNF_ABSOLUTE_URI ,
    "https://developer.android.com/index.html".getBytes(Charset.forName("US-ASCII")),
    new byte[0], new byte[0]);
The intent filter for the previous NDEF record would look like this:
<intent-filter>
    <action android:name="android.nfc.action.NDEF_DISCOVERED" />
    <category android:name="android.intent.category.DEFAULT" />
    <data android:scheme="https"
        android:host="developer.android.com"
        android:pathPrefix="/index.html" />
</intent-filter>
TNF_MIME_MEDIA
You can create a TNF_MIME_MEDIA NDEF record in the following ways:
Using the createMime() method:
Kotlin
val mimeRecord = NdefRecord.createMime(
        "application/vnd.com.example.android.beam",
        "Beam me up, Android".toByteArray(Charset.forName("US-ASCII"))
)
Java
NdefRecord mimeRecord = NdefRecord.createMime("application/vnd.com.example.android.beam",
    "Beam me up, Android".getBytes(Charset.forName("US-ASCII")));
Creating the NdefRecord manually:
Kotlin
val mimeRecord = Charset.forName("US-ASCII").let { usAscii ->
    NdefRecord(
            NdefRecord.TNF_MIME_MEDIA,
            "application/vnd.com.example.android.beam".toByteArray(usAscii),
            ByteArray(0),
            "Beam me up, Android!".toByteArray(usAscii)
    )
}
Java
NdefRecord mimeRecord = new NdefRecord(
    NdefRecord.TNF_MIME_MEDIA ,
    "application/vnd.com.example.android.beam".getBytes(Charset.forName("US-ASCII")),
    new byte[0], "Beam me up, Android!".getBytes(Charset.forName("US-ASCII")));
The intent filter for the previous NDEF record would look like this:
<intent-filter>
    <action android:name="android.nfc.action.NDEF_DISCOVERED" />
    <category android:name="android.intent.category.DEFAULT" />
    <data android:mimeType="application/vnd.com.example.android.beam" />
</intent-filter>
TNF_WELL_KNOWN with RTD_TEXT
You can create a TNF_WELL_KNOWN NDEF record in the following way:
Kotlin
fun createTextRecord(payload: String, locale: Locale, encodeInUtf8: Boolean): NdefRecord {
    val langBytes = locale.language.toByteArray(Charset.forName("US-ASCII"))
    val utfEncoding = if (encodeInUtf8) Charset.forName("UTF-8") else Charset.forName("UTF-16")
    val textBytes = payload.toByteArray(utfEncoding)
    val utfBit: Int = if (encodeInUtf8) 0 else 1 shl 7
    val status = (utfBit + langBytes.size).toChar()
    val data = ByteArray(1 + langBytes.size + textBytes.size)
    data[0] = status.toByte()
    System.arraycopy(langBytes, 0, data, 1, langBytes.size)
    System.arraycopy(textBytes, 0, data, 1 + langBytes.size, textBytes.size)
    return NdefRecord(NdefRecord.TNF_WELL_KNOWN, NdefRecord.RTD_TEXT, ByteArray(0), data)
}
Java
public NdefRecord createTextRecord(String payload, Locale locale, boolean encodeInUtf8) {
    byte[] langBytes = locale.getLanguage().getBytes(Charset.forName("US-ASCII"));
    Charset utfEncoding = encodeInUtf8 ? Charset.forName("UTF-8") : Charset.forName("UTF-16");
    byte[] textBytes = payload.getBytes(utfEncoding);
    int utfBit = encodeInUtf8 ? 0 : (1 << 7);
    char status = (char) (utfBit + langBytes.length);
    byte[] data = new byte[1 + langBytes.length + textBytes.length];
    data[0] = (byte) status;
    System.arraycopy(langBytes, 0, data, 1, langBytes.length);
    System.arraycopy(textBytes, 0, data, 1 + langBytes.length, textBytes.length);
    NdefRecord record = new NdefRecord(NdefRecord.TNF_WELL_KNOWN,
    NdefRecord.RTD_TEXT, new byte[0], data);
    return record;
}
The intent filter for the previous NDEF record would look like this:
<intent-filter>
    <action android:name="android.nfc.action.NDEF_DISCOVERED" />
    <category android:name="android.intent.category.DEFAULT" />
    <data android:mimeType="text/plain" />
</intent-filter>
TNF_WELL_KNOWN with RTD_URI
You can create a TNF_WELL_KNOWN NDEF record in the following ways:
Using the createUri(String) method:
Kotlin
val rtdUriRecord1 = NdefRecord.createUri("https://example.com")
Java
NdefRecord rtdUriRecord1 = NdefRecord.createUri("https://example.com");
Using the createUri(Uri) method:
Kotlin
val rtdUriRecord2 = Uri.parse("https://example.com").let { uri ->
    NdefRecord.createUri(uri)
}
Java
Uri uri = Uri.parse("https://example.com");
NdefRecord rtdUriRecord2 = NdefRecord.createUri(uri);
Creating the NdefRecord manually:
Kotlin
val uriField = "example.com".toByteArray(Charset.forName("US-ASCII"))
val payload = ByteArray(uriField.size + 1)                   //add 1 for the URI Prefix
payload [0] = 0x01                                           //prefixes https://www. to the URI
System.arraycopy(uriField, 0, payload, 1, uriField.size)     //appends URI to payload
val rtdUriRecord = NdefRecord(NdefRecord.TNF_WELL_KNOWN, NdefRecord.RTD_URI, ByteArray(0), payload)
Java
byte[] uriField = "example.com".getBytes(Charset.forName("US-ASCII"));
byte[] payload = new byte[uriField.length + 1];              //add 1 for the URI Prefix
payload[0] = 0x01;                                           //prefixes https://www. to the URI
System.arraycopy(uriField, 0, payload, 1, uriField.length);  //appends URI to payload
NdefRecord rtdUriRecord = new NdefRecord(
    NdefRecord.TNF_WELL_KNOWN, NdefRecord.RTD_URI, new byte[0], payload);
The intent filter for the previous NDEF record would look like this:
<intent-filter>
    <action android:name="android.nfc.action.NDEF_DISCOVERED" />
    <category android:name="android.intent.category.DEFAULT" />
    <data android:scheme="https"
        android:host="example.com"
        android:pathPrefix="" />
</intent-filter>
TNF_EXTERNAL_TYPE
You can create a TNF_EXTERNAL_TYPE NDEF record in the following
ways:
Using the createExternal() method:
Kotlin
var payload: ByteArray //assign to your data
val domain = "com.example" //usually your app's package name
val type = "externalType"
val extRecord = NdefRecord.createExternal(domain, type, payload)
Java
byte[] payload; //assign to your data
String domain = "com.example"; //usually your app's package name
String type = "externalType";
NdefRecord extRecord = NdefRecord.createExternal(domain, type, payload);
Creating the NdefRecord manually:
Kotlin
var payload: ByteArray
...
val extRecord = NdefRecord(
        NdefRecord.TNF_EXTERNAL_TYPE,
        "com.example:externalType".toByteArray(Charset.forName("US-ASCII")),
        ByteArray(0),
        payload
)
Java
byte[] payload;
...
NdefRecord extRecord = new NdefRecord(
    NdefRecord.TNF_EXTERNAL_TYPE, "com.example:externalType".getBytes(Charset.forName("US-ASCII")),
    new byte[0], payload);
The intent filter for the previous NDEF record would look like this:
<intent-filter>
    <action android:name="android.nfc.action.NDEF_DISCOVERED" />
    <category android:name="android.intent.category.DEFAULT" />
    <data android:scheme="vnd.android.nfc"
        android:host="ext"
        android:pathPrefix="/com.example:externalType"/>
</intent-filter>
Use TNF_EXTERNAL_TYPE for more generic NFC tag deployments to better support both
Android-powered and non-Android-powered devices.
Note: URNs for TNF_EXTERNAL_TYPE have a canonical format of:
urn:nfc:ext:example.com:externalType, however the NFC Forum RTD specification
declares that the urn:nfc:ext: portion of the URN must be omitted from the
NDEF record. So all you need to provide is the domain (example.com in the example)
and type (externalType in the example) separated by a colon.
When dispatching TNF_EXTERNAL_TYPE, Android converts the urn:nfc:ext:example.com:externalType
URN to a vnd.android.nfc://ext/example.com:externalType URI, which is what the
intent filter in the example declares.
Android application records
Introduced in Android 4.0 (API level 14), an Android Application Record (AAR) provides a stronger certainty that your application is started when an NFC tag is scanned. An AAR has the package name of an application embedded inside an NDEF record. You can add an AAR to any NDEF record of your NDEF message, because Android searches the entire NDEF message for AARs. If it finds an AAR, it starts the application based on the package name inside the AAR. If the application is not present on the device, Google Play is launched to download the application.
AARs are useful if you want to prevent other applications from filtering for the same intent and potentially handling specific tags that you have deployed. AARs are only supported at the application level, because of the package name constraint, and not at the Activity level as with intent filtering. If you want to handle an intent at the Activity level, use intent filters.
If a tag contains an AAR, the tag dispatch system dispatches in the following manner:
- Try to start an Activity using an intent filter as normal. If the Activity that matches the intent also matches the AAR, start the Activity.
- If the Activity that filters for the intent does not match the AAR, if multiple Activities can handle the intent, or if no Activity handles the intent, start the application specified by the AAR.
- If no application can start with the AAR, go to Google Play to download the application based on the AAR.
Note: You can override AARs and the intent dispatch system with the foreground dispatch system, which allows a foreground activity to have priority when an NFC tag is discovered. With this method, the activity must be in the foreground to override AARs and the intent dispatch system.
If you still want to filter for scanned tags that do not contain an AAR, you can declare intent filters as normal. This is useful if your application is interested in other tags that do not contain an AAR. For example, maybe you want to guarantee that your application handles proprietary tags that you deploy as well as general tags deployed by third parties. Keep in mind that AARs are specific to Android 4.0 devices or later, so when deploying tags, you most likely want to use a combination of AARs and MIME types/URIs to support the widest range of devices. In addition, when you deploy NFC tags, think about how you want to write your NFC tags to enable support for the most devices (Android-powered and other devices). You can do this by defining a relatively unique MIME type or URI to make it easier for applications to distinguish.
Android provides a simple API to create an AAR,
createApplicationRecord(). All you need to
do is embed the AAR anywhere in your NdefMessage. You do not want
to use the first record of your NdefMessage, unless the AAR is the only
record in the NdefMessage. This is because the Android
system checks the first record of an NdefMessage to determine the MIME type or
URI of the tag, which is used to create an intent for applications to filter. The following code
shows you how to create an AAR:
Kotlin
val msg = NdefMessage(
        arrayOf(
                ...,
                NdefRecord.createApplicationRecord("com.example.android.beam")
        )
)
Java
NdefMessage msg = new NdefMessage(
        new NdefRecord[] {
            ...,
            NdefRecord.createApplicationRecord("com.example.android.beam")}
        );
)
Beam NDEF messages to other devices
Android Beam allows simple peer-to-peer data exchange between two Android-powered devices. The application that wants to beam data to another device must be in the foreground and the device receiving the data must not be locked. When the beaming device comes in close enough contact with a receiving device, the beaming device displays the "Touch to Beam" UI. The user can then choose whether or not to beam the message to the receiving device.
Note: Foreground NDEF pushing was available at API level 10,
which provides similar functionality to Android Beam. These APIs have since been deprecated, but
are available to support older devices. See enableForegroundNdefPush() for more information.
You can enable Android Beam for your application by calling one of the two methods:
setNdefPushMessage(): Accepts anNdefMessageto set as the message to beam. Automatically beams the message when two devices are in close enough proximity.setNdefPushMessageCallback(): Accepts a callback that contains acreateNdefMessage()which is called when a device is in range to beam data to. The callback lets you create the NDEF message only when necessary.
An activity can only push one NDEF message at a time, so setNdefPushMessageCallback() takes precedence
over setNdefPushMessage() if both are set. To use
Android Beam, the following general guidelines must be met:
- The activity that is beaming the data must be in the foreground. Both devices must have their screens unlocked.
- You must encapsulate the data that you are beaming in an
NdefMessageobject. - The NFC device that is receiving the beamed data must support the
com.android.nppNDEF push protocol or NFC Forum's SNEP (Simple NDEF Exchange Protocol). Thecom.android.nppprotocol is required for devices on API level 9 (Android 2.3) to API level 13 (Android 3.2).com.android.nppand SNEP are both required on API level 14 (Android 4.0) and later.
Note: If your activity enables Android Beam and is in the foreground, the standard intent dispatch system is disabled. However, if your activity also enables foreground dispatching, then it can still scan tags that match the intent filters set in the foreground dispatching.
To enable Android Beam:
- Create an
NdefMessagethat contains theNdefRecords that you want to push onto the other device. - Call
setNdefPushMessage()with aNdefMessageor callsetNdefPushMessageCallbackpassing in aNfcAdapter.CreateNdefMessageCallbackobject in theonCreate()method of your activity. These methods require at least one activity that you want to enable with Android Beam, along with an optional list of other activities to activate.In general, you normally use
setNdefPushMessage()if your Activity only needs to push the same NDEF message at all times, when two devices are in range to communicate. You usesetNdefPushMessageCallbackwhen your application cares about the current context of the application and wants to push an NDEF message depending on what the user is doing in your application.
The following sample shows how a simple activity calls NfcAdapter.CreateNdefMessageCallback in the onCreate() method of an
activity (see AndroidBeamDemo
for the complete sample). This example also has methods to help you create a MIME record:
Kotlin
package com.example.android.beam

import android.app.Activity
import android.content.Intent
import android.nfc.NdefMessage
import android.nfc.NdefRecord
import android.nfc.NfcAdapter
import android.nfc.NfcAdapter.CreateNdefMessageCallback
import android.nfc.NfcEvent
import android.os.Bundle
import android.os.Parcelable
import android.widget.TextView
import android.widget.Toast
import java.nio.charset.Charset

class Beam : Activity(), NfcAdapter.CreateNdefMessageCallback {

    private var nfcAdapter: NfcAdapter? = null
    private lateinit var textView: TextView

    override fun onCreate(savedInstanceState: Bundle?) {
        super.onCreate(savedInstanceState)
        setContentView(R.layout.main)
        textView = findViewById(R.id.textView)
        // Check for available NFC Adapter
        nfcAdapter = NfcAdapter.getDefaultAdapter(this)
        if (nfcAdapter == null) {
            Toast.makeText(this, "NFC is not available", Toast.LENGTH_LONG).show()
            finish()
            return
        }
        // Register callback
        nfcAdapter?.setNdefPushMessageCallback(this, this)
    }

    override fun createNdefMessage(event: NfcEvent): NdefMessage {
        val text = "Beam me up, Android!\n\n" +
                "Beam Time: " + System.currentTimeMillis()
        return NdefMessage(
                arrayOf(
                        createMime("application/vnd.com.example.android.beam", text.toByteArray())
                )
                /**
                 * The Android Application Record (AAR) is commented out. When a device
                 * receives a push with an AAR in it, the application specified in the AAR
                 * is guaranteed to run. The AAR overrides the tag dispatch system.
                 * You can add it back in to guarantee that this
                 * activity starts when receiving a beamed message. For now, this code
                 * uses the tag dispatch system.
                 *///,NdefRecord.createApplicationRecord("com.example.android.beam")
        )
    }

    override fun onResume() {
        super.onResume()
        // Check to see that the Activity started due to an Android Beam
        if (NfcAdapter.ACTION_NDEF_DISCOVERED == intent.action) {
            processIntent(intent)
        }
    }

    override fun onNewIntent(intent: Intent) {
        // onResume gets called after this to handle the intent
        setIntent(intent)
    }

    /**
     * Parses the NDEF Message from the intent and prints to the TextView
     */
    private fun processIntent(intent: Intent) {
        textView = findViewById(R.id.textView)
        // only one message sent during the beam
        intent.getParcelableArrayExtra(NfcAdapter.EXTRA_NDEF_MESSAGES)?.also { rawMsgs ->
            (rawMsgs[0] as NdefMessage).apply {
                // record 0 contains the MIME type, record 1 is the AAR, if present
                textView.text = String(records[0].payload)
            }
        }
    }
}
Java
package com.example.android.beam;

import android.app.Activity;
import android.content.Intent;
import android.nfc.NdefMessage;
import android.nfc.NdefRecord;
import android.nfc.NfcAdapter;
import android.nfc.NfcAdapter.CreateNdefMessageCallback;
import android.nfc.NfcEvent;
import android.os.Bundle;
import android.os.Parcelable;
import android.widget.TextView;
import android.widget.Toast;
import java.nio.charset.Charset;


public class Beam extends Activity implements CreateNdefMessageCallback {
    NfcAdapter nfcAdapter;
    TextView textView;

    @Override
    public void onCreate(Bundle savedInstanceState) {
        super.onCreate(savedInstanceState);
        setContentView(R.layout.main);
        TextView textView = (TextView) findViewById(R.id.textView);
        // Check for available NFC Adapter
        nfcAdapter = NfcAdapter.getDefaultAdapter(this);
        if (nfcAdapter == null) {
            Toast.makeText(this, "NFC is not available", Toast.LENGTH_LONG).show();
            finish();
            return;
        }
        // Register callback
        nfcAdapter.setNdefPushMessageCallback(this, this);
    }

    @Override
    public NdefMessage createNdefMessage(NfcEvent event) {
        String text = ("Beam me up, Android!\n\n" +
                "Beam Time: " + System.currentTimeMillis());
        NdefMessage msg = new NdefMessage(
                new NdefRecord[] { createMime(
                        "application/vnd.com.example.android.beam", text.getBytes())
         /**
          * The Android Application Record (AAR) is commented out. When a device
          * receives a push with an AAR in it, the application specified in the AAR
          * is guaranteed to run. The AAR overrides the tag dispatch system.
          * You can add it back in to guarantee that this
          * activity starts when receiving a beamed message. For now, this code
          * uses the tag dispatch system.
          */
          //,NdefRecord.createApplicationRecord("com.example.android.beam")
        });
        return msg;
    }

    @Override
    public void onResume() {
        super.onResume();
        // Check to see that the Activity started due to an Android Beam
        if (NfcAdapter.ACTION_NDEF_DISCOVERED.equals(getIntent().getAction())) {
            processIntent(getIntent());
        }
    }

    @Override
    public void onNewIntent(Intent intent) {
        // onResume gets called after this to handle the intent
        setIntent(intent);
    }

    /**
     * Parses the NDEF Message from the intent and prints to the TextView
     */
    void processIntent(Intent intent) {
        textView = (TextView) findViewById(R.id.textView);
        Parcelable[] rawMsgs = intent.getParcelableArrayExtra(
                NfcAdapter.EXTRA_NDEF_MESSAGES);
        // only one message sent during the beam
        NdefMessage msg = (NdefMessage) rawMsgs[0];
        // record 0 contains the MIME type, record 1 is the AAR, if present
        textView.setText(new String(msg.getRecords()[0].getPayload()));
    }
}
Note that this code comments out an AAR, which you can remove. If you enable the AAR, the application specified in the AAR always receives the Android Beam message. If the application is not present, Google Play is started to download the application. Therefore, the following intent filter is not technically necessary for Android 4.0 devices or later if the AAR is used:
<intent-filter>
  <action android:name="android.nfc.action.NDEF_DISCOVERED"/>
  <category android:name="android.intent.category.DEFAULT"/>
  <data android:mimeType="application/vnd.com.example.android.beam"/>
</intent-filter>
With this intent filter, the com.example.android.beam application now can be started
when it scans an NFC tag or receives an Android Beam with an AAR of
type com.example.android.beam, or when an NDEF formatted message contains a MIME record
of type application/vnd.com.example.android.beam.
Even though AARs guarantee an application is started or downloaded, intent filters are recommended, because they let you start an Activity of your choice in your application instead of always starting the main Activity within the package specified by an AAR. AARs do not have Activity level granularity. Also, because some Android-powered devices do not support AARs, you should also embed identifying information in the first NDEF record of your NDEF messages and filter for that as well, just in case. See Creating Common Types of NDEF records for more information on how to create records.