
Android Studio 3.3 (January 2019)
Android Studio 3.3 is a major release that includes a variety of new features and improvements.
3.3.2 (March 2019)
This minor update includes various bug fixes and performance improvements. To see a list of notable bug fixes, read the related post on the Release Updates blog.
3.3.1 (February 2019)
This minor update includes various bug fixes and performance improvements.
IntelliJ IDEA 2018.2.2
The core Android Studio IDE has been updated with improvements from IntelliJ IDEA through the 2018.2.2 release.
Android Gradle plugin updates
For information on what’s new in the Android Gradle plugin, see its release notes.
Navigation Editor
The Navigation Editor lets you quickly visualize and build navigation into your app by using the Navigation Architecture Component.
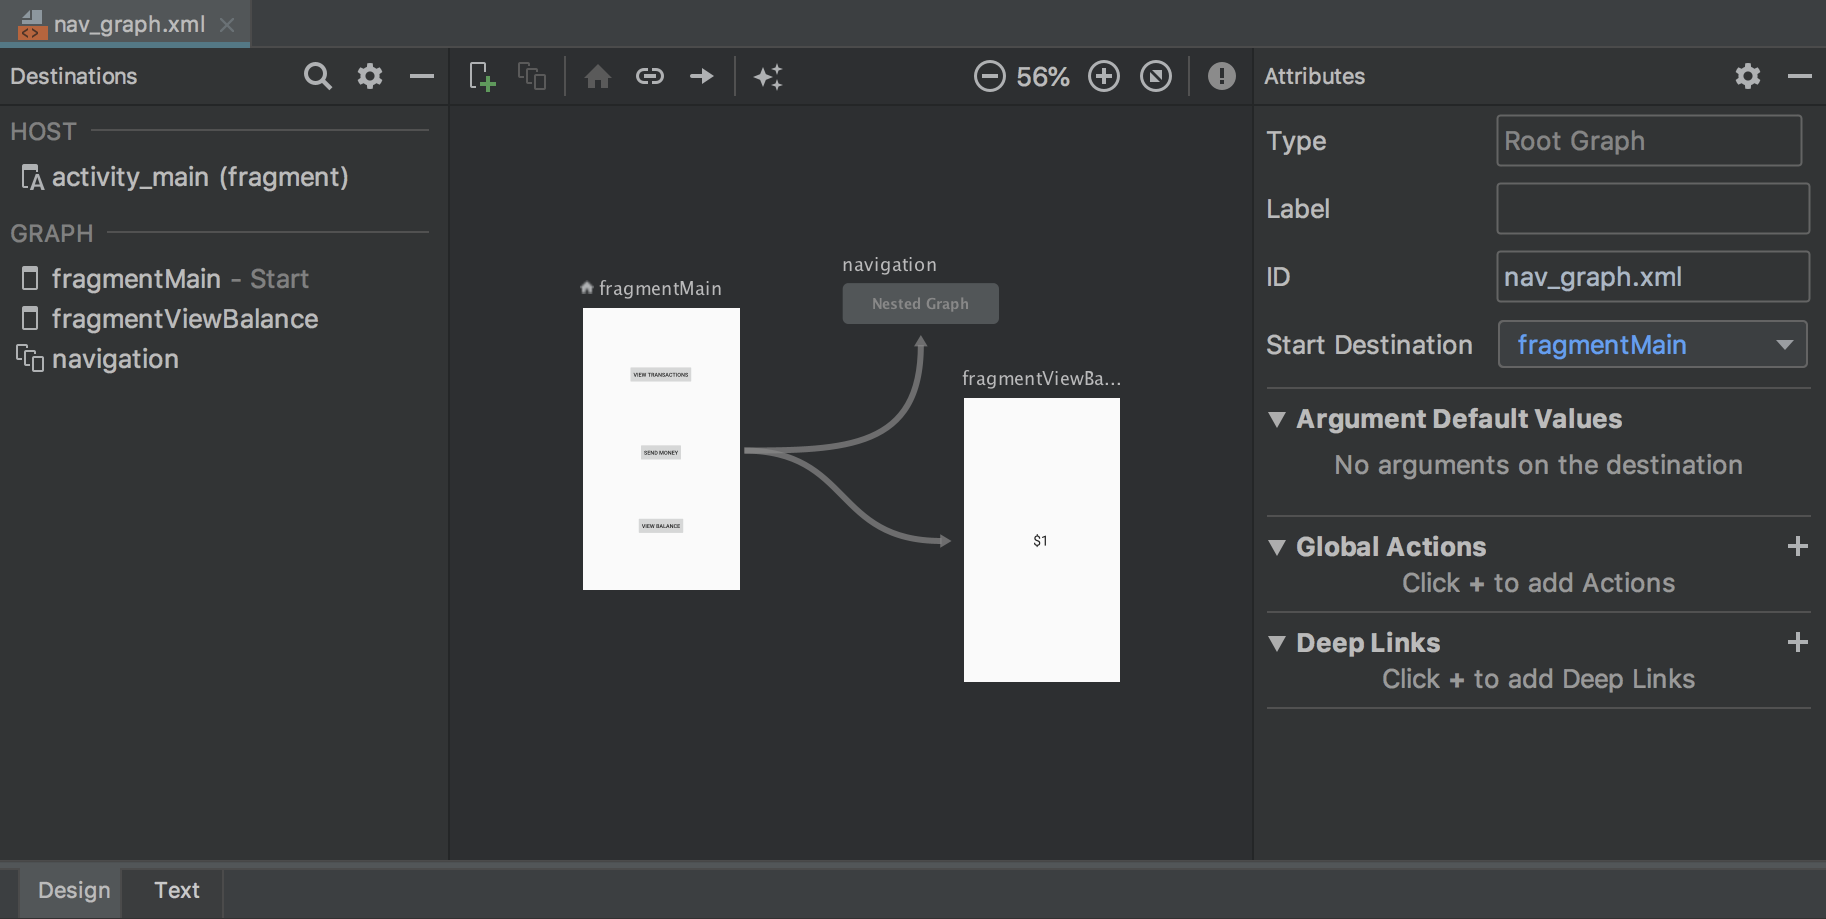
For more information, see Implement navigation with the Navigation Architecture Component.
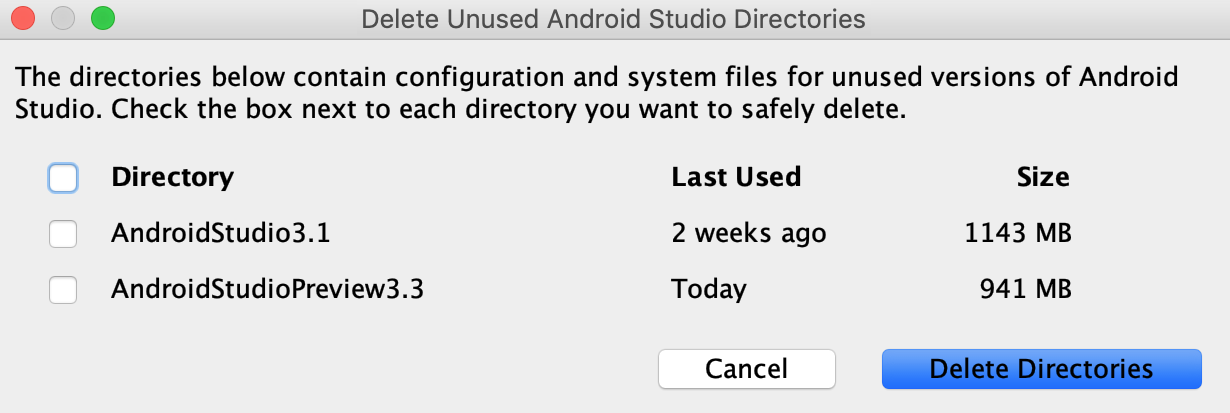
Delete unused Android Studio directories
When you run a major version of Android Studio for the first time, it looks for directories containing caches, settings, indices, and logs for versions of Android Studio for which a corresponding installation can’t be found. The Delete Unused Android Studio Directories dialog then displays locations, sizes, and last-modified times of these unused directories and provides an option to delete them.
The directories Android Studio considers for deletion are listed below:
- Linux:
~/.AndroidStudio[Preview]X.Y - Mac:
~/Library/{Preferences, Caches, Logs, Application Support}/AndroidStudio[Preview]X.Y - Windows:
%USER%.AndroidStudio[Preview]X.Y
Lint improvements
Lint, when invoked from Gradle, is significantly faster—larger projects can expect lint to run up to four times faster.
Create New Project wizard
The Create New Project wizard has a new look and contains updates that help streamline the creation of new Android Studio projects.
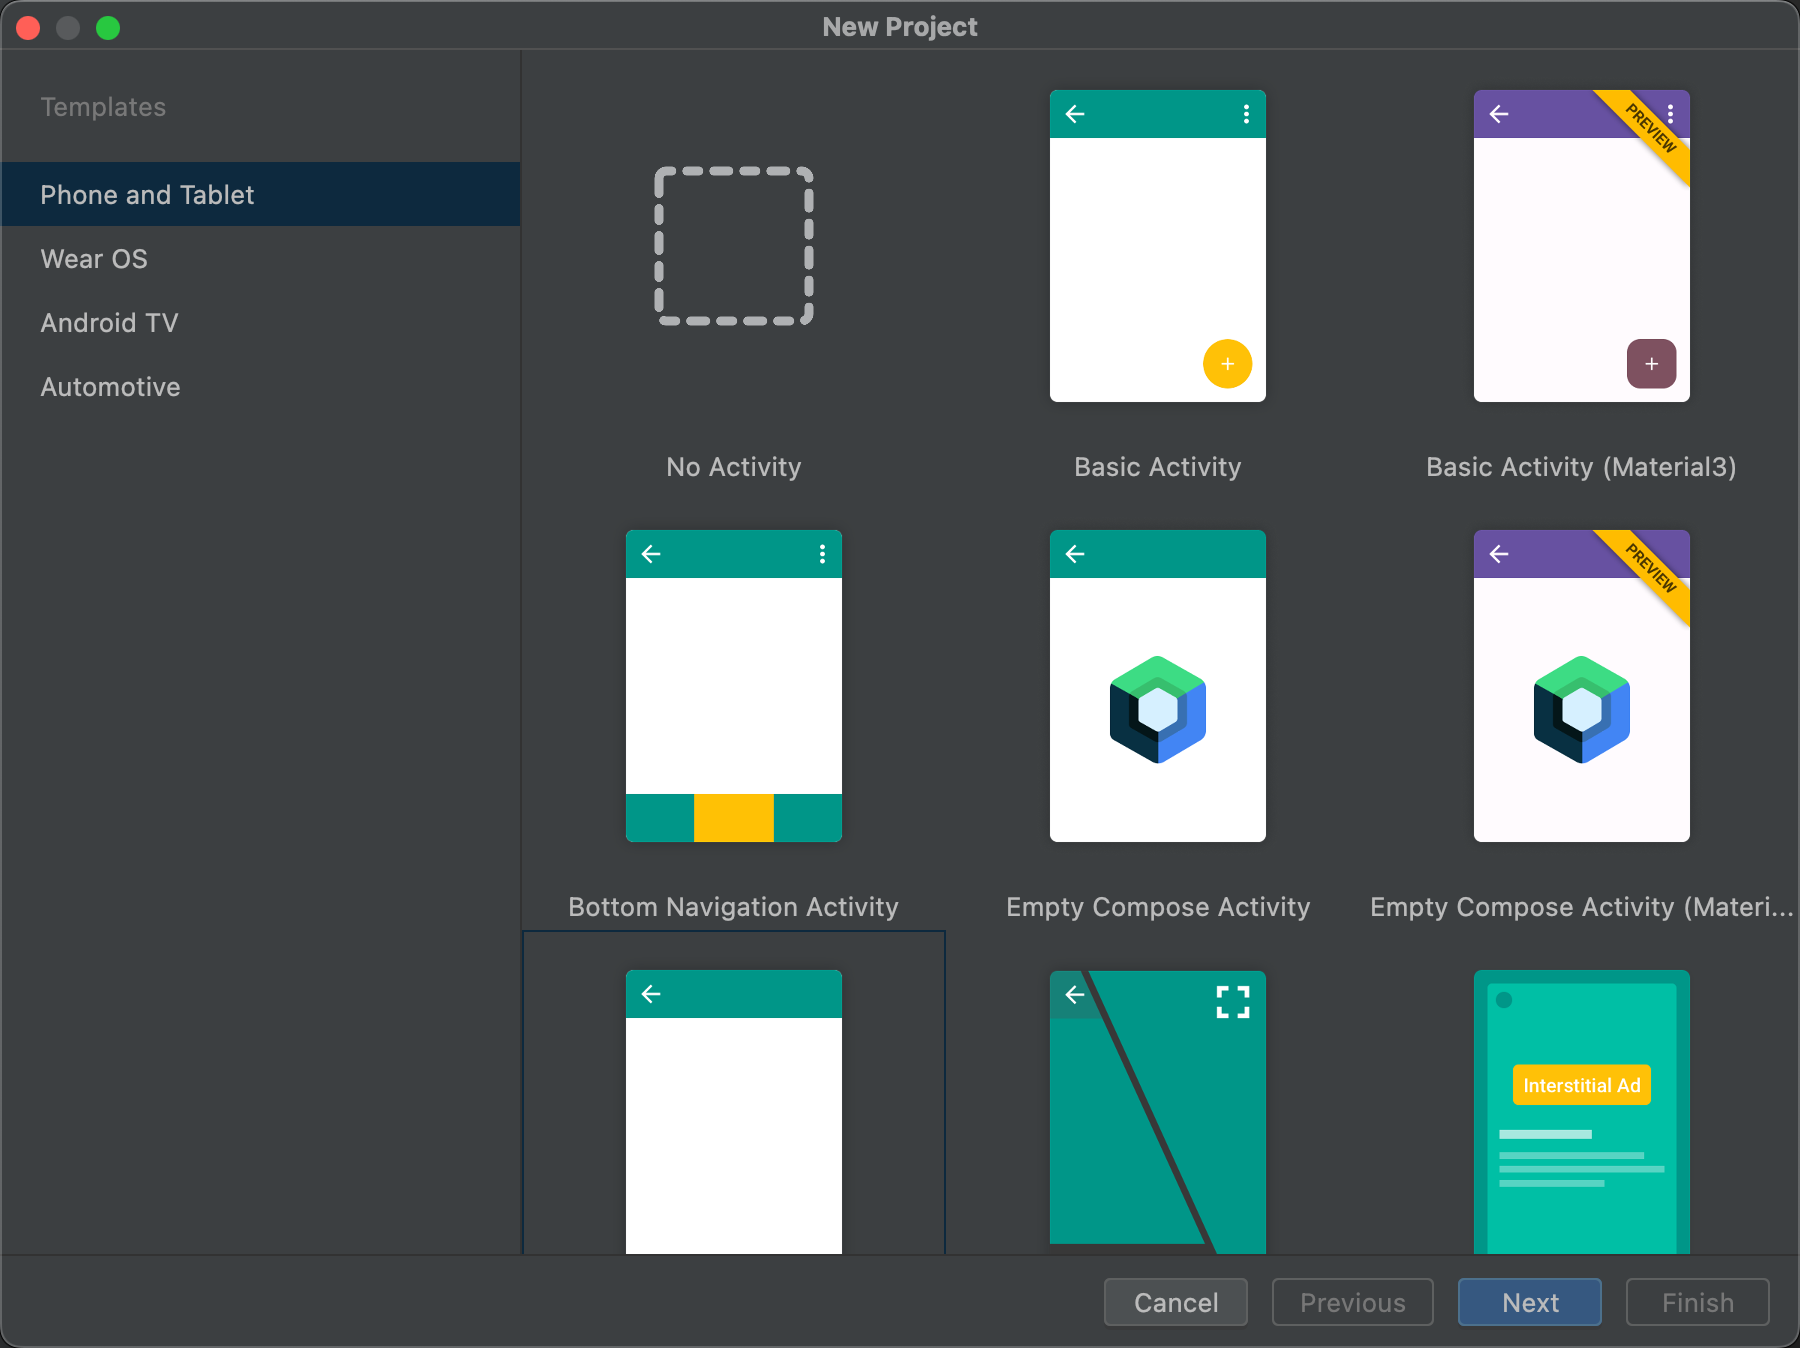
For more information, see Create a project.
Profiler updates
Android Studio 3.3 includes updates to several of the individual profilers.
Improved performance
Based on user feedback, rendering performance while using the profilers has been greatly improved. Please continue to provide feedback, especially if you continue to see performance issues.
Profiler memory allocation tracking options
To improve app performance while profiling, the Memory Profiler now samples memory allocations periodically by default. If desired, you can change this behavior by using the Allocation Tracking dropdown when testing on devices running Android 8.0 (API level 26) or higher.
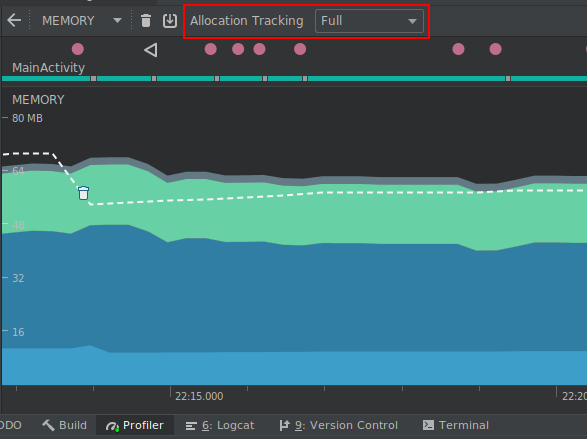
Using the Allocation Tracking dropdown, you can choose from the following modes:
-
Full: captures all object memory allocations. Note that if you have an app that allocates a lot of objects, you might see significant performance issues while profiling.
-
Sampled: captures a periodic sample of object memory allocations. This is the default behavior and has less impact on app performance while profiling. You might encounter some performance issues with apps that allocate a lot of objects within a short time period.
-
Off: turns memory allocation off. If not already selected, this mode is enabled automatically while taking a CPU recording and then returned to the previous setting when the recording is finished. You can change this behavior in the CPU recording configuration dialog.
The tracking affects both Java objects and JNI references.
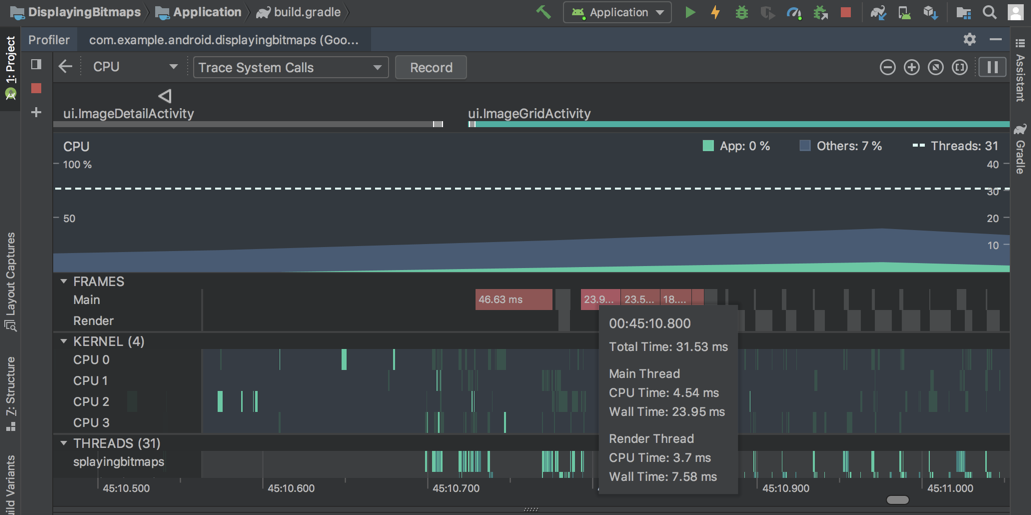
Inspect frame rendering data
In the CPU Profiler, you can now inspect how long it takes your Java app to render each frame on the main UI thread and RenderThread. This data might be useful when investigating bottlenecks that cause UI jank and low framerates. For example, each frame that takes longer than the 16ms required to maintain a smooth framerate is displayed in red.
To see frame rendering data, record a trace using a configuration that allows you to Trace System Calls. After recording the trace, look for info about each frame along the timeline for the recording under the section called FRAMES, as shown below.
To learn more about investigating and fixing framerate issues, read Slow rendering.
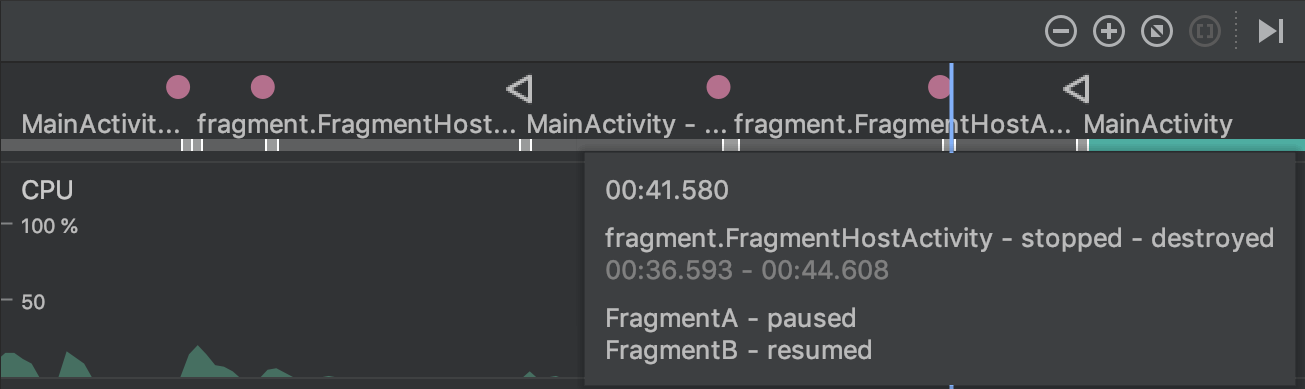
Fragments in the event timeline
The event timeline now shows when fragments are attached and detached. Additionally, when you hover over a fragment, a tooltip shows you the fragment status.
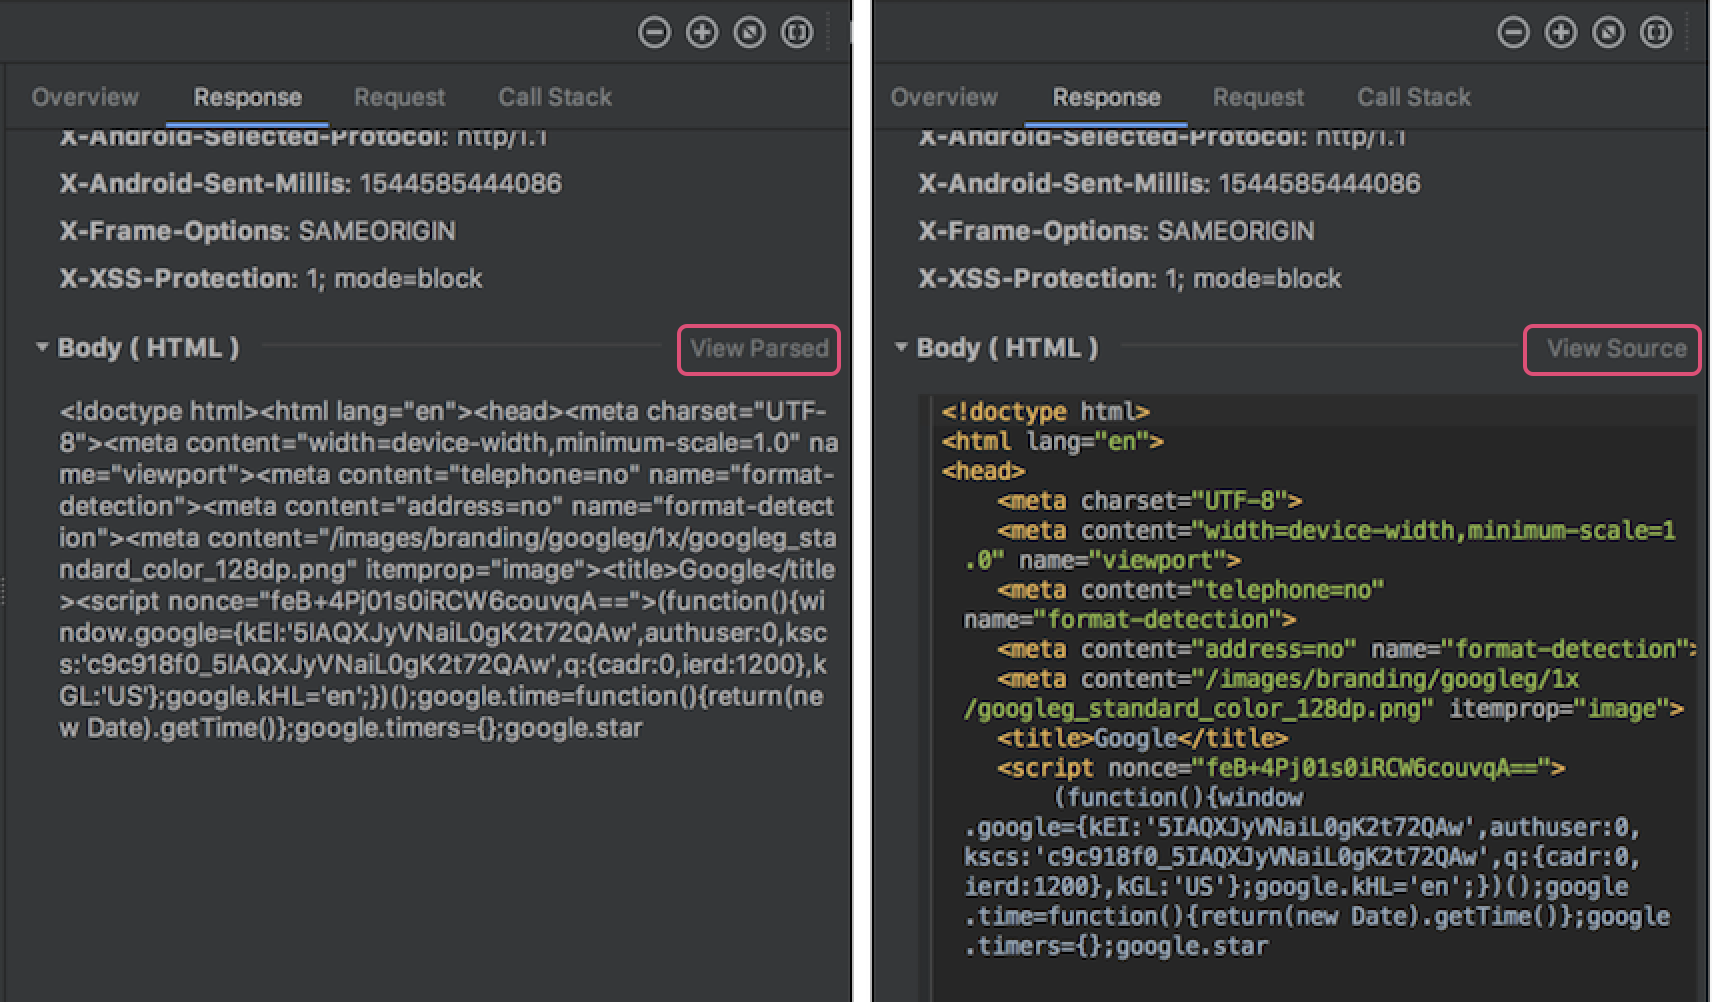
View formatted text for connection payloads in the Network profiler
Previously, the Network profiler displayed only raw text from connection payloads. Android Studio 3.3 now formats certain text types by default, including JSON, XML, and HTML. In the Response and Request tabs, click the View Parsed link to display formatted text, and click the View Source link to display raw text.
For more information, see Inspect network traffic with Network Profiler.
Automatic downloading of SDK components
When your project needs an SDK component from the SDK platforms, NDK, or CMake, Gradle now attempts to automatically download the required packages as long as you’ve previously accepted any related license agreements using the SDK Manager.
For more information, see Auto-download missing packages with Gradle.
Support for Clang-Tidy
Android Studio now includes support for static code analysis using Clang-Tidy for projects that include native code. To enable support for Clang-Tidy, update your NDK to r18 or higher.
You can then enable or re-enable the inspections by opening the Settings or Preferences dialog and navigating to Editor > Inspections > C/C++ > General > Clang-Tidy. When selecting this inspection in the Settings or Preferences dialog, you can also see the list of Clang-Tidy checks that are enabled and disabled under the Option section of the right-most panel. To enable additional checks, add them to the list and click Apply.
To configure Clang-Tidy with additional options, click Configure Clang-Tidy Checks Options and add them in the dialog that opens.
Removal of options for C++ customization
The following options have been removed from the Customize C++ Support dialog:
- Exceptions Support (-fexceptions)
- Runtime Type Information Support (-ftti)
The respective behaviors are enabled for all projects created through Android Studio.
CMake version 3.10.2
CMake version 3.10.2 is now included with SDK Manager. Note that Gradle still uses version 3.6.0 by default.
To specify a CMake version for Gradle to use, add the following to your module’s
build.gradle file:
    android {
        ...
        externalNativeBuild {
            cmake {
                ...
                version "3.10.2"
            }
        }
    }
For more information on configuring CMake in build.gradle, see
Manually configure Gradle.
New “+” syntax to specify minimum CMake versions
When specifying a version of CMake in your main module’s build.gradle file,
you can now append a “+” to match the behavior of CMake’s
cmake_minimum_required()
command.
Caution: Using "+" syntax with other build dependencies is discouraged, as dynamic dependencies can cause unexpected version updates and difficulty resolving version differences.
Android App Bundles now support Instant Apps
Android Studio now lets you build Android App Bundles with full support for Google Play Instant. In other words, you can now build and deploy both installed app and instant experiences from a single Android Studio project and include them in a single Android App Bundle.
If you’re creating a new Android Studio project using the Create New Project dialog, make sure you check the box next to Configure your project > This project will support instant apps. Android Studio then creates a new app project as it normally would, but includes the following properties in your manifest to add Instant app support to your app’s base module:
    <manifest ... xmlns:dist="http://schemas.android.com/apk/distribution">
        <dist:module dist:instant="true" />
        ...
    </manifest>
You can then create an instant-enabled feature module by selecting File > New > New Module from the menu bar and then selecting Instant Dynamic Feature Module from the Create New Module dialog. Keep in mind, creating this module also instant-enables your app’s base module.
To deploy your app to a local device as an instant experience, edit your run configuration and check the box next to General > Deploy as instant app.
Single-variant project sync
Syncing your project with your build configuration is an important step in letting Android Studio understand how your project is structured. However, this process can be time-consuming for large projects. If your project uses multiple build variants, you can now optimize project syncs by limiting them to only the variant you have currently selected.
You need to use Android Studio 3.3 or higher with Android Gradle plugin 3.3.0 or higher to enable this optimization. When you meet these requirements, the IDE prompts you to enable this optimization when you sync your project. The optimization is also enabled by default on new projects.
To enable this optimization manually, click File > Settings > Experimental > Gradle (Android Studio > Preferences > Experimental > Gradle on a Mac) and select the Only sync the active variant checkbox.
Note: This optimization currently supports projects that include only the Java programming language. If, for example, the IDE detects Kotlin or C++ code in your project, it does not automatically enable this optimization, and you should not enable it manually.
For more information, see Enable single-variant project sync.
Provide quick feedback
If you've opted into sharing usage statistics to help improve Android Studio, you'll see these two new icons in the status bar at the bottom of the IDE window:


Simply click the icon that best represents your current experience with the IDE. When you do so, the IDE sends usage statistics that allow the Android Studio team to better understand your sentiment. In some cases, such as when you indicate a negative experience with the IDE, you'll have an opportunity to provide additional feedback.
If you haven't already done so, you can enable sharing usage statistics by opening the Settings dialog Preferences on a Mac), navigating to Appearance & Behavior > System Settings > Data Sharing and checking Send usage statistics to Google.