
When you add a dependency, you might encounter issues with dependencies required by the original dependency, and conflicts among different dependency versions. Here's how to analyze your dependency graph and fix common issues that arise.
For guidance on fixing dependency resolution errors that involve custom build logic, see Custom dependency resolution strategies.
View module dependencies
Some direct dependencies may have dependencies of their own. These are called transitive dependencies. Rather than requiring you to manually declare each transitive dependency, Gradle automatically gathers and adds them for you. The Android plugin for Gradle provides a task that displays a list of the dependencies Gradle resolves for a given module.
For each module, the report also groups the dependencies based on build variant, testing source set, and classpath. The following is sample report for an app module's runtime classpath of its debug build variant and compile classpath of its instrumented test source set.
debugRuntimeClasspath - Dependencies for runtime/packaging
+--- :mylibrary (variant: debug)
+--- com.google.android.material:material:1.0.0@aar
+--- androidx.appcompat:appcompat:1.0.2@aar
+--- androidx.constraintlayout:constraintlayout:1.1.3@aar
+--- androidx.fragment:fragment:1.0.0@aar
+--- androidx.vectordrawable:vectordrawable-animated:1.0.0@aar
+--- androidx.recyclerview:recyclerview:1.0.0@aar
+--- androidx.legacy:legacy-support-core-ui:1.0.0@aar
...

debugAndroidTest
debugAndroidTestCompileClasspath - Dependencies for compilation
+--- androidx.test.ext:junit:1.1.0@aar
+--- androidx.test.espresso:espresso-core:3.1.1@aar
+--- androidx.test:runner:1.1.1@aar
+--- junit:junit:4.12@jar
...
To run the task, proceed as follows:
- Select View > Tool Windows > Gradle (or click
Gradle
 in the tool windows bar).
- Expand AppName > Tasks > android and double-click androidDependencies. After Gradle executes the task, the Run window should open to display the output.
For more information about managing dependencies in Gradle, see Dependency management basics in the Gradle User Guide.
Exclude transitive dependencies
As an app grows in scope, it can contain a number of dependencies including
direct dependencies and transitive dependencies (libraries which your app's
imported libraries depend on).
To exclude transitive dependencies that you no longer need, you can use the
exclude keyword as given below:
Kotlin
dependencies {
    implementation("some-library") {
        exclude(group = "com.example.imgtools", module = "native")
    }
}
Groovy
dependencies {
    implementation('some-library') {
        exclude group: 'com.example.imgtools', module: 'native'
    }
}
Exclude transitive dependencies from test configurations
If you need to exclude certain transitive dependencies from your tests,
the code sample shown above might not work as expected. That's because a test
configuration (e.g., androidTestImplementation) extends the module's
implementation configuration. That is, it always contains implementation
dependencies when Gradle resolves the configuration.
So, to exclude transitive dependencies from your tests, you must do so at execution time as shown below:
Kotlin
android.testVariants.all {
    compileConfiguration.exclude(group = "com.jakewharton.threetenabp", module = "threetenabp")
    runtimeConfiguration.exclude(group = "com.jakewharton.threetenabp", module = "threetenabp")
}
Groovy
android.testVariants.all { variant ->
    variant.getCompileConfiguration().exclude group: 'com.jakewharton.threetenabp', module: 'threetenabp'
    variant.getRuntimeConfiguration().exclude group: 'com.jakewharton.threetenabp', module: 'threetenabp'
}
Note: You can still use the exclude keyword
in the dependencies block as shown in the original code sample from the
Exclude transitive dependencies
section to omit transitive dependencies that are specific to the test
configuration and are not included in other configurations.
Fix dependency resolution errors
When you add multiple dependencies to your app project, those direct and transitive dependencies might conflict with one another. The Android Gradle plugin tries to resolve these conflicts gracefully, but some conflicts may lead to compile time or runtime errors.
To help you investigate which dependencies are contributing to errors, inspect your app's dependency tree and look for dependencies that appear more than once or with conflicting versions.
If you can't easily identify the duplicate dependency, try using Android Studio's UI to search for dependencies that include the duplicate class as follows:
- Select Navigate > Class from the menu bar.
- In the pop-up search dialog, make sure that the box next to Include non-project items is checked.
- Type the name of the class that appears in the build error.
- Inspect the results for the dependencies that include the class.
The following sections describe the different types of dependency resolution errors you may encounter and how to fix them.
Fix duplicate class errors
If a class appears more than once on the runtime classpath, you get an error similar to the following:
Program type already present com.example.MyClass
This error typically occurs due to one of the following circumstances:
- A binary dependency includes a library that your app also includes as a
direct dependency. For example, your app declares a direct dependency on
Library A and Library B, but Library A already includes Library B in its
binary.
- To resolve this issue, remove Library B as a direct dependency.
- Your app has a local binary dependency and a remote binary dependency on the
same library.
- To resolve this issue, remove one of the binary dependencies.
Fix conflicts between classpaths
When Gradle resolves the compile classpath, it first resolves the runtime classpath and uses the result to determine what versions of dependencies should be added to the compile classpath. In other words, the runtime classpath determines the required version numbers for identical dependencies on downstream classpaths.
Your app's runtime classpath also determines the version numbers that Gradle requires for matching dependencies in the runtime classpath for the app's test APK. The hierarchy of classpaths is described in figure 1.
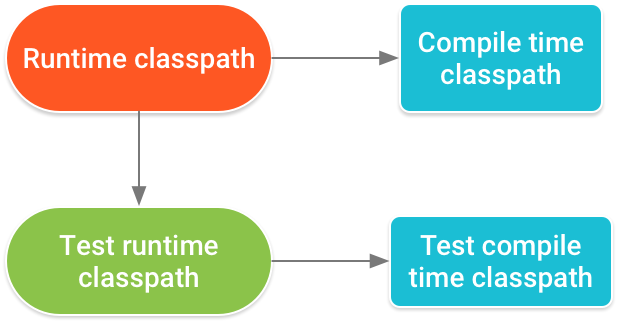
Figure 1. Version numbers of dependencies that appear across multiple classpaths must match according to this hierarchy.
A conflict where different versions of the same dependency appears across
multiple classpaths might occur when, for example, your app includes a version of
a dependency using the implementation
dependency configuration
and a library module includes a different version of the dependency using the
runtimeOnly configuration.
When resolving dependencies on your runtime and compile time classpaths, Android Gradle plugin 3.3.0 and higher attempt to automatically fix certain downstream version conflicts. For example, if the runtime classpath includes Library A version 2.0 and the compile classpath includes Library A version 1.0, the plugin automatically updates the dependency on the compile classpath to Library A version 2.0 to avoid errors.
However, if the runtime classpath includes Library A version 1.0 and the compile classpath includes Library A version 2.0, the plugin does not downgrade the dependency on the compile classpath to Library A version 1.0, and you still get an error similar to the following:
Conflict with dependency 'com.example.library:some-lib:2.0' in project 'my-library'.
Resolved versions for runtime classpath (1.0) and compile classpath (2.0) differ.
To resolve this issue, do one of the following:
- Include the desired version of the dependency as an
apidependency to your library module. That is, only your library module declares the dependency, but the app module will also have access to its API, transitively. - Alternatively, you can declare the dependency in both modules, but you should make sure that each module uses the same version of the dependency. Consider configuring project-wide properties to ensure versions of each dependency remain consistent throughout your project.