
Gemini 開發人員 API 可讓您存取 Google 的 Gemini 模型,在 Android 應用程式中建構最先進的生成式 AI 功能,包括對話式聊天、圖像生成 (使用 Nano Banana),以及根據文字、圖像、音訊和影片輸入內容生成文字。
如要存取 Gemini Pro 和 Flash 模型,可以使用 Gemini Developer API 搭配 Firebase AI Logic。您無須提供信用卡即可開始使用,而且還能享有超值的免費方案。向少量使用者驗證整合項目後,即可切換至付費層級,擴大規模。

開始使用
直接從應用程式與 Gemini API 互動前,您需要先完成幾項操作,包括熟悉提示,以及設定 Firebase 和應用程式以使用 SDK。
測試提示
您可以透過實驗提示,找出最適合 Android 應用程式的措辭、內容和格式。Google AI Studio 是一個整合式開發環境 (IDE),可用於為應用程式的使用情境設計提示原型。
為您的用途建立有效的提示需要進行大量實驗,這是整個過程的關鍵環節。如要進一步瞭解提示,請參閱 Firebase 說明文件。
確定提示沒問題後,按一下「<>」按鈕,即可取得可新增至程式碼的程式碼片段。
設定 Firebase 專案,並將應用程式連結至 Firebase
準備好從應用程式呼叫 API 後,請按照 Firebase AI Logic 入門指南「步驟 1」中的操作說明,在應用程式中設定 Firebase 和 SDK。
新增 Gradle 依附元件
將下列 Gradle 依附元件新增至應用程式模組:
Kotlin
dependencies {
  // ... other androidx dependencies

  // Import the BoM for the Firebase platform
  implementation(platform("com.google.firebase:firebase-bom:34.14.1"))

  // Add the dependency for the Firebase AI Logic library When using the BoM,
  // you don't specify versions in Firebase library dependencies
  implementation("com.google.firebase:firebase-ai")
}
Java
dependencies {
  // Import the BoM for the Firebase platform
  implementation(platform("com.google.firebase:34.14.1"))

  // Add the dependency for the Firebase AI Logic library When using the BoM,
  // you don't specify versions in Firebase library dependencies
  implementation("com.google.firebase:firebase-ai")

  // Required for one-shot operations (to use `ListenableFuture` from Guava
  // Android)
  implementation("com.google.guava:guava:31.0.1-android")

  // Required for streaming operations (to use `Publisher` from Reactive
  // Streams)
  implementation("org.reactivestreams:reactive-streams:1.0.4")
}
初始化生成式模型
首先,請例項化 GenerativeModel 並指定模型名稱:
Kotlin
// Start by instantiating a GenerativeModel and specifying the model name: val model = Firebase.ai(backend = GenerativeBackend.googleAI()) .generativeModel("gemini-2.5-flash")
Java
GenerativeModel firebaseAI = FirebaseAI.getInstance(GenerativeBackend.googleAI()) .generativeModel("gemini-2.5-flash"); GenerativeModelFutures model = GenerativeModelFutures.from(firebaseAI);
進一步瞭解可搭配 Gemini Developer API 使用的模型。您也可以進一步瞭解如何設定模型參數。
從應用程式與 Gemini Developer API 互動
您已設定 Firebase 和應用程式來使用 SDK,現在可以從應用程式與 Gemini Developer API 互動。
生成文字
如要生成文字回覆,請使用提示呼叫 generateContent()。
Kotlin
scope.launch { val response = model.generateContent("Write a story about a magic backpack.") }
Java
Content prompt = new Content.Builder() .addText("Write a story about a magic backpack.") .build(); ListenableFuture<GenerateContentResponse> response = model.generateContent(prompt); Futures.addCallback(response, new FutureCallback<GenerateContentResponse>() { @Override public void onSuccess(GenerateContentResponse result) { String resultText = result.getText(); } @Override public void onFailure(Throwable t) { t.printStackTrace(); } }, executor);
從圖片和其他媒體生成文字
您也可以根據提示詞生成文字,提示詞可包含文字、圖片或其他媒體。呼叫 generateContent() 時,您可以將媒體做為內嵌資料傳遞。
舉例來說,如要使用點陣圖,請使用 image 內容類型:
Kotlin
scope.launch { val response = model.generateContent( content { image(bitmap) text("what is the object in the picture?") } ) }
Java
Content content = new Content.Builder() .addImage(bitmap) .addText("what is the object in the picture?") .build(); ListenableFuture<GenerateContentResponse> response = model.generateContent(content); Futures.addCallback(response, new FutureCallback<GenerateContentResponse>() { @Override public void onSuccess(GenerateContentResponse result) { String resultText = result.getText(); } @Override public void onFailure(Throwable t) { t.printStackTrace(); } }, executor);
如要傳遞音訊檔案,請使用 inlineData 內容類型:
Kotlin
scope.launch { val contentResolver = applicationContext.contentResolver contentResolver.openInputStream(audioUri).use { stream -> stream?.let { val bytes = it.readBytes() val prompt = content { inlineData(bytes, "audio/mpeg") // Specify the appropriate audio MIME type text("Transcribe this audio recording.") } val response = model.generateContent(prompt) } } }
Java
ContentResolver resolver = applicationContext.getContentResolver(); try (InputStream stream = resolver.openInputStream(audioUri)) { File audioFile = new File(new URI(audioUri.toString())); int audioSize = (int) audioFile.length(); byte[] audioBytes = new byte[audioSize]; if (stream != null) { stream.read(audioBytes, 0, audioBytes.length); stream.close(); // Provide a prompt that includes audio specified earlier and text Content prompt = new Content.Builder() .addInlineData(audioBytes, "audio/mpeg") // Specify the appropriate audio MIME type .addText("Transcribe what's said in this audio recording.") .build(); // To generate text output, call `generateContent` with the prompt ListenableFuture<GenerateContentResponse> response = model.generateContent(prompt); Futures.addCallback(response, new FutureCallback<GenerateContentResponse>() { @Override public void onSuccess(GenerateContentResponse result) { String text = result.getText(); Log.d(TAG, (text == null) ? "" : text); } @Override public void onFailure(Throwable t) { Log.e(TAG, "Failed to generate a response", t); } }, executor); } else { Log.e(TAG, "Error getting input stream for file."); // Handle the error appropriately } } catch (IOException e) { Log.e(TAG, "Failed to read the audio file", e); } catch (URISyntaxException e) { Log.e(TAG, "Invalid audio file", e); }
如要提供影片檔案,請繼續使用 inlineData 內容類型:
Kotlin
scope.launch { val contentResolver = applicationContext.contentResolver contentResolver.openInputStream(videoUri).use { stream -> stream?.let { val bytes = it.readBytes() val prompt = content { inlineData(bytes, "video/mp4") // Specify the appropriate video MIME type text("Describe the content of this video") } val response = model.generateContent(prompt) } } }
Java
ContentResolver resolver = applicationContext.getContentResolver(); try (InputStream stream = resolver.openInputStream(videoUri)) { File videoFile = new File(new URI(videoUri.toString())); int videoSize = (int) videoFile.length(); byte[] videoBytes = new byte[videoSize]; if (stream != null) { stream.read(videoBytes, 0, videoBytes.length); stream.close(); // Provide a prompt that includes video specified earlier and text Content prompt = new Content.Builder() .addInlineData(videoBytes, "video/mp4") .addText("Describe the content of this video") .build(); // To generate text output, call generateContent with the prompt ListenableFuture<GenerateContentResponse> response = model.generateContent(prompt); Futures.addCallback(response, new FutureCallback<GenerateContentResponse>() { @Override public void onSuccess(GenerateContentResponse result) { String resultText = result.getText(); System.out.println(resultText); } @Override public void onFailure(Throwable t) { t.printStackTrace(); } }, executor); } } catch (IOException e) { e.printStackTrace(); } catch (URISyntaxException e) { e.printStackTrace(); }
同樣地,您也可以傳遞 PDF (application/pdf) 和純文字 (text/plain) 文件,方法是將各自的 MIME 類型做為參數傳遞。
多輪對話
您也可以支援多輪對話。使用 startChat() 函式初始化即時通訊。您可以視需要提供模型訊息記錄。然後呼叫 sendMessage() 函式傳送即時通訊訊息。
Kotlin
val chat = model.startChat( history = listOf( content(role = "user") { text("Hello, I have 2 dogs in my house.") }, content(role = "model") { text("Great to meet you. What would you like to know?") } ) ) scope.launch { val response = chat.sendMessage("How many paws are in my house?") }
Java
Content.Builder userContentBuilder = new Content.Builder(); userContentBuilder.setRole("user"); userContentBuilder.addText("Hello, I have 2 dogs in my house."); Content userContent = userContentBuilder.build(); Content.Builder modelContentBuilder = new Content.Builder(); modelContentBuilder.setRole("model"); modelContentBuilder.addText("Great to meet you. What would you like to know?"); Content modelContent = modelContentBuilder.build(); List<Content> history = Arrays.asList(userContent, modelContent); // Initialize the chat ChatFutures chat = model.startChat(history); // Create a new user message Content.Builder messageBuilder = new Content.Builder(); messageBuilder.setRole("user"); messageBuilder.addText("How many paws are in my house?"); Content message = messageBuilder.build(); // Send the message ListenableFuture<GenerateContentResponse> response = chat.sendMessage(message); Futures.addCallback(response, new FutureCallback<GenerateContentResponse>() { @Override public void onSuccess(GenerateContentResponse result) { String resultText = result.getText(); System.out.println(resultText); } @Override public void onFailure(Throwable t) { t.printStackTrace(); } }, executor);
在 Android 裝置上使用 Nano Banana 生成圖像
Gemini 2.5 Flash Image 模型 (又稱 Nano Banana) 可運用世界知識和推理能力生成及編輯圖像。生成與情境相關的圖片,並無縫混合或交錯顯示文字和圖片輸出內容。此外,Gemini 還能根據長篇文字序列生成準確的圖像,並支援對話式圖像編輯,同時保留脈絡。
除了 Gemini,您也可以使用 Imagen 模型,特別是需要生成高品質圖像,且要求照片寫實、藝術細節或特定風格時。不過,對於 Android 應用程式的大多數用戶端用途而言,Gemini 已經綽綽有餘。
本指南說明如何使用 Android 適用的 Firebase AI Logic SDK,透過 Gemini 2.5 Flash Image 模型 (Nano Banana) 執行圖片相關工作。如要進一步瞭解如何使用 Gemini 生成圖片,請參閱「在 Firebase 上使用 Gemini 生成圖片」說明文件。如要使用 Imagen 模型,請參閱說明文件。
初始化生成式模型
例項化 GenerativeModel 並指定模型名稱
gemini-2.5-flash-image-preview。確認您設定 responseModalities 時,同時納入 TEXT 和 IMAGE。
Kotlin
val model = Firebase.ai(backend = GenerativeBackend.googleAI()).generativeModel( modelName = "gemini-2.5-flash-image-preview", // Configure the model to respond with text and images (required) generationConfig = generationConfig { responseModalities = listOf( ResponseModality.TEXT, ResponseModality.IMAGE ) } )
Java
GenerativeModel ai = FirebaseAI.getInstance(GenerativeBackend.googleAI()).generativeModel( "gemini-2.5-flash-image-preview", // Configure the model to respond with text and images (required) new GenerationConfig.Builder() .setResponseModalities(Arrays.asList(ResponseModality.TEXT, ResponseModality.IMAGE)) .build() ); GenerativeModelFutures model = GenerativeModelFutures.from(ai);
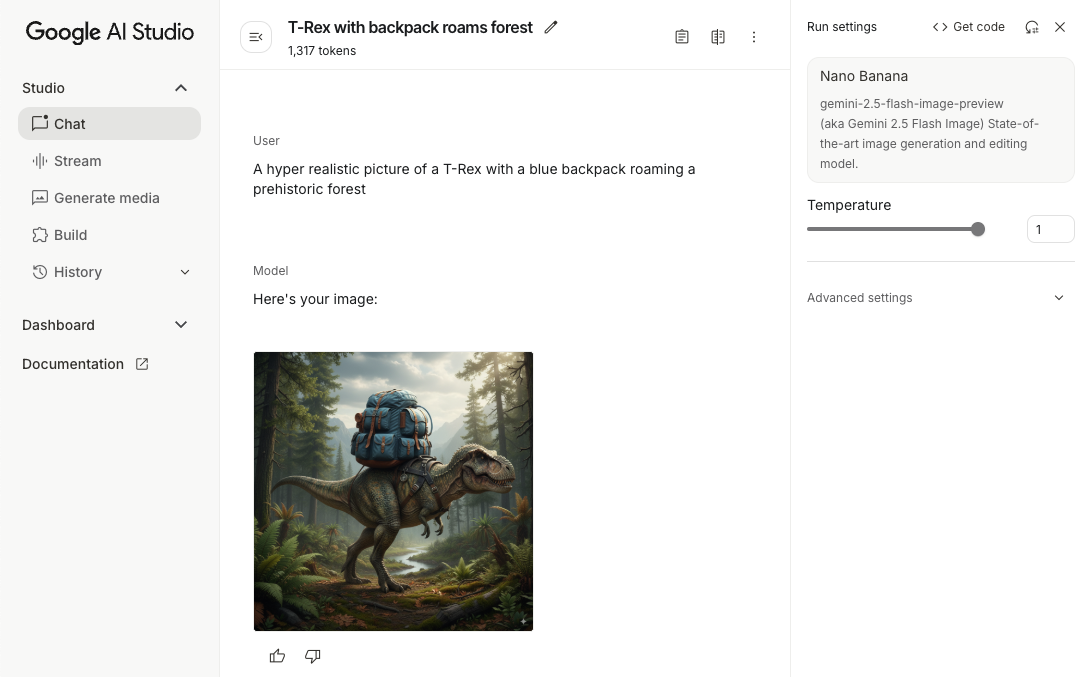
生成圖像 (僅輸入文字)
你可以提供純文字提示,指示 Gemini 模型生成圖片:
Kotlin
scope.launch { // Provide a text prompt instructing the model to generate an image val prompt = "A hyper realistic picture of a t-rex with a blue bag pack roaming a pre-historic forest." // To generate image output, call `generateContent` with the text input val generatedImageAsBitmap: Bitmap? = model.generateContent(prompt) .candidates.first().content.parts.filterIsInstance<ImagePart>() .firstOrNull()?.image }
Java
// Provide a text prompt instructing the model to generate an image Content prompt = new Content.Builder() .addText("Generate an image of the Eiffel Tower with fireworks in the background.") .build(); // To generate an image, call `generateContent` with the text input ListenableFuture<GenerateContentResponse> response = model.generateContent(prompt); Futures.addCallback(response, new FutureCallback<GenerateContentResponse>() { @Override public void onSuccess(GenerateContentResponse result) { // iterate over all the parts in the first candidate in the result object for (Part part : result.getCandidates().get(0).getContent().getParts()) { if (part instanceof ImagePart) { ImagePart imagePart = (ImagePart) part; // The returned image as a bitmap Bitmap generatedImageAsBitmap = imagePart.getImage(); break; } } } @Override public void onFailure(Throwable t) { t.printStackTrace(); } }, executor);
編輯圖片 (輸入文字和圖片)
你可以在提示中提供文字和一或多張圖片,要求 Gemini 模型編輯現有圖片:
Kotlin
scope.launch { // Provide a text prompt instructing the model to edit the image val prompt = content { image(bitmap) text("Edit this image to make it look like a cartoon") } // To edit the image, call `generateContent` with the prompt (image and text input) val generatedImageAsBitmap: Bitmap? = model.generateContent(prompt) .candidates.first().content.parts.filterIsInstance<ImagePart>().firstOrNull()?.image // Handle the generated text and image }
Java
// Provide an image for the model to edit Bitmap bitmap = BitmapFactory.decodeResource(resources, R.drawable.scones); // Provide a text prompt instructing the model to edit the image Content promptcontent = new Content.Builder() .addImage(bitmap) .addText("Edit this image to make it look like a cartoon") .build(); // To edit the image, call `generateContent` with the prompt (image and text input) ListenableFuture<GenerateContentResponse> response = model.generateContent(promptcontent); Futures.addCallback(response, new FutureCallback<GenerateContentResponse>() { @Override public void onSuccess(GenerateContentResponse result) { // iterate over all the parts in the first candidate in the result object for (Part part : result.getCandidates().get(0).getContent().getParts()) { if (part instanceof ImagePart) { ImagePart imagePart = (ImagePart) part; Bitmap generatedImageAsBitmap = imagePart.getImage(); break; } } } @Override public void onFailure(Throwable t) { t.printStackTrace(); } }, executor);
透過多輪對話疊代及編輯圖像
如要透過對話方式編輯圖像,可以使用多輪對話。 這樣一來,後續要求就能根據先前的編輯內容進行微調,不必重新傳送原始圖片。
首先,使用 startChat() 初始化對話,並視需要提供訊息記錄。然後,後續訊息請使用 sendMessage():
Kotlin
scope.launch { // Create the initial prompt instructing the model to edit the image val prompt = content { image(bitmap) text("Edit this image to make it look like a cartoon") } // Initialize the chat val chat = model.startChat() // To generate an initial response, send a user message with the image and text prompt var response = chat.sendMessage(prompt) // Inspect the returned image var generatedImageAsBitmap: Bitmap? = response .candidates.first().content.parts.filterIsInstance<ImagePart>().firstOrNull()?.image // Follow up requests do not need to specify the image again response = chat.sendMessage("But make it old-school line drawing style") generatedImageAsBitmap = response .candidates.first().content.parts.filterIsInstance<ImagePart>().firstOrNull()?.image }
Java
// Provide an image for the model to edit Bitmap bitmap = BitmapFactory.decodeResource(resources, R.drawable.scones); // Initialize the chat ChatFutures chat = model.startChat(); // Create the initial prompt instructing the model to edit the image Content prompt = new Content.Builder() .setRole("user") .addImage(bitmap) .addText("Edit this image to make it look like a cartoon") .build(); // To generate an initial response, send a user message with the image and text prompt ListenableFuture<GenerateContentResponse> response = chat.sendMessage(prompt); // Extract the image from the initial response ListenableFuture<Bitmap> initialRequest = Futures.transform(response, result -> { for (Part part : result.getCandidates().get(0).getContent().getParts()) { if (part instanceof ImagePart) { ImagePart imagePart = (ImagePart) part; return imagePart.getImage(); } } return null; }, executor); // Follow up requests do not need to specify the image again ListenableFuture<GenerateContentResponse> modelResponseFuture = Futures.transformAsync( initialRequest, generatedImage -> { Content followUpPrompt = new Content.Builder() .addText("But make it old-school line drawing style") .build(); return chat.sendMessage(followUpPrompt); }, executor); // Add a final callback to check the reworked image Futures.addCallback(modelResponseFuture, new FutureCallback<GenerateContentResponse>() { @Override public void onSuccess(GenerateContentResponse result) { for (Part part : result.getCandidates().get(0).getContent().getParts()) { if (part instanceof ImagePart) { ImagePart imagePart = (ImagePart) part; Bitmap generatedImageAsBitmap = imagePart.getImage(); break; } } } @Override public void onFailure(Throwable t) { t.printStackTrace(); } }, executor);
注意事項與限制
請注意下列事項和限制:
- 輸出格式:系統會以 PNG 格式生成圖片,最大尺寸為 1024 像素。
- 輸入內容類型:模型不支援音訊或影片輸入內容,無法生成圖像。
- 支援的語言:為獲得最佳效能,請使用下列語言:
英文 (
en)、墨西哥西班牙文 (es-mx)、日文 (ja-jp)、簡體中文 (zh-cn) 和北印度文 (hi-in)。 - 生成問題:
- 圖片生成功能不一定會觸發,有時只會輸出文字。明確要求生成圖片 (例如「生成圖片」、「在過程中提供圖片」、「更新圖片」)。
- 模型可能會中途停止生成內容。請再試一次或改用其他提示。
- 模型可能會以圖片形式生成文字。明確要求生成文字輸出內容 (例如「生成敘事文字和插圖」)。
詳情請參閱 Firebase 說明文件。
後續步驟
設定應用程式後,請考慮採取下列後續步驟:
- 請參閱 GitHub 上的 Android Quickstart Firebase 範例應用程式和 Android AI 範例目錄。
- 準備將應用程式投入正式環境,包括設定 Firebase App Check,防止未經授權的用戶端濫用 Gemini API。
- 如要進一步瞭解 Firebase AI Logic,請參閱 Firebase 說明文件。