
The getting started guide covered how to create a WorkRequest
and enqueue it.
In this guide you will learn how to define and customize WorkRequest objects
to handle common use cases, such as how to:
- Schedule one-time and recurring work
- Set work constraints like requiring Wi-Fi or charging
- Guarantee a minimum delay in work execution
- Set retry and back-off strategies
- Pass input data to work
- Group related work together using tags
Overview
Work is defined in WorkManager using a WorkRequest. In order to
schedule any work with WorkManager you must first create a
WorkRequest object and then enqueue it.
Kotlin
val myWorkRequest = ...
WorkManager.getInstance(myContext).enqueue(myWorkRequest)
Java
WorkRequest myWorkRequest = ...
WorkManager.getInstance(myContext).enqueue(myWorkRequest);
The WorkRequest object contains all of the information needed by WorkManager
to schedule and run your work. It includes constraints which must be met for
your work to run, scheduling information such as delays or repeating intervals,
retry configuration, and may include input data if your work relies on it.
WorkRequest itself is an abstract base class. There are two
derived implementations of this class that you can use to create the request,
OneTimeWorkRequest and PeriodicWorkRequest.
As their names imply, OneTimeWorkRequest is useful for scheduling
non-repeating work, whilst PeriodicWorkRequest is more appropriate for
scheduling work that repeats on some interval.
Schedule one-time work
For basic work, which requires no additional configuration, use the static
method from:
Kotlin
val myWorkRequest = OneTimeWorkRequest.from(MyWork::class.java)
Java
WorkRequest myWorkRequest = OneTimeWorkRequest.from(MyWork.class);
For more complex work, you can use a builder:
Kotlin
val uploadWorkRequest: WorkRequest =
   OneTimeWorkRequestBuilder<MyWork>()
       // Additional configuration
       .build()
Java
WorkRequest uploadWorkRequest =
   new OneTimeWorkRequest.Builder(MyWork.class)
       // Additional configuration
       .build();
Schedule expedited work
WorkManager 2.7.0 introduced the concept of expedited work. This allows WorkManager to execute important work while giving the system better control over access to resources.
Expedited work is notable for the following characteristics:
- Importance: Expedited work suits tasks which are important to the user or are user-initiated.
- Speed: Expedited work best fits short tasks that start immediately and complete within a few minutes.
- Quotas: A system-level quota that limits foreground execution time determines whether an expedited job can start.
- Power Management: Power management restrictions, such as Battery Saver and Doze, are less likely to affect expedited work.
- Latency: The system immediately executes expedited work, provided that the system's current workload enables it to do so. This means they are latency sensitive and can't be scheduled for later execution.
A potential use case for expedited work might be within a chat app when the user wants to send a message or an attached image. Similarly, an app that handles a payment or subscription flow might also want to use expedited work. This is because those tasks are important to the user, execute quickly in the background, need to begin immediately, and should continue to execute even if the user closes the app
Quotas
The system must allocate execution time to an expedited job before it can run. Execution time is not unlimited. Rather, each app receives a quota of execution time. When your app uses its execution time and reaches its allocated quota, you can no longer execute expedited work until the quota refreshes. This allows Android to more effectively balance resources between applications.
The amount of execution time available to an app is based on the standby bucket and process importance.
You can determine what occurs when the execution quota does not allow for an expedited job to run immediately. See the following snippets for detail.
Execute expedited work
Starting in WorkManager 2.7, your app can call setExpedited() to declare that
a WorkRequest should run as quickly as possible using an expedited job. The
following code snippet provides an example of how to use setExpedited():
Kotlin
val request = OneTimeWorkRequestBuilder<SyncWorker>()
    <b>.setExpedited(OutOfQuotaPolicy.RUN_AS_NON_EXPEDITED_WORK_REQUEST)</b>
    .build()

WorkManager.getInstance(context)
    .enqueue(request)
Java
OneTimeWorkRequest request = new OneTimeWorkRequestBuilder<T>()
    .setInputData(inputData)
    <b>.setExpedited(OutOfQuotaPolicy.RUN_AS_NON_EXPEDITED_WORK_REQUEST)</b>
    .build();
In this example, we initialize an instance of OneTimeWorkRequest and call
setExpedited() on it. This request then becomes expedited work. If the quota
allows, it will begin to run immediately in the background. If the quota has
been used, the OutOfQuotaPolicy parameter indicates that the request should
be run as normal, non-expedited work.
Backwards compatibility and foreground services
To maintain backwards compatibility for expedited jobs, WorkManager might run a foreground service on platform versions older than Android 12. Foreground services can display a notification to the user.
The getForegroundInfoAsync() and getForegroundInfo() methods in your Worker
enable WorkManager to display a notification when you call setExpedited()
prior to Android 12.
Any ListenableWorker must implement the getForegroundInfo method if you
would like to request that the task run as an expedited job.
When targeting Android 12 or higher, foreground services remain available to
you through the corresponding setForeground method.
Worker
Workers don't know whether the work they're doing is expedited or not. But
workers can display a notification on some versions of Android when a
WorkRequest has been expedited.
To enable this, WorkManager provides the getForegroundInfoAsync() method,
which you must implement so WorkManager can display a notification to start a
ForegroundService for you where necessary.
CoroutineWorker
If you use a CoroutineWorker, you must implement getForegroundInfo(). You
then pass it to setForeground() within doWork(). Doing so will create the
notification in versions of Android prior to 12.
Consider the following example:
  class ExpeditedWorker(appContext: Context, workerParams: WorkerParameters):
   CoroutineWorker(appContext, workerParams) {

   override suspend fun getForegroundInfo(): ForegroundInfo {
       return ForegroundInfo(
           NOTIFICATION_ID, createNotification()
       )
   }

   override suspend fun doWork(): Result {
       TODO()
   }

    private fun createNotification() : Notification {
       TODO()
    }

}
Quota policies
You can control what happens to expedited work when your app reaches its
execution quota. To continue, you can pass setExpedited():
OutOfQuotaPolicy.RUN_AS_NON_EXPEDITED_WORK_REQUEST, which causes the job to run as an ordinary work request. The earlier snippet demonstrates this.OutOfQuotaPolicy.DROP_WORK_REQUEST, which causes the request to cancel if there is not sufficient quota.
Deferred expedited work
The system tries to execute a given expedited job as soon as possible after the job is invoked. However, as is the case with other types of jobs, the system might defer the start of new expedited work, such as in the following cases:
- Load: The system load is too high, which can occur when too many jobs are already running, or when the system doesn't have enough memory.
- Quota: The expedited job quota limit has been exceeded. Expedited work uses a quota system that's based on the App Standby Buckets and limits the maximum execution time within a rolling time window. The quotas used for expedited work are more restrictive than the ones used for other types of background jobs.
Schedule periodic work
Your app may at times require that certain work runs periodically. For example, you may want to periodically backup your data, download fresh content in your app, or upload logs to a server.
Here is how you use the PeriodicWorkRequest to create a
WorkRequest object which executes periodically:
Kotlin
val saveRequest =
       PeriodicWorkRequestBuilder<SaveImageToFileWorker>(1, TimeUnit.HOURS)
    // Additional configuration
           .build()
Java
PeriodicWorkRequest saveRequest =
       new PeriodicWorkRequest.Builder(SaveImageToFileWorker.class, 1, TimeUnit.HOURS)
           // Constraints
           .build();
In this example, the work is scheduled with a one hour interval.
The interval period is defined as the minimum time between repetitions. The exact time that the worker is going to be executed depends on the constraints that you are using in your WorkRequest object and on the optimizations performed by the system.
Flexible run intervals
If the nature of your work makes it sensitive to run timing, you can configure
your PeriodicWorkRequest to run within a flex
period inside each interval period, as shown in Figure 1.
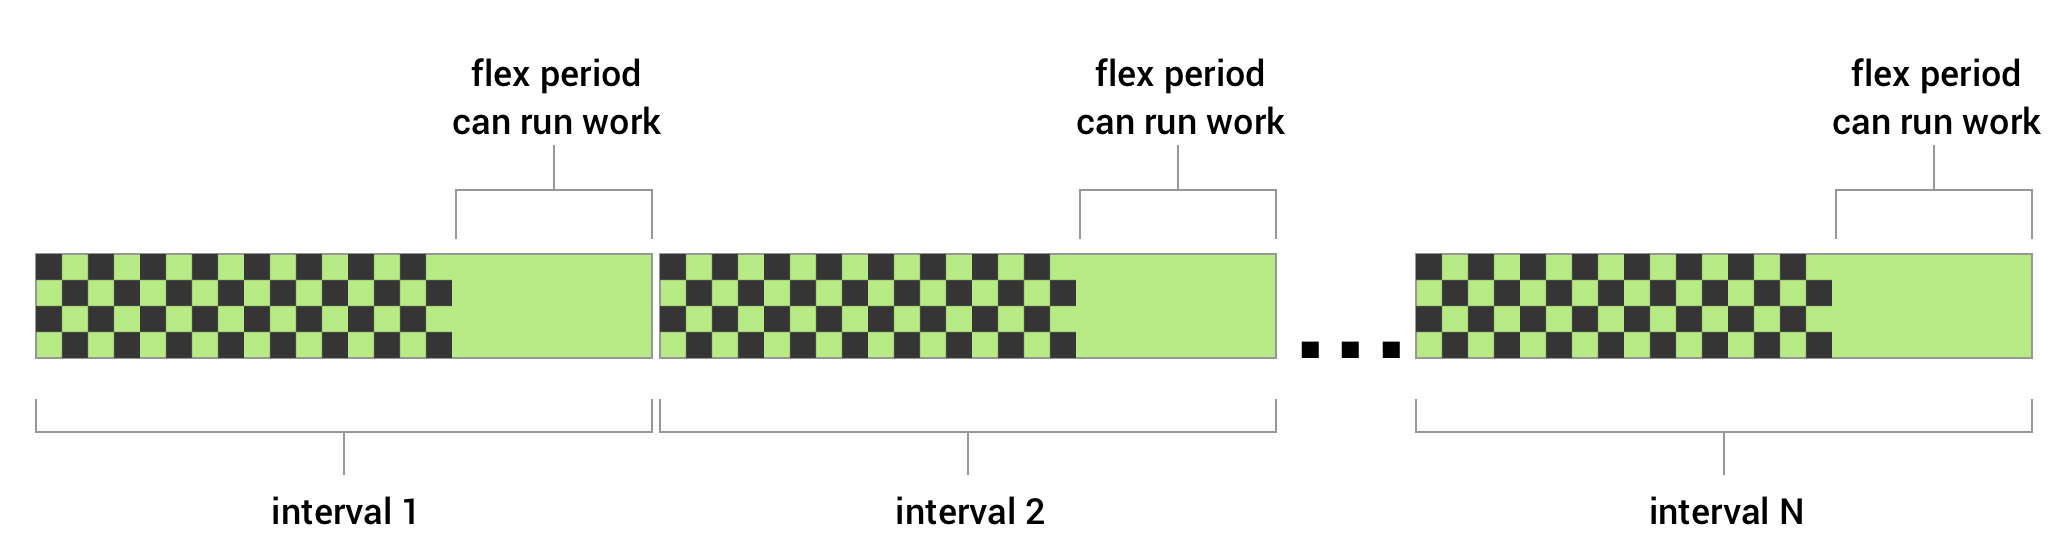
Figure 1. Diagram shows repeating intervals with the flexible period in which the work can run.
To define periodic work with a flex period, you pass a flexInterval along with
the repeatInterval when creating the PeriodicWorkRequest. The flex period
begins at repeatInterval - flexInterval, and goes to the end of the interval.
The following is an example of periodic work that can run during the last 15 minutes of every one hour period.
Kotlin
val myUploadWork = PeriodicWorkRequestBuilder<SaveImageToFileWorker>(
       1, TimeUnit.HOURS, // repeatInterval (the period cycle)
       15, TimeUnit.MINUTES) // flexInterval
    .build()
Java
WorkRequest saveRequest =
       new PeriodicWorkRequest.Builder(SaveImageToFileWorker.class,
               1, TimeUnit.HOURS,
               15, TimeUnit.MINUTES)
           .build();
The repeat interval must be greater than or equal to
PeriodicWorkRequest.MIN_PERIODIC_INTERVAL_MILLIS and the flex
interval must be greater than or equal to
PeriodicWorkRequest.MIN_PERIODIC_FLEX_MILLIS`.
Effect of Constraints on Periodic Work
You can apply constraints to periodic work. For example, you could add a
constraint to your work request such that the work only runs when the user's
device is charging. In this case, even if the defined repeat interval passes,
the PeriodicWorkRequest will not run until this condition is met. This could
cause a particular run of your work to be delayed, or even skipped if the
conditions are not met within the run interval.
Work constraints
Constraints ensure that work is deferred until optimal conditions are
met. The following constraints are available to WorkManager:
| NetworkType | Constrains the type of network required for your work to run.
For example, Wi-Fi (UNMETERED).
|
| BatteryNotLow | When set to true, your work will not run if the device is in low battery mode. |
| RequiresCharging | When set to true, your work will only run when the device is charging. |
| DeviceIdle | When set to true, this requires the user's device to be idle before the work will run. This can be useful for running batched operations that might otherwise have a negative performance impact on other apps running actively on the user's device. |
| StorageNotLow | When set to true, your work won't run if the user's storage space on the device is too low. |
To create a set of constraints and associate it with some work, create a
Constraints instance using the Constraints.Builder() and assign it to your
WorkRequest.Builder().
For example, the following code builds a work request which only runs when the user's device is both charging and on Wi-Fi:
Kotlin
val constraints = Constraints.Builder()
   .setRequiredNetworkType(NetworkType.UNMETERED)
   .setRequiresCharging(true)
   .build()

val myWorkRequest: WorkRequest =
   OneTimeWorkRequestBuilder<MyWork>()
       .setConstraints(constraints)
       .build()
Java
Constraints constraints = new Constraints.Builder()
       .setRequiredNetworkType(NetworkType.UNMETERED)
       .setRequiresCharging(true)
       .build();

WorkRequest myWorkRequest =
       new OneTimeWorkRequest.Builder(MyWork.class)
               .setConstraints(constraints)
               .build();
When multiple constraints are specified, your work will run only when all the constraints are met.
In the event that a constraint becomes unmet while your work is running, WorkManager will stop your worker. The work will then be retried when all the constraints are met.
Delayed Work
In the event that your work has no constraints or that all the constraints are met when your work is enqueued, the system may choose to run the work immediately. If you do not want the work to be run immediately, you can specify your work to start after a minimum initial delay.
Here is an example of how to set your work to run at least 10 minutes after it has been enqueued.
Kotlin
val myWorkRequest = OneTimeWorkRequestBuilder<MyWork>()
   .setInitialDelay(10, TimeUnit.MINUTES)
   .build()
Java
WorkRequest myWorkRequest =
      new OneTimeWorkRequest.Builder(MyWork.class)
               .setInitialDelay(10, TimeUnit.MINUTES)
               .build();
While the example illustrates how to set an initial delay for a
OneTimeWorkRequest, you can also set an initial delay for a
PeriodicWorkRequest. In that case, only the first run of your periodic work
would be delayed.
Retry and backoff policy
If you require that WorkManager retry your work, you can return
Result.retry() from your worker. Your work is then
rescheduled according to a backoff delay and backoff policy.
Backoff delay specifies the minimum amount of time to wait before retrying your work after the first attempt. This value can be no less than 10 seconds (or MIN_BACKOFF_MILLIS).
Backoff policy defines how the backoff delay should increase over time for subsequent retry attempts. WorkManager supports 2 backoff policies,
LINEARandEXPONENTIAL.
Every work request has a backoff policy and backoff delay. The default policy
is EXPONENTIAL with a delay of 30 seconds, but you can override this in your
work request configuration.
Here is an example of customizing the backoff delay and policy.
Kotlin
val myWorkRequest = OneTimeWorkRequestBuilder<MyWork>()
   .setBackoffCriteria(
       BackoffPolicy.LINEAR,
       WorkRequest.MIN_BACKOFF_MILLIS,
       TimeUnit.MILLISECONDS)
   .build()
Java
WorkRequest myWorkRequest =
       new OneTimeWorkRequest.Builder(MyWork.class)
               .setBackoffCriteria(
                       BackoffPolicy.LINEAR,
                       WorkRequest.MIN_BACKOFF_MILLIS,
                       TimeUnit.MILLISECONDS)
               .build();
In this example, the minimum backoff delay is set to the minimum allowed value,
10 seconds. Since the policy is LINEAR the retry interval will increase by
approximately 10 seconds with each new attempt. For example, the first run
finishing with Result.retry() will be attempted again after 10 seconds,
followed by 20, 30, 40, and so on, if the work continues to return
Result.retry() after subsequent attempts. If the backoff policy were set to
EXPONENTIAL, the retry duration sequence would be closer to 20, 40, and 80.
Tag work
Every work request has a unique identifier, which can be used to identify that work later in order to cancel the work or observe its progress.
If you have a group of logically related work, you may also find it helpful to tag those work items. Tagging lets you operate with a group of work requests together.
For example, WorkManager.cancelAllWorkByTag(String) cancels
all work requests with a particular tag, and
WorkManager.getWorkInfosByTag(String) returns a list of the
WorkInfo objects which can be used to determine the current work state.
The following code shows how you can add a "cleanup" tag to your work:
Kotlin
val myWorkRequest = OneTimeWorkRequestBuilder<MyWork>()
   .addTag("cleanup")
   .build()
Java
WorkRequest myWorkRequest =
       new OneTimeWorkRequest.Builder(MyWork.class)
       .addTag("cleanup")
       .build();
Finally, multiple tags can be added to a single work request. Internally these
tags are stored as a set of strings. To get the set of tags associated with
the WorkRequest you can use WorkInfo.getTags().
From your Worker class, you can retrieve its set of tags using
ListenableWorker.getTags().
Assign input data
Your work may require input data in order to do its work. For example, work that handles uploading an image might require the URI of the image to be uploaded as input.
Input values are stored as key-value pairs in a Data object
and can be set on the work request. WorkManager will deliver the input Data to
your work when it executes the work. The Worker class can access
the input arguments by calling Worker.getInputData(). The
following code shows how you can create a Worker instance which
requires input data and how to send it in your work request.
Kotlin
// Define the Worker requiring input
class UploadWork(appContext: Context, workerParams: WorkerParameters)
   : Worker(appContext, workerParams) {

   override fun doWork(): Result {
       val imageUriInput =
           inputData.getString("IMAGE_URI") ?: return Result.failure()

       uploadFile(imageUriInput)
       return Result.success()
   }
   ...
}

// Create a WorkRequest for your Worker and sending it input
val myUploadWork = OneTimeWorkRequestBuilder<UploadWork>()
   .setInputData(workDataOf(
       "IMAGE_URI" to "http://..."
   ))
   .build()
Java
// Define the Worker requiring input
public class UploadWork extends Worker {

   public UploadWork(Context appContext, WorkerParameters workerParams) {
       super(appContext, workerParams);
   }

   @NonNull
   @Override
   public Result doWork() {
       String imageUriInput = getInputData().getString("IMAGE_URI");
       if(imageUriInput == null) {
           return Result.failure();
       }

       uploadFile(imageUriInput);
       return Result.success();
   }
   ...
}

// Create a WorkRequest for your Worker and sending it input
WorkRequest myUploadWork =
      new OneTimeWorkRequest.Builder(UploadWork.class)
           .setInputData(
               new Data.Builder()
                   .putString("IMAGE_URI", "http://...")
                   .build()
           )
           .build();
Similarly, you can use the Data class to output a return value.
Next Steps
In the States and observation page, you'll learn more about work states and how to monitor the progress of your work.