
Apps that use standard views work with the autofill framework without requiring special configuration. You can also optimize how your app works with the framework.
Set up the autofill environment
This section describes how to set up basic autofill functionality for your app.
Configure an autofill service
An autofill service must be configured on your device for your app to use the autofill framework. Although most phones and tablets running Android 8.0 (API level 26) and higher ship with an autofill service, we recommend you use a test service when testing your app, such as the autofill service in the Android autofill framework sample. When using an emulator, explicitly set an autofill service, because the emulator might not come with a default service.
After you install the test autofill service from the sample app, enable the autofill service by navigating to Settings > System > Languages & input > Advanced > Input assistance > Autofill service.
For more information about configuring an emulator to test autofill, see Test your app with autofill.
Use Activity Context for views
The autofill service requires Activity Context to function properly. When
instantiating a view, use Activity as the
context to so that it can be properly autofilled.
Provide hints for autofill
The autofill service determines the type of each view using heuristics. However, if your app relies on these heuristics, autofill behavior might unexpectedly change as you update your app. To make sure that the autofill service correctly identifies your app's form factors, provide autofill hints.
You can set autofill hints using the
android:autofillHints
attribute. The following example sets a "password" hint on an
EditText:
<EditText
    android:layout_width="match_parent"
    android:layout_height="wrap_content"
    android:autofillHints="password" />
You can also set hints programmatically using the
setAutofillHints()
method, as shown in the following example:
Kotlin
val password = findViewById<EditText>(R.id.password)
password.setAutofillHints(View.AUTOFILL_HINT_PASSWORD)
Java
EditText password = findViewById(R.id.password);
password.setAutofillHints(View.AUTOFILL_HINT_PASSWORD);
Include predefined hint constants
The autofill framework doesn't validate hints; they are passed along
without change or validation to the autofill service. While you can use any
value, the
View
and AndroidX
HintConstants classes contain
lists of officially supported hint constants.
Using a combination of these constants, you can build layouts for common autofill scenarios:
Account credentials
On a login form, you can include account credential hints such as
AUTOFILL_HINT_USERNAME
and
AUTOFILL_HINT_PASSWORD.
For creating a new account, or when users change their username and password,
you can use
AUTOFILL_HINT_NEW_USERNAME
and
AUTOFILL_HINT_NEW_PASSWORD.
Credit card info
When requesting credit card info, you can use hints such as
AUTOFILL_HINT_CREDIT_CARD_NUMBER
and
AUTOFILL_HINT_CREDIT_CARD_SECURITY_CODE.
For credit card expiration dates, do one of the following:
- If you're using a single view for expiration date, use
AUTOFILL_HINT_CREDIT_CARD_EXPIRATION_DATE. - If using a different view for each portion of the expiration date, you can use
AUTOFILL_HINT_CREDIT_CARD_EXPIRATION_DAY,AUTOFILL_HINT_CREDIT_CARD_EXPIRATION_MONTH, andAUTOFILL_HINT_CREDIT_CARD_EXPIRATION_YEARfor each respective view.
Physical address
For physical address form fields, you can use hints such as the following:
- For an address in a single view, use
AUTOFILL_HINT_POSTAL_ADDRESS. - When using separate views for different parts of an address, you can use the following:
Names of people
When requesting people's names, you can use hints such as the following:
- To autofill a person's full name in a single view, use
AUTOFILL_HINT_PERSON_NAME. - If using separate views for different parts of a name, you can use any of the following:
Phone numbers
For phone numbers, you can use the following:
- When requesting a full phone number in a single view, use
AUTOFILL_HINT_PHONE_NUMBER. - If using separate views for different parts of a phone number, you can use any of the following:
One-time password (OTP)
For a one-time password in a single view, you can use
AUTOFILL_HINT_SMS_OTP.
For multiple views where each view maps to a single digit of the OTP,
you can use the
generateSmsOtpHintForCharacterPosition()
method to generate per-character hints.
Associate website and mobile app data
Autofill services such as Autofill with Google can share user login data among browsers and Android devices after the app and a website are associated. When a user chooses the same autofill service on both platforms, signing in to your web app makes their login credentials available to autofill when they sign in to your corresponding Android app.
To associate your Android app with your website, host a Digital Asset
Link with the
delegate_permission/common.get_login_creds relation in your site. Then,
declare the association in your app's AndroidManifest.xml file. For detailed
instructions about how to associate your website with your Android app, see
Enable automatic sign-in across apps and
websites.
Complete an autofill workflow
This section describes specific scenarios in which you can take steps to improve autofill functionality for users of your app.
Determine whether autofill is enabled
Users can enable or disable autofill as well as change the autofill service by navigating to Settings > System > Languages & input > Advanced > Input assistance > Autofill service. Your app can't override the user's autofill settings, but you can implement additional autofill functionality in your app, or in particular views of your app, if autofill is available to the user.
For example,
TextView shows an autofill entry in the
overflow menu if autofill is enabled for the user. To check whether autofill
is enabled for the user, call the isEnabled()
method of the
AutofillManager object.
To make sure your sign-up and login experience is optimized for users without autofill, implement One Tap sign-in.
Force an autofill request
Sometimes you need to force an autofill request to occur in response to a
user action. For example, TextView offers an autofill
menu item when the user performs a touch & hold on the view.
The following code example shows how to force an autofill request:
Kotlin
fun eventHandler(view: View) {
    val afm = requireContext().getSystemService(AutofillManager::class.java)
    afm?.requestAutofill(view)
}
Java
public void eventHandler(View view) {
    AutofillManager afm = context.getSystemService(AutofillManager.class);
    if (afm != null) {
        afm.requestAutofill(view);
    }
}
You can also use the cancel()
method to cancel the current autofill context. This can be useful if you
have a button that clears the fields on a login page.
Use the correct autofill type for data in picker controls
Pickers can be useful with autofill by providing a UI that lets users
change the value of a field that stores date or time data. For example, in a
credit card form, a date picker lets users enter or change the expiration date
of their credit card. However, you must use another view, such as an
EditText, to display the data when the picker isn't visible.
An EditText object natively expects autofill data of type
AUTOFILL_TYPE_TEXT.
If you are using a different type of data, create a custom view that inherits
from EditText and implements the methods required to handle the corresponding
type of data. For instance, if you have a date field, implement the methods with
logic that correctly handles values of type
AUTOFILL_TYPE_DATE.
When you specify the autofill data type, the autofill service can create an appropriate representation of the data displayed in the view. For more information, see Use pickers with autofill.
Finish the autofill context
The autofill framework saves user input for future use by showing a "Save for
autofill?" dialog after the autofill context is finished. Typically, the
autofill context is finished when an activity finishes. However, there are some
situations where you need to explicitly notify the framework—for example,
if you're using the same activity but different fragments for both your login
and content screens. In these situations, you can explicitly finish the
context by calling AutofillManager.commit().
Support for custom views
Custom views can specify the metadata that is exposed to the autofill framework by using the autofill API. Some views act as a container of virtual children, such as views that contain OpenGL-rendered UI. These views must use the API to specify the structure of the information used in the app before they can work with the autofill framework.
If your app uses custom views, consider the following scenarios:
- The custom view provides a standard view structure, or a default view structure.
- The custom view has a virtual structure, or a view structure that isn't available to the autofill framework.
Custom views with standard view structure
Custom views can define the metadata that autofill requires to work. Make sure that your custom view manages the metadata appropriately to work with the autofill framework. Your custom view must take the following actions:
- Handle the autofill value that the framework sends to your app.
- Provide the autofill type and value to the framework.
When autofill is triggered, the autofill framework calls
autofill()
on your view and sends the value that
your view must use. Implement autofill() to specify how your
custom view handles the autofill value.
Your view must specify an autofill type and value by overriding the
getAutofillType()
and
getAutofillValue()
methods, respectively.
Finally, autofill must not fill the view if the user can't provide a value for
the view in its current state—for example, if the view is disabled.
In these cases, getAutofillType() must return
AUTOFILL_TYPE_NONE,
getAutofillValue() must return null, and autofill() must do nothing.
The following cases require additional steps to properly work within the framework:
- The custom view is editable.
- The custom view contains sensitive data.
The custom view is editable
If the view is editable, notify the autofill framework about changes
by calling
notifyValueChanged()
on the AutofillManager object.
The custom view contains sensitive data
If a view contains personally identifiable information (PII) such as email addresses, credit card numbers, and passwords, it must be marked as sensitive.
In general, views whose content comes from static resources don't contain sensitive data, while views whose content is dynamically set might contain sensitive data. For example, a label that contains enter your username doesn't contain sensitive data, while a label that contains Hello, John does.
The autofill framework assumes that all data is sensitive by default. You can mark data that isn't sensitive.
To mark whether a view contains sensitive data, implement
onProvideAutofillStructure()
and call
setDataIsSensitive()
on the ViewStructure object.
The following code example shows how to mark the data in the view structure as not sensitive:
Kotlin
override fun onProvideAutofillStructure(structure: ViewStructure, flags: Int) {
    super.onProvideAutofillStructure(structure, flags)

    structure.setDataIsSensitive(false)
}
Java
@Override
public void onProvideAutofillStructure(ViewStructure structure, int flags) {
    super.onProvideAutofillStructure(structure, flags);

    structure.setDataIsSensitive(false);
}
If a view accepts only predefined values, you can use the
setAutofillOptions()
method to set the options that can be used to autofill the view. In particular,
views whose autofill type is
AUTOFILL_TYPE_LIST must use
this method, because the autofill service can do a better job if it knows the
options that are available to fill the view.
Views that use an adapter, such as a
Spinner, are a similar case. For example,
a spinner that provides dynamically created years, based on the current year, to
use in credit card expiration fields can
implement the
getAutofillOptions()
method of the
Adapter interface to provide a list of
years.
Views that use an ArrayAdapter
also can provide lists of
values. ArrayAdapter automatically sets autofill options for static resources.
If you provide the values dynamically, override getAutofillOptions().
Custom views with virtual structure
The autofill framework requires a view structure before it can edit and save the information in your app's UI. The view structure isn't available to the framework in the following situations:
- The app uses a low-level rendering engine, such as OpenGL, to render the UI.
- The app uses an instance of
Canvasto draw the UI.
In these cases, you can specify a view structure by implementing
onProvideAutofillVirtualStructure()
and following these steps:
- Increase the child count of the view structure by calling
addChildCount(). - Add a child by calling
newChild(). - Set the autofill ID for the child by calling
setAutofillId(). - Set relevant properties, such as the autofill value and type.
- If the data in the virtual child is sensitive, pass
truetosetDataIsSensitive(); otherwise, passfalse.
The following code snippet shows how to create a new child in the virtual structure:
Kotlin
override fun onProvideAutofillVirtualStructure(structure: ViewStructure, flags: Int) {

    super.onProvideAutofillVirtualStructure(structure, flags)

    // Create a new child in the virtual structure.
    structure.addChildCount(1)
    val child = structure.newChild(childIndex)

    // Set the autofill ID for the child.
    child.setAutofillId(structure.autofillId!!, childVirtualId)

    // Populate the child by providing properties such as value and type.
    child.setAutofillValue(childAutofillValue)
    child.setAutofillType(childAutofillType)

    // Some children can provide a list of values, such as when the child is
    // a spinner.
    val childAutofillOptions = arrayOf<CharSequence>("option1", "option2")
    child.setAutofillOptions(childAutofillOptions)

    // Just like other types of views, mark the data as sensitive when
    // appropriate.
    val sensitive = !contentIsSetFromResources()
    child.setDataIsSensitive(sensitive)
}
Java
@Override
public void onProvideAutofillVirtualStructure(ViewStructure structure, int flags) {

    super.onProvideAutofillVirtualStructure(structure, flags);

    // Create a new child in the virtual structure.
    structure.addChildCount(1);
    ViewStructure child =
            structure.newChild(childIndex);

    // Set the autofill ID for the child.
    child.setAutofillId(structure.getAutofillId(), childVirtualId);

    // Populate the child by providing properties such as value and type.
    child.setAutofillValue(childAutofillValue);
    child.setAutofillType(childAutofillType);

    // Some children can provide a list of values, such as when the child is
    // a spinner.
    CharSequence childAutofillOptions[] = { "option1", "option2" };
    child.setAutofillOptions(childAutofillOptions);

    // Just like other types of views, mark the data as sensitive when
    // appropriate.
    boolean sensitive = !contentIsSetFromResources();
    child.setDataIsSensitive(sensitive);
}
When elements in a virtual structure change, notify the framework by performing the following tasks:
- If the focus inside the children changes, call
notifyViewEntered()andnotifyViewExited()on theAutofillManagerobject. - If the value of a child changes, call
notifyValueChanged()on theAutofillManagerobject. - If the view hierarchy is no longer available because the user completed
a step in the workflow, such as when they sign in using a login form,
call
commit()on theAutofillManagerobject. - If the view hierarchy isn't valid because the user canceled a step
in the workflow, such as when the user taps a button that clears a login
form, call
cancel()on theAutofillManagerobject.
Use callbacks on autofill events
If your app provides its own autocomplete views, you need a mechanism that tells
the app to enable or disable the views in response to changes in the UI autofill
affordance. The autofill framework provides this mechanism in the form of
AutofillCallback.
This class provides the
onAutofillEvent(View, int)
method, which the app calls after a change in the autofill state associated with a
view.
There is also an overloaded version of this method that includes a childId
parameter that your app can use with virtual views. The available states are
defined as constants
in the callback.
You can register a callback using the
registerCallback()
method of the AutofillManager class. The following code example shows
how to declare a callback for autofill events:
Kotlin
val afm = context.getSystemService(AutofillManager::class.java)

afm?.registerCallback(object : AutofillManager.AutofillCallback() {
    // For virtual structures, override
    // onAutofillEvent(View view, int childId, int event) instead.
    override fun onAutofillEvent(view: View, event: Int) {
        super.onAutofillEvent(view, event)
        when (event) {
            EVENT_INPUT_HIDDEN -> {
                // The autofill affordance associated with the view was hidden.
            }
            EVENT_INPUT_SHOWN -> {
                // The autofill affordance associated with the view was shown.
            }
            EVENT_INPUT_UNAVAILABLE -> {
                // Autofill isn't available.
            }
        }

    }
})
Java
AutofillManager afm = getContext().getSystemService(AutofillManager.class);

afm.registerCallback(new AutofillManager.AutofillCallback() {
    // For virtual structures, override
    // onAutofillEvent(View view, int childId, int event) instead.
    @Override
    public void onAutofillEvent(@NonNull View view, int event) {
        super.onAutofillEvent(view, event);
        switch (event) {
            case EVENT_INPUT_HIDDEN:
                // The autofill affordance associated with the view was hidden.
                break;
            case EVENT_INPUT_SHOWN:
                // The autofill affordance associated with the view was shown.
                break;
            case EVENT_INPUT_UNAVAILABLE:
                // Autofill isn't available.
                break;
        }
    }
});
When it's time to remove the callback, use the
unregisterCallback()
method.
Customize the autofill highlighted drawable
When a view is autofilled, the platform renders a
Drawable over the view to
indicate that the view contents are autofilled. By default, this drawable is a
solid rectangle with a translucent color that is slightly darker than the
theme's color used to draw backgrounds. The drawable doesn't need to be changed,
but it can be customized by overriding the android:autofilledHighlight item of
the theme used by the application
or activity, as shown in this example:
res/values/styles.xml
<resources>
    <style name="MyAutofilledHighlight" parent="...">
        <item name="android:autofilledHighlight">@drawable/my_drawable</item>
    </style>
</resources>
res/drawable/my_drawable.xml
<shape xmlns:android="http://schemas.android.com/apk/res/android">
    <solid android:color="#4DFF0000" />
</shape>
AndroidManifest.xml
<application ...
    android:theme="@style/MyAutofilledHighlight">
<!-- or -->
<activity ...
    android:theme="@style/MyAutofilledHighlight">
Authenticate for autofill
An autofill service can require the user to authenticate before the service can complete fields in your app, in which case the Android system launches the service's authentication activity as part of your activity's stack.
You don't need to update your app to support authentication, because
authentication happens within the service. However, you must make sure the
view structure of the activity is preserved when the activity is restarted,
such as by creating the view structure in
onCreate(),
not in onStart() or
onResume().
You can verify how your app behaves when an autofill service requires authentication by using the HeuristicsService from the AutofillFramework sample and configuring it to require fill response authentication. You can also use the BadViewStructureCreationSignInActivity sample to emulate this issue.
Assign autofill IDs to recycled views
Containers that recycle views, such as the
RecyclerView class, are
useful for apps that need to
display scrolling lists of elements based on large data sets. As the container
scrolls, the system reuses views in the layout, but the views then contain new
content.
If the initial contents of a recycled view are filled out, the autofill service retains the logical meaning of the views using their autofill IDs. A problem arises when, as the system reuses the views in the layout, the views' logical IDs remain the same, causing the wrong autofill user data to be associated with an autofill ID.
To solve this problem on devices running Android 9 (API level 28) and higher,
explicitly manage the autofill ID of views that are used by
RecyclerView using these methods:
- The
getNextAutofillId()method gets a new autofill ID that is unique to the activity. - The
setAutofillId()method sets the unique, logical autofill ID of this view in the activity.
Address known issues
This section presents workarounds to known issues within the autofill framework.
Autofill causes apps to crash on Android 8.0, 8.1
In Android 8.0 (API level 26) and 8.1 (API level 27), autofill can cause your
app to crash in certain scenarios. To work around potential issues, tag any
views that are not autofilled with importantForAutofill=no. You can also tag
the whole activity with importantForAutofill=noExcludeDescendants.
Resized dialogs aren't considered for autofill
In Android 8.1 (API level 27) and lower, if a view in a
dialog is resized after it's already displayed,
the view isn't considered for autofill. These views aren't included in the
AssistStructure object that
the Android system sends
to the autofill service. As a result, the service can't fill out the views.
To work around this issue, replace the
token
property of the dialog window parameters with the token property of the
activity that creates the dialog. After you validate that autofill is enabled, save the window parameters in the
onWindowAttributesChanged()
method of the class that inherits from
Dialog. Then, replace
the token property of the saved
parameters with the token property of the parent activity in the
onAttachedToWindow()
method.
The following code snippet shows a class that implements this workaround:
Kotlin
class MyDialog(context: Context) : Dialog(context) {

    // Used to store the dialog window parameters.
    private var token: IBinder? = null

    private val isDialogResizedWorkaroundRequired: Boolean
        get() {
            if (Build.VERSION.SDK_INT != Build.VERSION_CODES.O || Build.VERSION.SDK_INT != Build.VERSION_CODES.O_MR1) {
                return false
            }
            val autofillManager = if (Build.VERSION.SDK_INT >= Build.VERSION_CODES.M) {
                context.getSystemService(AutofillManager::class.java)
            } else {
                null
            }
            return autofillManager?.isEnabled ?: false
        }

    override fun onWindowAttributesChanged(params: WindowManager.LayoutParams) {
        if (params.token == null && token != null) {
            params.token = token
        }

        super.onWindowAttributesChanged(params)
    }

    override fun onAttachedToWindow() {
        if (isDialogResizedWorkaroundRequired) {
            token = ownerActivity!!.window.attributes.token
        }

        super.onAttachedToWindow()
    }

}
Java
public class MyDialog extends Dialog {

    public MyDialog(Context context) {
        super(context);
    }

    // Used to store the dialog window parameters.
    private IBinder token;

    @Override
    public void onWindowAttributesChanged(WindowManager.LayoutParams params) {
        if (params.token == null && token != null) {
            params.token = token;
        }

        super.onWindowAttributesChanged(params);
    }

    @Override
    public void onAttachedToWindow() {
        if (isDialogResizedWorkaroundRequired()) {
            token = getOwnerActivity().getWindow().getAttributes().token;
        }

        super.onAttachedToWindow();
    }

    private boolean isDialogResizedWorkaroundRequired() {
        if (Build.VERSION.SDK_INT != Build.VERSION_CODES.O
                || Build.VERSION.SDK_INT != Build.VERSION_CODES.O_MR1) {
            return false;
        }
        AutofillManager autofillManager =
                null;
        if (android.os.Build.VERSION.SDK_INT >= android.os.Build.VERSION_CODES.M) {
            autofillManager = getContext().getSystemService(AutofillManager.class);
        }
        return autofillManager != null && autofillManager.isEnabled();
    }

}
To avoid unnecessary operations, the following code snippet shows how to check whether autofill is supported in the device and enabled for the current user, and whether this workaround is required:
Kotlin
// AutofillExtensions.kt

fun Context.isDialogResizedWorkaroundRequired(): Boolean {
    // After the issue is resolved on Android, check whether the
    // workaround is still required for the current device.
    return isAutofillAvailable()
}

fun Context.isAutofillAvailable(): Boolean {
    if (Build.VERSION.SDK_INT < Build.VERSION_CODES.O) {
        // The autofill framework is available on Android 8.0
        // or higher.
        return false
    }

    val afm = getSystemService(AutofillManager::class.java)
    // Return true if autofill is supported by the device and enabled
    // for the current user.
    return afm != null && afm.isEnabled
}
Java
public class AutofillHelper {

    public static boolean isDialogResizedWorkaroundRequired(Context context) {
        // After the issue is resolved on Android, check whether the
        // workaround is still required for the current device.
        return isAutofillAvailable(context);
    }

    public static boolean isAutofillAvailable(Context context) {
        if (Build.VERSION.SDK_INT < Build.VERSION_CODES.O) {
            // The autofill framework is available on Android 8.0
            // or higher.
            return false;
        }

        AutofillManager afm = context.getSystemService(AutofillManager.class);
        // Return true if autofill is supported by the device and enabled
        // for the current user.
        return afm != null && afm.isEnabled();
    }
}
Test your app with autofill
After you optimize your app to work with autofill services, test whether it works as intended with autofill services.
Use an emulator or a physical device running Android 8.0 (API level 26) or higher to test your app. For more information about how to create an emulator, see Create and manage virtual devices.
Install an autofill service
Before you can test your app with autofill, you need to install another app that provides autofill services. You can use a third-party app for this purpose, but it's easier to use a sample autofill service so that you don't need to sign up for third-party services.
You can use the Android autofill framework
sample in
Java
to test your app with autofill services. The sample app provides an autofill
service and client Activity classes that you can use to test the workflow
before using it with your app. This page references the
android-AutofillFramework sample app.
After you install the app, enable the autofill service in the emulator's system settings by navigating to Settings > System > Languages & input > Advanced > Input assistance > Autofill service.
Analyze data requirements
To test your app with the autofill service, the service needs to have data that it can use to fill out your app. The service also needs to understand what type of data is expected in the views of your app. For example, if your app has a view that expects a username, the service must have a dataset that contains a username and some mechanism to know that the view expects such data.
Tell the service what type of data is expected in your views by setting the
android:autofillHints attribute. Some services use sophisticated heuristics
to determine the type of data, but others, such as the sample app, rely on the
developer to provide this information. Your app works better with autofill
services if you set the android:autofillHints attribute in the views that are
relevant for autofill.
Run your test
After you analyze the data requirements, you can run your test, which includes saving test data in the autofill service and triggering autofill in your app.
Save data in the service
To save data in the autofill service that is currently active, do the following:
- Open an app containing a view that expects the type of data you want to use during your test. The android-AutofillFramework sample app provides the UI with views that expect several types of data, such as credit card numbers and usernames.
- Tap the view that holds the type of data you need.
- Enter a value into the view.
- Tap the confirmation button, such as Sign in or Submit. You usually have to submit the form before the service saves the data.
- Verify the permission request from the system dialog. The system dialog shows the name of the service that is currently active and asks if this is the service you want to use in your test. If you want to use the service, tap Save.
If Android doesn't display the permission dialog, or if the service isn't the one you want to use in your test, then check that the service is currently active in system settings.
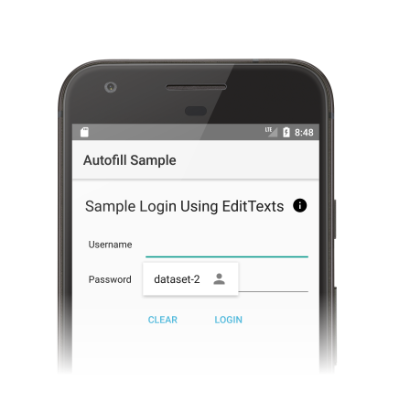
Trigger autofill in your app
To trigger autofill in your app, do the following:
- Open your app and go to the activity that has the views you want to test.
- Tap the view that needs to be filled out.
- The system displays the autofill UI, which contains the datasets that can fill the view, as shown in Figure 1.
- Tap the dataset that contains the data you want to use. The view displays the data previously stored in the service.
If Android doesn't display the autofill UI, you can try the following troubleshooting options:
- Check that the views in your app use the correct value in the
android:autofillHintsattribute. For a list of possible values for the attribute, see the constants prefixed withAUTOFILL_HINTin theViewclass. - Check that the
android:importantForAutofillattribute is set to a value other thannoon the view that needs to be filled out, or set to a value other thannoExcludeDescendantson the view or one of its parents.