
自動填入服務應用程式可將資料插入其他應用程式的檢視畫面,讓使用者更容易填寫表單。此外,自動填入服務也可從應用程式的檢視畫面擷取使用者資料,並儲存資料供日後使用。自動填入服務通常是由管理使用者資料的應用程式提供,例如密碼管理工具。
Android 在 Android 8.0 (API 級別 26) 以上版本中提供自動填入架構,讓填寫表單變得更加容易。裝置須具備自動填入服務的應用程式,使用者才能運用自動填入功能。
本頁說明如何在應用程式中實作自動填入服務。如需說明如何實作這項服務的程式碼範例,請參閱 Java 或 Kotlin 版本的 AutofillFramework 範例。如要進一步瞭解自動填入服務的運作方式,請參閱 AutofillService 和 AutofillManager 類別的參考頁面。
資訊清單宣告和權限
提供自動填入服務的應用程式必須包含說明服務實作的宣告。如要指定宣告內容,請在應用程式資訊清單中納入 <service> 元素。<service> 元素必須包含下列屬性和元素:
android:name屬性:指向實作該服務應用程式中的AutofillService子類別。android:permission屬性,可宣告BIND_AUTOFILL_SERVICE權限。<intent-filter>元素,其中的必要<action>子項會指定android.service.autofill.AutofillService動作。- 選用的
<meta-data>元素:可用來為服務提供其他設定參數。
以下範例為自動填入服務宣告:
<service
    android:name=".MyAutofillService"
    android:label="My Autofill Service"
    android:permission="android.permission.BIND_AUTOFILL_SERVICE">
    <intent-filter>
        <action android:name="android.service.autofill.AutofillService" />
    </intent-filter>
    <meta-data
        android:name="android.autofill"
        android:resource="@xml/service_configuration" />
</service>
<meta-data> 元素包含指向 XML 資源的 android:resource 屬性,其中包含該服務的相關詳細資料。上述範例中的 service_configuration 資源指定可讓使用者設定服務的活動。以下範例為 service_configuration XML 資源:
<autofill-service
  xmlns:android="http://schemas.android.com/apk/res/android"
  android:settingsActivity="com.example.android.SettingsActivity" />
如要進一步瞭解 XML 資源,請參閱「應用程式資源總覽」。
提示啟用服務
如果應用程式宣告 BIND_AUTOFILL_SERVICE 權限,且使用者在裝置設定中啟用這項權限,該應用程式就會做為自動填入服務。應用程式可透過呼叫 AutofillManager 類別的 hasEnabledAutofillServices() 方法,確認是否為已啟用的服務。
如果應用程式並非目前的自動填入服務,則可以使用 ACTION_REQUEST_SET_AUTOFILL_SERVICE 意圖要求使用者變更自動填入設定。如果使用者選擇與呼叫端套件相符的自動填入服務,意圖會回傳 RESULT_OK 值。
填寫用戶端檢視畫面
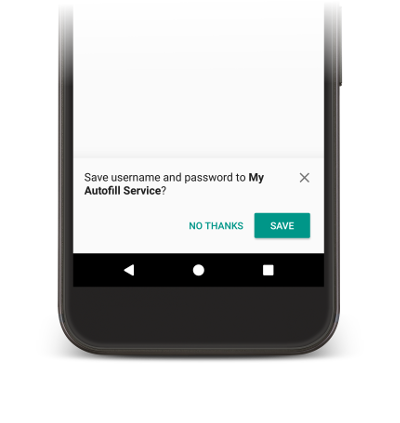
當使用者與其他應用程式互動時,自動填入服務會收到填寫用戶端檢視畫面的要求。如果自動填入服務中的使用者資料符合要求,就會在回應中傳送資料。Android 系統會顯示自動填入 UI 並提供可用資料,如圖 1 所示:

自動填入架構會定義用來填寫檢視畫面的工作流程,藉此縮短將 Android 系統繫結至自動填入服務的時間。在每個要求中,Android 系統會呼叫 onFillRequest() 方法,以便將 AssistStructure 物件傳送至服務。
自動填入服務會透過先前儲存的使用者資料,確認其是否符合要求。如果符合要求,服務就會將資料封裝在 Dataset 物件中,然後呼叫 onSuccess() 方法,傳遞包含 Dataset 物件的 FillResponse 物件。如果服務沒有符合要求的資料,就會將 null 傳遞至 onSuccess() 方法。如果處理要求時發生錯誤,服務會改為呼叫 onFailure() 方法。如需工作流程的詳細說明,請參閱AutofillService 參考頁面中的說明。
以下程式碼為 onFillRequest() 方法的範例:
Kotlin
override fun onFillRequest(
    request: FillRequest,
    cancellationSignal: CancellationSignal,
    callback: FillCallback
) {
    // Get the structure from the request
    val context: List<FillContext> = request.fillContexts
    val structure: AssistStructure = context[context.size - 1].structure

    // Traverse the structure looking for nodes to fill out
    val parsedStructure: ParsedStructure = parseStructure(structure)

    // Fetch user data that matches the fields
    val (username: String, password: String) = fetchUserData(parsedStructure)

    // Build the presentation of the datasets
    val usernamePresentation = RemoteViews(packageName, android.R.layout.simple_list_item_1)
    usernamePresentation.setTextViewText(android.R.id.text1, "my_username")
    val passwordPresentation = RemoteViews(packageName, android.R.layout.simple_list_item_1)
    passwordPresentation.setTextViewText(android.R.id.text1, "Password for my_username")

    // Add a dataset to the response
    val fillResponse: FillResponse = FillResponse.Builder()
            .addDataset(Dataset.Builder()
                    .setValue(
                            parsedStructure.usernameId,
                            AutofillValue.forText(username),
                            usernamePresentation
                    )
                    .setValue(
                            parsedStructure.passwordId,
                            AutofillValue.forText(password),
                            passwordPresentation
                    )
                    .build())
            .build()

    // If there are no errors, call onSuccess() and pass the response
    callback.onSuccess(fillResponse)
}

data class ParsedStructure(var usernameId: AutofillId, var passwordId: AutofillId)

data class UserData(var username: String, var password: String)
Java
@Override
public void onFillRequest(FillRequest request, CancellationSignal cancellationSignal, FillCallback callback) {
    // Get the structure from the request
    List<FillContext> context = request.getFillContexts();
    AssistStructure structure = context.get(context.size() - 1).getStructure();

    // Traverse the structure looking for nodes to fill out
    ParsedStructure parsedStructure = parseStructure(structure);

    // Fetch user data that matches the fields
    UserData userData = fetchUserData(parsedStructure);

    // Build the presentation of the datasets
    RemoteViews usernamePresentation = new RemoteViews(getPackageName(), android.R.layout.simple_list_item_1);
    usernamePresentation.setTextViewText(android.R.id.text1, "my_username");
    RemoteViews passwordPresentation = new RemoteViews(getPackageName(), android.R.layout.simple_list_item_1);
    passwordPresentation.setTextViewText(android.R.id.text1, "Password for my_username");

    // Add a dataset to the response
    FillResponse fillResponse = new FillResponse.Builder()
            .addDataset(new Dataset.Builder()
                    .setValue(parsedStructure.usernameId,
                            AutofillValue.forText(userData.username), usernamePresentation)
                    .setValue(parsedStructure.passwordId,
                            AutofillValue.forText(userData.password), passwordPresentation)
                    .build())
            .build();

    // If there are no errors, call onSuccess() and pass the response
    callback.onSuccess(fillResponse);
}

class ParsedStructure {
    AutofillId usernameId;
    AutofillId passwordId;
}

class UserData {
    String username;
    String password;
}
一項服務可能具備多個符合要求的資料集。在此情況下,Android 系統會在自動填入 UI 中顯示多個選項 (每個資料集各一個選項)。以下程式碼範例說明如何在回應中提供多個資料集:
Kotlin
// Add multiple datasets to the response
val fillResponse: FillResponse = FillResponse.Builder()
        .addDataset(Dataset.Builder()
                .setValue(parsedStructure.usernameId,
                        AutofillValue.forText(user1Data.username), username1Presentation)
                .setValue(parsedStructure.passwordId,
                        AutofillValue.forText(user1Data.password), password1Presentation)
                .build())
        .addDataset(Dataset.Builder()
                .setValue(parsedStructure.usernameId,
                        AutofillValue.forText(user2Data.username), username2Presentation)
                .setValue(parsedStructure.passwordId,
                        AutofillValue.forText(user2Data.password), password2Presentation)
                .build())
        .build()
Java
// Add multiple datasets to the response
FillResponse fillResponse = new FillResponse.Builder()
        .addDataset(new Dataset.Builder()
                .setValue(parsedStructure.usernameId,
                        AutofillValue.forText(user1Data.username), username1Presentation)
                .setValue(parsedStructure.passwordId,
                        AutofillValue.forText(user1Data.password), password1Presentation)
                .build())
        .addDataset(new Dataset.Builder()
                .setValue(parsedStructure.usernameId,
                        AutofillValue.forText(user2Data.username), username2Presentation)
                .setValue(parsedStructure.passwordId,
                        AutofillValue.forText(user2Data.password), password2Presentation)
                .build())
        .build();
自動填入服務可瀏覽 AssistStructure 中的 ViewNode 物件,以擷取完成要求所需的自動填入資料。服務可使用 ViewNode 類別的方法 (例如 getAutofillId()) 擷取自動填入資料。
服務必須能描述檢視畫面的內容,確認其是否能符合要求。服務要描述檢視畫面的內容時,首先必須使用 autofillHints 屬性。不過,用戶端應用程式必須在檢視畫面中明確提供屬性,服務才能使用該屬性。
如果用戶端應用程式未提供 autofillHints 屬性,則服務必須根據自身的經驗法則來描述內容。服務可透過其他類別的方法 (例如 getText() 或 getHint()) 取得檢視畫面內容的相關資訊。詳情請參閱「針對自動填入提供提示」。
以下範例說明如何掃遍 AssistStructure,並從 ViewNode 物件擷取自動填入資料:
Kotlin
fun traverseStructure(structure: AssistStructure) {
    val windowNodes: List<AssistStructure.WindowNode> =
            structure.run {
                (0 until windowNodeCount).map { getWindowNodeAt(it) }
            }

    windowNodes.forEach { windowNode: AssistStructure.WindowNode ->
        val viewNode: ViewNode? = windowNode.rootViewNode
        traverseNode(viewNode)
    }
}

fun traverseNode(viewNode: ViewNode?) {
    if (viewNode?.autofillHints?.isNotEmpty() == true) {
        // If the client app provides autofill hints, you can obtain them using
        // viewNode.getAutofillHints();
    } else {
        // Or use your own heuristics to describe the contents of a view
        // using methods such as getText() or getHint()
    }

    val children: List<ViewNode>? =
            viewNode?.run {
                (0 until childCount).map { getChildAt(it) }
            }

    children?.forEach { childNode: ViewNode ->
        traverseNode(childNode)
    }
}
Java
public void traverseStructure(AssistStructure structure) {
    int nodes = structure.getWindowNodeCount();

    for (int i = 0; i < nodes; i++) {
        WindowNode windowNode = structure.getWindowNodeAt(i);
        ViewNode viewNode = windowNode.getRootViewNode();
        traverseNode(viewNode);
    }
}

public void traverseNode(ViewNode viewNode) {
    if(viewNode.getAutofillHints() != null && viewNode.getAutofillHints().length > 0) {
        // If the client app provides autofill hints, you can obtain them using
        // viewNode.getAutofillHints();
    } else {
        // Or use your own heuristics to describe the contents of a view
        // using methods such as getText() or getHint()
    }

    for(int i = 0; i < viewNode.getChildCount(); i++) {
        ViewNode childNode = viewNode.getChildAt(i);
        traverseNode(childNode);
    }
}
儲存使用者資料
自動填入服務需要使用者資料才能填寫應用程式中的檢視畫面。使用者手動填寫檢視畫面時,系統會提示使用者將資料儲存至目前的自動填入服務,如圖 2 所示。
如要儲存資料,服務必須表明其打算儲存資料供日後使用。在 Android 系統傳送儲存資料的要求之前,會顯示填入要求,讓服務有機會填寫檢視畫面。為了表明其打算儲存資料,服務會在填入要求的回應中加入 SaveInfo 物件。SaveInfo 物件至少包含下列資料:
- 要儲存的使用者資料類型。如需可用的
SAVE_DATA值清單,請參閱SaveInfo。 - 觸發儲存要求所需變更的檢視畫面組合下限。舉例來說,登入表單通常需要使用者更新
username和password檢視畫面,才能觸發儲存要求。
SaveInfo 物件與 FillResponse 物件相關聯,如下列程式碼範例所示:
Kotlin
override fun onFillRequest(
    request: FillRequest,
    cancellationSignal: CancellationSignal,
    callback: FillCallback
) {
    // ...
    // Builder object requires a non-null presentation
    val notUsed = RemoteViews(packageName, android.R.layout.simple_list_item_1)

    val fillResponse: FillResponse = FillResponse.Builder()
            .addDataset(
                    Dataset.Builder()
                            .setValue(parsedStructure.usernameId, null, notUsed)
                            .setValue(parsedStructure.passwordId, null, notUsed)
                            .build()
            )
            .setSaveInfo(
                    SaveInfo.Builder(
                            SaveInfo.SAVE_DATA_TYPE_USERNAME or SaveInfo.SAVE_DATA_TYPE_PASSWORD,
                            arrayOf(parsedStructure.usernameId, parsedStructure.passwordId)
                    ).build()
            )
            .build()
    // ...
}
Java
@Override
public void onFillRequest(FillRequest request, CancellationSignal cancellationSignal, FillCallback callback) {
    // ...
    // Builder object requires a non-null presentation
    RemoteViews notUsed = new RemoteViews(getPackageName(), android.R.layout.simple_list_item_1);

    FillResponse fillResponse = new FillResponse.Builder()
            .addDataset(new Dataset.Builder()
                    .setValue(parsedStructure.usernameId, null, notUsed)
                    .setValue(parsedStructure.passwordId, null, notUsed)
                    .build())
            .setSaveInfo(new SaveInfo.Builder(
                    SaveInfo.SAVE_DATA_TYPE_USERNAME | SaveInfo.SAVE_DATA_TYPE_PASSWORD,
                    new AutofillId[] {parsedStructure.usernameId, parsedStructure.passwordId})
                    .build())
            .build();
    // ...
}
自動填入服務可實作邏輯,保存 onSaveRequest() 方法中的使用者資料。通常會在用戶端活動結束後或用戶端應用程式呼叫 commit() 時,呼叫該方法。以下程式碼為 onSaveRequest() 方法的範例:
Kotlin
override fun onSaveRequest(request: SaveRequest, callback: SaveCallback) {
    // Get the structure from the request
    val context: List<FillContext> = request.fillContexts
    val structure: AssistStructure = context[context.size - 1].structure

    // Traverse the structure looking for data to save
    traverseStructure(structure)

    // Persist the data - if there are no errors, call onSuccess()
    callback.onSuccess()
}
Java
@Override
public void onSaveRequest(SaveRequest request, SaveCallback callback) {
    // Get the structure from the request
    List<FillContext> context = request.getFillContexts();
    AssistStructure structure = context.get(context.size() - 1).getStructure();

    // Traverse the structure looking for data to save
    traverseStructure(structure);

    // Persist the data - if there are no errors, call onSuccess()
    callback.onSuccess();
}
自動填入服務必須先加密機密資料,才能保存資料。不過,使用者資料可能包含非機密的標籤或資料。例如,使用者帳戶可包含標籤,將資料標示為「工作」或「個人」帳戶。服務不得將標籤加密,如果未對標籤加密,而使用者尚未通過驗證,服務也能在簡報檢視畫面中使用標籤。接著,在使用者通過驗證後,服務會將標籤替換成實際資料。
延後自動填入儲存 UI
從 Android 10 開始,如果您使用多個畫面實作自動填入工作流程 (例如,一個使用者名稱欄位畫面和一個密碼畫面),則可使用 SaveInfo.FLAG_DELAY_SAVE 旗標延後自動填入儲存 UI。
如果您設定了這個旗標,當系統確認與 SaveInfo 回應相關聯的自動填入內容時,就不會觸發自動填入儲存 UI。您可以改為在相同工作內另外使用不同的活動提供未來填入要求,然後透過儲存要求顯示 UI。詳情請參閱 SaveInfo.FLAG_DELAY_SAVE 的說明。
要求使用者驗證
自動填入服務可要求使用者在驗證完成後才能填寫檢視畫面,藉此提供額外的安全防護。在下列情況中,很適合實作使用者驗證:
- 需要使用主要密碼或指紋掃描功能解鎖應用程式中的使用者資料。
- 需要使用信用卡驗證碼 (CVC) 解鎖特定資料集,例如信用卡資料。
在服務要求使用者通過驗證才能解鎖資料的情況下,服務可能會顯示樣板資料或標籤,並指定負責驗證作業的 Intent。在驗證流程完成後,如果您需要其他資料來處理要求,可將這類資料新增至意圖。如此一來,您的驗證活動就能將資料回傳至應用程式中的 AutofillService 類別。
以下程式碼範例說明如何指定要求需要驗證:
Kotlin
val authPresentation = RemoteViews(packageName, android.R.layout.simple_list_item_1).apply {
    setTextViewText(android.R.id.text1, "requires authentication")
}
val authIntent = Intent(this, AuthActivity::class.java).apply {
    // Send any additional data required to complete the request
    putExtra(MY_EXTRA_DATASET_NAME, "my_dataset")
}

val intentSender: IntentSender = PendingIntent.getActivity(
        this,
        1001,
        authIntent,
        PendingIntent.FLAG_CANCEL_CURRENT
).intentSender

// Build a FillResponse object that requires authentication
val fillResponse: FillResponse = FillResponse.Builder()
        .setAuthentication(autofillIds, intentSender, authPresentation)
        .build()
Java
RemoteViews authPresentation = new RemoteViews(getPackageName(), android.R.layout.simple_list_item_1);
authPresentation.setTextViewText(android.R.id.text1, "requires authentication");
Intent authIntent = new Intent(this, AuthActivity.class);

// Send any additional data required to complete the request
authIntent.putExtra(MY_EXTRA_DATASET_NAME, "my_dataset");
IntentSender intentSender = PendingIntent.getActivity(
                this,
                1001,
                authIntent,
                PendingIntent.FLAG_CANCEL_CURRENT
        ).getIntentSender();

// Build a FillResponse object that requires authentication
FillResponse fillResponse = new FillResponse.Builder()
        .setAuthentication(autofillIds, intentSender, authPresentation)
        .build();
活動完成驗證流程後,必須呼叫 setResult() 方法來傳遞 RESULT_OK 值,並將 EXTRA_AUTHENTICATION_RESULT 額外項目設為 FillResponse 物件,其中包含已填入的資料集。以下程式碼範例說明如何在驗證流程完成後回傳結果:
Kotlin
// The data sent by the service and the structure are included in the intent
val datasetName: String? = intent.getStringExtra(MY_EXTRA_DATASET_NAME)
val structure: AssistStructure = intent.getParcelableExtra(EXTRA_ASSIST_STRUCTURE)
val parsedStructure: ParsedStructure = parseStructure(structure)
val (username, password) = fetchUserData(parsedStructure)

// Build the presentation of the datasets
val usernamePresentation =
        RemoteViews(packageName, android.R.layout.simple_list_item_1).apply {
            setTextViewText(android.R.id.text1, "my_username")
        }
val passwordPresentation =
        RemoteViews(packageName, android.R.layout.simple_list_item_1).apply {
            setTextViewText(android.R.id.text1, "Password for my_username")
        }

// Add the dataset to the response
val fillResponse: FillResponse = FillResponse.Builder()
        .addDataset(Dataset.Builder()
                .setValue(
                        parsedStructure.usernameId,
                        AutofillValue.forText(username),
                        usernamePresentation
                )
                .setValue(
                        parsedStructure.passwordId,
                        AutofillValue.forText(password),
                        passwordPresentation
                )
                .build()
        ).build()

val replyIntent = Intent().apply {
    // Send the data back to the service
    putExtra(MY_EXTRA_DATASET_NAME, datasetName)
    putExtra(EXTRA_AUTHENTICATION_RESULT, fillResponse)
}

setResult(Activity.RESULT_OK, replyIntent)
Java
Intent intent = getIntent();

// The data sent by the service and the structure are included in the intent
String datasetName = intent.getStringExtra(MY_EXTRA_DATASET_NAME);
AssistStructure structure = intent.getParcelableExtra(EXTRA_ASSIST_STRUCTURE);
ParsedStructure parsedStructure = parseStructure(structure);
UserData userData = fetchUserData(parsedStructure);

// Build the presentation of the datasets
RemoteViews usernamePresentation = new RemoteViews(getPackageName(), android.R.layout.simple_list_item_1);
usernamePresentation.setTextViewText(android.R.id.text1, "my_username");
RemoteViews passwordPresentation = new RemoteViews(getPackageName(), android.R.layout.simple_list_item_1);
passwordPresentation.setTextViewText(android.R.id.text1, "Password for my_username");

// Add the dataset to the response
FillResponse fillResponse = new FillResponse.Builder()
        .addDataset(new Dataset.Builder()
                .setValue(parsedStructure.usernameId,
                        AutofillValue.forText(userData.username), usernamePresentation)
                .setValue(parsedStructure.passwordId,
                        AutofillValue.forText(userData.password), passwordPresentation)
                .build())
        .build();

Intent replyIntent = new Intent();

// Send the data back to the service
replyIntent.putExtra(MY_EXTRA_DATASET_NAME, datasetName);
replyIntent.putExtra(EXTRA_AUTHENTICATION_RESULT, fillResponse);

setResult(RESULT_OK, replyIntent);
如果需要解鎖信用卡資料集,服務可以顯示相關 UI,要求提供信用卡驗證碼。在透過顯示樣板資料 (例如銀行名稱和信用卡號碼末四碼) 解鎖資料集之前,您可以隱藏資料。以下範例說明如何要求資料集驗證,並在使用者提供信用卡驗證碼之前隱藏資料:
Kotlin
// Parse the structure and fetch payment data
val parsedStructure: ParsedStructure = parseStructure(structure)
val paymentData: Payment = fetchPaymentData(parsedStructure)

// Build the presentation that shows the bank and the last four digits of the
// credit card number, such as 'Bank-1234'
val maskedPresentation: String = "${paymentData.bank}-" +
        paymentData.creditCardNumber.substring(paymentData.creditCardNumber.length - 4)
val authPresentation = RemoteViews(packageName, android.R.layout.simple_list_item_1).apply {
    setTextViewText(android.R.id.text1, maskedPresentation)
}

// Prepare an intent that displays the UI that asks for the CVC
val cvcIntent = Intent(this, CvcActivity::class.java)
val cvcIntentSender: IntentSender = PendingIntent.getActivity(
        this,
        1001,
        cvcIntent,
        PendingIntent.FLAG_CANCEL_CURRENT
).intentSender

// Build a FillResponse object that includes a Dataset that requires authentication
val fillResponse: FillResponse = FillResponse.Builder()
        .addDataset(
                Dataset.Builder()
                        // The values in the dataset are replaced by the actual
                        // data once the user provides the CVC
                        .setValue(parsedStructure.creditCardId, null, authPresentation)
                        .setValue(parsedStructure.expDateId, null, authPresentation)
                        .setAuthentication(cvcIntentSender)
                        .build()
        ).build()
Java
// Parse the structure and fetch payment data
ParsedStructure parsedStructure = parseStructure(structure);
Payment paymentData = fetchPaymentData(parsedStructure);

// Build the presentation that shows the bank and the last four digits of the
// credit card number, such as 'Bank-1234'
String maskedPresentation = paymentData.bank + "-" +
    paymentData.creditCardNumber.subString(paymentData.creditCardNumber.length - 4);
RemoteViews authPresentation = new RemoteViews(getPackageName(), android.R.layout.simple_list_item_1);
authPresentation.setTextViewText(android.R.id.text1, maskedPresentation);

// Prepare an intent that displays the UI that asks for the CVC
Intent cvcIntent = new Intent(this, CvcActivity.class);
IntentSender cvcIntentSender = PendingIntent.getActivity(
        this,
        1001,
        cvcIntent,
        PendingIntent.FLAG_CANCEL_CURRENT
).getIntentSender();

// Build a FillResponse object that includes a Dataset that requires authentication
FillResponse fillResponse = new FillResponse.Builder()
        .addDataset(new Dataset.Builder()
                // The values in the dataset are replaced by the actual
                // data once the user provides the CVC
                .setValue(parsedStructure.creditCardId, null, authPresentation)
                .setValue(parsedStructure.expDateId, null, authPresentation)
                .setAuthentication(cvcIntentSender)
                .build())
        .build();
活動驗證信用卡驗證碼後,必須呼叫 setResult() 方法來傳遞 RESULT_OK 值,並將 EXTRA_AUTHENTICATION_RESULT 額外項目設為 Dataset 物件,其中包含信用卡號碼和到期日。新資料集會取代需要驗證的資料集,並立即填寫檢視畫面。以下程式碼說明如何在使用者提供信用卡驗證碼後回傳資料集:
Kotlin
// Parse the structure and fetch payment data.
val parsedStructure: ParsedStructure = parseStructure(structure)
val paymentData: Payment = fetchPaymentData(parsedStructure)

// Build a non-null RemoteViews object to use as the presentation when
// creating the Dataset object. This presentation isn't actually used, but the
// Builder object requires a non-null presentation.
val notUsed = RemoteViews(packageName, android.R.layout.simple_list_item_1)

// Create a dataset with the credit card number and expiration date.
val responseDataset: Dataset = Dataset.Builder()
        .setValue(
                parsedStructure.creditCardId,
                AutofillValue.forText(paymentData.creditCardNumber),
                notUsed
        )
        .setValue(
                parsedStructure.expDateId,
                AutofillValue.forText(paymentData.expirationDate),
                notUsed
        )
        .build()

val replyIntent = Intent().apply {
    putExtra(EXTRA_AUTHENTICATION_RESULT, responseDataset)
}
Java
// Parse the structure and fetch payment data.
ParsedStructure parsedStructure = parseStructure(structure);
Payment paymentData = fetchPaymentData(parsedStructure);

// Build a non-null RemoteViews object to use as the presentation when
// creating the Dataset object. This presentation isn't actually used, but the
// Builder object requires a non-null presentation.
RemoteViews notUsed = new RemoteViews(getPackageName(), android.R.layout.simple_list_item_1);

// Create a dataset with the credit card number and expiration date.
Dataset responseDataset = new Dataset.Builder()
        .setValue(parsedStructure.creditCardId,
                AutofillValue.forText(paymentData.creditCardNumber), notUsed)
        .setValue(parsedStructure.expDateId,
                AutofillValue.forText(paymentData.expirationDate), notUsed)
        .build();

Intent replyIntent = new Intent();
replyIntent.putExtra(EXTRA_AUTHENTICATION_RESULT, responseDataset);
整理邏輯群組中的資料
自動填入服務必須將資料整理成邏輯群組,以便區隔來自不同網域的概念。這類邏輯群組在本頁中稱為「分區」。下列清單為分區和欄位的標準範例:
- 憑證:包含使用者名稱和密碼欄位。
- 地址:包含街道、城市、州和郵遞區號欄位。
- 付款資訊:包含信用卡號碼、到期日和驗證碼欄位。
如果自動填入服務可正確建立資料分區,就不會在資料集中公開來自多個分區的資料,藉此有效保護其使用者的資料。舉例來說,包含憑證的資料集不需要包含付款資訊。將資料整理到不同分區中,可讓服務提供符合要求所需的最低相關資訊量。
將資料整理到不同分區中,可讓服務填入來自多個分區的活動檢視畫面,同時將最低量的相關資料傳送至用戶端應用程式。舉例來說,假設某項活動包含使用者名稱、密碼、街道和城市檢視畫面,而自動填入服務具有下列資料:
| 分區 | 欄位 1 | 欄位 2 |
|---|---|---|
| 憑證 | work_username | work_password |
| personal_username | personal_password | |
| 地址 | work_street | work_city |
| personal_street | personal_city |
服務可準備資料集,其中包括工作帳戶和個人帳戶的憑證分區。使用者選擇某個資料集時,後續的自動填入回應就能根據使用者的第一個選擇,提供公司或個人地址。
服務可呼叫 isFocused() 方法,並同時掃遍 AssistStructure 物件,藉此識別產生要求的欄位。如此一來,服務就能利用適當的分區資料來準備 FillResponse。
簡訊動態密碼自動填入
您的自動填入服務可協助使用者填寫透過 SMS Retriever API 傳送的一次性代碼。
您必須符合下列需求才能使用這項功能:
- 在 Android 9 (API 級別 28) 以上版本上執行自動填入服務。
- 使用者同意自動填入服務讀取簡訊中的一次性代碼。
- 自動填入功能適用的應用程式尚未使用 SMS Retriever API 讀取一次性代碼。
自動填入服務可使用 SmsCodeRetriever.getAutofillClient(),只要透過 Google Play 服務 19.0.56 以上版本呼叫 SmsCodeAutofillClient 即可。
在自動填入服務中使用這個 API 的主要步驟如下:
- 在自動填入服務中,使用來自
SmsCodeAutofillClient的hasOngoingSmsRequest,判斷是否已有針對自動填入功能適用的應用程式套件名稱的任何有效要求。只有在自動填入服務回傳false時才能顯示建議提示。 - 在自動填入服務中使用來自
SmsCodeAutofillClient的checkPermissionState,檢查自動填入服務是否具備自動填入一次性代碼的權限。這個權限狀態可為NONE、GRANTED或DENIED。自動填入服務必須顯示NONE和GRANTED狀態的建議提示。 - 在自動填入驗證活動中使用
SmsRetriever.SEND_PERMISSION權限,為BroadcastReceiver註冊SmsCodeRetriever.SMS_CODE_RETRIEVED_ACTION監聽功能,以便在適用情況下接收簡訊代碼結果。 在
SmsCodeAutofillClient上呼叫startSmsCodeRetriever,開始監聽透過簡訊傳送的一次性代碼。如果使用者授權自動填入服務擷取簡訊中的一次性代碼,系統會查看過去 1 分鐘到接下來 5 分鐘這段期間內收到的簡訊。如果自動填入服務必須要求使用者授權讀取一次性代碼,
startSmsCodeRetriever回傳的Task可能會失敗,並同時回傳ResolvableApiException。如果發生這種情況,您必須呼叫ResolvableApiException.startResolutionForResult()方法,顯示權限要求的同意聲明對話方塊。接收來自意圖的簡訊代碼結果,然後回傳簡訊代碼做為自動填入回應。
在 Chrome 中啟用自動填入功能
Chrome 允許第三方自動填入服務以原生方式自動填入表單,為使用者提供更流暢簡單的使用體驗。如要使用第三方自動填入服務自動填入密碼、密碼金鑰和其他資訊 (例如地址和付款資料),使用者必須在 Chrome 設定中選取「使用其他自動填入服務」。
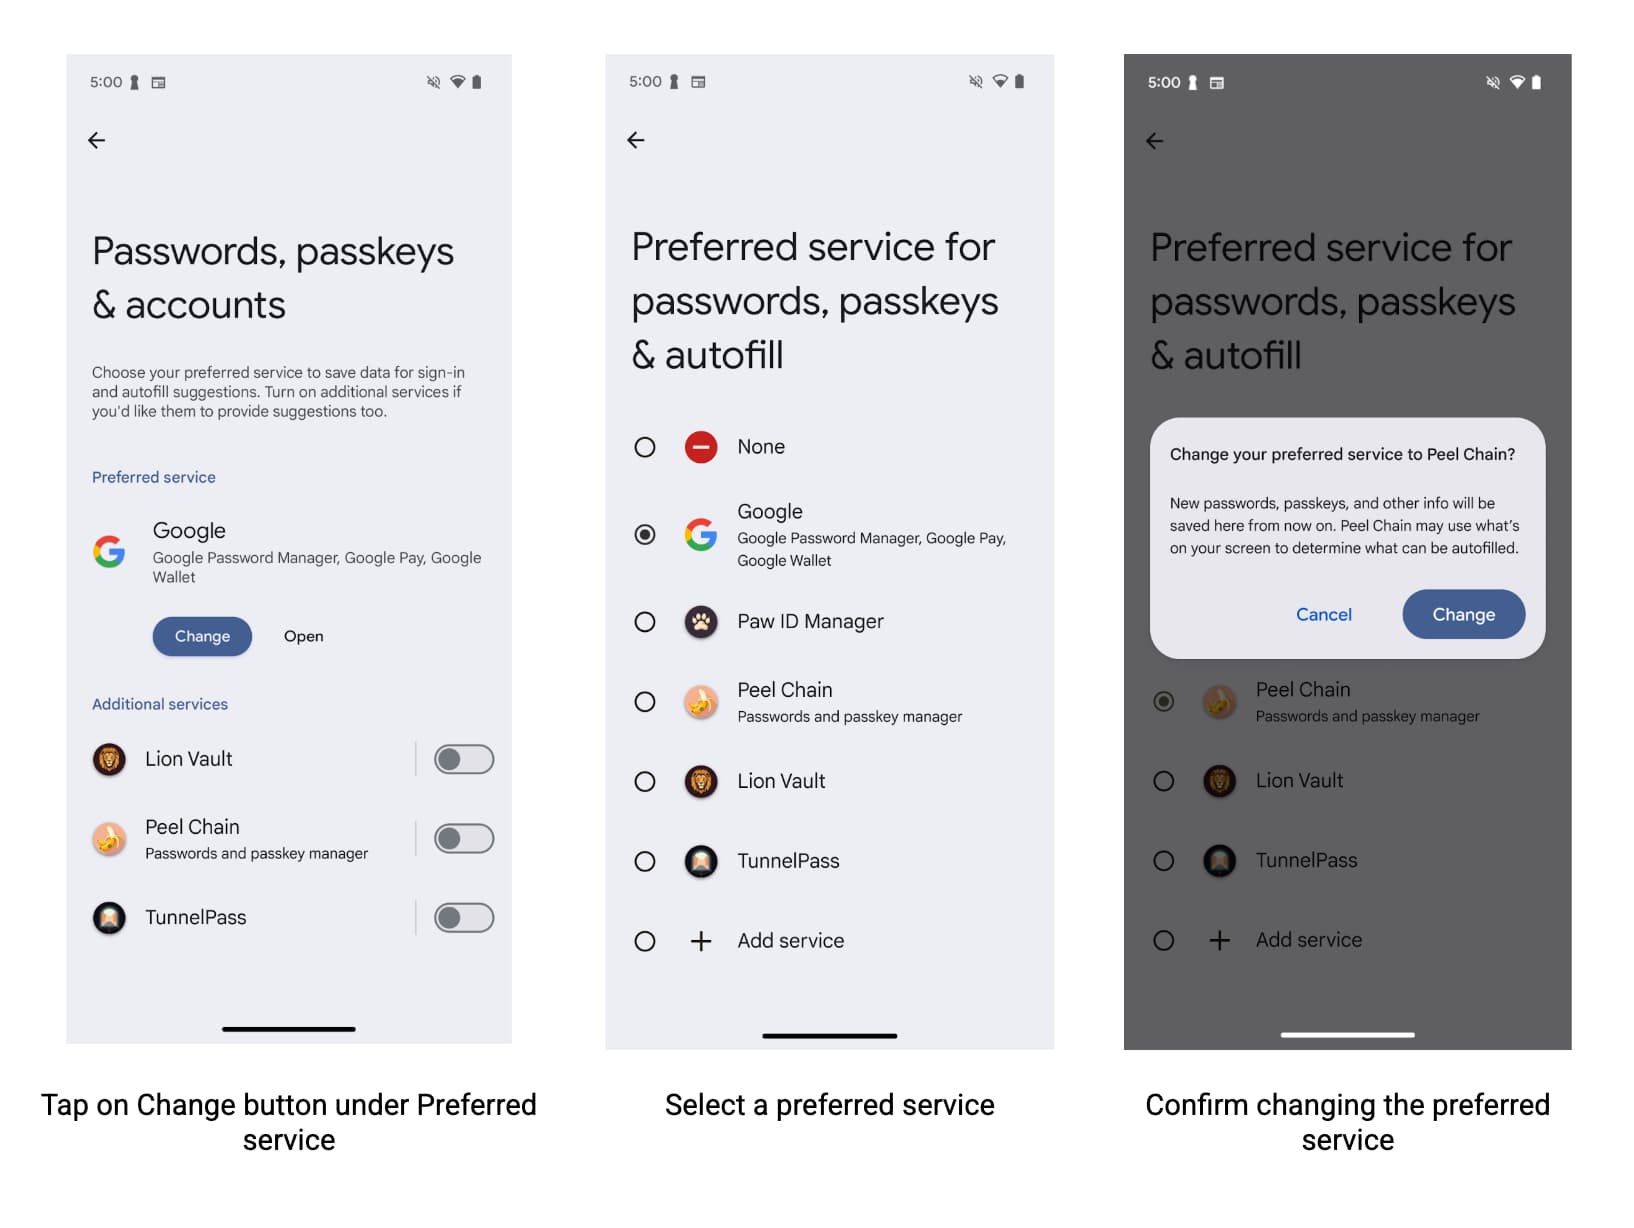
為確保使用者透過您的服務和 Android 版 Chrome 享有最佳自動填入體驗,自動填入服務供應商應鼓勵使用者在 Chrome 設定中指定偏好的服務供應商。
為協助使用者開啟切換按鈕,開發人員可以:
- 查詢 Chrome 設定,瞭解使用者是否要使用第三方自動填入服務。
- 深層連結至 Chrome 設定頁面,使用者可在該頁面啟用第三方自動填寫服務。
指定相容模式的 Chrome 版本上限
Chrome 137 版起已停止支援相容模式,改用 Android 自動填入功能。保留相容模式可能會導致穩定性問題。請依下列方式指定支援相容性模式的 Chrome 封裝檔案最高版本,確保穩定性。
<autofill-service>
  ...
  <compatibility-package android:name="com.android.chrome" android:maxLongVersionCode="711900039" />
  <compatibility-package android:name="com.chrome.beta" android:maxLongVersionCode="711900039" />
  <compatibility-package android:name="com.chrome.dev" android:maxLongVersionCode="711900039" />
  <compatibility-package android:name="com.chrome.canary" android:maxLongVersionCode="711900039" />
  ...
</autofill-service>
讀取 Chrome 設定
任何應用程式都可以讀取 Chrome 是否使用第三方自動填入模式,以便使用 Android 自動填入功能。Chrome 會使用 Android 的 ContentProvider 傳達這項資訊。在 Android 資訊清單中宣告要從哪些管道讀取設定:
<uses-permission android:name="android.permission.READ_USER_DICTIONARY"/>
<queries>
 <!-- To Query Chrome Beta: -->
 <package android:name="com.chrome.beta" />

 <!-- To Query Chrome Stable: -->
 <package android:name="com.android.chrome" />
</queries>
接著,請使用 Android 的 ContentResolver 建構內容 URI,要求提供該資訊:
Kotlin
val CHROME_CHANNEL_PACKAGE = "com.android.chrome" // Chrome Stable.
val CONTENT_PROVIDER_NAME = ".AutofillThirdPartyModeContentProvider"
val THIRD_PARTY_MODE_COLUMN = "autofill_third_party_state"
val THIRD_PARTY_MODE_ACTIONS_URI_PATH = "autofill_third_party_mode"

val uri = Uri.Builder()
    .scheme(ContentResolver.SCHEME_CONTENT)
    .authority(CHROME_CHANNEL_PACKAGE + CONTENT_PROVIDER_NAME)
    .path(THIRD_PARTY_MODE_ACTIONS_URI_PATH)
    .build()

val cursor = contentResolver.query(
    uri,
    arrayOf(THIRD_PARTY_MODE_COLUMN), // projection
    null, // selection
    null, // selectionArgs
    null  // sortOrder
)

if (cursor == null) {
  // Terminate now! Chromium versions older than this don't provide this information.
}

cursor?.use { // Use the safe call operator and the use function for auto-closing
    if (it.moveToFirst()) { // Check if the cursor has any rows
        val index = it.getColumnIndex(THIRD_PARTY_MODE_COLUMN)
        if (index != -1) { // Check if the column exists
          val value = it.getInt(index)
          if (0 == value) {
              // 0 means that the third party mode is turned off. Chrome uses its built-in
              // password manager. This is the default for new users.
          } else {
              // 1 means that the third party mode is turned on. Chrome forwards all
              // autofill requests to Android Autofill. Users have to opt-in for this.
          }
        } else {
          // Handle the case where the column doesn't exist.  Log a warning, perhaps.
          Log.w("Autofill", "Column $THIRD_PARTY_MODE_COLUMN not found in cursor")
        }
    }
} // The cursor is automatically closed here
Java
final String CHROME_CHANNEL_PACKAGE = "com.android.chrome";  // Chrome Stable.
final String CONTENT_PROVIDER_NAME = ".AutofillThirdPartyModeContentProvider";
final String THIRD_PARTY_MODE_COLUMN = "autofill_third_party_state";
final String THIRD_PARTY_MODE_ACTIONS_URI_PATH = "autofill_third_party_mode";

final Uri uri = new Uri.Builder()
                  .scheme(ContentResolver.SCHEME_CONTENT)
                  .authority(CHROME_CHANNEL_PACKAGE + CONTENT_PROVIDER_NAME)
                  .path(THIRD_PARTY_MODE_ACTIONS_URI_PATH)
                  .build();

final Cursor cursor = getContentResolver().query(
                  uri,
                  /*projection=*/new String[] {THIRD_PARTY_MODE_COLUMN},
                  /*selection=*/ null,
                  /*selectionArgs=*/ null,
                  /*sortOrder=*/ null);

if (cursor == null) {
  // Terminate now! Chromium versions older than this don't provide this information.
}

cursor.moveToFirst(); // Retrieve the result;

int index = cursor.getColumnIndex(THIRD_PARTY_MODE_COLUMN);

if (0 == cursor.getInt(index)) {
  // 0 means that the third party mode is turned off. Chrome uses its built-in
  // password manager. This is the default for new users.
} else {
  // 1 means that the third party mode is turned on. Chrome forwards all
  // autofill requests to Android Autofill. Users have to opt-in for this.
}
深層連結至 Chrome 設定
如要深層連結至 Chrome 設定頁面,讓使用者啟用第三方自動填入服務,請使用 Android Intent。請務必如本範例所示,設定動作和類別:
Kotlin
val autofillSettingsIntent = Intent(Intent.ACTION_APPLICATION_PREFERENCES)
autofillSettingsIntent.addCategory(Intent.CATEGORY_DEFAULT)
autofillSettingsIntent.addCategory(Intent.CATEGORY_APP_BROWSER)
autofillSettingsIntent.addCategory(Intent.CATEGORY_PREFERENCE)

// Invoking the intent with a chooser allows users to select the channel they
// want to configure. If only one browser reacts to the intent, the chooser is
// skipped.
val chooser = Intent.createChooser(autofillSettingsIntent, "Pick Chrome Channel")
startActivity(chooser)

// If the caller knows which Chrome channel they want to configure,
// they can instead add a package hint to the intent, e.g.
val specificChromeIntent = Intent(Intent.ACTION_APPLICATION_PREFERENCES) // Create a *new* intent
specificChromeIntent.addCategory(Intent.CATEGORY_DEFAULT)
specificChromeIntent.addCategory(Intent.CATEGORY_APP_BROWSER)
specificChromeIntent.addCategory(Intent.CATEGORY_PREFERENCE)
specificChromeIntent.setPackage("com.android.chrome") // Set the package on the *new* intent
startActivity(specificChromeIntent) // Start the *new* intent
Java
Intent autofillSettingsIntent = new Intent(Intent.ACTION_APPLICATION_PREFERENCES);
autofillSettingsIntent.addCategory(Intent.CATEGORY_DEFAULT);
autofillSettingsIntent.addCategory(Intent.CATEGORY_APP_BROWSER);
autofillSettingsIntent.addCategory(Intent.CATEGORY_PREFERENCE);

// Invoking the intent with a chooser allows users to select the channel they
// want to configure. If only one browser reacts to the intent, the chooser is
// skipped.
Intent chooser = Intent.createChooser(autofillSettingsIntent, "Pick Chrome Channel");
startActivity(chooser);

// If the caller knows which Chrome channel they want to configure,
// they can instead add a package hint to the intent, e.g.
autofillSettingsIntent.setPackage("com.android.chrome");
startActivity(autofillSettingsIntent);
進階自動填入情況
在下列情況下使用自動填入功能:
與鍵盤整合
自 Android 11 起,這個平台可讓鍵盤和其他輸入法編輯器 (「IME」) 以內嵌方式顯示自動填入建議,而非使用下拉式選單。如要進一步瞭解自動填入服務如何支援這項功能,請參閱「將自動填入功能與鍵盤整合」。
為資料集分頁
大型自動填入回應可能會超過 Binder 物件允許的交易大小,該物件代表處理要求所需的可在遠端處理物件。為避免 Android 系統在這類情況下擲回例外狀況,您可以一次新增最多 20 個 Dataset 物件,確保 FillResponse 不會過大。如果回應需要更多資料集,您可以新增資料集,讓使用者知道還有更多資訊,並在選取之後擷取下一組資料集。詳情請參閱「addDataset(Dataset)」。
儲存分割至多個畫面的資料
應用程式通常會將同一個活動的使用者資料分割至多個畫面,例如建立新使用者帳戶。舉例來說,第一個畫面可能會要求提供使用者名稱,第二個畫面則要求提供密碼。在這些情況下,自動填入服務必須等到使用者在所有相關欄位中輸入資料後,才會顯示自動填入儲存 UI。請按照下列步驟處理這類情況:
- 在第一個填入要求中,在回應內新增用戶端狀態組合,其中包含畫面中部分欄位的自動填入 ID。
- 在第二個填入要求中,擷取用戶端狀態組合,從用戶端狀態取得先前要求中設定的自動填入 ID,然後將這些 ID 和
FLAG_SAVE_ON_ALL_VIEWS_INVISIBLE旗標新增到第二個回應中使用的SaveInfo物件。 在儲存要求中,使用適當的
FillContext物件取得每個欄位的值。每個填入要求都有一個填入內容。詳情請參閱「在資料分割至多個畫面時進行儲存」。
為每個要求提供初始化和分割邏輯
每次有自動填入要求時,Android 系統都會繫結至服務,並呼叫其 onConnected() 方法。服務處理要求後,Android 系統會呼叫 onDisconnected() 方法,並與服務解除繫結。如要提供在處理要求之前執行的程式碼,您可以實作 onConnected();如要提供在處理要求之後執行的程式碼,則實作 onDisconnected()。
自訂自動填入儲存 UI
自動填入服務可自訂自動填入儲存 UI,協助使用者決定是否要允許這項服務儲存資料。服務可透過文字或客製化檢視畫面,提供有關儲存內容的其他資訊。服務也可以變更取消儲存要求的按鈕外觀,並在使用者輕觸該按鈕時獲得通知。詳情請參閱 SaveInfo 參考資料頁面。
相容性模式
相容性模式允許自動填入服務將無障礙虛擬結構用於自動填入用途。如果瀏覽器尚未明確實作自動填入 API,提供自動填入功能就特別實用。
如要使用相容性模式測試自動填入服務,請明確地將需要相容性模式的瀏覽器或應用程式加入許可清單。您可以執行下列指令,查看已將哪些套件加入許可清單:
$ adb shell settings get global autofill_compat_mode_allowed_packages
如果測試中的套件不在清單中,請執行下列指令新增套件,其中 pkgX 代表應用程式套件:
$ adb shell settings put global autofill_compat_mode_allowed_packages pkg1[resId1]:pkg2[resId1,resId2]
如果應用程式是瀏覽器,請使用 resIdx 為包含轉譯頁面網址的輸入欄位指定資源 ID。
相容性模式有下列限制:
- 當服務使用
FLAG_SAVE_ON_ALL_VIEWS_INVISIBLE旗標或呼叫setTrigger()方法時,就會觸發儲存要求。使用相容性模式時,系統會預設FLAG_SAVE_ON_ALL_VIEWS_INVISIBLE。 - 可能無法在
onSaveRequest(SaveRequest, SaveCallback)方法中使用節點的文字值。
如要進一步瞭解相容性模式,包括其相關限制,請參閱 AutofillService 類別參考資料。