

擷取系統通常會錄製影片和音訊串流,將其壓縮並多路複用兩個訊息串,然後將作為結果的訊息串寫入磁碟。
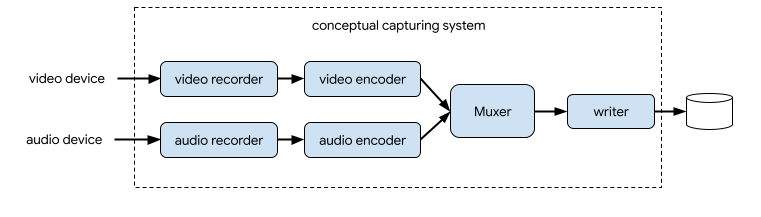
在 CameraX 中,影片擷取解決方案為 VideoCapture 用途:
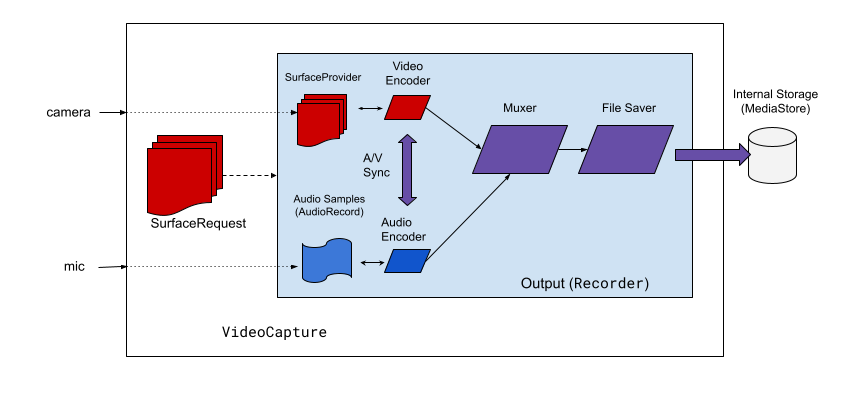
VideoCapture 應用實例的概念圖表。如圖 2 所示,CameraX 影片擷取包括幾個高階架構元件:
- 影片來源:
SurfaceProvider。 - 音訊來源:
AudioSource。 - 用於對影片/音訊編碼及壓縮的兩個編碼器。
- 一種媒體多工器,好讓這兩個串流多工傳輸。
- 可寫入結果的檔案儲存工具。
VideoCapture API 簡化複雜的擷取引擎,並提供簡單易懂的 API 應用程式。
VideoCapture API 總覽
VideoCapture 是 CameraX 的應用實例,可單獨使用或搭配其他用途使用。特定支援的組合取決於相機硬體功能,但 Preview 和 VideoCapture 是適用於所有裝置的用途組合。
VideoCapture API 是由下列與應用程式通訊的物件組成:
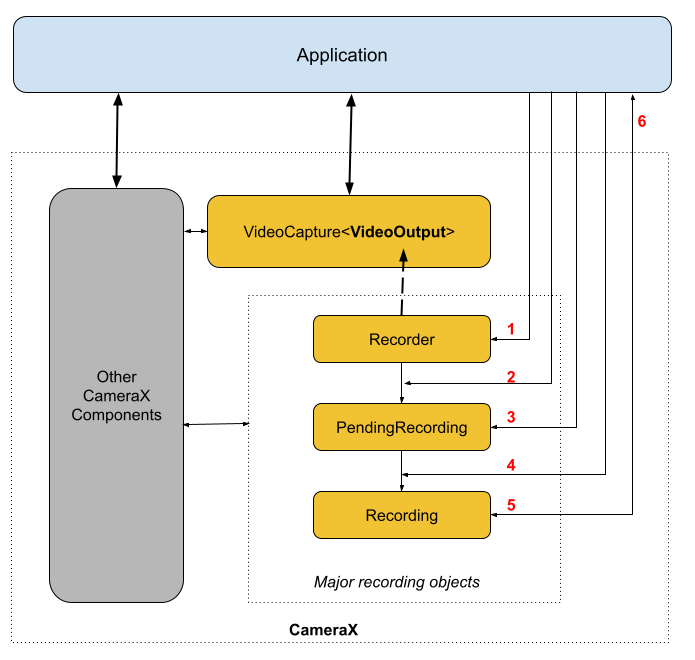
VideoCapture是頂層用途類別。VideoCapture會透過CameraSelector和其他「CameraX 用途」繫結至LifecycleOwner。如要進一步瞭解這些概念和使用方式,請參閱「CameraX 架構」。Recorder是 VideoOutput 的實作,與VideoCapture緊密結合。Recorder是用於執行影片和音訊擷取。應用程式會從Recorder建立錄製內容。PendingRecording可設定錄製內容,並提供啟用音訊及設定事件監聽器等選項。您必須使用Recorder才能建立PendingRecording。PendingRecording不會錄下任何內容。Recording會執行實際錄製內容。您必須使用PendingRecording才能建立Recording。
圖 3 說明這些物件之間的關係:
圖例:
- 使用
QualitySelector建立Recorder。 - 使用其中一種
OutputOptions來設定Recorder。 - 如有需要,請使用
withAudioEnabled()啟用音訊功能。 - 使用
VideoRecordEvent事件監聽器呼叫start()來開始記錄。 - 請使用
Recording上的pause()/resume()/stop()來控制錄製內容。 - 在事件監聽器中回應
VideoRecordEvents。
詳細 API 清單位於原始碼中的 current.txt。
使用 VideoCapture API
如要將 CameraX VideoCapture 用途整合至您的應用程式,請按照下列步驟操作:
- 繫結
VideoCapture。 - 準備及設定錄製內容。
- 啟動和控制執行階段記錄內容。
以下各節概述您可以在每個步驟中執行哪些操作,以取得端對端錄音。
繫結 VideoCapture
如要繫結 VideoCapture 用途,請按照下列步驟操作:
- 建立
Recorder物件。 - 建立
VideoCapture物件。 - 繫結至
Lifecycle。
CameraX VideoCapture API 採用建構工具的設計模式。應用程式會使用 Recorder.Builder 建立 Recorder。您也可以透過 QualitySelector 物件,設定 Recorder 的影片解析度。
CameraX Recorder 支援下列預先定義的 Qualities 影片解析度:
- 4K UHD 超高畫質影片尺寸 (2160p) 的
Quality.UHD - Full HD 高畫質影片尺寸 (1080p) 的
Quality.FHD - HD 高畫質影片尺寸 (720p) 的
Quality.HD - SD 標準畫質影片尺寸 (480p) 的
Quality.SD
請注意,CameraX 在應用程式授權後也可以選擇其他解析度。
每個選項的確切影片尺寸取決於相機和編碼器的功能。詳情請參閱 CamcorderProfile 的說明文件。
應用程式可透過建立 QualitySelector 來設定解析度。您可以使用下列任一方法建立 QualitySelector:
使用
fromOrderedList()提供幾個偏好的解析度,並納入備用策略,以在系統無法支援偏好的解析度時採用。CameraX 可以根據所選相機的功能,判斷出最佳備用廣告比對符合,詳情請參閱
QualitySelector的FallbackStrategy specification。舉例來說,以下程式碼會要求系統用於錄製內容的最高支援解析度,如果無法支援要求的解析度,請授權 CameraX 選擇最接近 Quality.SD 解析度的解析度:val qualitySelector = QualitySelector.fromOrderedList( listOf(Quality.UHD, Quality.FHD, Quality.HD, Quality.SD), FallbackStrategy.lowerQualityOrHigherThan(Quality.SD))請先查詢相機功能,然後使用
QualitySelector::from()從支援的解析度中進行選擇:val cameraInfo = cameraProvider.availableCameraInfos.filter { Camera2CameraInfo .from(it) .getCameraCharacteristic(CameraCharacteristics.LENS\_FACING) == CameraMetadata.LENS_FACING_BACK } val supportedQualities = QualitySelector.getSupportedQualities(cameraInfo[0]) val filteredQualities = arrayListOf (Quality.UHD, Quality.FHD, Quality.HD, Quality.SD) .filter { supportedQualities.contains(it) } // Use a simple ListView with the id of simple_quality_list_view viewBinding.simpleQualityListView.apply { adapter = ArrayAdapter(context, android.R.layout.simple_list_item_1, filteredQualities.map { it.qualityToString() }) // Set up the user interaction to manually show or hide the system UI. setOnItemClickListener { _, _, position, _ -> // Inside View.OnClickListener, // convert Quality.* constant to QualitySelector val qualitySelector = QualitySelector.from(filteredQualities[position]) // Create a new Recorder/VideoCapture for the new quality // and bind to lifecycle val recorder = Recorder.Builder() .setQualitySelector(qualitySelector).build() // ... } } // A helper function to translate Quality to a string fun Quality.qualityToString() : String { return when (this) { Quality.UHD -> "UHD" Quality.FHD -> "FHD" Quality.HD -> "HD" Quality.SD -> "SD" else -> throw IllegalArgumentException() } }請注意,從
QualitySelector.getSupportedQualities()回傳的功能保證適用於VideoCapture用途或VideoCapture和Preview用途的組合。與ImageCapture或ImageAnalysis用途一起使用時,如果要求的相機不支援所需的組合,則 CameraX 仍可能繫結失敗。
取得 QualitySelector 後,應用程式可以建立 VideoCapture 物件並執行繫結。請注意,此繫結與其他用途相同:
val recorder = Recorder.Builder()
    .setExecutor(cameraExecutor).setQualitySelector(qualitySelector)
    .build()
val videoCapture = VideoCapture.withOutput(recorder)

try {
    // Bind use cases to camera
    cameraProvider.bindToLifecycle(
            this, CameraSelector.DEFAULT_BACK_CAMERA, preview, videoCapture)
} catch(exc: Exception) {
    Log.e(TAG, "Use case binding failed", exc)
}
請注意,bindToLifecycle() 會傳回 Camera 物件。如需進一步瞭解如何控制相機輸出內容 (例如縮放和曝光),請參閱這份指南。
Recorder 會選取最適合系統的格式。最常見的影片轉碼器為 H.264 AVC),容器格式為 MPEG-4。
設定及建立影片錄製
應用程式可透過 Recorder 建立錄製物件,執行影片和音訊擷取。應用程式會按照下列步驟建立錄製內容:
- 使用
prepareRecording()設定OutputOptions。 - (選用) 啟用錄音功能。
- 使用
start()註冊VideoRecordEvent監聽器,然後開始錄影。
呼叫 start() 函式時,Recorder 會回傳 Recording 物件。您的應用程式可使用此 Recording 物件來完成錄製或執行其他操作,例如暫停或繼續。
Recorder 一次支援一個 Recording 物件。在前一個 Recording 物件上呼叫 Recording.stop() 或 Recording.close() 後,即可建立新的錄製內容。
以下將詳細介紹這些步驟。首先,應用程式會使用 Recorder.prepareRecording() 為錄製工具設定 OutputOptions。Recorder 支援下列 OutputOptions 類型:
- 用來錄製
FileDescriptor的FileDescriptorOutputOptions。 - 用來錄製
File的FileOutputOptions。 - 用來錄製
MediaStore的MediaStoreOutputOptions。
所有 OutputOptions 類型都支援透過 setFileSizeLimit() 設定檔案大小上限。其他選項特定適用於個別輸出類型,例如 ParcelFileDescriptor 適用於 FileDescriptorOutputOptions。
prepareRecording() 會回傳 PendingRecording 物件,也就是用於建立對應 Recording 物件的中繼物件。PendingRecording 是暫時性類別,在大部分情況下應該不會顯示,而且應用程式很少快取。
應用程式可進一步設定錄製內容,例如:
- 啟用包含
withAudioEnabled()的音訊。 - 透過
start(Executor, Consumer<VideoRecordEvent>)註冊監聽器,以便接收錄製內容。 - 允許錄製作業在 VideoCapture 繫結至其他攝影機時,持續錄製內容 (使用
PendingRecording.asPersistentRecording())。
如要開始錄製,請呼叫 PendingRecording.start()。CameraX 會將 PendingRecording 轉換為 Recording,並將記錄要求排入佇列,然後將新建立的 Recording 物件回傳至應用程式。當對應的相機裝置開始錄製後,CameraX 就會傳送 VideoRecordEvent.EVENT_TYPE_START 事件。
以下範例說明如何將影片和音訊錄製為 MediaStore 檔案:
// Create MediaStoreOutputOptions for our recorder
val name = "CameraX-recording-" +
        SimpleDateFormat(FILENAME_FORMAT, Locale.US)
                .format(System.currentTimeMillis()) + ".mp4"
val contentValues = ContentValues().apply {
   put(MediaStore.Video.Media.DISPLAY_NAME, name)
}
val mediaStoreOutput = MediaStoreOutputOptions.Builder(this.contentResolver,
                              MediaStore.Video.Media.EXTERNAL_CONTENT_URI)
                              .setContentValues(contentValues)
                              .build()

// 2. Configure Recorder and Start recording to the mediaStoreOutput.
val recording = videoCapture.output
                .prepareRecording(context, mediaStoreOutput)
                .withAudioEnabled()
                .start(ContextCompat.getMainExecutor(this), captureListener)
根據預設,前置鏡頭的相機預覽畫面會左右相反,但 VideoCapture 錄製的影片預設不會左右相反。CameraX 1.3 現在支援鏡像影片錄製,讓前置鏡頭預覽畫面和錄製的影片一致。
MirrorMode 有三種選項:MIRROR_MODE_OFF、MIRROR_MODE_ON 和 MIRROR_MODE_ON_FRONT_ONLY。如要與相機預覽畫面對齊,Google 建議使用 MIROR_MODE_ON_FRONT_ONLY,也就是說,後置鏡頭不會啟用鏡像功能,但前置鏡頭會啟用。如要進一步瞭解 MirrorMode,請參閱 MirrorMode constants。
這個程式碼片段說明如何使用 MIRROR_MODE_ON_FRONT_ONLY 呼叫 VideoCapture.Builder.setMirrorMode()。詳情請參閱 setMirrorMode()。
Kotlin
val recorder = Recorder.Builder().build()

val videoCapture = VideoCapture.Builder(recorder)
    .setMirrorMode(MIRROR_MODE_ON_FRONT_ONLY)
    .build()

useCases.add(videoCapture);
Java
Recorder.Builder builder = new Recorder.Builder();
if (mVideoQuality != QUALITY_AUTO) {
    builder.setQualitySelector(
        QualitySelector.from(mVideoQuality));
}
  VideoCapture<Recorder> videoCapture = new VideoCapture.Builder<>(builder.build())
      .setMirrorMode(MIRROR_MODE_ON_FRONT_ONLY)
      .build();
    useCases.add(videoCapture);
控制進行中的錄製
您可以使用以下方法暫停、繼續及停止進行中的 Recording:
請注意,無論錄製處於暫停或啟用的狀態,您都可以呼叫 stop() 來終止 Recording。
如果您已使用 PendingRecording.start() 註冊 EventListener,Recording 就會使用 VideoRecordEvent 進行通訊。
VideoRecordEvent.EVENT_TYPE_STATUS是用於記錄目前檔案大小和記錄時距等統計資料。VideoRecordEvent.EVENT_TYPE_FINALIZE是用於記錄結果,包括最終檔案的 URI 和其他相關錯誤等資訊。
應用程式收到表示錄製成功的 EVENT_TYPE_FINALIZE 後,您就可以透過 OutputOptions 中指定的位置存取錄製的影片。
其他資源
如要進一步瞭解 CameraX,請參閱下列其他資源: