
Screen flash, also called front flash or selfie flash, utilizes a phone's screen brightness to illuminate the subject when capturing images with the front camera in low light conditions. It is available in many native camera apps and social media apps. As most people hold their phone close enough when framing a self portrait, this approach is effective.
However, it's difficult for developers to implement the feature properly and maintain a good capture quality consistently across devices. This guide shows how to properly implement this feature, using Camera2, the low-level Android camera framework API.
General workflow
To implement the feature properly, the two key factors are the usage of precapture metering sequence (automatic exposure precapture), and the timing of the operations. The general workflow is seen in Figure 1.
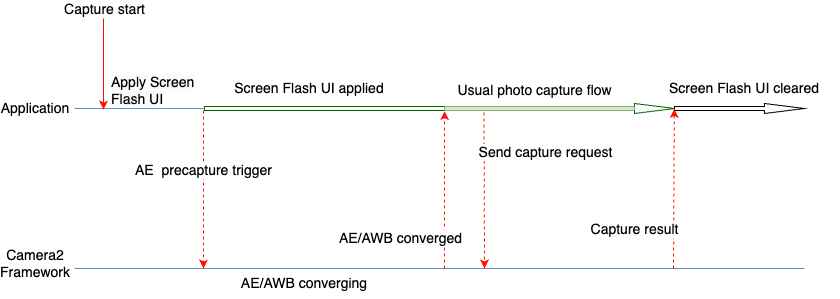
The following steps are used when an image needs to be captured with the screen flash feature.
- Apply UI changes required for screen flash, which can provide sufficient
light for taking photo using the device screen. For general use cases, Google
suggests the following UI changes, as used in our tests:
- App screen is covered with a white color overlay.
- Screen brightness is maximized.
- Set automatic exposure (AE) mode to
CONTROL_AE_MODE_ON_EXTERNAL_FLASH, if supported. - Trigger a precapture metering sequence using
CONTROL_AE_PRECAPTURE_TRIGGER. Wait for auto-exposure (AE) and auto-white balance (AWB) to be converged.
Once converged, the usual photo capture flow of the app is used.
Send capture request to framework.
Wait for receiving capture result.
Reset AE mode if
CONTROL_AE_MODE_ON_EXTERNAL_FLASHwas set.Clear the UI changes for screen flash.
Camera2 sample codes
Cover app screen with a white colored overlay
Add a View in the layout XML file of your application. The view has enough elevation to be on top of all other UI elements during screen flash capture. It is kept invisible by default and made visible only when the screen flash UI changes are applied.
In the following code sample, white color (#FFFFFF) is used as an example for
the view. Applications can choose the color, or offer multiple colors to users,
based on their requirements.
<View
    android:id="@+id/white_color_overlay"
    android:layout_width="match_parent"
    android:layout_height="match_parent"
    android:background="#FFFFFF"
    android:visibility="invisible"
    android:elevation="8dp" />
Maximize screen brightness
There are multiple ways to change screen brightness in an Android app. One direct way is to change the screenBrightness WindowManager parameter in the Activity Window reference.
Kotlin
private var previousBrightness: Float = -1.0f

private fun maximizeScreenBrightness() {
    activity?.window?.let { window ->
        window.attributes?.apply {
            previousBrightness = screenBrightness
            screenBrightness = 1f
            window.attributes = this
        }
    }
}

private fun restoreScreenBrightness() {
    activity?.window?.let { window ->
        window.attributes?.apply {
            screenBrightness = previousBrightness
            window.attributes = this
        }
    }
}
Java
private float mPreviousBrightness = -1.0f;

private void maximizeScreenBrightness() {
    if (getActivity() == null || getActivity().getWindow() == null) {
        return;
    }

    Window window = getActivity().getWindow();
    WindowManager.LayoutParams attributes = window.getAttributes();

    mPreviousBrightness = attributes.screenBrightness;
    attributes.screenBrightness = 1f;
    window.setAttributes(attributes);
}

private void restoreScreenBrightness() {
    if (getActivity() == null || getActivity().getWindow() == null) {
        return;
    }

    Window window = getActivity().getWindow();
    WindowManager.LayoutParams attributes = window.getAttributes();

    attributes.screenBrightness = mPreviousBrightness;
    window.setAttributes(attributes);
}
Set AE mode to CONTROL_AE_MODE_ON_EXTERNAL_FLASH
CONTROL_AE_MODE_ON_EXTERNAL_FLASH is available with API level 28 or higher.
However, this AE mode isn't available in all devices, so check if the AE mode is
available and set the value accordingly. To check the availability, use CameraCharacteristics#CONTROL_AE_AVAILABLE_MODES.
Kotlin
private val characteristics: CameraCharacteristics by lazy {
    cameraManager.getCameraCharacteristics(cameraId)
}

@RequiresApi(Build.VERSION_CODES.P)
private fun isExternalFlashAeModeAvailable() =
    characteristics.get(CameraCharacteristics.CONTROL_AE_AVAILABLE_MODES)
        ?.contains(CaptureRequest.CONTROL_AE_MODE_ON_EXTERNAL_FLASH) ?: false
Java
try {
    mCharacteristics = mCameraManager.getCameraCharacteristics(mCameraId);
} catch (CameraAccessException e) {
    e.printStackTrace();
}

@RequiresApi(Build.VERSION_CODES.P)
private boolean isExternalFlashAeModeAvailable() {
    int[] availableAeModes = mCharacteristics.get(CameraCharacteristics.CONTROL_AE_AVAILABLE_MODES);

    for (int aeMode : availableAeModes) {
        if (aeMode == CaptureRequest.CONTROL_AE_MODE_ON_EXTERNAL_FLASH) {
            return true;
        }
    }
    return false;
}
If the application has a repeating capture request set (it's required for Preview), the AE mode needs to set to the repeating request. Otherwise, it might be overridden by a default or other user-set AE mode in the next repeating capture. If this happens, the camera might not get enough time to do all the operations it normally does for an external flash AE mode.
To help ensure the camera completely processes the AE mode update request, check the capture result in the repeating capture callback and wait for the AE mode to update in the result.
Capture callback that can wait for AE mode to be updated
The following code snippet shows how this can be accomplished.
Kotlin
private val repeatingCaptureCallback = object : CameraCaptureSession.CaptureCallback() {
    private var targetAeMode: Int? = null
    private var aeModeUpdateDeferred: CompletableDeferred? = null

    suspend fun awaitAeModeUpdate(targetAeMode: Int) {
        this.targetAeMode = targetAeMode
        aeModeUpdateDeferred = CompletableDeferred()
        // Makes the current coroutine wait until aeModeUpdateDeferred is completed. It is
        // completed once targetAeMode is found in the following capture callbacks
        aeModeUpdateDeferred?.await()
    }

    private fun process(result: CaptureResult) {
        // Checks if AE mode is updated and completes any awaiting Deferred
        aeModeUpdateDeferred?.let {
            val aeMode = result[CaptureResult.CONTROL_AE_MODE]
            if (aeMode == targetAeMode) {
                it.complete(Unit)
            }
        }
    }

    override fun onCaptureCompleted(
        session: CameraCaptureSession,
        request: CaptureRequest,
        result: TotalCaptureResult
    ) {
        super.onCaptureCompleted(session, request, result)
        process(result)
    }
}
Java
static class AwaitingCaptureCallback extends CameraCaptureSession.CaptureCallback {
    private int mTargetAeMode;
    private CountDownLatch mAeModeUpdateLatch = null;

    public void awaitAeModeUpdate(int targetAeMode) {
        mTargetAeMode = targetAeMode;
        mAeModeUpdateLatch = new CountDownLatch(1);
        // Makes the current thread wait until mAeModeUpdateLatch is released, it will be
        // released once targetAeMode is found in the capture callbacks below
        try {
            mAeModeUpdateLatch.await();
        } catch (InterruptedException e) {
            e.printStackTrace();
        }
    }

    private void process(CaptureResult result) {
        // Checks if AE mode is updated and decrements the count of any awaiting latch
        if (mAeModeUpdateLatch != null) {
            int aeMode = result.get(CaptureResult.CONTROL_AE_MODE);
            if (aeMode == mTargetAeMode) {
                mAeModeUpdateLatch.countDown();
            }
        }
    }

    @Override
    public void onCaptureCompleted(@NonNull CameraCaptureSession session,
            @NonNull CaptureRequest request,
            @NonNull TotalCaptureResult result) {
        super.onCaptureCompleted(session, request, result);
        process(result);
    }
}

private final AwaitingCaptureCallback mRepeatingCaptureCallback = new AwaitingCaptureCallback();
Set a repeating request to enable or disable the AE mode
With the capture callback in place, the following code samples show how to set a repeating request.
Kotlin
/** [HandlerThread] where all camera operations run */
private val cameraThread = HandlerThread("CameraThread").apply { start() }

/** [Handler] corresponding to [cameraThread] */
private val cameraHandler = Handler(cameraThread.looper)

private suspend fun enableExternalFlashAeMode() {
    if (Build.VERSION.SDK_INT >= 28 && isExternalFlashAeModeAvailable()) {
        session.setRepeatingRequest(
            camera.createCaptureRequest(CameraDevice.TEMPLATE_PREVIEW).apply {
                addTarget(previewSurface)
                set(
                    CaptureRequest.CONTROL_AE_MODE,
                    CaptureRequest.CONTROL_AE_MODE_ON_EXTERNAL_FLASH
                )
            }.build(), repeatingCaptureCallback, cameraHandler
        )

        // Wait for the request to be processed by camera
        repeatingCaptureCallback.awaitAeModeUpdate(CaptureRequest.CONTROL_AE_MODE_ON_EXTERNAL_FLASH)
    }
}

private fun disableExternalFlashAeMode() {
    if (Build.VERSION.SDK_INT >= 28 && isExternalFlashAeModeAvailable()) {
        session.setRepeatingRequest(
            camera.createCaptureRequest(CameraDevice.TEMPLATE_PREVIEW).apply {
                addTarget(previewSurface)
            }.build(), repeatingCaptureCallback, cameraHandler
        )
    }
}
Java
private void setupCameraThread() {
    // HandlerThread where all camera operations run
    HandlerThread cameraThread = new HandlerThread("CameraThread");
    cameraThread.start();

    // Handler corresponding to cameraThread
    mCameraHandler = new Handler(cameraThread.getLooper());
}

private void enableExternalFlashAeMode() {
    if (Build.VERSION.SDK_INT >= 28 && isExternalFlashAeModeAvailable()) {
        try {
            CaptureRequest.Builder requestBuilder = mCamera.createCaptureRequest(CameraDevice.TEMPLATE_PREVIEW);
            requestBuilder.addTarget(mPreviewSurface);
            requestBuilder.set(CaptureRequest.CONTROL_AE_MODE, CaptureRequest.CONTROL_AE_MODE_ON_EXTERNAL_FLASH);
            mSession.setRepeatingRequest(requestBuilder.build(), mRepeatingCaptureCallback, mCameraHandler);
        } catch (CameraAccessException e) {
            e.printStackTrace();
        }

        // Wait for the request to be processed by camera
        mRepeatingCaptureCallback.awaitAeModeUpdate(CaptureRequest.CONTROL_AE_MODE_ON_EXTERNAL_FLASH);
    }
}

private void disableExternalFlashAeMode() {
    if (Build.VERSION.SDK_INT >= 28 && isExternalFlashAeModeAvailable()) {
        try {
            CaptureRequest.Builder requestBuilder = mCamera.createCaptureRequest(CameraDevice.TEMPLATE_PREVIEW);
            requestBuilder.addTarget(mPreviewSurface);
            mSession.setRepeatingRequest(requestBuilder.build(), mRepeatingCaptureCallback, mCameraHandler);
        } catch (CameraAccessException e) {
            e.printStackTrace();
        }
    }
}
Trigger a precapture sequence
To trigger a precapture metering sequence, you can submit a
CaptureRequest with CONTROL_AE_PRECAPTURE_TRIGGER_START value set to the request. You need to
wait for the request to be processed and then wait for the AE & AWB to converge.
Although precapture triggers with a single capture request, waiting for the AE and AWB convergence does require more complexity. You can keep track of the AE state and the AWB state using a capture callback set to a repeating request.
Updating the same repeating callback lets you have code simplicity. Applications often require a Preview for which they set up a repeating request while setting up the camera. So, you can set the repeating capture callback to that initial repeating request once, and then re-use it for result checking and waiting purposes.
Capture callback code update to wait for convergence
To update the repeating capture callback, use the following code snippet.
Kotlin
private val repeatingCaptureCallback = object : CameraCaptureSession.CaptureCallback() {
    private var targetAeMode: Int? = null
    private var aeModeUpdateDeferred: CompletableDeferred? = null

    private var convergenceDeferred: CompletableDeferred? = null

    suspend fun awaitAeModeUpdate(targetAeMode: Int) {
        this.targetAeMode = targetAeMode
        aeModeUpdateDeferred = CompletableDeferred()
        // Makes the current coroutine wait until aeModeUpdateDeferred is completed. It is
        // completed once targetAeMode is found in the following capture callbacks
        aeModeUpdateDeferred?.await()
    }

    suspend fun awaitAeAwbConvergence() {
        convergenceDeferred = CompletableDeferred()
        // Makes the current coroutine wait until convergenceDeferred is completed, it will be
        // completed once both AE & AWB are reported as converged in the capture callbacks below
        convergenceDeferred?.await()
    }

    private fun process(result: CaptureResult) {
        // Checks if AE mode is updated and completes any awaiting Deferred
        aeModeUpdateDeferred?.let {
            val aeMode = result[CaptureResult.CONTROL_AE_MODE]
            if (aeMode == targetAeMode) {
                it.complete(Unit)
            }
        }

        // Checks for convergence and completes any awaiting Deferred
        convergenceDeferred?.let {
            val aeState = result[CaptureResult.CONTROL_AE_STATE]
            val awbState = result[CaptureResult.CONTROL_AWB_STATE]

            val isAeReady = (
                    aeState == null // May be null in some devices (e.g. legacy camera HW level)
                            || aeState == CaptureResult.CONTROL_AE_STATE_CONVERGED
                            || aeState == CaptureResult.CONTROL_AE_STATE_FLASH_REQUIRED
                    )

            val isAwbReady = (
                    awbState == null // May be null in some devices (e.g. legacy camera HW level)
                            || awbState == CaptureResult.CONTROL_AWB_STATE_CONVERGED
                    )

            if (isAeReady && isAwbReady) {
                // if any non-null convergenceDeferred is set, complete it
                it.complete(Unit)
            }
        }
    }

    override fun onCaptureCompleted(
        session: CameraCaptureSession,
        request: CaptureRequest,
        result: TotalCaptureResult
    ) {
        super.onCaptureCompleted(session, request, result)
        process(result)
    }
}
Java
static class AwaitingCaptureCallback extends CameraCaptureSession.CaptureCallback {
    private int mTargetAeMode;
    private CountDownLatch mAeModeUpdateLatch = null;

    private CountDownLatch mConvergenceLatch = null;

    public void awaitAeModeUpdate(int targetAeMode) {
        mTargetAeMode = targetAeMode;
        mAeModeUpdateLatch = new CountDownLatch(1);
        // Makes the current thread wait until mAeModeUpdateLatch is released, it will be
        // released once targetAeMode is found in the capture callbacks below
        try {
            mAeModeUpdateLatch.await();
        } catch (InterruptedException e) {
            e.printStackTrace();
        }
    }

    public void awaitAeAwbConvergence() {
        mConvergenceLatch = new CountDownLatch(1);
        // Makes the current coroutine wait until mConvergenceLatch is released, it will be
        // released once both AE & AWB are reported as converged in the capture callbacks below
        try {
            mConvergenceLatch.await();
        } catch (InterruptedException e) {
            e.printStackTrace();
        }
    }

    private void process(CaptureResult result) {
        // Checks if AE mode is updated and decrements the count of any awaiting latch
        if (mAeModeUpdateLatch != null) {
            int aeMode = result.get(CaptureResult.CONTROL_AE_MODE);
            if (aeMode == mTargetAeMode) {
                mAeModeUpdateLatch.countDown();
            }
        }

        // Checks for convergence and decrements the count of any awaiting latch
        if (mConvergenceLatch != null) {
            Integer aeState = result.get(CaptureResult.CONTROL_AE_STATE);
            Integer awbState = result.get(CaptureResult.CONTROL_AWB_STATE);

            boolean isAeReady = (
                    aeState == null // May be null in some devices (e.g. legacy camera HW level)
                            || aeState == CaptureResult.CONTROL_AE_STATE_CONVERGED
                            || aeState == CaptureResult.CONTROL_AE_STATE_FLASH_REQUIRED
            );

            boolean isAwbReady = (
                    awbState == null // May be null in some devices (e.g. legacy camera HW level)
                            || awbState == CaptureResult.CONTROL_AWB_STATE_CONVERGED
            );

            if (isAeReady && isAwbReady) {
                mConvergenceLatch.countDown();
                mConvergenceLatch = null;
            }
        }
    }

    @Override
    public void onCaptureCompleted(@NonNull CameraCaptureSession session,
            @NonNull CaptureRequest request,
            @NonNull TotalCaptureResult result) {
        super.onCaptureCompleted(session, request, result);
        process(result);
    }
}
Set the callback to a repeating request during camera setup
The following code sample lets you set the callback to a repeating request during initialization.
Kotlin
// Open the selected camera
camera = openCamera(cameraManager, cameraId, cameraHandler)

// Creates list of Surfaces where the camera will output frames
val targets = listOf(previewSurface, imageReaderSurface)

// Start a capture session using our open camera and list of Surfaces where frames will go
session = createCameraCaptureSession(camera, targets, cameraHandler)

val captureRequest = camera.createCaptureRequest(
        CameraDevice.TEMPLATE_PREVIEW).apply { addTarget(previewSurface) }

// This will keep sending the capture request as frequently as possible until the
// session is torn down or session.stopRepeating() is called
session.setRepeatingRequest(captureRequest.build(), repeatingCaptureCallback, cameraHandler)
Java
// Open the selected camera mCamera = openCamera(mCameraManager, mCameraId, mCameraHandler); // Creates list of Surfaces where the camera will output frames Listtargets = new ArrayList<>(Arrays.asList(mPreviewSurface, mImageReaderSurface)); // Start a capture session using our open camera and list of Surfaces where frames will go mSession = createCaptureSession(mCamera, targets, mCameraHandler); try { CaptureRequest.Builder requestBuilder = mCamera.createCaptureRequest(CameraDevice.TEMPLATE_PREVIEW); requestBuilder.addTarget(mPreviewSurface); // This will keep sending the capture request as frequently as possible until the // session is torn down or session.stopRepeating() is called mSession.setRepeatingRequest(requestBuilder.build(), mRepeatingCaptureCallback, mCameraHandler); } catch (CameraAccessException e) { e.printStackTrace(); }
Precapture sequence triggering and waiting
With the callback set, you can use the following code sample for a precapture sequence triggering and waiting.
Kotlin
private suspend fun runPrecaptureSequence() {
    // Creates a new capture request with CONTROL_AE_PRECAPTURE_TRIGGER_START
    val captureRequest = session.device.createCaptureRequest(
        CameraDevice.TEMPLATE_PREVIEW
    ).apply {
        addTarget(previewSurface)
        set(
            CaptureRequest.CONTROL_AE_PRECAPTURE_TRIGGER,
            CaptureRequest.CONTROL_AE_PRECAPTURE_TRIGGER_START
        )
    }

    val precaptureDeferred = CompletableDeferred()
    session.capture(captureRequest.build(), object: CameraCaptureSession.CaptureCallback() {
        override fun onCaptureCompleted(
            session: CameraCaptureSession,
            request: CaptureRequest,
            result: TotalCaptureResult
        ) {
            // Waiting for this callback ensures the precapture request has been processed
            precaptureDeferred.complete(Unit)
        }
    }, cameraHandler)

    precaptureDeferred.await()

    // Precapture trigger request has been processed, we can wait for AE & AWB convergence now
    repeatingCaptureCallback.awaitAeAwbConvergence()
}
Java
private void runPrecaptureSequence() {
    // Creates a new capture request with CONTROL_AE_PRECAPTURE_TRIGGER_START
    try {
        CaptureRequest.Builder requestBuilder =
                mSession.getDevice().createCaptureRequest(CameraDevice.TEMPLATE_PREVIEW);
        requestBuilder.addTarget(mPreviewSurface);
        requestBuilder.set(CaptureRequest.CONTROL_AE_PRECAPTURE_TRIGGER,
                CaptureRequest.CONTROL_AE_PRECAPTURE_TRIGGER_START);

        CountDownLatch precaptureLatch = new CountDownLatch(1);
        mSession.capture(requestBuilder.build(), new CameraCaptureSession.CaptureCallback() {
            @Override
            public void onCaptureCompleted(@NonNull CameraCaptureSession session,
                                           @NonNull CaptureRequest request,
                                           @NonNull TotalCaptureResult result) {
                Log.d(TAG, "CONTROL_AE_PRECAPTURE_TRIGGER_START processed");
                // Waiting for this callback ensures the precapture request has been processed
                precaptureLatch.countDown();
            }
        }, mCameraHandler);

        precaptureLatch.await();

        // Precapture trigger request has been processed, we can wait for AE & AWB convergence now
        mRepeatingCaptureCallback.awaitAeAwbConvergence();
    } catch (CameraAccessException | InterruptedException e) {
        e.printStackTrace();
    }
}
Stitch everything together
With all the major components ready, whenever a picture needs to be taken, as when a user clicks the capture button to take a picture, all the steps can execute in the order noted in the preceding discussion and code samples.
Kotlin
// User clicks captureButton to take picture
captureButton.setOnClickListener { v ->
    // Apply the screen flash related UI changes
    whiteColorOverlayView.visibility = View.VISIBLE
    maximizeScreenBrightness()

    // Perform I/O heavy operations in a different scope
    lifecycleScope.launch(Dispatchers.IO) {
        // Enable external flash AE mode and wait for it to be processed
        enableExternalFlashAeMode()

        // Run precapture sequence and wait for it to complete
        runPrecaptureSequence()

        // Start taking picture and wait for it to complete
        takePhoto()

        disableExternalFlashAeMode()
        v.post {
            // Clear the screen flash related UI changes
            restoreScreenBrightness()
            whiteColorOverlayView.visibility = View.INVISIBLE
        }
    }
}
Java
// User clicks captureButton to take picture
mCaptureButton.setOnClickListener(new View.OnClickListener() {
    @Override
    public void onClick(View v) {
        // Apply the screen flash related UI changes
        mWhiteColorOverlayView.setVisibility(View.VISIBLE);
        maximizeScreenBrightness();

        // Perform heavy operations in a different thread
        Executors.newSingleThreadExecutor().execute(() -> {
            // Enable external flash AE mode and wait for it to be processed
            enableExternalFlashAeMode();

            // Run precapture sequence and wait for it to complete
            runPrecaptureSequence();

            // Start taking picture and wait for it to complete
            takePhoto();

            disableExternalFlashAeMode();

            v.post(() -> {
                // Clear the screen flash related UI changes
                restoreScreenBrightness();
                mWhiteColorOverlayView.setVisibility(View.INVISIBLE);
            });
        });
    }
});
Sample pictures
You can see from the following examples of what happens when screen flash is implemented incorrectly, and when it is implemented correctly.
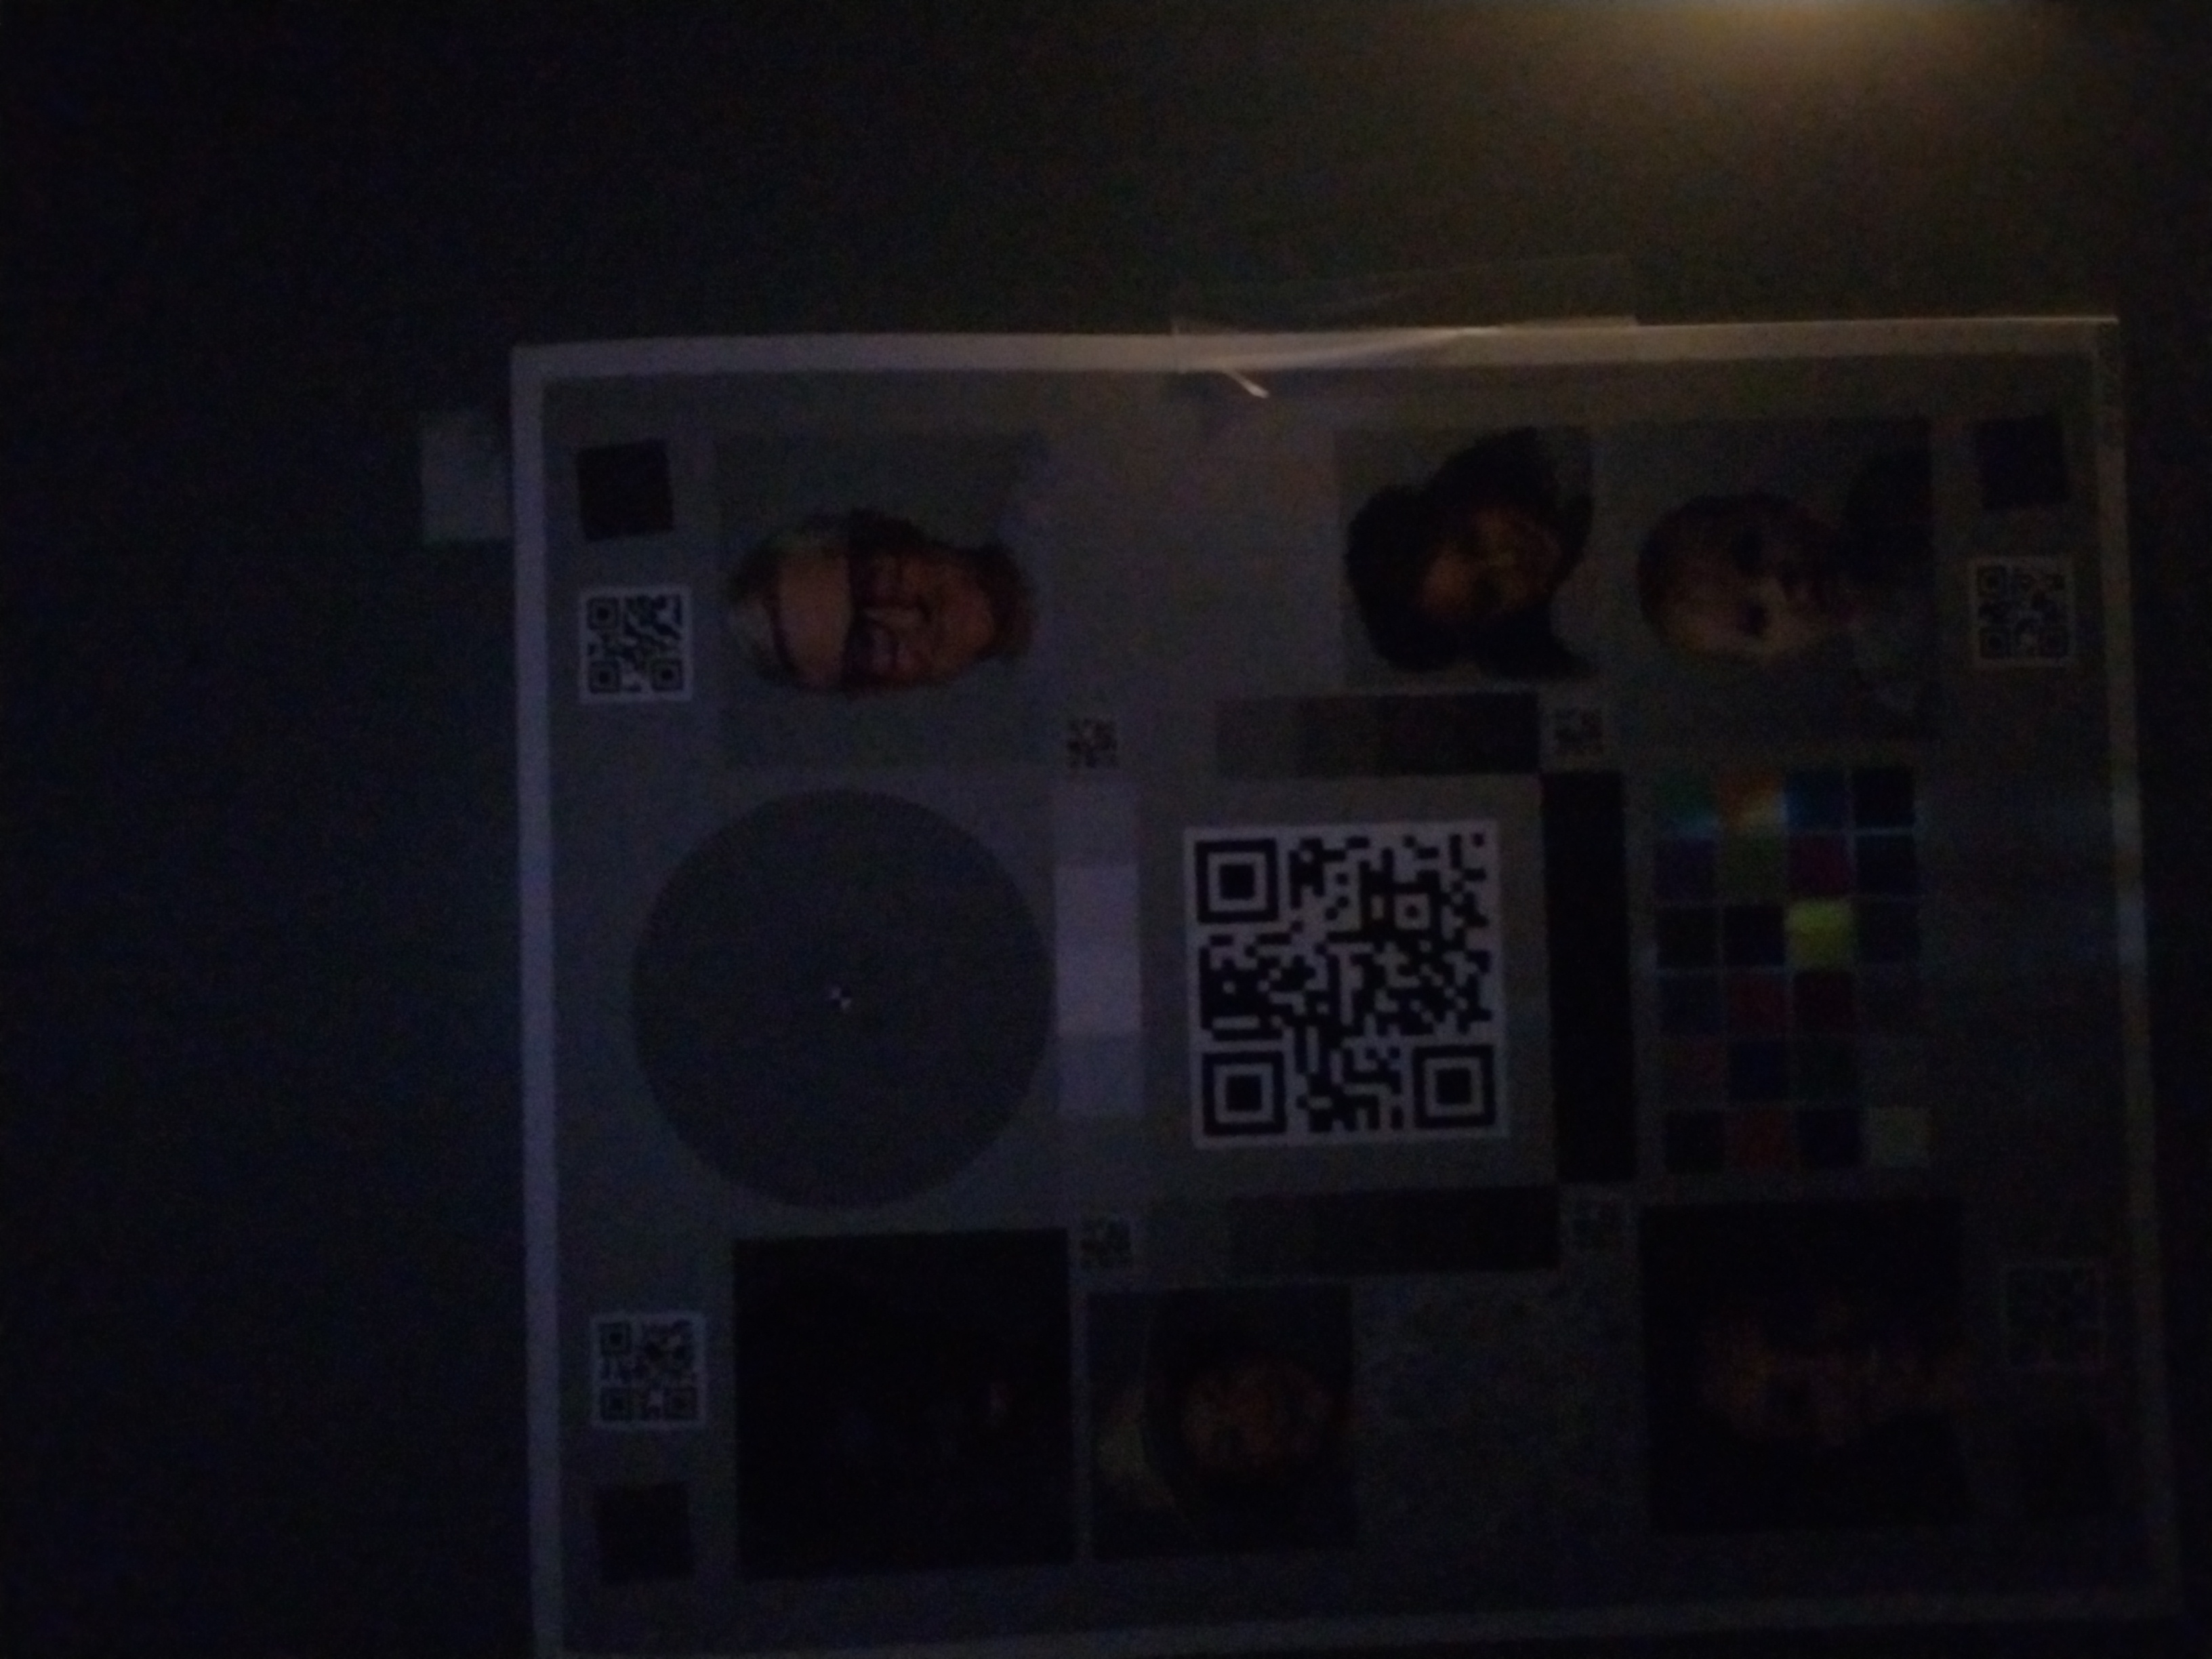
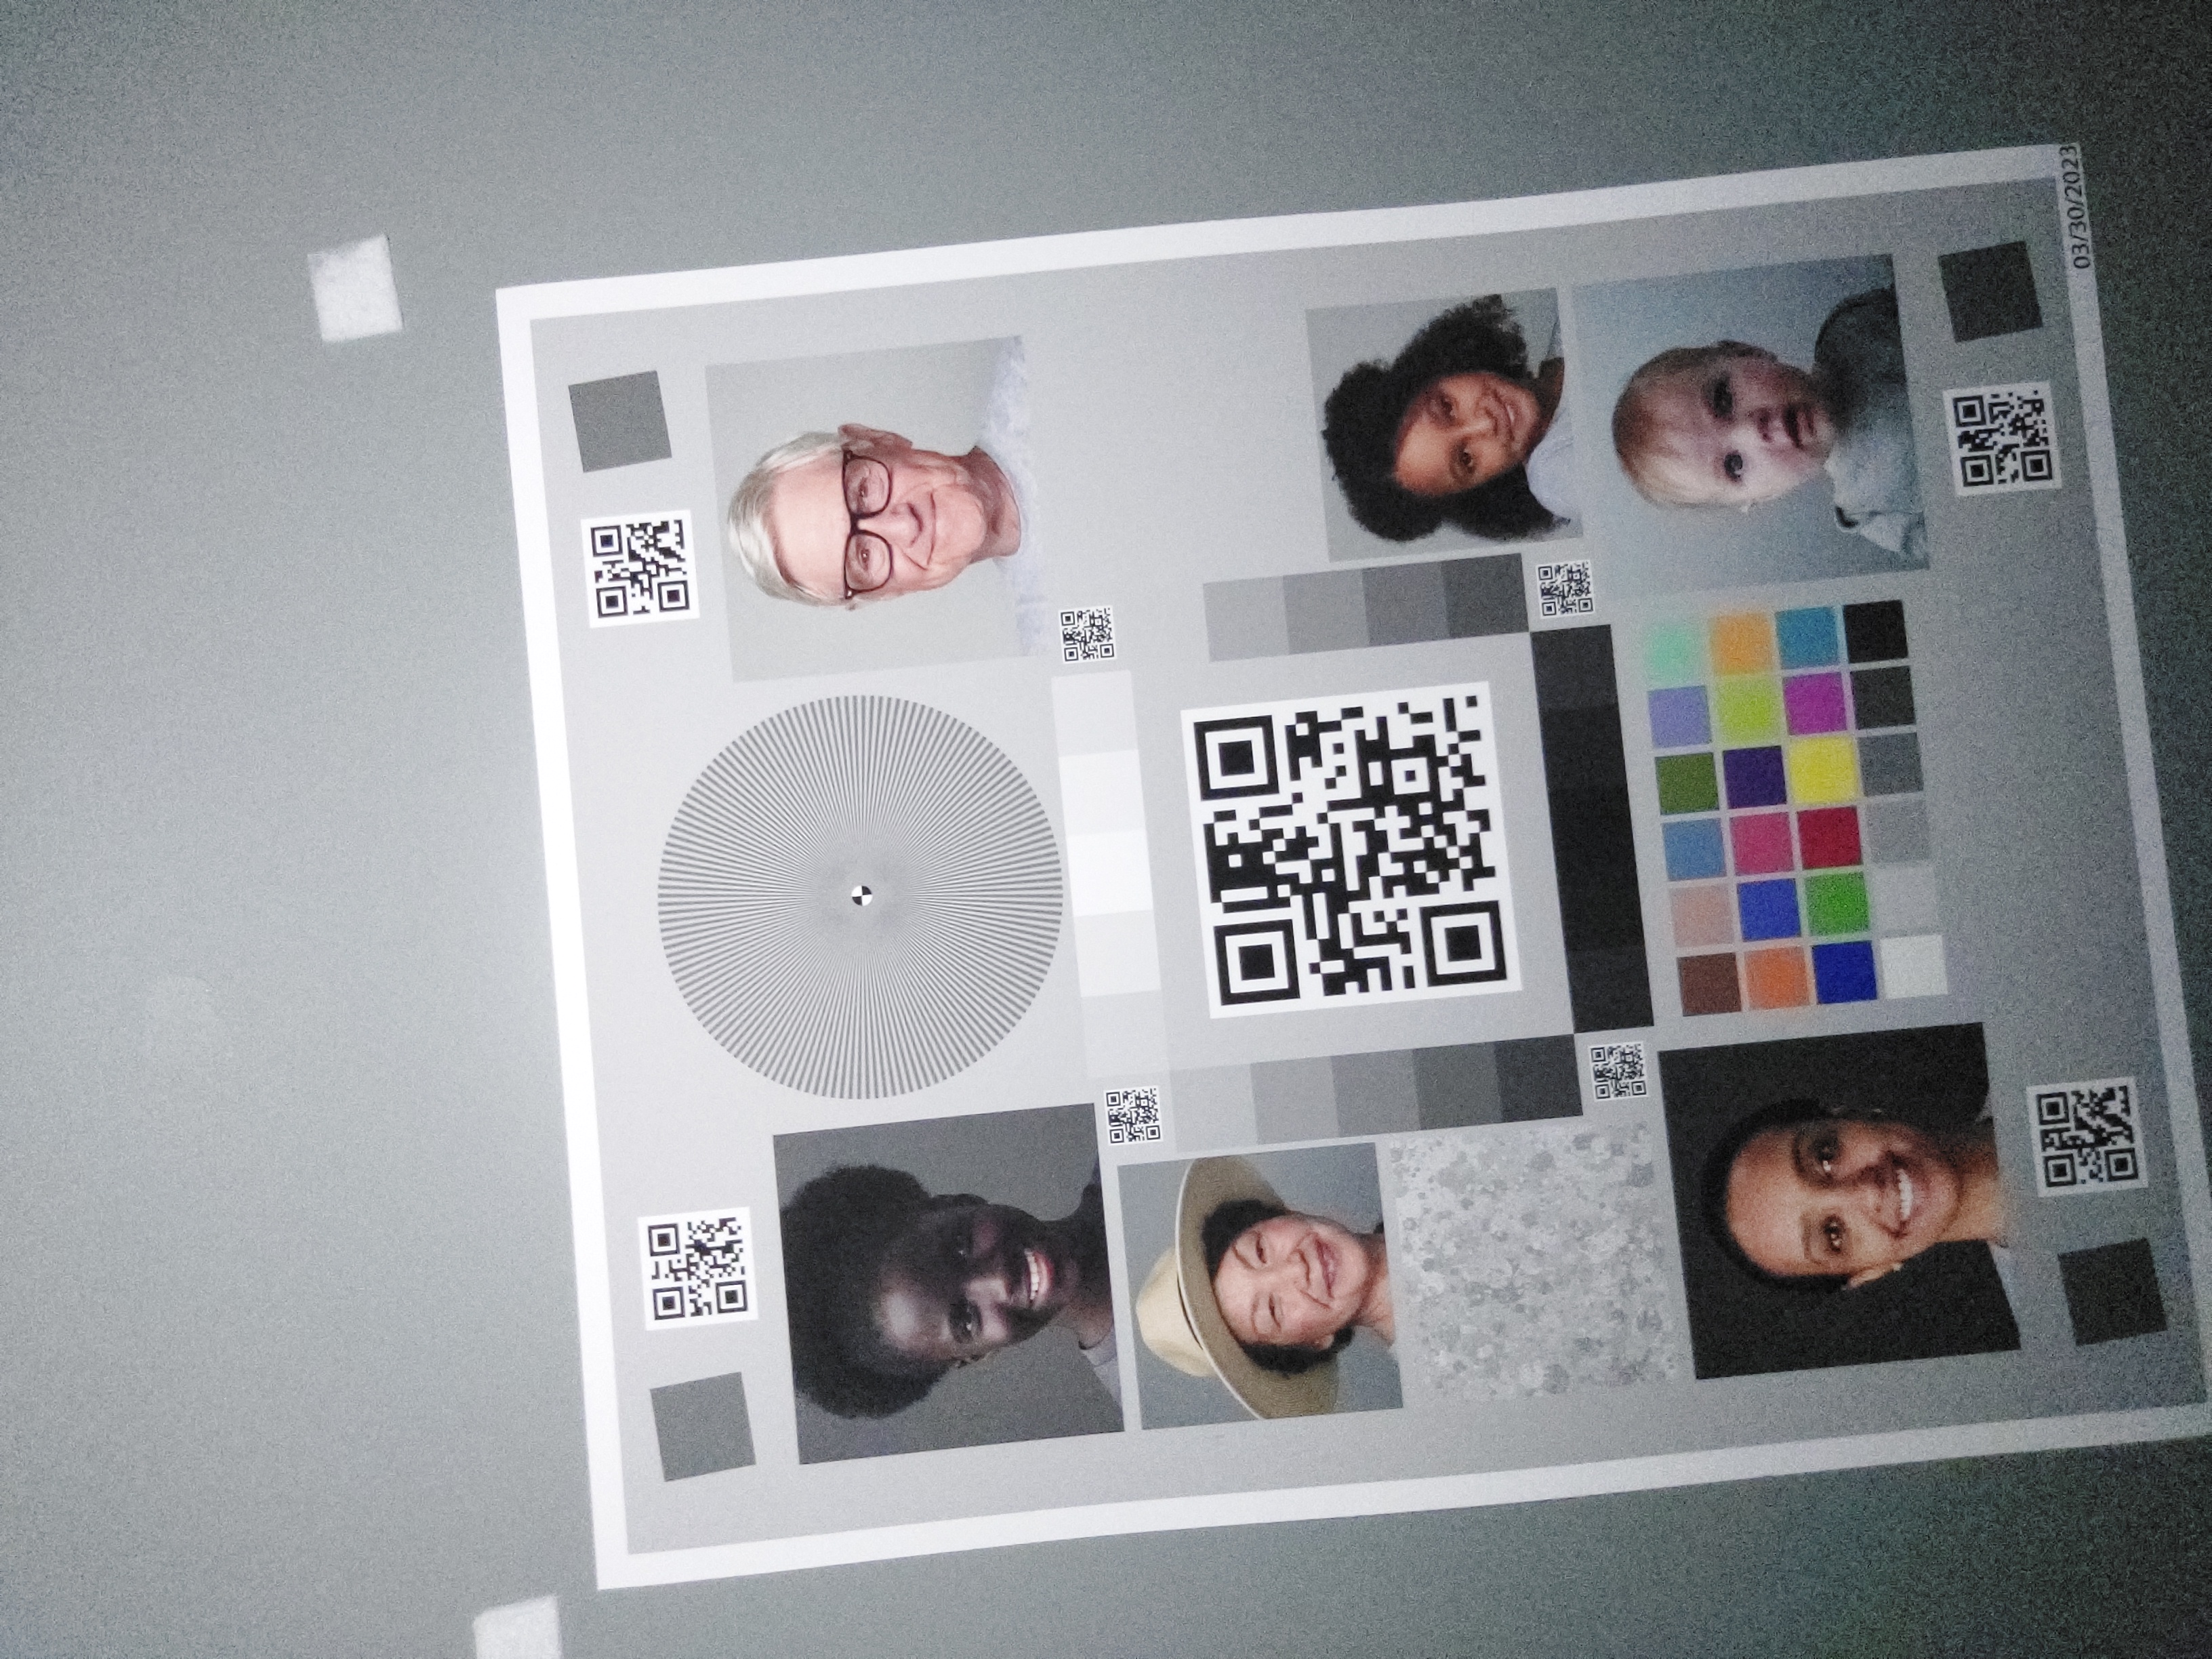
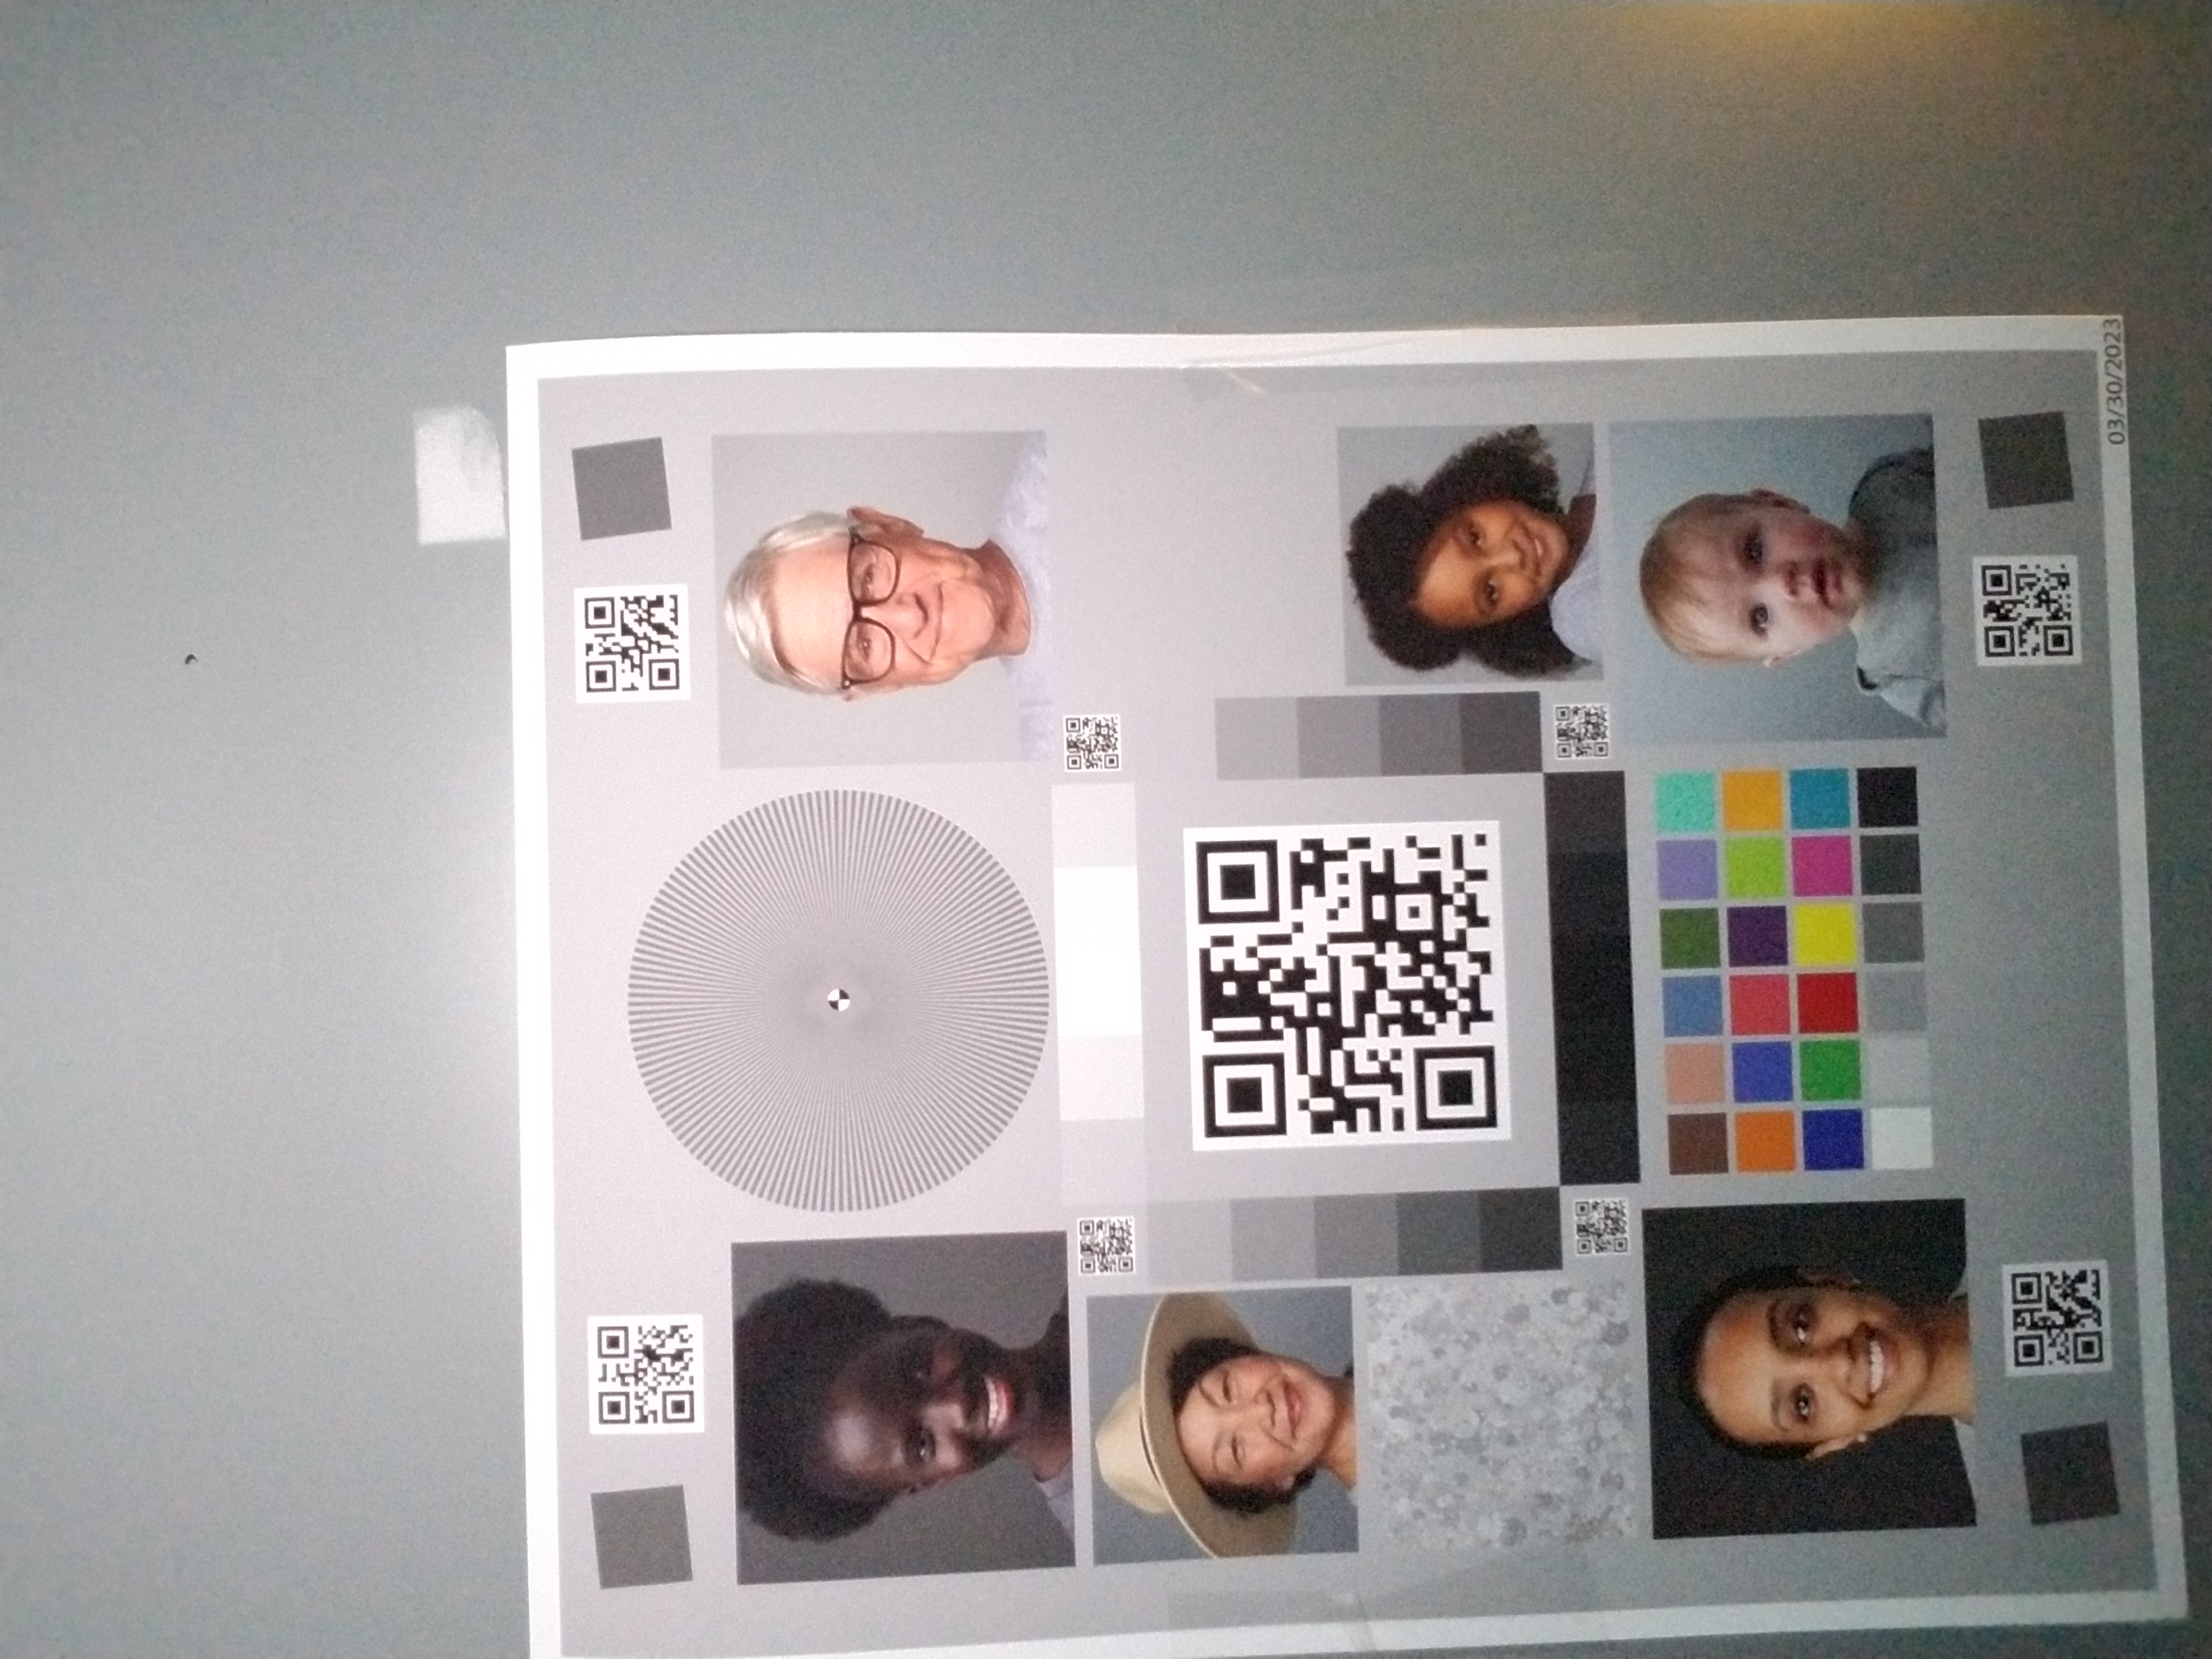
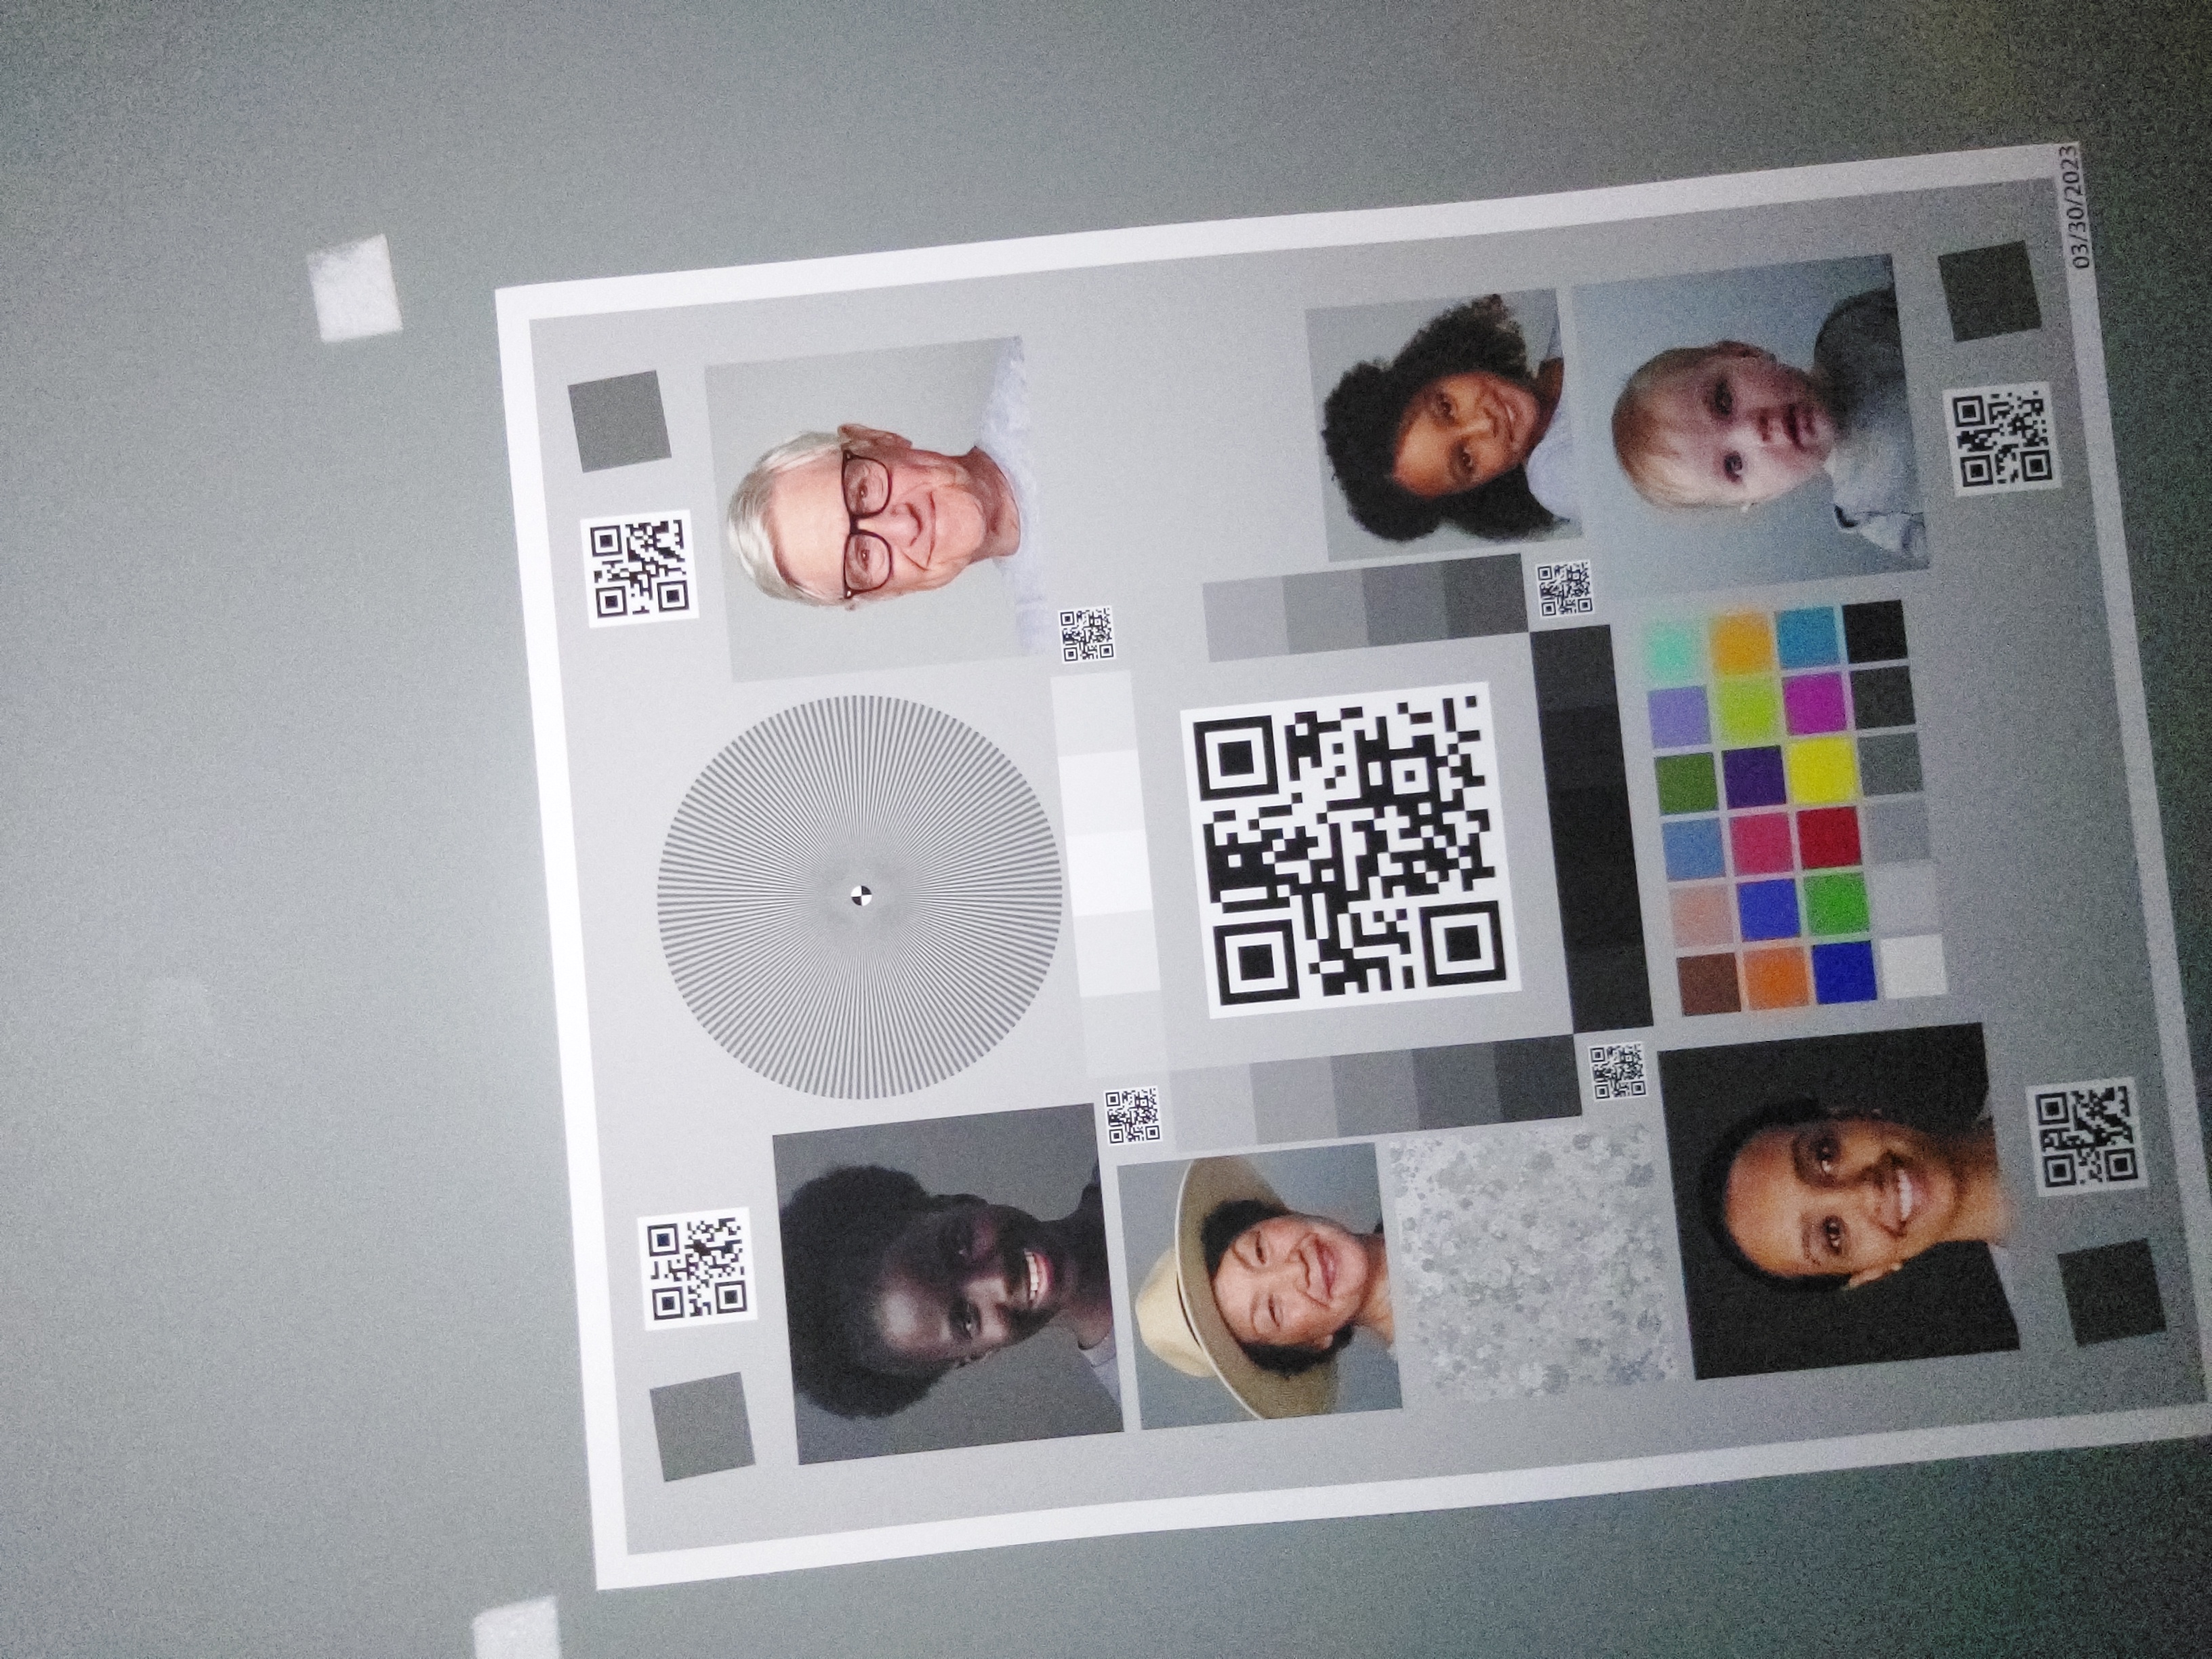
When done wrong
If screen flash isn't implemented properly, you get inconsistent results across multiple captures, devices and lighting conditions. Often, captured images have a bad exposure or color tint problem. For some devices, these kinds of bugs become more evident in a specific lighting condition, such as a low-light environment instead of a completely dark one.
The following table shows examples of such problems. They are taken in the CameraX lab infrastructure, with light sources remained at a warm-white color. This warm-white light source lets you see how the blue color tint is an actual problem, not a side-effect of a light source.
| Environment | Under-exposure | Over-exposure | Color tint |
|---|---|---|---|
| Dark environment (No light source but the phone) |

|
|

|
| Low light (Additional ~3 lux light source) |
|

|

|
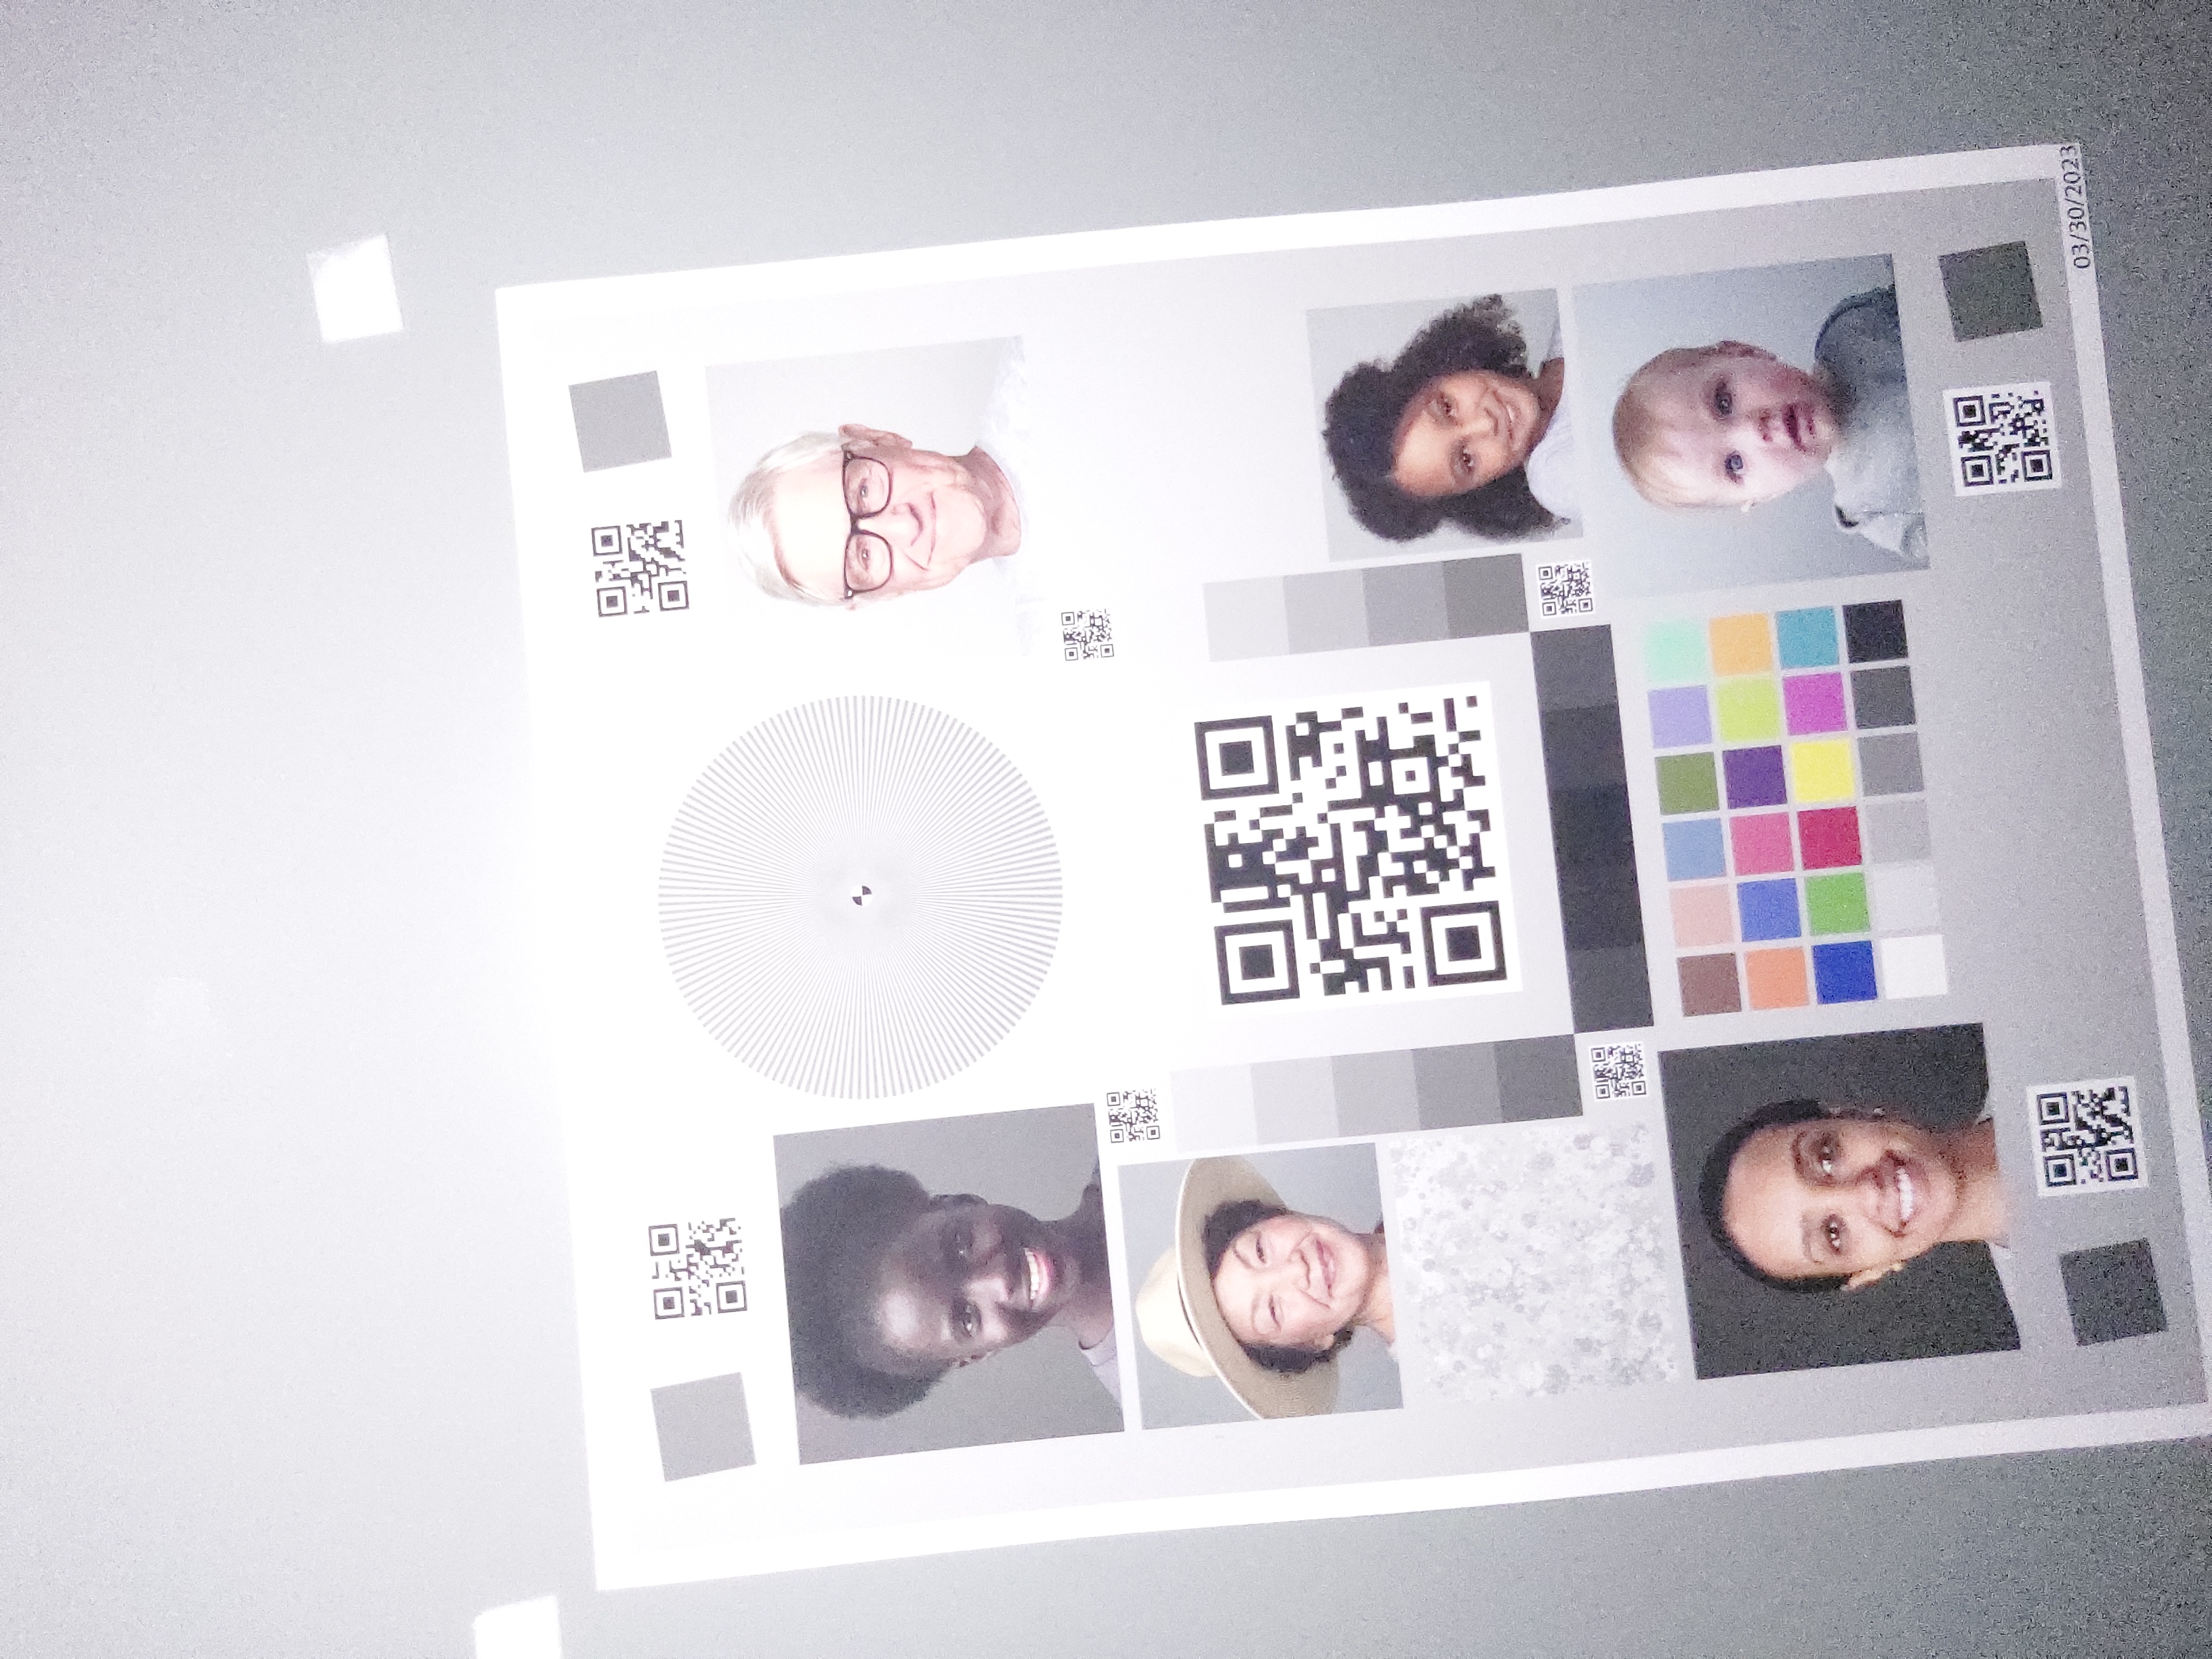
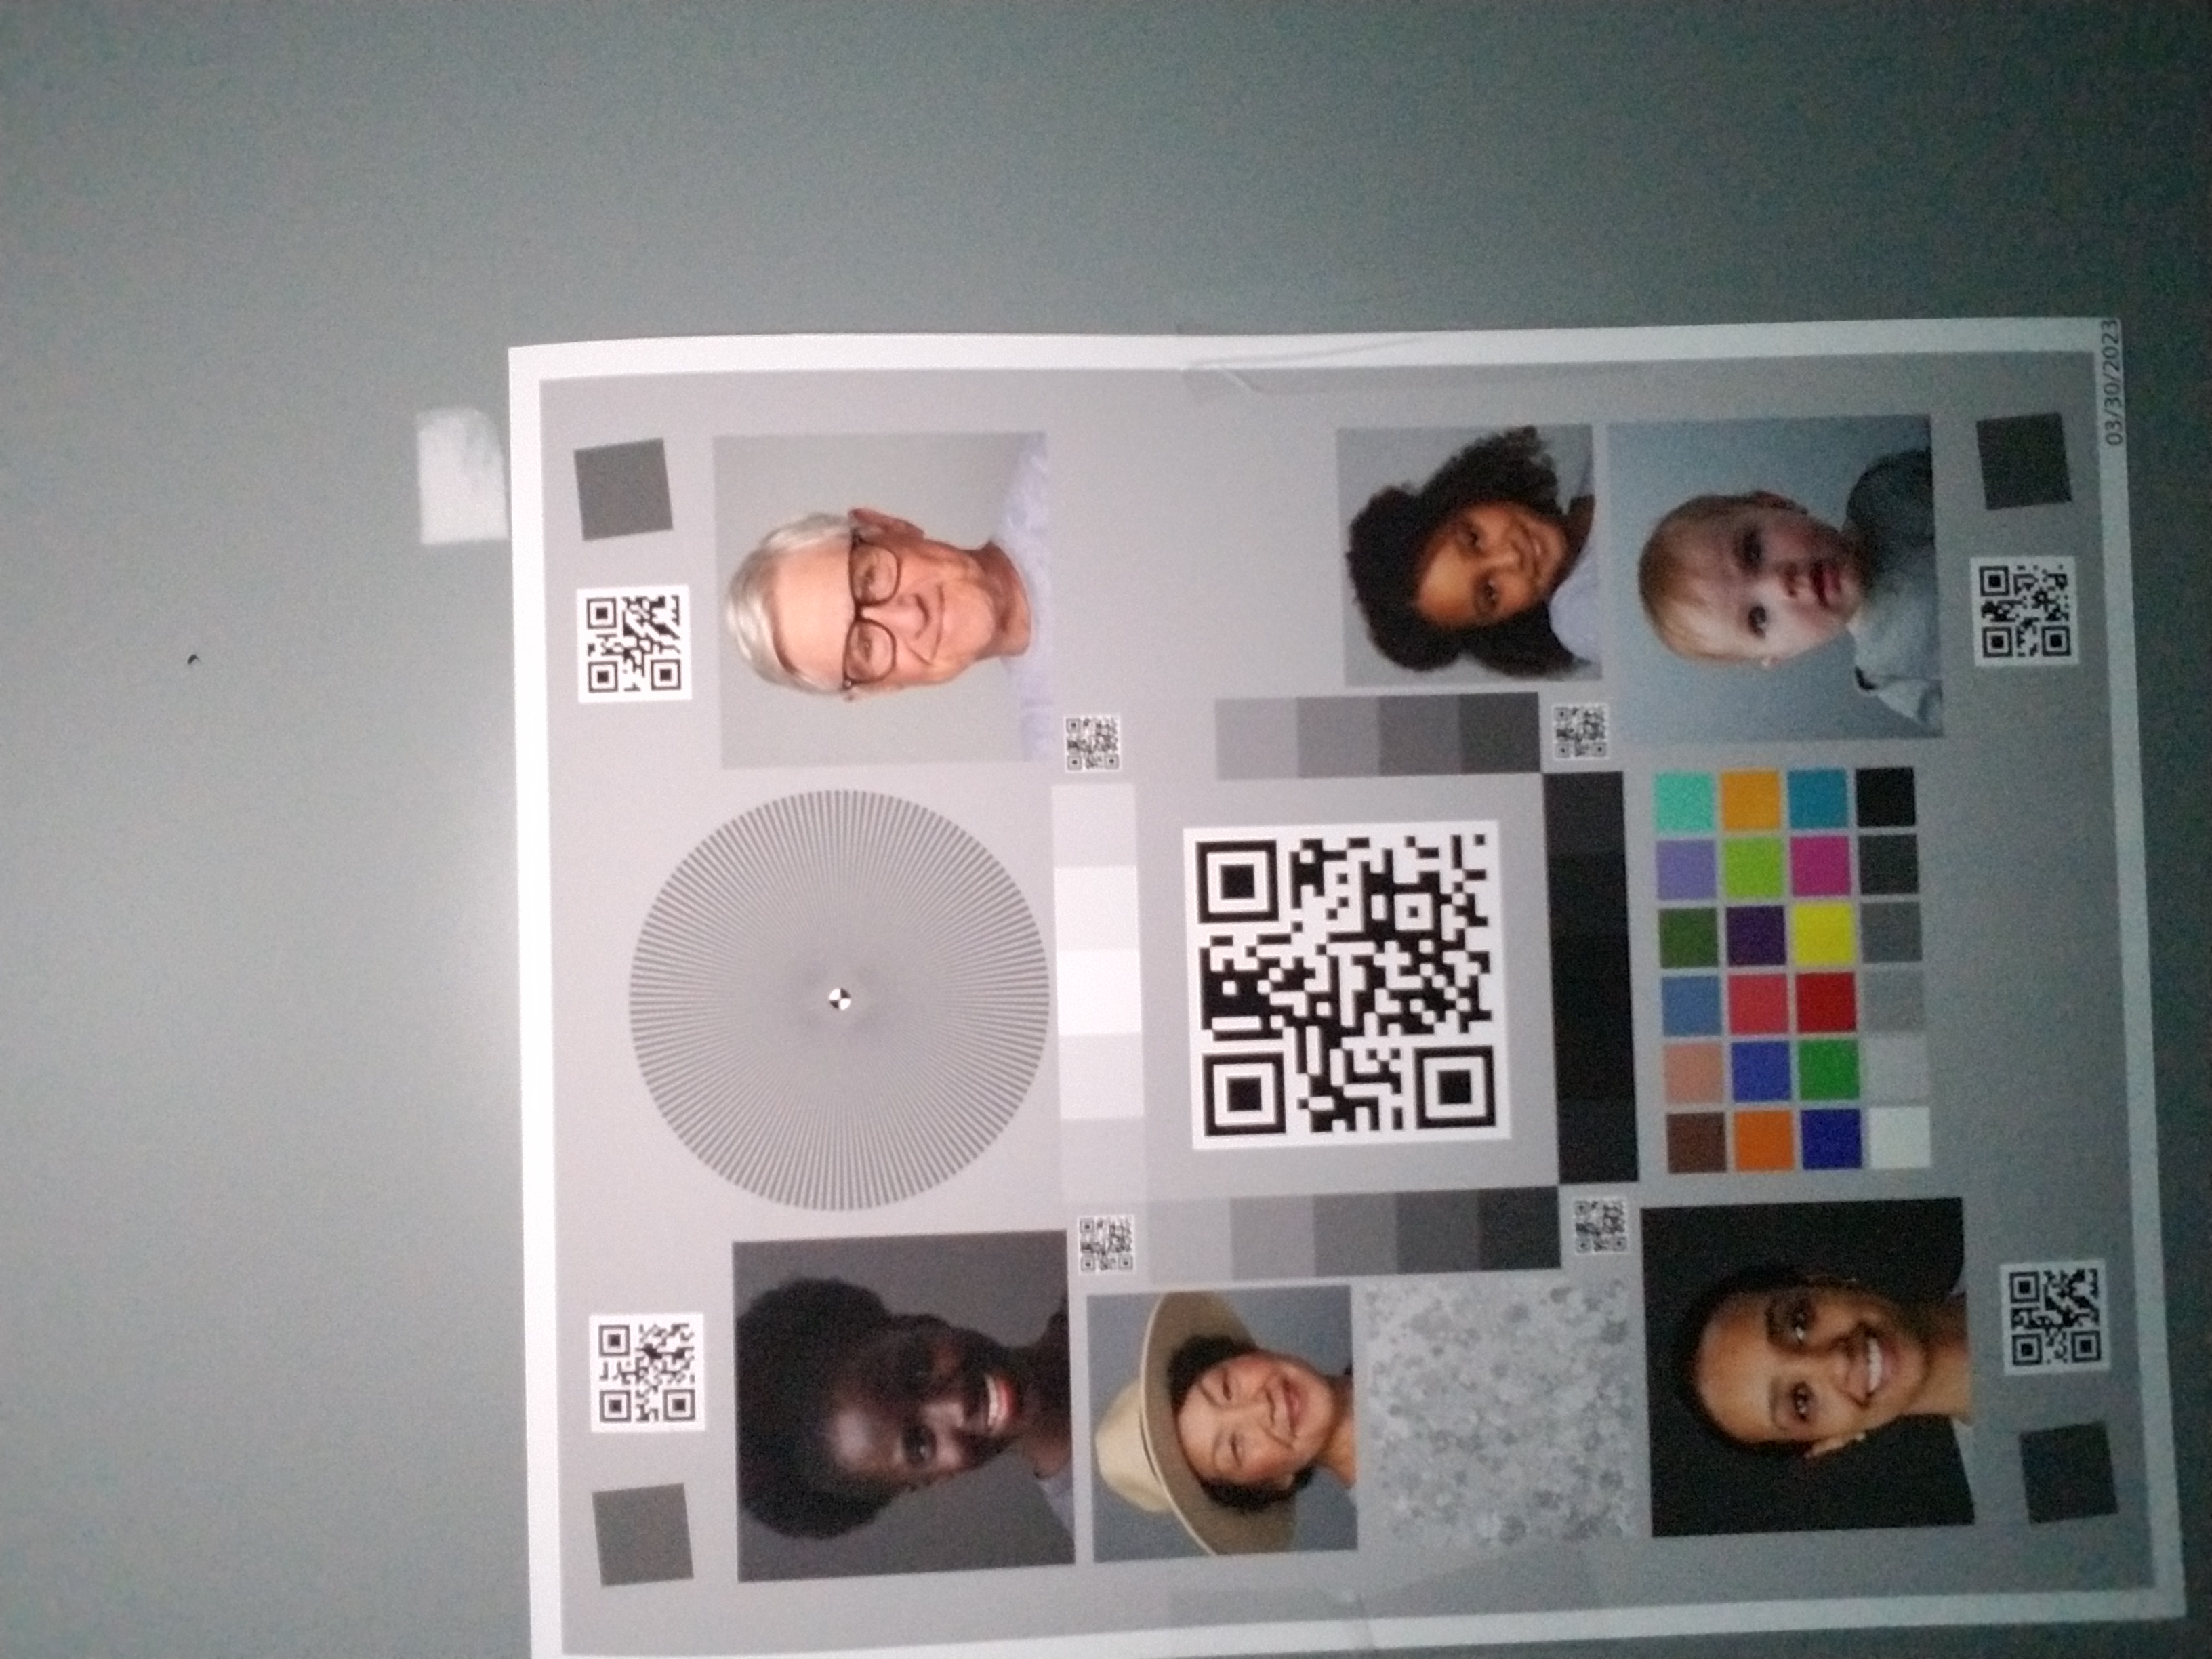
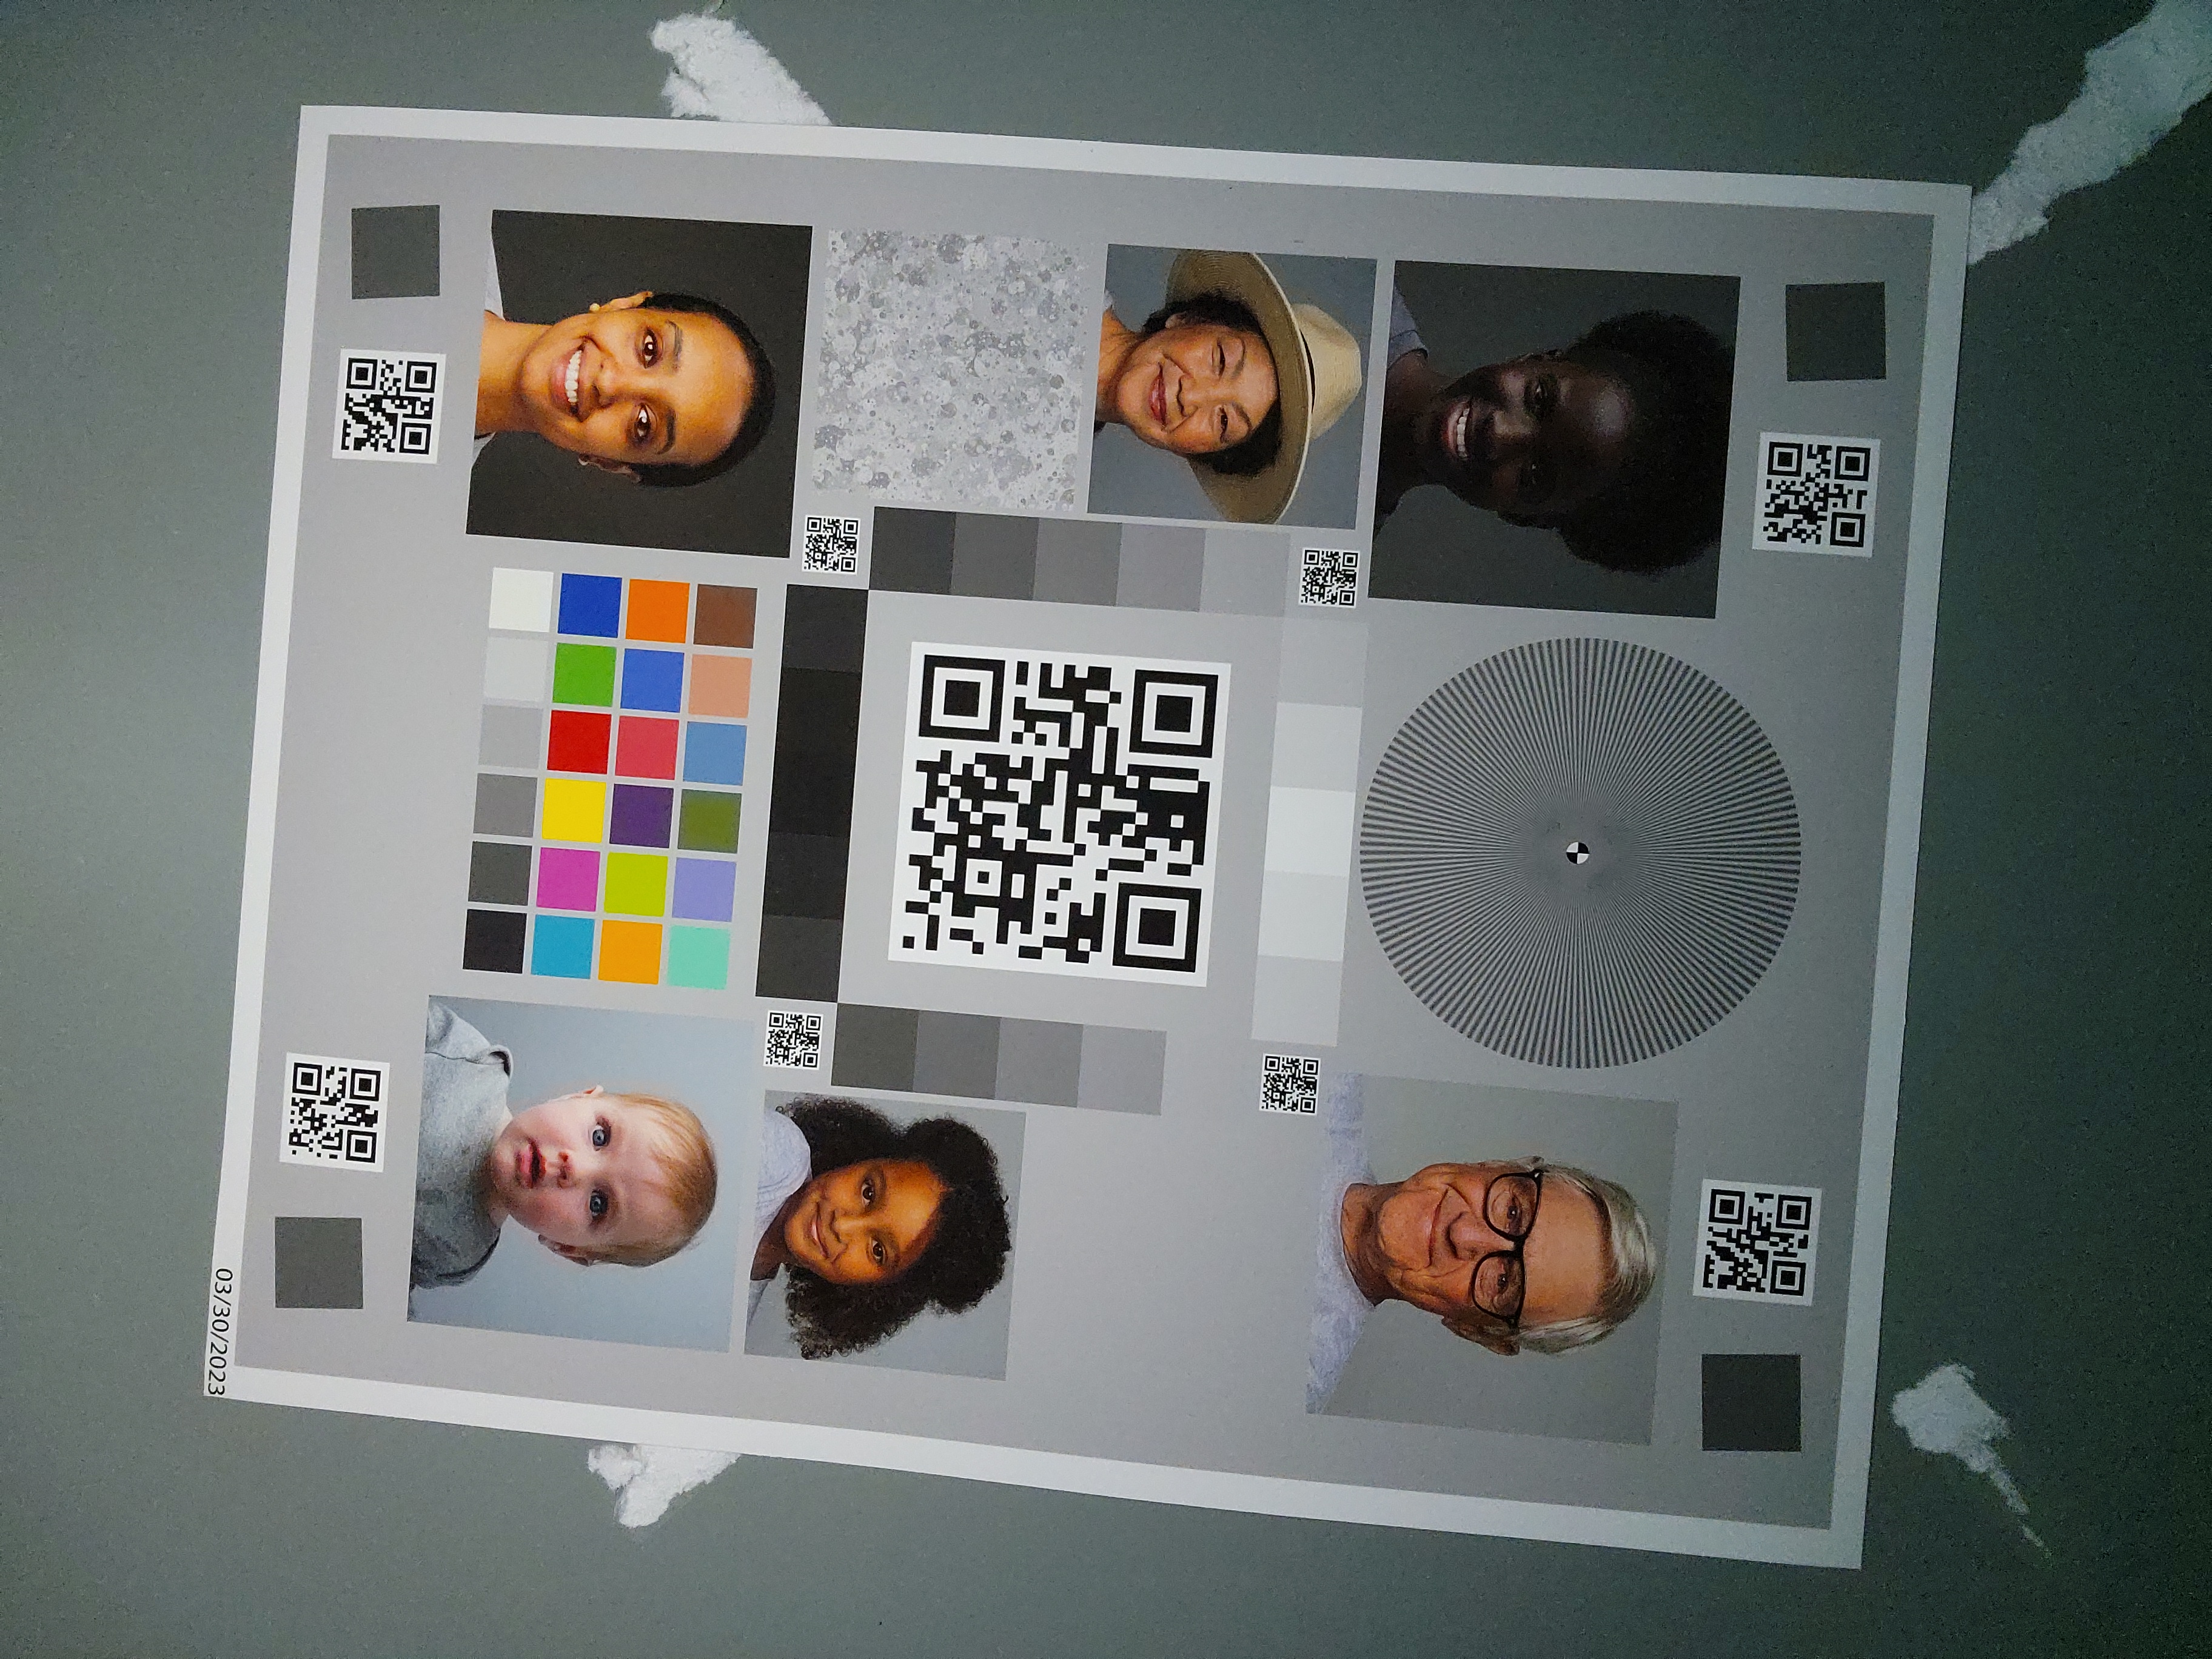
When done right
When the standard implementation is used for the same devices and conditions, you can see the results in the following table.
| Environment | Under-exposure (fixed) | Over-exposure (fixed) | Color tint (fixed) |
|---|---|---|---|
| Dark environment (No light source but the phone) |
|
|
|
| Low light (Additional ~3 lux light source) |
|
|
|
As observed, the image quality significantly improves with the standard implementation.