

일반적으로 사용자는 TV와 상호작용할 때 콘텐츠 시청 전에 최소한의 입력만 하기를 선호합니다. 많은 TV 사용자에게 이상적인 시나리오는 앉아서 TV를 켜고 시청하는 것입니다. 사용자가 좋아하는 콘텐츠에 도달하는 데 필요한 단계를 최소화하는 것이 일반적으로 사용자가 선호하는 방식입니다.
참고: 여기에 설명된 API는 Android 7.1 (API 레벨 25) 이하 버전에서 실행되는 앱에서만 추천을 제공하는 데 사용할 수 있습니다. Android 8.0 (API 레벨 26) 이상에서 실행되는 앱에 대한 권장 사항을 제공하려면 앱에서 recommendations 채널을 사용해야 합니다.
안드로이드 프레임워크는 홈 화면에 추천 항목을 표시하여 최소한의 입력으로 상호 작용할 수 있도록 지원합니다. 기기 최초 사용 후 TV 홈 화면의 첫 번째 줄에 콘텐츠 추천이 표시됩니다. 앱의 콘텐츠 카탈로그에서 추천 항목을 제공하면 사용자가 앱을 다시 방문하도록 유도하는 데 도움이 될 수 있습니다.
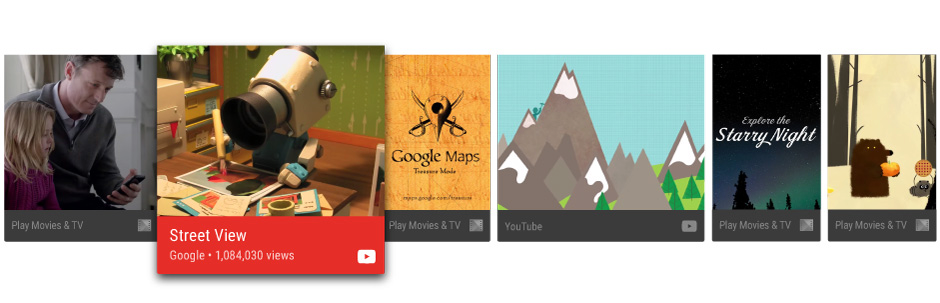
이 가이드는 사용자가 앱 콘텐츠를 발견하고 즐길 수 있도록 추천 기능을 생성하고 안드로이드 프레임워크에 제공하는 방법을 알려줍니다. Leanback 샘플 앱의 샘플 구현도 참조하세요.
추천 권장사항
추천을 통해 사용자는 자신이 즐기는 콘텐츠와 앱을 빠르게 찾을 수 있습니다. 고품질의 관련성 높은 추천 콘텐츠를 생성하는 것은 TV 앱에서 훌륭한 사용자 경험을 제공하는 데 중요한 요소입니다. 따라서 사용자에게 어떤 추천 콘텐츠를 제공할지 신중하게 고려하고 면밀히 관리해야 합니다.
추천 유형
추천 기능을 만들 때는 사용자가 시청을 완료하지 못한 부분으로 연결하거나, 관련 콘텐츠로 확장할 수 있는 활동을 제안해야 합니다. 다음은 고려해 볼 만한 구체적인 권장 사항 몇 가지입니다.
- 계속되는 내용 사용자가 시리즈 시청을 재개할 수 있도록 다음 에피소드를 추천합니다. 또는 일시 정지된 영화, TV 프로그램 또는 팟캐스트에 대한 이어보기 추천 기능을 사용하여 사용자가 몇 번의 클릭만으로 일시 정지된 콘텐츠를 다시 시청할 수 있도록 할 수 있습니다.
- 새로운 콘텐츠 사용자가 다른 시리즈 시청을 완료했을 경우, 새로운 첫 방송 에피소드와 같은 추천 콘텐츠를 제공합니다. 또한 앱에서 사용자가 콘텐츠를 구독, 팔로우 또는 추적할 수 있도록 허용하는 경우, 추적 중인 콘텐츠 목록에서 시청하지 않은 항목에 대해 새로운 콘텐츠를 추천하세요.
- 사용자의 과거 시청 행동에 기반한 관련 콘텐츠를 추천합니다.
최상의 사용자 경험을 위한 추천 카드 디자인 방법에 대한 자세한 내용은 Android TV 디자인 사양의 추천 행을 참조하세요.
추천 새로고침
추천 항목을 새로 고칠 때는 단순히 삭제하고 다시 게시하지 마세요. 그렇게 하면 추천 항목이 추천 목록의 맨 끝에 나타나게 됩니다. 영화와 같은 콘텐츠 항목이 재생되면 추천 목록에서 해당 항목을 제거합니다.
권장사항 맞춤설정
추천 카드의 전경 및 배경 이미지, 색상, 앱 아이콘, 제목 및 부제목과 같은 사용자 인터페이스 요소를 설정하여 브랜드 정보를 전달하도록 추천 카드를 맞춤 설정할 수 있습니다. 자세한 내용을 알아보려면 Android TV 디자인 사양의 권장 행을 참조하세요.
그룹 추천
추천 소스에 기반한 그룹 추천을 할 수 있습니다(선택사항). 예를 들어, 앱은 두 가지 유형의 추천을 제공할 수 있습니다. 하나는 사용자가 구독하는 콘텐츠에 대한 추천이고, 다른 하나는 사용자가 아직 알지 못할 수도 있는 새로운 인기 콘텐츠에 대한 추천입니다.
시스템은 추천 행을 생성하거나 업데이트할 때 각 그룹별로 추천 순위를 매기고 순서를 지정합니다. 추천 항목에 그룹 정보를 제공하면 관련 없는 추천 항목 아래에 정렬되지 않도록 할 수 있습니다.
추천의 그룹 키 문자열을 설정하려면 NotificationCompat.Builder.setGroup()을 사용하십시오. 예를 들어, 추천 항목이 새로운 인기 콘텐츠를 포함하는 그룹에 속한다고 표시하려면 setGroup("trending")을 호출할 수 있습니다.
추천 서비스 만들기
콘텐츠 추천은 백그라운드 처리로 만들어집니다. 앱이 추천 기능에 기여하려면 앱 카탈로그의 목록을 시스템의 추천 목록에 주기적으로 추가하는 서비스를 생성해야 합니다.
다음 코드 예제는 IntentService을 확장하여 애플리케이션용 추천 서비스를 만드는 방법을 보여줍니다.
Kotlin
class UpdateRecommendationsService : IntentService("RecommendationService") {
    override protected fun onHandleIntent(intent: Intent) {
        Log.d(TAG, "Updating recommendation cards")
        val recommendations = VideoProvider.getMovieList()
        if (recommendations == null) return

        var count = 0

        try {
            val builder = RecommendationBuilder()
                    .setContext(applicationContext)
                    .setSmallIcon(R.drawable.videos_by_google_icon)

            for (entry in recommendations.entrySet()) {
                for (movie in entry.getValue()) {
                    Log.d(TAG, "Recommendation - " + movie.getTitle())

                    builder.setBackground(movie.getCardImageUrl())
                            .setId(count + 1)
                            .setPriority(MAX_RECOMMENDATIONS - count)
                            .setTitle(movie.getTitle())
                            .setDescription(getString(R.string.popular_header))
                            .setImage(movie.getCardImageUrl())
                            .setIntent(buildPendingIntent(movie))
                            .build()
                    if (++count >= MAX_RECOMMENDATIONS) {
                        break
                    }
                }
                if (++count >= MAX_RECOMMENDATIONS) {
                    break
                }
            }
        } catch (e: IOException) {
            Log.e(TAG, "Unable to update recommendation", e)
        }
    }

    private fun buildPendingIntent(movie: Movie): PendingIntent {
        val detailsIntent = Intent(this, DetailsActivity::class.java)
        detailsIntent.putExtra("Movie", movie)

        val stackBuilder = TaskStackBuilder.create(this)
        stackBuilder.addParentStack(DetailsActivity::class.java)
        stackBuilder.addNextIntent(detailsIntent)

        // Ensure a unique PendingIntents, otherwise all
        // recommendations end up with the same PendingIntent
        detailsIntent.setAction(movie.getId().toString())

        val intent = stackBuilder.getPendingIntent(0, PendingIntent.FLAG_UPDATE_CURRENT)
        return intent
    }

    companion object {
        private val TAG = "UpdateRecommendationsService"
        private val MAX_RECOMMENDATIONS = 3
    }
}
자바
public class UpdateRecommendationsService extends IntentService {
    private static final String TAG = "UpdateRecommendationsService";
    private static final int MAX_RECOMMENDATIONS = 3;

    public UpdateRecommendationsService() {
        super("RecommendationService");
    }

    @Override
    protected void onHandleIntent(Intent intent) {
        Log.d(TAG, "Updating recommendation cards");
        HashMap<String, List<Movie>> recommendations = VideoProvider.getMovieList();
        if (recommendations == null) return;

        int count = 0;

        try {
            RecommendationBuilder builder = new RecommendationBuilder()
                    .setContext(getApplicationContext())
                    .setSmallIcon(R.drawable.videos_by_google_icon);

            for (Map.Entry<String, List<Movie>> entry : recommendations.entrySet()) {
                for (Movie movie : entry.getValue()) {
                    Log.d(TAG, "Recommendation - " + movie.getTitle());

                    builder.setBackground(movie.getCardImageUrl())
                            .setId(count + 1)
                            .setPriority(MAX_RECOMMENDATIONS - count)
                            .setTitle(movie.getTitle())
                            .setDescription(getString(R.string.popular_header))
                            .setImage(movie.getCardImageUrl())
                            .setIntent(buildPendingIntent(movie))
                            .build();

                    if (++count >= MAX_RECOMMENDATIONS) {
                        break;
                    }
                }
                if (++count >= MAX_RECOMMENDATIONS) {
                    break;
                }
            }
        } catch (IOException e) {
            Log.e(TAG, "Unable to update recommendation", e);
        }
    }

    private PendingIntent buildPendingIntent(Movie movie) {
        Intent detailsIntent = new Intent(this, DetailsActivity.class);
        detailsIntent.putExtra("Movie", movie);

        TaskStackBuilder stackBuilder = TaskStackBuilder.create(this);
        stackBuilder.addParentStack(DetailsActivity.class);
        stackBuilder.addNextIntent(detailsIntent);
        // Ensure a unique PendingIntents, otherwise all
        // recommendations end up with the same PendingIntent
        detailsIntent.setAction(Long.toString(movie.getId()));

        PendingIntent intent = stackBuilder.getPendingIntent(0, PendingIntent.FLAG_UPDATE_CURRENT);
        return intent;
    }
}
이 서비스가 시스템에서 인식되고 실행되려면 앱 매니페스트를 사용하여 등록해야 합니다. 다음 코드 조각은 이 클래스를 서비스로 선언하는 방법을 보여줍니다.
<manifest ... >
  <application ... >
    ...

    <service
            android:name="com.example.android.tvleanback.UpdateRecommendationsService"
            android:enabled="true" />
  </application>
</manifest>
추천 빌드
추천 서비스가 실행되기 시작하면 추천 항목을 생성하여 안드로이드 프레임워크에 전달해야 합니다. 프레임워크는 특정 템플릿을 사용하고 특정 범주로 표시된 Notification 객체로 권장 사항을 받습니다.
값 설정
추천 카드에 대한 UI 요소 값을 설정하려면 다음과 같이 설명된 빌더 패턴을 따르는 빌더 클래스를 생성합니다. 먼저 추천 카드 요소의 값을 설정합니다.
Kotlin
class RecommendationBuilder {
    ...

    fun setTitle(title: String): RecommendationBuilder {
        this.title = title
        return this
    }

    fun setDescription(description: String): RecommendationBuilder {
        this.description = description
        return this
    }

    fun setImage(uri: String): RecommendationBuilder {
        imageUri = uri
        return this
    }

    fun setBackground(uri: String): RecommendationBuilder {
        backgroundUri = uri
        return this
    }

...
자바
public class RecommendationBuilder {
    ...

    public RecommendationBuilder setTitle(String title) {
            this.title = title;
            return this;
        }

        public RecommendationBuilder setDescription(String description) {
            this.description = description;
            return this;
        }

        public RecommendationBuilder setImage(String uri) {
            imageUri = uri;
            return this;
        }

        public RecommendationBuilder setBackground(String uri) {
            backgroundUri = uri;
            return this;
        }
...
알림 만들기
값을 설정한 후에는 빌더 클래스의 값을 알림에 할당하고 NotificationCompat.Builder.build()을 호출하여 알림을 생성합니다.
또한, setLocalOnly()을 호출하여 NotificationCompat.BigPictureStyle 알림이 다른 기기에 표시되지 않도록 하십시오.
다음 코드 예에서는 추천을 빌드하는 방법을 보여줍니다.
Kotlin
class RecommendationBuilder {
    ...

    @Throws(IOException::class)
    fun build(): Notification {
        ...

        val notification = NotificationCompat.BigPictureStyle(
        NotificationCompat.Builder(context)
                .setContentTitle(title)
                .setContentText(description)
                .setPriority(priority)
                .setLocalOnly(true)
                .setOngoing(true)
                .setColor(context.resources.getColor(R.color.fastlane_background))
                .setCategory(Notification.CATEGORY_RECOMMENDATION)
                .setLargeIcon(image)
                .setSmallIcon(smallIcon)
                .setContentIntent(intent)
                .setExtras(extras))
                .build()

        return notification
    }
}
자바
public class RecommendationBuilder {
    ...

    public Notification build() throws IOException {
        ...

        Notification notification = new NotificationCompat.BigPictureStyle(
                new NotificationCompat.Builder(context)
                        .setContentTitle(title)
                        .setContentText(description)
                        .setPriority(priority)
                        .setLocalOnly(true)
                        .setOngoing(true)
                        .setColor(context.getResources().getColor(R.color.fastlane_background))
                        .setCategory(Notification.CATEGORY_RECOMMENDATION)
                        .setLargeIcon(image)
                        .setSmallIcon(smallIcon)
                        .setContentIntent(intent)
                        .setExtras(extras))
                .build();

        return notification;
    }
}
추천 서비스 실행
앱의 추천 서비스는 최신 추천을 생성하기 위해 주기적으로 실행되어야 합니다. 서비스를 실행하려면 타이머를 실행하고 정기적으로 호출하는 클래스를 만드세요. 다음 코드 예제는 BroadcastReceiver 클래스를 확장하여 30분마다 추천 서비스를 주기적으로 실행하도록 합니다.
Kotlin
class BootupActivity : BroadcastReceiver() {
    override fun onReceive(context: Context, intent: Intent) {
        Log.d(TAG, "BootupActivity initiated")
        if (intent.action.endsWith(Intent.ACTION_BOOT_COMPLETED)) {
            scheduleRecommendationUpdate(context)
        }
    }

    private fun scheduleRecommendationUpdate(context: Context) {
        Log.d(TAG, "Scheduling recommendations update")
        val alarmManager = context.getSystemService(Context.ALARM_SERVICE) as AlarmManager
        val recommendationIntent = Intent(context, UpdateRecommendationsService::class.java)
        val alarmIntent = PendingIntent.getService(context, 0, recommendationIntent, 0)
        alarmManager.setInexactRepeating(AlarmManager.ELAPSED_REALTIME_WAKEUP,
                INITIAL_DELAY,
                AlarmManager.INTERVAL_HALF_HOUR,
                alarmIntent
        )
    }

    companion object {
        private val TAG = "BootupActivity"
        private val INITIAL_DELAY:Long = 5000
    }
}
자바
public class BootupActivity extends BroadcastReceiver {
    private static final String TAG = "BootupActivity";

    private static final long INITIAL_DELAY = 5000;

    @Override
    public void onReceive(Context context, Intent intent) {
        Log.d(TAG, "BootupActivity initiated");
        if (intent.getAction().endsWith(Intent.ACTION_BOOT_COMPLETED)) {
            scheduleRecommendationUpdate(context);
        }
    }

    private void scheduleRecommendationUpdate(Context context) {
        Log.d(TAG, "Scheduling recommendations update");

        AlarmManager alarmManager = (AlarmManager) context.getSystemService(Context.ALARM_SERVICE);
        Intent recommendationIntent = new Intent(context, UpdateRecommendationsService.class);
        PendingIntent alarmIntent = PendingIntent.getService(context, 0, recommendationIntent, 0);

        alarmManager.setInexactRepeating(AlarmManager.ELAPSED_REALTIME_WAKEUP,
                INITIAL_DELAY,
                AlarmManager.INTERVAL_HALF_HOUR,
                alarmIntent);
    }
}
BroadcastReceiver 클래스의 이 구현은 설치된 TV 장치가 시작된 후에 실행되어야 합니다. 이를 위해 앱 매니페스트에 이 클래스를 등록하고, 기기 부팅 프로세스 완료를 수신하는 인텐트 필터를 추가하세요. 다음 샘플 코드는 이 구성을 매니페스트에 추가하는 방법을 보여줍니다.
<manifest ... >
  <application ... >
    <receiver android:name="com.example.android.tvleanback.BootupActivity"
              android:enabled="true"
              android:exported="false">
      <intent-filter>
        <action android:name="android.intent.action.BOOT_COMPLETED"/>
      </intent-filter>
    </receiver>
  </application>
</manifest>
중요: 부팅 완료 알림을 받으려면 앱에서 RECEIVE_BOOT_COMPLETED 권한을 요청해야 합니다.
자세한 내용은 ACTION_BOOT_COMPLETED를 참고하세요.
추천 서비스 클래스의 onHandleIntent() 메서드에서 다음과 같이 추천 결과를 관리자에게 전송하세요.
Kotlin
val notification = notificationBuilder.build()
notificationManager.notify(id, notification)
자바
Notification notification = notificationBuilder.build();
notificationManager.notify(id, notification);