

Khi tương tác với TV, người dùng thường muốn nhập ít thông tin đầu vào trước khi xem nội dung. Tình huống lý tưởng đối với nhiều người dùng TV là: ngồi xuống, bật TV và xem. Ít bước nhất để đưa người dùng đến với nội dung họ yêu thích thường là con đường mà họ thích.
Lưu ý: Hãy sử dụng các API được mô tả ở đây để đưa ra đề xuất chỉ trong ứng dụng chạy trong các phiên bản Android lên đến và bao gồm Android 7.1 (API cấp 25). Để cung cấp đề xuất cho ứng dụng chạy trong Android 8.0 (API cấp 26) trở lên, ứng dụng của bạn phải sử dụng kênh đề xuất.
Khung Android hỗ trợ hoạt động tương tác đầu vào tối thiểu bằng cách cung cấp một hàng đề xuất trên màn hình chính. Nội dung đề xuất xuất hiện dưới dạng hàng đầu tiên trên màn hình chính của TV lần đầu tiên sử dụng thiết bị. Việc đóng góp các đề xuất từ danh mục nội dung của ứng dụng có thể giúp ích cho bạn đưa người dùng quay lại ứng dụng của bạn.
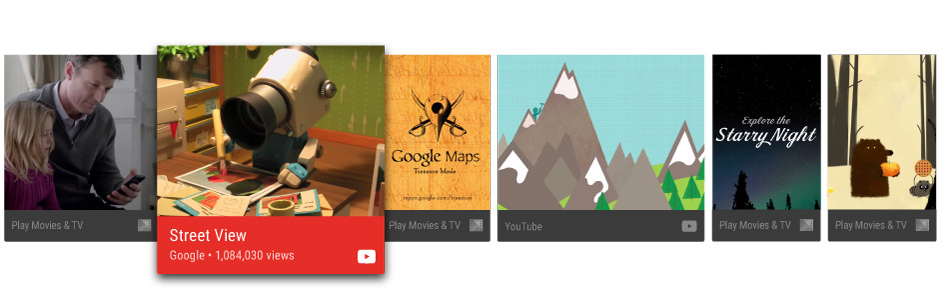
Hình 1. Ví dụ về hàng đề xuất.
Hướng dẫn này chỉ cho bạn cách tạo và cung cấp các đề xuất cho khung Android để người dùng có thể dễ dàng khám phá và thưởng thức nội dung ứng dụng của bạn. Xem thêm cách triển khai mẫu trong thời gian Ứng dụng mẫu Leanback của Google.
Các phương pháp hay nhất cho các đề xuất
Hệ thống đề xuất giúp người dùng nhanh chóng tìm thấy nội dung và ứng dụng mà họ yêu thích. Đang tạo những đề xuất có chất lượng cao và phù hợp với người dùng là một yếu tố quan trọng trong việc tạo trải nghiệm người dùng tuyệt vời hơn với ứng dụng dành cho TV. Vì lý do này, bạn nên xem xét cẩn thận những gì đề xuất mà bạn hiển thị cho người dùng và quản lý chúng một cách chặt chẽ.
Các loại đề xuất
Khi tạo nội dung đề xuất, bạn nên liên kết người dùng quay lại các hoạt động xem chưa hoàn chỉnh hoặc gợi ý các hoạt động mở rộng sang nội dung có liên quan. Sau đây là một số loại các đề xuất bạn nên cân nhắc:
- Những đề xuất nội dung tiếp nối cho tập tiếp theo để người dùng xem tiếp xem một chương trình dài tập. Ngoài ra, bạn có thể dùng các đề xuất về việc tiếp tục phát cho những bộ phim, chương trình truyền hình hoặc podcast đã tạm dừng để người dùng có thể quay lại xem nội dung bị tạm dừng chỉ bằng vài cú nhấp chuột.
- Đề xuất Nội dung mới, chẳng hạn như cho một tập mới phát hành lần đầu, nếu người dùng đã xem xong một chuỗi video khác. Ngoài ra, nếu ứng dụng của bạn cho phép người dùng đăng ký, theo dõi hoặc theo dõi thêm nội dung mới, đề xuất nội dung mới cho các mục chưa xem trong danh sách nội dung bạn theo dõi.
- Đề xuất Nội dung có liên quan dựa trên ý kiến của người dùng hành vi xem trước đây.
Để biết thêm thông tin về cách thiết kế thẻ đề xuất nhằm mang lại trải nghiệm tốt nhất cho người dùng, hãy xem Hàng Đề xuất trong Thông số thiết kế của Android TV.
Làm mới đề xuất
Khi làm mới nội dung đề xuất, đừng chỉ xoá rồi đăng lại vì làm như vậy sẽ gây ra lỗi các đề xuất sẽ xuất hiện ở cuối hàng đề xuất. Khi một mục nội dung, chẳng hạn như phim, đã được phát, xoá địa điểm đó khỏi danh sách đề xuất.
Tuỳ chỉnh nội dung đề xuất
Bạn có thể tuỳ chỉnh các thẻ đề xuất để truyền tải thông tin xây dựng thương hiệu bằng cách thiết lập giao diện người dùng các phần tử như nền trước và nền, màu sắc, biểu tượng ứng dụng, tiêu đề và phụ đề của thẻ. Để tìm hiểu thêm, hãy xem Hàng Đề xuất trong Thông số thiết kế của Android TV.
Đề xuất theo nhóm
Bạn có thể tuỳ ý nhóm các đề xuất dựa trên nguồn đề xuất. Ví dụ: ứng dụng của bạn có thể cung cấp hai nhóm đề xuất: đề xuất về nội dung mà người dùng đăng ký theo dõi, và gợi ý các nội dung thịnh hành mới mà người dùng có thể chưa biết đến.
Khi tạo hoặc cập nhật, hệ thống sẽ xếp hạng và sắp xếp thứ tự đề xuất cho từng nhóm riêng biệt hàng đề xuất. Bằng việc cung cấp thông tin nhóm cho các đề xuất, bạn có thể đảm bảo để đề xuất của bạn không bị xếp dưới những đề xuất không liên quan.
Sử dụng
NotificationCompat.Builder.setGroup() để đặt chuỗi khoá nhóm của một đề xuất. Cho
ví dụ: để đánh dấu một nội dung đề xuất là thuộc về một nhóm chứa nội dung thịnh hành mới,
bạn có thể gọi setGroup("trending").
Tạo dịch vụ đề xuất
Hệ thống đề xuất nội dung được tạo bằng quy trình xử lý ở chế độ nền. Để đơn đăng ký của bạn đóng góp vào đề xuất, tạo ra một dịch vụ bổ sung danh sách định kỳ từ danh mục của ứng dụng vào danh sách các đề xuất của hệ thống.
Ví dụ về mã sau minh hoạ cách mở rộng IntentService để
tạo dịch vụ đề xuất cho ứng dụng của bạn:
Kotlin
class UpdateRecommendationsService : IntentService("RecommendationService") {
    override protected fun onHandleIntent(intent: Intent) {
        Log.d(TAG, "Updating recommendation cards")
        val recommendations = VideoProvider.getMovieList()
        if (recommendations == null) return

        var count = 0

        try {
            val builder = RecommendationBuilder()
                    .setContext(applicationContext)
                    .setSmallIcon(R.drawable.videos_by_google_icon)

            for (entry in recommendations.entrySet()) {
                for (movie in entry.getValue()) {
                    Log.d(TAG, "Recommendation - " + movie.getTitle())

                    builder.setBackground(movie.getCardImageUrl())
                            .setId(count + 1)
                            .setPriority(MAX_RECOMMENDATIONS - count)
                            .setTitle(movie.getTitle())
                            .setDescription(getString(R.string.popular_header))
                            .setImage(movie.getCardImageUrl())
                            .setIntent(buildPendingIntent(movie))
                            .build()
                    if (++count >= MAX_RECOMMENDATIONS) {
                        break
                    }
                }
                if (++count >= MAX_RECOMMENDATIONS) {
                    break
                }
            }
        } catch (e: IOException) {
            Log.e(TAG, "Unable to update recommendation", e)
        }
    }

    private fun buildPendingIntent(movie: Movie): PendingIntent {
        val detailsIntent = Intent(this, DetailsActivity::class.java)
        detailsIntent.putExtra("Movie", movie)

        val stackBuilder = TaskStackBuilder.create(this)
        stackBuilder.addParentStack(DetailsActivity::class.java)
        stackBuilder.addNextIntent(detailsIntent)

        // Ensure a unique PendingIntents, otherwise all
        // recommendations end up with the same PendingIntent
        detailsIntent.setAction(movie.getId().toString())

        val intent = stackBuilder.getPendingIntent(0, PendingIntent.FLAG_UPDATE_CURRENT)
        return intent
    }

    companion object {
        private val TAG = "UpdateRecommendationsService"
        private val MAX_RECOMMENDATIONS = 3
    }
}
Java
public class UpdateRecommendationsService extends IntentService {
    private static final String TAG = "UpdateRecommendationsService";
    private static final int MAX_RECOMMENDATIONS = 3;

    public UpdateRecommendationsService() {
        super("RecommendationService");
    }

    @Override
    protected void onHandleIntent(Intent intent) {
        Log.d(TAG, "Updating recommendation cards");
        HashMap<String, List<Movie>> recommendations = VideoProvider.getMovieList();
        if (recommendations == null) return;

        int count = 0;

        try {
            RecommendationBuilder builder = new RecommendationBuilder()
                    .setContext(getApplicationContext())
                    .setSmallIcon(R.drawable.videos_by_google_icon);

            for (Map.Entry<String, List<Movie>> entry : recommendations.entrySet()) {
                for (Movie movie : entry.getValue()) {
                    Log.d(TAG, "Recommendation - " + movie.getTitle());

                    builder.setBackground(movie.getCardImageUrl())
                            .setId(count + 1)
                            .setPriority(MAX_RECOMMENDATIONS - count)
                            .setTitle(movie.getTitle())
                            .setDescription(getString(R.string.popular_header))
                            .setImage(movie.getCardImageUrl())
                            .setIntent(buildPendingIntent(movie))
                            .build();

                    if (++count >= MAX_RECOMMENDATIONS) {
                        break;
                    }
                }
                if (++count >= MAX_RECOMMENDATIONS) {
                    break;
                }
            }
        } catch (IOException e) {
            Log.e(TAG, "Unable to update recommendation", e);
        }
    }

    private PendingIntent buildPendingIntent(Movie movie) {
        Intent detailsIntent = new Intent(this, DetailsActivity.class);
        detailsIntent.putExtra("Movie", movie);

        TaskStackBuilder stackBuilder = TaskStackBuilder.create(this);
        stackBuilder.addParentStack(DetailsActivity.class);
        stackBuilder.addNextIntent(detailsIntent);
        // Ensure a unique PendingIntents, otherwise all
        // recommendations end up with the same PendingIntent
        detailsIntent.setAction(Long.toString(movie.getId()));

        PendingIntent intent = stackBuilder.getPendingIntent(0, PendingIntent.FLAG_UPDATE_CURRENT);
        return intent;
    }
}
Để dịch vụ này được hệ thống nhận dạng và chạy, hãy đăng ký dịch vụ bằng tệp kê khai ứng dụng. Đoạn mã sau đây minh hoạ cách khai báo lớp này là một dịch vụ:
<manifest ... >
  <application ... >
    ...

    <service
            android:name="com.example.android.tvleanback.UpdateRecommendationsService"
            android:enabled="true" />
  </application>
</manifest>
Đề xuất về bản dựng
Khi bắt đầu chạy, dịch vụ đề xuất của bạn phải tạo các đề xuất và chuyển các đề xuất đó đến
khung Android. Khung này sẽ nhận được các đề xuất dưới dạng đối tượng Notification sử dụng một mẫu cụ thể và được đánh dấu bằng một
danh mục.
Đặt các giá trị
Để đặt giá trị thành phần trên giao diện người dùng cho thẻ đề xuất, bạn cần tạo một lớp trình tạo như sau mẫu trình tạo được mô tả như sau. Trước tiên, bạn đặt giá trị cho thẻ đề xuất phần tử.
Kotlin
class RecommendationBuilder {
    ...

    fun setTitle(title: String): RecommendationBuilder {
        this.title = title
        return this
    }

    fun setDescription(description: String): RecommendationBuilder {
        this.description = description
        return this
    }

    fun setImage(uri: String): RecommendationBuilder {
        imageUri = uri
        return this
    }

    fun setBackground(uri: String): RecommendationBuilder {
        backgroundUri = uri
        return this
    }

...
Java
public class RecommendationBuilder {
    ...

    public RecommendationBuilder setTitle(String title) {
            this.title = title;
            return this;
        }

        public RecommendationBuilder setDescription(String description) {
            this.description = description;
            return this;
        }

        public RecommendationBuilder setImage(String uri) {
            imageUri = uri;
            return this;
        }

        public RecommendationBuilder setBackground(String uri) {
            backgroundUri = uri;
            return this;
        }
...
Tạo thông báo
Sau khi đặt giá trị, bạn sẽ tạo thông báo, chỉ định các giá trị từ trình tạo
lớp vào thông báo và gọi NotificationCompat.Builder.build().
Ngoài ra, hãy nhớ gọi
setLocalOnly()
để thông báo NotificationCompat.BigPictureStyle không hiện lên
trên các thiết bị khác.
Ví dụ về mã sau đây minh hoạ cách tạo một đề xuất.
Kotlin
class RecommendationBuilder {
    ...

    @Throws(IOException::class)
    fun build(): Notification {
        ...

        val notification = NotificationCompat.BigPictureStyle(
        NotificationCompat.Builder(context)
                .setContentTitle(title)
                .setContentText(description)
                .setPriority(priority)
                .setLocalOnly(true)
                .setOngoing(true)
                .setColor(context.resources.getColor(R.color.fastlane_background))
                .setCategory(Notification.CATEGORY_RECOMMENDATION)
                .setLargeIcon(image)
                .setSmallIcon(smallIcon)
                .setContentIntent(intent)
                .setExtras(extras))
                .build()

        return notification
    }
}
Java
public class RecommendationBuilder {
    ...

    public Notification build() throws IOException {
        ...

        Notification notification = new NotificationCompat.BigPictureStyle(
                new NotificationCompat.Builder(context)
                        .setContentTitle(title)
                        .setContentText(description)
                        .setPriority(priority)
                        .setLocalOnly(true)
                        .setOngoing(true)
                        .setColor(context.getResources().getColor(R.color.fastlane_background))
                        .setCategory(Notification.CATEGORY_RECOMMENDATION)
                        .setLargeIcon(image)
                        .setSmallIcon(smallIcon)
                        .setContentIntent(intent)
                        .setExtras(extras))
                .build();

        return notification;
    }
}
Chạy dịch vụ đề xuất
Dịch vụ đề xuất của ứng dụng phải chạy định kỳ để tạo những
nội dung đề xuất. Để chạy dịch vụ, hãy tạo một lớp để chạy bộ tính giờ và gọi
theo định kỳ. Ví dụ về mã sau đây mở rộng lớp BroadcastReceiver để bắt đầu thực thi định kỳ một dịch vụ đề xuất
mỗi nửa giờ:
Kotlin
class BootupActivity : BroadcastReceiver() {
    override fun onReceive(context: Context, intent: Intent) {
        Log.d(TAG, "BootupActivity initiated")
        if (intent.action.endsWith(Intent.ACTION_BOOT_COMPLETED)) {
            scheduleRecommendationUpdate(context)
        }
    }

    private fun scheduleRecommendationUpdate(context: Context) {
        Log.d(TAG, "Scheduling recommendations update")
        val alarmManager = context.getSystemService(Context.ALARM_SERVICE) as AlarmManager
        val recommendationIntent = Intent(context, UpdateRecommendationsService::class.java)
        val alarmIntent = PendingIntent.getService(context, 0, recommendationIntent, 0)
        alarmManager.setInexactRepeating(AlarmManager.ELAPSED_REALTIME_WAKEUP,
                INITIAL_DELAY,
                AlarmManager.INTERVAL_HALF_HOUR,
                alarmIntent
        )
    }

    companion object {
        private val TAG = "BootupActivity"
        private val INITIAL_DELAY:Long = 5000
    }
}
Java
public class BootupActivity extends BroadcastReceiver {
    private static final String TAG = "BootupActivity";

    private static final long INITIAL_DELAY = 5000;

    @Override
    public void onReceive(Context context, Intent intent) {
        Log.d(TAG, "BootupActivity initiated");
        if (intent.getAction().endsWith(Intent.ACTION_BOOT_COMPLETED)) {
            scheduleRecommendationUpdate(context);
        }
    }

    private void scheduleRecommendationUpdate(Context context) {
        Log.d(TAG, "Scheduling recommendations update");

        AlarmManager alarmManager = (AlarmManager) context.getSystemService(Context.ALARM_SERVICE);
        Intent recommendationIntent = new Intent(context, UpdateRecommendationsService.class);
        PendingIntent alarmIntent = PendingIntent.getService(context, 0, recommendationIntent, 0);

        alarmManager.setInexactRepeating(AlarmManager.ELAPSED_REALTIME_WAKEUP,
                INITIAL_DELAY,
                AlarmManager.INTERVAL_HALF_HOUR,
                alarmIntent);
    }
}
Phương thức triển khai lớp BroadcastReceiver này phải chạy sau khi bắt đầu
thiết bị TV được lắp đặt. Để thực hiện việc này, hãy đăng ký lớp học này trong ứng dụng của bạn
tệp kê khai có bộ lọc ý định giúp theo dõi việc hoàn tất quá trình khởi động thiết bị. Chiến lược phát hành đĩa đơn
mã mẫu sau đây minh hoạ cách thêm cấu hình này vào tệp kê khai:
<manifest ... >
  <application ... >
    <receiver android:name="com.example.android.tvleanback.BootupActivity"
              android:enabled="true"
              android:exported="false">
      <intent-filter>
        <action android:name="android.intent.action.BOOT_COMPLETED"/>
      </intent-filter>
    </receiver>
  </application>
</manifest>
Lưu ý quan trọng: Việc nhận thông báo khởi động xong yêu cầu ứng dụng của bạn
yêu cầu quyền RECEIVE_BOOT_COMPLETED.
Để biết thêm thông tin, hãy xem ACTION_BOOT_COMPLETED.
Trong hạng dịch vụ đề xuất dành cho bạn onHandleIntent()
hãy đăng đề xuất cho người quản lý như sau:
Kotlin
val notification = notificationBuilder.build()
notificationManager.notify(id, notification)
Java
Notification notification = notificationBuilder.build();
notificationManager.notify(id, notification);