
自動入力サービスは、他のアプリのビューにデータを挿入することにより、ユーザーが簡単にフォームに入力できるようにするアプリです。また、アプリのビューからユーザーデータを取得して、後で使用できるように保存することも可能です。通常、自動入力サービスは、ユーザーデータを管理するアプリ(パスワード マネージャーなど)によって提供されます。
Android では、Android 8.0(API レベル 26)以降で利用可能な自動入力フレームワークにより、フォーム入力を簡易化できます。ユーザーは、自動入力サービスを提供するアプリがデバイスに存在する場合に限り、自動入力機能を利用できます。
このページでは、自動入力サービスをアプリに実装する方法について説明します。サービスの実装方法を示すコードサンプルについては、Java または Kotlin の AutofillFramework サンプルをご覧ください。自動入力サービスの仕組みの詳細については、AutofillService クラスと AutofillManager クラスのリファレンス ページをご覧ください。
マニフェストの宣言と権限
自動入力サービスを提供するアプリは、サービスの実装を記述する宣言を含んでいる必要があります。宣言を指定するには、アプリ マニフェストに <service> 要素を追加します。<service> 要素には、次の属性と要素を含める必要があります。
- サービスを実装するアプリ内の
AutofillServiceのサブクラスを指すandroid:name属性。 BIND_AUTOFILL_SERVICE権限を宣言するandroid:permission属性。<intent-filter>要素。その必須の<action>子要素でandroid.service.autofill.AutofillServiceアクションを指定します。<meta-data>要素(オプション)。サービスの追加の構成パラメータを指定するために使用できます。
次の例は、自動入力サービスの宣言を示しています。
<service
    android:name=".MyAutofillService"
    android:label="My Autofill Service"
    android:permission="android.permission.BIND_AUTOFILL_SERVICE">
    <intent-filter>
        <action android:name="android.service.autofill.AutofillService" />
    </intent-filter>
    <meta-data
        android:name="android.autofill"
        android:resource="@xml/service_configuration" />
</service>
<meta-data> 要素には、サービスに関する詳細を含む XML リソースを指す android:resource 属性が含まれています。上記の例の service_configuration リソースは、ユーザーがサービスを構成できるアクティビティを指定しています。次の例は、service_configuration XML リソースを示しています。
<autofill-service
  xmlns:android="http://schemas.android.com/apk/res/android"
  android:settingsActivity="com.example.android.SettingsActivity" />
XML リソースの詳細については、アプリのリソースの概要をご覧ください。
サービスの有効化を求めるプロンプト
アプリが BIND_AUTOFILL_SERVICE 権限を宣言し、ユーザーがデバイス設定でその権限を有効にすると、アプリは自動入力サービスとして使用されるようになります。AutofillManager クラスの hasEnabledAutofillServices() メソッドを呼び出すことにより、アプリが有効なサービスかどうかを確認できます。
アプリが現在の自動入力サービスでない場合は、ACTION_REQUEST_SET_AUTOFILL_SERVICE インテントを使用して、自動入力設定の変更をユーザーにリクエストできます。ユーザーが呼び出し元のパッケージと一致する自動入力サービスを選択すると、インテントは RESULT_OK 値を返します。
クライアント ビューへの入力
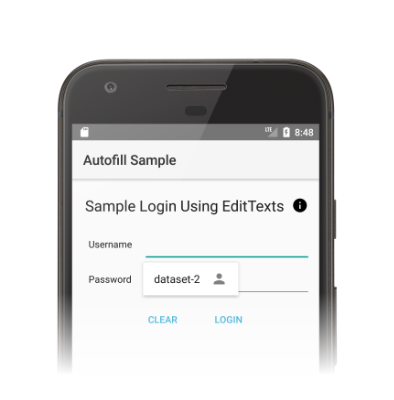
ユーザーが他のアプリを操作すると、自動入力サービスはクライアント ビューへの入力リクエストを受け取ります。自動入力サービスは、要求を満たすユーザーデータを持っている場合、そのデータを含むレスポンスを送信します。図 1 に示すように、Android システムは利用可能なデータを使用して自動入力 UI を表示します。
自動入力フレームワークは、Android システムが自動入力サービスに束縛される時間を最小限に抑えるように設計されたビューへの入力を行うワークフローを定義します。Android システムは、リクエストごとに onFillRequest() メソッドを呼び出して AssistStructure オブジェクトをサービスに送信します。
自動入力サービスは、過去に保存したユーザーデータでリクエストを満たせるかどうかを確認します。要求を満たせる場合、サービスは Dataset オブジェクトにデータをパッケージングします。サービスは onSuccess() メソッドを呼び出して、Dataset オブジェクトを含む FillResponse オブジェクトを渡します。要求を満たすデータがない場合、サービスは null を onSuccess() メソッドに渡します。リクエストの処理中にエラーが発生した場合は、代わりに onFailure() メソッドを呼び出します。ワークフローの詳細については、AutofillService リファレンス ページの説明をご覧ください。
次のコードは、onFillRequest() メソッドの例を示しています。
Kotlin
override fun onFillRequest(
    request: FillRequest,
    cancellationSignal: CancellationSignal,
    callback: FillCallback
) {
    // Get the structure from the request
    val context: List<FillContext> = request.fillContexts
    val structure: AssistStructure = context[context.size - 1].structure

    // Traverse the structure looking for nodes to fill out
    val parsedStructure: ParsedStructure = parseStructure(structure)

    // Fetch user data that matches the fields
    val (username: String, password: String) = fetchUserData(parsedStructure)

    // Build the presentation of the datasets
    val usernamePresentation = RemoteViews(packageName, android.R.layout.simple_list_item_1)
    usernamePresentation.setTextViewText(android.R.id.text1, "my_username")
    val passwordPresentation = RemoteViews(packageName, android.R.layout.simple_list_item_1)
    passwordPresentation.setTextViewText(android.R.id.text1, "Password for my_username")

    // Add a dataset to the response
    val fillResponse: FillResponse = FillResponse.Builder()
            .addDataset(Dataset.Builder()
                    .setValue(
                            parsedStructure.usernameId,
                            AutofillValue.forText(username),
                            usernamePresentation
                    )
                    .setValue(
                            parsedStructure.passwordId,
                            AutofillValue.forText(password),
                            passwordPresentation
                    )
                    .build())
            .build()

    // If there are no errors, call onSuccess() and pass the response
    callback.onSuccess(fillResponse)
}

data class ParsedStructure(var usernameId: AutofillId, var passwordId: AutofillId)

data class UserData(var username: String, var password: String)
Java
@Override
public void onFillRequest(FillRequest request, CancellationSignal cancellationSignal, FillCallback callback) {
    // Get the structure from the request
    List<FillContext> context = request.getFillContexts();
    AssistStructure structure = context.get(context.size() - 1).getStructure();

    // Traverse the structure looking for nodes to fill out
    ParsedStructure parsedStructure = parseStructure(structure);

    // Fetch user data that matches the fields
    UserData userData = fetchUserData(parsedStructure);

    // Build the presentation of the datasets
    RemoteViews usernamePresentation = new RemoteViews(getPackageName(), android.R.layout.simple_list_item_1);
    usernamePresentation.setTextViewText(android.R.id.text1, "my_username");
    RemoteViews passwordPresentation = new RemoteViews(getPackageName(), android.R.layout.simple_list_item_1);
    passwordPresentation.setTextViewText(android.R.id.text1, "Password for my_username");

    // Add a dataset to the response
    FillResponse fillResponse = new FillResponse.Builder()
            .addDataset(new Dataset.Builder()
                    .setValue(parsedStructure.usernameId,
                            AutofillValue.forText(userData.username), usernamePresentation)
                    .setValue(parsedStructure.passwordId,
                            AutofillValue.forText(userData.password), passwordPresentation)
                    .build())
            .build();

    // If there are no errors, call onSuccess() and pass the response
    callback.onSuccess(fillResponse);
}

class ParsedStructure {
    AutofillId usernameId;
    AutofillId passwordId;
}

class UserData {
    String username;
    String password;
}
サービスは、要求を満たすデータセットを複数持っていることがあります。その場合、Android システムは、複数のオプション(データセットごとに 1 つずつ)を自動入力 UI に表示します。次のコード例は、レスポンスで複数のデータセットを提示する方法を示しています。
Kotlin
// Add multiple datasets to the response
val fillResponse: FillResponse = FillResponse.Builder()
        .addDataset(Dataset.Builder()
                .setValue(parsedStructure.usernameId,
                        AutofillValue.forText(user1Data.username), username1Presentation)
                .setValue(parsedStructure.passwordId,
                        AutofillValue.forText(user1Data.password), password1Presentation)
                .build())
        .addDataset(Dataset.Builder()
                .setValue(parsedStructure.usernameId,
                        AutofillValue.forText(user2Data.username), username2Presentation)
                .setValue(parsedStructure.passwordId,
                        AutofillValue.forText(user2Data.password), password2Presentation)
                .build())
        .build()
Java
// Add multiple datasets to the response
FillResponse fillResponse = new FillResponse.Builder()
        .addDataset(new Dataset.Builder()
                .setValue(parsedStructure.usernameId,
                        AutofillValue.forText(user1Data.username), username1Presentation)
                .setValue(parsedStructure.passwordId,
                        AutofillValue.forText(user1Data.password), password1Presentation)
                .build())
        .addDataset(new Dataset.Builder()
                .setValue(parsedStructure.usernameId,
                        AutofillValue.forText(user2Data.username), username2Presentation)
                .setValue(parsedStructure.passwordId,
                        AutofillValue.forText(user2Data.password), password2Presentation)
                .build())
        .build();
自動入力サービスは、AssistStructure 内の ViewNode オブジェクトを走査して、リクエストを満たすために必要な自動入力データを取得できます。自動入力データを取得するには、ViewNode クラスのメソッド(getAutofillId() など)を使用します。
サービスが要求を満たせるかどうかを確認するには、ビューのコンテンツを記述できることが必要です。ビューのコンテンツを記述するためにサービスが最初に使用する必要があるのは、autofillHints 属性です。しかし、クライアント アプリがビュー内でこの属性を明示的に提供していなければ、サービスはこの属性を利用できません。
クライアント アプリによって autofillHints 属性が提供されない場合、サービスは自身のヒューリスティックを使用してコンテンツを記述する必要があります。サービスは、他のクラスのメソッド(getText() や getHint() など)を使用して、ビューのコンテンツに関する情報を取得できます。詳しくは、自動入力用のヒントを指定するをご覧ください。
次の例は、AssistStructure を走査して、ViewNode オブジェクトから自動入力データを取得する方法を示しています。
Kotlin
fun traverseStructure(structure: AssistStructure) {
    val windowNodes: List<AssistStructure.WindowNode> =
            structure.run {
                (0 until windowNodeCount).map { getWindowNodeAt(it) }
            }

    windowNodes.forEach { windowNode: AssistStructure.WindowNode ->
        val viewNode: ViewNode? = windowNode.rootViewNode
        traverseNode(viewNode)
    }
}

fun traverseNode(viewNode: ViewNode?) {
    if (viewNode?.autofillHints?.isNotEmpty() == true) {
        // If the client app provides autofill hints, you can obtain them using
        // viewNode.getAutofillHints();
    } else {
        // Or use your own heuristics to describe the contents of a view
        // using methods such as getText() or getHint()
    }

    val children: List<ViewNode>? =
            viewNode?.run {
                (0 until childCount).map { getChildAt(it) }
            }

    children?.forEach { childNode: ViewNode ->
        traverseNode(childNode)
    }
}
Java
public void traverseStructure(AssistStructure structure) {
    int nodes = structure.getWindowNodeCount();

    for (int i = 0; i < nodes; i++) {
        WindowNode windowNode = structure.getWindowNodeAt(i);
        ViewNode viewNode = windowNode.getRootViewNode();
        traverseNode(viewNode);
    }
}

public void traverseNode(ViewNode viewNode) {
    if(viewNode.getAutofillHints() != null && viewNode.getAutofillHints().length > 0) {
        // If the client app provides autofill hints, you can obtain them using
        // viewNode.getAutofillHints();
    } else {
        // Or use your own heuristics to describe the contents of a view
        // using methods such as getText() or getHint()
    }

    for(int i = 0; i < viewNode.getChildCount(); i++) {
        ViewNode childNode = viewNode.getChildAt(i);
        traverseNode(childNode);
    }
}
ユーザーデータを保存する
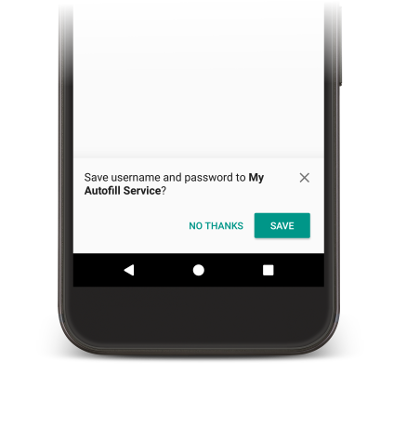
自動入力サービスがアプリのビューに入力するには、ユーザーデータが必要です。ユーザーが手動でビューに入力すると、図 2 に示すように、現在の自動入力サービスにデータを保存するように促すプロンプトが表示されます。
データを保存するには、サービスは将来の使用に備えてデータを保存する意図を明示する必要があります。Android システムがデータの保存リクエストを送信する前に、ビューを入力する機会をサービスに提供する入力リクエストが実行されます。サービスは、データを保存する意図を明示するため、入力リクエストへのレスポンスに SaveInfo オブジェクトを含めます。SaveInfo オブジェクトには、少なくとも次のデータが含まれます。
- 保存されるユーザーデータの型。利用可能な
SAVE_DATA値のリストについては、SaveInfoをご覧ください。 - 保存リクエストをトリガーするために変更する必要がある最小限のビューのセット。
たとえば、通常、ログイン フォームは保存リクエストをトリガーするために
usernameビューとpasswordビューを更新する必要があります。
次のコード例で示しているように、SaveInfo オブジェクトは FillResponse オブジェクトに関連付けられます。
Kotlin
override fun onFillRequest(
    request: FillRequest,
    cancellationSignal: CancellationSignal,
    callback: FillCallback
) {
    // ...
    // Builder object requires a non-null presentation
    val notUsed = RemoteViews(packageName, android.R.layout.simple_list_item_1)

    val fillResponse: FillResponse = FillResponse.Builder()
            .addDataset(
                    Dataset.Builder()
                            .setValue(parsedStructure.usernameId, null, notUsed)
                            .setValue(parsedStructure.passwordId, null, notUsed)
                            .build()
            )
            .setSaveInfo(
                    SaveInfo.Builder(
                            SaveInfo.SAVE_DATA_TYPE_USERNAME or SaveInfo.SAVE_DATA_TYPE_PASSWORD,
                            arrayOf(parsedStructure.usernameId, parsedStructure.passwordId)
                    ).build()
            )
            .build()
    // ...
}
Java
@Override
public void onFillRequest(FillRequest request, CancellationSignal cancellationSignal, FillCallback callback) {
    // ...
    // Builder object requires a non-null presentation
    RemoteViews notUsed = new RemoteViews(getPackageName(), android.R.layout.simple_list_item_1);

    FillResponse fillResponse = new FillResponse.Builder()
            .addDataset(new Dataset.Builder()
                    .setValue(parsedStructure.usernameId, null, notUsed)
                    .setValue(parsedStructure.passwordId, null, notUsed)
                    .build())
            .setSaveInfo(new SaveInfo.Builder(
                    SaveInfo.SAVE_DATA_TYPE_USERNAME | SaveInfo.SAVE_DATA_TYPE_PASSWORD,
                    new AutofillId[] {parsedStructure.usernameId, parsedStructure.passwordId})
                    .build())
            .build();
    // ...
}
自動入力サービスは、ユーザーデータを保持するロジックを onSaveRequest() メソッドで実装できます。このメソッドは、通常、クライアント アクティビティが終了した後、またはクライアント アプリが commit() を呼び出したときに呼び出されます。次のコードは、onSaveRequest() メソッドの例を示しています。
Kotlin
override fun onSaveRequest(request: SaveRequest, callback: SaveCallback) {
    // Get the structure from the request
    val context: List<FillContext> = request.fillContexts
    val structure: AssistStructure = context[context.size - 1].structure

    // Traverse the structure looking for data to save
    traverseStructure(structure)

    // Persist the data - if there are no errors, call onSuccess()
    callback.onSuccess()
}
Java
@Override
public void onSaveRequest(SaveRequest request, SaveCallback callback) {
    // Get the structure from the request
    List<FillContext> context = request.getFillContexts();
    AssistStructure structure = context.get(context.size() - 1).getStructure();

    // Traverse the structure looking for data to save
    traverseStructure(structure);

    // Persist the data - if there are no errors, call onSuccess()
    callback.onSuccess();
}
自動入力サービスが機密データを保持する場合は、その前に暗号化する必要があります。しかし、ユーザーデータには、機密ではないラベルまたはデータが含まれる場合があります。たとえば、ユーザー アカウントには、データが仕事用アカウントか個人用アカウントかを示すラベルが含まれていることがあります。サービスはラベルを暗号化してはなりません。ラベルを暗号化しないことにより、ユーザーが認証されていない場合にプレゼンテーション ビューでラベルを使用して、ユーザー認証後にラベルを実際のデータに置き換えることができます。
自動入力保存 UI の表示を延期する
Android 10 以降では、複数の画面で自動入力ワークフローを実装する場合(たとえばユーザー名フィールド用に 1 つの画面、パスワード用にもう 1 つの画面)、SaveInfo.FLAG_DELAY_SAVE フラグを使用して自動入力保存 UI の表示を延期できます。
このフラグが設定されている場合、SaveInfo レスポンスに関連付けられた自動入力コンテキストが commit されても、自動入力保存 UI はトリガーされません。代わりに、将来の入力リクエストを送信する同じタスク内の別のアクティビティを使用して、保存リクエストにより UI を表示できます。詳細については、SaveInfo.FLAG_DELAY_SAVE をご覧ください。
ユーザー認証を要求する
自動入力サービスは、ビューに入力する前にユーザーの認証を要求することにより、追加のセキュリティ レベルを提供できます。次のシナリオは、ユーザー認証を実装するのに適した状況の例です。
- プライマリ パスワードまたは指紋スキャンを使用して、アプリ内のユーザーデータをロック解除する必要がある。
- カード確認コード(CVC)を使用して、クレジット カード情報などの特定のデータセットをロック解除する必要がある。
サービスがデータをロック解除する前にユーザー認証を必要とするシナリオでは、サービスはボイラープレート データまたはラベルを提示して、認証を処理する Intent を指定できます。認証フローの完了後にリクエストを処理するために追加データが必要な場合は、そのデータをインテントに追加できます。その後、認証アクティビティから、アプリの AutofillService クラスにデータを返すことができます。
次のコード例は、リクエストが認証を必要とすることを指定する方法を示しています。
Kotlin
val authPresentation = RemoteViews(packageName, android.R.layout.simple_list_item_1).apply {
    setTextViewText(android.R.id.text1, "requires authentication")
}
val authIntent = Intent(this, AuthActivity::class.java).apply {
    // Send any additional data required to complete the request
    putExtra(MY_EXTRA_DATASET_NAME, "my_dataset")
}

val intentSender: IntentSender = PendingIntent.getActivity(
        this,
        1001,
        authIntent,
        PendingIntent.FLAG_CANCEL_CURRENT
).intentSender

// Build a FillResponse object that requires authentication
val fillResponse: FillResponse = FillResponse.Builder()
        .setAuthentication(autofillIds, intentSender, authPresentation)
        .build()
Java
RemoteViews authPresentation = new RemoteViews(getPackageName(), android.R.layout.simple_list_item_1);
authPresentation.setTextViewText(android.R.id.text1, "requires authentication");
Intent authIntent = new Intent(this, AuthActivity.class);

// Send any additional data required to complete the request
authIntent.putExtra(MY_EXTRA_DATASET_NAME, "my_dataset");
IntentSender intentSender = PendingIntent.getActivity(
                this,
                1001,
                authIntent,
                PendingIntent.FLAG_CANCEL_CURRENT
        ).getIntentSender();

// Build a FillResponse object that requires authentication
FillResponse fillResponse = new FillResponse.Builder()
        .setAuthentication(autofillIds, intentSender, authPresentation)
        .build();
認証フローを完了したら、アクティビティは setResult() メソッドを呼び出して RESULT_OK 値を渡し、EXTRA_AUTHENTICATION_RESULT エクストラを、入力されたデータセットを含む FillResponse オブジェクトに設定する必要があります。次のコードは、認証フローの完了後に結果を返す方法の例を示しています。
Kotlin
// The data sent by the service and the structure are included in the intent
val datasetName: String? = intent.getStringExtra(MY_EXTRA_DATASET_NAME)
val structure: AssistStructure = intent.getParcelableExtra(EXTRA_ASSIST_STRUCTURE)
val parsedStructure: ParsedStructure = parseStructure(structure)
val (username, password) = fetchUserData(parsedStructure)

// Build the presentation of the datasets
val usernamePresentation =
        RemoteViews(packageName, android.R.layout.simple_list_item_1).apply {
            setTextViewText(android.R.id.text1, "my_username")
        }
val passwordPresentation =
        RemoteViews(packageName, android.R.layout.simple_list_item_1).apply {
            setTextViewText(android.R.id.text1, "Password for my_username")
        }

// Add the dataset to the response
val fillResponse: FillResponse = FillResponse.Builder()
        .addDataset(Dataset.Builder()
                .setValue(
                        parsedStructure.usernameId,
                        AutofillValue.forText(username),
                        usernamePresentation
                )
                .setValue(
                        parsedStructure.passwordId,
                        AutofillValue.forText(password),
                        passwordPresentation
                )
                .build()
        ).build()

val replyIntent = Intent().apply {
    // Send the data back to the service
    putExtra(MY_EXTRA_DATASET_NAME, datasetName)
    putExtra(EXTRA_AUTHENTICATION_RESULT, fillResponse)
}

setResult(Activity.RESULT_OK, replyIntent)
Java
Intent intent = getIntent();

// The data sent by the service and the structure are included in the intent
String datasetName = intent.getStringExtra(MY_EXTRA_DATASET_NAME);
AssistStructure structure = intent.getParcelableExtra(EXTRA_ASSIST_STRUCTURE);
ParsedStructure parsedStructure = parseStructure(structure);
UserData userData = fetchUserData(parsedStructure);

// Build the presentation of the datasets
RemoteViews usernamePresentation = new RemoteViews(getPackageName(), android.R.layout.simple_list_item_1);
usernamePresentation.setTextViewText(android.R.id.text1, "my_username");
RemoteViews passwordPresentation = new RemoteViews(getPackageName(), android.R.layout.simple_list_item_1);
passwordPresentation.setTextViewText(android.R.id.text1, "Password for my_username");

// Add the dataset to the response
FillResponse fillResponse = new FillResponse.Builder()
        .addDataset(new Dataset.Builder()
                .setValue(parsedStructure.usernameId,
                        AutofillValue.forText(userData.username), usernamePresentation)
                .setValue(parsedStructure.passwordId,
                        AutofillValue.forText(userData.password), passwordPresentation)
                .build())
        .build();

Intent replyIntent = new Intent();

// Send the data back to the service
replyIntent.putExtra(MY_EXTRA_DATASET_NAME, datasetName);
replyIntent.putExtra(EXTRA_AUTHENTICATION_RESULT, fillResponse);

setResult(RESULT_OK, replyIntent);
クレジット カードのデータセットをロック解除する必要があるシナリオでは、サービスは CVC を要求する UI を表示できます。銀行名やクレジット カード番号の末尾 4 桁などのボイラープレート データを表示して、データセットがロック解除されるまでデータを非表示にすることができます。次の例は、データセットの認証を要求し、ユーザーが CVC を入力するまでデータを非表示にする方法を示しています。
Kotlin
// Parse the structure and fetch payment data
val parsedStructure: ParsedStructure = parseStructure(structure)
val paymentData: Payment = fetchPaymentData(parsedStructure)

// Build the presentation that shows the bank and the last four digits of the
// credit card number, such as 'Bank-1234'
val maskedPresentation: String = "${paymentData.bank}-" +
        paymentData.creditCardNumber.substring(paymentData.creditCardNumber.length - 4)
val authPresentation = RemoteViews(packageName, android.R.layout.simple_list_item_1).apply {
    setTextViewText(android.R.id.text1, maskedPresentation)
}

// Prepare an intent that displays the UI that asks for the CVC
val cvcIntent = Intent(this, CvcActivity::class.java)
val cvcIntentSender: IntentSender = PendingIntent.getActivity(
        this,
        1001,
        cvcIntent,
        PendingIntent.FLAG_CANCEL_CURRENT
).intentSender

// Build a FillResponse object that includes a Dataset that requires authentication
val fillResponse: FillResponse = FillResponse.Builder()
        .addDataset(
                Dataset.Builder()
                        // The values in the dataset are replaced by the actual
                        // data once the user provides the CVC
                        .setValue(parsedStructure.creditCardId, null, authPresentation)
                        .setValue(parsedStructure.expDateId, null, authPresentation)
                        .setAuthentication(cvcIntentSender)
                        .build()
        ).build()
Java
// Parse the structure and fetch payment data
ParsedStructure parsedStructure = parseStructure(structure);
Payment paymentData = fetchPaymentData(parsedStructure);

// Build the presentation that shows the bank and the last four digits of the
// credit card number, such as 'Bank-1234'
String maskedPresentation = paymentData.bank + "-" +
    paymentData.creditCardNumber.subString(paymentData.creditCardNumber.length - 4);
RemoteViews authPresentation = new RemoteViews(getPackageName(), android.R.layout.simple_list_item_1);
authPresentation.setTextViewText(android.R.id.text1, maskedPresentation);

// Prepare an intent that displays the UI that asks for the CVC
Intent cvcIntent = new Intent(this, CvcActivity.class);
IntentSender cvcIntentSender = PendingIntent.getActivity(
        this,
        1001,
        cvcIntent,
        PendingIntent.FLAG_CANCEL_CURRENT
).getIntentSender();

// Build a FillResponse object that includes a Dataset that requires authentication
FillResponse fillResponse = new FillResponse.Builder()
        .addDataset(new Dataset.Builder()
                // The values in the dataset are replaced by the actual
                // data once the user provides the CVC
                .setValue(parsedStructure.creditCardId, null, authPresentation)
                .setValue(parsedStructure.expDateId, null, authPresentation)
                .setAuthentication(cvcIntentSender)
                .build())
        .build();
CVC を検証したら、アクティビティは setResult() メソッドを呼び出して RESULT_OK 値を渡し、EXTRA_AUTHENTICATION_RESULT エクストラを、クレジット カード番号と有効期限を含む Dataset オブジェクトに設定する必要があります。認証を必要とするデータセットが新しいデータセットに置き換えられ、直ちにビューへの入力が行われます。次のコードは、ユーザーが CVC を入力した後でデータセットを返す方法を示しています。
Kotlin
// Parse the structure and fetch payment data.
val parsedStructure: ParsedStructure = parseStructure(structure)
val paymentData: Payment = fetchPaymentData(parsedStructure)

// Build a non-null RemoteViews object to use as the presentation when
// creating the Dataset object. This presentation isn't actually used, but the
// Builder object requires a non-null presentation.
val notUsed = RemoteViews(packageName, android.R.layout.simple_list_item_1)

// Create a dataset with the credit card number and expiration date.
val responseDataset: Dataset = Dataset.Builder()
        .setValue(
                parsedStructure.creditCardId,
                AutofillValue.forText(paymentData.creditCardNumber),
                notUsed
        )
        .setValue(
                parsedStructure.expDateId,
                AutofillValue.forText(paymentData.expirationDate),
                notUsed
        )
        .build()

val replyIntent = Intent().apply {
    putExtra(EXTRA_AUTHENTICATION_RESULT, responseDataset)
}
Java
// Parse the structure and fetch payment data.
ParsedStructure parsedStructure = parseStructure(structure);
Payment paymentData = fetchPaymentData(parsedStructure);

// Build a non-null RemoteViews object to use as the presentation when
// creating the Dataset object. This presentation isn't actually used, but the
// Builder object requires a non-null presentation.
RemoteViews notUsed = new RemoteViews(getPackageName(), android.R.layout.simple_list_item_1);

// Create a dataset with the credit card number and expiration date.
Dataset responseDataset = new Dataset.Builder()
        .setValue(parsedStructure.creditCardId,
                AutofillValue.forText(paymentData.creditCardNumber), notUsed)
        .setValue(parsedStructure.expDateId,
                AutofillValue.forText(paymentData.expirationDate), notUsed)
        .build();

Intent replyIntent = new Intent();
replyIntent.putExtra(EXTRA_AUTHENTICATION_RESULT, responseDataset);
データを複数の論理グループに分類する
自動入力サービスは、さまざまなドメインのコンセプトごとに分けられた論理グループにデータを分類する必要があります。このページでは、そうした論理グループを「パーティション」と呼びます。パーティションとフィールドの一般的な例を以下に示します。
- 認証情報。ユーザー名とパスワードのフィールドがあります。
- 住所。都道府県、市区町村、番地、郵便番号のフィールドがあります。
- 支払い情報。クレジット カード番号、有効期限、確認コードのフィールドがあります。
データを適切なパーティションに分類する自動入力サービスでは、1 つのデータセットに複数のパーティションのデータがエクスポーズされないため、ユーザーのデータの保護を強化できます。たとえば、認証情報のデータセットに支払い情報を含める必要はありません。データをパーティションに分類することにより、サービスがリクエストに応えるためにエクスポーズする必要がある関連情報の量を最小限に抑えることができます。
データをパーティションに分類すると、サービスは、複数のパーティションのビューを含むアクティビティを、クライアント アプリに送信する関連データの量を最小限に抑えながら入力できます。たとえば、ユーザー名、パスワード、住所、都市のビューを含むアクティビティと、次のデータを含む自動入力サービスを考えてみましょう。
| パーティション | フィールド 1 | フィールド 2 |
|---|---|---|
| 認証情報 | work_username | work_password |
| personal_username | personal_password | |
| 住所 | work_street | work_city |
| personal_street | personal_city |
サービスは、仕事用アカウントと個人用アカウントの両方について、認証情報パーティションを含むデータセットを準備できます。ユーザーがデータセットを選択すると、自動入力サービスはユーザーの選択内容に応じて、その後のレスポンスで仕事先または自宅のいずれかの住所を提示できます。
サービスは、AssistStructure オブジェクトの走査中に isFocused() メソッドを呼び出して、リクエストの送信元フィールドを特定できます。これにより、サービスは適切なパーティション データを使用して FillResponse を準備できます。
SMS のワンタイム コードの自動入力
自動入力サービスは、SMS Retriever API を使用して送信されたワンタイム コードをユーザーが入力する操作をサポートできます。
この機能を使用するには、次の要件を満たす必要があります。
- 自動入力サービスが Android 9(API レベル 28)以降で実行されている。
- 自動入力サービスが SMS からのワンタイム コードを読み取ることにユーザーが同意している。
- 自動入力を提供するアプリがまだ SMS Retriever API を使用してワンタイム コードを読み取っていない。
自動入力サービスは SmsCodeAutofillClient を使用できます。この API は、Google Play 開発者サービス 19.0.56 以降から SmsCodeRetriever.getAutofillClient() を呼び出すことにより利用可能になります。
この API を自動入力サービスで使用する主な手順は次のとおりです。
- 自動入力サービスで、
SmsCodeAutofillClientのhasOngoingSmsRequestを使用して、自動入力を提供するアプリのパッケージ名に対応するアクティブなリクエストがあるかどうかを調べます。自動入力サービスが候補のプロンプトを表示するのは、これによってfalseが返された場合のみにしなければなりません。 - 自動入力サービスで、
SmsCodeAutofillClientのcheckPermissionStateを使用して、ワンタイム コードを自動入力する権限が自動入力サービスにあるかどうかを確認します。この権限の状態は、NONE、GRANTED、DENIEDのいずれかです。自動入力サービスは、状態がNONEとGRANTEDの場合に候補のプロンプトを表示しなければなりません。 - 自動入力認証アクティビティで、
SmsRetriever.SEND_PERMISSION権限を使用して、SMS コードが利用可能になったときにSmsCodeRetriever.SMS_CODE_RETRIEVED_ACTIONをリッスンするBroadcastReceiverを登録します。 SmsCodeAutofillClientでstartSmsCodeRetrieverを呼び出して、SMS で送信されたワンタイム コードのリッスンを開始します。SMS からワンタイム コードを取得する権限をユーザーが自動入力サービスに付与している場合、サービスは、過去 5 分以内で最後に受信した SMS メッセージを検索します。自動入力サービスがワンタイム コードの読み取り権限をユーザーにリクエストする必要がある場合、
startSmsCodeRetrieverによって返されるTaskがResolvableApiExceptionで失敗することがあります。その場合、ResolvableApiException.startResolutionForResult()メソッドを呼び出して、権限のリクエストを行う同意ダイアログを表示する必要があります。インテントから SMS コードの結果を受け取り、自動入力レスポンスとして SMS コードを返します。
Chrome で自動入力を有効にする
Chrome では、サードパーティの自動入力サービスを利用してフォームをネイティブに自動入力できるため、ユーザーはよりスムーズかつシンプルなユーザー エクスペリエンスを享受できます。サードパーティの自動入力サービスを使用してパスワード、パスキー、住所やお支払いデータなどの情報を自動入力するには、Chrome の設定で [別のサービスを使用して自動入力] を選択する必要があります。
![[別のサービスを使用して自動入力] の切り替えが有効になっている Chrome の設定](https://android-dot-devsite-v2-prod.appspot.com/static/images/guide/topics/text/autofill-chrome.jpg?hl=ja)
ユーザーが Android 版 Chrome で自動入力サービスを最大限に活用できるように、自動入力サービス プロバイダは、Chrome の設定で優先するサービス プロバイダを指定するようユーザーに推奨する必要があります。
ユーザーが切り替えをオンにできるように、デベロッパーは次のことを行えます。
- Chrome の設定をクエリして、ユーザーがサードパーティの自動入力サービスを使用するかどうかを確認します。
- ユーザーがサードパーティの自動入力サービスを有効にできる Chrome の設定ページへのディープリンク。
互換モードの Chrome の最大バージョンを指定する
Chrome は、Android 自動入力のサポートを優先するため、バージョン 137 以降で互換モードのサポートを終了しました。互換モードを維持すると、安定性の問題が発生する可能性があります。安定性のために互換モードをサポートする Chrome パッケージの最大バージョンを次のように指定します。
<autofill-service>
  ...
  <compatibility-package android:name="com.android.chrome" android:maxLongVersionCode="711900039" />
  <compatibility-package android:name="com.chrome.beta" android:maxLongVersionCode="711900039" />
  <compatibility-package android:name="com.chrome.dev" android:maxLongVersionCode="711900039" />
  <compatibility-package android:name="com.chrome.canary" android:maxLongVersionCode="711900039" />
  ...
</autofill-service>
Chrome の設定を読み取る
どのアプリでも、Chrome が Android の自動入力を使用できるサードパーティの自動入力モードを使用しているかどうかを読み取ることができます。Chrome は、Android の ContentProvider を使用してその情報を伝えます。設定を読み取るチャネルを Android マニフェストで宣言します。
<uses-permission android:name="android.permission.READ_USER_DICTIONARY"/>
<queries>
 <!-- To Query Chrome Beta: -->
 <package android:name="com.chrome.beta" />

 <!-- To Query Chrome Stable: -->
 <package android:name="com.android.chrome" />
</queries>
次に、Android の ContentResolver を使用して、コンテンツ URI を作成し、その情報をリクエストします。
Kotlin
val CHROME_CHANNEL_PACKAGE = "com.android.chrome" // Chrome Stable.
val CONTENT_PROVIDER_NAME = ".AutofillThirdPartyModeContentProvider"
val THIRD_PARTY_MODE_COLUMN = "autofill_third_party_state"
val THIRD_PARTY_MODE_ACTIONS_URI_PATH = "autofill_third_party_mode"

val uri = Uri.Builder()
    .scheme(ContentResolver.SCHEME_CONTENT)
    .authority(CHROME_CHANNEL_PACKAGE + CONTENT_PROVIDER_NAME)
    .path(THIRD_PARTY_MODE_ACTIONS_URI_PATH)
    .build()

val cursor = contentResolver.query(
    uri,
    arrayOf(THIRD_PARTY_MODE_COLUMN), // projection
    null, // selection
    null, // selectionArgs
    null  // sortOrder
)

if (cursor == null) {
  // Terminate now! Chromium versions older than this don't provide this information.
}

cursor?.use { // Use the safe call operator and the use function for auto-closing
    if (it.moveToFirst()) { // Check if the cursor has any rows
        val index = it.getColumnIndex(THIRD_PARTY_MODE_COLUMN)
        if (index != -1) { // Check if the column exists
          val value = it.getInt(index)
          if (0 == value) {
              // 0 means that the third party mode is turned off. Chrome uses its built-in
              // password manager. This is the default for new users.
          } else {
              // 1 means that the third party mode is turned on. Chrome forwards all
              // autofill requests to Android Autofill. Users have to opt-in for this.
          }
        } else {
          // Handle the case where the column doesn't exist.  Log a warning, perhaps.
          Log.w("Autofill", "Column $THIRD_PARTY_MODE_COLUMN not found in cursor")
        }
    }
} // The cursor is automatically closed here
Java
final String CHROME_CHANNEL_PACKAGE = "com.android.chrome";  // Chrome Stable.
final String CONTENT_PROVIDER_NAME = ".AutofillThirdPartyModeContentProvider";
final String THIRD_PARTY_MODE_COLUMN = "autofill_third_party_state";
final String THIRD_PARTY_MODE_ACTIONS_URI_PATH = "autofill_third_party_mode";

final Uri uri = new Uri.Builder()
                  .scheme(ContentResolver.SCHEME_CONTENT)
                  .authority(CHROME_CHANNEL_PACKAGE + CONTENT_PROVIDER_NAME)
                  .path(THIRD_PARTY_MODE_ACTIONS_URI_PATH)
                  .build();

final Cursor cursor = getContentResolver().query(
                  uri,
                  /*projection=*/new String[] {THIRD_PARTY_MODE_COLUMN},
                  /*selection=*/ null,
                  /*selectionArgs=*/ null,
                  /*sortOrder=*/ null);

if (cursor == null) {
  // Terminate now! Chromium versions older than this don't provide this information.
}

cursor.moveToFirst(); // Retrieve the result;

int index = cursor.getColumnIndex(THIRD_PARTY_MODE_COLUMN);

if (0 == cursor.getInt(index)) {
  // 0 means that the third party mode is turned off. Chrome uses its built-in
  // password manager. This is the default for new users.
} else {
  // 1 means that the third party mode is turned on. Chrome forwards all
  // autofill requests to Android Autofill. Users have to opt-in for this.
}
Chrome 設定へのディープリンク
ユーザーがサードパーティの自動入力サービスを有効にできる Chrome の設定ページにディープリンクするには、Android の Intent を使用します。この例に示すように、アクションとカテゴリを必ず構成してください。
Kotlin
val autofillSettingsIntent = Intent(Intent.ACTION_APPLICATION_PREFERENCES)
autofillSettingsIntent.addCategory(Intent.CATEGORY_DEFAULT)
autofillSettingsIntent.addCategory(Intent.CATEGORY_APP_BROWSER)
autofillSettingsIntent.addCategory(Intent.CATEGORY_PREFERENCE)

// Invoking the intent with a chooser allows users to select the channel they
// want to configure. If only one browser reacts to the intent, the chooser is
// skipped.
val chooser = Intent.createChooser(autofillSettingsIntent, "Pick Chrome Channel")
startActivity(chooser)

// If the caller knows which Chrome channel they want to configure,
// they can instead add a package hint to the intent, e.g.
val specificChromeIntent = Intent(Intent.ACTION_APPLICATION_PREFERENCES) // Create a *new* intent
specificChromeIntent.addCategory(Intent.CATEGORY_DEFAULT)
specificChromeIntent.addCategory(Intent.CATEGORY_APP_BROWSER)
specificChromeIntent.addCategory(Intent.CATEGORY_PREFERENCE)
specificChromeIntent.setPackage("com.android.chrome") // Set the package on the *new* intent
startActivity(specificChromeIntent) // Start the *new* intent
Java
Intent autofillSettingsIntent = new Intent(Intent.ACTION_APPLICATION_PREFERENCES);
autofillSettingsIntent.addCategory(Intent.CATEGORY_DEFAULT);
autofillSettingsIntent.addCategory(Intent.CATEGORY_APP_BROWSER);
autofillSettingsIntent.addCategory(Intent.CATEGORY_PREFERENCE);

// Invoking the intent with a chooser allows users to select the channel they
// want to configure. If only one browser reacts to the intent, the chooser is
// skipped.
Intent chooser = Intent.createChooser(autofillSettingsIntent, "Pick Chrome Channel");
startActivity(chooser);

// If the caller knows which Chrome channel they want to configure,
// they can instead add a package hint to the intent, e.g.
autofillSettingsIntent.setPackage("com.android.chrome");
startActivity(autofillSettingsIntent);
自動入力の高度なシナリオ
自動入力は、次のようなシナリオで使用します。
キーボードと統合する
Android 11 以降のプラットフォームでは、プルダウン メニューの代わりにキーボードとその他のインプット メソッド エディタ(IME)を使用して、自動入力候補をインラインで表示できます。自動入力サービスがこの機能をサポートする方法の詳細については、自動入力をキーボードと統合するをご覧ください。
データセットをページ分割する
サイズの大きい自動入力レスポンスは、リクエストの処理に必要なリモート可能オブジェクトを表す Binder オブジェクトの許容トランザクション サイズを超えることがあります。そのような場合に Android システムが例外をスローしないようにするため、一度に追加する Dataset オブジェクトを 20 個以下に制限して、FillResponse を小さいサイズに保つことができます。それより多くのデータセットがレスポンスに必要な場合は、他にも情報があることをユーザーに知らせるデータセットを追加し、ユーザーがそれを選択したら次のグループのデータセットを取得するようにします。詳細は、addDataset(Dataset) をご覧ください。
複数の画面に分割されたデータを保存する
アプリでは、新しいユーザー アカウントの作成など、同じアクティビティ内でユーザーデータを複数の画面に分割することがしばしばあります。たとえば、最初の画面でユーザー名の入力を要求し、2 番目の画面でパスワードの入力を要求します。このような場合、自動入力サービスは、ユーザーが関連するすべてのフィールドにデータを入力するまで待ってから、自動入力保存 UI を表示する必要があります。こうしたシナリオは以下の手順に沿って処理できます。
- 最初の入力リクエストで、クライアント状態バンドルをレスポンスに追加します。これには、画面に存在する部分的なフィールドの自動入力 ID を含めます。
- 2 番目の入力リクエストで、クライアント状態バンドルを取得し、そのクライアント状態から、前のリクエストで設定された自動入力 ID を取得します。次いでそれらの ID と
FLAG_SAVE_ON_ALL_VIEWS_INVISIBLEフラグを、2 番目のレスポンスで使用するSaveInfoオブジェクトに追加します。 保存リクエストで、適切な
FillContextオブジェクトを使用して各フィールドの値を取得します。1 つの入力リクエストごとに、1 つの入力コンテキストが存在します。詳細については、複数の画面に分割されたデータを保存するをご覧ください。
リクエストごとに初期化ロジックと解体ロジックを提供する
自動入力リクエストが発生するたびに、Android システムはサービスをバインドしてその onConnected() メソッドを呼び出します。サービスがリクエストを処理したら、Android システムは onDisconnected() メソッドを呼び出してサービスのバインドを解除します。onConnected() を実装すると、リクエストの処理前に実行されるコードを提供できます。onDisconnected() を実装すると、リクエストの処理後に実行されるコードを提供できます。
自動入力保存 UI をカスタマイズする
自動入力サービスでは、自動入力保存 UI をカスタマイズして、ユーザーが自分のデータの保存をサービスに許可するかどうかを決めるための手助けができます。たとえば、テキストまたはカスタマイズされたビューを通して、保存されるデータに関する補足情報を提供できます。また、保存リクエストをキャンセルするボタンの外観を変更できます。ユーザーがそのボタンをタップしたときに通知を受け取ることもできます。詳細については、SaveInfo リファレンス ページをご覧ください。
互換性モード
互換性モードを利用すると、自動入力サービスは、自動入力を行う目的でユーザー補助機能の仮想構造を使用できます。これは、自動入力 API が明示的に実装されていないブラウザで自動入力機能を提供する場合に、特に便利です。
互換性モードを使用して自動入力サービスをテストするには、互換性モードを必要とするブラウザまたはアプリを明示的に許可リストに追加します。すでに許可リストに含まれているパッケージを確認するには、次のコマンドを実行します。
$ adb shell settings get global autofill_compat_mode_allowed_packages
テスト対象のパッケージが許可リストに含まれていない場合は、次のコマンドで追加します。ここで pkgX はアプリのパッケージです。
$ adb shell settings put global autofill_compat_mode_allowed_packages pkg1[resId1]:pkg2[resId1,resId2]
アプリがブラウザである場合は、resIdx を使用して、レンダリングされるページの URL を含む入力フィールドのリソース ID を指定します。
互換性モードには、以下の制限があります。
- 保存リクエストがトリガーされるのは、サービスが
FLAG_SAVE_ON_ALL_VIEWS_INVISIBLEフラグを使用したときか、setTrigger()メソッドが呼び出されたときです。FLAG_SAVE_ON_ALL_VIEWS_INVISIBLEは、互換性モードを使用すると、デフォルトで設定されます。 onSaveRequest(SaveRequest, SaveCallback)メソッドで、ノードのテキスト値が利用できない場合があります。
互換性モードとそれに関連する制限の詳細については、AutofillService クラスのリファレンスをご覧ください。