
Hey there! Welcome back to our series on CameraX and Jetpack Compose. In the previous posts, we’ve covered the fundamentals of setting up a camera preview and added tap-to-focus functionality.
🧱 Part 1: Building a basic camera preview using the new camera-compose artifact. We covered permission handling and basic integration.
👆 Part 2: Using the Compose gesture system, graphics, and coroutines to implement a visual tap-to-focus.
🔦 Part 3 (this post): Exploring how to overlay Compose UI elements on top of your camera preview for a richer user experience.
📂 Part 4: Using adaptive APIs and the Compose animation framework to smoothly animate to and from tabletop mode on foldable phones.
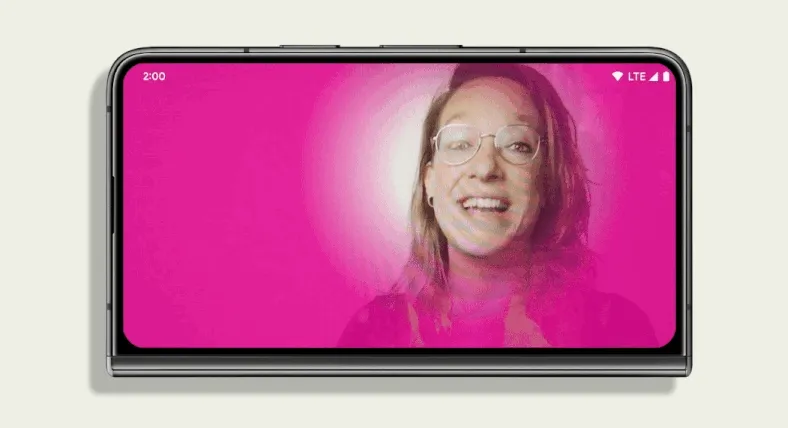
In this post, we’ll dive into something a bit more visually engaging — implementing a spotlight effect on top of our camera preview, using face detection as the basis for the effect. Why, you say? I’m not sure. But it sure looks cool 🙂. And, more importantly, it demonstrates how we can easily translate sensor coordinates into UI coordinates, allowing us to use them in Compose!
Enable face detection
First, let’s modify the CameraPreviewViewModel to enable face detection. We’ll use the Camera2Interop API, which allows us to interact with the underlying Camera2 API from CameraX. This gives us the opportunity to use camera features that are not exposed by CameraX directly. We need to make the following changes:
- Create a StateFlow that contains the face bounds as a list of
Rects. - Set the
STATISTICS_FACE_DETECT_MODEcapture request option to FULL, which enables face detection. - Set a
CaptureCallbackto get the face information from the capture result.
class CameraPreviewViewModel : ViewModel() {
    ...
    private val _sensorFaceRects = MutableStateFlow(listOf<Rect>())
    val sensorFaceRects: StateFlow<List<Rect>> = _sensorFaceRects.asStateFlow()

    private val cameraPreviewUseCase = Preview.Builder()
        .apply {
            Camera2Interop.Extender(this)
                .setCaptureRequestOption(
                    CaptureRequest.STATISTICS_FACE_DETECT_MODE,
                    CaptureRequest.STATISTICS_FACE_DETECT_MODE_FULL
                )
                .setSessionCaptureCallback(object : CameraCaptureSession.CaptureCallback() {
                    override fun onCaptureCompleted(
                        session: CameraCaptureSession,
                        request: CaptureRequest,
                        result: TotalCaptureResult
                    ) {
                        super.onCaptureCompleted(session, request, result)
                        result.get(CaptureResult.STATISTICS_FACES)
                            ?.map { face -> face.bounds.toComposeRect() }
                            ?.toList()
                            ?.let { faces -> _sensorFaceRects.update { faces } }
                    }
                })
        }
        .build().apply {
    ...
}
With these changes in place, our view model now emits a list of Rect objects representing the bounding boxes of detected faces in sensor coordinates.
Translate sensor coordinates to UI coordinates
The bounding boxes of detected faces that we stored in the last section use coordinates in the sensor coordinate system. To draw the bounding boxes in our UI, we need to transform these coordinates so that they are correct in the Compose coordinate system. We need to:
- Transform the sensor coordinates into preview buffer coordinates
- Transform the preview buffer coordinates into Compose UI coordinates
These transformations are done using transformation matrices. Each of the transformations has its own matrix:
- Our
SurfaceRequestholds on to aTransformationInfoinstance, which contains asensorToBufferTranformmatrix. - Our
CameraXViewfinderhas an associatedCoordinateTransformer. You might remember that we already used this transformer in the previous blog post to transform tap-to-focus coordinates.
We can create a helper method that can do the transformation for us:
private fun List<Rect>.transformToUiCoords(
    transformationInfo: SurfaceRequest.TransformationInfo?,
    uiToBufferCoordinateTransformer: MutableCoordinateTransformer
): List<Rect> = this.map { sensorRect ->
    val bufferToUiTransformMatrix = Matrix().apply {
        setFrom(uiToBufferCoordinateTransformer.transformMatrix)
        invert()
    }

    val sensorToBufferTransformMatrix = Matrix().apply {
        transformationInfo?.let {
            setFrom(it.sensorToBufferTransform)
        }
    }

    val bufferRect = sensorToBufferTransformMatrix.map(sensorRect)
    val uiRect = bufferToUiTransformMatrix.map(bufferRect)

    uiRect
}
- We iterate through the list of detected faces, and for each face execute the transformation.
- The
CoordinateTransformer.transformMatrixthat we get from ourCameraXViewfindertransforms coordinates from UI to buffer coordinates by default. In our case, we want the matrix to work the other way around, transforming buffer coordinates into UI coordinates. Therefore, we use theinvert()method to invert the matrix. - We first transform the face from sensor coordinates to buffer coordinates using the
sensorToBufferTransformMatrix, and then transform those buffer coordinates to UI coordinates using thebufferToUiTransformMatrix.
Implement the spotlight effect
Now, let’s update the CameraPreviewContent composable to draw the spotlight effect. We’ll use a Canvas composable to draw a gradient mask over the preview, making the detected faces visible:
@Composable
fun CameraPreviewContent(
    viewModel: CameraPreviewViewModel,
    modifier: Modifier = Modifier,
    lifecycleOwner: LifecycleOwner = LocalLifecycleOwner.current
) {
    val surfaceRequest by viewModel.surfaceRequest.collectAsStateWithLifecycle()
    val sensorFaceRects by viewModel.sensorFaceRects.collectAsStateWithLifecycle()
    val transformationInfo by
        produceState<SurfaceRequest.TransformationInfo?>(null, surfaceRequest) {
            try {
                surfaceRequest?.setTransformationInfoListener(Runnable::run) { transformationInfo ->
                    value = transformationInfo
                }
                awaitCancellation()
            } finally {
                surfaceRequest?.clearTransformationInfoListener()
            }
        }
    val shouldSpotlightFaces by remember {
        derivedStateOf { sensorFaceRects.isNotEmpty() && transformationInfo != null}
    }
    val spotlightColor = Color(0xDDE60991)
    ..

    surfaceRequest?.let { request ->
        val coordinateTransformer = remember { MutableCoordinateTransformer() }
        CameraXViewfinder(
            surfaceRequest = request,
            coordinateTransformer = coordinateTransformer,
            modifier = ..
        )

        AnimatedVisibility(shouldSpotlightFaces, enter = fadeIn(), exit = fadeOut()) {
            Canvas(Modifier.fillMaxSize()) {
                val uiFaceRects = sensorFaceRects.transformToUiCoords(
                    transformationInfo = transformationInfo,
                    uiToBufferCoordinateTransformer = coordinateTransformer
                )

                // Fill the whole space with the color
                drawRect(spotlightColor)
                // Then extract each face and make it transparent

                uiFaceRects.forEach { faceRect ->
                    drawRect(
                        Brush.radialGradient(
                            0.4f to Color.Black, 1f to Color.Transparent,
                            center = faceRect.center,
                            radius = faceRect.minDimension * 2f,
                        ),
                        blendMode = BlendMode.DstOut
                    )
                }
            }
        }
    }
}
Here’s how it works:
- We collect the list of faces from the view model.
- To make sure we’re not recomposing the whole screen every time the list of detected faces changes, we use
derivedStateOfto keep track of whether any faces are detected at all. This can then be used withAnimatedVisibilityto animate the colored overlay in and out. - The
surfaceRequestcontains the information we need to transform sensor coordinates to buffer coordinates in theSurfaceRequest.TransformationInfo. We use theproduceStatefunction to set up a listener in the surface request, and clear this listener when the composable leaves the composition tree. - We use a
Canvasto draw a translucent pink rectangle that covers the entire screen. - We defer the reading of the
sensorFaceRectsvariable until we’re inside theCanvasdraw block. Then we transform the coordinates into UI coordinates. - We iterate over the detected faces, and for each face, we draw a radial gradient that will make the inside of the face rectangle transparent.
- We use
BlendMode.DstOutto make sure that we are cutting out the gradient from the pink rectangle, creating the spotlight effect.
Note: When you change the camera to DEFAULT_FRONT_CAMERA you will notice that the spotlight is mirrored! This is a known issue, tracked in the Google Issue Tracker.
Result
With this code, we have a fully functional spotlight effect that highlights detected faces. You can find the full code snippet here.
This effect is just the beginning — by using the power of Compose, you can create a myriad of visually stunning camera experiences. Being able to transform sensor and buffer coordinates into Compose UI coordinates and back means we can utilize all Compose UI features and integrate them seamlessly with the underlying camera system. With animations, advanced UI graphics, simple UI state management, and full gesture control, your imagination is the limit!
In the final post of the series, we’ll dive into how to use adaptive APIs and the Compose animation framework to seamlessly transition between different camera UIs on foldable devices. Stay tuned!
The code snippets in this blog have the following license:
// Copyright 2024 Google LLC. SPDX-License-Identifier: Apache-2.0
Many thanks to Nick Butcher, Alex Vanyo, Trevor McGuire, Don Turner and Lauren Ward for reviewing and providing feedback. Made possible by the hard work of Yasith Vidanaarachch.
Written by:
Continue reading
-


How-tos
In this article you’ll learn how to use the waitUntil test API in Compose to wait for certain conditions to be met.
Jose Alcérreca • 3 min read
-

How-tos
While app performance is often equated with a smooth UI and fast start times, memory serves as the silent foundation upon which these visible metrics are built. It's no secret that we're seeing a shift where device memory is more important than ever.
Alice Yuan, Ajesh Pai, Fung Lam • 10 min read
-


How-tos
Today, we're excited to announce a new verified email credential issued by Google, which developers can now retrieve directly from Android’s Credential Manager Digital Credential API.
Niharika Arora, Jean-Pierre Pralle • 3 min read
Stay in the loop
Get the latest Android development insights delivered to your inbox weekly.