
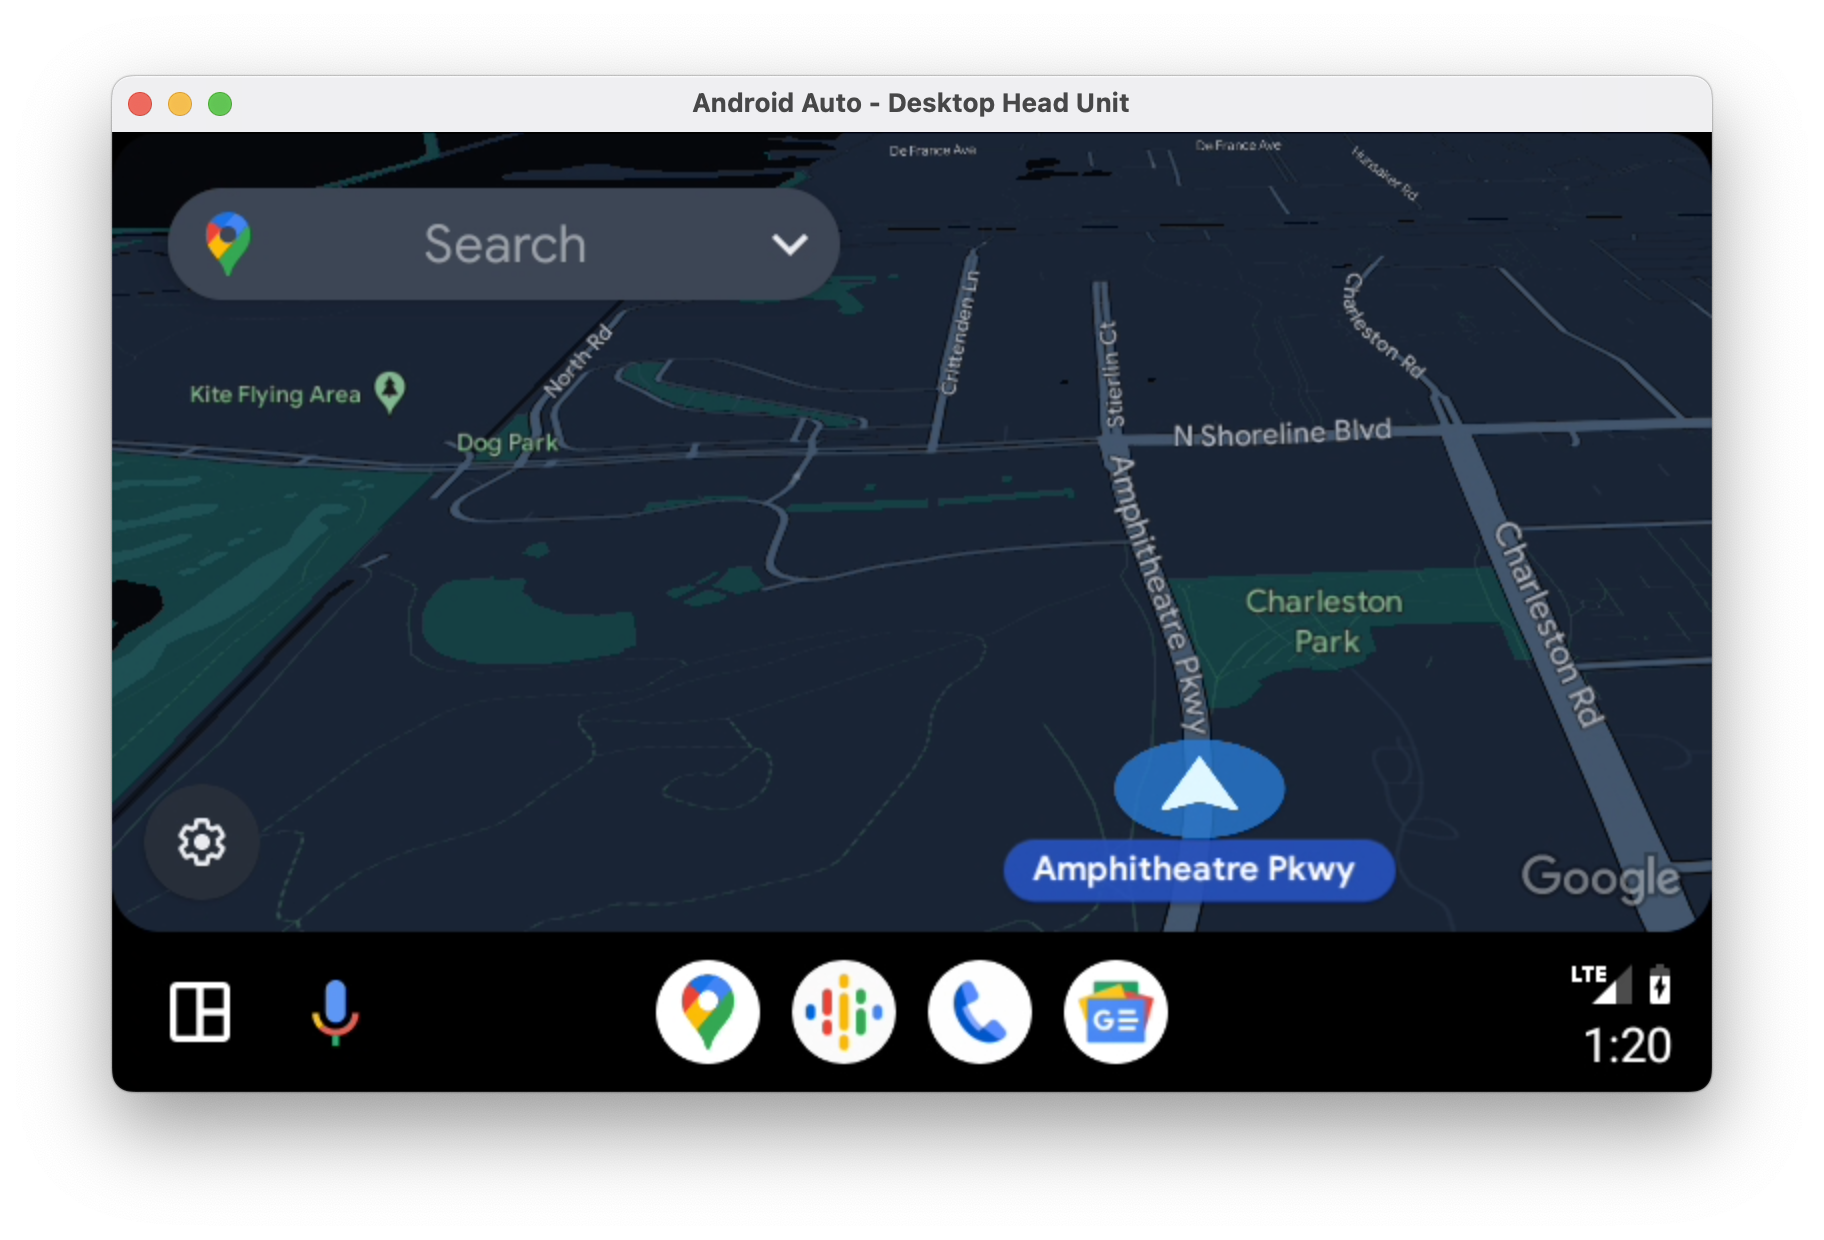
The Desktop Head Unit (DHU) lets your development machine emulate an Android Auto head unit so that you can run and test Android Auto apps. The DHU runs on Windows, macOS, and Linux systems.
After you've installed the DHU, you can test your Android Auto apps by connecting your mobile device to it using one of the supported connection mechanisms described in Run the DHU.
To report bugs or request features related to the DHU, use the issue tracker.
Install the DHU
To install the DHU on your development machine:
- Enable developer mode on a mobile device running Android 9 (API level 28) or higher, as described in Configure on-device developer options.
- Compile and install your app on the device.
- Install Android Auto on the device. If Android Auto is already installed, make sure that you are using the latest version.
In Android Studio, open the SDK Manager and navigate to the SDK Tools tab, then download the Android Auto Desktop Head Unit Emulator package.
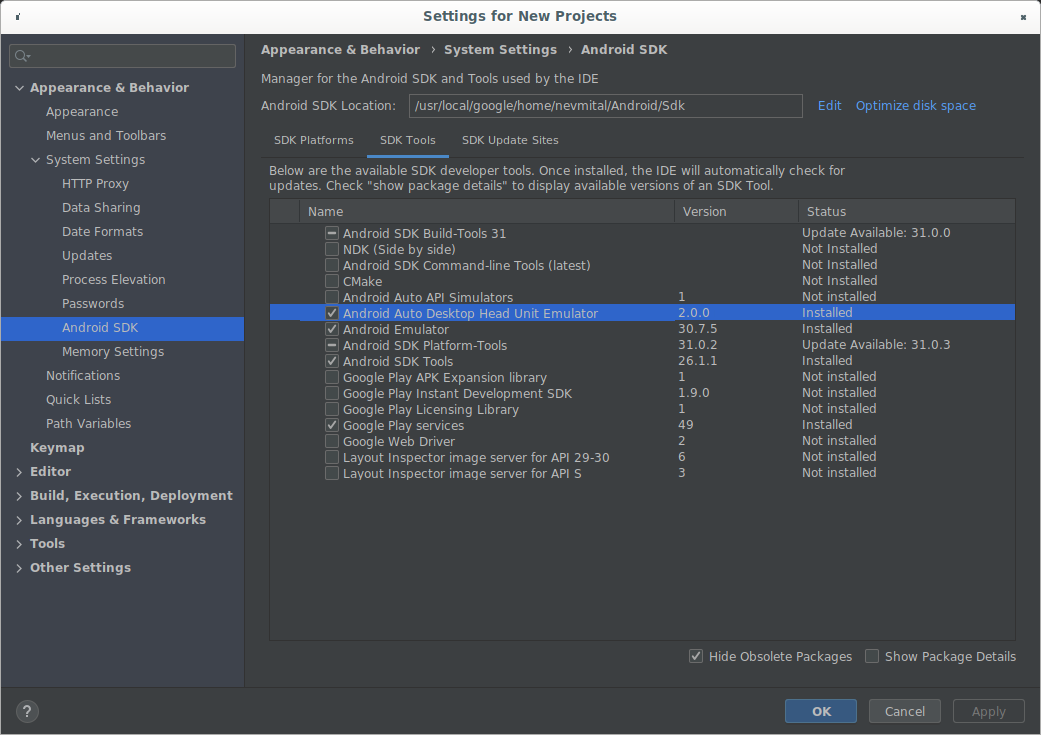
The SDK Manager showing the DHU 2.0. The DHU is installed in the
SDK_LOCATION/extras/google/auto/directory.On Linux or macOS systems, run the following command in that directory to make the DHU binary executable:
chmod +x ./desktop-head-unitAdditional steps for Linux
If you are running DHU version 2.x on a Linux system, you need to install some
additional libraries. The DHU binary depends on GLIBC version 2.32 or later.
You can check the GLIBC version of your system by running this command:
ldd --versionIf the version is lower than 2.32, update GLIBC to 2.32 or later, which might
require you to upgrade the OS to a version that is compatible with GLIBC 2.32
or later.
You must also install the libc++1 and libc++abi1 libraries. The installation
procedure varies depending on your Linux distribution. For example, on
Debian-derived Linux distributions, you can install the libraries with this
command:
sudo apt-get install libc++1 libc++abi1Install pre-release versions of the DHU
To get access to pre-release versions of the DHU, you can either use a preview version of Android Studio or change the update channel of your existing Android Studio installation to the beta channel.
Run the DHU
After you install the DHU, you can test your Android Auto apps by connecting your mobile device and workstation over USB. Run the DHU by connecting your mobile device to a development machine using either the Accessory Mode (recommended for DHU 2.x), or ADB Tunneling.
Connect using Accessory Mode
Android Auto supports connecting to DHU version 2.x with the Android Open Accessory (AOA) protocol, using the following command:
./desktop-head-unit --usbBy default, the DHU scans through the list of available USB devices and attempts
to connect to the first compatible one. To target a specific device, include the
device ID as part of the --usb command, as follows:
./desktop-head-unit --usb=[DEVICE_ID]Connect using ADB Tunneling
This method requires setting up a connection to the Android Auto head unit
server over Android Debug Bridge (adb). Follow these steps to set up
tunneling and run the DHU:
- Enable Android Auto developer mode if it is not already.
If the head unit server is not already running, open the overflow menu and select Start head unit server, as shown in figure 1.
On the device, a foreground service appears in the notification area that indicates that the server is running, as shown in figure 2.
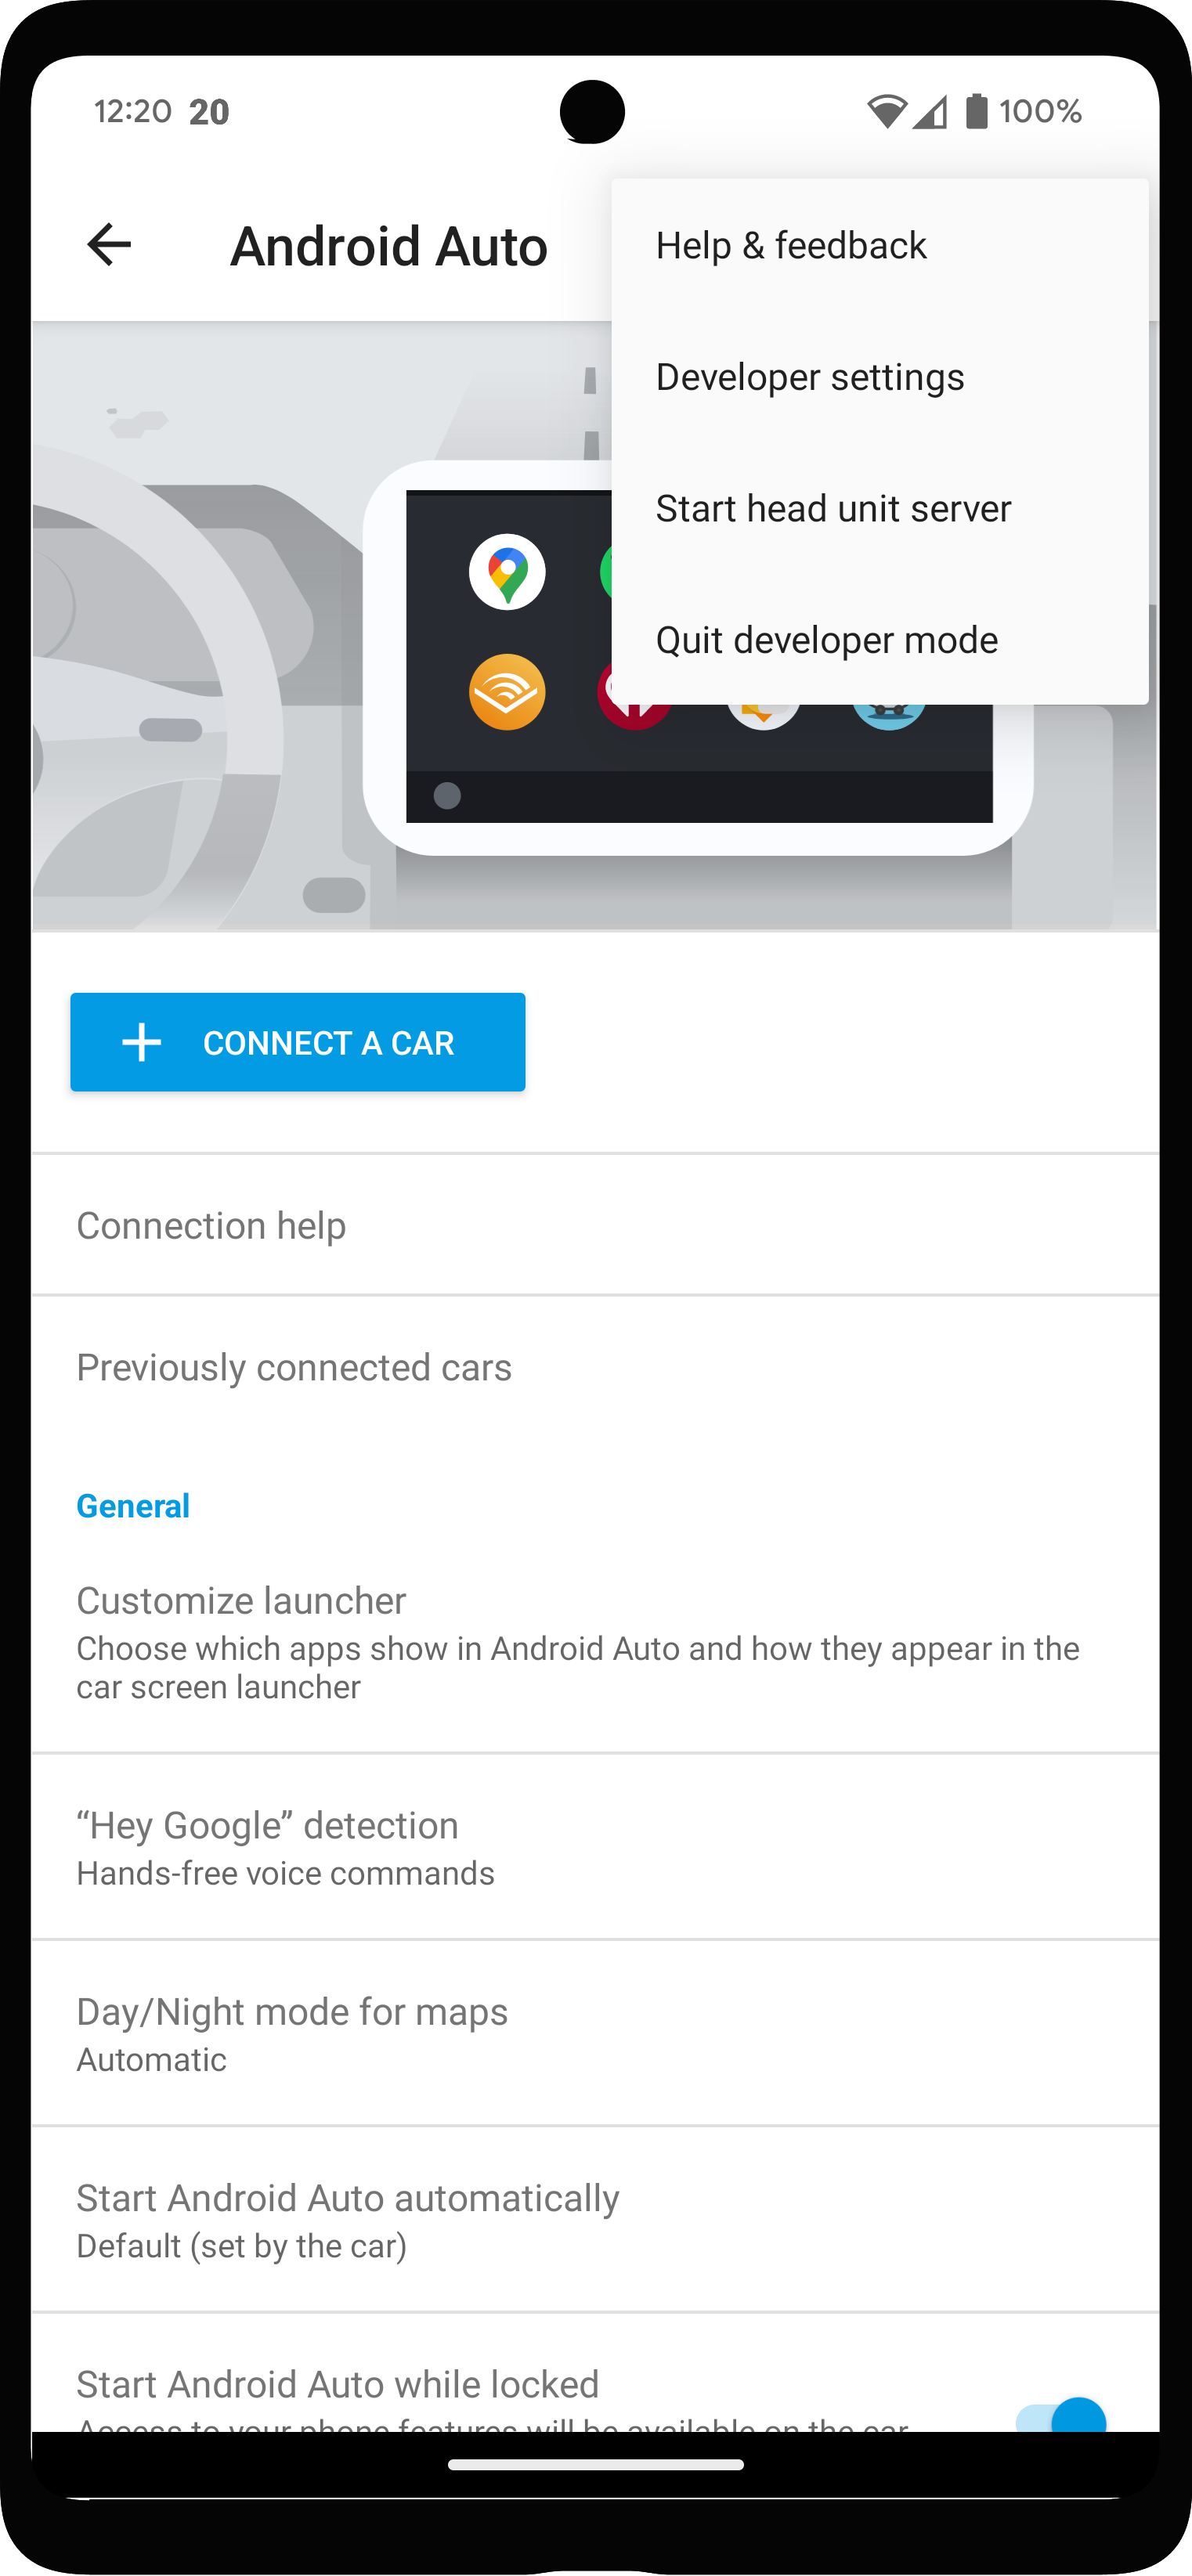
Figure 1. Context menu with developer options.
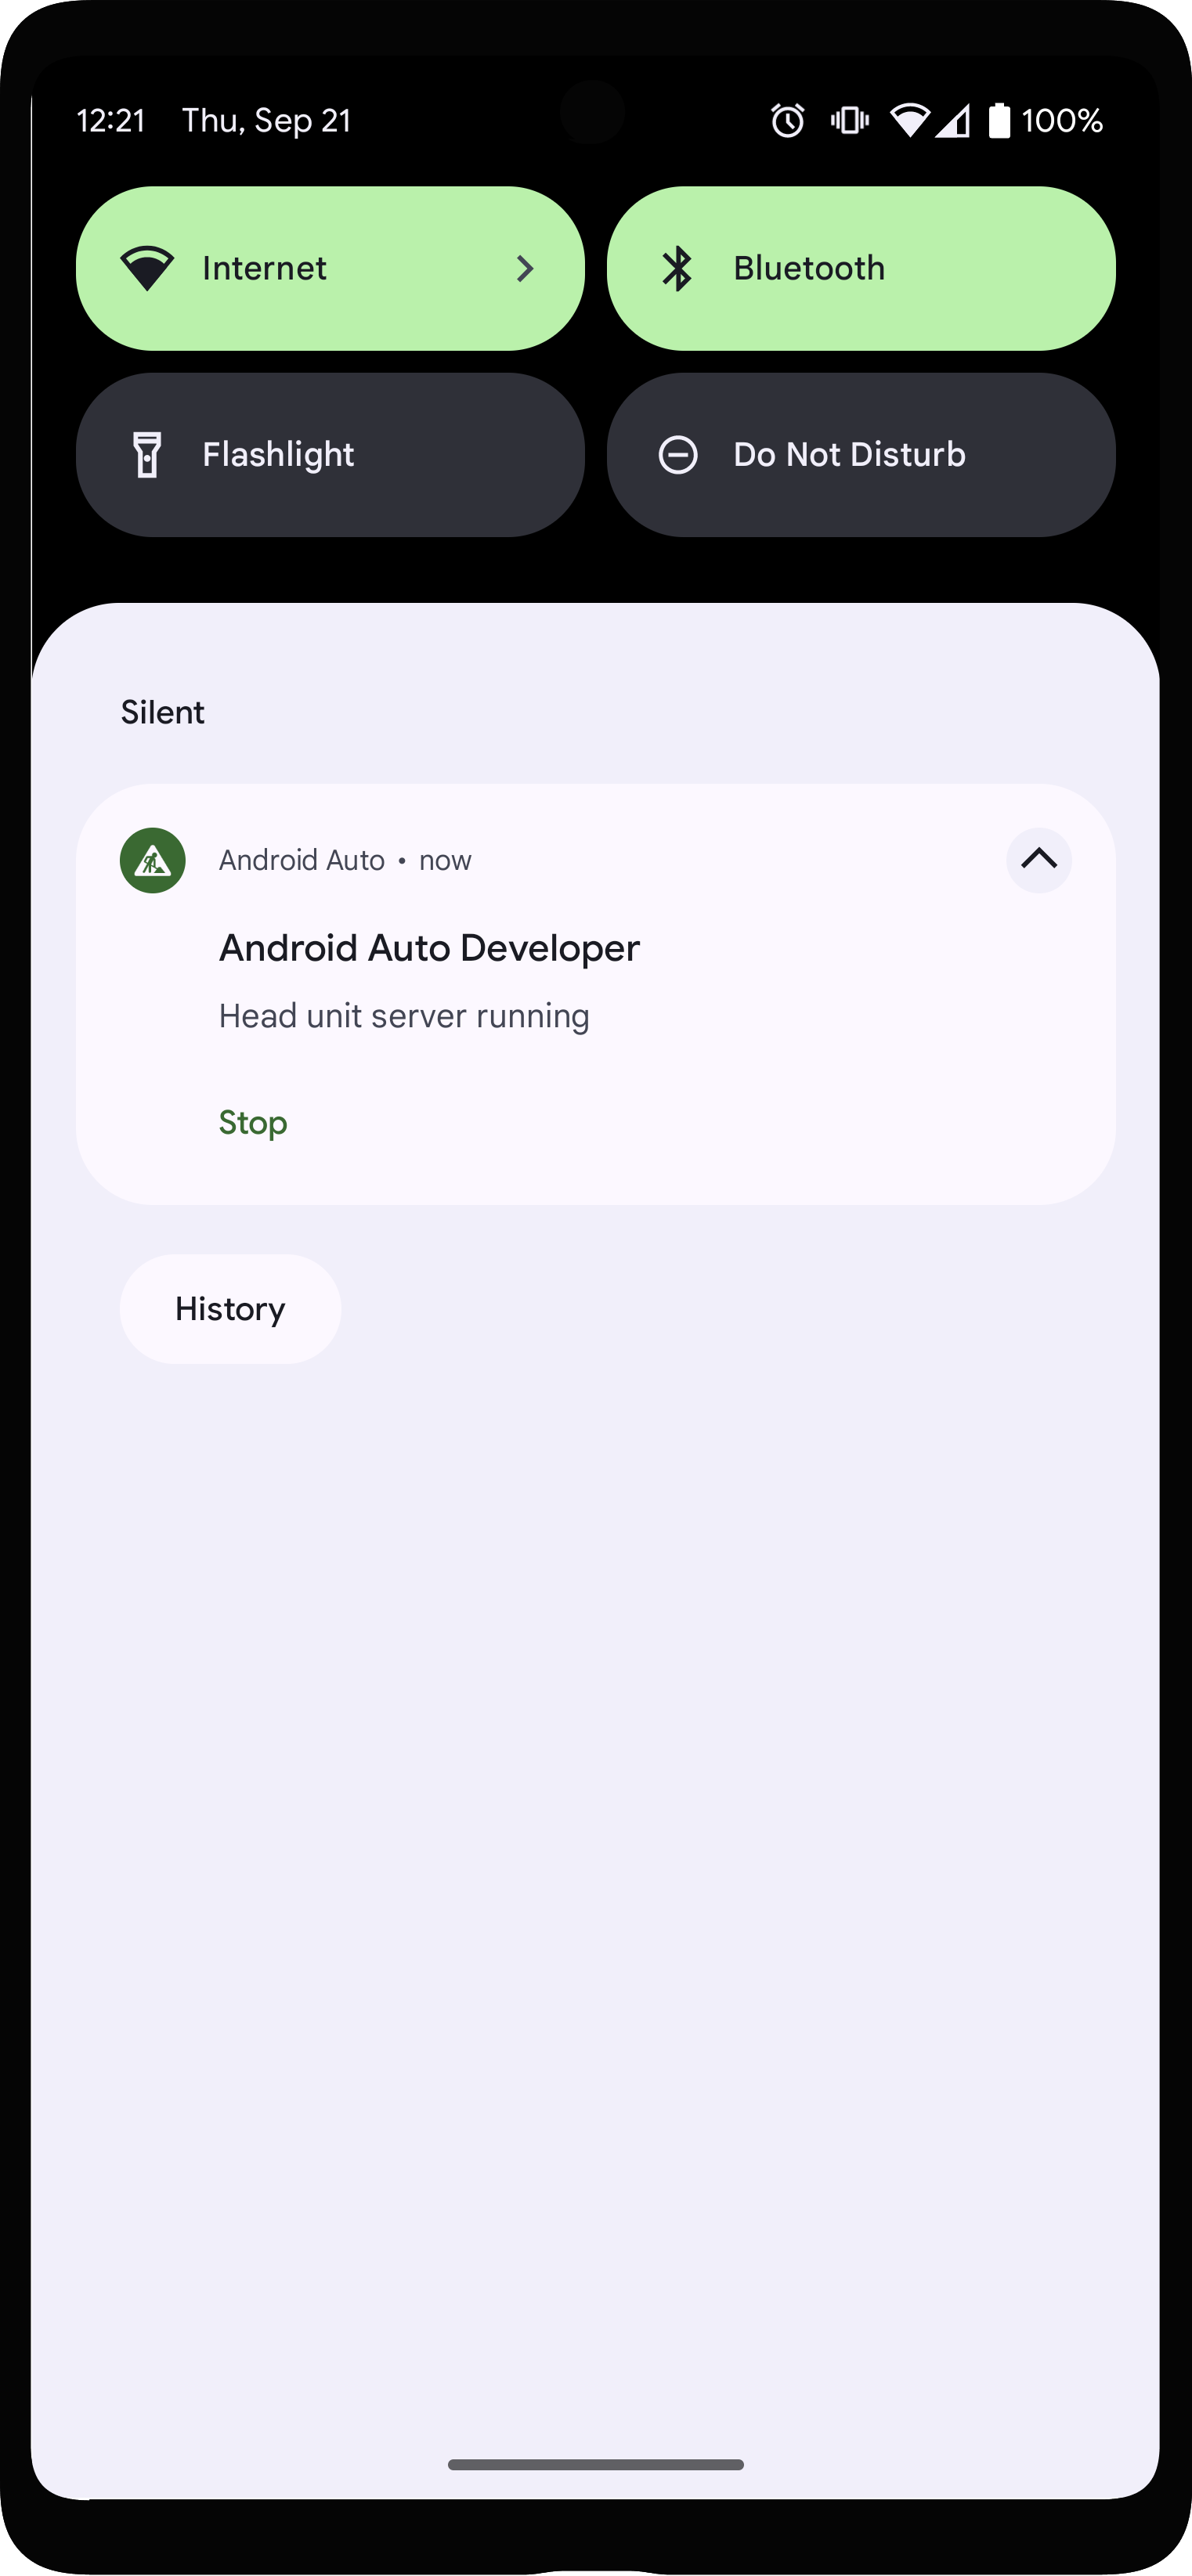
Figure 2. Notification that the head unit server is running.
In the Android Auto app, tap Previously connected cars near the top of the Settings and verify Add new cars to Android Auto is enabled.
Connect the mobile device to the development machine using USB.
Make sure the mobile device's screen is unlocked so it can launch the DHU.
On the development machine, run the following
adbcommand to forward socket connections from the development machine's port 5277 to the same port number on the mobile device. This configuration lets the DHU connect to the head unit server running on the mobile device over a TCP socket.adb forward tcp:5277 tcp:5277Start the DHU by running the command
desktop-head-unit.exeon Windows, or./desktop-head-uniton macOS or Linux, from theSDK_LOCATION/extras/google/auto/directory:cd SDK_LOCATION/extras/google/autodesktop-head-unit.exe # Windows./desktop-head-unit # macOS or Linux
- If this is the first time you are connecting the mobile device to the DHU, check the mobile device's screen to accept the terms of service and adjust permission settings as needed.
After the DHU has started, you can use DHU console commands to run and test your app.
Command-line options
By default, the head unit server connects over port 5277. To override the host
or port, use the --adb=<[localhost:]port> flag, as shown in the following
example:
./desktop-head-unit --adb=5999By default, the DHU emulates an Android Auto-compatible head unit with a
touchscreen user interface. Simulate user touches by clicking the DHU with a
mouse. To emulate head units that use a rotary controller for input, you can use
the -i rotary flag, as shown in the following example:
./desktop-head-unit -i controllerWhen the DHU is in rotary-controller mode, you can use keyboard shortcuts to simulate controller operations. See the Rotary controller section for more details. In rotary controller mode, the DHU ignores mouse clicks. You must operate Android Auto with the simulated rotary-controller operations.
Other command-line options for DHU are listed in the following table:
| Option | Description |
|---|---|
-c, --config=FILE |
Use the specified configuration .ini file. Refer to the
Configure the DHU section for more
details. |
-i, --input=INPUT |
Use specified input mode, one of: touch,
rotary, or hybrid. |
-a, --adb=HOSTPORT |
Use ADB transport. Optional host:port
or port. Defaults to port 5277. |
-a, --usb=DEVICE_ID |
Use USB AOA transport. Optional DEVICE_ID. |
-v, --version |
Show version information. |
-l, --licenses |
Show open source licenses. |
-h, --headless |
Run in headless mode, with no UI. |
-t, --always_show_window_on_top |
Show DHU windows on top of other windows (off by default) |
-?, --help |
Show help listing. |
DHU user guide
This section describes the features supported by the DHU and how to use them.
Commands are entered in the terminal window where you started DHU. Multiple
commands can be run on the same line by separating them with ;.
System
| Command | Key | Description |
|---|---|---|
help [command] |
Show full command set. If a command name is specified, show help for that command. | |
quitexit |
Alt+Q | Quit the head unit. |
sleep [seconds] |
Sleep for one second. If a delay is specified, sleep that many
seconds. This can be used for scripting the head unit
with ./desktop-head-unit < script.txt in, for example, a CI
environment. |
|
screenshot filename.png
|
Save a screenshot to filename.png.
|
|
licenses |
Display licenses of libraries used in the DHU. | |
keycode keycode
|
Send keycode, one of the names listed in the Keycodes section. |
Touch and touchpad
When touch or touchpad is enabled, clicking in the display window, for touch, or touchpad window, for touchpad, registers as a touch event.
For touch, simulate multi-touch by right-clicking the first finger location, then clicking and holding the right button for the second finger. The centerpoint of the two fingers remains fixed; moving the mouse lets you rotate them around the center, pinch in and out, or both.
For touchpad, click and hold the left button to scroll between different UI elements on the screen. Clicking the right button selects the element that has focus.
| Command | Key | Description |
|---|---|---|
tap x y
|
Simulate a touch event at the specified coordinates. |
Rotary controller
The DHU has rotary controller support. When it is enabled, the following actions are supported:
- Clicking up, down, left, and right on the D-pad
- Rotating clockwise and counterclockwise
- Performing a rotation flick (five steps at once)
- Clicking down and back on the controller
The commands and key bindings are listed in the following table.
A scroll wheel on a mouse sends dpad rotate commands, and the middle mouse
button click, usually the scroll wheel, sends dpad click commands.
Note that most cars have touch screens. Some cars have only rotary controllers, and some have a hybrid touch and controller. Cars can also support a touchpad, which can be used for map panning and text entry. Be mindful of these different configurations when simulating different vehicle head units.
| Command | Key | Description |
|---|---|---|
dpad {up|down|left|right} |
Arrow keys | Move the rotary controller. |
dpad {ur|dl|ul|dr} |
Move the rotary controller. | |
dpad soft {left|right} |
Shift+Arrow keys | Press side buttons available on some rotary controllers. |
dpad click |
Return | Press the rotary controller. |
dpad back |
Backspace | Press back button available on some rotary controllers. |
dpad rotate left |
1 | Spin rotary controller counter-clockwise (left). |
dpad rotate right |
2 | Spin rotary controller clockwise (right). |
dpad flick left |
Shift+1 | Spin rotary controller counter-clockwise fast. |
dpad flick right |
Shift+2 | Spin rotary controller clockwise fast. |
dpad 0-9*#+ |
Num pad |
Microphone
The DHU supports using a microphone for voice input or to play a prerecorded
voice track. For convenience, the following sound files for common voice
commands are included with the DHU. These sound files are located in the
SDK_LOCATION/extras/google/auto/voice/ directory.
| Filename | Text |
|---|---|
navhome.wav |
Navigate to home. |
navwork.wav |
Navigate to work. |
navsoh.wav |
Navigate to Sydney Opera House. |
navgoogle.wav |
Navigate to 1600 Amphitheatre Parkway, California, USA. |
exitnav.wav |
Exit navigation. |
howlong.wav |
How long until I get there? |
showtraffic.wav |
Show traffic. |
showalternateroute.wav |
Show alternate routes. |
pause.wav |
Pause music. |
nextturn.wav |
When is my next turn? |
To run an individual .wav file in the DHU prompt, use the following command:
mic play /path/to/filename.wavThe following table lists other microphone-related commands:
| Command | Key | Description |
|---|---|---|
mic begin |
M | Activate the microphone, simulating a click of the steering-wheel button, and wait for input from the computer microphone. |
mic play filename.wav
|
Activate the microphone and play the specified WAV file recording. Note: You don't hear the WAV file being played, but you do hear the response from Android Auto. | |
mic repeat |
Repeat the last recording used with mic play. |
|
mic reject {on|off} |
Activate or deactivate rejection of microphone requests. When on, all microphone requests are rejected. |
Sensors
The DHU supports simulating changes in the vehicle's sensor data with the
following commands. To mock sensor data and send it to Android Auto, the
corresponding sensors must be enabled with the configuration .ini used
file when starting the DHU.
| Command | Description |
|---|---|
fuel [percentage] |
Set the fuel level to the specified percent or (with no value passed in) deactivate fuel level. |
range [km] |
Set the range to the specified kilometers or (with no value passed in) deactivate range data. |
lowfuel [{on|off}] |
Set the low fuel warning sensor or (with no value passed in) deactivate the sensor. |
accel [x] [y] [z] |
Set the accelerometer to the specified x, y, and z values (m/s^2) or (with no parameters passed in) unset the accelerometer data. Pass in NAN to skip optional parameters if needed. |
compass bearing [pitch] [roll] |
Set the compass to the specified bearing, pitch, and roll values (degrees). Pass in NAN to skip optional parameters if needed. |
gyro [x] [y] [z] |
Set the gyroscope to the specified x, y, and z rotation speed (rad/s) or (with no parameters passed in) unset the gyroscope data. Pass in NAN to skip optional parameters if needed. |
location lat long [accuracy]
[altitude] [speed] [bearing] |
Set the location to the specified lat and long values along with the optional accuracy (m), altitude (m), speed (m/s), and bearing (degrees). Pass in NAN to skip optional parameters if needed. |
odometer km [current_trip_km] |
Set the odometer to the specified kilometers along with an optional current trip km value. |
speed [speed] |
Set the vehicle speed to the specified value (m/s) or (with no value passed in) deactivate the sensor. |
tollcard {insert|remove} |
Insert or remove a toll card. |
gps_satellite number_in_use [[azimuth] [elevation] [prn] [snr] [used_in_fix]] |
Set the GPS satellite sensor to the specified number in use value along with the optional list of azimuth (degree within 0 to 360 range), elevation (degree within 0 to 90 range), prn (pseudorandom noise), snr (dB), and used in fix (true or false). |
parking_brake engaged |
Set the parking brake sensor to either true or false. |
gear gear_value |
Set the gear sensor to the specified value (for example, 0 for neutral, 100 for drive, 101 for park, and 102 for reverse). |
Day and night modes
The DHU supports simulating changing between day and night mode with the following commands and key bindings:
| Command | Key | Description |
|---|---|---|
day |
Shift+N | Activate day mode—high-brightness, full color. |
night |
Ctrl+N | Activate night mode—low-brightness, high-contrast. |
daynightnightday |
N | Toggle day or night mode. |
Focus management
The DHU supports simulating whether or not Android Auto has focus on the head unit using the following commands:
| Command | Description |
|---|---|
focus video {on|off|toggle} |
Activate or deactivate video focus on the head unit. Turning off video focus simulates the head unit hiding Android Auto. |
focus audio {on|off|toggle} |
Activate or deactivate audio focus on the head unit. Turning off audio focus simulates the head unit playing its own audio source. |
focus nav {on|off|toggle} |
Activate or deactivate navigation focus on the head unit. Turning off navigation focus simulates the head unit running its own navigation system. |
Restrictions and driving status
The DHU supports simulating certain restrictions when the vehicle is moving, such as disabling the keyboard and disallowing phone configurations, using the following commands:
| Command | Key | Description |
|---|---|---|
restrict none |
U | Disable all restrictions. |
restrict all |
Shift+U | Enable all restrictions, such as to simulate driving. |
Instrument cluster
The DHU supports emulating an instrument cluster. This cluster is usually behind the steering wheel, and it shows basic information during navigation about the next turn—such as the next road name or a turn arrow—distance, or time. It also displays information about ongoing phone calls.
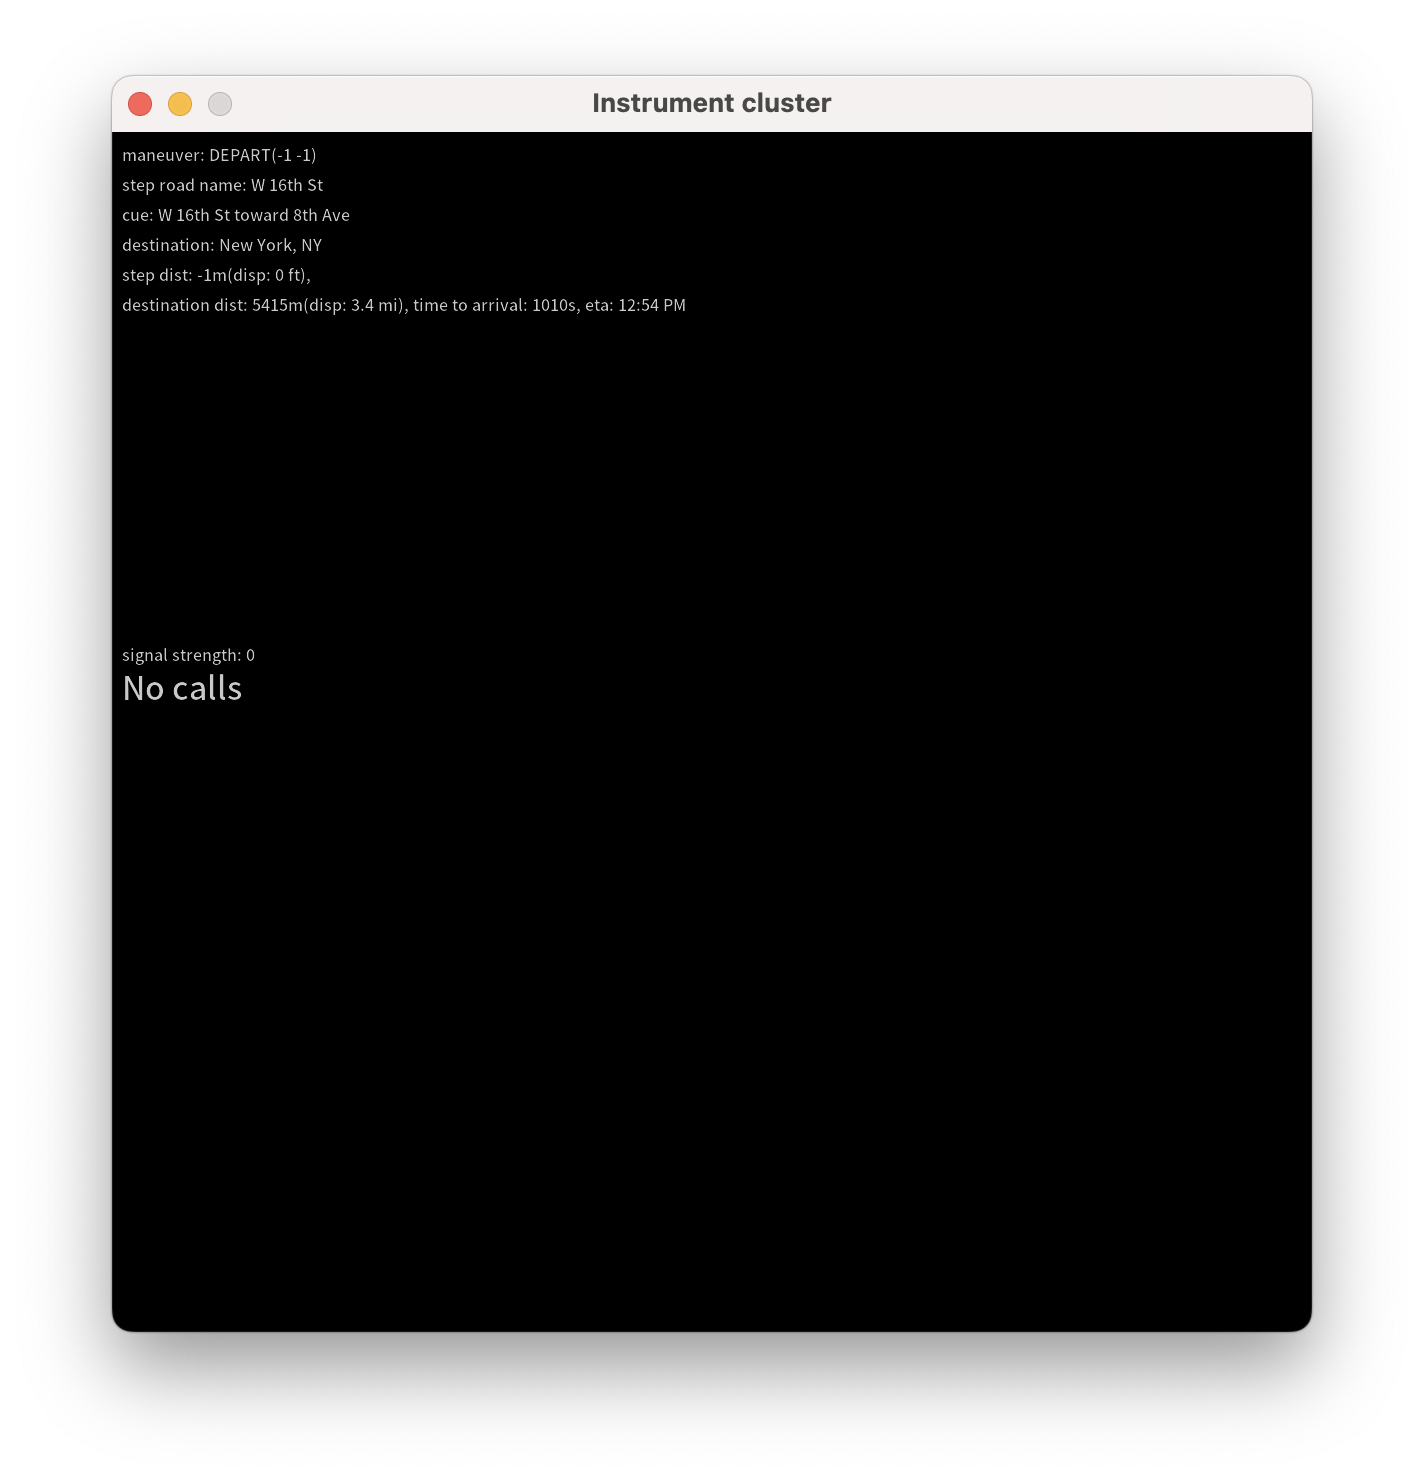
This can be enabled using the instrumentcluster entry in the [general]
section of the configuration file, or by the navcluster or phonecluster
entries to control each feature separately.
[general]
...
instrumentcluster = true
Cluster Display
Some vehicles have cluster displays capable of displaying rich visual information such as map tiles. Starting with version 2.1 of the DHU (currently available using the Android Studio Beta update channel ), you can emulate such a display on your development machine.
This can be done using a configuration file with a cluster [display] section.
[display] sections support the same video configuration options as the
main display configured in the [general] section of the file.
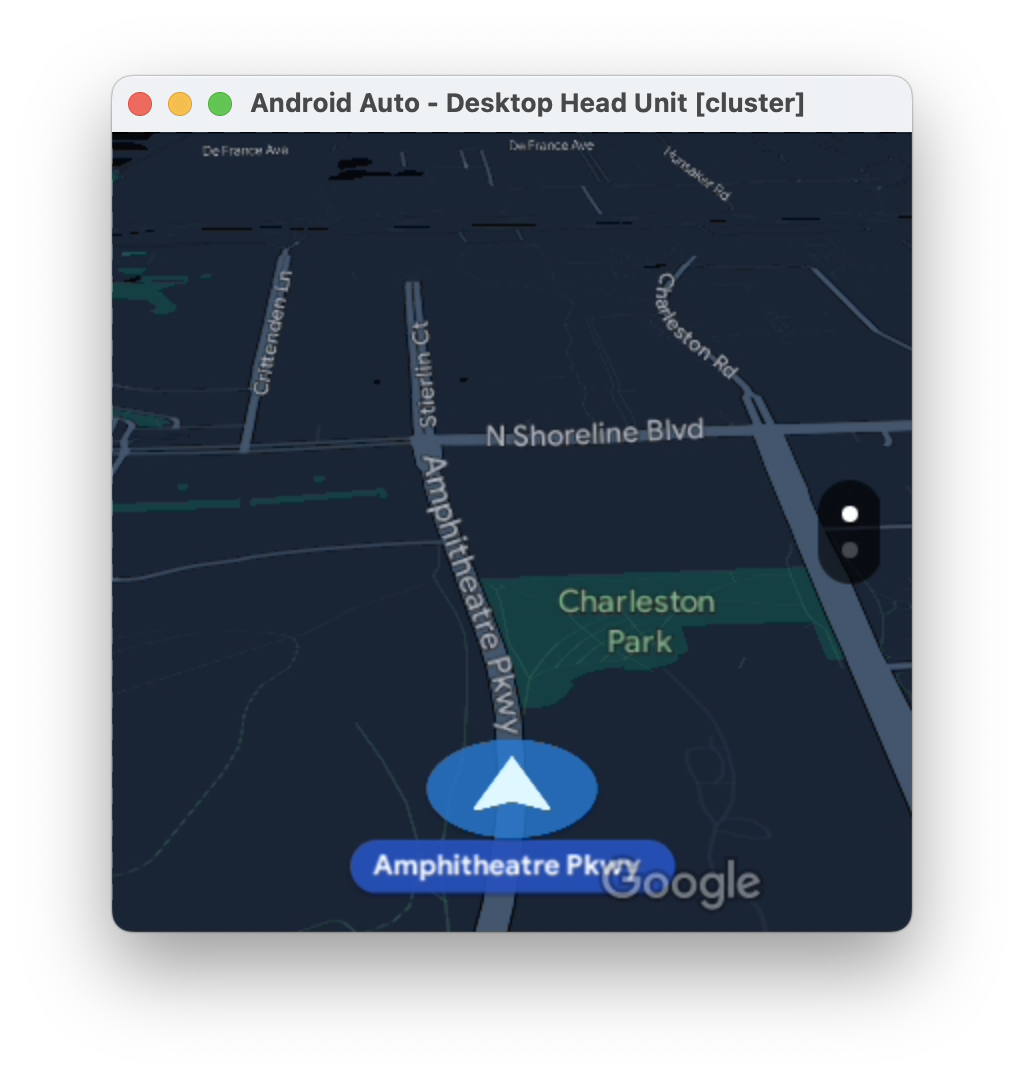
...

# The display name following the colon can be whatever you like.
[display:cluster]
# Setting the displaytype as cluster is what lets the DHU know how to handle it.
displaytype = cluster
resolution = 800x480
dpi = 160
...
This configuration can either be added directly to an existing .ini file or
you can reuse it by putting it in a separate file and passing multiple
configuration files when launching the DHU. When using multiple configuration
files, later definitions of a given value override earlier ones.
# Launch your landscape configuration with your cluster display configuration
./desktop-head-unit -c landscape.ini -c cluster.ini

# Launch the portait configuration with the same cluster display configuration
./desktop-head-unit -c portrait.ini -c cluster.ini
Media Playback Status
The DHU supports an additional information display to show media playback status, such as what track is playing.
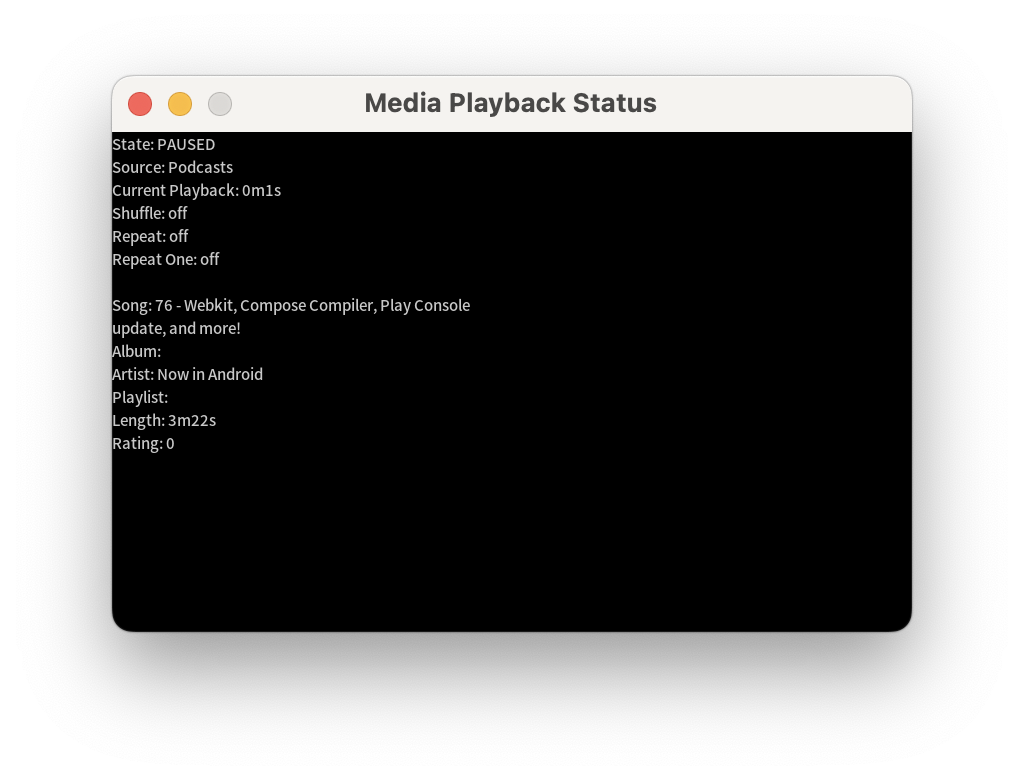
This can be enabled using the playbackstatus entry in the [general] section.
[general]
...
playbackstatus = true
Keycodes
The DHU provides a set of default keycodes that simulates the set of shortcut
buttons that are commonly available in vehicles. For example, the home keycode
can be triggered in the DHU prompt as follows:
keycode homeThe following table lists other available keycodes:
| Keycode | Description |
|---|---|
home |
Go to the home screen. |
back |
Go back. |
callendcall
|
Make or end a call. |
search |
Trigger search. |
media_play_pausemedia_playmedia_pause |
Play or pause media. |
media_nextmedia_previous |
Go to the next or previous media track. |
media |
Go to the default media app. |
navigation |
Go to the default navigation app. |
tel |
Go to the default telephone app. |
Configure the DHU
The DHU supports a configuration .ini file to change the input modes between
touch and rotary controller and to set the frame rate, resolution, and DPI the
head unit requests from the phone.
The default location for the configuration file is ~/.android/headunit.ini. To
change the configuration of the head unit on your system, you can modify this
file.
You can also specify a configuration file to load using the -c flag:
./desktop-head-unit -c /path/to/config.ini
The following snippet shows a sample configuration:
[general]
touch = true
touchpad = false
controller = false
instrumentcluster = false
resolution = 800x480
dpi = 160
framerate = 30
fueltypes = unleaded,electric,hydrogen
evconnectors = supercharger
Sample configuration files that demonstrate different head unit settings you can
test against are under the
SDK_LOCATION/extras/google/auto/config/ folder.
For more advanced use cases, refer to the following supported settings:
Input configuration
The following table lists input configuration options:
| Name | Default | Type | Description |
|---|---|---|---|
inputmode |
default |
String | Define the input mode. The options touch,
rotary, and hybrid activate and deactivate
touchscreen and rotary support and set default keycodes, as appropriate.
default defers to the touch and
controller options. |
controller |
false |
Boolean | Enable rotary controller input. Ignored unless inputmode is default. |
touch |
true |
Boolean |
Activate touchscreen. Ignored unless inputmode is
default.
|
touchpad |
false |
Boolean | Enable touchpad. |
touchpadnavigation |
false |
Boolean | Enable touchpad to be used for UI navigation. |
touchpadtapasselect |
false |
Boolean | When true, a tap on the touchpad is a select event. |
touchpaduiabsolute |
false |
Boolean | When touchpadnavigation is true, set
whether the touches should be treated as absolute or as gestures. |
Video configuration
Android Auto supports three video resolutions:
- 480p (800x480, the default)
- 720p (1280x720)
- 1080p (1920x1080)
To support other aspect ratios, the head unit can specify a margin to letterbox
(pillarbox) as necessary. For example, if you want a 1000x600 screen, set the
resolution to 720p (1280x720) and a marginwidth of 280 and marginheight of
120. This has the effect of adding a 140 px margin on the left and right edges
and a 60 px margin on the top and bottom.
The following example configuration emulates a typical 6-inch screen (750x450):
[general]
...
resolution = 800x480
marginwidth = 50
marginheight = 30
And the following example configuration emulates a very wide screen:
[general]
...
resolution = 1280x720
marginwidth = 0
marginheight = 220
The following table lists other video configuration options:
| Name | Default | Type | Description |
|---|---|---|---|
resolution |
800x480 |
String | One of: 800x480, 1280x720,
1920x1080. |
dpi |
160 |
Integer | |
normalizedpi |
false |
Boolean | When true, reduce DHU window size to account for larger
DPI values. When false, larger DPI values result in larger
windows, which does not mimic real displays but does help with
inspecting visual content. |
realdpi |
160 |
Integer | Used in video configuration. |
framerate |
30 |
Integer | Used in video configuration. |
marginheight |
0 |
Integer | Used in video configuration. |
marginwidth |
0 |
Integer | Used in video configuration. |
margins |
0,0,0,0 |
String | Used in video configuration. Overrides marginwidth and
marginheight if present. Format is top, bottom, left,
right. |
contentinsets |
0,0,0,0 |
String | Used in video configuration. Format is top, bottom, left, right. |
stablecontentinsets |
0,0,0,0 |
String | Used in video configuration. Defaults to the value of
contentinsets. Format is top, bottom, left, right. |
cropmargins |
false |
Boolean | If margins, marginheight, or
marginwidth is specified, a true value for this
setting removes those margins from the displayed video. This reflects more
closely what the end user sees. |
pixelaspectratio |
1.0 |
Float | Used in video configuration. |
Sensor configuration
To mock sensor data and send it to Android Auto, the corresponding sensors must
be enabled using the following options. If a sensor is not enabled, any data
sent for that sensor using the DHU commands is ignored. This configuration
must be put in a [sensors] section, not in the [general] section used for
most other config.
[general]
touch = true
...

[sensors]
location = true
fuel = true
...
| Name | Default | Type | Description |
|---|---|---|---|
accelerometer |
false |
Boolean | Enable accelerometer sensor data. |
compass |
false |
Boolean | Enable compass sensor data. |
driving_status |
false |
Boolean | Enable driving status sensor data. |
fuel |
false |
Boolean | Enable fuel sensor data. |
gyroscope |
false |
Boolean | Enable gyroscope sensor data. |
location |
false |
Boolean | Enable vehicle location sensor data. |
night_mode |
false |
Boolean | Enable night mode sensor data. |
odometer |
false |
Boolean | Enable odometer sensor data. |
speed |
false |
Boolean | Enable speed sensor data. |
toll_card |
false |
Boolean | Enable toll card sensor data. |
gps_satellite |
false |
Boolean | Enable GPS satellite sensor data. |
parking_brake |
false |
Boolean | Enable parking brake sensor data. |
gear |
false |
Boolean | Enable gear sensor data. |
Miscellaneous configuration options
The following table lists other configuration options:
| Name | Default | Type | Description |
|---|---|---|---|
instrumentcluster |
false |
Boolean | Enable instrument cluster. Adds a window to the UI to display navigation and phone status. |
navcluster |
false |
Boolean | Enable instrument cluster. Adds a window to the UI to display navigation status. |
phonecluster |
false |
Boolean | Enable instrument cluster. Adds a window to the UI to display phone status. |
playbackstatus |
false |
Boolean | Enable playback status. Adds a window to the UI to display playback status messages. |
driverposition |
left |
String | One of: left, center, or
right. |
windowleft |
|
Integer | Set the left position of the main window. |
windowtop |
|
Integer | Set the top position of the main window. |
fueltypes |
unleaded |
Strings | One or more of the following, in a comma-separated list:
|
evconnectors |
|
Strings | Zero or more of the following, in a comma-separated list:
fueltypes contains electric.
|
Troubleshoot
Sometimes the DHU shows a blank screen when first connected. You can work around this by doing the following:
- Close the DHU.
- Follow step 5 described in Run the DHU to stop and restart the Head Unit Server.
- Start the DHU again.
- Grant any additional permissions requested on the phone screen. The DHU might shut down once more.
- Restart the DHU if necessary.