

提供在 Android 中建立自訂觸覺效果的範例和指引,包括使用 VibrationEffect.Builder 建立以時間軸為錨點的組合、自訂震動模式,以及進階波形封包。 keywords_public: > Android、觸覺、自訂效果、震動、觸覺 API、震動模式、 VibrationEffect.Builder、組合、觸覺基本元素、波形封包、 UI
本頁提供範例,說明如何在 Android 應用程式中使用不同的觸覺回饋 API,建立超出標準震動波形的自訂效果。
本頁面包含下列範例:
- 以
VibrationEffect.Builder為錨點的時間軸錨定構圖- 使用預設設定撰寫:依序產生預先定義的觸覺感受。
- 使用封包和預設設定進行合成: 沿時間軸合併封包和預設設定。
- 重複使用及移動事件: 移動並重複使用現有的合成事件。
- 重複組合:建立重複的時間軸效果。
- 自訂震動模式
- 震動基本組合
- 震動波形與封包
如需其他範例,請參閱「為活動新增觸覺回饋」,並一律遵循觸覺技術設計原則。
使用備援來處理裝置相容性問題
實作自訂觸覺效果時,裝置相容性和備援行為取決於您選擇的 API 介面:
VibrationEffect.Builder(建議):從 Android 16 (26Q4) 開始,使用VibrationEffect.Builder建立的效果會自動回退至架構層級。如果裝置本身不支援要求的Preset或基本Envelope,架構會在播放時盡力自動將其轉換為適當的替代項目。您不需要在播放以VibrationEffect.Builder組成的效果前,手動檢查每個原始裝置的功能。- 例外狀況:使用
WaveformEnvelopeBuilder建立的進階波形封包不支援自動備援,因為這類封包取決於特定硬體頻率對應 (FOAM)。如果格式不受支援,就無法播放。
- 例外狀況:使用
VibrationEffect.Composition:使用startComposition()API 建立的組合不會自動備援。如果組合包含任何不支援的原始項目,整個震動就會無法播放。您必須使用vibrator.arePrimitivesSupported()手動檢查功能。- 具有振幅控制功能的波形:如果裝置沒有振幅控制功能,非零振幅會向上捨入至 100%。檢查
vibrator.hasAmplitudeControl(),並視需要改用明確設計的開啟/關閉模式。
使用觸覺基本類型
Android 包含多種觸覺技術基本單元,這些單元的震幅和頻率各不相同。您可以單獨使用一個基本觸覺效果,也可以組合使用多個基本觸覺效果,達到豐富的觸覺效果。
- 在兩個基本元素之間使用 50 毫秒以上的延遲,以產生可辨識的間隔,並盡可能考量基本元素持續時間。
- 使用比例相差 1.4 以上的色階,讓強度差異更明顯。
使用 0.5、0.7 和 1.0 的比例,建立低、中和高強度的基本元素版本。
建立自訂震動模式
震動模式通常用於注意力觸覺回饋,例如通知和鈴聲。Vibrator 服務可以播放長時間的震動模式,並隨時間改變震動幅度。這類效果稱為波形。
波形效果通常可以察覺,但如果在安靜的環境中播放,突然的長時間震動可能會嚇到使用者。如果目標振幅的升幅過快,也可能產生可聽見的嗡嗡聲。設計波形模式,平滑振幅轉換,營造升降效果。
震動模式示例
下列各節提供幾種震動模式的範例:
增加曝光量模式
波形會以 VibrationEffect 表示,並有三個參數:
- 時間:每個波形區段的時間長度陣列 (以毫秒為單位)。
- 震幅:第一個引數中指定各個時間長度所需的震動幅度,以 0 到 255 的整數值表示,其中 0 代表震動器「關閉狀態」,255 則是裝置的最大震幅。
- 重複索引:陣列中的索引,指定開始重複波形的位置,如果只應播放一次模式,則為 -1。
以下是脈衝兩次,且脈衝之間有 350 毫秒暫停的波形範例。第一個脈衝會平穩地升至最大振幅,第二個脈衝則會快速升至最大振幅並維持。負重複索引值會定義結尾的停止位置。
Kotlin
val timings: LongArray = longArrayOf(
    50, 50, 50, 50, 50, 100, 350, 25, 25, 25, 25, 200)
val amplitudes: IntArray = intArrayOf(
    33, 51, 75, 113, 170, 255, 0, 38, 62, 100, 160, 255)
val repeatIndex = -1 // Don't repeat.

vibrator.vibrate(VibrationEffect.createWaveform(
    timings, amplitudes, repeatIndex))
Java
long[] timings = new long[] {
    50, 50, 50, 50, 50, 100, 350, 25, 25, 25, 25, 200 };
int[] amplitudes = new int[] {
    33, 51, 75, 113, 170, 255, 0, 38, 62, 100, 160, 255 };
int repeatIndex = -1; // Don't repeat.

vibrator.vibrate(VibrationEffect.createWaveform(
    timings, amplitudes, repeatIndex));
重複模式
波形也可以重複播放,直到取消為止。如要建立重複波形,請設定非負數的 repeat 參數。播放重複波形時,震動會持續進行,直到服務明確取消為止:
Kotlin
void startVibrating() {
val timings: LongArray = longArrayOf(50, 50, 100, 50, 50)
val amplitudes: IntArray = intArrayOf(64, 128, 255, 128, 64)
val repeat = 1 // Repeat from the second entry, index = 1.
VibrationEffect repeatingEffect = VibrationEffect.createWaveform(
    timings, amplitudes, repeat)
// repeatingEffect can be used in multiple places.

vibrator.vibrate(repeatingEffect)
}

void stopVibrating() {
vibrator.cancel()
}
Java
void startVibrating() {
long[] timings = new long[] { 50, 50, 100, 50, 50 };
int[] amplitudes = new int[] { 64, 128, 255, 128, 64 };
int repeat = 1; // Repeat from the second entry, index = 1.
VibrationEffect repeatingEffect = VibrationEffect.createWaveform(
    timings, amplitudes, repeat);
// repeatingEffect can be used in multiple places.

vibrator.vibrate(repeatingEffect);
}

void stopVibrating() {
vibrator.cancel();
}
這對於需要使用者採取動作確認的間歇性事件非常實用。例如來電和觸發的鬧鐘。
具有備用項目的模式
控制震動的振幅是硬體相關功能。如果低階裝置沒有這項功能,在裝置上播放波形時,裝置會針對振幅陣列中的每個正向項目,以最大振幅震動。如果應用程式需要支援這類裝置,請使用不會在該情況下產生震動效果的模式,或是設計較簡單的開啟/關閉模式,做為替代方案。
Kotlin
if (vibrator.hasAmplitudeControl()) {
  vibrator.vibrate(VibrationEffect.createWaveform(
    smoothTimings, amplitudes, smoothRepeatIdx))
} else {
  vibrator.vibrate(VibrationEffect.createWaveform(
    onOffTimings, onOffRepeatIdx))
}
Java
if (vibrator.hasAmplitudeControl()) {
  vibrator.vibrate(VibrationEffect.createWaveform(
    smoothTimings, amplitudes, smoothRepeatIdx));
} else {
  vibrator.vibrate(VibrationEffect.createWaveform(
    onOffTimings, onOffRepeatIdx));
}
以 VibrationEffect.Builder 為錨點的時間軸錨定構圖
從 Android 16 (26Q4) 開始,VibrationEffect.Builder 是建立複雜震動效果和組合的偏好 API。您可以使用 startTimeMillis,沿著絕對時間軸排序離散的觸覺元素,建構生動的觸覺感受。
VibrationEffect.Builder 支援合併多種震動類型:
- 預設:預先定義的觸覺脈衝 (
VibrationEffect.Preset),例如點擊和滴答聲。 - 封包:動態連續波形,包括與硬體無關的基本封包 (
BasicEnvelopeBuilder) 和進階調頻封包 (WaveformEnvelopeBuilder)。 - 現有的 VibrationEffects:原始組合 (
VibrationEffect.Composition)、步進波形 (VibrationEffect.createWaveform)、預先定義的效果 (VibrationEffect.createPredefined) 和單次觸發 (VibrationEffect.createOneShot),可使用addEvents()或建構函式複製匯入。 - 重複序列:以
setRepeatingEffect()設定的連續模式。
以 VibrationEffect.Builder 建構的震動效果內建架構層級的自動備援,適用於所有元素 (包括預設值、基本封包和合併的震動效果),確保不同裝置都能提供一致的使用者體驗,不必手動檢查功能。(使用 WaveformEnvelopeBuilder 建立的進階波形封包需要硬體支援,且不支援自動備援。)
使用預設設定撰寫
使用 VibrationEffect.Preset 將常見的預先定義短促觸覺脈衝 (例如 PRESET_CLICK、PRESET_TICK 或 PRESET_LOW_TICK) 新增至合成內容。裝置製造商會實作預設值,提供清晰、短促且令人愉悅的震動,符合觸覺回饋原則,確保觸覺回饋效果良好。如要進一步瞭解這些功能及其運作方式,請參閱「震動致動器入門」。
預設集會取代 VibrationEffect.Composition API 中的簡短基本體。
如要產生較長或連續的觸覺回饋 (例如強度逐漸增強或減弱),請改用包絡線波形 (PWLE)。
每個預設集都可以指派介於 0.0f 和 1.0f 之間的選用比例,並從合成作業開始時的明確開始時間 (以毫秒為單位) 開始。
Kotlin
val clickPreset = VibrationEffect.Preset.create(
    VibrationEffect.Preset.PRESET_CLICK, /* scale= */ 0.8f
)
val tickPreset = VibrationEffect.Preset.create(
    VibrationEffect.Preset.PRESET_TICK, /* scale= */ 0.5f
)

val effect = VibrationEffect.Builder()
    .addPreset(/* startTimeMillis= */ 0L, clickPreset)
    .addPreset(/* startTimeMillis= */ 100L, tickPreset)
    .build()

vibrator.vibrate(effect)
Java
VibrationEffect.Preset clickPreset = VibrationEffect.Preset.create(
    VibrationEffect.Preset.PRESET_CLICK, /* scale= */ 0.8f
);
VibrationEffect.Preset tickPreset = VibrationEffect.Preset.create(
    VibrationEffect.Preset.PRESET_TICK, /* scale= */ 0.5f
);

VibrationEffect effect = new VibrationEffect.Builder()
    .addPreset(/* startTimeMillis= */ 0L, clickPreset)
    .addPreset(/* startTimeMillis= */ 100L, tickPreset)
    .build();

vibrator.vibrate(effect);
使用封包和預設集作曲
您可以順暢地合併 VibrationEffect.Envelope 執行個體 (使用 BasicEnvelopeBuilder 或 WaveformEnvelopeBuilder 建立),並使用預設值建立豐富的多段式觸覺模式。
以下範例會播放平順的升降波封,然後播放尖銳的點擊預設:
Kotlin
val basicEnvelope = VibrationEffect.Envelope.create(
    VibrationEffect.BasicEnvelopeBuilder()
        .setInitialSharpness(0.0f)
        .addControlPoint(1.0f, 1.0f, 300L)
        .addControlPoint(0.0f, 0.5f, 100L)
)
val clickPreset = VibrationEffect.Preset.create(
    VibrationEffect.Preset.PRESET_CLICK, 0.9f
)

val mixedEffect = VibrationEffect.Builder()
    .addEnvelope(/* startTimeMillis= */ 0L, basicEnvelope)
    .addPreset(/* startTimeMillis= */ 450L, clickPreset)
    .build()

vibrator.vibrate(mixedEffect)
Java
VibrationEffect.Envelope basicEnvelope = VibrationEffect.Envelope.create(
    new VibrationEffect.BasicEnvelopeBuilder()
        .setInitialSharpness(0.0f)
        .addControlPoint(1.0f, 1.0f, 300L)
        .addControlPoint(0.0f, 0.5f, 100L)
);
VibrationEffect.Preset clickPreset = VibrationEffect.Preset.create(
    VibrationEffect.Preset.PRESET_CLICK, 0.9f
);

VibrationEffect mixedEffect = new VibrationEffect.Builder()
    .addEnvelope(/* startTimeMillis= */ 0L, basicEnvelope)
    .addPreset(/* startTimeMillis= */ 450L, clickPreset)
    .build();

vibrator.vibrate(mixedEffect);
重複使用及移動現有活動
如要重複使用或串連現有的 VibrationEffect (包括 VibrationEffect.Composition),請使用 getEvents() 擷取其 VibrationEffect.Event 物件清單,並使用 addEvents(startTimeShiftMillis, events) 附加偏移量 (或直接將效果傳遞至 VibrationEffect.Builder(effect) 建構函式)。以這種方式匯入 VibrationEffect.Composition 執行個體時,架構會自動將其基本項目轉換為預設集,啟用執行階段備援支援。
Kotlin
val existingEffect = VibrationEffect.Builder()
    .addPreset(
        0L,
        VibrationEffect.Preset.create(VibrationEffect.Preset.PRESET_CLICK)
    )
    .addPreset(
        80L,
        VibrationEffect.Preset.create(VibrationEffect.Preset.PRESET_TICK)
    )
    .build()

// Shift and append the existing events 200ms into the new composition.
val combinedEffect = VibrationEffect.Builder()
    .addEvents(/* startTimeShiftMillis= */ 200L, existingEffect.events)
    .build()

vibrator.vibrate(combinedEffect)
Java
VibrationEffect existingEffect = new VibrationEffect.Builder()
    .addPreset(
        0L,
        VibrationEffect.Preset.create(VibrationEffect.Preset.PRESET_CLICK)
    )
    .addPreset(
        80L,
        VibrationEffect.Preset.create(VibrationEffect.Preset.PRESET_TICK)
    )
    .build();

// Shift and append the existing events 200ms into the new composition.
VibrationEffect combinedEffect = new VibrationEffect.Builder()
    .addEvents(/* startTimeShiftMillis= */ 200L, existingEffect.getEvents())
    .build();

vibrator.vibrate(combinedEffect);
建立重複的構圖
使用 setRepeatingEffect(startTimeMillis, repeatingEffect, durationMillis) 在組合中新增重複模式:
Kotlin
val repeatingPattern = VibrationEffect.Builder()
    .addPreset(
        0L,
        VibrationEffect.Preset.create(
            VibrationEffect.Preset.PRESET_CLICK, 1.0f
        )
    )
    .addPreset(
        150L,
        VibrationEffect.Preset.create(
            VibrationEffect.Preset.PRESET_LOW_TICK, 0.6f
        )
    )
    .build()

val repeatingEffect = VibrationEffect.Builder()
    .setRepeatingEffect(
        /* startTimeMillis= */ 0L,
        /* effect= */ repeatingPattern,
        /* durationMillis= */ 300L
    )
    .build()

vibrator.vibrate(repeatingEffect)
Java
VibrationEffect repeatingPattern = new VibrationEffect.Builder()
    .addPreset(
        0L,
        VibrationEffect.Preset.create(
            VibrationEffect.Preset.PRESET_CLICK, 1.0f
        )
    )
    .addPreset(
        150L,
        VibrationEffect.Preset.create(
            VibrationEffect.Preset.PRESET_LOW_TICK, 0.6f
        )
    )
    .build();

VibrationEffect repeatingEffect = new VibrationEffect.Builder()
    .setRepeatingEffect(
        /* startTimeMillis= */ 0L,
        /* effect= */ repeatingPattern,
        /* durationMillis= */ 300L
    )
    .build();

vibrator.vibrate(repeatingEffect);
時間、驗證和偏移管理
使用 VibrationEffect.Builder 設計組合時,請注意下列時間和驗證規則:
- 嚴格遞增的開始時間:新增至建構工具的每個元素,
startTimeMillis必須大於或等於前一個元素的開始時間。 - 建構時間驗證:建構工具會在
build()時間盡力執行驗證,使用已知元素時間長度 (或預設的 1 毫秒最小值)。如果偵測到不可能重疊,系統會擲回IllegalArgumentException。 - 播放順序偏移:如果前一個震動元素在下一個元素的開始時間到來時仍在實際播放,架構會自動將下一個元素移至最早可用的時段。這樣可確保事件不會重疊,也不會遺漏任何震動,但如果事件排程過於接近,可能會導致輕微的時間漂移。為盡量減少漂移,請在連續觸覺事件之間預留足夠時間 (例如 50 毫秒以上)。
建立震動基本體組合
本節說明如何使用 VibrationEffect.Composition 撰寫震動效果。裝置製造商會實作本頁稍早所述的組合 primitive。這類觸覺回饋會提供清晰、短促且令人愉悅的震動,符合觸覺技術原則。如要進一步瞭解這些功能和運作方式,請參閱「震動致動器入門」。
與 VibrationEffect.Builder 不同,VibrationEffect.Composition API 不會自動為不支援的基元提供備援。因此:
啟用進階觸覺回饋前,請先確認特定裝置支援您使用的所有基本元素。
停用不支援的一致體驗組合,而不只是缺少基本體的特效。
- Kotlin:
val fallbackEffect = VibrationEffect.Builder(compositionEffect).build()(或.addEvents(0L, compositionEffect.events)) - Java:
VibrationEffect fallbackEffect =new VibrationEffect.Builder(compositionEffect).build();(或.addEvents(0L, compositionEffect.getEvents()))
以 VibrationEffect.Builder 建構時,架構會將組合基本項目轉換為預設集,並在使用者裝置不支援任何基本項目時,自動提供執行階段備援。
組合震動效果
您可以使用 VibrationEffect.Composition 建立組合震動效果。以下是緩慢上升效果,隨後是急促的點擊效果:
Kotlin
vibrator.vibrate(
    VibrationEffect.startComposition().addPrimitive(
    VibrationEffect.Composition.PRIMITIVE_SLOW_RISE
    ).addPrimitive(
    VibrationEffect.Composition.PRIMITIVE_CLICK
    ).compose()
)
Java
vibrator.vibrate(
    VibrationEffect.startComposition()
        .addPrimitive(VibrationEffect.Composition.PRIMITIVE_SLOW_RISE)
        .addPrimitive(VibrationEffect.Composition.PRIMITIVE_CLICK)
        .compose());
加入要依序播放的圖元,即可建立組合。每個基本元素也都能縮放,因此您可以控制每個元素產生的震動幅度。震動強度範圍為 0 到 1,其中 0 實際上對應至使用者 (幾乎) 感受不到的最小震幅。
在震動基本體中建立變化版本
如要建立相同基本元素的弱版和強版,請建立強度比率為 1.4 以上的版本,這樣就能輕易察覺強度差異。請勿嘗試建立超過三種相同基元的強度等級,因為這些等級在知覺上並無差異。舉例來說,使用 0.5、0.7 和 1.0 的比例,建立原始圖元的低、中和高強度版本。
在震動基本單元之間加入間隔
組合也可以指定要在連續基本項目之間加入的延遲時間。這個延遲時間以毫秒為單位,表示自上一個基本元素結束後經過的時間。一般來說,兩個圖元之間的間隔為 5 到 10 毫秒,太短而無法偵測。如要在兩個圖元之間建立可辨識的間隔,請使用 50 毫秒以上的間隔。以下是含有延遲的組合範例:
Kotlin
val delayMs = 100
vibrator.vibrate(
    VibrationEffect.startComposition().addPrimitive(
    VibrationEffect.Composition.PRIMITIVE_SPIN, 0.8f
    ).addPrimitive(
    VibrationEffect.Composition.PRIMITIVE_SPIN, 0.6f
    ).addPrimitive(
    VibrationEffect.Composition.PRIMITIVE_THUD, 1.0f, delayMs
    ).compose()
)
Java
int delayMs = 100;
vibrator.vibrate(
    VibrationEffect.startComposition()
        .addPrimitive(VibrationEffect.Composition.PRIMITIVE_SPIN, 0.8f)
        .addPrimitive(VibrationEffect.Composition.PRIMITIVE_SPIN, 0.6f)
        .addPrimitive(
            VibrationEffect.Composition.PRIMITIVE_THUD, 1.0f, delayMs)
        .compose());
查看支援哪些基本型別
您可以使用下列 API 驗證裝置是否支援特定基本類型:
Kotlin
val primitive = VibrationEffect.Composition.PRIMITIVE_LOW_TICK

if (vibrator.areAllPrimitivesSupported(primitive)) {
  vibrator.vibrate(VibrationEffect.startComposition()
        .addPrimitive(primitive).compose())
} else {
  // Play a predefined effect or custom pattern as a fallback.
}
Java
int primitive = VibrationEffect.Composition.PRIMITIVE_LOW_TICK;

if (vibrator.areAllPrimitivesSupported(primitive)) {
  vibrator.vibrate(VibrationEffect.startComposition()
        .addPrimitive(primitive).compose());
} else {
  // Play a predefined effect or custom pattern as a fallback.
}
您也可以檢查多個基本項目,然後根據裝置支援層級決定要組合哪些項目:
Kotlin
val effects: IntArray = intArrayOf(
VibrationEffect.Composition.PRIMITIVE_LOW_TICK,
VibrationEffect.Composition.PRIMITIVE_TICK,
VibrationEffect.Composition.PRIMITIVE_CLICK
)
val supported: BooleanArray = vibrator.arePrimitivesSupported(primitives)
Java
int[] primitives = new int[] {
VibrationEffect.Composition.PRIMITIVE_LOW_TICK,
VibrationEffect.Composition.PRIMITIVE_TICK,
VibrationEffect.Composition.PRIMITIVE_CLICK
};
boolean[] supported = vibrator.arePrimitivesSupported(effects);
震動組合範例
以下各節提供幾個震動組合範例,取自 GitHub 上的 觸覺回饋範例應用程式。
抗拒 (低勾選次數)
您可以控制原始震動的振幅,向使用者提供有用的回饋,瞭解目前執行的動作。您可以運用間距較小的比例值,為基本體建立平滑的漸強效果。連續基本元素之間的延遲時間,也可以根據使用者互動動態設定。以下範例說明如何透過拖曳手勢控制檢視區塊動畫,並加入觸覺回饋。
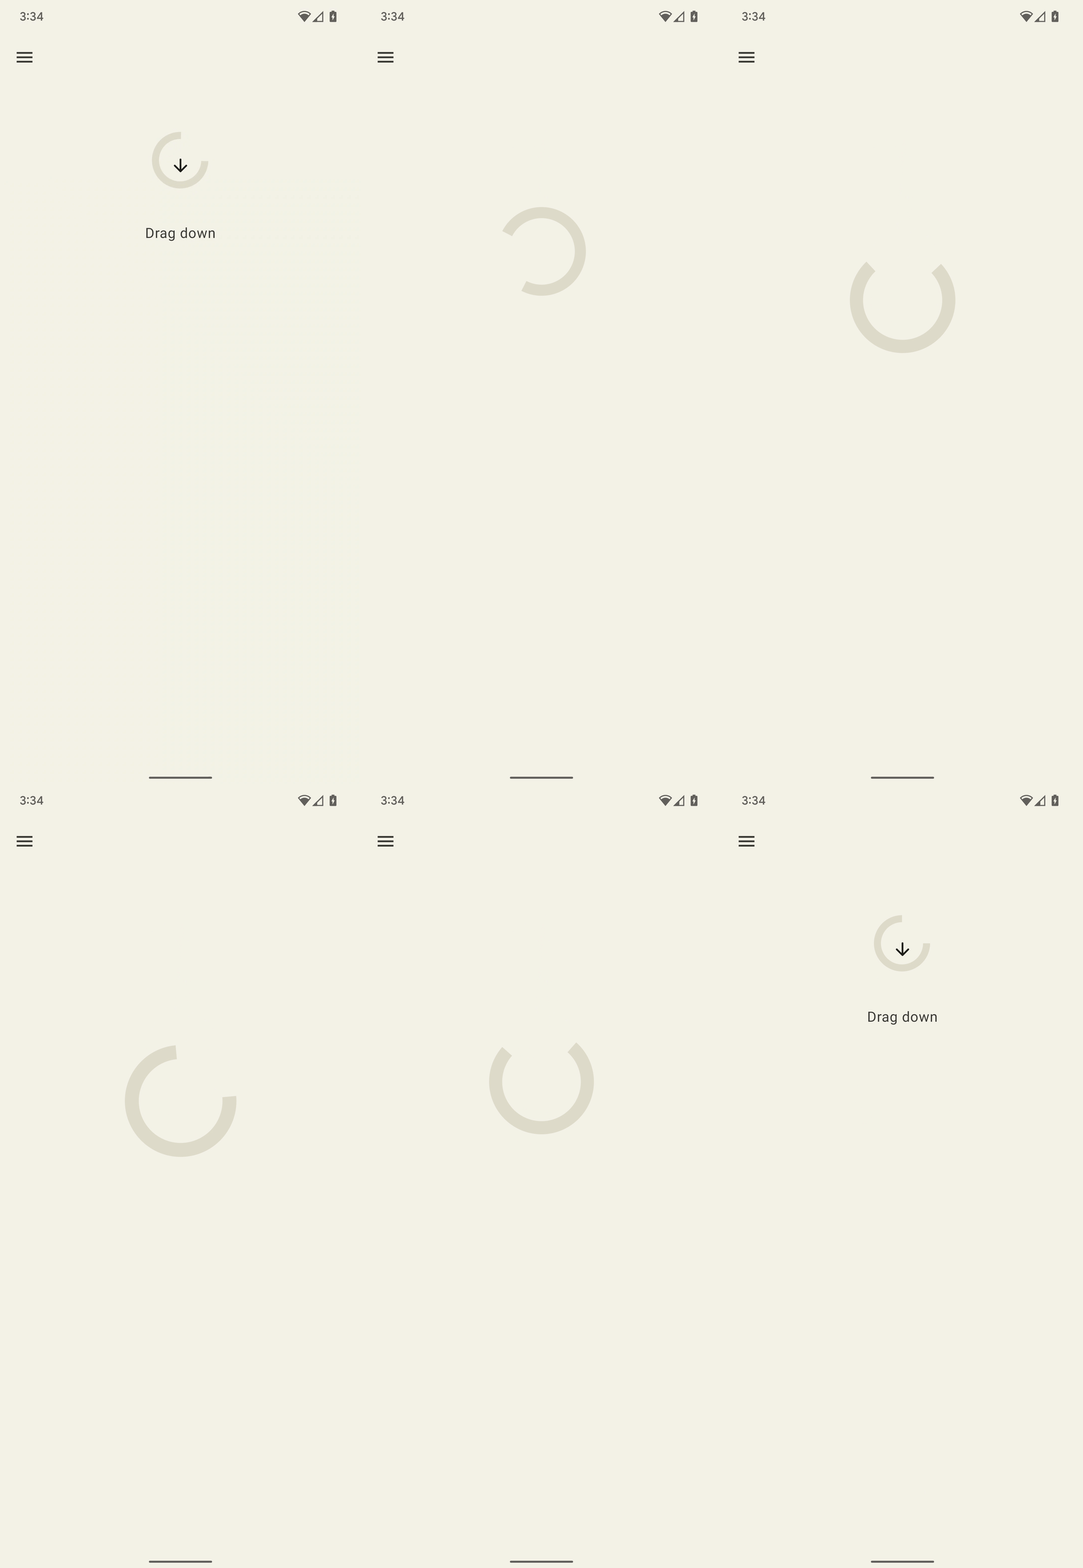
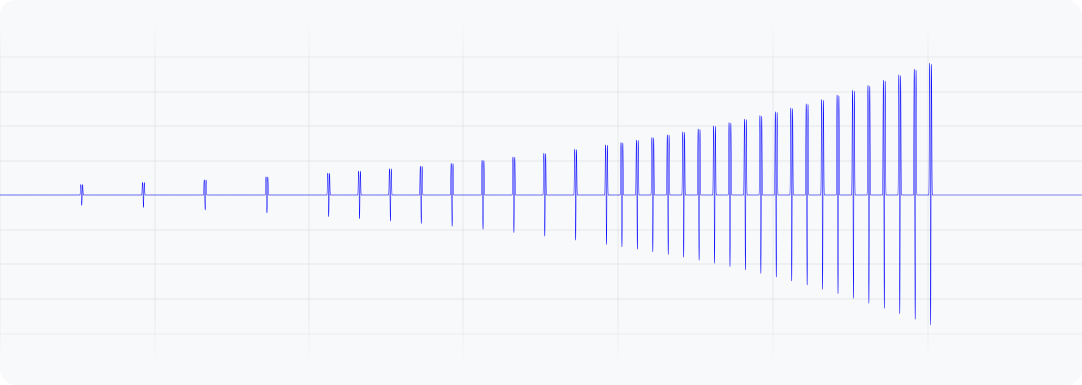
圖 1. 這個波形代表裝置震動的輸出加速度。
Kotlin
@Composable
fun ResistScreen() {
    // Control variables for the dragging of the indicator.
    var isDragging by remember { mutableStateOf(false) }
    var dragOffset by remember { mutableStateOf(0f) }

    // Only vibrates while the user is dragging
    if (isDragging) {
        LaunchedEffect(Unit) {
        // Continuously run the effect for vibration to occur even when the view
        // is not being drawn, when user stops dragging midway through gesture.
        while (true) {
            // Calculate the interval inversely proportional to the drag offset.
            val vibrationInterval = calculateVibrationInterval(dragOffset)
            // Calculate the scale directly proportional to the drag offset.
            val vibrationScale = calculateVibrationScale(dragOffset)

            delay(vibrationInterval)
            vibrator.vibrate(
            VibrationEffect.startComposition().addPrimitive(
                VibrationEffect.Composition.PRIMITIVE_LOW_TICK,
                vibrationScale
            ).compose()
            )
        }
        }
    }

    Screen() {
        Column(
        Modifier
            .draggable(
            orientation = Orientation.Vertical,
            onDragStarted = {
                isDragging = true
            },
            onDragStopped = {
                isDragging = false
            },
            state = rememberDraggableState { delta ->
                dragOffset += delta
            }
            )
        ) {
        // Build the indicator UI based on how much the user has dragged it.
        ResistIndicator(dragOffset)
        }
    }
}
Java
class DragListener implements View.OnTouchListener {
    // Control variables for the dragging of the indicator.
    private int startY;
    private int vibrationInterval;
    private float vibrationScale;

    @Override
    public boolean onTouch(View view, MotionEvent event) {
        switch (event.getAction()) {
        case MotionEvent.ACTION_DOWN:
            startY = event.getRawY();
            vibrationInterval = calculateVibrationInterval(0);
            vibrationScale = calculateVibrationScale(0);
            startVibration();
            break;
        case MotionEvent.ACTION_MOVE:
            float dragOffset = event.getRawY() - startY;
            // Calculate the interval inversely proportional to the drag offset.
            vibrationInterval = calculateVibrationInterval(dragOffset);
            // Calculate the scale directly proportional to the drag offset.
            vibrationScale = calculateVibrationScale(dragOffset);
            // Build the indicator UI based on how much the user has dragged it.
            updateIndicator(dragOffset);
            break;
        case MotionEvent.ACTION_CANCEL:
        case MotionEvent.ACTION_UP:
            // Only vibrates while the user is dragging
            cancelVibration();
            break;
        }
        return true;
    }

    private void startVibration() {
        vibrator.vibrate(
            VibrationEffect.startComposition()
                .addPrimitive(VibrationEffect.Composition.PRIMITIVE_LOW_TICK,
                        vibrationScale)
                .compose());

        // Continuously run the effect for vibration to occur even when the view
        // is not being drawn, when user stops dragging midway through gesture.
        handler.postDelayed(this::startVibration, vibrationInterval);
    }

    private void cancelVibration() {
        handler.removeCallbacksAndMessages(null);
    }
}
擴展 (升降)
有兩種基本型,可提高震動強度:PRIMITIVE_QUICK_RISE 和 PRIMITIVE_SLOW_RISE。兩者都能達到相同目標,但時間長度不同。只有一個用於調降的原始值:PRIMITIVE_QUICK_FALL。這些基本元素可共同運作,產生強度逐漸增加然後消失的波形片段。您可以對齊縮放的基本元素,避免振幅在元素之間突然跳動,這也有助於延長整體效果的持續時間。在知覺上,人們總是比較容易注意到上升部分,因此讓上升部分比下降部分短,可以將重點轉移到下降部分。
以下範例說明如何運用這項組合,展開及收合圓圈。升起效果可加強動畫期間的擴展感。升降效果的組合有助於強調動畫結尾的摺疊效果。
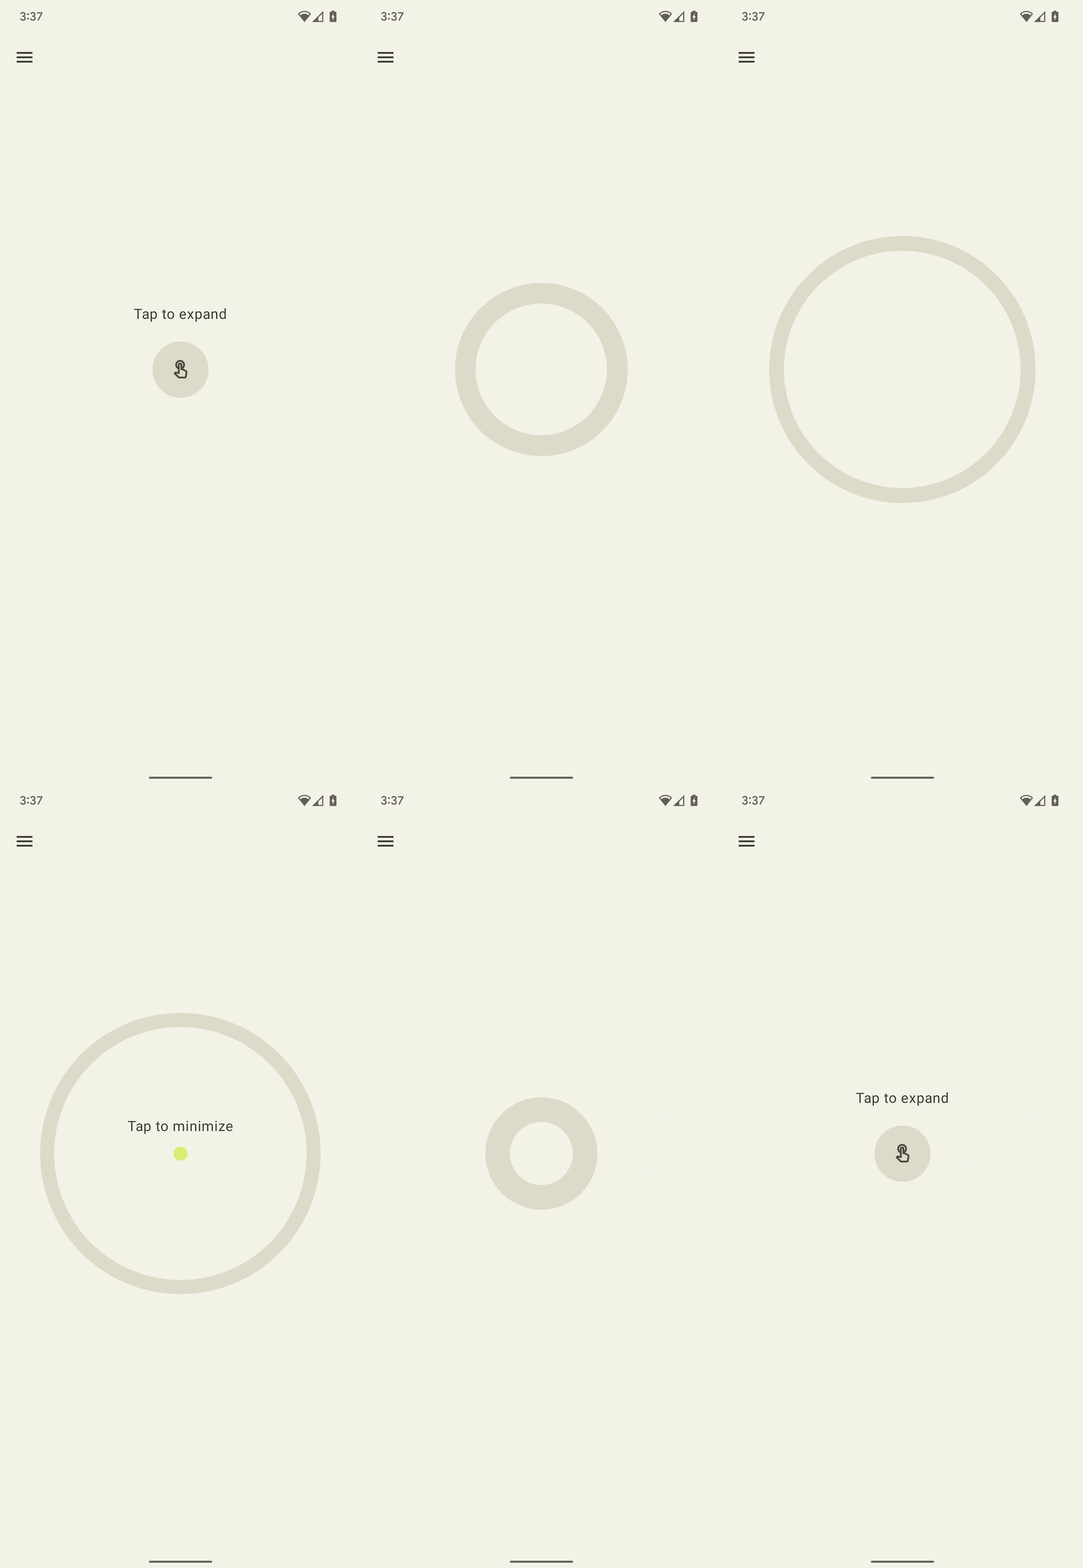
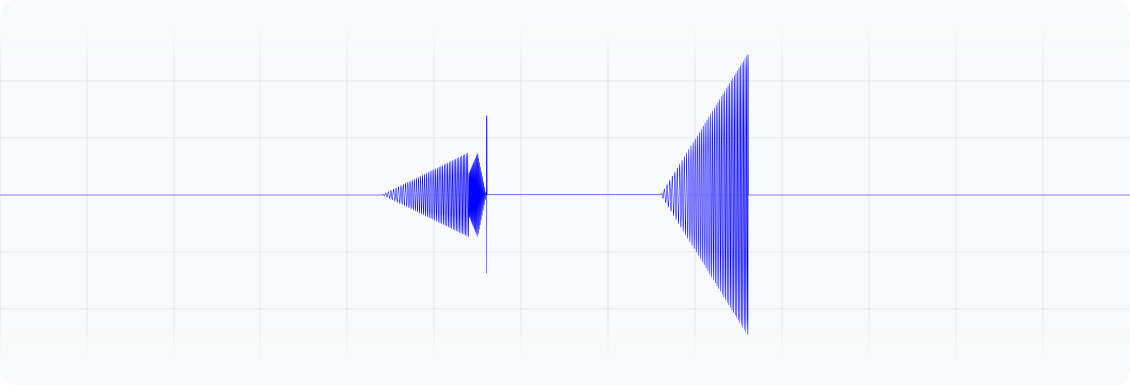
圖 2:這個波形代表裝置震動的輸出加速度。
Kotlin
enum class ExpandShapeState {
    Collapsed,
    Expanded
}

@Composable
fun ExpandScreen() {
    // Control variable for the state of the indicator.
    var currentState by remember { mutableStateOf(ExpandShapeState.Collapsed) }

    // Animation between expanded and collapsed states.
    val transitionData = updateTransitionData(currentState)

    Screen() {
        Column(
        Modifier
            .clickable(
            {
                if (currentState == ExpandShapeState.Collapsed) {
                currentState = ExpandShapeState.Expanded
                vibrator.vibrate(
                    VibrationEffect.startComposition().addPrimitive(
                    VibrationEffect.Composition.PRIMITIVE_SLOW_RISE,
                    0.3f
                    ).addPrimitive(
                    VibrationEffect.Composition.PRIMITIVE_QUICK_FALL,
                    0.3f
                    ).compose()
                )
                } else {
                currentState = ExpandShapeState.Collapsed
                vibrator.vibrate(
                    VibrationEffect.startComposition().addPrimitive(
                    VibrationEffect.Composition.PRIMITIVE_SLOW_RISE
                    ).compose()
                )
            }
            )
        ) {
        // Build the indicator UI based on the current state.
        ExpandIndicator(transitionData)
        }
    }
}
Java
class ClickListener implements View.OnClickListener {
    private final Animation expandAnimation;
    private final Animation collapseAnimation;
    private boolean isExpanded;

    ClickListener(Context context) {
        expandAnimation = AnimationUtils.loadAnimation(context, R.anim.expand);
        expandAnimation.setAnimationListener(new Animation.AnimationListener() {

        @Override
        public void onAnimationStart(Animation animation) {
            vibrator.vibrate(
            VibrationEffect.startComposition()
                .addPrimitive(
                    VibrationEffect.Composition.PRIMITIVE_SLOW_RISE, 0.3f)
                .addPrimitive(
                    VibrationEffect.Composition.PRIMITIVE_QUICK_FALL, 0.3f)
                .compose());
        }
        });

        collapseAnimation = AnimationUtils
                .loadAnimation(context, R.anim.collapse);
        collapseAnimation.setAnimationListener(new Animation.AnimationListener() {

            @Override
            public void onAnimationStart(Animation animation) {
                vibrator.vibrate(
                VibrationEffect.startComposition()
                    .addPrimitive(
                        VibrationEffect.Composition.PRIMITIVE_SLOW_RISE)
                    .compose());
            }
        });
    }

    @Override
    public void onClick(View view) {
        view.startAnimation(isExpanded ? collapseAnimation : expandAnimation);
        isExpanded = !isExpanded;
    }
}
搖晃 (含旋轉)
觸覺回饋原則的重點之一是讓使用者感到愉悅。如要以有趣的方式導入令人愉悅的意外震動效果,可以使用 PRIMITIVE_SPIN。多次呼叫這個基本型別時,效果最佳。將多個旋轉效果串連在一起,即可產生不穩定的晃動效果,如果對每個圖元套用隨機縮放效果,還能進一步強化這種效果。您也可以嘗試調整連續自旋圖元之間的間距。如果連續旋轉兩次,中間沒有任何間隔 (0 毫秒),就會產生緊密的旋轉感。將旋轉間隔從 10 毫秒增加到 50 毫秒,會產生較鬆散的旋轉感,可用於配合影片或動畫的持續時間。
請勿使用超過 100 毫秒的間隙,因為連續旋轉不再能順暢整合,而是會開始感覺像是個別效果。
以下是彈性形狀的範例,在拖曳並放開後會彈回原位。動畫會套用一組旋轉效果,並根據彈跳位移量以不同強度播放,藉此強化動畫。
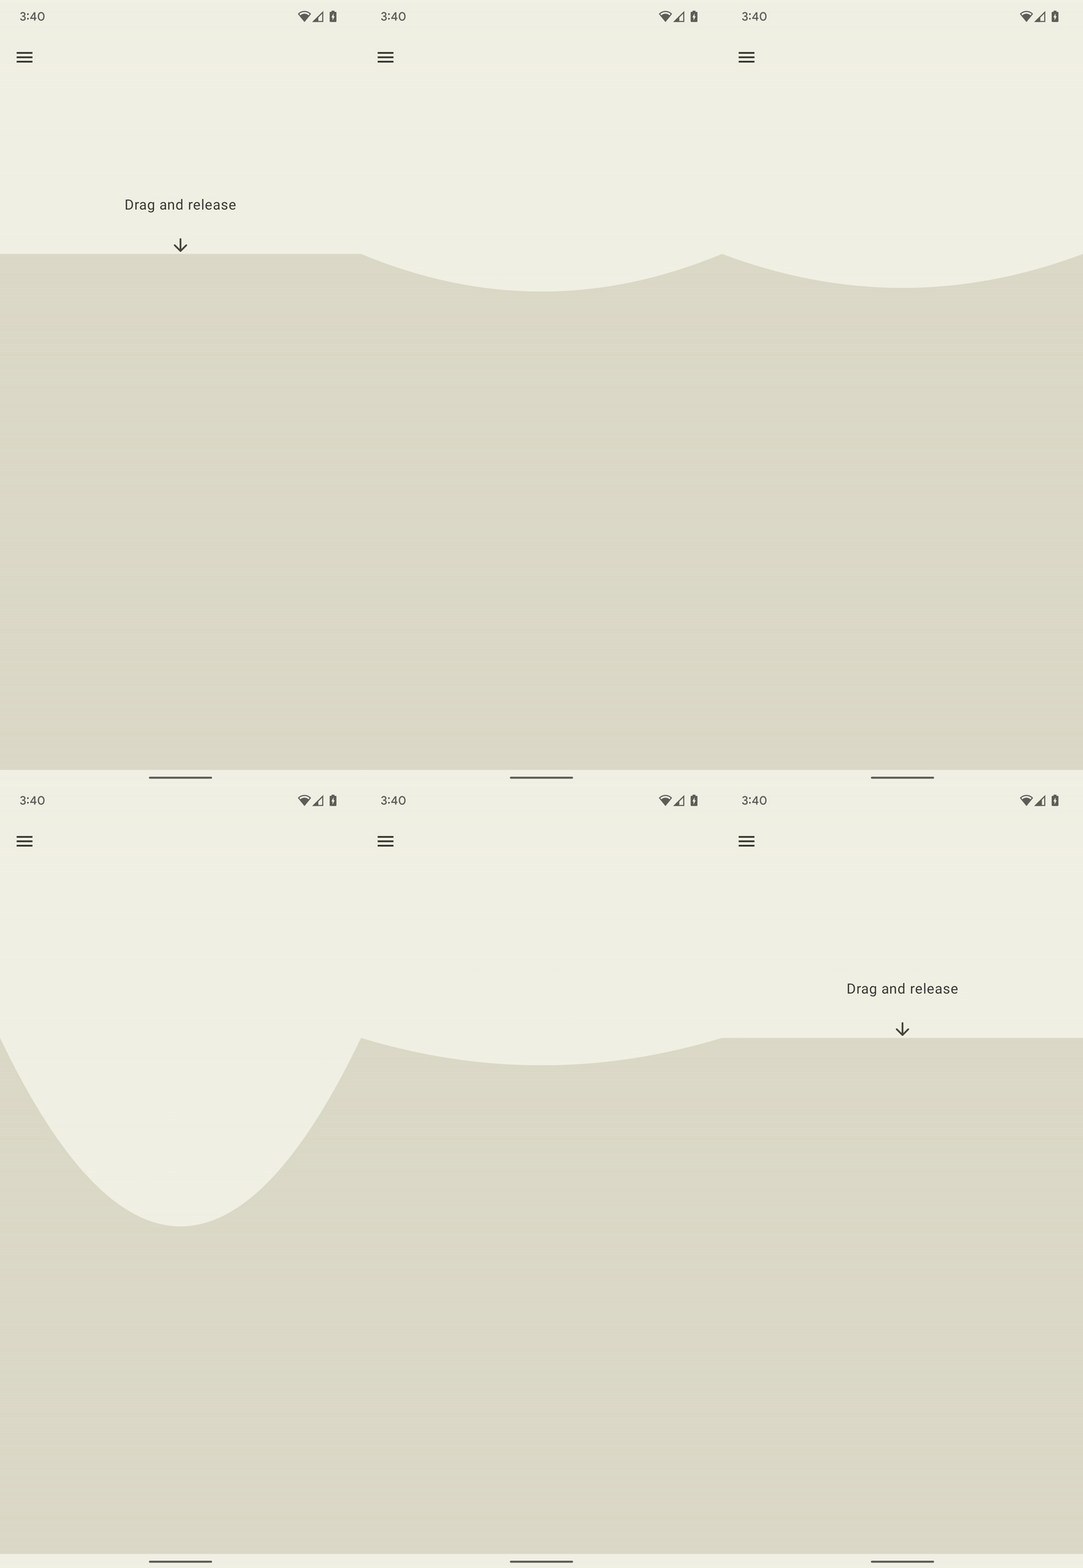
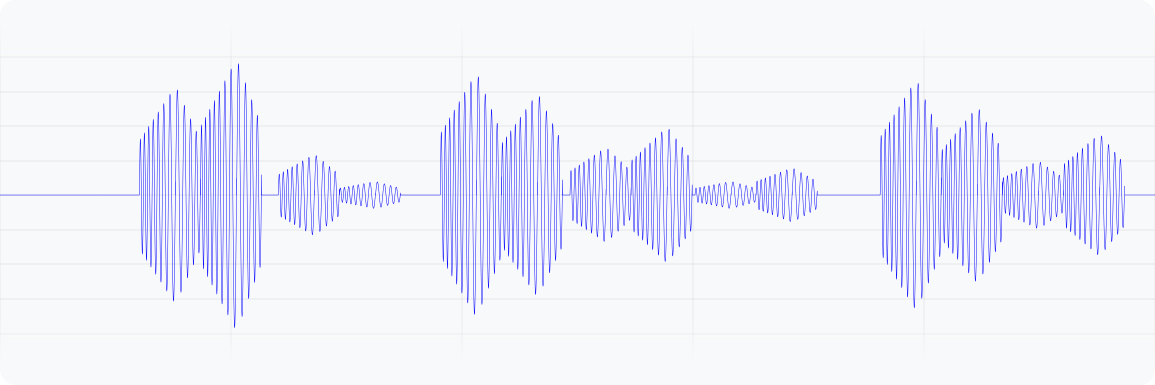
圖 3. 這個波形代表裝置震動的輸出加速度。
Kotlin
@Composable
fun WobbleScreen() {
    // Control variables for the dragging and animating state of the elastic.
    var dragDistance by remember { mutableStateOf(0f) }
    var isWobbling by remember { mutableStateOf(false) }

    // Use drag distance to create an animated float value behaving like a spring.
    val dragDistanceAnimated by animateFloatAsState(
        targetValue = if (dragDistance > 0f) dragDistance else 0f,
        animationSpec = spring(
            dampingRatio = Spring.DampingRatioHighBouncy,
            stiffness = Spring.StiffnessMedium
        ),
    )

    if (isWobbling) {
        LaunchedEffect(Unit) {
            while (true) {
                val displacement = dragDistanceAnimated / MAX_DRAG_DISTANCE
                // Use some sort of minimum displacement so the final few frames
                // of animation don't generate a vibration.
                if (displacement > SPIN_MIN_DISPLACEMENT) {
                    vibrator.vibrate(
                        VibrationEffect.startComposition().addPrimitive(
                            VibrationEffect.Composition.PRIMITIVE_SPIN,
                            nextSpinScale(displacement)
                        ).addPrimitive(
                        VibrationEffect.Composition.PRIMITIVE_SPIN,
                        nextSpinScale(displacement)
                        ).compose()
                    )
                }
                // Delay the next check for a sufficient duration until the
                // current composition finishes. Note that you can use
                // Vibrator.getPrimitiveDurations API to calculcate the delay.
                delay(VIBRATION_DURATION)
            }
        }
    }

    Box(
        Modifier
            .fillMaxSize()
            .draggable(
                onDragStopped = {
                    isWobbling = true
                    dragDistance = 0f
                },
                orientation = Orientation.Vertical,
                state = rememberDraggableState { delta ->
                    isWobbling = false
                    dragDistance += delta
                }
            )
    ) {
        // Draw the wobbling shape using the animated spring-like value.
        WobbleShape(dragDistanceAnimated)
    }
}

// Calculate a random scale for each spin to vary the full effect.
fun nextSpinScale(displacement: Float): Float {
    // Generate a random offset in the range [-0.1, +0.1] to be added to the
    // vibration scale so the spin effects have slightly different values.
    val randomOffset: Float = Random.Default.nextFloat() * 0.2f - 0.1f
    return (displacement + randomOffset).absoluteValue.coerceIn(0f, 1f)
}
Java
class AnimationListener implements DynamicAnimation.OnAnimationUpdateListener {
    private final Random vibrationRandom = new Random(seed);
    private final long lastVibrationUptime;

    @Override
    public void onAnimationUpdate(
        DynamicAnimation animation, float value, float velocity) {
        // Delay the next check for a sufficient duration until the current
        // composition finishes. Note that you can use
        // Vibrator.getPrimitiveDurations API to calculcate the delay.
        if (SystemClock.uptimeMillis() - lastVibrationUptime < VIBRATION_DURATION) {
            return;
        }

        float displacement = calculateRelativeDisplacement(value);

        // Use some sort of minimum displacement so the final few frames
        // of animation don't generate a vibration.
        if (displacement < SPIN_MIN_DISPLACEMENT) {
            return;
        }

        lastVibrationUptime = SystemClock.uptimeMillis();
        vibrator.vibrate(
        VibrationEffect.startComposition()
            .addPrimitive(VibrationEffect.Composition.PRIMITIVE_SPIN,
            nextSpinScale(displacement))
            .addPrimitive(VibrationEffect.Composition.PRIMITIVE_SPIN,
            nextSpinScale(displacement))
            .compose());
    }

    // Calculate a random scale for each spin to vary the full effect.
    float nextSpinScale(float displacement) {
        // Generate a random offset in the range [-0.1,+0.1] to be added to
        // the vibration scale so the spin effects have slightly different
        // values.
        float randomOffset = vibrationRandom.nextFloat() * 0.2f - 0.1f
        return MathUtils.clamp(displacement + randomOffset, 0f, 1f)
    }
}
彈跳 (發出砰砰聲)
震動效果的另一項進階應用是模擬實體互動。PRIMITIVE_THUD 可產生強烈且迴盪的效果,搭配影片或動畫中的衝擊視覺化效果,可提升整體體驗。
以下範例是經過強化的球體掉落動畫,每次球體從畫面底部彈起時,都會播放重擊效果:
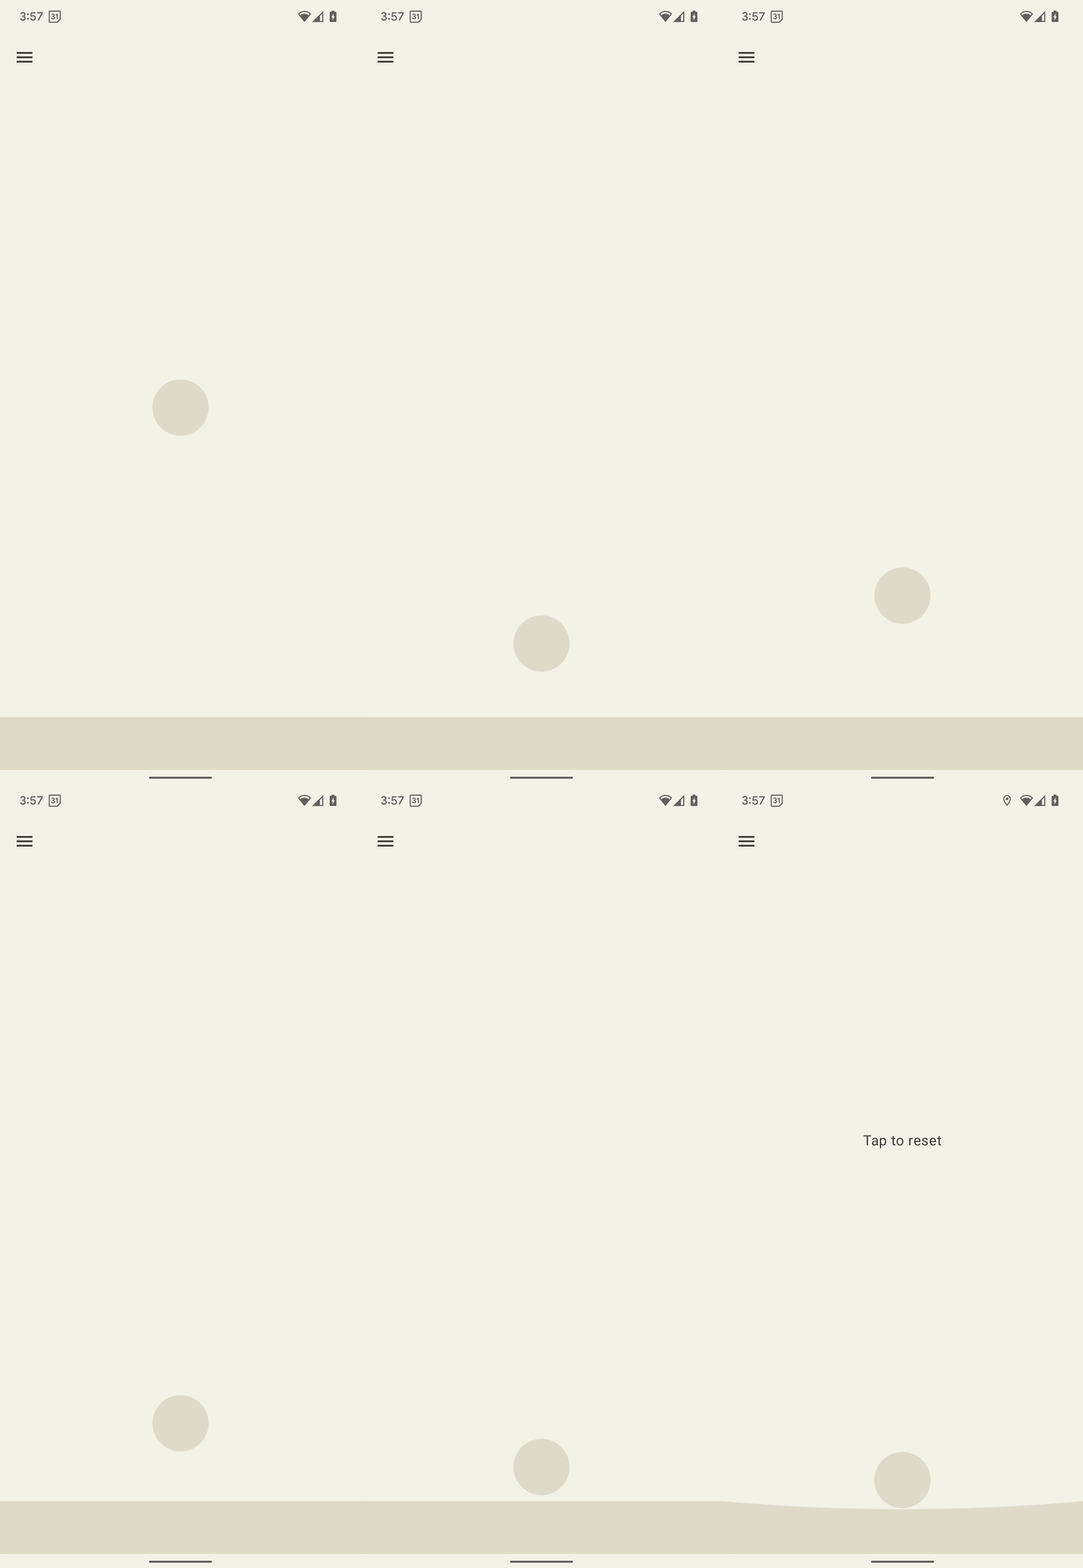
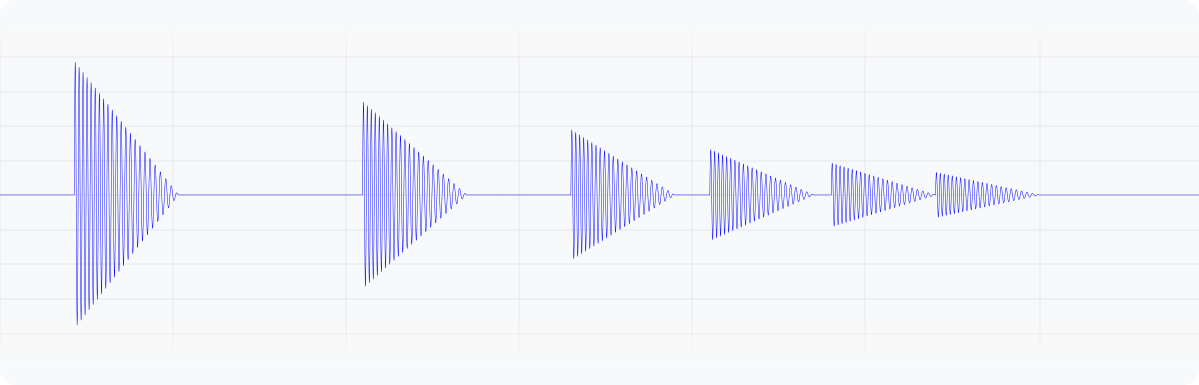
圖 4. 這個波形代表裝置震動的輸出加速度。
Kotlin
enum class BallPosition {
    Start,
    End
}

@Composable
fun BounceScreen() {
    // Control variable for the state of the ball.
    var ballPosition by remember { mutableStateOf(BallPosition.Start) }
    var bounceCount by remember { mutableStateOf(0) }

    // Animation for the bouncing ball.
    var transitionData = updateTransitionData(ballPosition)
    val collisionData = updateCollisionData(transitionData)

    // Ball is about to contact floor, only vibrating once per collision.
    var hasVibratedForBallContact by remember { mutableStateOf(false) }
    if (collisionData.collisionWithFloor) {
        if (!hasVibratedForBallContact) {
        val vibrationScale = 0.7.pow(bounceCount++).toFloat()
        vibrator.vibrate(
            VibrationEffect.startComposition().addPrimitive(
            VibrationEffect.Composition.PRIMITIVE_THUD,
            vibrationScale
            ).compose()
        )
        hasVibratedForBallContact = true
        }
    } else {
        // Reset for next contact with floor.
        hasVibratedForBallContact = false
    }

    Screen() {
        Box(
        Modifier
            .fillMaxSize()
            .clickable {
            if (transitionData.isAtStart) {
                ballPosition = BallPosition.End
            } else {
                ballPosition = BallPosition.Start
                bounceCount = 0
            }
            },
        ) {
        // Build the ball UI based on the current state.
        BouncingBall(transitionData)
        }
    }
}
Java
class ClickListener implements View.OnClickListener {
    @Override
    public void onClick(View view) {
        view.animate()
        .translationY(targetY)
        .setDuration(3000)
        .setInterpolator(new BounceInterpolator())
        .setUpdateListener(new AnimatorUpdateListener() {

            boolean hasVibratedForBallContact = false;
            int bounceCount = 0;

            @Override
            public void onAnimationUpdate(ValueAnimator animator) {
            boolean valueBeyondThreshold = (float) animator.getAnimatedValue() > 0.98;
            if (valueBeyondThreshold) {
                if (!hasVibratedForBallContact) {
                float vibrationScale = (float) Math.pow(0.7, bounceCount++);
                vibrator.vibrate(
                    VibrationEffect.startComposition()
                    .addPrimitive(
                        VibrationEffect.Composition.PRIMITIVE_THUD,
                        vibrationScale)
                    .compose());
                hasVibratedForBallContact = true;
                }
            } else {
                // Reset for next contact with floor.
                hasVibratedForBallContact = false;
            }
            }
        });
    }
}
震動波形和封包
建立自訂震動模式的程序可讓您控制震動幅度,營造平順的震動強度升降效果。本節說明如何使用波形封包建立動態觸覺效果,精確控制一段時間內的震動幅度與頻率。讓您打造更豐富細膩的觸覺體驗。
從 Android 16 (API 級別 36) 開始,系統提供下列 API,可透過定義一系列控制點來建立震動波形波封:
BasicEnvelopeBuilder:可存取的方法,用於建立與硬體無關的觸覺效果。WaveformEnvelopeBuilder:建立觸覺效果的進階方法,需要熟悉觸覺硬體。
Android 不會提供信封效果的回溯功能。如需這項支援服務,請完成下列步驟:
- 使用
Vibrator.areEnvelopeEffectsSupported()檢查特定裝置是否支援波封效果。 - 停用不支援的一致體驗組合,或使用自訂震動模式或組合做為備用替代方案。
如要建立更多基本波封效果,請使用 BasicEnvelopeBuilder 和下列參數:
- intensity 值,範圍為 \( [0, 1] \),代表震動的強度。舉例來說, \( 0.5 \)值會被視為裝置可達到的全域最大強度的一半。
範圍 \( [0, 1] \)中的 sharpness 值,代表震動的清脆程度。值越低,震動越平緩;值越高,震動越強烈。
duration 值,代表從上一個控制點 (即強度和銳利度配對) 轉換至新控制點所用的時間 (以毫秒為單位)。
以下是波形範例,說明如何在 500 毫秒內將震動強度從低音調提升至高音調,並達到最大強度,然後在 100 毫秒內降回\( 0 \) (關閉)。
vibrator.vibrate(VibrationEffect.BasicEnvelopeBuilder()
    .setInitialSharpness(0.0f)
    .addControlPoint(1.0f, 1.0f, 500)
    .addControlPoint(0.0f, 1.0f, 100)
    .build()
)
如果您對觸覺回饋有更深入的瞭解,可以使用 WaveformEnvelopeBuilder 定義包絡效果。使用這個物件時,您可以透過 VibratorFrequencyProfile 存取頻率至輸出加速對應 (FOAM)。
- 範圍內的振幅值 \( [0, 1] \),代表特定頻率下可達成的震動強度,由裝置 FOAM 決定。舉例來說,值為 \( 0.5 \) 會產生最大輸出加速度的一半,而這是在指定頻率下可達成的。
以赫茲為單位指定的頻率值。
duration 值,代表從上一個控制點轉換至新控制點所花的時間 (以毫秒為單位)。
以下程式碼顯示定義 400 毫秒震動效果的波形範例。首先,振幅會以 60 Hz 的固定頻率,在 50 毫秒內從無到有。接著,頻率會在接下來的 100 毫秒內升至 120 Hz,並維持 200 毫秒。最後,振幅會在最後 50 毫秒內降至 \( 0 \),且頻率會回到 60 Hz:
vibrator.vibrate(VibrationEffect.WaveformEnvelopeBuilder()
    .addControlPoint(1.0f, 60f, 50)
    .addControlPoint(1.0f, 120f, 100)
    .addControlPoint(1.0f, 120f, 200)
    .addControlPoint(0.0f, 60f, 50)
    .build()
)
下列各節提供幾個包含包絡線的震動波形範例。
彈跳彈簧
先前的範例使用 PRIMITIVE_THUD 模擬實體彈跳互動。基本封包 API 可提供更精細的控制項,讓您精確調整震動強度和銳利度。因此觸覺回饋能更準確地跟隨動畫事件。
以下範例是自由落體的彈簧,動畫經過強化,每次彈簧從螢幕底部彈起時,都會播放基本包絡效果:
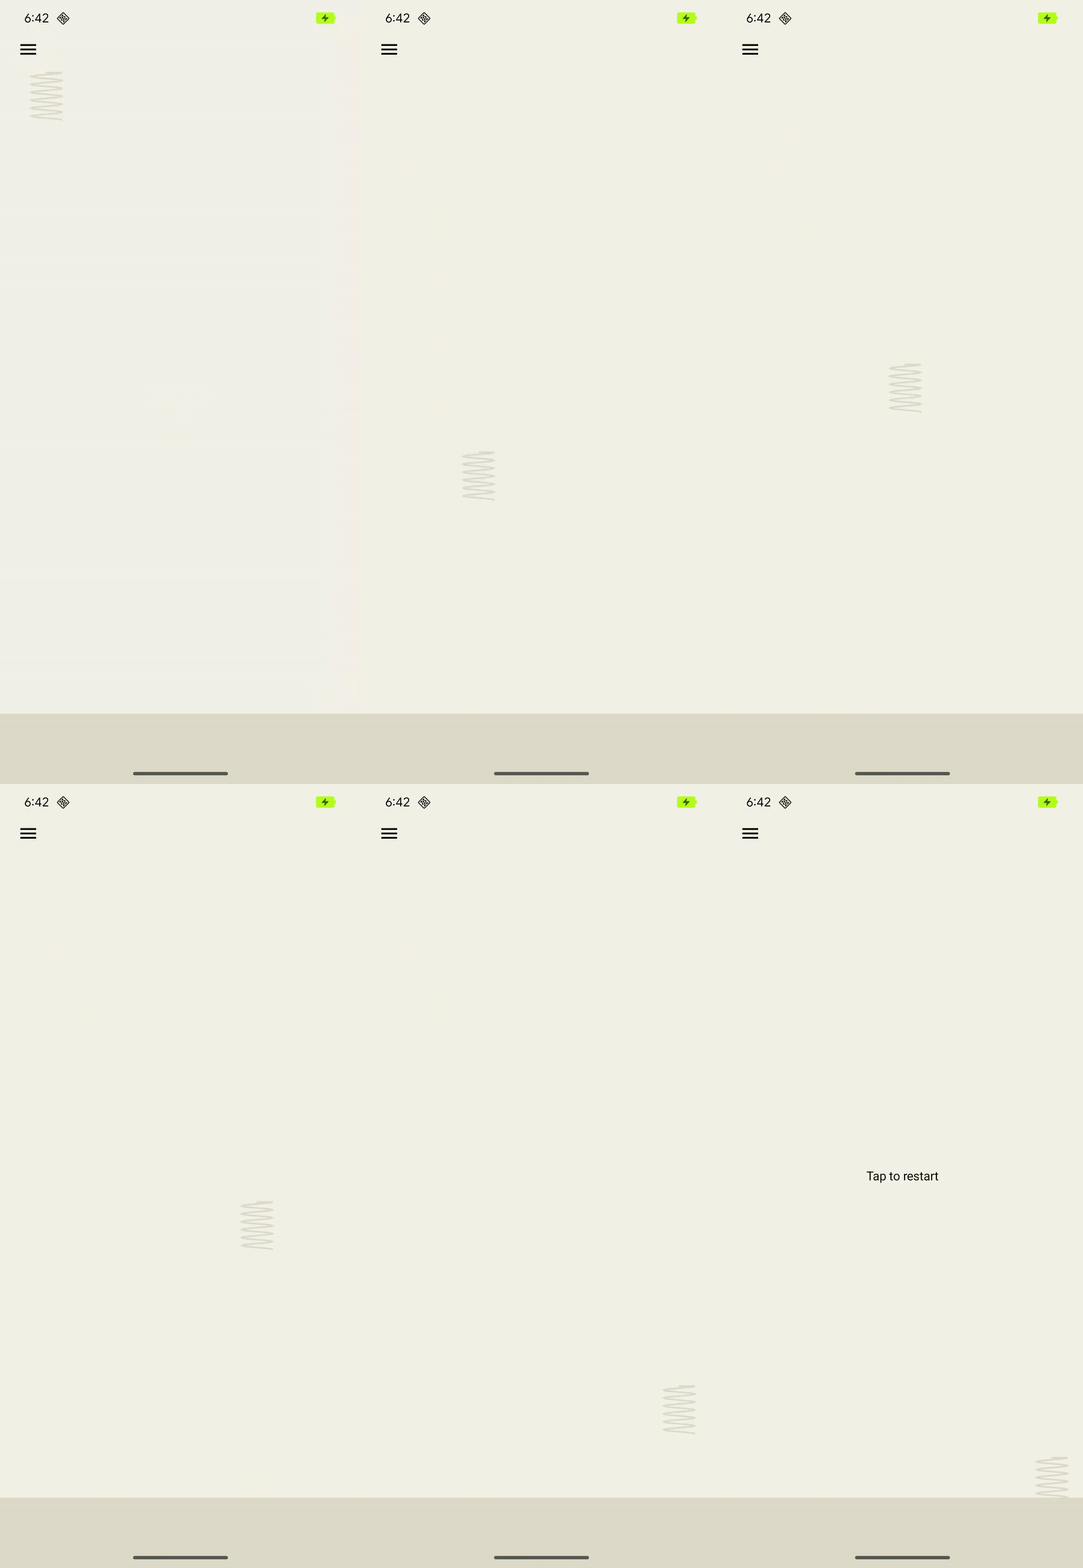
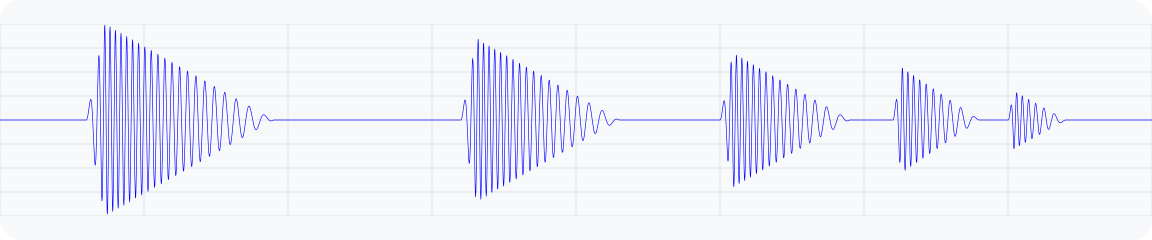
圖 5. 輸出加速波形圖,模擬彈簧彈跳的震動。
@Composable
fun BouncingSpringAnimation() {
  var springX by remember { mutableStateOf(SPRING_WIDTH) }
  var springY by remember { mutableStateOf(SPRING_HEIGHT) }
  var velocityX by remember { mutableFloatStateOf(INITIAL_VELOCITY) }
  var velocityY by remember { mutableFloatStateOf(INITIAL_VELOCITY) }
  var sharpness by remember { mutableFloatStateOf(INITIAL_SHARPNESS) }
  var intensity by remember { mutableFloatStateOf(INITIAL_INTENSITY) }
  var multiplier by remember { mutableFloatStateOf(INITIAL_MULTIPLIER) }
  var bottomBounceCount by remember { mutableIntStateOf(0) }
  var animationStartTime by remember { mutableLongStateOf(0L) }
  var isAnimating by remember { mutableStateOf(false) }

  val (screenHeight, screenWidth) = getScreenDimensions(context)

  LaunchedEffect(isAnimating) {
    animationStartTime = System.currentTimeMillis()
    isAnimating = true

    while (isAnimating) {
      velocityY += GRAVITY
      springX += velocityX.dp
      springY += velocityY.dp

      // Handle bottom collision
      if (springY > screenHeight - FLOOR_HEIGHT - SPRING_HEIGHT / 2) {
        // Set the spring's y-position to the bottom bounce point, to keep it
        // above the floor.
        springY = screenHeight - FLOOR_HEIGHT - SPRING_HEIGHT / 2

        // Reverse the vertical velocity and apply damping to simulate a bounce.
        velocityY *= -BOUNCE_DAMPING
        bottomBounceCount++

        // Calculate the fade-out duration of the vibration based on the
        // vertical velocity.
        val fadeOutDuration =
            ((abs(velocityY) / GRAVITY) * FRAME_DELAY_MS).toLong()

        // Create a "boing" envelope vibration effect that fades out.
        vibrator.vibrate(
            VibrationEffect.BasicEnvelopeBuilder()
                // Starting from zero sharpness here, will simulate a smoother
                // "boing" effect.
                .setInitialSharpness(0f)

                // Add a control point to reach the target intensity and
                // sharpness very quickly.
                .addControlPoint(intensity, sharpness, 20L)

                // Add a control point to fade out the vibration intensity while
                // maintaining sharpness.
                .addControlPoint(0f, sharpness, fadeOutDuration)
                .build()
        )

        // Decrease the intensity and sharpness of the vibration for subsequent
        // bounces, and reduce the multiplier to create a fading effect.
        intensity *= multiplier
        sharpness *= multiplier
        multiplier -= 0.1f
      }

      if (springX > screenWidth - SPRING_WIDTH / 2) {
        // Prevent the spring from moving beyond the right edge of the screen.
        springX = screenWidth - SPRING_WIDTH / 2
      }

      // Check for 3 bottom bounces and then slow down.
      if (bottomBounceCount >= MAX_BOTTOM_BOUNCE &&
            System.currentTimeMillis() - animationStartTime > 1000) {
        velocityX *= 0.9f
        velocityY *= 0.9f
      }

      delay(FRAME_DELAY_MS) // Control animation speed.

      // Determine if the animation should continue based on the spring's
      // position and velocity.
      isAnimating = (springY < screenHeight + SPRING_HEIGHT ||
            springX < screenWidth + SPRING_WIDTH)
        && (velocityX >= 0.1f || velocityY >= 0.1f)
    }
  }

  Box(
    modifier = Modifier
      .fillMaxSize()
      .noRippleClickable {
        if (!isAnimating) {
          resetAnimation()
        }
      }
      .width(screenWidth)
      .height(screenHeight)
  ) {
    DrawSpring(mutableStateOf(springX), mutableStateOf(springY))
    DrawFloor()
    if (!isAnimating) {
      DrawText("Tap to restart")
    }
  }
}
火箭發射
先前的範例說明如何使用基本封包 API 模擬彈簧的彈跳反應。WaveformEnvelopeBuilder 可精確控制裝置的完整頻率範圍,實現高度自訂的觸覺效果。結合這項資料與 FOAM 資料,即可根據特定頻率功能調整震動。
以下範例說明如何使用動態震動模式模擬火箭發射。效果會從最低支援的頻率加速度輸出 (0.1 G) 變化到共振頻率,並一律維持 10% 的振幅輸入。這樣一來,即使驅動振幅相同,效果也能以相當強大的輸出開始,並提高感知強度和銳利度。達到共振後,效果頻率會降回最低值,這時會感覺強度和銳利度下降。這會產生初始阻力,然後釋放,模擬發射到太空的感覺。
基本信封 API 無法達到這種效果,因為它會抽象化裝置的共振頻率和輸出加速度曲線等特定資訊。提高銳利度可能會使等效頻率超出共振頻率,進而導致意外的加速下降。
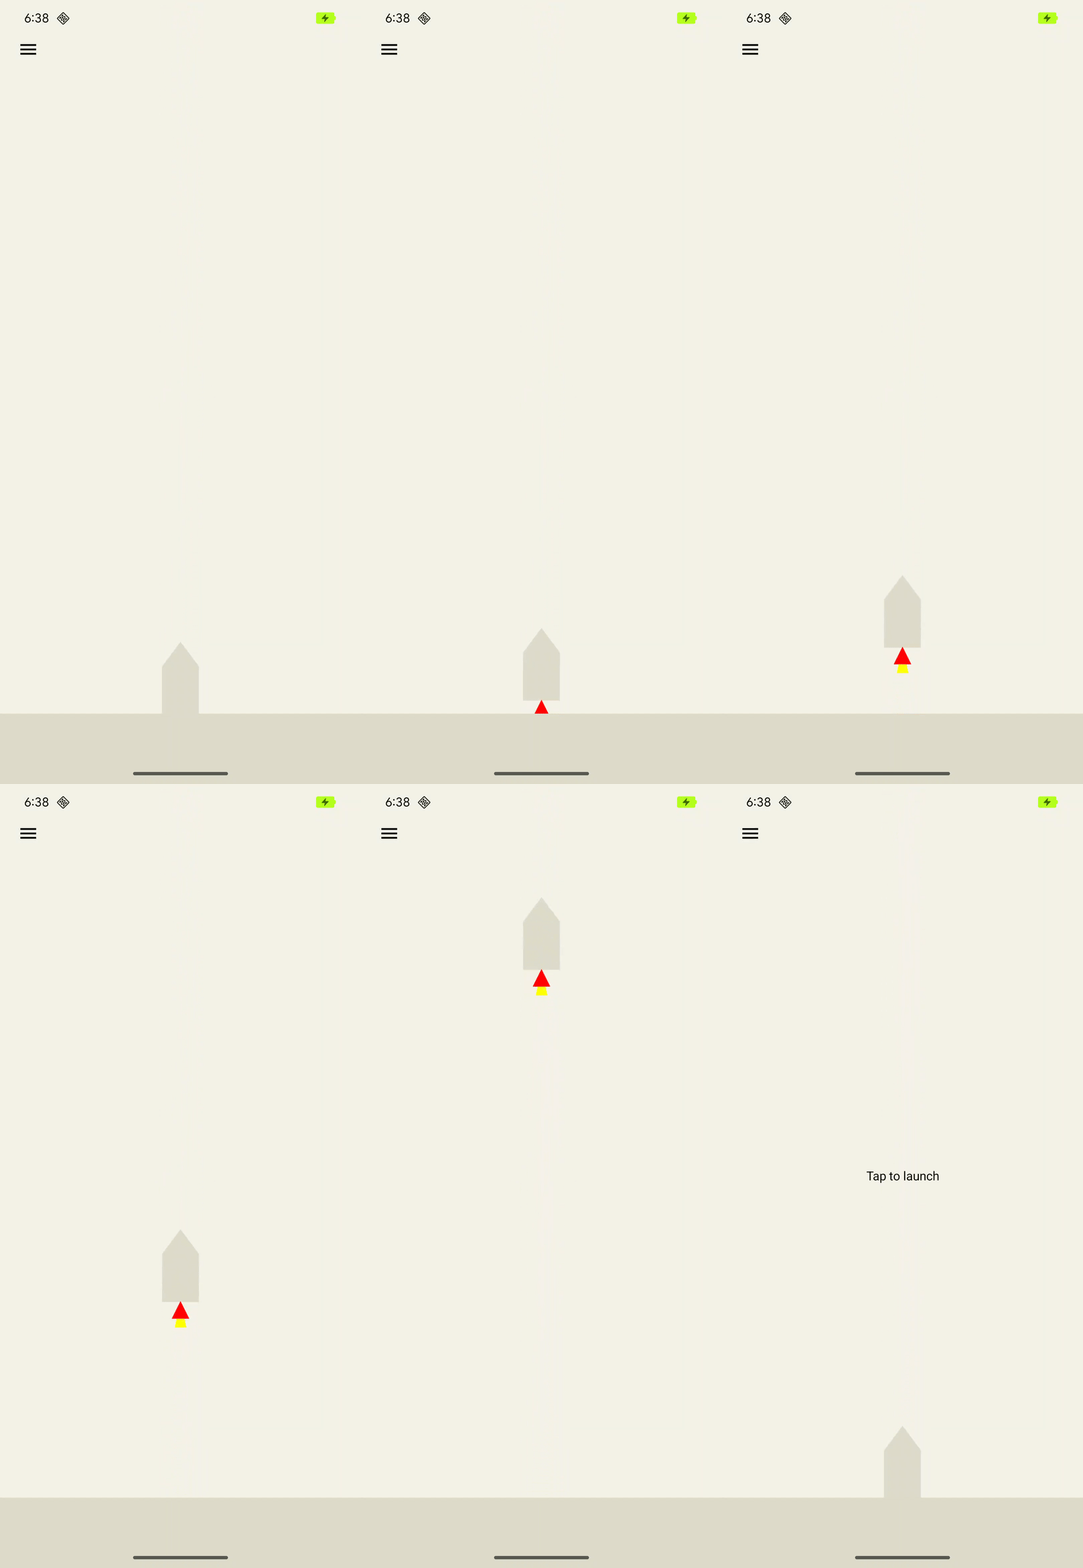
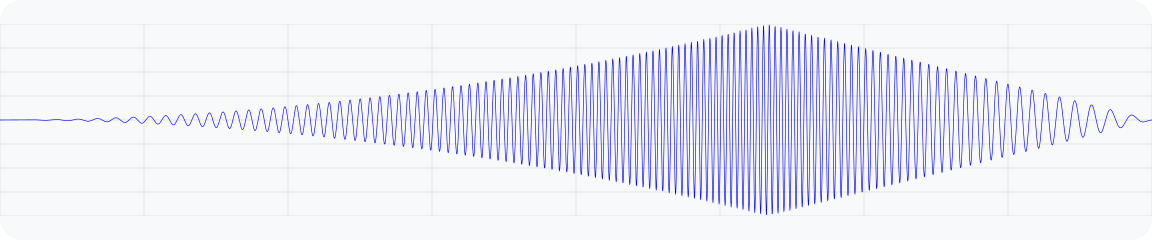
圖 6. 模擬火箭發射的震動輸出加速波形圖。
@Composable
fun RocketLaunchAnimation() {
  val context = LocalContext.current
  val screenHeight = remember { mutableFloatStateOf(0f) }
  var rocketPositionY by remember { mutableFloatStateOf(0f) }
  var isLaunched by remember { mutableStateOf(false) }
  val animation = remember { Animatable(0f) }

  val animationDuration = 3000
  LaunchedEffect(isLaunched) {
    if (isLaunched) {
      animation.animateTo(
        1.2f, // Overshoot so that the rocket goes off the screen.
        animationSpec = tween(
          durationMillis = animationDuration,
          // Applies an easing curve with a slow start and rapid acceleration
          // towards the end.
          easing = CubicBezierEasing(1f, 0f, 0.75f, 1f)
        )
      ) {
        rocketPositionY = screenHeight.floatValue * value
      }
      animation.snapTo(0f)
      rocketPositionY = 0f;
      isLaunched = false;
    }
  }

  Box(
    modifier = Modifier
      .fillMaxSize()
      .noRippleClickable {
        if (!isLaunched) {
          // Play vibration with same duration as the animation, using 70% of
          // the time for the rise of the vibration, to match the easing curve
          // defined previously.
          playVibration(vibrator, animationDuration, 0.7f)
          isLaunched = true
        }
      }
      .background(Color(context.getColor(R.color.background)))
      .onSizeChanged { screenHeight.floatValue = it.height.toFloat() }
  ) {
    drawRocket(rocketPositionY)
  }
}

private fun playVibration(
  vibrator: Vibrator,
  totalDurationMs: Long,
  riseBias: Float,
  minOutputAccelerationGs: Float = 0.1f,
) {
  require(riseBias in 0f..1f) { "Rise bias must be between 0 and 1." }

  if (!vibrator.areEnvelopeEffectsSupported()) {
    return
  }

  val resonantFrequency = vibrator.resonantFrequency
  if (resonantFrequency.isNaN()) {
    // Device doesn't have or expose a resonant frequency.
    return
  }

  val startFrequency = vibrator.frequencyProfile?.getFrequencyRange(minOutputAccelerationGs)?.lower ?: return

  if (startFrequency >= resonantFrequency) {
    // Vibrator can't generate the minimum required output at lower frequencies.
    return
  }

  val minDurationMs = vibrator.envelopeEffectInfo.minControlPointDurationMillis
  val rampUpDurationMs = (riseBias * totalDurationMs).toLong() - minDurationMs
  val rampDownDurationMs = totalDurationMs - rampUpDuration - minDurationMs

  vibrator.vibrate(
    VibrationEffect.WaveformEnvelopeBuilder()
      // Quickly reach the target output at the start frequency
      .addControlPoint(0.1f, startFrequency, minDurationMs)
      .addControlPoint(0.1f, resonantFrequency, rampUpDurationMs)
      .addControlPoint(0.1f, startFrequency, rampDownDurationMs)

      // Controlled ramp down to zero to avoid ringing after the vibration.
      .addControlPoint(0.0f, startFrequency, minDurationMs)
      .build()
  )
}
LavaBeats
如「火箭發射」範例所示,WaveformEnvelopeBuilder API 可控制震動的振幅和頻率區段,因此能設計出許多複雜的觸覺效果。另一種設計是模擬更抽象的身體感覺,例如「活潑」。
具體做法是使用特定振幅和頻率的震動片段,代表典型心電圖 (ECG) 信號的生物標記。LavaBeats 是一個例子,其中 ECG 記錄的兩個特徵區段會以兩個脈衝表示,兩者之間有時間延遲。第一個特徵脈衝是 QRS 波群,會顯示為高振幅和短時間的尖峰。第二個脈衝是 T 波,振幅較小、持續時間較長,形狀也較平滑 (請參閱圖 7)。
使用 WaveformEnvelopeBuilder 建構這兩個脈衝的各種重複模式,並以固定的第一到第二個脈衝延遲時間分隔。第一個脈衝可以是啁啾訊號,在短時間內從低頻率開始,以較高頻率結束。第二個脈衝可以表示為低頻正弦波的單一週期。我們可以將這兩個脈衝組成節拍,並按照每分鐘節拍數 (bpm) 的典型速率,重複組成節拍數次,每次間隔一段時間。產生類似心跳的觸覺效果。
您可以在 GitHub 上的觸覺回饋範例應用程式中試用 LavaBeats,感受觸覺效果,並查看與觸覺效果節奏一致的熔岩燈視覺化效果。你也可以變更效果設定,修改兩個脈衝的振幅、頻率、持續時間和延遲,創造不同的震動感覺。
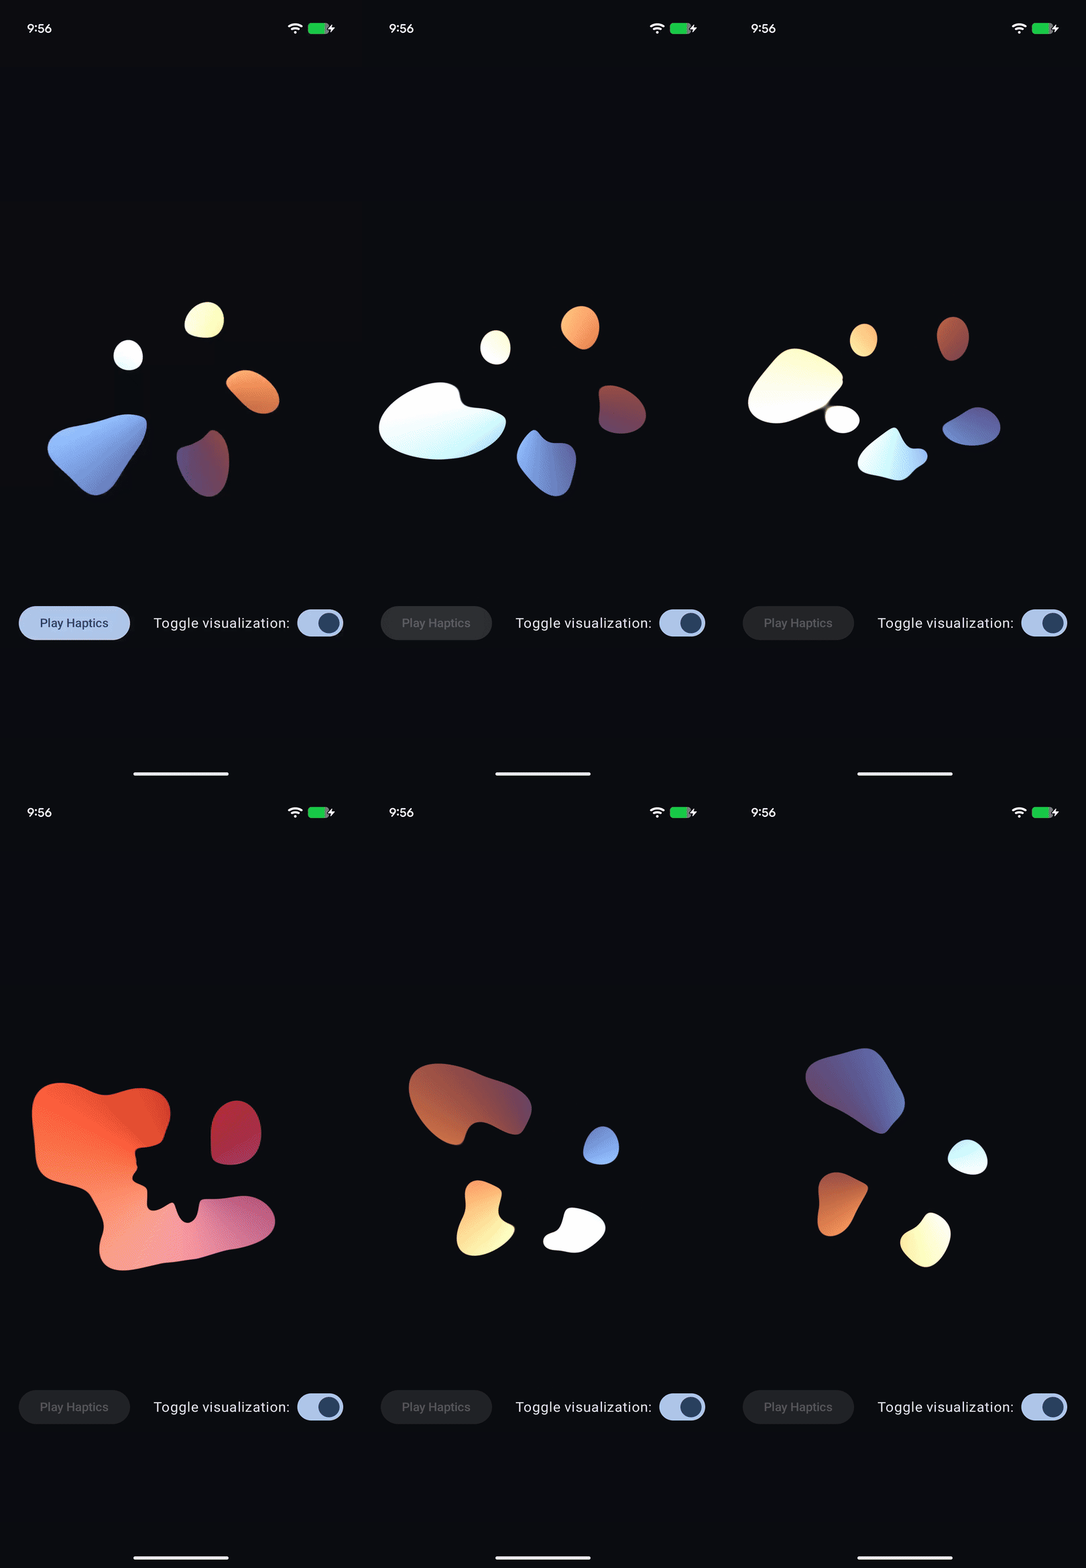
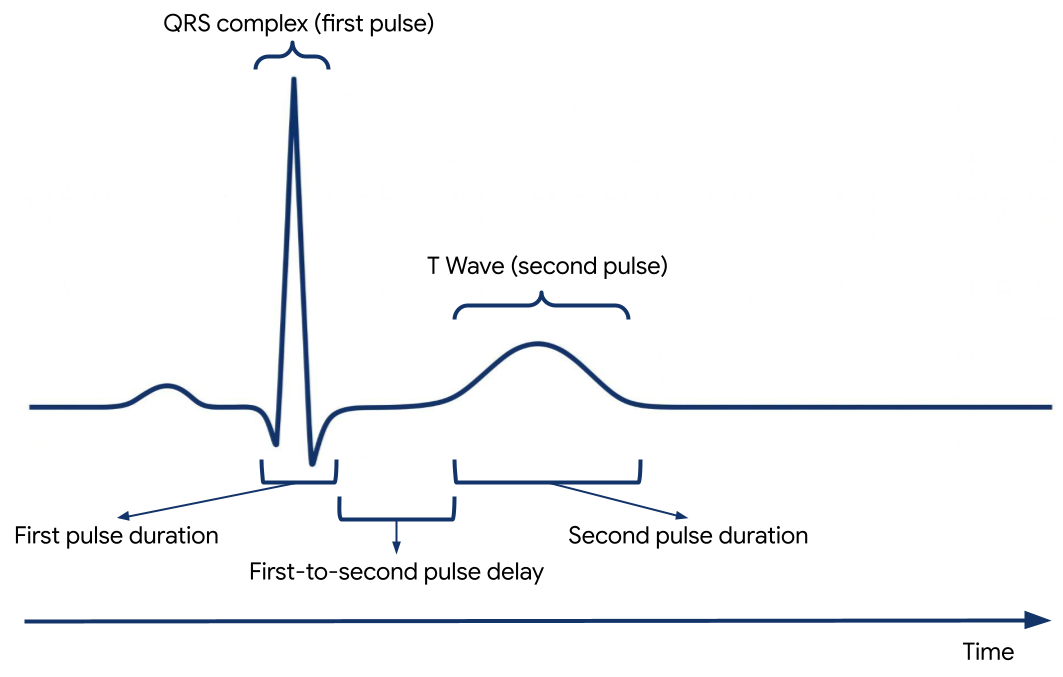
圖 7. 心電圖記錄片段,顯示 QRS 波群和 T 波
@RequiresApi(Build.VERSION_CODES.BAKLAVA)
private fun createEnvelopeEffect(
beatParameters: List<BeatParameter>
):VibrationEffect =
    VibrationEffect.WaveformEnvelopeBuilder()
        .apply {
            repeat(beatParameters.getNumBeats()) {
                // First pulse chirp
                addControlPoint(
                    beatParameters.getFirstPulseAmplitude(),
                    beatParameters.getFirstPulseStartFreq(),
                    ENVELOPE_RAMP_DURATION_MILLIS,
                )
                addControlPoint(
                    beatParameters.getFirstPulseAmplitude(),
                    beatParameters.getFirstPulseEndFreq(),
                    beatParameters.getFirstPulseDurationMillis().toLong(),
                )
                addControlPoint(
                    0f,
                    beatParameters.getFirstPulseEndFreq(),
                    ENVELOPE_RAMP_DURATION_MILLIS,
                )

                // Delay between first and second pulse
                addControlPoint(
                    0f,
                    beatParameters.getFirstPulseEndFreq(),
                    beatParameters.getFirstToSecondPulseDelayMillis().toLong(),
                )

                // Second pulse
                addControlPoint(
                    beatParameters.getSecondPulseAmplitude(),
                    beatParameters.getSecondPulseFreq(),
                    ENVELOPE_RAMP_DURATION_MILLIS,
                )
                addControlPoint(
                    beatParameters.getSecondPulseAmplitude(),
                    beatParameters.getSecondPulseFreq(),
                    (1_000 / (2f * beatParameters.getSecondPulseFreq())).toLong(),
                )
                addControlPoint(
                    0f,
                    beatParameters.getSecondPulseFreq(),
                    ENVELOPE_RAMP_DURATION_MILLIS,
                )
                addControlPoint(
                    0f,
                    beatParameters.getSecondPulseFreq(),
                    beatParameters.getBeatDelayMillis().toLong(),
                )
            }
        }
        .build()

/** A parameter of a haptic beat effect that represents an ECG signal parameter */
@Stable
data class BeatParameter(
    val description: String = "",
    val value: Float = 0f,
    val range: ClosedFloatingPointRange<Float> = 0f..1f,
    val steps: Int = 0,
    val isFrequencyType: Boolean = false,
)