
Spans are powerful markup objects that you can use to style text at the
character or paragraph level. By attaching spans to text objects, you can change
text in a variety of ways, including adding color, making the text clickable,
scaling the text size, and drawing text in a customized way. Spans can also
change TextPaint properties, draw on a
Canvas, and change text layout.
Android provides several types of spans that cover a variety of common text styling patterns. You can also create your own spans to apply custom styling.
Create and apply a span
To create a span, you can use one of the classes listed in the following table. The classes differ based on whether the text itself is mutable, whether the text markup is mutable, and what underlying data structure contains the span data.
| Class | Mutable text | Mutable markup | Data structure |
|---|---|---|---|
SpannedString |
No | No | Linear array |
SpannableString |
No | Yes | Linear array |
SpannableStringBuilder |
Yes | Yes | Interval tree |
All three classes extend the Spanned
interface. SpannableString and SpannableStringBuilder also extend the
Spannable interface.
Here's how to decide which one to use:
- If you aren't modifying the text or markup after creation, use
SpannedString. - If you need to attach a small number of spans to a single text object and
the text itself is read-only, use
SpannableString. - If you need to modify text after creation and you need to attach spans to
the text, use
SpannableStringBuilder. - If you need to attach a large number of spans to a text object, regardless
of whether the text itself is read-only, use
SpannableStringBuilder.
To apply a span, call setSpan(Object _what_, int _start_, int _end_, int
_flags_)
on a Spannable object. The what parameter refers to the span you are
applying to the text, and the start and end parameters indicate the portion
of the text you are applying the span to.
If you insert text inside a span's boundaries, the span automatically expands to
include the inserted text. When inserting text at the span
boundaries—that is, at the start or end indices—the flags
parameter determines whether the span expands to include the inserted text. Use
the
Spannable.SPAN_EXCLUSIVE_INCLUSIVE
flag to include inserted text, and use
Spannable.SPAN_EXCLUSIVE_EXCLUSIVE
to exclude the inserted text.
The following example shows how to attach a
ForegroundColorSpan to a
string:
Kotlin
val spannable = SpannableStringBuilder("Text is spantastic!")
spannable.setSpan(
    ForegroundColorSpan(Color.RED),
    8, // start
    12, // end
    Spannable.SPAN_EXCLUSIVE_INCLUSIVE
)
Java
SpannableStringBuilder spannable = new SpannableStringBuilder("Text is spantastic!");
spannable.setSpan(
    new ForegroundColorSpan(Color.RED),
    8, // start
    12, // end
    Spannable.SPAN_EXCLUSIVE_INCLUSIVE
);
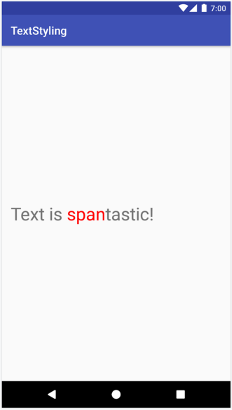
ForegroundColorSpan.
Because the span is set using Spannable.SPAN_EXCLUSIVE_INCLUSIVE, the span
expands to include inserted text at the span boundaries, as shown in the
following example:
Kotlin
val spannable = SpannableStringBuilder("Text is spantastic!")
spannable.setSpan(
    ForegroundColorSpan(Color.RED),
    8, // start
    12, // end
    Spannable.SPAN_EXCLUSIVE_INCLUSIVE
)
spannable.insert(12, "(& fon)")
Java
SpannableStringBuilder spannable = new SpannableStringBuilder("Text is spantastic!");
spannable.setSpan(
    new ForegroundColorSpan(Color.RED),
    8, // start
    12, // end
    Spannable.SPAN_EXCLUSIVE_INCLUSIVE
);
spannable.insert(12, "(& fon)");
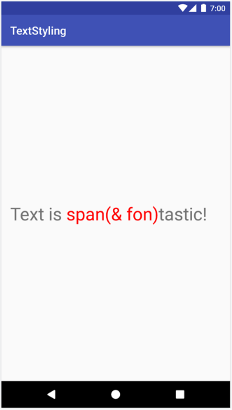
Spannable.SPAN_EXCLUSIVE_INCLUSIVE.
You can attach multiple spans to the same text. The following example shows how to create text that is bold and red:
Kotlin
val spannable = SpannableString("Text is spantastic!")
spannable.setSpan(ForegroundColorSpan(Color.RED), 8, 12, Spannable.SPAN_EXCLUSIVE_EXCLUSIVE)
spannable.setSpan(
    StyleSpan(Typeface.BOLD),
    8,
    spannable.length,
    Spannable.SPAN_EXCLUSIVE_EXCLUSIVE
)
Java
SpannableString spannable = new SpannableString("Text is spantastic!");
spannable.setSpan(
    new ForegroundColorSpan(Color.RED),
    8, 12,
    Spannable.SPAN_EXCLUSIVE_EXCLUSIVE
);
spannable.setSpan(
    new StyleSpan(Typeface.BOLD),
    8, spannable.length(),
    Spannable.SPAN_EXCLUSIVE_EXCLUSIVE
);

ForegroundColorSpan(Color.RED) and
StyleSpan(BOLD).
Android span types
Android provides over 20 span types in the android.text.style package. Android categorizes spans in two primary ways:
- How the span affects text: a span can affect text appearance or text metrics.
- Span scope: some spans can be applied to individual characters, while others must be applied to an entire paragraph.
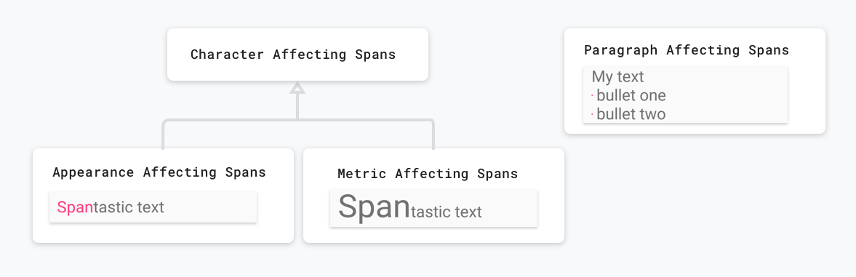
The following sections describe these categories in more detail.
Spans that affect text appearance
Some spans that apply at the character level affect text appearance, such as
changing text or background color and adding underlines or strikethroughs. These
spans extend the
CharacterStyle class.
The following code example shows how to apply an UnderlineSpan to underline
the text:
Kotlin
val string = SpannableString("Text with underline span")
string.setSpan(UnderlineSpan(), 10, 19, Spanned.SPAN_EXCLUSIVE_EXCLUSIVE)
Java
SpannableString string = new SpannableString("Text with underline span");
string.setSpan(new UnderlineSpan(), 10, 19, Spanned.SPAN_EXCLUSIVE_EXCLUSIVE);

UnderlineSpan.
Spans that affect only text appearance trigger a redraw of the text without
triggering a recalculation of the layout. These spans implement
UpdateAppearance and extend
CharacterStyle.
CharacterStyle subclasses define how to draw text by providing access to
update the TextPaint.
Spans that affect text metrics
Other spans that apply at the character level affect text metrics, such as line
height and text size. These spans extend the
MetricAffectingSpan
class.
The following code example creates a
RelativeSizeSpan that
increases text size by 50%:
Kotlin
val string = SpannableString("Text with relative size span")
string.setSpan(RelativeSizeSpan(1.5f), 10, 24, Spanned.SPAN_EXCLUSIVE_EXCLUSIVE)
Java
SpannableString string = new SpannableString("Text with relative size span");
string.setSpan(new RelativeSizeSpan(1.5f), 10, 24, Spanned.SPAN_EXCLUSIVE_EXCLUSIVE);

RelativeSizeSpan.
Applying a span that affects text metrics causes an observing object to re-measure the text for correct layout and rendering—for example, changing text size might cause words to appear on different lines. Applying the preceding span triggers a remeasure, recalculation of the text layout, and redrawing of the text.
Spans that affect text metrics extend the MetricAffectingSpan class, an
abstract class that lets subclasses define how the span affects text measurement
by providing access to the TextPaint. Since MetricAffectingSpan extends
CharacterStyle, subclasses affect the appearance of the text at the character
level.
Spans that affect paragraphs
A span can also affect text at the paragraph level, such as changing the
alignment or the margin of a block of text. Spans that affect entire paragraphs
implement ParagraphStyle. To
use these spans, you attach them to the entire paragraph, excluding the ending
new line character. If you try to apply a paragraph span to something other than
a whole paragraph, Android doesn't apply the span at all.
Figure 8 shows how Android separates paragraphs in text.
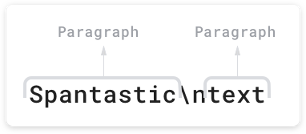
\n) character.
The following code example applies a
QuoteSpan to a paragraph. Note that
if you attach the span to any position other than the beginning or end of a
paragraph, Android doesn't apply the style at all.
Kotlin
spannable.setSpan(QuoteSpan(color), 8, text.length, Spannable.SPAN_EXCLUSIVE_EXCLUSIVE)
Java
spannable.setSpan(new QuoteSpan(color), 8, text.length, Spannable.SPAN_EXCLUSIVE_EXCLUSIVE);
QuoteSpan
applied to a paragraph.
Create custom spans
If you need more functionality than what is provided in the existing Android spans, you can implement a custom span. When implementing your own span, decide whether your span affects text at the character level or the paragraph level and also whether it affects the layout or appearance of the text. This helps you determine which base classes you can extend and which interfaces you might need to implement. Use the following table for reference:
| Scenario | Class or interface |
|---|---|
| Your span affects text at the character level. | CharacterStyle |
| Your span affects text appearance. | UpdateAppearance |
| Your span affects text metrics. | UpdateLayout |
| Your span affects text at the paragraph level. | ParagraphStyle |
For example, if you need to implement a custom span that modifies text size and
color, extend RelativeSizeSpan. Through inheritance, RelativeSizeSpan
extends CharacterStyle and implements the two Update interfaces. Since this
class already provides callbacks for updateDrawState and updateMeasureState,
you can override these callbacks to implement your custom behavior. The
following code creates a custom span that extends RelativeSizeSpan and
overrides the updateDrawState callback to set the color of the TextPaint:
Kotlin
class RelativeSizeColorSpan(
    size: Float,
    @ColorInt private val color: Int
) : RelativeSizeSpan(size) {
    override fun updateDrawState(textPaint: TextPaint) {
        super.updateDrawState(textPaint)
        textPaint.color = color
    }
}
Java
public class RelativeSizeColorSpan extends RelativeSizeSpan {
    private int color;
    public RelativeSizeColorSpan(float spanSize, int spanColor) {
        super(spanSize);
        color = spanColor;
    }
    @Override
    public void updateDrawState(TextPaint textPaint) {
        super.updateDrawState(textPaint);
        textPaint.setColor(color);
    }
}
This example illustrates how to create a custom span. You can achieve the same
effect by applying a RelativeSizeSpan and ForegroundColorSpan to the text.
Test span usage
The Spanned interface lets you both set spans and also retrieve spans from
text. When testing, implement an Android JUnit
test to verify that the correct spans are added
at the correct locations. The Text Styling sample app
contains a span that applies markup to bullet points by attaching
BulletPointSpan to the text. The following code example shows how to test
whether the bullet points appear as expected:
Kotlin
@Test fun textWithBulletPoints() {
   val result = builder.markdownToSpans("Points\n* one\n+ two")

   // Check whether the markup tags are removed.
   assertEquals("Points\none\ntwo", result.toString())

   // Get all the spans attached to the SpannedString.
   val spans = result.getSpans<Any>(0, result.length, Any::class.java)

   // Check whether the correct number of spans are created.
   assertEquals(2, spans.size.toLong())

   // Check whether the spans are instances of BulletPointSpan.
   val bulletSpan1 = spans[0] as BulletPointSpan
   val bulletSpan2 = spans[1] as BulletPointSpan

   // Check whether the start and end indices are the expected ones.
   assertEquals(7, result.getSpanStart(bulletSpan1).toLong())
   assertEquals(11, result.getSpanEnd(bulletSpan1).toLong())
   assertEquals(11, result.getSpanStart(bulletSpan2).toLong())
   assertEquals(14, result.getSpanEnd(bulletSpan2).toLong())
}
Java
@Test
public void textWithBulletPoints() {
    SpannedString result = builder.markdownToSpans("Points\n* one\n+ two");

    // Check whether the markup tags are removed.
    assertEquals("Points\none\ntwo", result.toString());

    // Get all the spans attached to the SpannedString.
    Object[] spans = result.getSpans(0, result.length(), Object.class);

    // Check whether the correct number of spans are created.
    assertEquals(2, spans.length);

    // Check whether the spans are instances of BulletPointSpan.
    BulletPointSpan bulletSpan1 = (BulletPointSpan) spans[0];
    BulletPointSpan bulletSpan2 = (BulletPointSpan) spans[1];

    // Check whether the start and end indices are the expected ones.
    assertEquals(7, result.getSpanStart(bulletSpan1));
    assertEquals(11, result.getSpanEnd(bulletSpan1));
    assertEquals(11, result.getSpanStart(bulletSpan2));
    assertEquals(14, result.getSpanEnd(bulletSpan2));
}
For more test examples, see MarkdownBuilderTest on GitHub.
Test custom spans
When testing spans, verify that the TextPaint contains the expected
modifications and that the correct elements appear on your Canvas. For
example, consider a custom span implementation that prepends a bullet point to
some text. The bullet point has a specified size and color, and there is a gap
between the left margin of the drawable area and the bullet point.
You can test the behavior of this class by implementing an AndroidJUnit test, checking for the following:
- If you correctly apply the span, a bullet point of the specified size and color appears on the canvas, and the proper space exists between the left margin and the bullet point.
- If you don't apply the span, none of the custom behavior appears.
You can see the implementation of these tests in the TextStyling sample on GitHub.
You can test Canvas interactions by mocking the canvas, passing the mocked
object to the
drawLeadingMargin()
method, and verifying that the correct methods are called with the correct
parameters.
You can find more span test samples in BulletPointSpanTest.
Best practices for using spans
There are several memory-efficient ways to set text in a TextView, depending
on your needs.
Attach or detach a span without changing the underlying text
TextView.setText()
contains multiple overloads that handle spans differently. For example, you can
set a Spannable text object with the following code:
Kotlin
textView.setText(spannableObject)
Java
textView.setText(spannableObject);
When calling this overload of setText(), the TextView creates a copy of your
Spannable as a SpannedString and keeps it in memory as a CharSequence.
This means that your text and the spans are immutable, so when you need to
update the text or the spans, create a new Spannable object and call
setText() again, which also triggers a re-measuring and re-drawing of the
layout.
To indicate that the spans must be mutable, you can instead use
setText(CharSequence text, TextView.BufferType
type)
,
as shown in the following example:
Kotlin
textView.setText(spannable, BufferType.SPANNABLE)
val spannableText = textView.text as Spannable
spannableText.setSpan(
     ForegroundColorSpan(color),
     8, spannableText.length,
     SPAN_INCLUSIVE_INCLUSIVE
)
Java
textView.setText(spannable, BufferType.SPANNABLE);
Spannable spannableText = (Spannable) textView.getText();
spannableText.setSpan(
     new ForegroundColorSpan(color),
     8, spannableText.getLength(),
     SPAN_INCLUSIVE_INCLUSIVE);
In this example, the
BufferType.SPANNABLE
parameter causes the TextView to create a SpannableString, and the
CharSequence object kept by the TextView now has mutable markup and
immutable text. To update the span, retrieve the text as a Spannable and then
update the spans as needed.
When you attach, detach, or reposition spans, the TextView automatically
updates to reflect the change to the text. If you change an internal attribute
of an existing span, call invalidate() to make appearance-related changes or
requestLayout() to make metric-related changes.
Set text in a TextView multiple times
In some cases, such as when using a
RecyclerView.ViewHolder,
you might want to reuse a TextView and set the text multiple times. By
default, regardless of whether you set the BufferType, the TextView creates
a copy of the CharSequence object and holds it in memory. This makes all
TextView updates intentional—you can't update the original
CharSequence object to update the text. This means every time you set new
text, the TextView creates a new object.
If want to take more control over this process and avoid the extra object
creation, you can implement your own
Spannable.Factory and override
newSpannable().
Instead of creating a new text object, you can cast and return the existing
CharSequence as a Spannable, as demonstrated in the following example:
Kotlin
val spannableFactory = object : Spannable.Factory() {
    override fun newSpannable(source: CharSequence?): Spannable {
        return source as Spannable
    }
}
Java
Spannable.Factory spannableFactory = new Spannable.Factory(){
    @Override
    public Spannable newSpannable(CharSequence source) {
        return (Spannable) source;
    }
};
You must use textView.setText(spannableObject, BufferType.SPANNABLE) when
setting the text. Otherwise, the source CharSequence is created as a Spanned
instance and can't be cast to Spannable, causing newSpannable() to throw a
ClassCastException.
After overriding newSpannable(), tell the TextView to use the new Factory:
Kotlin
textView.setSpannableFactory(spannableFactory)
Java
textView.setSpannableFactory(spannableFactory);
Set the Spannable.Factory object once, right after you get a reference to your
TextView. If you're using a RecyclerView, set the Factory object when you
first inflate your views. This avoids extra object creation when your
RecyclerView binds a new item to your ViewHolder.
Change internal span attributes
If you need to change only an internal attribute of a mutable span, such as the
bullet color in a custom bullet span, you can avoid the overhead from calling
setText() multiple times by keeping a reference to the span as it's created.
When you need to modify the span, you can modify the reference and then call
invalidate() or requestLayout() on the TextView, depending on the type of
attribute you changed.
In the following code example, a custom bullet point implementation has a default color of red that changes to gray when a button is tapped:
Kotlin
class MainActivity : AppCompatActivity() {

    // Keeping the span as a field.
    val bulletSpan = BulletPointSpan(color = Color.RED)

    override fun onCreate(savedInstanceState: Bundle?) {
        ...
        val spannable = SpannableString("Text is spantastic")
        // Setting the span to the bulletSpan field.
        spannable.setSpan(
            bulletSpan,
            0, 4,
            Spanned.SPAN_INCLUSIVE_INCLUSIVE
        )
        styledText.setText(spannable)
        button.setOnClickListener {
            // Change the color of the mutable span.
            bulletSpan.color = Color.GRAY
            // Color doesn't change until invalidate is called.
            styledText.invalidate()
        }
    }
}
Java
public class MainActivity extends AppCompatActivity {

    private BulletPointSpan bulletSpan = new BulletPointSpan(Color.RED);

    @Override
    protected void onCreate(Bundle savedInstanceState) {
        ...
        SpannableString spannable = new SpannableString("Text is spantastic");
        // Setting the span to the bulletSpan field.
        spannable.setSpan(bulletSpan, 0, 4, Spanned.SPAN_INCLUSIVE_INCLUSIVE);
        styledText.setText(spannable);
        button.setOnClickListener(new View.OnClickListener() {
            @Override
            public void onClick(View view) {
                // Change the color of the mutable span.
                bulletSpan.setColor(Color.GRAY);
                // Color doesn't change until invalidate is called.
                styledText.invalidate();
            }
        });
    }
}
Use Android KTX extension functions
Android KTX also contains extension functions that make working with spans easier. To learn more, see the documentation for the androidx.core.text package.