تعبیه فعالیت

تعبیه فعالیت، برنامه‌ها را در دستگاه‌های صفحه‌نمایش بزرگ با تقسیم پنجره کار برنامه بین دو فعالیت یا دو نمونه از یک فعالیت بهینه می‌کند.

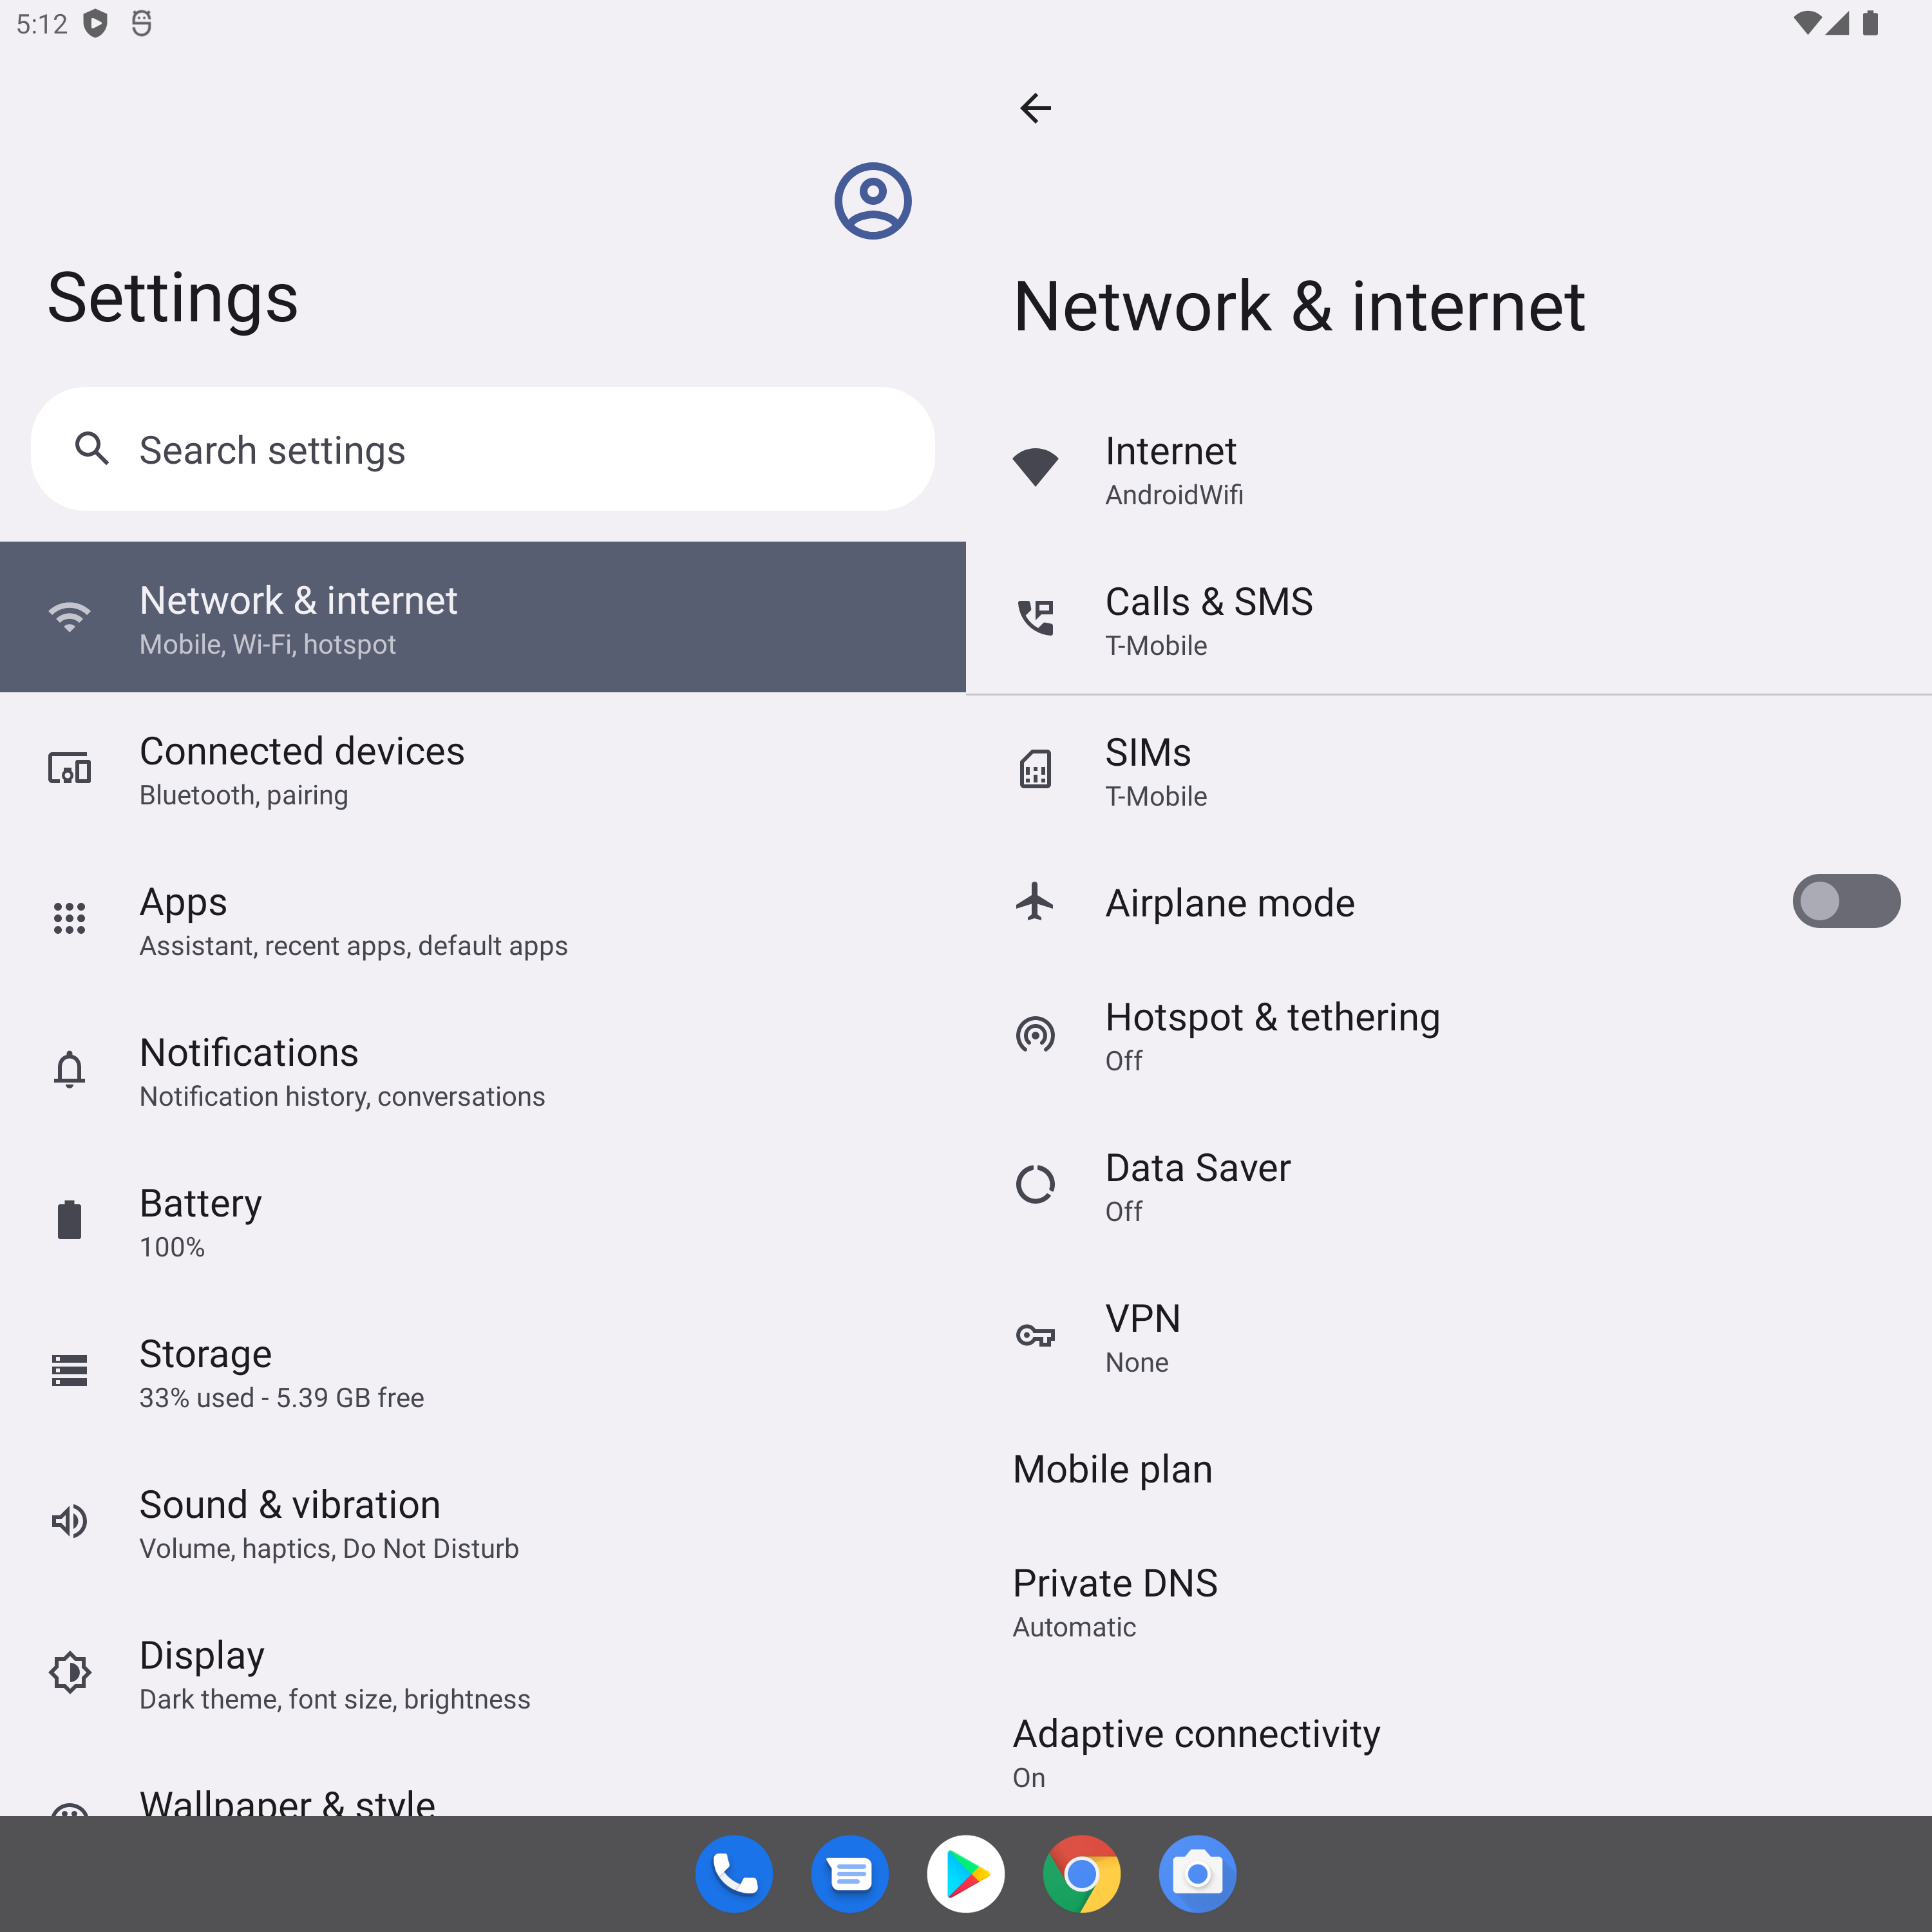
شکل 1. برنامه تنظیمات با فعالیت های کنار هم.

اگر برنامه شما از چندین فعالیت تشکیل شده است، جاسازی فعالیت به شما امکان می‌دهد تجربه کاربری پیشرفته‌تری را در رایانه‌های لوحی، دستگاه‌های تاشو، و دستگاه‌های ChromeOS ارائه دهید.

جاسازی فعالیت نیازی به بازآفرینی کد ندارد. شما با ایجاد یک فایل پیکربندی XML یا با برقراری تماس‌های Jetpack WindowManager API تعیین می‌کنید که چگونه برنامه‌تان فعالیت‌های خود را نمایش می‌دهد - کنار هم یا پشته‌ای.

پشتیبانی از صفحه نمایش های کوچک به صورت خودکار حفظ می شود. هنگامی که برنامه شما روی دستگاهی با صفحه نمایش کوچک است، فعالیت ها یکی روی دیگری قرار می گیرند. در صفحه های بزرگ، فعالیت ها در کنار هم نمایش داده می شوند. سیستم ارائه را بر اساس پیکربندی که ایجاد کرده‌اید تعیین می‌کند—بدون نیاز به منطق انشعاب.

تعبیه فعالیت‌ها تغییرات جهت‌گیری دستگاه را در خود جای می‌دهد و به‌طور یکپارچه روی دستگاه‌های تاشو کار می‌کند، فعالیت‌ها را همزمان با تا شدن و باز شدن دستگاه، انباشته و جدا می‌کند.

جاسازی فعالیت در اکثر دستگاه‌های دارای صفحه نمایش بزرگ دارای Android 12L (سطح API 32) و بالاتر پشتیبانی می‌شود.

تقسیم پنجره وظیفه

تعبیه فعالیت، پنجره کار برنامه را به دو ظرف اصلی و ثانویه تقسیم می‌کند. کانتینرها دارای فعالیت هایی هستند که از فعالیت اصلی یا سایر فعالیت های موجود در کانتینرها راه اندازی شده اند.

فعالیت‌ها هنگام راه‌اندازی در کانتینر ثانویه انباشته می‌شوند، و کانتینر ثانویه در بالای کانتینر اصلی در صفحه‌های کوچک انباشته می‌شود، بنابراین انباشتن فعالیت‌ها و پیمایش به عقب با ترتیب فعالیت‌هایی که از قبل در برنامه شما تعبیه شده است، مطابقت دارد.

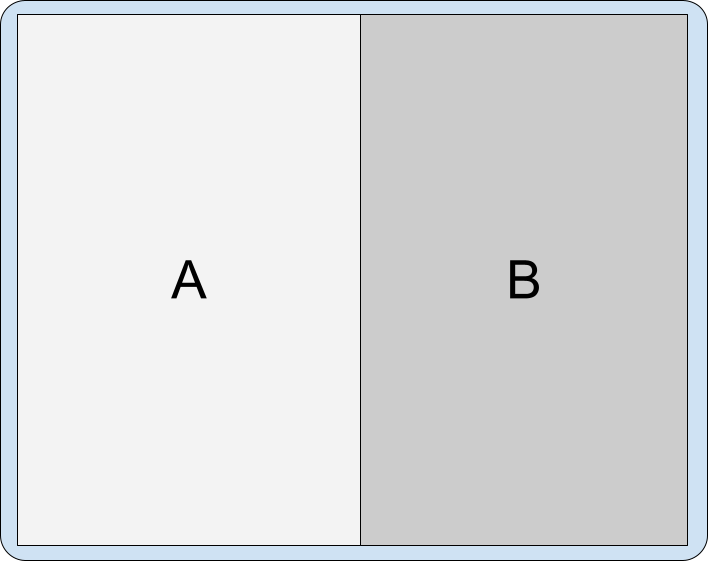
تعبیه فعالیت به شما امکان می دهد تا فعالیت ها را به روش های مختلف نمایش دهید. برنامه شما می‌تواند با راه‌اندازی دو فعالیت در کنار هم، پنجره کار را تقسیم کند:

شکل 2. دو فعالیت در کنار هم.

یا، فعالیتی که کل پنجره کار را اشغال کرده است می‌تواند با راه‌اندازی یک فعالیت جدید در کنار:

شکل 3. فعالیت A فعالیت B را به طرفین شروع می کند.

فعالیت هایی که قبلاً در یک تقسیم و به اشتراک گذاری یک پنجره وظیفه هستند می توانند فعالیت های دیگر را به روش های زیر راه اندازی کنند:

  • در کنار فعالیت دیگری:

    شکل 4. فعالیت A فعالیت C را به سمت فعالیت B شروع می کند.
  • به پهلو، و تقسیم را به طرفین منتقل کنید، فعالیت اولیه قبلی را پنهان کنید:

    شکل 5. فعالیت B فعالیت C را به پهلو شروع می کند و تقسیم را به طرفین تغییر می دهد.
  • راه اندازی یک فعالیت در محل در بالا؛ یعنی در همان پشته فعالیت:

    شکل 6. فعالیت B فعالیت C را بدون هیچ پرچم قصد اضافی شروع می کند.
  • یک پنجره کامل فعالیت را در همان کار راه اندازی کنید:

    شکل 7. فعالیت A یا فعالیت B فعالیت C را شروع می کند که پنجره وظیفه را پر می کند.

ناوبری برگشت

انواع مختلف برنامه‌ها بسته به وابستگی‌های بین فعالیت‌ها یا نحوه راه‌اندازی رویداد برگشتی توسط کاربران، می‌توانند قوانین پیمایش برگشتی متفاوتی در حالت پنجره وظیفه تقسیم‌بندی داشته باشند، برای مثال:

  • با هم رفتن: اگر فعالیت‌ها مرتبط هستند و یکی نباید بدون دیگری نشان داده شود، پیمایش برگشتی را می‌توان برای تکمیل هر دو پیکربندی کرد.
  • به تنهایی: اگر فعالیت‌ها کاملاً مستقل باشند، پیمایش برگشتی در یک فعالیت بر وضعیت فعالیت دیگری در پنجره کار تأثیر نمی‌گذارد.

هنگام استفاده از پیمایش دکمه‌ای، رویداد برگشت به آخرین فعالیت متمرکز ارسال می‌شود.

برای پیمایش مبتنی بر اشاره:

  • Android 14 (سطح API 34) و پایین‌تر — رویداد برگشتی به فعالیتی که حرکت در آن انجام شده ارسال می‌شود. وقتی کاربران از سمت چپ صفحه تند تند بکشند، رویداد برگشت به فعالیت در سمت چپ پنجره تقسیم ارسال می‌شود. هنگامی که کاربران از سمت راست صفحه تند کشیدند، رویداد برگشتی به فعالیت در قسمت سمت راست ارسال می‌شود.

  • اندروید 15 (سطح API 35) و بالاتر

    • وقتی با چندین فعالیت از یک برنامه سروکار دارید، ژست بدون در نظر گرفتن جهت کشیدن انگشت، فعالیت برتر را به پایان می‌رساند و تجربه یکپارچه‌تر را ارائه می‌دهد.

    • در سناریوهایی که شامل دو فعالیت از برنامه‌های مختلف است (همپوشانی)، رویداد برگشتی به آخرین فعالیت متمرکز هدایت می‌شود و با رفتار پیمایش دکمه‌ها همسو می‌شود.

طرح چند صفحه ای

Jetpack WindowManager شما را قادر می‌سازد تا در دستگاه‌های دارای صفحه نمایش بزرگ با Android 12L (سطح API 32) یا بالاتر و در برخی از دستگاه‌های دارای نسخه‌های پلتفرم قبلی، فعالیتی را با طرح‌بندی چند صفحه‌ای ایجاد کنید. برنامه‌های موجود که بر اساس فعالیت‌های متعدد به جای قطعات یا طرح‌بندی‌های مبتنی بر نما هستند، مانند SlidingPaneLayout می‌توانند یک تجربه کاربری بهبودیافته با صفحه نمایش بزرگ بدون تغییر کد منبع ارائه کنند.

یکی از مثال‌های رایج تقسیم فهرست-جزئیات است. برای اطمینان از ارائه با کیفیت بالا، سیستم فعالیت لیست را شروع می کند و سپس برنامه بلافاصله فعالیت جزئیات را شروع می کند. سیستم انتقال منتظر می ماند تا هر دو فعالیت ترسیم شوند، سپس آنها را با هم نمایش می دهد. برای کاربر، این دو فعالیت به عنوان یک راه اندازی می شوند.

شکل 8. دو فعالیت به طور همزمان در یک طرح چند صفحه ای شروع شدند.

تقسیم ویژگی ها

شما می توانید تعیین کنید که چگونه پنجره وظیفه بین کانتینرهای تقسیم شده تناسب داشته باشد و چگونه کانتینرها نسبت به یکدیگر چیده شوند.

برای قوانین تعریف شده در یک فایل پیکربندی XML، ویژگی های زیر را تنظیم کنید:

  • splitRatio : نسبت های ظرف را تنظیم می کند. مقدار یک عدد ممیز شناور در بازه باز (0.0، 1.0) است.
  • splitLayoutDirection : نحوه چیدمان کانتینرهای تقسیم نسبت به یکدیگر را مشخص می کند. ارزش ها عبارتند از:
    • ltr : از چپ به راست
    • rtl : از راست به چپ
    • locale : ltr یا rtl از روی تنظیمات محلی تعیین می شود

برای مثال به بخش پیکربندی XML مراجعه کنید.

برای قوانین ایجاد شده با استفاده از API های WindowManager، یک شی SplitAttributes با SplitAttributes.Builder ایجاد کنید و متدهای سازنده زیر را فراخوانی کنید:

  • setSplitType() : نسبت کانتینرهای تقسیم را تنظیم می کند. برای آرگومان های معتبر، از جمله متد SplitAttributes.SplitType.ratio() ، به SplitAttributes.SplitType مراجعه کنید.
  • setLayoutDirection() : چیدمان کانتینرها را تنظیم می کند. برای مقادیر ممکن به SplitAttributes.LayoutDirection مراجعه کنید.

برای مثال به بخش WindowManager API مراجعه کنید.

شکل 9. دو تقسیم فعالیت از چپ به راست اما با نسبت‌های تقسیم متفاوت چیده شده‌اند.

متغیرهای

فعالیت‌های مکان‌دار فعالیت‌های ثانویه خالی هستند که ناحیه‌ای از یک تقسیم فعالیت را اشغال می‌کنند. در نهایت قرار است با فعالیت دیگری که حاوی محتوا است جایگزین شوند. به عنوان مثال، یک فعالیت نگهدارنده مکان می‌تواند سمت ثانویه یک فعالیت تقسیم‌شده در یک طرح‌بندی فهرست-جزئیات را اشغال کند تا زمانی که یک مورد از فهرست انتخاب شود، در این مرحله یک فعالیت حاوی اطلاعات جزئیات برای آیتم فهرست انتخاب‌شده جایگزین مکان‌دار می‌شود.

به‌طور پیش‌فرض، سیستم مکان‌دارها را تنها زمانی نمایش می‌دهد که فضای کافی برای تقسیم فعالیت وجود داشته باشد. هنگامی که اندازه نمایشگر به عرض یا ارتفاع خیلی کوچک برای نمایش یک تقسیم تغییر می کند، متغیرها به طور خودکار تمام می شوند. هنگامی که فضا اجازه می دهد، سیستم مکان نگهدار را با حالت اولیه مجدد راه اندازی می کند.

شکل 10. تاشو و باز شدن دستگاه تاشو. با تغییر اندازه نمایشگر، فعالیت مکان‌نما به پایان می‌رسد و دوباره ایجاد می‌شود.

با این حال، ویژگی stickyPlaceholder روش SplitPlaceholderRule یا setSticky() SplitPlaceholder.Builder می تواند رفتار پیش فرض را لغو کند. هنگامی که ویژگی یا متد مقدار true را مشخص می کند، هنگامی که اندازه نمایشگر از یک نمایشگر دو جداره به نمایشگر تک صفحه ای کاهش می یابد، سیستم مکان نگهدار را به عنوان بالاترین فعالیت در پنجره کار نمایش می دهد (برای مثال به پیکربندی تقسیم بندی مراجعه کنید) .

شکل 11. تاشو و باز شدن دستگاه تاشو. فعالیت متغیر مکان چسبنده است.

اندازه پنجره تغییر می کند

هنگامی که پیکربندی دستگاه تغییر می‌کند، عرض پنجره کار را کاهش می‌دهد تا برای طرح‌بندی چند صفحه‌ای به اندازه کافی بزرگ نباشد (مثلاً وقتی یک دستگاه تاشو با صفحه بزرگ از اندازه تبلت به اندازه تلفن تا می‌شود یا اندازه پنجره برنامه در حالت چند پنجره‌ای تغییر می‌کند. )، فعالیت‌های غیر مکان‌دار در پنجره ثانویه پنجره وظیفه در بالای فعالیت‌های پنجره اصلی قرار می‌گیرند.

فعالیت‌های مکان‌دار فقط زمانی نشان داده می‌شوند که عرض نمایش کافی برای تقسیم وجود داشته باشد. در صفحه‌های کوچک‌تر، جای‌بان به‌طور خودکار حذف می‌شود. وقتی ناحیه نمایش دوباره به اندازه کافی بزرگ شد، مکان نگهدار دوباره ایجاد می شود. (به بخش Placeholders مراجعه کنید.)

انباشته کردن فعالیت ها امکان پذیر است زیرا WindowManager فعالیت های موجود در پنجره ثانویه را در بالای فعالیت ها در پنجره اصلی مرتب می کند.

چندین فعالیت در پنجره ثانویه

اکتیویتی B فعالیت C را در جای خود و بدون پرچم های قصد اضافی شروع می کند:

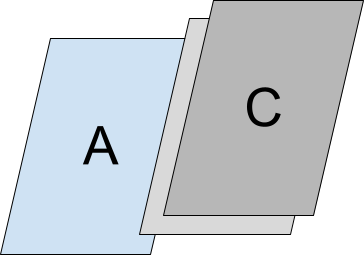
تقسیم فعالیت شامل فعالیت های A، B، و C با C روی هم چیده شده است           بالای B.

که منجر به ترتیب z زیر از فعالیت ها در همان کار می شود:

پشته فعالیت ثانویه حاوی فعالیت C که در بالای B قرار گرفته است.           پشته ثانویه در بالای پشته فعالیت اولیه انباشته می شود           حاوی فعالیت A.

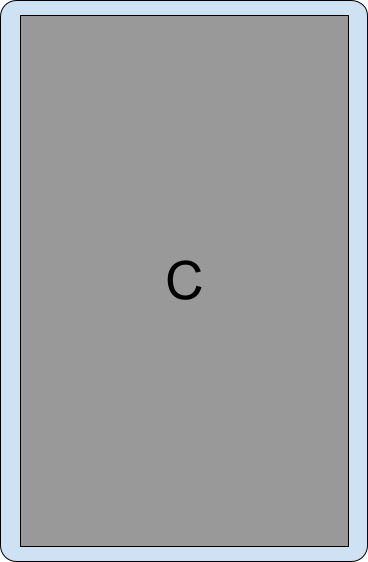
بنابراین، در یک پنجره کار کوچکتر، برنامه به یک فعالیت با C در بالای پشته کوچک می شود:

پنجره کوچکی که فقط فعالیت C را نشان می دهد.

پیمایش به عقب در پنجره کوچکتر از طریق فعالیت هایی که روی هم چیده شده اند هدایت می شود.

اگر پیکربندی پنجره کار به اندازه بزرگتر بازیابی شود که بتواند چندین پنجره را در خود جای دهد، فعالیت ها دوباره در کنار هم نمایش داده می شوند.

تقسیم های انباشته

فعالیت B فعالیت C را به طرفین شروع می کند و تقسیم را به طرفین تغییر می دهد:

پنجره کار که فعالیت های A و B و سپس فعالیت های B و C را نشان می دهد.

نتیجه، ترتیب z فعالیت‌های زیر در همان کار است:

فعالیت های A، B و C در یک پشته. فعالیت ها روی هم چیده شده اند           به ترتیب زیر از بالا به پایین: C، B، A.

در یک پنجره کار کوچکتر، برنامه به یک فعالیت منفرد با C در بالا کوچک می شود:

پنجره کوچکی که فقط فعالیت C را نشان می دهد.

جهت گیری پرتره ثابت

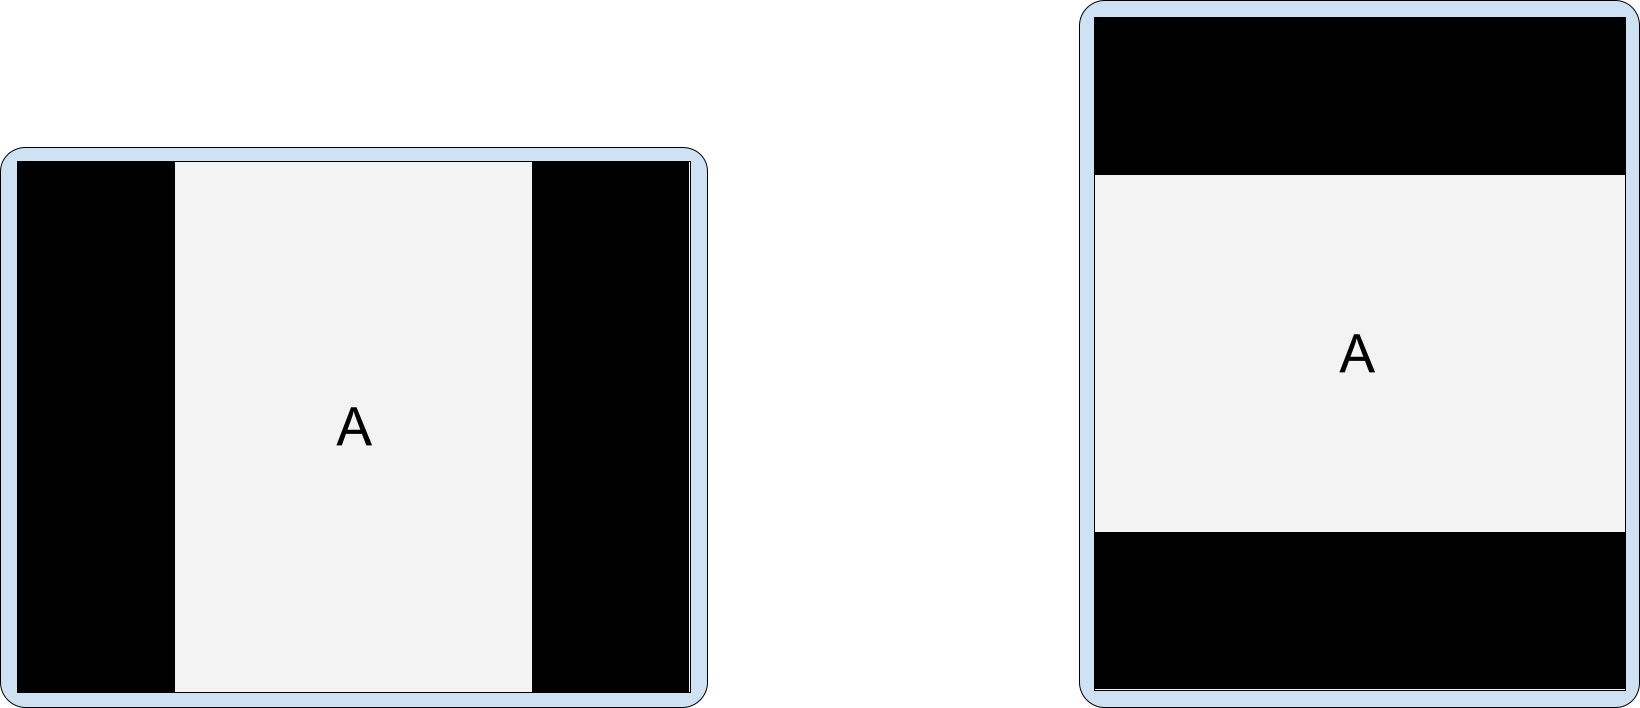
تنظیم مانیفست android:screenOrientation به برنامه ها امکان می دهد فعالیت ها را به جهت گیری عمودی یا افقی محدود کنند. برای بهبود تجربه کاربری در دستگاه‌های صفحه‌نمایش بزرگ مانند تبلت‌ها و تاشوها، سازندگان دستگاه (OEM) می‌توانند درخواست‌های جهت‌گیری صفحه را نادیده بگیرند و برنامه را در جهت عمودی در نمایشگرهای افقی یا جهت افقی در نمایشگرهای عمودی را نادیده بگیرند.

شکل 12. فعالیت های جعبه نامه: پرتره ثابت در دستگاه افقی (سمت چپ)، منظره ثابت در دستگاه عمودی (راست).

به طور مشابه، هنگامی که تعبیه فعالیت فعال است، OEM ها می توانند دستگاه ها را برای فعالیت های پرتره ثابت صندوق نامه در جهت افقی روی صفحه نمایش های بزرگ (عرض ≥ 600dp) سفارشی کنند. هنگامی که یک فعالیت پرتره ثابت فعالیت دوم را راه اندازی می کند، دستگاه می تواند دو فعالیت را در کنار هم در یک نمایشگر دو صفحه نمایش دهد.

شکل 13. فعالیت پرتره ثابت A فعالیت B را به پهلو شروع می کند.

همیشه ویژگی android.window.PROPERTY_ACTIVITY_EMBEDDING_SPLITS_ENABLED را به فایل مانیفست برنامه خود اضافه کنید تا به دستگاه‌ها اطلاع دهید که برنامه شما از جاسازی فعالیت پشتیبانی می‌کند (بخش پیکربندی تقسیم را ببینید). سپس دستگاه‌های سفارشی‌سازی‌شده OEM می‌توانند تعیین کنند که آیا فعالیت‌های پرتره ثابت در صندوق پست انجام شود یا خیر.

پیکربندی تقسیم

قوانین تقسیم، تقسیم‌های فعالیت را پیکربندی می‌کنند. شما قوانین تقسیم را در یک فایل پیکربندی XML یا با برقراری تماس های Jetpack WindowManager API تعریف می کنید.

در هر صورت، برنامه شما باید به کتابخانه WindowManager دسترسی داشته باشد و باید به سیستم اطلاع دهد که برنامه جاسازی فعالیت را اجرا کرده است.

موارد زیر را انجام دهید:

  1. به عنوان مثال، آخرین وابستگی کتابخانه WindowManager را به فایل build.gradle در سطح ماژول برنامه خود اضافه کنید:

    implementation 'androidx.window:window:1.1.0-beta02'

    کتابخانه WindowManager تمام اجزای مورد نیاز برای تعبیه فعالیت را فراهم می کند.

  2. به سیستم اطلاع دهید که برنامه شما جاسازی فعالیت را اجرا کرده است.

    ویژگی android.window.PROPERTY_ACTIVITY_EMBEDDING_SPLITS_ENABLED را به عنصر <application> فایل مانیفست برنامه اضافه کنید و مقدار را روی true تنظیم کنید، برای مثال:

    <manifest xmlns:android="http://schemas.android.com/apk/res/android">
        <application>
            <property
                android:name="android.window.PROPERTY_ACTIVITY_EMBEDDING_SPLITS_ENABLED"
                android:value="true" />
        </application>
    </manifest>
    

    در نسخه 1.1.0-alpha06 و نسخه‌های بعدی WindowManager، تقسیم‌های جاسازی فعالیت غیرفعال می‌شوند، مگر اینکه ویژگی به مانیفست اضافه شود و روی true تنظیم شود.

    همچنین، سازندگان دستگاه از این تنظیم برای فعال کردن قابلیت‌های سفارشی برای برنامه‌هایی که از جاسازی فعالیت پشتیبانی می‌کنند، استفاده می‌کنند. به عنوان مثال، دستگاه‌ها می‌توانند یک فعالیت فقط عمودی در نمایشگرهای افقی را صندوق‌دار کنند تا هنگام شروع فعالیت دوم، فعالیت را برای انتقال به یک طرح‌بندی دو جداره جهت‌دهی کنند ( به جهت‌گیری عمودی ثابت مراجعه کنید).

پیکربندی XML

برای ایجاد یک پیاده سازی مبتنی بر XML از تعبیه فعالیت، مراحل زیر را کامل کنید:

  1. یک فایل منبع XML ایجاد کنید که کارهای زیر را انجام دهد:

    • فعالیت هایی را تعریف می کند که یک تقسیم را به اشتراک می گذارند
    • گزینه های تقسیم را پیکربندی می کند
    • هنگامی که محتوا در دسترس نیست، یک مکان نگهدار برای ظرف ثانویه تقسیم ایجاد می کند
    • فعالیت هایی را مشخص می کند که هرگز نباید بخشی از یک تقسیم شوند

    به عنوان مثال:

    <!-- main_split_config.xml -->
    
    <resources
        xmlns:window="http://schemas.android.com/apk/res-auto">
    
        <!-- Define a split for the named activities. -->
        <SplitPairRule
            window:splitRatio="0.33"
            window:splitLayoutDirection="locale"
            window:splitMinWidthDp="840"
            window:splitMaxAspectRatioInPortrait="alwaysAllow"
            window:finishPrimaryWithSecondary="never"
            window:finishSecondaryWithPrimary="always"
            window:clearTop="false">
            <SplitPairFilter
                window:primaryActivityName=".ListActivity"
                window:secondaryActivityName=".DetailActivity"/>
        </SplitPairRule>
    
        <!-- Specify a placeholder for the secondary container when content is
             not available. -->
        <SplitPlaceholderRule
            window:placeholderActivityName=".PlaceholderActivity"
            window:splitRatio="0.33"
            window:splitLayoutDirection="locale"
            window:splitMinWidthDp="840"
            window:splitMaxAspectRatioInPortrait="alwaysAllow"
            window:stickyPlaceholder="false">
            <ActivityFilter
                window:activityName=".ListActivity"/>
        </SplitPlaceholderRule>
    
        <!-- Define activities that should never be part of a split. Note: Takes
             precedence over other split rules for the activity named in the
             rule. -->
        <ActivityRule
            window:alwaysExpand="true">
            <ActivityFilter
                window:activityName=".ExpandedActivity"/>
        </ActivityRule>
    
    </resources>
    
  2. یک مقدار دهی اولیه ایجاد کنید.

    جزء WindowManager RuleController فایل پیکربندی XML را تجزیه می کند و قوانین را در دسترس سیستم قرار می دهد. یک Initializer کتابخانه راه‌اندازی Jetpack، فایل XML را در هنگام راه‌اندازی برنامه در دسترس RuleController قرار می‌دهد تا هنگام شروع هر فعالیتی، قوانین اعمال شوند.

    برای ایجاد یک مقداردهی اولیه، موارد زیر را انجام دهید:

    1. به عنوان مثال، آخرین وابستگی کتابخانه Jetpack Startup را به فایل build.gradle در سطح ماژول خود اضافه کنید:

      implementation 'androidx.startup:startup-runtime:1.1.1'

    2. کلاسی ایجاد کنید که رابط Initializer را پیاده سازی کند.

      Initializer با ارسال شناسه فایل پیکربندی XML ( main_split_config.xml ) به روش RuleController.parseRules() قوانین تقسیم را در دسترس RuleController قرار می دهد.

      کاتلین

      class SplitInitializer : Initializer<RuleController> {
      
          override fun create(context: Context): RuleController {
              return RuleController.getInstance(context).apply {
                  setRules(RuleController.parseRules(context, R.xml.main_split_config))
              }
          }
      
          override fun dependencies(): List<Class<out Initializer<*>>> {
              return emptyList()
          }
      }

      جاوا

      public class SplitInitializer implements Initializer<RuleController> {
      
           @NonNull
           @Override
           public RuleController create(@NonNull Context context) {
               RuleController ruleController = RuleController.getInstance(context);
               ruleController.setRules(
                   RuleController.parseRules(context, R.xml.main_split_config)
               );
               return ruleController;
           }
      
           @NonNull
           @Override
           public List<Class<? extends Initializer<?>>> dependencies() {
               return Collections.emptyList();
           }
      }
  3. یک ارائه دهنده محتوا برای تعاریف قوانین ایجاد کنید.

    androidx.startup.InitializationProvider به عنوان <provider> به فایل مانیفست برنامه خود اضافه کنید. یک ارجاع به اجرای اولیه ساز RuleController خود، SplitInitializer اضافه کنید:

    <!-- AndroidManifest.xml -->
    
    <provider android:name="androidx.startup.InitializationProvider"
        android:authorities="${applicationId}.androidx-startup"
        android:exported="false"
        tools:node="merge">
        <!-- Make SplitInitializer discoverable by InitializationProvider. -->
        <meta-data android:name="${applicationId}.SplitInitializer"
            android:value="androidx.startup" />
    </provider>
    

    InitializationProvider قبل از فراخوانی متد onCreate() برنامه SplitInitializer کشف و مقداردهی اولیه می کند. در نتیجه، زمانی که فعالیت اصلی برنامه شروع می شود، قوانین تقسیم اعمال می شوند.

WindowManager API

می‌توانید با تعداد انگشت شماری تماس API، تعبیه فعالیت را به صورت برنامه‌ریزی اجرا کنید. فراخوانی ها را در متد onCreate() یک زیر کلاس از Application انجام دهید تا مطمئن شوید که قوانین قبل از شروع هر فعالیتی قابل اجرا هستند.

برای ایجاد یک تقسیم فعالیت به صورت برنامه‌ریزی شده، موارد زیر را انجام دهید:

  1. ایجاد یک قانون تقسیم:

    1. یک SplitPairFilter ایجاد کنید که فعالیت هایی را که تقسیم را به اشتراک می گذارند شناسایی می کند:

      کاتلین

      val splitPairFilter = SplitPairFilter(
         ComponentName(this, ListActivity::class.java),
         ComponentName(this, DetailActivity::class.java),
         null
      )

      جاوا

      SplitPairFilter splitPairFilter = new SplitPairFilter(
         new ComponentName(this, ListActivity.class),
         new ComponentName(this, DetailActivity.class),
         null
      );
    2. فیلتر را به مجموعه فیلتر اضافه کنید:

      کاتلین

      val filterSet = setOf(splitPairFilter)

      جاوا

      Set<SplitPairFilter> filterSet = new HashSet<>();
      filterSet.add(splitPairFilter);
    3. ایجاد ویژگی های طرح بندی برای تقسیم:

      کاتلین

      val splitAttributes: SplitAttributes = SplitAttributes.Builder()
          .setSplitType(SplitAttributes.SplitType.ratio(0.33f))
          .setLayoutDirection(SplitAttributes.LayoutDirection.LEFT_TO_RIGHT)
          .build()

      جاوا

      final SplitAttributes splitAttributes = new SplitAttributes.Builder()
            .setSplitType(SplitAttributes.SplitType.ratio(0.33f))
            .setLayoutDirection(SplitAttributes.LayoutDirection.LEFT_TO_RIGHT)
            .build();

      SplitAttributes.Builder یک شی حاوی ویژگی های طرح بندی ایجاد می کند:

      • setSplitType() : نحوه تخصیص ناحیه نمایش موجود به هر کانتینر فعالیت را مشخص می کند. نوع تقسیم نسبت، نسبت ناحیه نمایش موجود را که به ظرف اولیه اختصاص داده شده است، مشخص می کند. ظرف ثانویه باقیمانده منطقه نمایش موجود را اشغال می کند.
      • setLayoutDirection() : نحوه چیدمان کانتینرهای اکتیویتی را نسبت به یکدیگر مشخص می کند، ابتدا کانتینر اصلی.
    4. یک SplitPairRule بسازید:

      کاتلین

      val splitPairRule = SplitPairRule.Builder(filterSet)
          .setDefaultSplitAttributes(splitAttributes)
          .setMinWidthDp(840)
          .setMinSmallestWidthDp(600)
          .setMaxAspectRatioInPortrait(EmbeddingAspectRatio.ratio(1.5f))
          .setFinishPrimaryWithSecondary(SplitRule.FinishBehavior.NEVER)
          .setFinishSecondaryWithPrimary(SplitRule.FinishBehavior.ALWAYS)
          .setClearTop(false)
          .build()

      جاوا

      SplitPairRule splitPairRule = new SplitPairRule.Builder(filterSet)
          .setDefaultSplitAttributes(splitAttributes)
          .setMinWidthDp(840)
          .setMinSmallestWidthDp(600)
          .setMaxAspectRatioInPortrait(EmbeddingAspectRatio.ratio(1.5f))
          .setFinishPrimaryWithSecondary(SplitRule.FinishBehavior.NEVER)
          .setFinishSecondaryWithPrimary(SplitRule.FinishBehavior.ALWAYS)
          .setClearTop(false)
          .build();

      SplitPairRule.Builder قانون را ایجاد و پیکربندی می کند:

      • filterSet : حاوی فیلترهای جفت تقسیم شده است که با شناسایی فعالیت هایی که یک تقسیم را به اشتراک می گذارند، تعیین می کند که چه زمانی قانون اعمال شود.
      • setDefaultSplitAttributes() : ویژگی های layout را به قانون اعمال می کند.
      • setMinWidthDp() : حداقل عرض نمایش (بر حسب پیکسل‌های مستقل از چگالی، dp) را تنظیم می‌کند که تقسیم را فعال می‌کند.
      • setMinSmallestWidthDp() : حداقل مقداری را (بر حسب dp) تنظیم می کند که ابعاد کوچکتر از دو بعد نمایشگر برای فعال کردن یک تقسیم بدون توجه به جهت دستگاه باید داشته باشد.
      • setMaxAspectRatioInPortrait() : حداکثر نسبت ابعاد نمایش (ارتفاع:عرض) را در جهت عمودی که تقسیم فعالیت برای آن نمایش داده می شود را تنظیم می کند. اگر نسبت تصویر یک نمایشگر عمودی از حداکثر نسبت تصویر بیشتر شود، بدون توجه به عرض نمایشگر، تقسیم‌بندی غیرفعال می‌شود. توجه: مقدار پیش‌فرض 1.4 است که باعث می‌شود فعالیت‌ها کل پنجره کار را در جهت عمودی در اکثر تبلت‌ها اشغال کنند. SPLIT_MAX_ASPECT_RATIO_PORTRAIT_DEFAULT و setMaxAspectRatioInLandscape() نیز ببینید. مقدار پیش‌فرض برای Landscape ALWAYS_ALLOW است.
      • setFinishPrimaryWithSecondary() : تعیین می کند که چگونه تمام کردن تمام فعالیت ها در کانتینر ثانویه بر فعالیت ها در کانتینر اصلی تأثیر می گذارد. NEVER نشان نمی‌دهد که سیستم نباید فعالیت‌های اولیه را در زمانی که تمام فعالیت‌ها در کانتینر ثانویه تمام می‌شوند به پایان برساند ( به پایان فعالیت‌ها مراجعه کنید).
      • setFinishSecondaryWithPrimary() : تعیین می کند که چگونه تمام کردن تمام فعالیت ها در کانتینر اصلی بر فعالیت های کانتینر ثانویه تأثیر می گذارد. ALWAYS نشان می‌دهد که سیستم باید همیشه فعالیت‌ها را در کانتینر ثانویه پایان دهد، زمانی که همه فعالیت‌ها در ظرف اولیه تمام می‌شوند ( به پایان فعالیت‌ها مراجعه کنید).
      • setClearTop() : مشخص می کند که آیا تمام فعالیت ها در کانتینر ثانویه زمانی که یک اکتیویتی جدید در کانتینر راه اندازی می شود به پایان می رسد یا خیر. یک مقدار false مشخص می‌کند که فعالیت‌های جدید در بالای فعالیت‌هایی که از قبل در کانتینر ثانویه قرار دارند، انباشته می‌شوند.
    5. نمونه singleton از WindowManager RuleController را دریافت کنید و قانون را اضافه کنید:

      کاتلین

        val ruleController = RuleController.getInstance(this)
        ruleController.addRule(splitPairRule)
        

      جاوا

        RuleController ruleController = RuleController.getInstance(this);
        ruleController.addRule(splitPairRule);
        
  2. هنگامی که محتوا در دسترس نیست، یک مکان نگهدار برای ظرف ثانویه ایجاد کنید:

    1. یک ActivityFilter ایجاد کنید که فعالیتی را که نگهدارنده مکان یک تقسیم پنجره وظیفه را با آن به اشتراک می گذارد، شناسایی می کند:

      کاتلین

      val placeholderActivityFilter = ActivityFilter(
          ComponentName(this, ListActivity::class.java),
          null
      )

      جاوا

      ActivityFilter placeholderActivityFilter = new ActivityFilter(
          new ComponentName(this, ListActivity.class),
          null
      );
    2. فیلتر را به مجموعه فیلتر اضافه کنید:

      کاتلین

      val placeholderActivityFilterSet = setOf(placeholderActivityFilter)

      جاوا

      Set<ActivityFilter> placeholderActivityFilterSet = new HashSet<>();
      placeholderActivityFilterSet.add(placeholderActivityFilter);
    3. یک SplitPlaceholderRule ایجاد کنید:

      کاتلین

      val splitPlaceholderRule = SplitPlaceholderRule.Builder(
            placeholderActivityFilterSet,
            Intent(context, PlaceholderActivity::class.java)
          ).setDefaultSplitAttributes(splitAttributes)
           .setMinWidthDp(840)
           .setMinSmallestWidthDp(600)
           .setMaxAspectRatioInPortrait(EmbeddingAspectRatio.ratio(1.5f))
           .setFinishPrimaryWithPlaceholder(SplitRule.FinishBehavior.ALWAYS)
           .setSticky(false)
           .build()

      جاوا

      SplitPlaceholderRule splitPlaceholderRule = new SplitPlaceholderRule.Builder(
            placeholderActivityFilterSet,
            new Intent(context, PlaceholderActivity.class)
          ).setDefaultSplitAttributes(splitAttributes)
           .setMinWidthDp(840)
           .setMinSmallestWidthDp(600)
           .setMaxAspectRatioInPortrait(EmbeddingAspectRatio.ratio(1.5f))
           .setFinishPrimaryWithPlaceholder(SplitRule.FinishBehavior.ALWAYS)
           .setSticky(false)
           .build();

      SplitPlaceholderRule.Builder قانون را ایجاد و پیکربندی می کند:

      • placeholderActivityFilterSet : حاوی فیلترهای فعالیت است که با شناسایی فعالیت هایی که فعالیت نگهدارنده مکان با آنها مرتبط است، تعیین می کند که چه زمانی قانون اعمال شود.
      • Intent : راه اندازی فعالیت نگهدارنده مکان را مشخص می کند.
      • setDefaultSplitAttributes() : ویژگی های layout را به قانون اعمال می کند.
      • setMinWidthDp() : حداقل عرض نمایش (برحسب پیکسل های مستقل از چگالی، dp) را تنظیم می کند که امکان تقسیم را فراهم می کند.
      • setMinSmallestWidthDp() : حداقل مقداری را (بر حسب dp) تنظیم می کند که ابعاد کوچکتر از دو بعد نمایشگر باید داشته باشد تا اجازه تقسیم بدون توجه به جهت دستگاه را بدهد.
      • setMaxAspectRatioInPortrait() : حداکثر نسبت ابعاد نمایش (ارتفاع:عرض) را در جهت عمودی که تقسیم فعالیت برای آن نمایش داده می شود را تنظیم می کند. توجه: مقدار پیش‌فرض 1.4 است که منجر به پر کردن فعالیت‌ها در پنجره کار در جهت عمودی در اکثر تبلت‌ها می‌شود. SPLIT_MAX_ASPECT_RATIO_PORTRAIT_DEFAULT و setMaxAspectRatioInLandscape() نیز ببینید. مقدار پیش‌فرض برای Landscape ALWAYS_ALLOW است.
      • setFinishPrimaryWithPlaceholder() : تعیین می کند که چگونه اتمام فعالیت محل نگهدارنده بر روی فعالیت ها در ظرف اصلی تأثیر می گذارد. ALWAYS نشان می‌دهد که سیستم باید همیشه فعالیت‌ها را در محفظه اولیه زمانی که نگه‌دارنده به پایان می‌رسد پایان دهد ( به پایان فعالیت‌ها مراجعه کنید).
      • setSticky() : تعیین می کند که آیا پس از اینکه مکان نگهدار برای اولین بار در یک تقسیم با حداقل عرض کافی ظاهر شد، فعالیت مکان نگهدار در بالای پشته فعالیت در نمایشگرهای کوچک ظاهر شود یا خیر.
    4. قانون را به RuleController WindowManager اضافه کنید:

      کاتلین

      ruleController.addRule(splitPlaceholderRule)

      جاوا

      ruleController.addRule(splitPlaceholderRule);
  3. فعالیت هایی را مشخص کنید که هرگز نباید بخشی از یک تقسیم شوند:

    1. یک ActivityFilter ایجاد کنید که فعالیتی را مشخص می کند که همیشه باید کل منطقه نمایش کار را اشغال کند:

      کاتلین

      val expandedActivityFilter = ActivityFilter(
        ComponentName(this, ExpandedActivity::class.java),
        null
      )

      جاوا

      ActivityFilter expandedActivityFilter = new ActivityFilter(
        new ComponentName(this, ExpandedActivity.class),
        null
      );
    2. فیلتر را به مجموعه فیلتر اضافه کنید:

      کاتلین

      val expandedActivityFilterSet = setOf(expandedActivityFilter)

      جاوا

      Set<ActivityFilter> expandedActivityFilterSet = new HashSet<>();
      expandedActivityFilterSet.add(expandedActivityFilter);
    3. یک ActivityRule ایجاد کنید:

      کاتلین

      val activityRule = ActivityRule.Builder(expandedActivityFilterSet)
          .setAlwaysExpand(true)
          .build()

      جاوا

      ActivityRule activityRule = new ActivityRule.Builder(
          expandedActivityFilterSet
      ).setAlwaysExpand(true)
       .build();

      ActivityRule.Builder قانون را ایجاد و پیکربندی می کند:

      • expandedActivityFilterSet : حاوی فیلترهای فعالیت است که تعیین می کند با شناسایی فعالیت هایی که می خواهید از تقسیم ها حذف شوند، چه زمانی قانون اعمال شود.
      • setAlwaysExpand() : مشخص می کند که آیا اکتیویتی باید کل پنجره وظیفه را پر کند یا خیر.
    4. قانون را به RuleController WindowManager اضافه کنید:

      کاتلین

      ruleController.addRule(activityRule)

      جاوا

      ruleController.addRule(activityRule);

تعبیه برنامه های متقابل

در Android 13 (سطح API 33) و بالاتر، برنامه‌ها می‌توانند فعالیت‌های برنامه‌های دیگر را جاسازی کنند. تعبیه فعالیت های متقابل یا متقاطع UID ، یکپارچه سازی بصری فعالیت ها از چندین برنامه Android را امکان پذیر می کند. سیستم یک فعالیت برنامه میزبان و یک فعالیت جاسازی شده از یک برنامه دیگر را در کنار هم یا بالا و پایین صفحه نمایش می دهد، درست مانند جاسازی فعالیت تک برنامه.

برای مثال، برنامه تنظیمات می‌تواند فعالیت انتخابگر تصویر زمینه را از برنامه WallpaperPicker جاسازی کند:
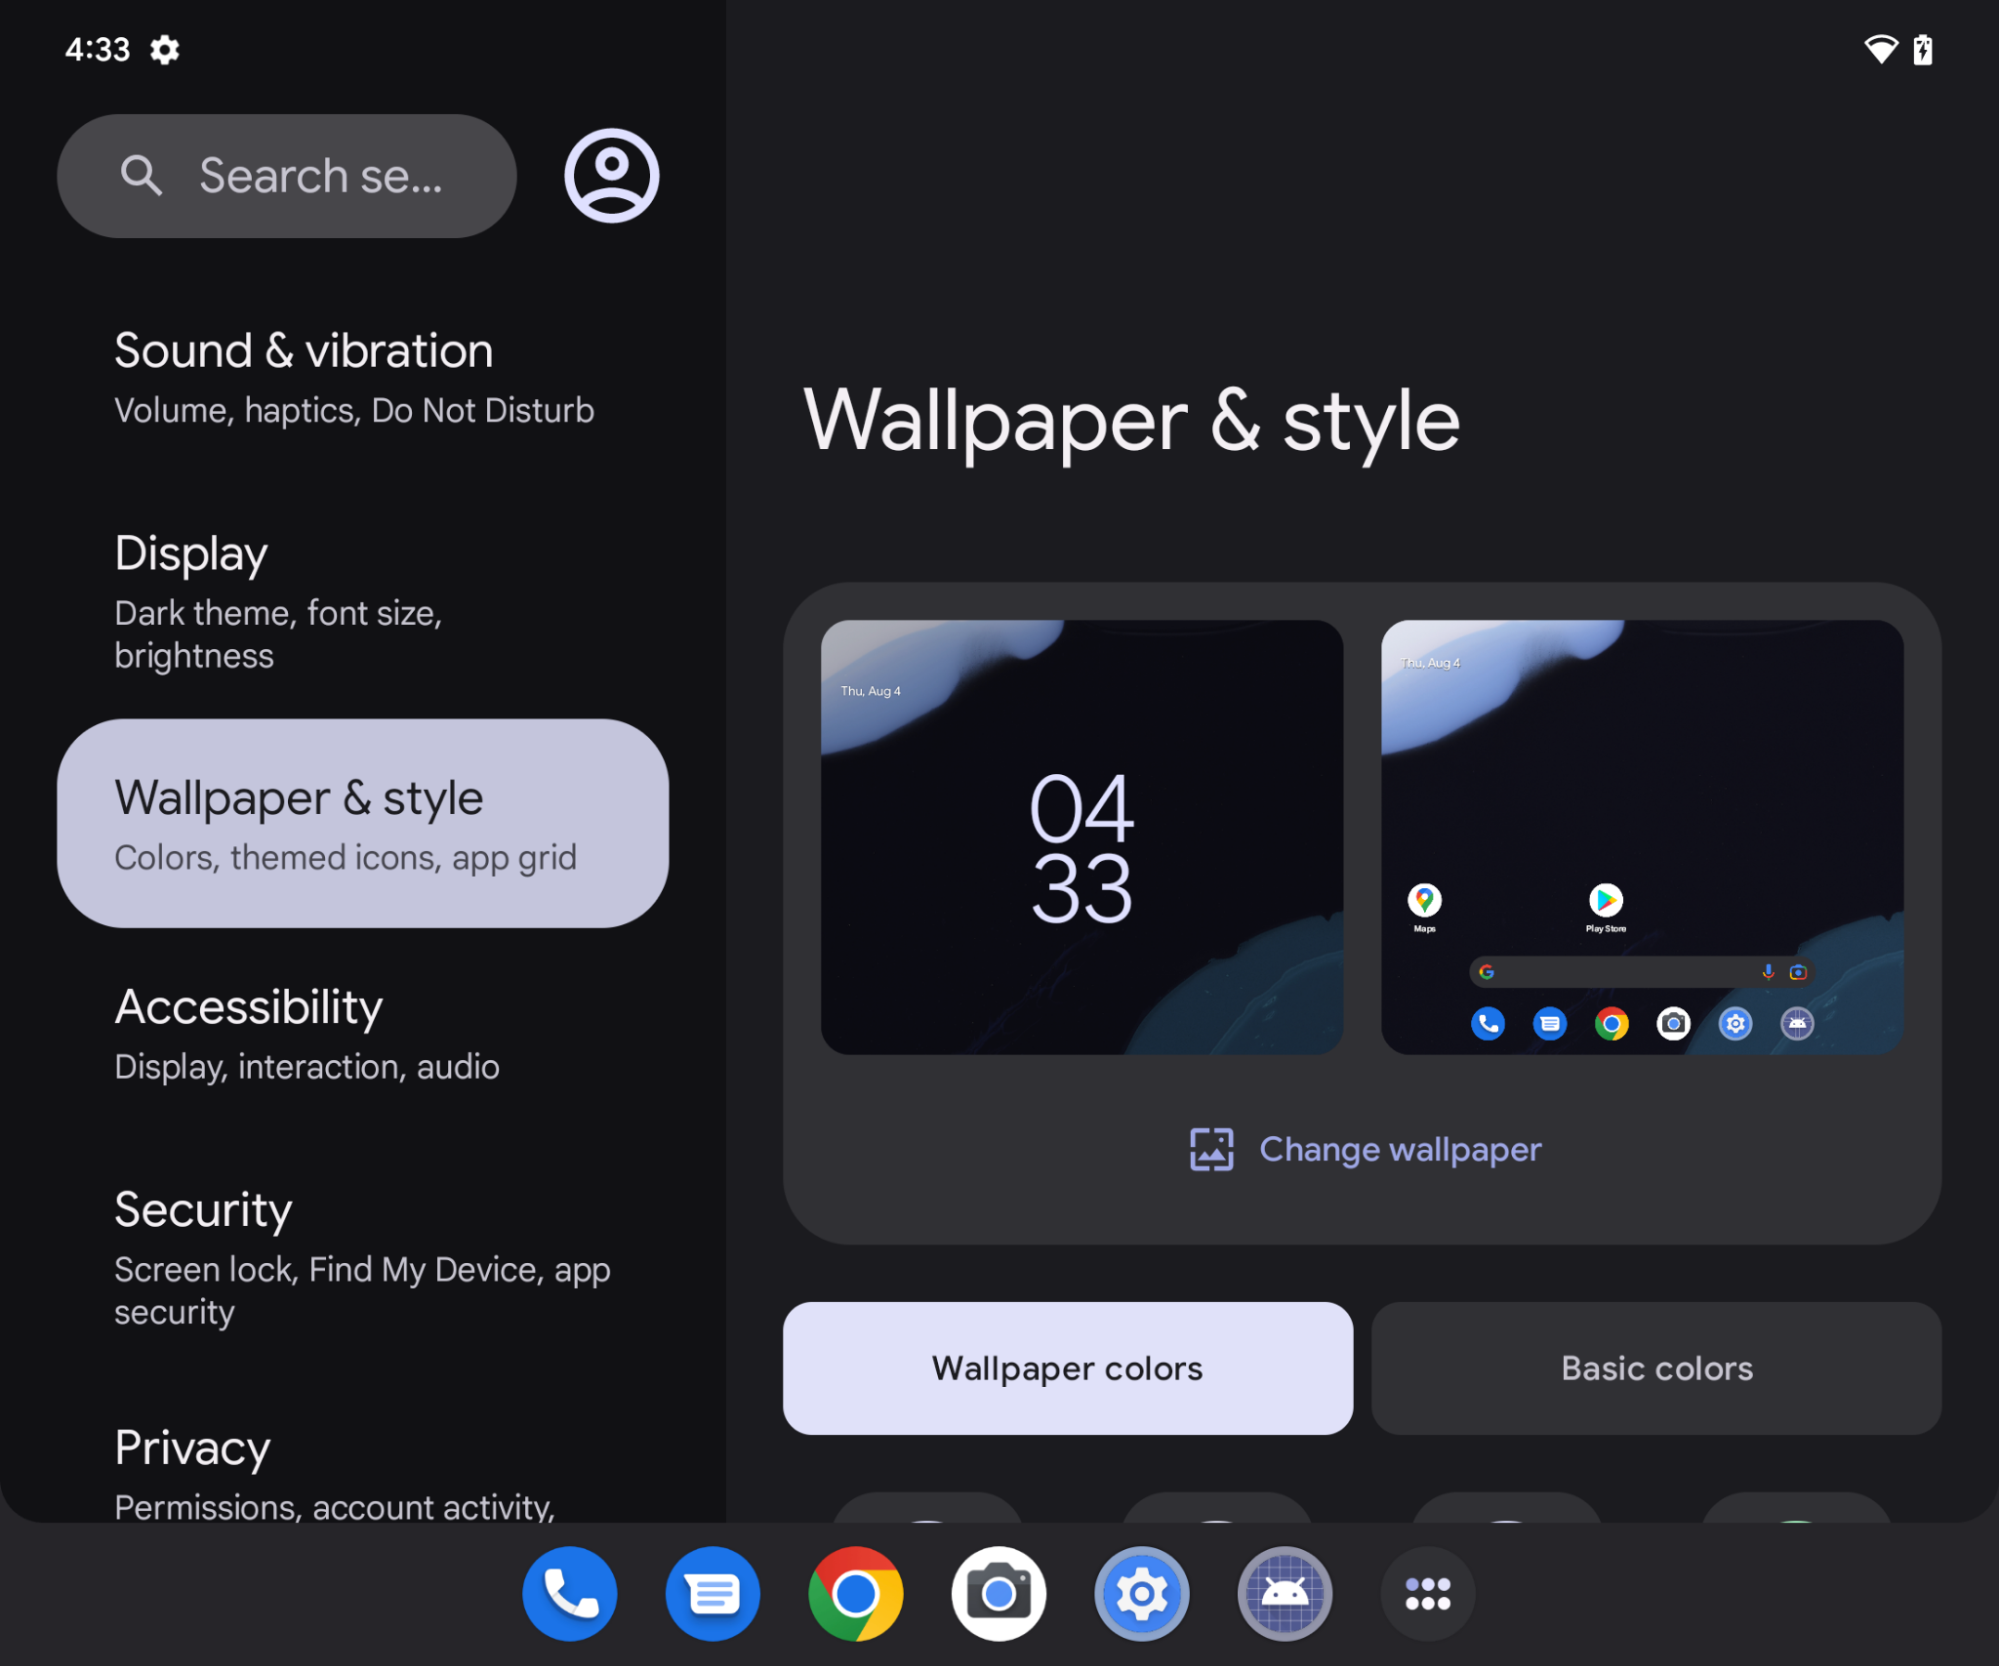
شکل 14. برنامه تنظیمات (منو در سمت چپ) با انتخابگر تصویر زمینه به عنوان فعالیت جاسازی شده (راست).

مدل اعتماد

فرآیندهای میزبانی که فعالیت‌های برنامه‌های دیگر را جاسازی می‌کنند، می‌توانند نمایش فعالیت‌های تعبیه‌شده، از جمله اندازه، موقعیت، برش و شفافیت را دوباره تعریف کنند. میزبان های مخرب می توانند از این قابلیت برای گمراه کردن کاربران و ایجاد کلیک جک یا سایر حملات اصلاح کننده رابط کاربری استفاده کنند.

برای جلوگیری از سوء استفاده از جاسازی فعالیت‌های بین برنامه‌ای، Android از برنامه‌ها می‌خواهد که برای اجازه دادن به جاسازی فعالیت‌های خود شرکت کنند. برنامه‌ها می‌توانند میزبان‌ها را به‌عنوان مورد اعتماد یا غیرقابل اعتماد معرفی کنند.

میزبان های قابل اعتماد

برای اجازه دادن به سایر برنامه‌ها برای جاسازی و کنترل کامل ارائه فعالیت‌ها از برنامه شما، گواهی SHA-256 برنامه میزبان را در ویژگی android:knownActivityEmbeddingCerts عناصر <activity> یا <application> فایل مانیفست برنامه خود مشخص کنید.

مقدار android:knownActivityEmbeddingCerts را به عنوان یک رشته تنظیم کنید:

<activity
    android:name=".MyEmbeddableActivity"
    android:knownActivityEmbeddingCerts="@string/known_host_certificate_digest"
    ... />

یا برای تعیین چندین گواهی، آرایه ای از رشته ها:

<activity
    android:name=".MyEmbeddableActivity"
    android:knownActivityEmbeddingCerts="@array/known_host_certificate_digests"
    ... />

که به منبعی مانند زیر ارجاع می دهد:

<resources>
    <string-array name="known_host_certificate_digests">
      <item>cert1</item>
      <item>cert2</item>
      ...
    </string-array>
</resources>

دارندگان برنامه می توانند با اجرای کار Gradle signingReport خلاصه گواهی SHA را دریافت کنند. خلاصه گواهی اثر انگشت SHA-256 بدون کولون جداکننده است. برای اطلاعات بیشتر، به اجرای گزارش امضا و احراز هویت مشتری مراجعه کنید.

هاست های غیر قابل اعتماد

برای اینکه به هر برنامه ای اجازه دهید فعالیت های برنامه شما را جاسازی کند و نمایش آنها را کنترل کند، ویژگی android:allowUntrustedActivityEmbedding در عناصر <activity> یا <application> در مانیفست برنامه مشخص کنید، به عنوان مثال:

<activity
    android:name=".MyEmbeddableActivity"
    android:allowUntrustedActivityEmbedding="true"
    ... />

مقدار پیش‌فرض ویژگی false است، که از تعبیه فعالیت بین برنامه‌ای جلوگیری می‌کند.

احراز هویت سفارشی

برای کاهش خطرات تعبیه فعالیت های نامعتبر، یک مکانیسم احراز هویت سفارشی ایجاد کنید که هویت میزبان را تأیید می کند. اگر گواهی‌های میزبان را می‌شناسید، از کتابخانه androidx.security.app.authenticator برای احراز هویت استفاده کنید. اگر میزبان پس از تعبیه فعالیت شما احراز هویت شود، می توانید محتوای واقعی را نمایش دهید. در غیر این صورت، می توانید به کاربر اطلاع دهید که اقدام مجاز نبوده و محتوا را مسدود کنید.

از متد ActivityEmbeddingController#isActivityEmbedded() از کتابخانه Jetpack WindowManager برای بررسی اینکه آیا یک میزبان فعالیت شما را تعبیه می کند، استفاده کنید، به عنوان مثال:

کاتلین

fun isActivityEmbedded(activity: Activity): Boolean {
    return ActivityEmbeddingController.getInstance(this).isActivityEmbedded(activity)
}

جاوا

boolean isActivityEmbedded(Activity activity) {
    return ActivityEmbeddingController.getInstance(this).isActivityEmbedded(activity);
}

حداقل محدودیت اندازه

سیستم Android حداقل ارتفاع و عرض مشخص شده در عنصر مانیفست برنامه <layout> را برای فعالیت های جاسازی شده اعمال می کند. اگر برنامه ای حداقل ارتفاع و عرض را مشخص نکند، مقادیر پیش فرض سیستم اعمال می شود ( sw220dp ).

اگر میزبان سعی کند اندازه ظرف تعبیه شده را به اندازه کوچکتر از حداقل تغییر دهد، ظرف جاسازی شده گسترش می یابد تا کل محدوده کار را اشغال کند.

<activity-alias>

برای اینکه جاسازی فعالیت قابل اعتماد یا غیرقابل اعتماد با عنصر <activity-alias> کار کند، android:knownActivityEmbeddingCerts یا android:allowUntrustedActivityEmbedding باید به جای نام مستعار، برای فعالیت هدف اعمال شود. خط مشی ای که امنیت سرور سیستم را تأیید می کند بر اساس پرچم های تنظیم شده روی هدف است، نه نام مستعار.

برنامه میزبان

برنامه های میزبان، تعبیه فعالیت بین برنامه ای را به همان روشی که تعبیه فعالیت تک برنامه ای را پیاده سازی می کنند، پیاده سازی می کنند. اشیاء SplitPairRule و SplitPairFilter یا ActivityRule و ActivityFilter فعالیت های تعبیه شده و تقسیم پنجره وظیفه را مشخص می کنند. قوانین تقسیم به صورت ایستا در XML یا در زمان اجرا با استفاده از فراخوانی های Jetpack WindowManager API تعریف می شوند.

اگر یک برنامه میزبان تلاش کند فعالیتی را جاسازی کند که در تعبیه بین برنامه ای شرکت نکرده است، فعالیت کل محدوده کار را اشغال می کند. در نتیجه، برنامه‌های میزبان باید بدانند که آیا فعالیت‌های هدف اجازه جاسازی بین برنامه‌ها را می‌دهند یا خیر.

اگر یک فعالیت جاسازی شده یک فعالیت جدید را در همان کار شروع کند و فعالیت جدید در جاسازی بین برنامه‌ای شرکت نکرده باشد، این فعالیت به جای پوشاندن فعالیت در ظرف جاسازی شده، کل محدوده کار را اشغال می‌کند.

یک برنامه میزبان می تواند فعالیت های خود را بدون محدودیت تعبیه کند تا زمانی که فعالیت ها در همان کار راه اندازی شوند.

نمونه های تقسیم شده

تقسیم از پنجره کامل

شکل 15. فعالیت A فعالیت B را به طرفین شروع می کند.

بدون نیاز به بازسازی می توانید پیکربندی تقسیم را به صورت ایستا یا در زمان اجرا تعریف کنید و سپس Context#startActivity() بدون هیچ پارامتر اضافی فراخوانی کنید.

<SplitPairRule>
    <SplitPairFilter
        window:primaryActivityName=".A"
        window:secondaryActivityName=".B"/>
</SplitPairRule>

تقسیم به طور پیش فرض

وقتی صفحه فرود یک برنامه به گونه‌ای طراحی شده است که در صفحه‌های بزرگ به دو کانتینر تقسیم شود، تجربه کاربر زمانی بهترین است که هر دو فعالیت به طور همزمان ایجاد و ارائه شوند. با این حال، ممکن است تا زمانی که کاربر با فعالیت در کانتینر اصلی تعامل نداشته باشد، محتوا برای ظرف ثانویه تقسیم در دسترس نباشد (به عنوان مثال، کاربر یک مورد را از منوی پیمایش انتخاب کند). یک فعالیت مکان‌نما می‌تواند جای خالی را پر کند تا زمانی که محتوا در ظرف ثانویه تقسیم نمایش داده شود (به بخش Placeholders مراجعه کنید).

شکل 16. تقسیم ایجاد شده با باز کردن دو فعالیت به طور همزمان. یکی از فعالیت ها جایگاه نگهدارنده است.

برای ایجاد یک تقسیم با یک مکان نگهدار، یک مکان نگهدار ایجاد کنید و آن را با فعالیت اصلی مرتبط کنید:

<SplitPlaceholderRule
    window:placeholderActivityName=".PlaceholderActivity">
    <ActivityFilter
        window:activityName=".MainActivity"/>
</SplitPlaceholderRule>

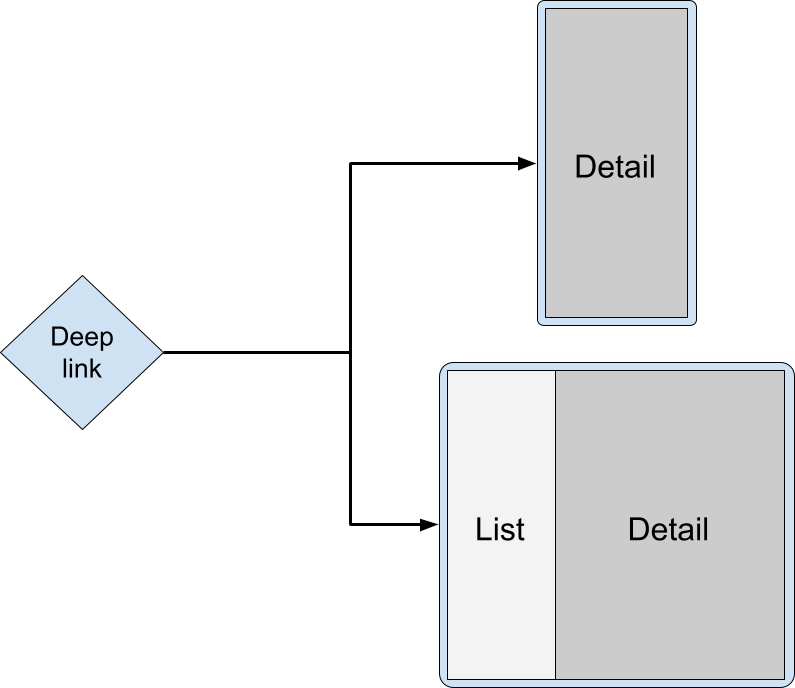
هنگامی که یک برنامه یک هدف دریافت می کند، فعالیت هدف می تواند به عنوان بخش ثانویه یک تقسیم فعالیت نشان داده شود. برای مثال، درخواستی برای نمایش یک صفحه جزئیات با اطلاعات مربوط به یک مورد از یک لیست. در نمایشگرهای کوچک، جزئیات در پنجره کار کامل نشان داده می شود. در دستگاه های بزرگتر، در کنار لیست.

شکل 17. فعالیت جزئیات پیوند عمیق به تنهایی در یک صفحه کوچک نشان داده شده است، اما همراه با یک فعالیت لیست در یک صفحه بزرگ.

درخواست راه اندازی باید به فعالیت اصلی هدایت شود و فعالیت جزئیات هدف باید به صورت تقسیمی راه اندازی شود. سیستم به طور خودکار بر اساس عرض نمایش موجود، ارائه صحیح را انتخاب می کند - پشته یا کنار هم -.

کاتلین

override fun onCreate(savedInstanceState Bundle?) {
    . . .
    RuleController.getInstance(this)
        .addRule(SplitPairRule.Builder(filterSet).build())
    startActivity(Intent(this, DetailActivity::class.java))
}

جاوا

@Override
protected void onCreate(@Nullable Bundle savedInstanceState) {
    . . .
    RuleController.getInstance(this)
        .addRule(new SplitPairRule.Builder(filterSet).build());
    startActivity(new Intent(this, DetailActivity.class));
}

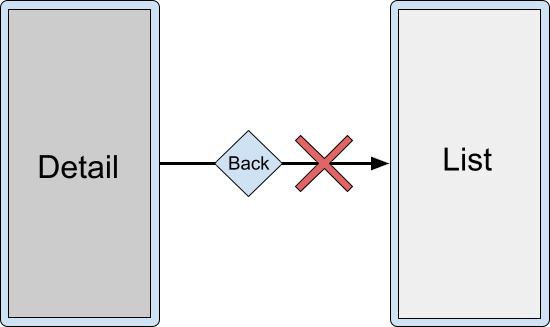
مقصد پیوند عمیق ممکن است تنها فعالیتی باشد که باید در پشته ناوبری پشتی در دسترس کاربر باشد، و ممکن است بخواهید از رد کردن فعالیت جزئیات و باقی گذاشتن تنها فعالیت اصلی خودداری کنید:

نمایشگر بزرگ با فعالیت لیست و فعالیت جزئیات در کنار هم.           پیمایش برگشت قادر به رد کردن فعالیت جزئیات و خروج از لیست نیست           فعالیت روی صفحه نمایش

نمایشگر کوچک فقط با فعالیت جزئیات. ناوبری برگشت امکان پذیر نیست           فعالیت جزئیات را رد کنید و فعالیت لیست را آشکار کنید.

در عوض، می‌توانید هر دو فعالیت را همزمان با استفاده از ویژگی finishPrimaryWithSecondary به پایان برسانید:

<SplitPairRule
    window:finishPrimaryWithSecondary="always">
    <SplitPairFilter
        window:primaryActivityName=".ListActivity"
        window:secondaryActivityName=".DetailActivity"/>
</SplitPairRule>

بخش تنظیمات پیکربندی را ببینید.

فعالیت های متعدد در کانتینرهای تقسیم شده

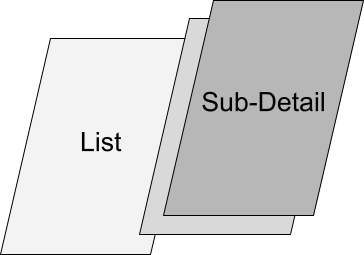
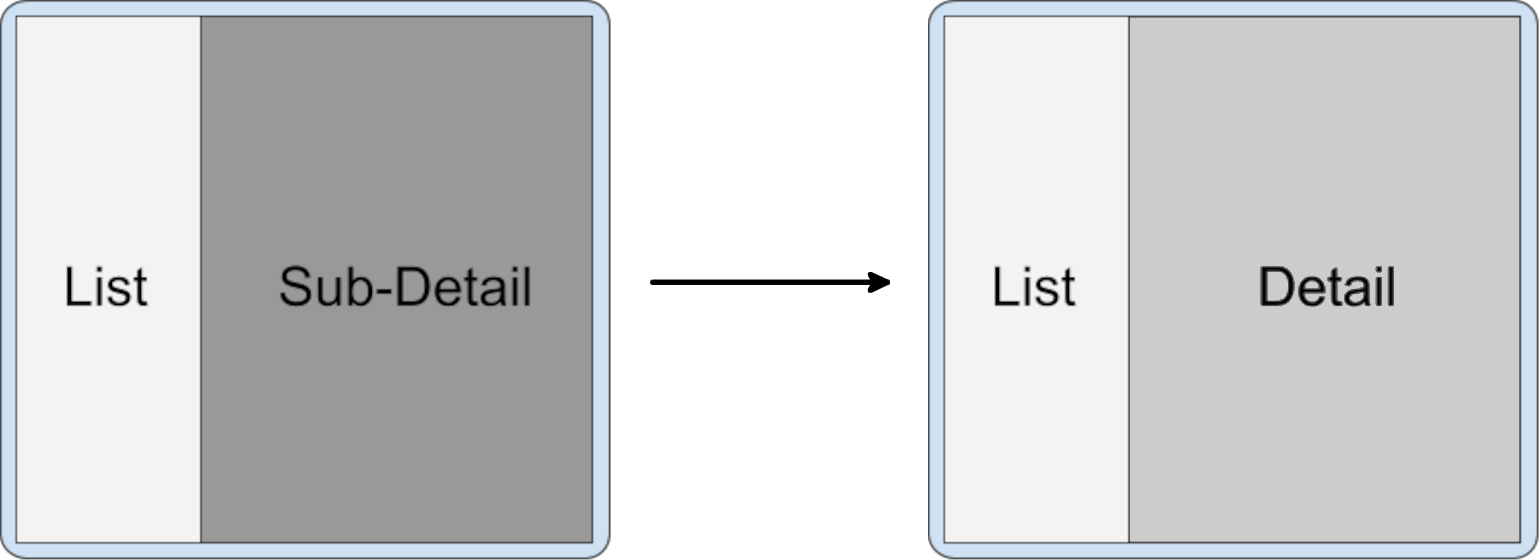
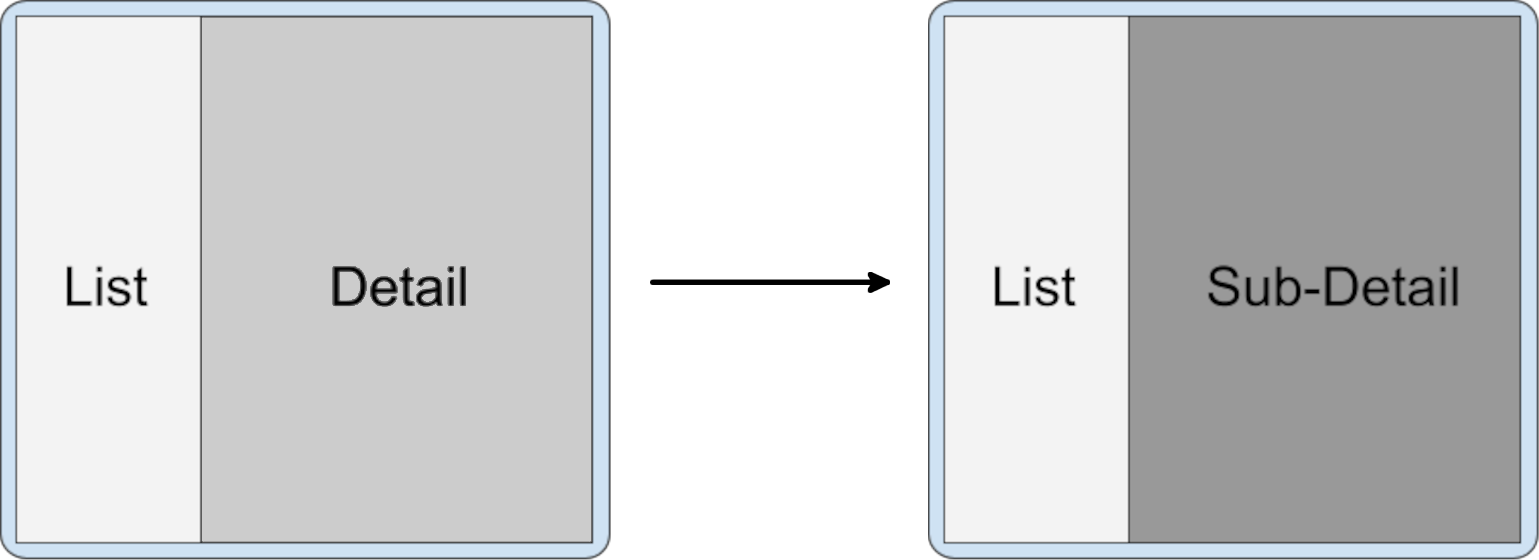
قرار دادن چندین فعالیت در یک کانتینر تقسیم شده، کاربران را قادر می سازد به محتوای عمیق دسترسی داشته باشند. به عنوان مثال، با تقسیم جزئیات لیست، کاربر ممکن است نیاز داشته باشد که به بخش جزئیات فرعی برود اما فعالیت اصلی را در جای خود نگه دارد:
شکل 18. فعالیت در قسمت دوم پنجره وظیفه باز شد.

کاتلین

class DetailActivity {
    . . .
    fun onOpenSubDetail() {
      startActivity(Intent(this, SubDetailActivity::class.java))
    }
}

جاوا

public class DetailActivity {
    . . .
    void onOpenSubDetail() {
        startActivity(new Intent(this, SubDetailActivity.class));
    }
}

فعالیت جزییات فرعی در بالای فعالیت جزئیات قرار می گیرد و آن را پنهان می کند:

سپس کاربر می تواند با پیمایش در پشته به سطح جزئیات قبلی برگردد:

شکل 19. فعالیت از بالای پشته حذف شد.

انباشتن فعالیت‌ها روی هم، رفتار پیش‌فرض زمانی است که فعالیت‌ها از یک فعالیت در یک کانتینر ثانویه راه‌اندازی می‌شوند. فعالیت‌هایی که از کانتینر اولیه در یک تقسیم فعال راه‌اندازی می‌شوند نیز به کانتینر ثانویه در بالای پشته فعالیت ختم می‌شوند.

فعالیت در یک کار جدید

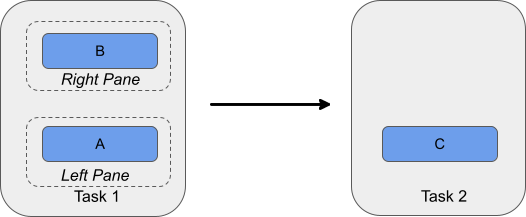
هنگامی که فعالیت‌ها در یک پنجره وظیفه تقسیم فعالیت‌ها را در یک کار جدید شروع می‌کنند، وظیفه جدید از وظیفه‌ای که شامل تقسیم می‌شود جدا است و پنجره کامل نمایش داده می‌شود. صفحه Recents دو کار را نشان می دهد: وظیفه در تقسیم و وظیفه جدید.

شکل 20. فعالیت C را در یک کار جدید از فعالیت B شروع کنید.

جایگزینی فعالیت

فعالیت ها را می توان در پشته کانتینر ثانویه جایگزین کرد. به عنوان مثال، زمانی که فعالیت اولیه برای ناوبری سطح بالا استفاده می شود و فعالیت ثانویه یک مقصد انتخاب شده است. هر انتخاب از پیمایش سطح بالا باید یک فعالیت جدید را در ظرف ثانویه شروع کند و فعالیت یا فعالیت هایی را که قبلاً در آنجا بودند حذف کند.
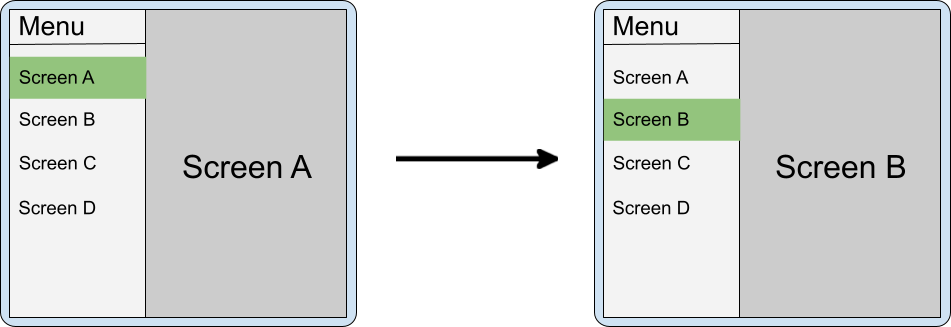
شکل 21. فعالیت ناوبری سطح بالا در صفحه اصلی جایگزین فعالیت های مقصد در پنجره ثانویه می شود.

اگر برنامه زمانی که انتخاب پیمایش تغییر می‌کند، فعالیت را در محفظه ثانویه به پایان نرساند، ممکن است هنگام جمع کردن تقسیم (زمانی که دستگاه تا شده است، پیمایش برگشت گیج کننده باشد). به عنوان مثال، اگر یک منو در صفحه اصلی دارید و صفحه‌های A و B را در قسمت ثانویه انباشته دارید، وقتی کاربر گوشی را تا می‌کند، B بالای A و A بالای منو است. هنگامی که کاربر از B به عقب برمی گردد، A به جای منو ظاهر می شود.

در چنین مواردی صفحه A باید از پشته حذف شود.

رفتار پیش‌فرض هنگام پرتاب به کنار در یک کانتینر جدید بر روی یک تقسیم موجود این است که کانتینرهای ثانویه جدید را در بالا قرار دهید و کانتینرهای قدیمی را در پشته نگه دارید. می‌توانید تقسیم‌ها را طوری پیکربندی کنید که کانتینرهای ثانویه قبلی را با clearTop پاک کرده و فعالیت‌های جدید را به طور معمول راه‌اندازی کنید.

<SplitPairRule
    window:clearTop="true">
    <SplitPairFilter
        window:primaryActivityName=".Menu"
        window:secondaryActivityName=".ScreenA"/>
    <SplitPairFilter
        window:primaryActivityName=".Menu"
        window:secondaryActivityName=".ScreenB"/>
</SplitPairRule>

کاتلین

class MenuActivity {
    . . .
    fun onMenuItemSelected(selectedMenuItem: Int) {
        startActivity(Intent(this, classForItem(selectedMenuItem)))
    }
}

جاوا

public class MenuActivity {
    . . .
    void onMenuItemSelected(int selectedMenuItem) {
        startActivity(new Intent(this, classForItem(selectedMenuItem)));
    }
}

یا از همان اکتیویتی ثانویه استفاده کنید و از فعالیت اصلی (منو) مقاصد جدیدی ارسال کنید که به همان نمونه حل می‌شوند، اما حالت یا به‌روزرسانی رابط کاربری را در ظرف ثانویه راه‌اندازی می‌کنند.

تقسیم های متعدد

برنامه‌ها می‌توانند با راه‌اندازی فعالیت‌های اضافی در کنار، ناوبری عمیق چند سطحی را ارائه دهند.

هنگامی که یک اکتیویتی در یک کانتینر ثانویه یک فعالیت جدید را به طرفین راه اندازی می کند، یک تقسیم جدید در بالای تقسیم موجود ایجاد می شود.

شکل 22. فعالیت B فعالیت C را به طرفین شروع می کند.

پشته پشتی شامل تمام فعالیت‌هایی است که قبلاً باز شده‌اند، بنابراین کاربران می‌توانند پس از اتمام C به تقسیم A/B بروند.

فعالیت های A، B و C در یک پشته. فعالیت ها انباشته شده اند           ترتیب زیر از بالا به پایین: C، B، A.

برای ایجاد یک تقسیم جدید ، فعالیت جدید را از ظرف ثانویه موجود به طرف آن راه اندازی کنید. تنظیمات را برای هر دو شکاف A/B و B/C اعلام کنید و فعالیت C را به طور عادی از B:

<SplitPairRule>
    <SplitPairFilter
        window:primaryActivityName=".A"
        window:secondaryActivityName=".B"/>
    <SplitPairFilter
        window:primaryActivityName=".B"
        window:secondaryActivityName=".C"/>
</SplitPairRule>

کاتلین

class B {
    . . .
    fun onOpenC() {
        startActivity(Intent(this, C::class.java))
    }
}

جاوا

public class B {
    . . .
    void onOpenC() {
        startActivity(new Intent(this, C.class));
    }
}

واکنش نشان می دهد به تغییرات حالت تقسیم

فعالیت های مختلف در یک برنامه می تواند دارای عناصر UI باشد که عملکرد یکسانی را انجام می دهند. به عنوان مثال ، کنترلی که پنجره ای حاوی تنظیمات حساب را باز می کند.

شکل 23 فعالیت های مختلف با عناصر UI از نظر عملکردی یکسان.

اگر دو فعالیت که یک عنصر UI مشترک دارند ، در یک تقسیم قرار دارند ، نشان دادن این عنصر در هر دو فعالیت ، زائد و شاید گیج کننده است.

شکل 24 عناصر UI کپی در تقسیم فعالیت.

برای دانستن اینکه چه زمانی فعالیت ها در یک تقسیم هستند ، جریان SplitController.splitInfoList را بررسی کنید یا یک شنونده را با SplitControllerCallbackAdapter برای تغییر در حالت تقسیم ثبت کنید. سپس ، UI را بر این اساس تنظیم کنید:

کاتلین

val layout = layoutInflater.inflate(R.layout.activity_main, null)
val view = layout.findViewById<View>(R.id.infoButton)
lifecycleScope.launch {
    lifecycle.repeatOnLifecycle(Lifecycle.State.STARTED) {
        splitController.splitInfoList(this@SplitDeviceActivity) // The activity instance.
            .collect { list ->
                view.visibility = if (list.isEmpty()) View.VISIBLE else View.GONE
            }
    }
}

جاوا

@Override
protected void onCreate(@Nullable Bundle savedInstanceState) {
    . . .
    new SplitControllerCallbackAdapter(SplitController.getInstance(this))
        .addSplitListener(
            this,
            Runnable::run,
            splitInfoList -> {
                View layout = getLayoutInflater().inflate(R.layout.activity_main, null);
                layout.findViewById(R.id.infoButton).setVisibility(
                    splitInfoList.isEmpty() ? View.VISIBLE : View.GONE);
            });
}

Coroutines را می توان در هر حالت چرخه عمر راه اندازی کرد ، اما به طور معمول در حالت STARTED برای حفظ منابع راه اندازی می شود (برای کسب اطلاعات بیشتر به استفاده از Coroutines Kotlin با اجزای آگاه از چرخه عمر مراجعه کنید).

در هر حالت چرخه عمر ، تماس تلفنی را می توان انجام داد ، از جمله هنگامی که یک فعالیت متوقف می شود. شنوندگان معمولاً باید در onStart() ثبت شوند و در onStop() ثبت نشده باشند.

معین

برخی از فعالیت ها کاربران را از تعامل با برنامه تا زمانی که یک عمل مشخص انجام شود ، مسدود می کند. به عنوان مثال ، یک فعالیت صفحه نمایش ورود به سیستم ، صفحه تأیید خط مشی یا پیام خطا. از فعالیت های معین باید در یک شکاف جلوگیری شود.

یک فعالیت می تواند مجبور شود همیشه با استفاده از پیکربندی Expand ، پنجره کار را پر کند:

<ActivityRule
    window:alwaysExpand="true">
    <ActivityFilter
        window:activityName=".FullWidthActivity"/>
</ActivityRule>

فعالیت های پایان

کاربران می توانند با کشیدن از لبه نمایش ، فعالیت های هر دو طرف تقسیم را به پایان برسانند:

شکل 25 فعالیت اتمام ژست را بکشید.
شکل 26. فعالیت اتمام ژست را بکشید.

اگر دستگاه برای استفاده از دکمه عقب به جای ناوبری ژست تنظیم شده باشد ، ورودی به فعالیت متمرکز ارسال می شود - فعالیتی که آخرین بار لمس شده یا راه اندازی شده است.

تأثیر این که تمام فعالیت ها در یک ظرف بر روی ظرف مخالف قرار دارد ، بستگی به پیکربندی تقسیم دارد.

ویژگی های پیکربندی

شما می توانید ویژگی های قانون جفت تقسیم را برای پیکربندی چگونگی پایان کار تمام فعالیت ها در یک طرف تقسیم بر فعالیت های آن طرف تقسیم تأثیر می گذارد. ویژگی ها عبارتند از:

  • window:finishPrimaryWithSecondary - چگونگی پایان کار تمام فعالیت ها در ظرف ثانویه بر فعالیت های موجود در ظرف اصلی تأثیر می گذارد
  • window:finishSecondaryWithPrimary - چگونگی پایان کار تمام فعالیت ها در کانتینر اصلی بر فعالیت های موجود در ظرف ثانویه تأثیر می گذارد

مقادیر احتمالی ویژگی ها عبارتند از:

  • always - همیشه فعالیت ها را در ظرف مرتبط به پایان برسانید
  • never - هرگز فعالیت ها را در ظرف مرتبط به پایان نرسانید
  • adjacent - هنگامی که دو ظروف در مجاورت یکدیگر نمایش داده می شوند ، فعالیت ها را در ظرف مرتبط به پایان برسانید ، اما نه وقتی که این دو ظروف جمع شده اند

به عنوان مثال:

<SplitPairRule
    &lt;!-- Do not finish primary container activities when all secondary container activities finish. --&gt;
    window:finishPrimaryWithSecondary="never"
    &lt;!-- Finish secondary container activities when all primary container activities finish. --&gt;
    window:finishSecondaryWithPrimary="always">
    <SplitPairFilter
        window:primaryActivityName=".A"
        window:secondaryActivityName=".B"/>
</SplitPairRule>

پیکربندی پیش فرض

هنگامی که تمام فعالیت ها در یک ظرف یک تقسیم تقسیم ، ظرف باقیمانده کل پنجره را اشغال می کند:

<SplitPairRule>
    <SplitPairFilter
        window:primaryActivityName=".A"
        window:secondaryActivityName=".B"/>
</SplitPairRule>

تقسیم فعالیت های A و B. A به پایان رسیده است ، و B را ترک می کند           کل پنجره را اشغال کنید.

تقسیم فعالیت های A و B. B به پایان رسیده است ، و A را ترک می کند           کل پنجره را اشغال کنید.

فعالیت ها را با هم تمام کنید

هنگامی که تمام فعالیت های موجود در ظرف ثانویه به پایان برسد ، فعالیت ها را در ظرف اصلی به طور خودکار به پایان برسانید:

<SplitPairRule
    window:finishPrimaryWithSecondary="always">
    <SplitPairFilter
        window:primaryActivityName=".A"
        window:secondaryActivityName=".B"/>
</SplitPairRule>

تقسیم فعالیت های A و B. B به پایان رسیده است ، که این نیز           A را تمام می کند و پنجره کار را خالی می کند.

تقسیم فعالیت های A و B. A به پایان رسیده است و B را تنها می گذارد           در پنجره کار

هنگامی که تمام فعالیت های موجود در ظرف اصلی به پایان برسد ، فعالیت ها را در ظرف ثانویه به طور خودکار به پایان برسانید:

<SplitPairRule
    window:finishSecondaryWithPrimary="always">
    <SplitPairFilter
        window:primaryActivityName=".A"
        window:secondaryActivityName=".B"/>
</SplitPairRule>

تقسیم فعالیت های A و B. A به پایان رسیده است ، که نیز           B را تمام می کند و پنجره کار را خالی می کند.

تقسیم فعالیت های A و B. B به پایان رسیده است و تنها می گذارد           در پنجره کار

فعالیت ها را با هم به پایان برسانید وقتی همه فعالیت ها در ظرف اولیه یا ثانویه به پایان برسد:

<SplitPairRule
    window:finishPrimaryWithSecondary="always"
    window:finishSecondaryWithPrimary="always">
    <SplitPairFilter
        window:primaryActivityName=".A"
        window:secondaryActivityName=".B"/>
</SplitPairRule>

تقسیم فعالیت های A و B. A به پایان رسیده است ، که نیز           B را تمام می کند و پنجره کار را خالی می کند.

تقسیم فعالیت های A و B. B به پایان رسیده است ، که این نیز           A را تمام می کند و پنجره کار را خالی می کند.

چندین فعالیت را در ظروف به پایان برسانید

اگر چندین فعالیت در یک ظرف تقسیم شده جمع شود ، پایان دادن به فعالیت در پایین پشته ، به طور خودکار فعالیت ها را در بالا به پایان نمی رساند.

به عنوان مثال ، اگر دو فعالیت در ظرف ثانویه باشد ، C در بالای B:

پشته فعالیت ثانویه حاوی فعالیت C در بالای B جمع شده است           در بالای پشته فعالیت prmary حاوی فعالیت جمع شده است           الف

و پیکربندی تقسیم با پیکربندی فعالیت های A و B تعریف می شود:

<SplitPairRule>
    <SplitPairFilter
        window:primaryActivityName=".A"
        window:secondaryActivityName=".B"/>
</SplitPairRule>

به پایان رساندن فعالیت برتر ، تقسیم را حفظ می کند.

تقسیم با فعالیت A در ظرف اولیه و فعالیت های B و C در           ثانویه ، C در بالای B. C به پایان رسید و A و B را در           تقسیم فعالیت.

به پایان رساندن فعالیت پایین (ریشه) ظرف ثانویه ، فعالیت های موجود در آن را از بین نمی برد. و بنابراین ، تقسیم را نیز حفظ می کند.

تقسیم با فعالیت A در ظرف اولیه و فعالیت های B و C در           ثانویه ، C در بالای B. B به پایان رسید و A و C را در           تقسیم فعالیت.

هرگونه قانون اضافی برای پایان فعالیت در کنار هم ، مانند اتمام فعالیت ثانویه با اولیه ، نیز اجرا می شود:

<SplitPairRule
    window:finishSecondaryWithPrimary="always">
    <SplitPairFilter
        window:primaryActivityName=".A"
        window:secondaryActivityName=".B"/>
</SplitPairRule>

تقسیم با فعالیت A در ظرف اولیه و فعالیت های B و C در           کانتینر ثانویه ، C در بالای B. یک پایان است.           اتمام B و C.

و هنگامی که تقسیم پیکربندی شده است تا ابتدایی و ثانویه را با هم به پایان برساند:

<SplitPairRule
    window:finishPrimaryWithSecondary="always"
    window:finishSecondaryWithPrimary="always">
    <SplitPairFilter
        window:primaryActivityName=".A"
        window:secondaryActivityName=".B"/>
</SplitPairRule>

تقسیم با فعالیت A در ظرف اولیه و فعالیت های B و C در           ثانویه ، C در بالای B. C به پایان رسید و A و B را در           تقسیم فعالیت.

تقسیم با فعالیت A در ظرف اولیه و فعالیت های B و C در           ثانویه ، C در بالای B. B به پایان رسید و A و C را در           تقسیم فعالیت.

تقسیم با فعالیت A در ظرف اولیه و فعالیت های B و C در           ثانویه ، C در بالای B. A به پایان رسید ، همچنین B و           سی.

در زمان اجرا ، ویژگی های تقسیم را تغییر دهید

خواص یک تقسیم فعال و قابل مشاهده قابل تغییر نیست. تغییر قوانین تقسیم بر پرتاب فعالیت های اضافی و ظروف جدید تأثیر می گذارد ، اما شکاف های موجود و فعال نیست.

برای تغییر خصوصیات شکاف های فعال ، فعالیت جانبی یا فعالیت های موجود در تقسیم را به پایان برسانید و دوباره با پیکربندی جدید به طرف آن راه اندازی کنید.

خصوصیات تقسیم پویا

Android 15 (API سطح 35) و بالاتر توسط JetPack Windowmanager 1.4 و بالاتر از ویژگی های پویا ارائه می دهد که امکان تنظیم قابلیت های تعبیه شده فعالیت را فراهم می کند ، از جمله:

  • گسترش صفحه: یک تقسیم کننده تعاملی و قابل کشیدن ، کاربران را قادر می سازد تا صفحات را در یک نمایش تقسیم تغییر دهند.
  • فعالیت پشته فعالیت: کاربران می توانند محتوا را در یک ظرف بچسبانند و ناوبری را در ظرف از ناوبری در ظرف دیگر جدا کنند.
  • گفتگو تمام صفحه DIM: هنگام نمایش یک گفتگو ، برنامه ها می توانند مشخص کنند که آیا کل پنجره کار را کم رنگ می کنند یا فقط ظرفی که گفتگو را باز کرده است.

انبساط

گسترش Pane کاربران را قادر می سازد تا فضای صفحه نمایش اختصاص یافته به این دو فعالیت را در یک طرح پان دوگانه تنظیم کنند.

برای سفارشی کردن ظاهر تقسیم کننده پنجره و تنظیم دامنه Draggable تقسیم کننده ، موارد زیر را انجام دهید:

  1. نمونه ای از DividerAttributes ایجاد کنید

  2. ویژگی های تقسیم کننده را سفارشی کنید:

    • color : رنگ جداکننده صفحه قابل کشیدن.

    • widthDp : عرض جداکننده صفحه قابل کشیدن. روی WIDTH_SYSTEM_DEFAULT تنظیم کنید تا سیستم بتواند عرض تقسیم کننده را تعیین کند.

    • دامنه درگ: حداقل درصد صفحه یا صفحه می تواند اشغال کند. می تواند از 0.33 تا 0.66 باشد. به DRAG_RANGE_SYSTEM_DEFAULT تنظیم کنید تا سیستم محدوده درگ را تعیین کند.

کاتلین

val splitAttributesBuilder: SplitAttributes.Builder = SplitAttributes.Builder()
    .setSplitType(SplitAttributes.SplitType.ratio(0.33f))
    .setLayoutDirection(SplitAttributes.LayoutDirection.LEFT_TO_RIGHT)

if (WindowSdkExtensions.getInstance().extensionVersion >= 6) {
    splitAttributesBuilder.setDividerAttributes(
      DividerAttributes.DraggableDividerAttributes.Builder()
        .setColor(getColor(context, R.color.divider_color))
        .setWidthDp(4)
        .setDragRange(DividerAttributes.DragRange.DRAG_RANGE_SYSTEM_DEFAULT)
        .build()
    )
}
val splitAttributes: SplitAttributes = splitAttributesBuilder.build()

جاوا

SplitAttributes.Builder splitAttributesBuilder = new SplitAttributes.Builder()
    .setSplitType(SplitAttributes.SplitType.ratio(0.33f))
    .setLayoutDirection(SplitAttributes.LayoutDirection.LEFT_TO_RIGHT);

if (WindowSdkExtensions.getInstance().getExtensionVersion() >= 6) {
    splitAttributesBuilder.setDividerAttributes(
      new DividerAttributes.DraggableDividerAttributes.Builder()
        .setColor(ContextCompat.getColor(context, R.color.divider_color))
        .setWidthDp(4)
        .setDragRange(DividerAttributes.DragRange.DRAG_RANGE_SYSTEM_DEFAULT)
        .build()
    );
}
SplitAttributes splitAttributes = splitAttributesBuilder.build();

فعالیت پشته فعالیت

فعالیت پشته فعالیت کاربران را قادر می سازد تا یکی از ویندوزهای تقسیم شده را پین کنند تا فعالیت در حالی که کاربران در پنجره دیگر حرکت می کنند ، بماند. فعالیت پشته فعالیت یک تجربه چند وظیفه ای پیشرفته را فراهم می کند.

برای فعال کردن فعالیت پشته فعالیت در برنامه خود ، موارد زیر را انجام دهید:

  1. یک دکمه را به پرونده طرح بندی فعالیتی که می خواهید پین کنید اضافه کنید ، به عنوان مثال ، فعالیت جزئیات یک لیست لیست لیست:

    <androidx.constraintlayout.widget.ConstraintLayout
     xmlns:android="http://schemas.android.com/apk/res/android"
     xmlns:app="http://schemas.android.com/apk/res-auto"
     xmlns:tools="http://schemas.android.com/tools"
     android:id="@+id/detailActivity"
     android:layout_width="match_parent"
     android:layout_height="match_parent"
     android:background="@color/white"
     tools:context=".DetailActivity">
    
    <TextView
       android:id="@+id/textViewItemDetail"
       android:layout_width="wrap_content"
       android:layout_height="wrap_content"
       android:textSize="36sp"
       android:textColor="@color/obsidian"
       app:layout_constraintBottom_toTopOf="@id/pinButton"
       app:layout_constraintEnd_toEndOf="parent"
       app:layout_constraintStart_toStartOf="parent"
       app:layout_constraintTop_toTopOf="parent" />
    
    <androidx.appcompat.widget.AppCompatButton
       android:id="@+id/pinButton"
       android:layout_width="wrap_content"
       android:layout_height="wrap_content"
       android:text="@string/pin_this_activity"
       app:layout_constraintBottom_toBottomOf="parent"
       app:layout_constraintEnd_toEndOf="parent"
       app:layout_constraintStart_toStartOf="parent"
       app:layout_constraintTop_toBottomOf="@id/textViewItemDetail"/>
    
    </androidx.constraintlayout.widget.ConstraintLayout>
    
  2. در روش onCreate() فعالیت ، یک شنونده OnClick را روی دکمه تنظیم کنید:

    کاتلین

    pinButton = findViewById(R.id.pinButton)
    pinButton.setOnClickListener {
        val splitAttributes: SplitAttributes = SplitAttributes.Builder()
            .setSplitType(SplitAttributes.SplitType.ratio(0.66f))
            .setLayoutDirection(SplitAttributes.LayoutDirection.LEFT_TO_RIGHT)
            .build()
    
        val pinSplitRule = SplitPinRule.Builder()
            .setSticky(true)
            .setDefaultSplitAttributes(splitAttributes)
            .build()
    
        SplitController.getInstance(applicationContext).pinTopActivityStack(taskId, pinSplitRule)
    }

    جاوا

    Button pinButton = findViewById(R.id.pinButton);
    pinButton.setOnClickListener( (view) => {
        SplitAttributes splitAttributes = new SplitAttributes.Builder()
            .setSplitType(SplitAttributes.SplitType.ratio(0.66f))
            .setLayoutDirection(SplitAttributes.LayoutDirection.LEFT_TO_RIGHT)
            .build();
    
        SplitPinRule pinSplitRule = new SplitPinRule.Builder()
            .setSticky(true)
            .setDefaultSplitAttributes(splitAttributes)
            .build();
    
        SplitController.getInstance(getApplicationContext()).pinTopActivityStack(getTaskId(), pinSplitRule);
    });

گفتگوی تمام صفحه کم نور

فعالیت ها به طور معمول نمایشگرهای آنها را کم می کنند تا توجه به یک گفتگو را جلب کنند. در فعالیت تعبیه شده ، هر دو صفحه نمایشگر دو قطعه باید کم رنگ باشند ، نه فقط صفحه حاوی فعالیتی که گفتگو را باز می کند ، برای یک تجربه UI یکپارچه.

با WindowManager 1.4 و بالاتر ، کل پنجره برنامه به طور پیش فرض هنگام باز شدن گفتگو کم می شود (به EmbeddingConfiguration.DimAreaBehavior.ON_TASK مراجعه کنید).

برای کم رنگ فقط ظرف فعالیتی که گفتگو را باز کرده است ، EmbeddingConfiguration.DimAreaBehavior.ON_ACTIVITY_STACK استفاده کنید.

فعالیت را از یک تقسیم به پنجره کامل استخراج کنید

یک پیکربندی جدید ایجاد کنید که فعالیت جانبی را به طور کامل نشان می دهد ، و سپس فعالیت را با نیتی که به همان نمونه برطرف می شود ، مجدداً راه اندازی کنید.

پشتیبانی تقسیم را در زمان اجرا بررسی کنید

تعبیه فعالیت در Android 12L (API سطح 32) و بالاتر پشتیبانی می شود ، اما در برخی از دستگاه ها که نسخه های قبلی پلت فرم را نیز اجرا می کنند نیز موجود است. برای بررسی در زمان اجرا برای در دسترس بودن ویژگی ، از ویژگی SplitController.splitSupportStatus یا SplitController.getSplitSupportStatus() استفاده کنید:

کاتلین

if (SplitController.getInstance(this).splitSupportStatus ==
     SplitController.SplitSupportStatus.SPLIT_AVAILABLE) {
     // Device supports split activity features.
}

جاوا

if (SplitController.getInstance(this).getSplitSupportStatus() ==
     SplitController.SplitSupportStatus.SPLIT_AVAILABLE) {
     // Device supports split activity features.
}

در صورت عدم پشتیبانی از شکاف ، فعالیت ها در بالای پشته فعالیت (به دنبال مدل تعبیه غیر فعال) راه اندازی می شوند.

جلوگیری از نادیده گرفتن سیستم

تولید کنندگان دستگاه های Android (تولید کنندگان تجهیزات اصلی یا OEM) می توانند فعالیت تعبیه شده را به عنوان تابعی از سیستم دستگاه پیاده سازی کنند. این سیستم قوانین تقسیم شده را برای برنامه های چند فعالیت مشخص می کند و بر رفتار پنجره ها برنامه ها غلبه می کند. سیستم غلبه بر برنامه های چند فعالیت را به یک حالت تعبیه شده فعالیت تعریف شده توسط سیستم سوق می دهد.

تعبیه فعالیت سیستم می تواند ارائه برنامه را از طریق چیدمان های چند صفحه ای مانند لیست لیست ، بدون هیچ گونه تغییر در برنامه افزایش دهد. با این حال ، تعبیه فعالیت سیستم همچنین ممکن است باعث ایجاد طرح بندی نادرست برنامه ، اشکالات یا درگیری با فعالیت تعبیه شده توسط برنامه شود.

برنامه شما می تواند با تنظیم یک ویژگی در پرونده مانیفست برنامه ، از تعبیه سیستم جلوگیری یا اجازه دهد: به عنوان مثال:

<manifest xmlns:android="http://schemas.android.com/apk/res/android">
    <application>
        <property
            android:name="android.window.PROPERTY_ACTIVITY_EMBEDDING_ALLOW_SYSTEM_OVERRIDE"
            android:value="true|false" />
    </application>
</manifest>

نام ملک در شیء JetPack Windowmanager WindowProperties تعریف شده است. اگر برنامه شما فعالیت تعبیه شده را انجام می دهد ، یا اگر می خواهید در غیر این صورت مانع از اعمال سیستم تعبیه شده در برنامه خود شوید ، مقدار آن را بر روی false تنظیم کنید. مقدار را به true تنظیم کنید تا سیستم بتواند فعالیت تعریف شده توسط سیستم را در برنامه خود اعمال کند.

محدودیت ها ، محدودیت ها و احتیاط ها

  • فقط برنامه میزبان کار ، که به عنوان صاحب فعالیت ریشه در کار شناخته می شود ، می تواند فعالیت های دیگری را در این کار سازماندهی و جاسازی کند. اگر فعالیت هایی که از تعبیه و تقسیم پشتیبانی می کنند در کار متفاوتی که متعلق به یک برنامه متفاوت است ، انجام شود ، تعبیه و تقسیم برای آن فعالیت ها کار نمی کند.
  • فعالیت ها فقط می توانند در یک کار واحد سازماندهی شوند. راه اندازی یک فعالیت در یک کار جدید ، همیشه آن را در یک پنجره جدید گسترده در خارج از هر شکاف موجود قرار می دهد.
  • فقط فعالیتهای موجود در همان فرآیند می توانند سازماندهی و تقسیم شوند. پاسخ به تماس SplitInfo فقط فعالیتهایی را که متعلق به همان فرآیند است ، گزارش می دهد ، زیرا هیچ راهی برای دانستن فعالیت در فرآیندهای مختلف وجود ندارد.
  • هر جفت یا قانون فعالیت مفرد فقط برای راه اندازی فعالیتهایی که پس از ثبت قانون اتفاق می افتد اعمال می شود. در حال حاضر هیچ راهی برای به روزرسانی شکاف های موجود یا خصوصیات بصری آنها وجود ندارد.
  • پیکربندی فیلتر Split Pair باید با اهداف مورد استفاده در هنگام راه اندازی کامل فعالیت ها مطابقت داشته باشد. تطبیق در جایی اتفاق می افتد که فعالیت جدیدی از فرآیند درخواست آغاز می شود ، بنابراین ممکن است در مورد نام های مؤلفه ای که بعداً در فرآیند سیستم هنگام استفاده از اهداف ضمنی حل می شوند ، آگاهی نداشته باشد. اگر در زمان راه اندازی یک نام مؤلفه مشخص نباشد ، می توان از کارت وحشی به جای آن استفاده کرد ("*/*") و فیلتر می تواند بر اساس عمل قصد انجام شود.
  • در حال حاضر هیچ راهی برای جابجایی فعالیت ها بین ظروف یا درون و خارج از شکاف پس از ایجاد وجود ندارد. شکاف ها فقط توسط کتابخانه Windowmanager ایجاد می شوند که فعالیت های جدید با قوانین مطابق با آنها راه اندازی می شود و با پایان یافتن آخرین فعالیت در یک ظرف تقسیم ، شکاف ها از بین می روند.
  • فعالیت ها می توانند هنگامی که پیکربندی تغییر می کند ، مجدداً راه اندازی شود ، بنابراین وقتی شکاف ایجاد می شود یا حذف می شود و محدودیت فعالیت ها تغییر می کنند ، فعالیت می تواند از طریق تخریب کامل نمونه قبلی و ایجاد یک مورد جدید انجام شود. در نتیجه ، توسعه دهندگان برنامه باید در مورد مواردی مانند راه اندازی فعالیت های جدید از تماس های چرخه عمر ، مراقب باشند.
  • دستگاه ها برای پشتیبانی از تعبیه فعالیت باید رابط افزودنی پنجره را شامل شوند. تقریباً تمام دستگاه های صفحه نمایش بزرگ که Android 12L (سطح API 32) یا بالاتر را اجرا می کنند ، شامل رابط هستند. با این حال ، برخی از دستگاه های صفحه نمایش بزرگ که قادر به انجام چندین فعالیت نیستند ، شامل رابط افزودنی پنجره نیستند. اگر یک دستگاه صفحه نمایش بزرگ از حالت چند پنجره پشتیبانی نمی کند ، ممکن است از تعبیه فعالیت پشتیبانی نکند.

منابع اضافی

،

تعبیه فعالیت با تقسیم پنجره کار یک برنامه بین دو فعالیت یا دو نمونه از یک فعالیت یکسان ، برنامه ها را در دستگاه های صفحه نمایش بزرگ بهینه می کند.

شکل 1. برنامه تنظیمات با فعالیت های کنار.

اگر برنامه شما از چندین فعالیت تشکیل شده است ، تعبیه فعالیت شما را قادر می سازد تا یک تجربه کاربر پیشرفته را در رایانه های لوحی ، تاشو و دستگاه های Chromeos ارائه دهید.

تعبیه فعالیت نیازی به اصلاح مجدد کد ندارد. شما تعیین می کنید که چگونه برنامه شما با ایجاد یک فایل پیکربندی XML یا با ایجاد تماس های API JetPack Windowmanager ، فعالیت های خود را - در کنار یا انباشته - نشان می دهد.

پشتیبانی از صفحه های کوچک به طور خودکار حفظ می شود. هنگامی که برنامه شما روی دستگاهی با صفحه نمایش کوچک قرار دارد ، فعالیت ها در بالای دیگری جمع می شوند. در صفحه های بزرگ ، فعالیت ها در کنار هم نمایش داده می شوند. سیستم ارائه را بر اساس پیکربندی ایجاد کرده اید - بدون منطق انشعاب لازم نیست.

تعبیه فعالیت دارای تغییرات جهت گیری دستگاه است و یکپارچه بر روی دستگاه های تاشو ، فعالیت های انباشته و دفع کننده کار می کند زیرا دستگاه تاشو و آشکار می شود.

تعبیه فعالیت در اکثر دستگاه های صفحه نمایش بزرگ که Android 12L (API سطح 32) و بالاتر دارند پشتیبانی می شود.

پنجره کار تقسیم

تعبیه فعالیت ، پنجره وظیفه برنامه را به دو ظروف تقسیم می کند: اولیه و ثانویه. ظروف فعالیتهای انجام شده از فعالیت اصلی یا سایر فعالیتهای موجود در ظروف را انجام می دهند.

فعالیت ها در کانتینر ثانویه به محض راه اندازی آنها جمع می شود و ظرف ثانویه در بالای ظرف اصلی روی صفحه های کوچک جمع می شود ، بنابراین فعالیت های انباشت و پشتی فعالیت با ترتیب فعالیت هایی که قبلاً در برنامه شما ساخته شده است سازگار است.

تعبیه فعالیت شما را قادر می سازد فعالیت ها را به روش های مختلفی به نمایش بگذارید. برنامه شما می تواند با راه اندازی دو فعالیت در کنار هم به طور همزمان ، پنجره کار را تقسیم کند:

شکل 2. دو فعالیت در کنار هم.

یا ، فعالیتی که کل پنجره کار را اشغال می کند می تواند با راه اندازی یک فعالیت جدید در کنار: شکاف ایجاد کند:

شکل 3 فعالیت A فعالیت B را به طرف شروع می کند.

فعالیت هایی که در حال حاضر در یک تقسیم و به اشتراک گذاشتن یک پنجره کار هستند می توانند فعالیت های دیگری را به روش های زیر انجام دهند:

  • به سمت بالای فعالیت دیگری:

    شکل 4. فعالیت A فعالیت C را به سمت فعالیت B شروع می کند.
  • به طرف ، و تقسیم را به صورت جانبی تغییر دهید و فعالیت اصلی قبلی را پنهان کنید:

    شکل 5 فعالیت B فعالیت C را به سمت سمت خود شروع می کند و تقسیم را به پهلو تغییر می دهد.
  • فعالیتی را در بالا انجام دهید. یعنی در همان پشته فعالیت:

    شکل 6 فعالیت B فعالیت C را بدون پرچم قصد اضافی شروع می کند.
  • یک پنجره کامل را در همان کار راه اندازی کنید:

    شکل 7 فعالیت A یا فعالیت B فعالیت C را شروع می کند که پنجره کار را پر می کند.

ناوبری برگشت

انواع مختلفی از برنامه ها می توانند بسته به وابستگی بین فعالیت ها یا نحوه ایجاد کاربران ، به عنوان مثال ، قوانین ناوبری پشتی مختلف را در یک وضعیت پنجره کار تقسیم کنند: به عنوان مثال:

  • با هم رفتن: اگر فعالیت ها مرتبط هستند ، و نباید بدون دیگری نشان داده شود ، می توان ناوبری برگشت را برای پایان دادن به هر دو پیکربندی کرد.
  • به تنهایی با آن: اگر فعالیت ها کاملاً مستقل باشند ، ناوبری پشت در یک فعالیت بر وضعیت فعالیت دیگری در پنجره کار تأثیر نمی گذارد.

رویداد برگشت هنگام استفاده از ناوبری دکمه به آخرین فعالیت متمرکز ارسال می شود.

برای ناوبری مبتنی بر ژست:

  • Android 14 (API سطح 34) و پایین تر - رویداد عقب به فعالیتی که ژست رخ داده است ارسال می شود. هنگامی که کاربران از سمت چپ صفحه ضربه می زنند ، رویداد پشتی به فعالیت در صفحه سمت چپ پنجره اسپلیت ارسال می شود. هنگامی که کاربران از سمت راست صفحه کشیده می شوند ، رویداد پشتی به فعالیت در سمت راست - در صفحه سمت راست ارسال می شود.

  • Android 15 (API سطح 35) و بالاتر

    • هنگام برخورد با چندین فعالیت از همان برنامه ، ژست فعالیت برتر را بدون در نظر گرفتن جهت کشیدن به پایان می رساند و تجربه یکپارچه تری را ارائه می دهد.

    • در سناریوهای مربوط به دو فعالیت از برنامه های مختلف (Overlay) ، رویداد عقب به آخرین فعالیت در فوکوس هدایت می شود و با رفتار ناوبری دکمه هماهنگ می شود.

طرح چند صفحه

JetPack WindowManager شما را قادر می سازد تا فعالیتی را در تعبیه چند صفحه ای در دستگاه های صفحه نمایش بزرگ با Android 12L (API سطح 32) یا بالاتر و در بعضی از دستگاه ها با نسخه های قبلی پلت فرم ایجاد کنید. برنامه های موجود که مبتنی بر فعالیت های متعدد هستند به جای قطعات یا طرح بندی های مبتنی بر نمایش مانند SlidingPaneLayout می توانند یک تجربه کاربری صفحه نمایش بزرگ را بهبود بخشند و بدون استفاده مجدد از کد منبع.

یک مثال متداول ، تقسیم لیست لیست است. برای اطمینان از ارائه با کیفیت بالا ، سیستم فعالیت لیست را شروع می کند و سپس برنامه بلافاصله فعالیت جزئیات را شروع می کند. سیستم انتقال منتظر است تا هر دو فعالیت ترسیم شود ، سپس آنها را با هم نمایش می دهد. برای کاربر ، این دو فعالیت به صورت یک انجام می شود.

شکل 8. دو فعالیت به طور همزمان در یک طرح چند صفحه آغاز شد.

ویژگی های تقسیم

می توانید مشخص کنید که چگونه پنجره کار بین ظروف تقسیم شده و نحوه قرار دادن ظروف نسبت به یکدیگر متناسب است.

برای قوانینی که در یک پرونده پیکربندی XML تعریف شده است ، ویژگی های زیر را تنظیم کنید:

  • splitRatio : نسبت های کانتینر را تنظیم می کند. مقدار یک عدد نقطه شناور در فاصله باز (0.0 ، 1.0) است.
  • splitLayoutDirection : نحوه بیان ظروف تقسیم شده نسبت به یکدیگر را مشخص می کند. ارزش ها عبارتند از:
    • ltr : چپ به راست
    • rtl : راست به چپ
    • locale : یا ltr یا rtl از تنظیمات محلی تعیین می شود

برای مثال به بخش پیکربندی XML مراجعه کنید.

برای قوانینی که با استفاده از API های WindowManager ایجاد شده است ، یک شیء SplitAttributes را با SplitAttributes.Builder ایجاد کنید و روش های سازنده زیر را فراخوانی کنید:

  • setSplitType() : نسبت ظروف تقسیم شده را تنظیم می کند. برای آرگومان های معتبر ، از جمله روش SplitAttributes.SplitType.ratio() به SplitAttributes.SplitType مراجعه کنید.
  • setLayoutDirection() : طرح ظروف را تنظیم می کند. برای مقادیر احتمالی به SplitAttributes.LayoutDirection مراجعه کنید.

برای مثال به بخش WindowManager API مراجعه کنید.

شکل 9. دو تقسیم فعالیت از چپ به راست اما با نسبت های مختلف تقسیم شده.

متغیرهای

فعالیت های نگهدارنده محل فعالیت های ثانویه خالی است که منطقه ای از یک فعالیت را اشغال می کند. آنها در نهایت به معنای جایگزین شدن با فعالیت دیگری هستند که حاوی محتوا است. به عنوان مثال ، یک فعالیت نگهدارنده می تواند سمت ثانویه فعالیت تقسیم شده در یک طرح لیست لیست را تا زمانی که یک مورد از لیست انتخاب شود ، اشغال کند ، در این مرحله فعالیتی که حاوی اطلاعات جزئیات برای مورد لیست انتخاب شده است جایگزین نگهدارنده مکان می شود.

به طور پیش فرض ، این سیستم فقط در صورت وجود فضای کافی برای تقسیم فعالیت ، مکان ها را نشان می دهد. متغیرها به طور خودکار وقتی اندازه صفحه نمایش به عرض یا ارتفاع بسیار کوچک تغییر می کند ، به طور خودکار به پایان می رسد. هنگامی که فضا اجازه می دهد ، سیستم محل نگهدارنده محل را با یک حالت مجدداً مجدداً راه اندازی می کند.

شکل 10 تاشو و آشکار شدن دستگاه تاشو. با تغییر اندازه صفحه نمایش ، فعالیت نگهدارنده محل به پایان رسیده و بازسازی می شود.

با این حال ، ویژگی stickyPlaceholder از یک روش SplitPlaceholderRule یا setSticky() از SplitPlaceholder.Builder می تواند رفتار پیش فرض را نادیده بگیرد. هنگامی که ویژگی یا روش مقدار true را مشخص می کند ، سیستم در هنگام تغییر مکان نمایش به صفحه نمایش تک صفحه از یک صفحه نمایش دو صفحه ، محل نگهدارنده محل را به عنوان بالاترین فعالیت در پنجره کار نشان می دهد (برای مثال به پیکربندی Split مراجعه کنید) .

شکل 11 تاشو و آشکار شدن دستگاه تاشو. فعالیت نگهدارنده محل چسبناک است.

اندازه پنجره تغییر می کند

هنگامی که تغییر پیکربندی دستگاه ، عرض پنجره کار را کاهش می دهد به طوری که به اندازه کافی برای یک طرح چند صفحه ای بزرگ نباشد (برای مثال ، وقتی یک دستگاه بزرگ صفحه قابل تاشو از اندازه تبلت به اندازه تلفن می رسد یا پنجره برنامه در حالت چند پنجره تغییر شکل می یابد ) ، فعالیت های غیر محل در صفحه ثانویه پنجره کار در بالای فعالیت ها در صفحه اصلی جمع می شود.

فعالیت های نگهدارنده مکان فقط در صورت وجود عرض صفحه نمایش کافی برای تقسیم نشان داده می شود. در صفحه های کوچکتر ، محل نگهدارنده به طور خودکار رد می شود. هنگامی که منطقه نمایش دوباره به اندازه کافی بزرگ می شود ، مکان نگهدارنده مجدداً بازسازی می شود. (به بخش متغیرها مراجعه کنید.)

فعالیت انباشت امکان پذیر است زیرا Windowmanager z فعالیت های موجود در صفحه ثانویه را در قسمت های فوق در قسمت اصلی انجام می دهد.

فعالیت های متعدد در صفحه ثانویه

فعالیت B فعالیت C را در محل و بدون پرچم قصد اضافی شروع می کند:

فعالیت تقسیم شده حاوی فعالیت های A ، B و C با C جمع شده           بالای ب.

منجر به سفارش زیر z از فعالیت ها در همان کار:

پشته فعالیت ثانویه حاوی فعالیت C در بالای B انباشته شده است.           پشته ثانویه در بالای پشته فعالیت Prmary جمع شده است           حاوی فعالیت A.

بنابراین ، در یک پنجره کار کوچکتر ، برنامه به یک فعالیت واحد با C در بالای پشته کوچک می شود:

پنجره کوچک که فقط فعالیت C را نشان می دهد C

پیمایش در پنجره کوچکتر از طریق فعالیتهای جمع شده در بالای یکدیگر حرکت می کند.

اگر پیکربندی پنجره کار به اندازه بزرگتر بازگردانده شود که می تواند چندین صفحه را در خود جای دهد ، فعالیت ها دوباره در کنار هم نمایش داده می شوند.

شکافهای انباشته

فعالیت B فعالیت C را به سمت آن شروع می کند و تقسیم را به صورت جانبی تغییر می دهد:

پنجره کار نشان دادن فعالیت های A و B ، سپس فعالیت های B و C

نتیجه ، ترتیب زیر z از فعالیت ها در همان کار است:

فعالیت های A ، B و C در یک پشته واحد. فعالیت ها انباشته می شوند           به ترتیب زیر از بالا به پایین: C ، B ، A.

در یک پنجره کار کوچکتر ، برنامه به یک فعالیت واحد با C در بالا کوچک می شود:

پنجره کوچک که فقط فعالیت C را نشان می دهد C

جهت یابی ثابت

Android: ScreenOrientation Manifice تنظیمات برنامه ها را قادر می سازد تا فعالیت هایی را برای جهت گیری پرتره یا چشم انداز محدود کنند. برای بهبود تجربه کاربر در دستگاه های صفحه نمایش بزرگ مانند رایانه های لوحی و تاشو ، تولید کنندگان دستگاه (OEM) می توانند درخواست های جهت گیری صفحه نمایش و جعبه نامه را در جهت گیری پرتره در نمایشگرهای منظره یا جهت گیری چشم انداز در نمایشگرهای پرتره نادیده بگیرند.

شکل 12 فعالیت های جعبه ای: پرتره ثابت در دستگاه منظره (سمت چپ) ، منظره های منظره ثابت در دستگاه پرتره (سمت راست).

به طور مشابه ، هنگامی که تعبیه فعالیت فعال می شود ، OEM ها می توانند دستگاه ها را به فعالیت های ثابت-Portraite در جهت گیری منظره در صفحه های بزرگ (عرض 600 DDP) سفارشی کنند. هنگامی که یک فعالیت پرتره ثابت فعالیت دوم را آغاز می کند ، دستگاه می تواند دو فعالیت را در کنار هم در یک صفحه نمایش دو صفحه نمایش دهد.

شکل 13 فعالیت پرتره ثابت A فعالیت B را به سمت آن شروع می کند.

همیشه ویژگی android.window.PROPERTY_ACTIVITY_EMBEDDING_SPLITS_ENABLED را به پرونده مانیفست برنامه خود اضافه کنید تا به دستگاه هایی که برنامه شما از تعبیه فعالیت پشتیبانی می کند ، اطلاع دهید (به بخش پیکربندی تقسیم شده مراجعه کنید). دستگاههای متمایز OEM می توانند تعیین کنند که آیا فعالیت های مربوط به Portraite Letterbox را دارند یا خیر.

پیکربندی تقسیم

قوانین تقسیم شده شکاف های فعالیت را پیکربندی می کنند. شما قوانین تقسیم را در یک پرونده پیکربندی XML یا با ایجاد تماس های JetPack WindowManager API تعریف می کنید.

در هر صورت ، برنامه شما باید به کتابخانه WindowManager دسترسی پیدا کند و باید سیستم را اطلاع دهد که برنامه تعبیه فعالیت را اجرا کرده است.

موارد زیر را انجام دهید:

  1. به عنوان مثال آخرین وابستگی کتابخانه WindowManager را به فایل build.gradle در سطح ماژول اضافه کنید ، به عنوان مثال:

    implementation 'androidx.window:window:1.1.0-beta02'

    کتابخانه WindowManager تمام مؤلفه های مورد نیاز برای تعبیه فعالیت را ارائه می دهد.

  2. به سیستم اطلاع دهید که برنامه شما تعبیه فعالیت را اجرا کرده است.

    android.window.PROPERTY_ACTIVITY_EMBEDDING_SPLITS_ENABLED را به عنصر <playing> پرونده مانیفست برنامه اضافه کنید و مقدار را به عنوان مثال تنظیم کنید: به عنوان مثال:

    <manifest xmlns:android="http://schemas.android.com/apk/res/android">
        <application>
            <property
                android:name="android.window.PROPERTY_ACTIVITY_EMBEDDING_SPLITS_ENABLED"
                android:value="true" />
        </application>
    </manifest>
    

    در WindowsManager نسخه 1.1.0-alpha06 و بعد از آن ، شکاف های تعبیه شده فعالیت غیرفعال هستند مگر اینکه این خاصیت به مانیفست اضافه شود و درست تنظیم شود.

    همچنین ، تولید کنندگان دستگاه از تنظیمات برای فعال کردن قابلیت های سفارشی برای برنامه هایی که از تعبیه فعالیت پشتیبانی می کنند ، استفاده می کنند. به عنوان مثال ، دستگاه ها می توانند یک فعالیت فقط پرتره را در نمایشگرهای منظره ایجاد کنند تا فعالیت را برای انتقال به یک طرح دو صفحه ای هنگام شروع فعالیت دوم به سمت خود نشان دهند ( به جهت گیری ثابت-پرتره مراجعه کنید).

پیکربندی XML

برای ایجاد یک اجرای مبتنی بر XML از تعبیه فعالیت ، مراحل زیر را انجام دهید:

  1. یک فایل منبع XML ایجاد کنید که موارد زیر را انجام می دهد:

    • فعالیتهایی را که تقسیم شده است تعریف می کند
    • گزینه های تقسیم را پیکربندی می کند
    • در صورت وجود محتوا ، یک مکان نگهدارنده برای ظرف ثانویه تقسیم ایجاد می کند
    • فعالیتهایی را که هرگز نباید بخشی از شکاف باشد مشخص می کند

    به عنوان مثال:

    <!-- main_split_config.xml -->
    
    <resources
        xmlns:window="http://schemas.android.com/apk/res-auto">
    
        <!-- Define a split for the named activities. -->
        <SplitPairRule
            window:splitRatio="0.33"
            window:splitLayoutDirection="locale"
            window:splitMinWidthDp="840"
            window:splitMaxAspectRatioInPortrait="alwaysAllow"
            window:finishPrimaryWithSecondary="never"
            window:finishSecondaryWithPrimary="always"
            window:clearTop="false">
            <SplitPairFilter
                window:primaryActivityName=".ListActivity"
                window:secondaryActivityName=".DetailActivity"/>
        </SplitPairRule>
    
        <!-- Specify a placeholder for the secondary container when content is
             not available. -->
        <SplitPlaceholderRule
            window:placeholderActivityName=".PlaceholderActivity"
            window:splitRatio="0.33"
            window:splitLayoutDirection="locale"
            window:splitMinWidthDp="840"
            window:splitMaxAspectRatioInPortrait="alwaysAllow"
            window:stickyPlaceholder="false">
            <ActivityFilter
                window:activityName=".ListActivity"/>
        </SplitPlaceholderRule>
    
        <!-- Define activities that should never be part of a split. Note: Takes
             precedence over other split rules for the activity named in the
             rule. -->
        <ActivityRule
            window:alwaysExpand="true">
            <ActivityFilter
                window:activityName=".ExpandedActivity"/>
        </ActivityRule>
    
    </resources>
    
  2. یک اولیه ساز ایجاد کنید.

    WindowManager RuleController Component پرونده پیکربندی XML را تجزیه می کند و قوانین را در دسترس سیستم قرار می دهد. یک کتابخانه Initializer JetPack Startup ، پرونده XML را در راه اندازی برنامه در دسترس RuleController قرار می دهد تا در هنگام شروع هرگونه فعالیت ، قوانین عملی شوند.

    برای ایجاد یک اولیه ساز ، موارد زیر را انجام دهید:

    1. به عنوان مثال آخرین وابستگی کتابخانه راه اندازی jetpack را به فایل build.gradle در سطح ماژول خود اضافه کنید ، به عنوان مثال:

      implementation 'androidx.startup:startup-runtime:1.1.1'

    2. کلاس ایجاد کنید که رابط Initializer را پیاده سازی کند.

      اولیه ساز با عبور از شناسه پرونده پیکربندی XML ( main_split_config.xml ) به روش RuleController.parseRules() قوانین تقسیم را در دسترس RuleController قرار می دهد.

      کاتلین

      class SplitInitializer : Initializer<RuleController> {
      
          override fun create(context: Context): RuleController {
              return RuleController.getInstance(context).apply {
                  setRules(RuleController.parseRules(context, R.xml.main_split_config))
              }
          }
      
          override fun dependencies(): List<Class<out Initializer<*>>> {
              return emptyList()
          }
      }

      جاوا

      public class SplitInitializer implements Initializer<RuleController> {
      
           @NonNull
           @Override
           public RuleController create(@NonNull Context context) {
               RuleController ruleController = RuleController.getInstance(context);
               ruleController.setRules(
                   RuleController.parseRules(context, R.xml.main_split_config)
               );
               return ruleController;
           }
      
           @NonNull
           @Override
           public List<Class<? extends Initializer<?>>> dependencies() {
               return Collections.emptyList();
           }
      }
  3. برای تعاریف قانون یک ارائه دهنده محتوا ایجاد کنید.

    androidx.startup.InitializationProvider به پرونده مانیفست برنامه خود به عنوان <provider> اضافه کنید. مرجع اجرای اولیه سازنده RuleController خود ، SplitInitializer درج کنید:

    <!-- AndroidManifest.xml -->
    
    <provider android:name="androidx.startup.InitializationProvider"
        android:authorities="${applicationId}.androidx-startup"
        android:exported="false"
        tools:node="merge">
        <!-- Make SplitInitializer discoverable by InitializationProvider. -->
        <meta-data android:name="${applicationId}.SplitInitializer"
            android:value="androidx.startup" />
    </provider>
    

    InitializationProvider قبل از فراخوانی روش onCreate() برنامه SplitInitializer کشف و اولیه می کند. در نتیجه ، با شروع فعالیت اصلی برنامه ، قوانین تقسیم عملی می شوند.

WindowManager API

شما می توانید فعالیت تعبیه شده را به صورت برنامه ای با تعداد انگشت شماری از تماس های API پیاده سازی کنید. تماس ها را در روش onCreate() یک زیر کلاس Application برای اطمینان از اجرای قوانین قبل از شروع هرگونه فعالیت انجام دهید.

برای ایجاد برنامه نویسی یک تقسیم فعالیت ، موارد زیر را انجام دهید:

  1. یک قانون تقسیم ایجاد کنید:

    1. یک SplitPairFilter ایجاد کنید که فعالیت هایی را که تقسیم شده است ، مشخص می کند:

      کاتلین

      val splitPairFilter = SplitPairFilter(
         ComponentName(this, ListActivity::class.java),
         ComponentName(this, DetailActivity::class.java),
         null
      )

      جاوا

      SplitPairFilter splitPairFilter = new SplitPairFilter(
         new ComponentName(this, ListActivity.class),
         new ComponentName(this, DetailActivity.class),
         null
      );
    2. فیلتر را به مجموعه فیلتر اضافه کنید:

      کاتلین

      val filterSet = setOf(splitPairFilter)

      جاوا

      Set<SplitPairFilter> filterSet = new HashSet<>();
      filterSet.add(splitPairFilter);
    3. برای تقسیم ویژگی های چیدمان ایجاد کنید:

      کاتلین

      val splitAttributes: SplitAttributes = SplitAttributes.Builder()
          .setSplitType(SplitAttributes.SplitType.ratio(0.33f))
          .setLayoutDirection(SplitAttributes.LayoutDirection.LEFT_TO_RIGHT)
          .build()

      جاوا

      final SplitAttributes splitAttributes = new SplitAttributes.Builder()
            .setSplitType(SplitAttributes.SplitType.ratio(0.33f))
            .setLayoutDirection(SplitAttributes.LayoutDirection.LEFT_TO_RIGHT)
            .build();

      SplitAttributes.Builder یک شیء حاوی ویژگی های طرح ایجاد می کند:

      • setSplitType() : چگونگی اختصاص منطقه نمایشگر موجود به هر ظرف فعالیت را مشخص می کند. نوع تقسیم نسبت نسبت منطقه نمایش موجود در دسترس به ظرف اصلی را مشخص می کند. کانتینر ثانویه باقیمانده منطقه نمایشگر موجود را اشغال می کند.
      • setLayoutDirection() : نحوه قرار دادن ظروف فعالیت نسبت به یکدیگر را مشخص می کند ، ابتدا ظرف اولیه.
    4. ایجاد یک SplitPairRule :

      کاتلین

      val splitPairRule = SplitPairRule.Builder(filterSet)
          .setDefaultSplitAttributes(splitAttributes)
          .setMinWidthDp(840)
          .setMinSmallestWidthDp(600)
          .setMaxAspectRatioInPortrait(EmbeddingAspectRatio.ratio(1.5f))
          .setFinishPrimaryWithSecondary(SplitRule.FinishBehavior.NEVER)
          .setFinishSecondaryWithPrimary(SplitRule.FinishBehavior.ALWAYS)
          .setClearTop(false)
          .build()

      جاوا

      SplitPairRule splitPairRule = new SplitPairRule.Builder(filterSet)
          .setDefaultSplitAttributes(splitAttributes)
          .setMinWidthDp(840)
          .setMinSmallestWidthDp(600)
          .setMaxAspectRatioInPortrait(EmbeddingAspectRatio.ratio(1.5f))
          .setFinishPrimaryWithSecondary(SplitRule.FinishBehavior.NEVER)
          .setFinishSecondaryWithPrimary(SplitRule.FinishBehavior.ALWAYS)
          .setClearTop(false)
          .build();

      SplitPairRule.Builder این قانون را ایجاد و پیکربندی می کند:

      • filterSet : شامل فیلترهای جفت تقسیم شده است که تعیین می کند چه موقع باید با شناسایی فعالیتهایی که یک تقسیم دارند ، این قانون را اعمال کنند.
      • setDefaultSplitAttributes() : ویژگی های طرح را برای این قانون اعمال می کند.
      • setMinWidthDp() : حداقل عرض نمایشگر (در پیکسل های مستقل از چگالی ، DP) را تنظیم می کند که شکاف را امکان پذیر می کند.
      • setMinSmallestWidthDp() : حداقل مقدار (در DP) را تعیین می کند که کوچکتر از دو بعد نمایشگر باید بدون توجه به جهت گیری دستگاه ، شکاف را فعال کند.
      • setMaxAspectRatioInPortrait() : حداکثر نسبت ابعاد نمایشگر (ارتفاع: عرض) را در جهت گیری پرتره که برای آن شکاف های فعالیت نمایش داده می شود ، تنظیم می کند. اگر نسبت ابعاد یک صفحه نمایش پرتره از حداکثر نسبت ابعاد فراتر رود ، شکاف ها بدون در نظر گرفتن عرض صفحه نمایش غیرفعال می شوند. توجه: مقدار پیش فرض 1.4 است ، که منجر به فعالیت هایی می شود که کل پنجره کار را در جهت گیری پرتره در اکثر تبلت ها اشغال می کند. همچنین به SPLIT_MAX_ASPECT_RATIO_PORTRAIT_DEFAULT و setMaxAspectRatioInLandscape() مراجعه کنید. The default value for landscape is ALWAYS_ALLOW .
      • setFinishPrimaryWithSecondary() : Sets how finishing all activities in the secondary container affects the activities in the primary container. NEVER indicates the system shouldn't finish the primary activities when all activities in the secondary container finish (see Finish activities ).
      • setFinishSecondaryWithPrimary() : Sets how finishing all activities in the primary container affects the activities in the secondary container. ALWAYS indicates the system should always finish the activities in the secondary container when all activities in the primary container finish (see Finish activities ).
      • setClearTop() : Specifies whether all activities in the secondary container are finished when a new activity is launched in the container. A false value specifies that new activities are stacked on top of activities already in the secondary container.
    5. Get the singleton instance of the WindowManager RuleController , and add the rule:

      کاتلین

        val ruleController = RuleController.getInstance(this)
        ruleController.addRule(splitPairRule)
        

      جاوا

        RuleController ruleController = RuleController.getInstance(this);
        ruleController.addRule(splitPairRule);
        
  2. Create a placeholder for the secondary container when content is not available:

    1. Create an ActivityFilter that identifies the activity with which the placeholder shares a task window split:

      کاتلین

      val placeholderActivityFilter = ActivityFilter(
          ComponentName(this, ListActivity::class.java),
          null
      )

      جاوا

      ActivityFilter placeholderActivityFilter = new ActivityFilter(
          new ComponentName(this, ListActivity.class),
          null
      );
    2. Add the filter to a filter set:

      کاتلین

      val placeholderActivityFilterSet = setOf(placeholderActivityFilter)

      جاوا

      Set<ActivityFilter> placeholderActivityFilterSet = new HashSet<>();
      placeholderActivityFilterSet.add(placeholderActivityFilter);
    3. Create a SplitPlaceholderRule :

      کاتلین

      val splitPlaceholderRule = SplitPlaceholderRule.Builder(
            placeholderActivityFilterSet,
            Intent(context, PlaceholderActivity::class.java)
          ).setDefaultSplitAttributes(splitAttributes)
           .setMinWidthDp(840)
           .setMinSmallestWidthDp(600)
           .setMaxAspectRatioInPortrait(EmbeddingAspectRatio.ratio(1.5f))
           .setFinishPrimaryWithPlaceholder(SplitRule.FinishBehavior.ALWAYS)
           .setSticky(false)
           .build()

      جاوا

      SplitPlaceholderRule splitPlaceholderRule = new SplitPlaceholderRule.Builder(
            placeholderActivityFilterSet,
            new Intent(context, PlaceholderActivity.class)
          ).setDefaultSplitAttributes(splitAttributes)
           .setMinWidthDp(840)
           .setMinSmallestWidthDp(600)
           .setMaxAspectRatioInPortrait(EmbeddingAspectRatio.ratio(1.5f))
           .setFinishPrimaryWithPlaceholder(SplitRule.FinishBehavior.ALWAYS)
           .setSticky(false)
           .build();

      SplitPlaceholderRule.Builder creates and configures the rule:

      • placeholderActivityFilterSet : Contains activity filters that determine when to apply the rule by identifying activities with which the placeholder activity is associated.
      • Intent : Specifies the launch of the placeholder activity.
      • setDefaultSplitAttributes() : Applies layout attributes to the rule.
      • setMinWidthDp() : Sets the minimum display width (in density-independent pixels, dp) that allows a split.
      • setMinSmallestWidthDp() : Sets the minimum value (in dp) that the smaller of the two display dimensions must have to allow a split regardless of the device orientation.
      • setMaxAspectRatioInPortrait() : Sets the maximum display aspect ratio (height:width) in portrait orientation for which activity splits are displayed. Note: The default value is 1.4, which results in activities filling the task window in portrait orientation on most tablets. See also SPLIT_MAX_ASPECT_RATIO_PORTRAIT_DEFAULT and setMaxAspectRatioInLandscape() . The default value for landscape is ALWAYS_ALLOW .
      • setFinishPrimaryWithPlaceholder() : Sets how finishing the placeholder activity affects the activities in the primary container. ALWAYS indicates the system should always finish the activities in the primary container when the placeholder finishes (see Finish activities ).
      • setSticky() : Determines whether the placeholder activity appears on top of the activity stack on small displays once the placeholder has first appeared in a split with sufficient minimum width.
    4. Add the rule to the WindowManager RuleController :

      کاتلین

      ruleController.addRule(splitPlaceholderRule)

      جاوا

      ruleController.addRule(splitPlaceholderRule);
  3. Specify activities that should never be part of a split:

    1. Create an ActivityFilter that identifies an activity that should always occupy the entire task display area:

      کاتلین

      val expandedActivityFilter = ActivityFilter(
        ComponentName(this, ExpandedActivity::class.java),
        null
      )

      جاوا

      ActivityFilter expandedActivityFilter = new ActivityFilter(
        new ComponentName(this, ExpandedActivity.class),
        null
      );
    2. Add the filter to a filter set:

      کاتلین

      val expandedActivityFilterSet = setOf(expandedActivityFilter)

      جاوا

      Set<ActivityFilter> expandedActivityFilterSet = new HashSet<>();
      expandedActivityFilterSet.add(expandedActivityFilter);
    3. Create an ActivityRule :

      کاتلین

      val activityRule = ActivityRule.Builder(expandedActivityFilterSet)
          .setAlwaysExpand(true)
          .build()

      جاوا

      ActivityRule activityRule = new ActivityRule.Builder(
          expandedActivityFilterSet
      ).setAlwaysExpand(true)
       .build();

      ActivityRule.Builder creates and configures the rule:

      • expandedActivityFilterSet : Contains activity filters that determine when to apply the rule by identifying activities that you want to exclude from splits.
      • setAlwaysExpand() : Specifies whether the activity should fill the entire task window.
    4. Add the rule to the WindowManager RuleController :

      کاتلین

      ruleController.addRule(activityRule)

      جاوا

      ruleController.addRule(activityRule);

Cross-application embedding

On Android 13 (API level 33) and higher, apps can embed activities from other apps. Cross‑application, or cross‑ UID , activity embedding enables visual integration of activities from multiple Android applications. The system displays an activity of the host app and an embedded activity from another app on screen side by side or top and bottom just as in single-app activity embedding.

For example, the Settings app could embed the wallpaper selector activity from the WallpaperPicker app:

Figure 14. Settings app (menu on left) with wallpaper selector as embedded activity (right).

Trust model

Host processes that embed activities from other apps are able to redefine the presentation of the embedded activities, including size, position, cropping, and transparency. Malicious hosts can use this capability to mislead users and create clickjacking or other UI-redressing attacks.

To prevent misuse of cross-app activity embedding, Android requires apps to opt in to allow embedding of their activities. Apps can designate hosts as trusted or untrusted.

میزبان های قابل اعتماد

To allow other applications to embed and fully control the presentation of activities from your app, specify the SHA-256 certificate of the host application in the android:knownActivityEmbeddingCerts attribute of the <activity> or <application> elements of your app's manifest file.

Set the value of android:knownActivityEmbeddingCerts either as a string:

<activity
    android:name=".MyEmbeddableActivity"
    android:knownActivityEmbeddingCerts="@string/known_host_certificate_digest"
    ... />

or, to specify multiple certificates, an array of strings:

<activity
    android:name=".MyEmbeddableActivity"
    android:knownActivityEmbeddingCerts="@array/known_host_certificate_digests"
    ... />

which references a resource like the following:

<resources>
    <string-array name="known_host_certificate_digests">
      <item>cert1</item>
      <item>cert2</item>
      ...
    </string-array>
</resources>

App owners can get a SHA certificate digest by running the Gradle signingReport task. The certificate digest is the SHA-256 fingerprint without the separating colons. For more information, see Run a signing report and Authenticating Your Client .

Untrusted hosts

To allow any app to embed your app's activities and control their presentation, specify the android:allowUntrustedActivityEmbedding attribute in the <activity> or <application> elements in the app manifest, for example:

<activity
    android:name=".MyEmbeddableActivity"
    android:allowUntrustedActivityEmbedding="true"
    ... />

The default value of the attribute is false, which prevents cross-app activity embedding.

احراز هویت سفارشی

To mitigate the risks of untrusted activity embedding, create a custom authentication mechanism that verifies the host identity. If you know the host certificates, use the androidx.security.app.authenticator library to authenticate. If the host authenticates after embedding your activity, you can display the actual content. If not, you can inform the user that the action was not allowed and block the content.

Use the ActivityEmbeddingController#isActivityEmbedded() method from the Jetpack WindowManager library to check whether a host is embedding your activity, for example:

کاتلین

fun isActivityEmbedded(activity: Activity): Boolean {
    return ActivityEmbeddingController.getInstance(this).isActivityEmbedded(activity)
}

جاوا

boolean isActivityEmbedded(Activity activity) {
    return ActivityEmbeddingController.getInstance(this).isActivityEmbedded(activity);
}

Minimum size restriction

The Android system applies the minimum height and width specified in the app manifest <layout> element to embedded activities. If an application does not specify minimum height and width, the system default values apply ( sw220dp ).

If the host attempts to resize the embedded container to a size smaller than the minimum, the embedded container expands to occupy the entire task bounds.

<activity-alias>

For trusted or untrusted activity embedding to work with the <activity-alias> element, android:knownActivityEmbeddingCerts or android:allowUntrustedActivityEmbedding must be applied to the target activity rather than the alias. The policy that verifies security on the system server is based on the flags set on the target, not the alias.

Host application

Host applications implement cross-app activity embedding the same way they implement single-app activity embedding. SplitPairRule and SplitPairFilter or ActivityRule and ActivityFilter objects specify embedded activities and task window splits. Split rules are defined statically in XML or at runtime using Jetpack WindowManager API calls.

If a host application attempts to embed an activity that has not opted in to cross-app embedding, the activity occupies the entire task bounds. As a result, host applications need to know whether target activities allow cross-app embedding.

If an embedded activity starts a new activity in the same task and the new activity has not opted in to cross-app embedding, the activity occupies the entire task bounds instead of overlaying the activity in the embedded container.

A host application can embed its own activities without restriction as long as the activities launch in the same task.

Split examples

Split from full window

Figure 15. Activity A starts activity B to the side.

No refactoring required. You can define the configuration for the split statically or at runtime and then call Context#startActivity() without any additional parameters.

<SplitPairRule>
    <SplitPairFilter
        window:primaryActivityName=".A"
        window:secondaryActivityName=".B"/>
</SplitPairRule>

Split by default

When the landing page of an application is designed to be split into two containers on large screens, the user experience is best when both activities are created and presented simultaneously. However, content might not be available for the secondary container of the split until the user interacts with the activity in the primary container (for example, the user selects an item from a navigation menu). A placeholder activity can fill the void until content can be displayed in the secondary container of the split (see the Placeholders section).

Figure 16. Split created by opening two activities simultaneously. One activity is a placeholder.

To create a split with a placeholder, create a placeholder and associate it with the primary activity:

<SplitPlaceholderRule
    window:placeholderActivityName=".PlaceholderActivity">
    <ActivityFilter
        window:activityName=".MainActivity"/>
</SplitPlaceholderRule>

When an app receives an intent, the target activity can be shown as the secondary part of an activity split; for example, a request to show a detail screen with information about an item from a list. On small displays, the detail is shown in the full task window; on larger devices, beside the list.

Figure 17. Deep link detail activity shown alone on a small screen, but together with a list activity on a large screen.

The launch request should be routed to the main activity, and the target detail activity should be launched in a split. The system automatically chooses the correct presentation—stacked or side by side—based on the available display width.

کاتلین

override fun onCreate(savedInstanceState Bundle?) {
    . . .
    RuleController.getInstance(this)
        .addRule(SplitPairRule.Builder(filterSet).build())
    startActivity(Intent(this, DetailActivity::class.java))
}

جاوا

@Override
protected void onCreate(@Nullable Bundle savedInstanceState) {
    . . .
    RuleController.getInstance(this)
        .addRule(new SplitPairRule.Builder(filterSet).build());
    startActivity(new Intent(this, DetailActivity.class));
}

The deep link destination might be the only activity that should be available to the user in the back navigation stack, and you might want to avoid dismissing the detail activity and leaving only the main activity:

Large display with list activity and detail activity side by side.
          Back navigation unable to dismiss detail activity and leave list
          activity on screen.

Small display with detail activity only. Back navigation unable to
          dismiss detail activity and reveal list activity.

Instead, you can finish both activities at the same time by using the finishPrimaryWithSecondary attribute:

<SplitPairRule
    window:finishPrimaryWithSecondary="always">
    <SplitPairFilter
        window:primaryActivityName=".ListActivity"
        window:secondaryActivityName=".DetailActivity"/>
</SplitPairRule>

See the Configuration attributes section.

Multiple activities in split containers

Stacking multiple activities in a split container enables users to access deep content. For example, with a list-detail split, the user might need to go into a sub-detail section but keep the primary activity in place:

Figure 18. Activity opened in place in the secondary pane of the task window.

کاتلین

class DetailActivity {
    . . .
    fun onOpenSubDetail() {
      startActivity(Intent(this, SubDetailActivity::class.java))
    }
}

جاوا

public class DetailActivity {
    . . .
    void onOpenSubDetail() {
        startActivity(new Intent(this, SubDetailActivity.class));
    }
}

The sub-detail activity is placed on top of the detail activity, concealing it:

The user can then go back to the previous detail level by navigating back through the stack:

Figure 19. Activity removed from the top of the stack.

Stacking activities on top of each other is the default behavior when activities are launched from an activity in the same secondary container. Activities launched from the primary container within an active split also end up in the secondary container on the top of the activity stack.

Activities in a new task

When activities in a split task window start activities in a new task, the new task is separate from the task that includes the split and is displayed full window. The Recents screen shows two tasks: the task in the split and the new task.

Figure 20. Start activity C in a new task from activity B.

Activity replacement

Activities can be replaced in the secondary container stack; for example, when the primary activity is used for top-level navigation and the secondary activity is a selected destination. Each selection from the top-level navigation should start a new activity in the secondary container and remove the activity or activities that were previously there.

Figure 21. Top-level navigation activity in the primary pane replaces destination activities in the secondary pane.

If the app doesn't finish the activity in the secondary container when the navigation selection changes, back navigation might be confusing when the split is collapsed (when the device is folded). For example, if you have a menu in the primary pane and screens A and B stacked in the secondary pane, when the user folds the phone, B is on top of A, and A is on top of the menu. When the user navigates back from B, A appears instead of the menu.

Screen A must be removed from the back stack in such cases.
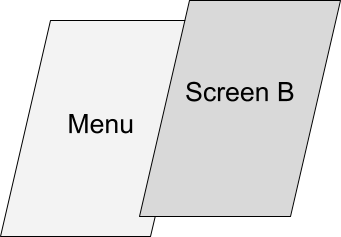
The default behavior when launching to the side in a new container over an existing split is to put the new secondary containers on top and retain the old ones in the back stack. You can configure the splits to clear the previous secondary containers with clearTop and launch new activities normally.

<SplitPairRule
    window:clearTop="true">
    <SplitPairFilter
        window:primaryActivityName=".Menu"
        window:secondaryActivityName=".ScreenA"/>
    <SplitPairFilter
        window:primaryActivityName=".Menu"
        window:secondaryActivityName=".ScreenB"/>
</SplitPairRule>

کاتلین

class MenuActivity {
    . . .
    fun onMenuItemSelected(selectedMenuItem: Int) {
        startActivity(Intent(this, classForItem(selectedMenuItem)))
    }
}

جاوا

public class MenuActivity {
    . . .
    void onMenuItemSelected(int selectedMenuItem) {
        startActivity(new Intent(this, classForItem(selectedMenuItem)));
    }
}

Alternatively, use the same secondary activity, and from the primary (menu) activity send new intents that resolve to the same instance but trigger a state or UI update in the secondary container.

Multiple splits

Apps can provide multi-level deep navigation by launching additional activities to the side.

When an activity in a secondary container launches a new activity to the side, a new split is created over top of the existing split.

Figure 22. Activity B starts activity C to the side.

The back stack contains all activities that were previously opened, so users can navigate to the A/B split after finishing C.
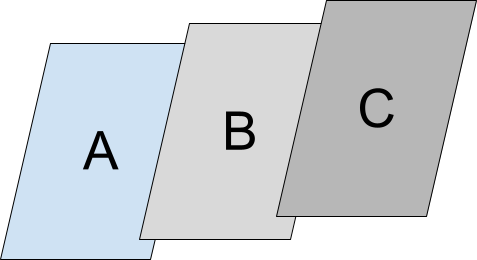
Activities A, B, and C in a stack. The activities are stacked in
          the following order from top to bottom: C, B, A.

To create a new split, launch the new activity to the side from the existing secondary container. Declare the configurations for both the A/B and B/C splits and launch activity C normally from B:

<SplitPairRule>
    <SplitPairFilter
        window:primaryActivityName=".A"
        window:secondaryActivityName=".B"/>
    <SplitPairFilter
        window:primaryActivityName=".B"
        window:secondaryActivityName=".C"/>
</SplitPairRule>

کاتلین

class B {
    . . .
    fun onOpenC() {
        startActivity(Intent(this, C::class.java))
    }
}

جاوا

public class B {
    . . .
    void onOpenC() {
        startActivity(new Intent(this, C.class));
    }
}

React to split state changes

Different activities in an app can have UI elements that perform the same function; for example, a control that opens a window containing account settings.
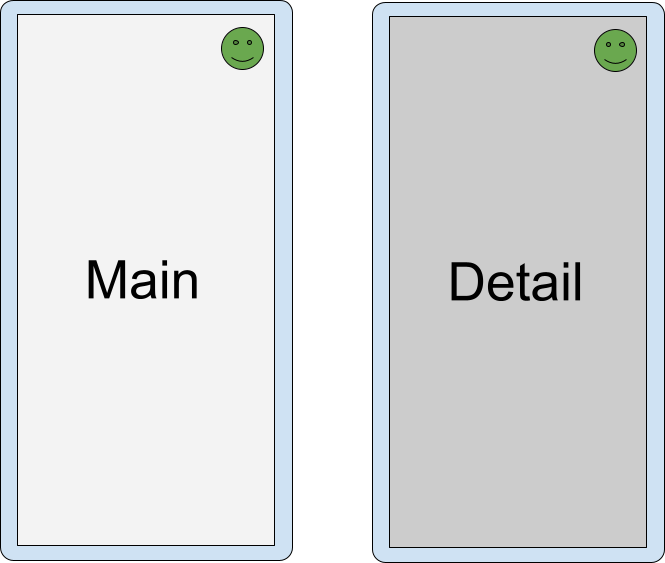
Figure 23. Different activities with functionally identical UI elements.

If two activities that have a UI element in common are in a split, it's redundant and perhaps confusing to show the element in both activities.
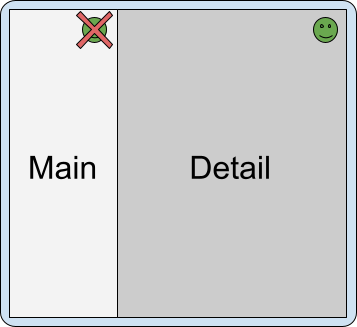
Figure 24. Duplicate UI elements in activity split.

To know when activities are in a split, check the SplitController.splitInfoList flow or register a listener with SplitControllerCallbackAdapter for changes in the split state. Then, adjust the UI accordingly:

کاتلین

val layout = layoutInflater.inflate(R.layout.activity_main, null)
val view = layout.findViewById<View>(R.id.infoButton)
lifecycleScope.launch {
    lifecycle.repeatOnLifecycle(Lifecycle.State.STARTED) {
        splitController.splitInfoList(this@SplitDeviceActivity) // The activity instance.
            .collect { list ->
                view.visibility = if (list.isEmpty()) View.VISIBLE else View.GONE
            }
    }
}

جاوا

@Override
protected void onCreate(@Nullable Bundle savedInstanceState) {
    . . .
    new SplitControllerCallbackAdapter(SplitController.getInstance(this))
        .addSplitListener(
            this,
            Runnable::run,
            splitInfoList -> {
                View layout = getLayoutInflater().inflate(R.layout.activity_main, null);
                layout.findViewById(R.id.infoButton).setVisibility(
                    splitInfoList.isEmpty() ? View.VISIBLE : View.GONE);
            });
}

Coroutines can be launched in any lifecycle state, but are typically launched in the STARTED state to conserve resources (see Use Kotlin coroutines with lifecycle-aware components for more information).

Callbacks can be made in any lifecycle state, including when an activity is stopped. Listeners should usually be registered in onStart() and unregistered in onStop() .

Full-window modal

Some activities block users from interacting with the application until a specified action is performed; for example, a login screen activity, policy acknowledgement screen, or error message. Modal activities should be prevented from appearing in a split.

An activity can be forced to always fill the task window by using the expand configuration:

<ActivityRule
    window:alwaysExpand="true">
    <ActivityFilter
        window:activityName=".FullWidthActivity"/>
</ActivityRule>

Finish activities

Users can finish activities on either side of the split by swiping from the edge of the display:
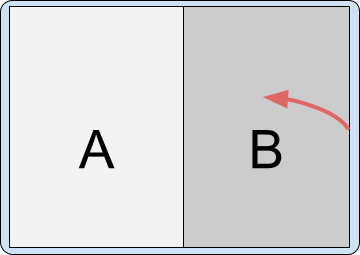
Figure 25. Swipe gesture finishing activity B.
Figure 26. Swipe gesture finishing activity A.

If the device is set up to use the back button instead of gesture navigation, the input is sent to the focused activity—the activity that was touched or launched last.

The effect that finishing all activities in a container has on the opposing container depends on the split configuration.

ویژگی های پیکربندی

You can specify split pair rule attributes to configure how finishing all activities on one side of the split affects the activities on the other side of the split. The attributes are:

  • window:finishPrimaryWithSecondary — How finishing all activities in the secondary container affects the activities in the primary container
  • window:finishSecondaryWithPrimary — How finishing all activities in the primary container affects the activities in the secondary container

Possible values of the attributes include:

  • always — Always finish the activities in the associated container
  • never — Never finish the activities in the associated container
  • adjacent — Finish the activities in the associated container when the two containers are displayed adjacent to each other, but not when the two containers are stacked

به عنوان مثال:

<SplitPairRule
    &lt;!-- Do not finish primary container activities when all secondary container activities finish. --&gt;
    window:finishPrimaryWithSecondary="never"
    &lt;!-- Finish secondary container activities when all primary container activities finish. --&gt;
    window:finishSecondaryWithPrimary="always">
    <SplitPairFilter
        window:primaryActivityName=".A"
        window:secondaryActivityName=".B"/>
</SplitPairRule>

پیکربندی پیش فرض

When all activities in one container of a split finish, the remaining container occupies the entire window:

<SplitPairRule>
    <SplitPairFilter
        window:primaryActivityName=".A"
        window:secondaryActivityName=".B"/>
</SplitPairRule>

Split containing activities A and B. A is finished, leaving B to
          occupy the entire window.

Split containing activities A and B. B is finished, leaving A to
          occupy the entire window.

Finish activities together

Finish the activities in the primary container automatically when all activities in the secondary container finish:

<SplitPairRule
    window:finishPrimaryWithSecondary="always">
    <SplitPairFilter
        window:primaryActivityName=".A"
        window:secondaryActivityName=".B"/>
</SplitPairRule>

Split containing activities A and B. B is finished, which also
          finishes A, leaving the task window empty.

Split containing activities A and B. A is finished, leaving B alone
          in the task window.

Finish the activities in the secondary container automatically when all activities in the primary container finish:

<SplitPairRule
    window:finishSecondaryWithPrimary="always">
    <SplitPairFilter
        window:primaryActivityName=".A"
        window:secondaryActivityName=".B"/>
</SplitPairRule>

Split containing activities A and B. A is finished, which also
          finishes B, leaving the task window empty.

Split containing activities A and B. B is finished, leaving A alone
          in the task window.

Finish activities together when all activities in either the primary or secondary container finish:

<SplitPairRule
    window:finishPrimaryWithSecondary="always"
    window:finishSecondaryWithPrimary="always">
    <SplitPairFilter
        window:primaryActivityName=".A"
        window:secondaryActivityName=".B"/>
</SplitPairRule>

Split containing activities A and B. A is finished, which also
          finishes B, leaving the task window empty.

Split containing activities A and B. B is finished, which also
          finishes A, leaving the task window empty.

Finish multiple activities in containers

If multiple activities are stacked in a split container, finishing an activity on the bottom of the stack does not automatically finish activities on top.

For example, if two activities are in the secondary container, C on top of B:

Secondary activity stack containing activity C stacked on top of B           is stacked on top of the prmary activity stack containing activity           الف

and the configuration of the split is defined by the configuration of activities A and B:

<SplitPairRule>
    <SplitPairFilter
        window:primaryActivityName=".A"
        window:secondaryActivityName=".B"/>
</SplitPairRule>

finishing the top activity retains the split.

Split with activity A in primary container and activities B and C in
          secondary, C stacked on top of B. C finishes, leaving A and B in the
          activity split.

Finishing the bottom (root) activity of the secondary container does not remove the activities on top of it; and so, also retains the split.

Split with activity A in primary container and activities B and C in
          secondary, C stacked on top of B. B finishes, leaving A and C in the
          activity split.

Any additional rules for finishing activities together, such as finishing the secondary activity with the primary, are also executed:

<SplitPairRule
    window:finishSecondaryWithPrimary="always">
    <SplitPairFilter
        window:primaryActivityName=".A"
        window:secondaryActivityName=".B"/>
</SplitPairRule>

Split with activity A in primary container and activities B and C in
          secondary container, C stacked on top of B. A finishes, also
          finishing B and C.

And when the split is configured to finish primary and secondary together:

<SplitPairRule
    window:finishPrimaryWithSecondary="always"
    window:finishSecondaryWithPrimary="always">
    <SplitPairFilter
        window:primaryActivityName=".A"
        window:secondaryActivityName=".B"/>
</SplitPairRule>

Split with activity A in primary container and activities B and C in
          secondary, C stacked on top of B. C finishes, leaving A and B in the
          activity split.

Split with activity A in primary container and activities B and C in
          secondary, C stacked on top of B. B finishes, leaving A and C in the
          activity split.

Split with activity A in primary container and activities B and C in           secondary, C stacked on top of B. A finishes, also finishing B and           سی.

Change split properties at runtime

The properties of an active and visible split cannot be changed. Changing the split rules affects additional activity launches and new containers, but not existing and active splits.

To change the properties of active splits, finish the side activity or activities in the split and launch to the side again with a new configuration.

Dynamic split properties

Android 15 (API level 35) and higher supported by Jetpack WindowManager 1.4 and higher offer dynamic features that enable configurability of activity embedding splits, including:

  • Pane expansion: An interactive, draggable divider enables users to resize the panes in a split presentation.
  • Activity stack pinning: Users can pin the content in one container and isolate navigation in the container from navigation in the other container.
  • Dialog full-screen dim: When displaying a dialog, apps can specify whether to dim the entire task window or just the container that opened the dialog.

Pane expansion

Pane expansion enables users to adjust the amount of screen space allocated to the two activities in a dual‑pane layout.

To customize the appearance of the window divider and set the divider's draggable range, do the following:

  1. Create an instance of DividerAttributes

  2. Customize the divider attributes:

    • color : The color of the draggable pane separator.

    • widthDp : The width of the draggable pane separator. Set to WIDTH_SYSTEM_DEFAULT to let the system determine the divider width.

    • Drag range: The minimum percentage of the screen either pane can occupy. Can range from 0.33 to 0.66. Set to DRAG_RANGE_SYSTEM_DEFAULT to let the system determine the drag range.

کاتلین

val splitAttributesBuilder: SplitAttributes.Builder = SplitAttributes.Builder()
    .setSplitType(SplitAttributes.SplitType.ratio(0.33f))
    .setLayoutDirection(SplitAttributes.LayoutDirection.LEFT_TO_RIGHT)

if (WindowSdkExtensions.getInstance().extensionVersion >= 6) {
    splitAttributesBuilder.setDividerAttributes(
      DividerAttributes.DraggableDividerAttributes.Builder()
        .setColor(getColor(context, R.color.divider_color))
        .setWidthDp(4)
        .setDragRange(DividerAttributes.DragRange.DRAG_RANGE_SYSTEM_DEFAULT)
        .build()
    )
}
val splitAttributes: SplitAttributes = splitAttributesBuilder.build()

جاوا

SplitAttributes.Builder splitAttributesBuilder = new SplitAttributes.Builder()
    .setSplitType(SplitAttributes.SplitType.ratio(0.33f))
    .setLayoutDirection(SplitAttributes.LayoutDirection.LEFT_TO_RIGHT);

if (WindowSdkExtensions.getInstance().getExtensionVersion() >= 6) {
    splitAttributesBuilder.setDividerAttributes(
      new DividerAttributes.DraggableDividerAttributes.Builder()
        .setColor(ContextCompat.getColor(context, R.color.divider_color))
        .setWidthDp(4)
        .setDragRange(DividerAttributes.DragRange.DRAG_RANGE_SYSTEM_DEFAULT)
        .build()
    );
}
SplitAttributes splitAttributes = splitAttributesBuilder.build();

Activity stack pinning

Activity stack pinning enables users to pin one of the split windows so the activity stays as is while users navigate within the other window. Activity stack pinning provides an enhanced multitasking experience.

To enable activity stack pinning in your app, do the following:

  1. Add a button to the layout file of the activity you want to pin, for example, the detail activity of an list‑detail layout:

    <androidx.constraintlayout.widget.ConstraintLayout
     xmlns:android="http://schemas.android.com/apk/res/android"
     xmlns:app="http://schemas.android.com/apk/res-auto"
     xmlns:tools="http://schemas.android.com/tools"
     android:id="@+id/detailActivity"
     android:layout_width="match_parent"
     android:layout_height="match_parent"
     android:background="@color/white"
     tools:context=".DetailActivity">
    
    <TextView
       android:id="@+id/textViewItemDetail"
       android:layout_width="wrap_content"
       android:layout_height="wrap_content"
       android:textSize="36sp"
       android:textColor="@color/obsidian"
       app:layout_constraintBottom_toTopOf="@id/pinButton"
       app:layout_constraintEnd_toEndOf="parent"
       app:layout_constraintStart_toStartOf="parent"
       app:layout_constraintTop_toTopOf="parent" />
    
    <androidx.appcompat.widget.AppCompatButton
       android:id="@+id/pinButton"
       android:layout_width="wrap_content"
       android:layout_height="wrap_content"
       android:text="@string/pin_this_activity"
       app:layout_constraintBottom_toBottomOf="parent"
       app:layout_constraintEnd_toEndOf="parent"
       app:layout_constraintStart_toStartOf="parent"
       app:layout_constraintTop_toBottomOf="@id/textViewItemDetail"/>
    
    </androidx.constraintlayout.widget.ConstraintLayout>
    
  2. In the onCreate() method of the activity, set an onclick listener on the button:

    کاتلین

    pinButton = findViewById(R.id.pinButton)
    pinButton.setOnClickListener {
        val splitAttributes: SplitAttributes = SplitAttributes.Builder()
            .setSplitType(SplitAttributes.SplitType.ratio(0.66f))
            .setLayoutDirection(SplitAttributes.LayoutDirection.LEFT_TO_RIGHT)
            .build()
    
        val pinSplitRule = SplitPinRule.Builder()
            .setSticky(true)
            .setDefaultSplitAttributes(splitAttributes)
            .build()
    
        SplitController.getInstance(applicationContext).pinTopActivityStack(taskId, pinSplitRule)
    }

    جاوا

    Button pinButton = findViewById(R.id.pinButton);
    pinButton.setOnClickListener( (view) => {
        SplitAttributes splitAttributes = new SplitAttributes.Builder()
            .setSplitType(SplitAttributes.SplitType.ratio(0.66f))
            .setLayoutDirection(SplitAttributes.LayoutDirection.LEFT_TO_RIGHT)
            .build();
    
        SplitPinRule pinSplitRule = new SplitPinRule.Builder()
            .setSticky(true)
            .setDefaultSplitAttributes(splitAttributes)
            .build();
    
        SplitController.getInstance(getApplicationContext()).pinTopActivityStack(getTaskId(), pinSplitRule);
    });

Dialog full-screen dim

Activities typically dim their displays to draw attention to a dialog. In activity embedding, both panes of the dual‑pane display should dim, not just the pane containing the activity that opened the dialog, for a unified UI experience.

With WindowManager 1.4 and higher, the entire app window dims by default when a dialog opens (see EmbeddingConfiguration.DimAreaBehavior.ON_TASK ).

To dim only the container of the activity that opened the dialog, use EmbeddingConfiguration.DimAreaBehavior.ON_ACTIVITY_STACK .

Extract an activity from a split to full window

Create a new configuration that displays the side activity full window, and then relaunch the activity with an intent that resolves to the same instance.

Check for split support at runtime

Activity embedding is supported on Android 12L (API level 32) and higher, but is also available on some devices running earlier platform versions. To check at runtime for the availability of the feature, use the SplitController.splitSupportStatus property or SplitController.getSplitSupportStatus() method:

کاتلین

if (SplitController.getInstance(this).splitSupportStatus ==
     SplitController.SplitSupportStatus.SPLIT_AVAILABLE) {
     // Device supports split activity features.
}

جاوا

if (SplitController.getInstance(this).getSplitSupportStatus() ==
     SplitController.SplitSupportStatus.SPLIT_AVAILABLE) {
     // Device supports split activity features.
}

If splits are not supported, activities are launched on top of the activity stack (following the non-activity embedding model).

Prevent system override

The manufacturers of Android devices (original equipment manufacturers, or OEMs), can implement activity embedding as a function of the device system. The system specifies split rules for multi-activity apps, overriding the windowing behavior of the apps. The system override forces multi-activity apps into a system-defined activity embedding mode.

System activity embedding can enhance app presentation through multi-pane layouts, such as list-detail , without any changes to the app. However, the system's activity embedding might also cause incorrect app layouts, bugs, or conflicts with activity embedding implemented by the app.

Your app can prevent or permit system activity embedding by setting a property in the app manifest file, for example:

<manifest xmlns:android="http://schemas.android.com/apk/res/android">
    <application>
        <property
            android:name="android.window.PROPERTY_ACTIVITY_EMBEDDING_ALLOW_SYSTEM_OVERRIDE"
            android:value="true|false" />
    </application>
</manifest>

The property name is defined in the Jetpack WindowManager WindowProperties object. Set the value to false if your app implements activity embedding, or if you want to otherwise prevent the system from applying its activity embedding rules to your app. Set the value to true to permit the system to apply system-defined activity embedding to your app.

Limitations, restrictions, and caveats

  • Only the host app of the task, which is identified as the owner of the root activity in the task, can organize and embed other activities in the task. If activities that support embedding and splits run in a task that belongs to a different application, then embedding and splits will not work for those activities.
  • Activities can only be organized within a single task. Launching an activity in a new task always puts it in a new expanded window outside of any existing splits.
  • Only activities in the same process can be organized and put in a split. The SplitInfo callback only reports activities that belong to the same process, since there is no way of knowing about activities in different processes.
  • Each pair or singular activity rule applies only to activity launches that happen after the rule has been registered. There is currently no way to update existing splits or their visual properties.
  • The split pair filter configuration must match the intents used when launching activities completely. The matching occurs at the point when a new activity is started from the application process, so it might not know about component names that are resolved later in the system process when using implicit intents. If a component name is not known at the time of launch, a wildcard can be used instead ("*/*") and filtering can be performed based on intent action.
  • There is currently no way to move activities between containers or in and out of splits after they were created. Splits are only created by the WindowManager library when new activities with matching rules are launched, and splits are destroyed when the last activity in a split container is finished.
  • Activities can be relaunched when the configuration changes, so when a split is created or removed and activity bounds change, the activity can go through complete destruction of the previous instance and creation of the new one. As a result, app developers should be careful with things like launching new activities from lifecycle callbacks.
  • Devices must include the window extensions interface to support activity embedding. Nearly all large screen devices running Android 12L (API level 32) or higher include the interface. However, some large screen devices that are not capable of running multiple activities don't include the window extensions interface. If a large screen device doesn't support multi-window mode, it might not support activity embedding.

منابع اضافی

،

Activity embedding optimizes apps on large screen devices by splitting an application's task window between two activities or two instances of the same activity.

Figure 1. Settings app with activities side by side.

If your app consists of multiple activities, activity embedding enables you to provide an enhanced user experience on tablets, foldables, and ChromeOS devices.

Activity embedding requires no code refactoring. You determine how your app displays its activities—side by side or stacked—by creating an XML configuration file or by making Jetpack WindowManager API calls.

Support for small screens is maintained automatically. When your app is on a device with a small screen, activities are stacked one on top of the other. On large screens, activities are displayed side by side. The system determines the presentation based on the configuration you've created—no branching logic required.

Activity embedding accommodates device orientation changes and works seamlessly on foldable devices, stacking and unstacking activities as the device folds and unfolds.

Activity embedding is supported on most large screen devices running Android 12L (API level 32) and higher.

Split task window

Activity embedding splits the app task window into two containers: primary and secondary. The containers hold activities launched from the main activity or from other activities already in the containers.

Activities are stacked in the secondary container as they're launched, and the secondary container is stacked on top of the primary container on small screens, so activity stacking and back navigation are consistent with the ordering of activities already built into your app.

Activity embedding enables you to display activities in a variety of ways. Your app can split the task window by launching two activities side by side simultaneously:

Figure 2. Two activities side by side.

Or, an activity that's occupying the entire task window can create a split by launching a new activity alongside:

Figure 3. Activity A starts activity B to the side.

Activities that are already in a split and sharing a task window can launch other activities in the following ways:

  • To the side on top of another activity:

    Figure 4. Activity A starts activity C to the side over activity B.
  • To the side, and shift the split sideways, concealing the previous primary activity:

    Figure 5. Activity B starts activity C to the side and shifts the split sideways.
  • Launch an activity in place on top; that is, in the same activity stack:

    Figure 6. Activity B starts activity C with no extra intent flags.
  • Launch an activity full window in the same task:

    Figure 7. Activity A or activity B starts activity C which fills the task window.

ناوبری برگشت

Different types of applications can have different back navigation rules in a split task window state depending on the dependencies between activities or how users trigger the back event, for example:

  • Going together: If activities are related, and one shouldn't be shown without the other, back navigation can be configured to finish both.
  • Going it alone: If activities are fully independent, back navigation on an activity does not affect the state of another activity in the task window.

The back event is sent to the last focused activity when using button navigation.

For gesture-based navigation:

  • Android 14 (API level 34) and lower — The back event is sent to the activity where the gesture occurred. When users swipe from the left side of the screen, the back event is sent to the activity in the left‑hand pane of the split window. When users swipe from the right side of the screen, the back event is sent to the activity in the right‑hand pane.

  • Android 15 (API level 35) and higher

    • When dealing with multiple activities from the same app, the gesture finishes the top activity regardless of the swipe direction, providing a more unified experience.

    • In scenarios involving two activities from different apps (overlay), the back event is directed to the last activity in focus, aligning with the behavior of button navigation.

Multi-pane layout

Jetpack WindowManager enables you to build an activity embedding multi-pane layout on large screen devices with Android 12L (API level 32) or higher and on some devices with earlier platform versions. Existing apps that are based on multiple activities rather than fragments or view-based layouts such as SlidingPaneLayout can provide an improved large screen user experience without refactoring source code.

One common example is a list-detail split. To ensure a high-quality presentation, the system starts the list activity, and then the application immediately starts the detail activity. The transition system waits until both activities are drawn, then displays them together. To the user, the two activities launch as one.

Figure 8. Two activities started simultaneously in a multi-pane layout.

Split attributes

You can specify how the task window is proportioned between the split containers and how the containers are layed out relative to one another.

For rules defined in an XML configuration file, set the following attributes:

  • splitRatio : Sets the container proportions. The value is a floating point number in the open interval (0.0, 1.0).
  • splitLayoutDirection : Specifies how the split containers are layed out relative to one another. ارزش ها عبارتند از:
    • ltr : Left to right
    • rtl : Right to left
    • locale : Either ltr or rtl is determined from the locale setting

See the XML configuration section for examples.

For rules created using the WindowManager APIs, create a SplitAttributes object with SplitAttributes.Builder and call the following builder methods:

See the WindowManager API section for examples.

Figure 9. Two activity splits layed out left to right but with different split ratios.

متغیرهای

Placeholder activities are empty secondary activities that occupy an area of an activity split. They are ultimately meant to be replaced with another activity that contains content. For example, a placeholder activity could occupy the secondary side of an activity split in a list-detail layout until an item from the list is selected, at which point an activity containing the detail information for the selected list item replaces the placeholder.

By default, the system displays placeholders only when there is enough space for an activity split. Placeholders automatically finish when the display size changes to a width or height too small to display a split. When space permits, the system relaunches the placeholder with a reinitialized state.

Figure 10. Foldable device folding and unfolding. Placeholder activity is finished and recreated as display size changes.

However, the stickyPlaceholder attribute of a SplitPlaceholderRule or setSticky() method of SplitPlaceholder.Builder can override the default behavior. When the attribute or method specifies a value of true , the system displays the placeholder as the topmost activity in the task window when the display is resized down to a single-pane display from a two-pane display (see Split configuration for an example) .

Figure 11. Foldable device folding and unfolding. Placeholder activity is sticky.

Window size changes

When device configuration changes reduce the task window width so that it is not large enough for a multi-pane layout (for example, when a large screen foldable device folds from tablet size to phone size or the app window is resized in multi-window mode), the non-placeholder activities in the secondary pane of the task window are stacked on top of the activities in the primary pane.

Placeholder activities are shown only when there is enough display width for a split. On smaller screens, the placeholder is automatically dismissed. When the display area becomes large enough again, the placeholder is recreated. (See the Placeholders section.)

Activity stacking is possible because WindowManager z-orders the activities in the secondary pane above activities in the primary pane.

Multiple activities in secondary pane

Activity B starts activity C in place with no extra intent flags:

Activity split containing activities A, B, and C with C stacked on
          top of B.

resulting in the following z-order of activities in the same task:

Secondary activity stack containing activity C stacked on top of B.
          Secondary stack is stacked on top of prmary activity stack
          containing activity A.

So, in a smaller task window, the application shrinks to a single activity with C at the top of the stack:

Small window showing only activity C.

Navigating back in the smaller window navigates through the activities stacked on top of each other.

If the task window configuration is restored to a larger size that can accommodate multiple panes, the activities are displayed side by side again.

Stacked splits

Activity B starts activity C to the side and shifts the split sideways:

Task window showing activities A and B, then activities B and C.

The result is the following z-order of activities in the same task:

Activities A, B, and C in a single stack. The activities are stacked
          in the following order from top to bottom: C, B, A.

In a smaller task window, the application shrinks to a single activity with C on top:

Small window showing only activity C.

Fixed-portrait orientation

The android:screenOrientation manifest setting enables apps to constrain activities to portrait or landscape orientation. To improve the user experience on large screen devices such as tablets and foldables, device manufacturers (OEMs) can ignore screen orientation requests and letterbox the app in portrait orientation on landscape displays or landscape orientation on portrait displays.

Figure 12. Letterboxed activities: fixed-portrait on landscape device (left), fixed-landscape on portrait device (right).

Similarly, when activity embedding is enabled, OEMs can customize devices to letterbox fixed-portrait activities in landscape orientation on large screens (width ≥ 600dp). When a fixed-portrait activity launches a second activity, the device can display the two activities side by side in a two-pane display.

Figure 13. Fixed-portrait activity A starts activity B to the side.

Always add the android.window.PROPERTY_ACTIVITY_EMBEDDING_SPLITS_ENABLED property to your app manifest file to inform devices that your app supports activity embedding (see the Split configuration section). OEM-customized devices can then determine whether to letterbox fixed-portrait activities.

Split configuration

Split rules configure activity splits. You define split rules in an XML configuration file or by making Jetpack WindowManager API calls.

In either case, your app must access the WindowManager library and must inform the system that the app has implemented activity embedding.

موارد زیر را انجام دهید:

  1. Add the latest WindowManager library dependency to your app's module-level build.gradle file, for example:

    implementation 'androidx.window:window:1.1.0-beta02'

    The WindowManager library provides all the components required for activity embedding.

  2. Inform the system that your app has implemented activity embedding.

    Add the android.window.PROPERTY_ACTIVITY_EMBEDDING_SPLITS_ENABLED property to the <application> element of the app manifest file, and set the value to true, for example:

    <manifest xmlns:android="http://schemas.android.com/apk/res/android">
        <application>
            <property
                android:name="android.window.PROPERTY_ACTIVITY_EMBEDDING_SPLITS_ENABLED"
                android:value="true" />
        </application>
    </manifest>
    

    On WindowManager release 1.1.0-alpha06 and later, activity embedding splits are disabled unless the property is added to the manifest and set to true.

    Also, device manufacturers use the setting to enable custom capabilities for apps that support activity embedding. For example, devices can letterbox a portrait-only activity on landscape displays to orient the activity for the transition to a two-pane layout when a second activity starts (see Fixed-portrait orientation ).

XML configuration

To create an XML-based implementation of activity embedding, complete the following steps:

  1. Create an XML resource file that does the following:

    • Defines activities that share a split
    • Configures the split options
    • Creates a placeholder for the secondary container of the split when content is not available
    • Specifies activities that should never be part of a split

    به عنوان مثال:

    <!-- main_split_config.xml -->
    
    <resources
        xmlns:window="http://schemas.android.com/apk/res-auto">
    
        <!-- Define a split for the named activities. -->
        <SplitPairRule
            window:splitRatio="0.33"
            window:splitLayoutDirection="locale"
            window:splitMinWidthDp="840"
            window:splitMaxAspectRatioInPortrait="alwaysAllow"
            window:finishPrimaryWithSecondary="never"
            window:finishSecondaryWithPrimary="always"
            window:clearTop="false">
            <SplitPairFilter
                window:primaryActivityName=".ListActivity"
                window:secondaryActivityName=".DetailActivity"/>
        </SplitPairRule>
    
        <!-- Specify a placeholder for the secondary container when content is
             not available. -->
        <SplitPlaceholderRule
            window:placeholderActivityName=".PlaceholderActivity"
            window:splitRatio="0.33"
            window:splitLayoutDirection="locale"
            window:splitMinWidthDp="840"
            window:splitMaxAspectRatioInPortrait="alwaysAllow"
            window:stickyPlaceholder="false">
            <ActivityFilter
                window:activityName=".ListActivity"/>
        </SplitPlaceholderRule>
    
        <!-- Define activities that should never be part of a split. Note: Takes
             precedence over other split rules for the activity named in the
             rule. -->
        <ActivityRule
            window:alwaysExpand="true">
            <ActivityFilter
                window:activityName=".ExpandedActivity"/>
        </ActivityRule>
    
    </resources>
    
  2. Create an initializer.

    The WindowManager RuleController component parses the XML configuration file and makes the rules available to the system. A Jetpack Startup library Initializer makes the XML file available to RuleController at app startup so that the rules are in effect when any activities start.

    To create an initializer, do the following:

    1. Add the latest Jetpack Startup library dependency to your module-level build.gradle file, for example:

      implementation 'androidx.startup:startup-runtime:1.1.1'

    2. Create a class that implements the Initializer interface.

      The initializer makes the split rules available to RuleController by passing the ID of the XML configuration file ( main_split_config.xml ) to the RuleController.parseRules() method.

      کاتلین

      class SplitInitializer : Initializer<RuleController> {
      
          override fun create(context: Context): RuleController {
              return RuleController.getInstance(context).apply {
                  setRules(RuleController.parseRules(context, R.xml.main_split_config))
              }
          }
      
          override fun dependencies(): List<Class<out Initializer<*>>> {
              return emptyList()
          }
      }

      جاوا

      public class SplitInitializer implements Initializer<RuleController> {
      
           @NonNull
           @Override
           public RuleController create(@NonNull Context context) {
               RuleController ruleController = RuleController.getInstance(context);
               ruleController.setRules(
                   RuleController.parseRules(context, R.xml.main_split_config)
               );
               return ruleController;
           }
      
           @NonNull
           @Override
           public List<Class<? extends Initializer<?>>> dependencies() {
               return Collections.emptyList();
           }
      }
  3. Create a content provider for the rule definitions.

    Add androidx.startup.InitializationProvider to your app manifest file as a <provider> . Include a reference to the implementation of your RuleController initializer, SplitInitializer :

    <!-- AndroidManifest.xml -->
    
    <provider android:name="androidx.startup.InitializationProvider"
        android:authorities="${applicationId}.androidx-startup"
        android:exported="false"
        tools:node="merge">
        <!-- Make SplitInitializer discoverable by InitializationProvider. -->
        <meta-data android:name="${applicationId}.SplitInitializer"
            android:value="androidx.startup" />
    </provider>
    

    InitializationProvider discovers and initializes SplitInitializer before the app's onCreate() method is called. As a result, the split rules are in effect when the app's main activity starts.

WindowManager API

You can implement activity embedding programmatically with a handful of API calls. Make the calls in the onCreate() method of a subclass of Application to ensure the rules are in effect before any activities launch.

To programmatically create an activity split, do the following:

  1. Create a split rule:

    1. Create a SplitPairFilter that identifies the activities that share the split:

      کاتلین

      val splitPairFilter = SplitPairFilter(
         ComponentName(this, ListActivity::class.java),
         ComponentName(this, DetailActivity::class.java),
         null
      )

      جاوا

      SplitPairFilter splitPairFilter = new SplitPairFilter(
         new ComponentName(this, ListActivity.class),
         new ComponentName(this, DetailActivity.class),
         null
      );
    2. Add the filter to a filter set:

      کاتلین

      val filterSet = setOf(splitPairFilter)

      جاوا

      Set<SplitPairFilter> filterSet = new HashSet<>();
      filterSet.add(splitPairFilter);
    3. Create layout attributes for the split:

      کاتلین

      val splitAttributes: SplitAttributes = SplitAttributes.Builder()
          .setSplitType(SplitAttributes.SplitType.ratio(0.33f))
          .setLayoutDirection(SplitAttributes.LayoutDirection.LEFT_TO_RIGHT)
          .build()

      جاوا

      final SplitAttributes splitAttributes = new SplitAttributes.Builder()
            .setSplitType(SplitAttributes.SplitType.ratio(0.33f))
            .setLayoutDirection(SplitAttributes.LayoutDirection.LEFT_TO_RIGHT)
            .build();

      SplitAttributes.Builder creates an object containing layout attributes:

      • setSplitType() : Defines how the available display area is allocated to each activity container. The ratio split type specifies the proportion of the available display area allocated to the primary container; the secondary container occupies the remainder of the available display area.
      • setLayoutDirection() : Specifies how the activity containers are laid out relative to one another, primary container first.
    4. Build a SplitPairRule :

      کاتلین

      val splitPairRule = SplitPairRule.Builder(filterSet)
          .setDefaultSplitAttributes(splitAttributes)
          .setMinWidthDp(840)
          .setMinSmallestWidthDp(600)
          .setMaxAspectRatioInPortrait(EmbeddingAspectRatio.ratio(1.5f))
          .setFinishPrimaryWithSecondary(SplitRule.FinishBehavior.NEVER)
          .setFinishSecondaryWithPrimary(SplitRule.FinishBehavior.ALWAYS)
          .setClearTop(false)
          .build()

      جاوا

      SplitPairRule splitPairRule = new SplitPairRule.Builder(filterSet)
          .setDefaultSplitAttributes(splitAttributes)
          .setMinWidthDp(840)
          .setMinSmallestWidthDp(600)
          .setMaxAspectRatioInPortrait(EmbeddingAspectRatio.ratio(1.5f))
          .setFinishPrimaryWithSecondary(SplitRule.FinishBehavior.NEVER)
          .setFinishSecondaryWithPrimary(SplitRule.FinishBehavior.ALWAYS)
          .setClearTop(false)
          .build();

      SplitPairRule.Builder creates and configures the rule:

      • filterSet : Contains split pair filters that determine when to apply the rule by identifying activities that share a split.
      • setDefaultSplitAttributes() : Applies layout attributes to the rule.
      • setMinWidthDp() : Sets the minimum display width (in density‑independent pixels, dp) that enables a split.
      • setMinSmallestWidthDp() : Sets the minimum value (in dp) that the smaller of the two display dimensions must have to enable a split regardless of the device orientation.
      • setMaxAspectRatioInPortrait() : Sets the maximum display aspect ratio (height:width) in portrait orientation for which activity splits are displayed. If the aspect ratio of a portrait display exceeds the maximum aspect ratio, splits are disabled regardless of the width of the display. Note: The default value is 1.4, which results in activities occupying the entire task window in portrait orientation on most tablets. See also SPLIT_MAX_ASPECT_RATIO_PORTRAIT_DEFAULT and setMaxAspectRatioInLandscape() . The default value for landscape is ALWAYS_ALLOW .
      • setFinishPrimaryWithSecondary() : Sets how finishing all activities in the secondary container affects the activities in the primary container. NEVER indicates the system shouldn't finish the primary activities when all activities in the secondary container finish (see Finish activities ).
      • setFinishSecondaryWithPrimary() : Sets how finishing all activities in the primary container affects the activities in the secondary container. ALWAYS indicates the system should always finish the activities in the secondary container when all activities in the primary container finish (see Finish activities ).
      • setClearTop() : Specifies whether all activities in the secondary container are finished when a new activity is launched in the container. A false value specifies that new activities are stacked on top of activities already in the secondary container.
    5. Get the singleton instance of the WindowManager RuleController , and add the rule:

      کاتلین

        val ruleController = RuleController.getInstance(this)
        ruleController.addRule(splitPairRule)
        

      جاوا

        RuleController ruleController = RuleController.getInstance(this);
        ruleController.addRule(splitPairRule);
        
  2. Create a placeholder for the secondary container when content is not available:

    1. Create an ActivityFilter that identifies the activity with which the placeholder shares a task window split:

      کاتلین

      val placeholderActivityFilter = ActivityFilter(
          ComponentName(this, ListActivity::class.java),
          null
      )

      جاوا

      ActivityFilter placeholderActivityFilter = new ActivityFilter(
          new ComponentName(this, ListActivity.class),
          null
      );
    2. Add the filter to a filter set:

      کاتلین

      val placeholderActivityFilterSet = setOf(placeholderActivityFilter)

      جاوا

      Set<ActivityFilter> placeholderActivityFilterSet = new HashSet<>();
      placeholderActivityFilterSet.add(placeholderActivityFilter);
    3. Create a SplitPlaceholderRule :

      کاتلین

      val splitPlaceholderRule = SplitPlaceholderRule.Builder(
            placeholderActivityFilterSet,
            Intent(context, PlaceholderActivity::class.java)
          ).setDefaultSplitAttributes(splitAttributes)
           .setMinWidthDp(840)
           .setMinSmallestWidthDp(600)
           .setMaxAspectRatioInPortrait(EmbeddingAspectRatio.ratio(1.5f))
           .setFinishPrimaryWithPlaceholder(SplitRule.FinishBehavior.ALWAYS)
           .setSticky(false)
           .build()

      جاوا

      SplitPlaceholderRule splitPlaceholderRule = new SplitPlaceholderRule.Builder(
            placeholderActivityFilterSet,
            new Intent(context, PlaceholderActivity.class)
          ).setDefaultSplitAttributes(splitAttributes)
           .setMinWidthDp(840)
           .setMinSmallestWidthDp(600)
           .setMaxAspectRatioInPortrait(EmbeddingAspectRatio.ratio(1.5f))
           .setFinishPrimaryWithPlaceholder(SplitRule.FinishBehavior.ALWAYS)
           .setSticky(false)
           .build();

      SplitPlaceholderRule.Builder creates and configures the rule:

      • placeholderActivityFilterSet : Contains activity filters that determine when to apply the rule by identifying activities with which the placeholder activity is associated.
      • Intent : Specifies the launch of the placeholder activity.
      • setDefaultSplitAttributes() : Applies layout attributes to the rule.
      • setMinWidthDp() : Sets the minimum display width (in density-independent pixels, dp) that allows a split.
      • setMinSmallestWidthDp() : Sets the minimum value (in dp) that the smaller of the two display dimensions must have to allow a split regardless of the device orientation.
      • setMaxAspectRatioInPortrait() : Sets the maximum display aspect ratio (height:width) in portrait orientation for which activity splits are displayed. Note: The default value is 1.4, which results in activities filling the task window in portrait orientation on most tablets. See also SPLIT_MAX_ASPECT_RATIO_PORTRAIT_DEFAULT and setMaxAspectRatioInLandscape() . The default value for landscape is ALWAYS_ALLOW .
      • setFinishPrimaryWithPlaceholder() : Sets how finishing the placeholder activity affects the activities in the primary container. ALWAYS indicates the system should always finish the activities in the primary container when the placeholder finishes (see Finish activities ).
      • setSticky() : Determines whether the placeholder activity appears on top of the activity stack on small displays once the placeholder has first appeared in a split with sufficient minimum width.
    4. Add the rule to the WindowManager RuleController :

      کاتلین

      ruleController.addRule(splitPlaceholderRule)

      جاوا

      ruleController.addRule(splitPlaceholderRule);
  3. Specify activities that should never be part of a split:

    1. Create an ActivityFilter that identifies an activity that should always occupy the entire task display area:

      کاتلین

      val expandedActivityFilter = ActivityFilter(
        ComponentName(this, ExpandedActivity::class.java),
        null
      )

      جاوا

      ActivityFilter expandedActivityFilter = new ActivityFilter(
        new ComponentName(this, ExpandedActivity.class),
        null
      );
    2. Add the filter to a filter set:

      کاتلین

      val expandedActivityFilterSet = setOf(expandedActivityFilter)

      جاوا

      Set<ActivityFilter> expandedActivityFilterSet = new HashSet<>();
      expandedActivityFilterSet.add(expandedActivityFilter);
    3. Create an ActivityRule :

      کاتلین

      val activityRule = ActivityRule.Builder(expandedActivityFilterSet)
          .setAlwaysExpand(true)
          .build()

      جاوا

      ActivityRule activityRule = new ActivityRule.Builder(
          expandedActivityFilterSet
      ).setAlwaysExpand(true)
       .build();

      ActivityRule.Builder creates and configures the rule:

      • expandedActivityFilterSet : Contains activity filters that determine when to apply the rule by identifying activities that you want to exclude from splits.
      • setAlwaysExpand() : Specifies whether the activity should fill the entire task window.
    4. Add the rule to the WindowManager RuleController :

      کاتلین

      ruleController.addRule(activityRule)

      جاوا

      ruleController.addRule(activityRule);

Cross-application embedding

On Android 13 (API level 33) and higher, apps can embed activities from other apps. Cross‑application, or cross‑ UID , activity embedding enables visual integration of activities from multiple Android applications. The system displays an activity of the host app and an embedded activity from another app on screen side by side or top and bottom just as in single-app activity embedding.

For example, the Settings app could embed the wallpaper selector activity from the WallpaperPicker app:

Figure 14. Settings app (menu on left) with wallpaper selector as embedded activity (right).

Trust model

Host processes that embed activities from other apps are able to redefine the presentation of the embedded activities, including size, position, cropping, and transparency. Malicious hosts can use this capability to mislead users and create clickjacking or other UI-redressing attacks.

To prevent misuse of cross-app activity embedding, Android requires apps to opt in to allow embedding of their activities. Apps can designate hosts as trusted or untrusted.

میزبان های قابل اعتماد

To allow other applications to embed and fully control the presentation of activities from your app, specify the SHA-256 certificate of the host application in the android:knownActivityEmbeddingCerts attribute of the <activity> or <application> elements of your app's manifest file.

Set the value of android:knownActivityEmbeddingCerts either as a string:

<activity
    android:name=".MyEmbeddableActivity"
    android:knownActivityEmbeddingCerts="@string/known_host_certificate_digest"
    ... />

or, to specify multiple certificates, an array of strings:

<activity
    android:name=".MyEmbeddableActivity"
    android:knownActivityEmbeddingCerts="@array/known_host_certificate_digests"
    ... />

which references a resource like the following:

<resources>
    <string-array name="known_host_certificate_digests">
      <item>cert1</item>
      <item>cert2</item>
      ...
    </string-array>
</resources>

App owners can get a SHA certificate digest by running the Gradle signingReport task. The certificate digest is the SHA-256 fingerprint without the separating colons. For more information, see Run a signing report and Authenticating Your Client .

Untrusted hosts

To allow any app to embed your app's activities and control their presentation, specify the android:allowUntrustedActivityEmbedding attribute in the <activity> or <application> elements in the app manifest, for example:

<activity
    android:name=".MyEmbeddableActivity"
    android:allowUntrustedActivityEmbedding="true"
    ... />

The default value of the attribute is false, which prevents cross-app activity embedding.

احراز هویت سفارشی

To mitigate the risks of untrusted activity embedding, create a custom authentication mechanism that verifies the host identity. If you know the host certificates, use the androidx.security.app.authenticator library to authenticate. If the host authenticates after embedding your activity, you can display the actual content. If not, you can inform the user that the action was not allowed and block the content.

Use the ActivityEmbeddingController#isActivityEmbedded() method from the Jetpack WindowManager library to check whether a host is embedding your activity, for example:

کاتلین

fun isActivityEmbedded(activity: Activity): Boolean {
    return ActivityEmbeddingController.getInstance(this).isActivityEmbedded(activity)
}

جاوا

boolean isActivityEmbedded(Activity activity) {
    return ActivityEmbeddingController.getInstance(this).isActivityEmbedded(activity);
}

Minimum size restriction

The Android system applies the minimum height and width specified in the app manifest <layout> element to embedded activities. If an application does not specify minimum height and width, the system default values apply ( sw220dp ).

If the host attempts to resize the embedded container to a size smaller than the minimum, the embedded container expands to occupy the entire task bounds.

<activity-alias>

For trusted or untrusted activity embedding to work with the <activity-alias> element, android:knownActivityEmbeddingCerts or android:allowUntrustedActivityEmbedding must be applied to the target activity rather than the alias. The policy that verifies security on the system server is based on the flags set on the target, not the alias.

Host application

Host applications implement cross-app activity embedding the same way they implement single-app activity embedding. SplitPairRule and SplitPairFilter or ActivityRule and ActivityFilter objects specify embedded activities and task window splits. Split rules are defined statically in XML or at runtime using Jetpack WindowManager API calls.

If a host application attempts to embed an activity that has not opted in to cross-app embedding, the activity occupies the entire task bounds. As a result, host applications need to know whether target activities allow cross-app embedding.

If an embedded activity starts a new activity in the same task and the new activity has not opted in to cross-app embedding, the activity occupies the entire task bounds instead of overlaying the activity in the embedded container.

A host application can embed its own activities without restriction as long as the activities launch in the same task.

Split examples

Split from full window

Figure 15. Activity A starts activity B to the side.

No refactoring required. You can define the configuration for the split statically or at runtime and then call Context#startActivity() without any additional parameters.

<SplitPairRule>
    <SplitPairFilter
        window:primaryActivityName=".A"
        window:secondaryActivityName=".B"/>
</SplitPairRule>

Split by default

When the landing page of an application is designed to be split into two containers on large screens, the user experience is best when both activities are created and presented simultaneously. However, content might not be available for the secondary container of the split until the user interacts with the activity in the primary container (for example, the user selects an item from a navigation menu). A placeholder activity can fill the void until content can be displayed in the secondary container of the split (see the Placeholders section).

Figure 16. Split created by opening two activities simultaneously. One activity is a placeholder.

To create a split with a placeholder, create a placeholder and associate it with the primary activity:

<SplitPlaceholderRule
    window:placeholderActivityName=".PlaceholderActivity">
    <ActivityFilter
        window:activityName=".MainActivity"/>
</SplitPlaceholderRule>

When an app receives an intent, the target activity can be shown as the secondary part of an activity split; for example, a request to show a detail screen with information about an item from a list. On small displays, the detail is shown in the full task window; on larger devices, beside the list.

Figure 17. Deep link detail activity shown alone on a small screen, but together with a list activity on a large screen.

The launch request should be routed to the main activity, and the target detail activity should be launched in a split. The system automatically chooses the correct presentation—stacked or side by side—based on the available display width.

کاتلین

override fun onCreate(savedInstanceState Bundle?) {
    . . .
    RuleController.getInstance(this)
        .addRule(SplitPairRule.Builder(filterSet).build())
    startActivity(Intent(this, DetailActivity::class.java))
}

جاوا

@Override
protected void onCreate(@Nullable Bundle savedInstanceState) {
    . . .
    RuleController.getInstance(this)
        .addRule(new SplitPairRule.Builder(filterSet).build());
    startActivity(new Intent(this, DetailActivity.class));
}

The deep link destination might be the only activity that should be available to the user in the back navigation stack, and you might want to avoid dismissing the detail activity and leaving only the main activity:

Large display with list activity and detail activity side by side.
          Back navigation unable to dismiss detail activity and leave list
          activity on screen.

Small display with detail activity only. Back navigation unable to
          dismiss detail activity and reveal list activity.

Instead, you can finish both activities at the same time by using the finishPrimaryWithSecondary attribute:

<SplitPairRule
    window:finishPrimaryWithSecondary="always">
    <SplitPairFilter
        window:primaryActivityName=".ListActivity"
        window:secondaryActivityName=".DetailActivity"/>
</SplitPairRule>

See the Configuration attributes section.

Multiple activities in split containers

Stacking multiple activities in a split container enables users to access deep content. For example, with a list-detail split, the user might need to go into a sub-detail section but keep the primary activity in place:

Figure 18. Activity opened in place in the secondary pane of the task window.

کاتلین

class DetailActivity {
    . . .
    fun onOpenSubDetail() {
      startActivity(Intent(this, SubDetailActivity::class.java))
    }
}

جاوا

public class DetailActivity {
    . . .
    void onOpenSubDetail() {
        startActivity(new Intent(this, SubDetailActivity.class));
    }
}

The sub-detail activity is placed on top of the detail activity, concealing it:

The user can then go back to the previous detail level by navigating back through the stack:

Figure 19. Activity removed from the top of the stack.

Stacking activities on top of each other is the default behavior when activities are launched from an activity in the same secondary container. Activities launched from the primary container within an active split also end up in the secondary container on the top of the activity stack.

Activities in a new task

When activities in a split task window start activities in a new task, the new task is separate from the task that includes the split and is displayed full window. The Recents screen shows two tasks: the task in the split and the new task.

Figure 20. Start activity C in a new task from activity B.

Activity replacement

Activities can be replaced in the secondary container stack; for example, when the primary activity is used for top-level navigation and the secondary activity is a selected destination. Each selection from the top-level navigation should start a new activity in the secondary container and remove the activity or activities that were previously there.

Figure 21. Top-level navigation activity in the primary pane replaces destination activities in the secondary pane.

If the app doesn't finish the activity in the secondary container when the navigation selection changes, back navigation might be confusing when the split is collapsed (when the device is folded). For example, if you have a menu in the primary pane and screens A and B stacked in the secondary pane, when the user folds the phone, B is on top of A, and A is on top of the menu. When the user navigates back from B, A appears instead of the menu.

Screen A must be removed from the back stack in such cases.

The default behavior when launching to the side in a new container over an existing split is to put the new secondary containers on top and retain the old ones in the back stack. You can configure the splits to clear the previous secondary containers with clearTop and launch new activities normally.

<SplitPairRule
    window:clearTop="true">
    <SplitPairFilter
        window:primaryActivityName=".Menu"
        window:secondaryActivityName=".ScreenA"/>
    <SplitPairFilter
        window:primaryActivityName=".Menu"
        window:secondaryActivityName=".ScreenB"/>
</SplitPairRule>

کاتلین

class MenuActivity {
    . . .
    fun onMenuItemSelected(selectedMenuItem: Int) {
        startActivity(Intent(this, classForItem(selectedMenuItem)))
    }
}

جاوا

public class MenuActivity {
    . . .
    void onMenuItemSelected(int selectedMenuItem) {
        startActivity(new Intent(this, classForItem(selectedMenuItem)));
    }
}

Alternatively, use the same secondary activity, and from the primary (menu) activity send new intents that resolve to the same instance but trigger a state or UI update in the secondary container.

Multiple splits

Apps can provide multi-level deep navigation by launching additional activities to the side.

When an activity in a secondary container launches a new activity to the side, a new split is created over top of the existing split.

Figure 22. Activity B starts activity C to the side.

The back stack contains all activities that were previously opened, so users can navigate to the A/B split after finishing C.

Activities A, B, and C in a stack. The activities are stacked in
          the following order from top to bottom: C, B, A.

To create a new split, launch the new activity to the side from the existing secondary container. Declare the configurations for both the A/B and B/C splits and launch activity C normally from B:

<SplitPairRule>
    <SplitPairFilter
        window:primaryActivityName=".A"
        window:secondaryActivityName=".B"/>
    <SplitPairFilter
        window:primaryActivityName=".B"
        window:secondaryActivityName=".C"/>
</SplitPairRule>

کاتلین

class B {
    . . .
    fun onOpenC() {
        startActivity(Intent(this, C::class.java))
    }
}

جاوا

public class B {
    . . .
    void onOpenC() {
        startActivity(new Intent(this, C.class));
    }
}

React to split state changes

Different activities in an app can have UI elements that perform the same function; for example, a control that opens a window containing account settings.

Figure 23. Different activities with functionally identical UI elements.

If two activities that have a UI element in common are in a split, it's redundant and perhaps confusing to show the element in both activities.

Figure 24. Duplicate UI elements in activity split.

To know when activities are in a split, check the SplitController.splitInfoList flow or register a listener with SplitControllerCallbackAdapter for changes in the split state. Then, adjust the UI accordingly:

کاتلین

val layout = layoutInflater.inflate(R.layout.activity_main, null)
val view = layout.findViewById<View>(R.id.infoButton)
lifecycleScope.launch {
    lifecycle.repeatOnLifecycle(Lifecycle.State.STARTED) {
        splitController.splitInfoList(this@SplitDeviceActivity) // The activity instance.
            .collect { list ->
                view.visibility = if (list.isEmpty()) View.VISIBLE else View.GONE
            }
    }
}

جاوا

@Override
protected void onCreate(@Nullable Bundle savedInstanceState) {
    . . .
    new SplitControllerCallbackAdapter(SplitController.getInstance(this))
        .addSplitListener(
            this,
            Runnable::run,
            splitInfoList -> {
                View layout = getLayoutInflater().inflate(R.layout.activity_main, null);
                layout.findViewById(R.id.infoButton).setVisibility(
                    splitInfoList.isEmpty() ? View.VISIBLE : View.GONE);
            });
}

Coroutines can be launched in any lifecycle state, but are typically launched in the STARTED state to conserve resources (see Use Kotlin coroutines with lifecycle-aware components for more information).

Callbacks can be made in any lifecycle state, including when an activity is stopped. Listeners should usually be registered in onStart() and unregistered in onStop() .

Full-window modal

Some activities block users from interacting with the application until a specified action is performed; for example, a login screen activity, policy acknowledgement screen, or error message. Modal activities should be prevented from appearing in a split.

An activity can be forced to always fill the task window by using the expand configuration:

<ActivityRule
    window:alwaysExpand="true">
    <ActivityFilter
        window:activityName=".FullWidthActivity"/>
</ActivityRule>

Finish activities

Users can finish activities on either side of the split by swiping from the edge of the display:
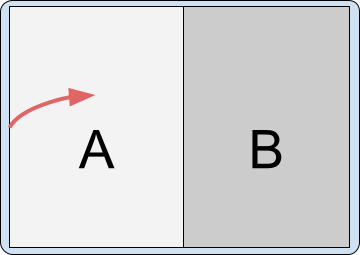
Figure 25. Swipe gesture finishing activity B.
Figure 26. Swipe gesture finishing activity A.

If the device is set up to use the back button instead of gesture navigation, the input is sent to the focused activity—the activity that was touched or launched last.

The effect that finishing all activities in a container has on the opposing container depends on the split configuration.

ویژگی های پیکربندی

You can specify split pair rule attributes to configure how finishing all activities on one side of the split affects the activities on the other side of the split. The attributes are:

  • window:finishPrimaryWithSecondary — How finishing all activities in the secondary container affects the activities in the primary container
  • window:finishSecondaryWithPrimary — How finishing all activities in the primary container affects the activities in the secondary container

Possible values of the attributes include:

  • always — Always finish the activities in the associated container
  • never — Never finish the activities in the associated container
  • adjacent — Finish the activities in the associated container when the two containers are displayed adjacent to each other, but not when the two containers are stacked

به عنوان مثال:

<SplitPairRule
    &lt;!-- Do not finish primary container activities when all secondary container activities finish. --&gt;
    window:finishPrimaryWithSecondary="never"
    &lt;!-- Finish secondary container activities when all primary container activities finish. --&gt;
    window:finishSecondaryWithPrimary="always">
    <SplitPairFilter
        window:primaryActivityName=".A"
        window:secondaryActivityName=".B"/>
</SplitPairRule>

پیکربندی پیش فرض

When all activities in one container of a split finish, the remaining container occupies the entire window:

<SplitPairRule>
    <SplitPairFilter
        window:primaryActivityName=".A"
        window:secondaryActivityName=".B"/>
</SplitPairRule>

Split containing activities A and B. A is finished, leaving B to
          occupy the entire window.

Split containing activities A and B. B is finished, leaving A to
          occupy the entire window.

Finish activities together

Finish the activities in the primary container automatically when all activities in the secondary container finish:

<SplitPairRule
    window:finishPrimaryWithSecondary="always">
    <SplitPairFilter
        window:primaryActivityName=".A"
        window:secondaryActivityName=".B"/>
</SplitPairRule>

Split containing activities A and B. B is finished, which also
          finishes A, leaving the task window empty.

Split containing activities A and B. A is finished, leaving B alone
          in the task window.

Finish the activities in the secondary container automatically when all activities in the primary container finish:

<SplitPairRule
    window:finishSecondaryWithPrimary="always">
    <SplitPairFilter
        window:primaryActivityName=".A"
        window:secondaryActivityName=".B"/>
</SplitPairRule>

Split containing activities A and B. A is finished, which also
          finishes B, leaving the task window empty.

Split containing activities A and B. B is finished, leaving A alone
          in the task window.

Finish activities together when all activities in either the primary or secondary container finish:

<SplitPairRule
    window:finishPrimaryWithSecondary="always"
    window:finishSecondaryWithPrimary="always">
    <SplitPairFilter
        window:primaryActivityName=".A"
        window:secondaryActivityName=".B"/>
</SplitPairRule>

Split containing activities A and B. A is finished, which also
          finishes B, leaving the task window empty.

Split containing activities A and B. B is finished, which also
          finishes A, leaving the task window empty.

Finish multiple activities in containers

If multiple activities are stacked in a split container, finishing an activity on the bottom of the stack does not automatically finish activities on top.

For example, if two activities are in the secondary container, C on top of B:

Secondary activity stack containing activity C stacked on top of B           is stacked on top of the prmary activity stack containing activity           الف

and the configuration of the split is defined by the configuration of activities A and B:

<SplitPairRule>
    <SplitPairFilter
        window:primaryActivityName=".A"
        window:secondaryActivityName=".B"/>
</SplitPairRule>

finishing the top activity retains the split.

Split with activity A in primary container and activities B and C in
          secondary, C stacked on top of B. C finishes, leaving A and B in the
          activity split.

Finishing the bottom (root) activity of the secondary container does not remove the activities on top of it; and so, also retains the split.

Split with activity A in primary container and activities B and C in
          secondary, C stacked on top of B. B finishes, leaving A and C in the
          activity split.

Any additional rules for finishing activities together, such as finishing the secondary activity with the primary, are also executed:

<SplitPairRule
    window:finishSecondaryWithPrimary="always">
    <SplitPairFilter
        window:primaryActivityName=".A"
        window:secondaryActivityName=".B"/>
</SplitPairRule>

Split with activity A in primary container and activities B and C in
          secondary container, C stacked on top of B. A finishes, also
          finishing B and C.

And when the split is configured to finish primary and secondary together:

<SplitPairRule
    window:finishPrimaryWithSecondary="always"
    window:finishSecondaryWithPrimary="always">
    <SplitPairFilter
        window:primaryActivityName=".A"
        window:secondaryActivityName=".B"/>
</SplitPairRule>

Split with activity A in primary container and activities B and C in
          secondary, C stacked on top of B. C finishes, leaving A and B in the
          activity split.

Split with activity A in primary container and activities B and C in
          secondary, C stacked on top of B. B finishes, leaving A and C in the
          activity split.

Split with activity A in primary container and activities B and C in           secondary, C stacked on top of B. A finishes, also finishing B and           سی.

Change split properties at runtime

The properties of an active and visible split cannot be changed. Changing the split rules affects additional activity launches and new containers, but not existing and active splits.

To change the properties of active splits, finish the side activity or activities in the split and launch to the side again with a new configuration.

Dynamic split properties

Android 15 (API level 35) and higher supported by Jetpack WindowManager 1.4 and higher offer dynamic features that enable configurability of activity embedding splits, including:

  • Pane expansion: An interactive, draggable divider enables users to resize the panes in a split presentation.
  • Activity stack pinning: Users can pin the content in one container and isolate navigation in the container from navigation in the other container.
  • Dialog full-screen dim: When displaying a dialog, apps can specify whether to dim the entire task window or just the container that opened the dialog.

Pane expansion

Pane expansion enables users to adjust the amount of screen space allocated to the two activities in a dual‑pane layout.

To customize the appearance of the window divider and set the divider's draggable range, do the following:

  1. Create an instance of DividerAttributes

  2. Customize the divider attributes:

    • color : The color of the draggable pane separator.

    • widthDp : The width of the draggable pane separator. Set to WIDTH_SYSTEM_DEFAULT to let the system determine the divider width.

    • Drag range: The minimum percentage of the screen either pane can occupy. Can range from 0.33 to 0.66. Set to DRAG_RANGE_SYSTEM_DEFAULT to let the system determine the drag range.

کاتلین

val splitAttributesBuilder: SplitAttributes.Builder = SplitAttributes.Builder()
    .setSplitType(SplitAttributes.SplitType.ratio(0.33f))
    .setLayoutDirection(SplitAttributes.LayoutDirection.LEFT_TO_RIGHT)

if (WindowSdkExtensions.getInstance().extensionVersion >= 6) {
    splitAttributesBuilder.setDividerAttributes(
      DividerAttributes.DraggableDividerAttributes.Builder()
        .setColor(getColor(context, R.color.divider_color))
        .setWidthDp(4)
        .setDragRange(DividerAttributes.DragRange.DRAG_RANGE_SYSTEM_DEFAULT)
        .build()
    )
}
val splitAttributes: SplitAttributes = splitAttributesBuilder.build()

جاوا

SplitAttributes.Builder splitAttributesBuilder = new SplitAttributes.Builder()
    .setSplitType(SplitAttributes.SplitType.ratio(0.33f))
    .setLayoutDirection(SplitAttributes.LayoutDirection.LEFT_TO_RIGHT);

if (WindowSdkExtensions.getInstance().getExtensionVersion() >= 6) {
    splitAttributesBuilder.setDividerAttributes(
      new DividerAttributes.DraggableDividerAttributes.Builder()
        .setColor(ContextCompat.getColor(context, R.color.divider_color))
        .setWidthDp(4)
        .setDragRange(DividerAttributes.DragRange.DRAG_RANGE_SYSTEM_DEFAULT)
        .build()
    );
}
SplitAttributes splitAttributes = splitAttributesBuilder.build();

Activity stack pinning

Activity stack pinning enables users to pin one of the split windows so the activity stays as is while users navigate within the other window. Activity stack pinning provides an enhanced multitasking experience.

To enable activity stack pinning in your app, do the following:

  1. Add a button to the layout file of the activity you want to pin, for example, the detail activity of an list‑detail layout:

    <androidx.constraintlayout.widget.ConstraintLayout
     xmlns:android="http://schemas.android.com/apk/res/android"
     xmlns:app="http://schemas.android.com/apk/res-auto"
     xmlns:tools="http://schemas.android.com/tools"
     android:id="@+id/detailActivity"
     android:layout_width="match_parent"
     android:layout_height="match_parent"
     android:background="@color/white"
     tools:context=".DetailActivity">
    
    <TextView
       android:id="@+id/textViewItemDetail"
       android:layout_width="wrap_content"
       android:layout_height="wrap_content"
       android:textSize="36sp"
       android:textColor="@color/obsidian"
       app:layout_constraintBottom_toTopOf="@id/pinButton"
       app:layout_constraintEnd_toEndOf="parent"
       app:layout_constraintStart_toStartOf="parent"
       app:layout_constraintTop_toTopOf="parent" />
    
    <androidx.appcompat.widget.AppCompatButton
       android:id="@+id/pinButton"
       android:layout_width="wrap_content"
       android:layout_height="wrap_content"
       android:text="@string/pin_this_activity"
       app:layout_constraintBottom_toBottomOf="parent"
       app:layout_constraintEnd_toEndOf="parent"
       app:layout_constraintStart_toStartOf="parent"
       app:layout_constraintTop_toBottomOf="@id/textViewItemDetail"/>
    
    </androidx.constraintlayout.widget.ConstraintLayout>
    
  2. In the onCreate() method of the activity, set an onclick listener on the button:

    کاتلین

    pinButton = findViewById(R.id.pinButton)
    pinButton.setOnClickListener {
        val splitAttributes: SplitAttributes = SplitAttributes.Builder()
            .setSplitType(SplitAttributes.SplitType.ratio(0.66f))
            .setLayoutDirection(SplitAttributes.LayoutDirection.LEFT_TO_RIGHT)
            .build()
    
        val pinSplitRule = SplitPinRule.Builder()
            .setSticky(true)
            .setDefaultSplitAttributes(splitAttributes)
            .build()
    
        SplitController.getInstance(applicationContext).pinTopActivityStack(taskId, pinSplitRule)
    }

    جاوا

    Button pinButton = findViewById(R.id.pinButton);
    pinButton.setOnClickListener( (view) => {
        SplitAttributes splitAttributes = new SplitAttributes.Builder()
            .setSplitType(SplitAttributes.SplitType.ratio(0.66f))
            .setLayoutDirection(SplitAttributes.LayoutDirection.LEFT_TO_RIGHT)
            .build();
    
        SplitPinRule pinSplitRule = new SplitPinRule.Builder()
            .setSticky(true)
            .setDefaultSplitAttributes(splitAttributes)
            .build();
    
        SplitController.getInstance(getApplicationContext()).pinTopActivityStack(getTaskId(), pinSplitRule);
    });

Dialog full-screen dim

Activities typically dim their displays to draw attention to a dialog. In activity embedding, both panes of the dual‑pane display should dim, not just the pane containing the activity that opened the dialog, for a unified UI experience.

With WindowManager 1.4 and higher, the entire app window dims by default when a dialog opens (see EmbeddingConfiguration.DimAreaBehavior.ON_TASK ).

To dim only the container of the activity that opened the dialog, use EmbeddingConfiguration.DimAreaBehavior.ON_ACTIVITY_STACK .

Extract an activity from a split to full window

Create a new configuration that displays the side activity full window, and then relaunch the activity with an intent that resolves to the same instance.

Check for split support at runtime

Activity embedding is supported on Android 12L (API level 32) and higher, but is also available on some devices running earlier platform versions. To check at runtime for the availability of the feature, use the SplitController.splitSupportStatus property or SplitController.getSplitSupportStatus() method:

کاتلین

if (SplitController.getInstance(this).splitSupportStatus ==
     SplitController.SplitSupportStatus.SPLIT_AVAILABLE) {
     // Device supports split activity features.
}

جاوا

if (SplitController.getInstance(this).getSplitSupportStatus() ==
     SplitController.SplitSupportStatus.SPLIT_AVAILABLE) {
     // Device supports split activity features.
}

If splits are not supported, activities are launched on top of the activity stack (following the non-activity embedding model).

Prevent system override

The manufacturers of Android devices (original equipment manufacturers, or OEMs), can implement activity embedding as a function of the device system. The system specifies split rules for multi-activity apps, overriding the windowing behavior of the apps. The system override forces multi-activity apps into a system-defined activity embedding mode.

System activity embedding can enhance app presentation through multi-pane layouts, such as list-detail , without any changes to the app. However, the system's activity embedding might also cause incorrect app layouts, bugs, or conflicts with activity embedding implemented by the app.

Your app can prevent or permit system activity embedding by setting a property in the app manifest file, for example:

<manifest xmlns:android="http://schemas.android.com/apk/res/android">
    <application>
        <property
            android:name="android.window.PROPERTY_ACTIVITY_EMBEDDING_ALLOW_SYSTEM_OVERRIDE"
            android:value="true|false" />
    </application>
</manifest>

The property name is defined in the Jetpack WindowManager WindowProperties object. Set the value to false if your app implements activity embedding, or if you want to otherwise prevent the system from applying its activity embedding rules to your app. Set the value to true to permit the system to apply system-defined activity embedding to your app.

Limitations, restrictions, and caveats

  • Only the host app of the task, which is identified as the owner of the root activity in the task, can organize and embed other activities in the task. If activities that support embedding and splits run in a task that belongs to a different application, then embedding and splits will not work for those activities.
  • Activities can only be organized within a single task. Launching an activity in a new task always puts it in a new expanded window outside of any existing splits.
  • Only activities in the same process can be organized and put in a split. The SplitInfo callback only reports activities that belong to the same process, since there is no way of knowing about activities in different processes.
  • Each pair or singular activity rule applies only to activity launches that happen after the rule has been registered. There is currently no way to update existing splits or their visual properties.
  • The split pair filter configuration must match the intents used when launching activities completely. The matching occurs at the point when a new activity is started from the application process, so it might not know about component names that are resolved later in the system process when using implicit intents. If a component name is not known at the time of launch, a wildcard can be used instead ("*/*") and filtering can be performed based on intent action.
  • There is currently no way to move activities between containers or in and out of splits after they were created. Splits are only created by the WindowManager library when new activities with matching rules are launched, and splits are destroyed when the last activity in a split container is finished.
  • Activities can be relaunched when the configuration changes, so when a split is created or removed and activity bounds change, the activity can go through complete destruction of the previous instance and creation of the new one. As a result, app developers should be careful with things like launching new activities from lifecycle callbacks.
  • Devices must include the window extensions interface to support activity embedding. Nearly all large screen devices running Android 12L (API level 32) or higher include the interface. However, some large screen devices that are not capable of running multiple activities don't include the window extensions interface. If a large screen device doesn't support multi-window mode, it might not support activity embedding.

منابع اضافی