Create resizable bitmaps (9-patch files)
Stay organized with collections
Save and categorize content based on your preferences.
The Draw 9-patch tool is a WYSIWYG editor included in Android Studio. The tool lets you create
bitmap images that automatically resize to accommodate the contents of the view and the size of
the screen. You can scale selected parts of the image horizontally or vertically based on indicators
drawn within the image.
For an introduction to NinePatch graphics and how they work, read
NinePatch drawables.
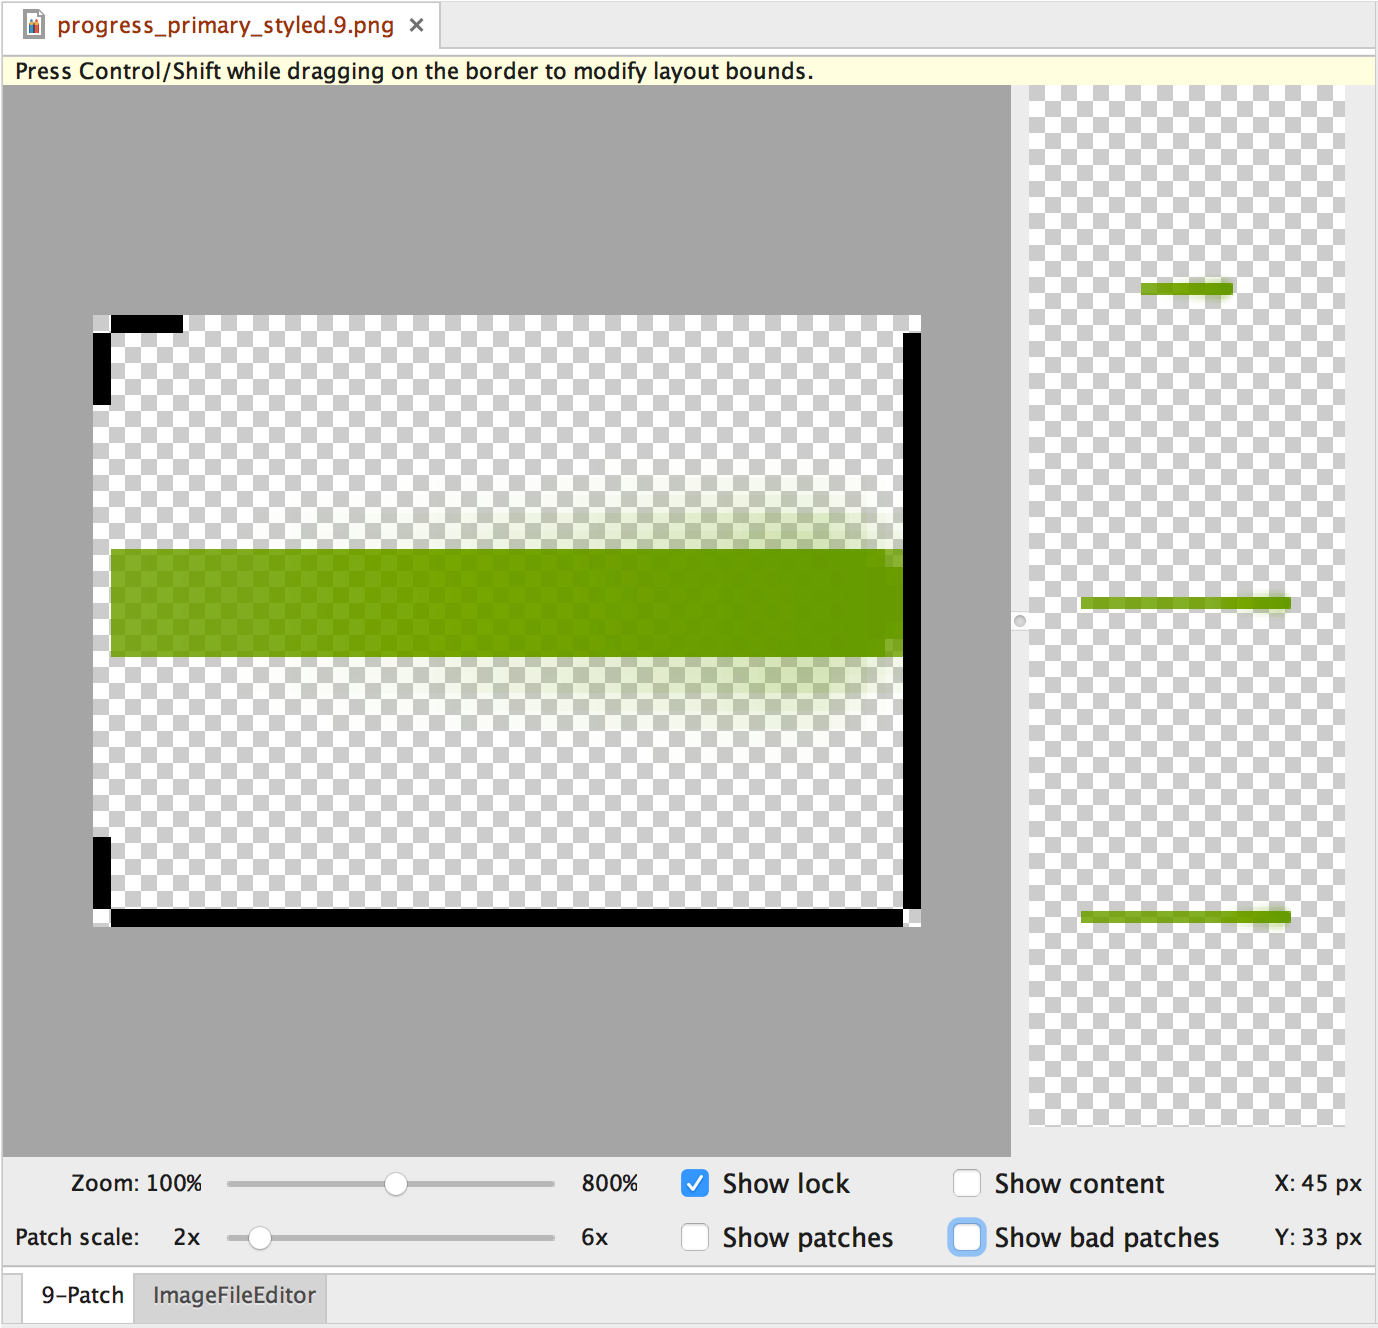
Figure 1. Android Studio's
Draw 9-patch tool displaying a NinePatch image.
Follow these steps to create a NinePatch graphic using the Draw 9-patch tool in Android
Studio. You'll need the PNG image that you'd like to create a NinePatch image from.
- In Android Studio, right-click the PNG image you'd like to create
a NinePatch image from, then click Create 9-patch file.
- Enter a filename for your NinePatch image and click OK. Your image
will be created with the
.9.png
file extension.
- Double-click your new NinePatch file to open it in Android Studio.
In the workspace that opens, the left pane is your drawing area, where you can edit
the lines for the stretchable patches and content area. The right
pane is the preview area, where you can preview your graphic when stretched.
- Click within the 1-pixel perimeter to draw the lines that define the stretchable
patches and (optional) the content area.
Right-click to erase
previously drawn lines (on Mac, hold Shift and click).
- When done, click File > Save to save your changes.
To open an existing NinePatch file in Android
Studio, double-click the file.
To make sure that your NinePatch graphics scale down properly, verify that any
stretchable regions are at least 2x2 pixels in size.
Otherwise, those regions may disappear when scaled down. To avoid interpolation during scaling
that may cause the color at the boundaries to change, provide 1 pixel of extra safe
space in the graphics before and after stretchable regions.
Note: A normal PNG file (*.png
) is
loaded with an empty 1-pixel border added around the image. You can draw
the stretchable patches and content area within the border.
A previously saved NinePatch file (*.9.png
) is loaded as-is,
with no drawing area added because it already exists.
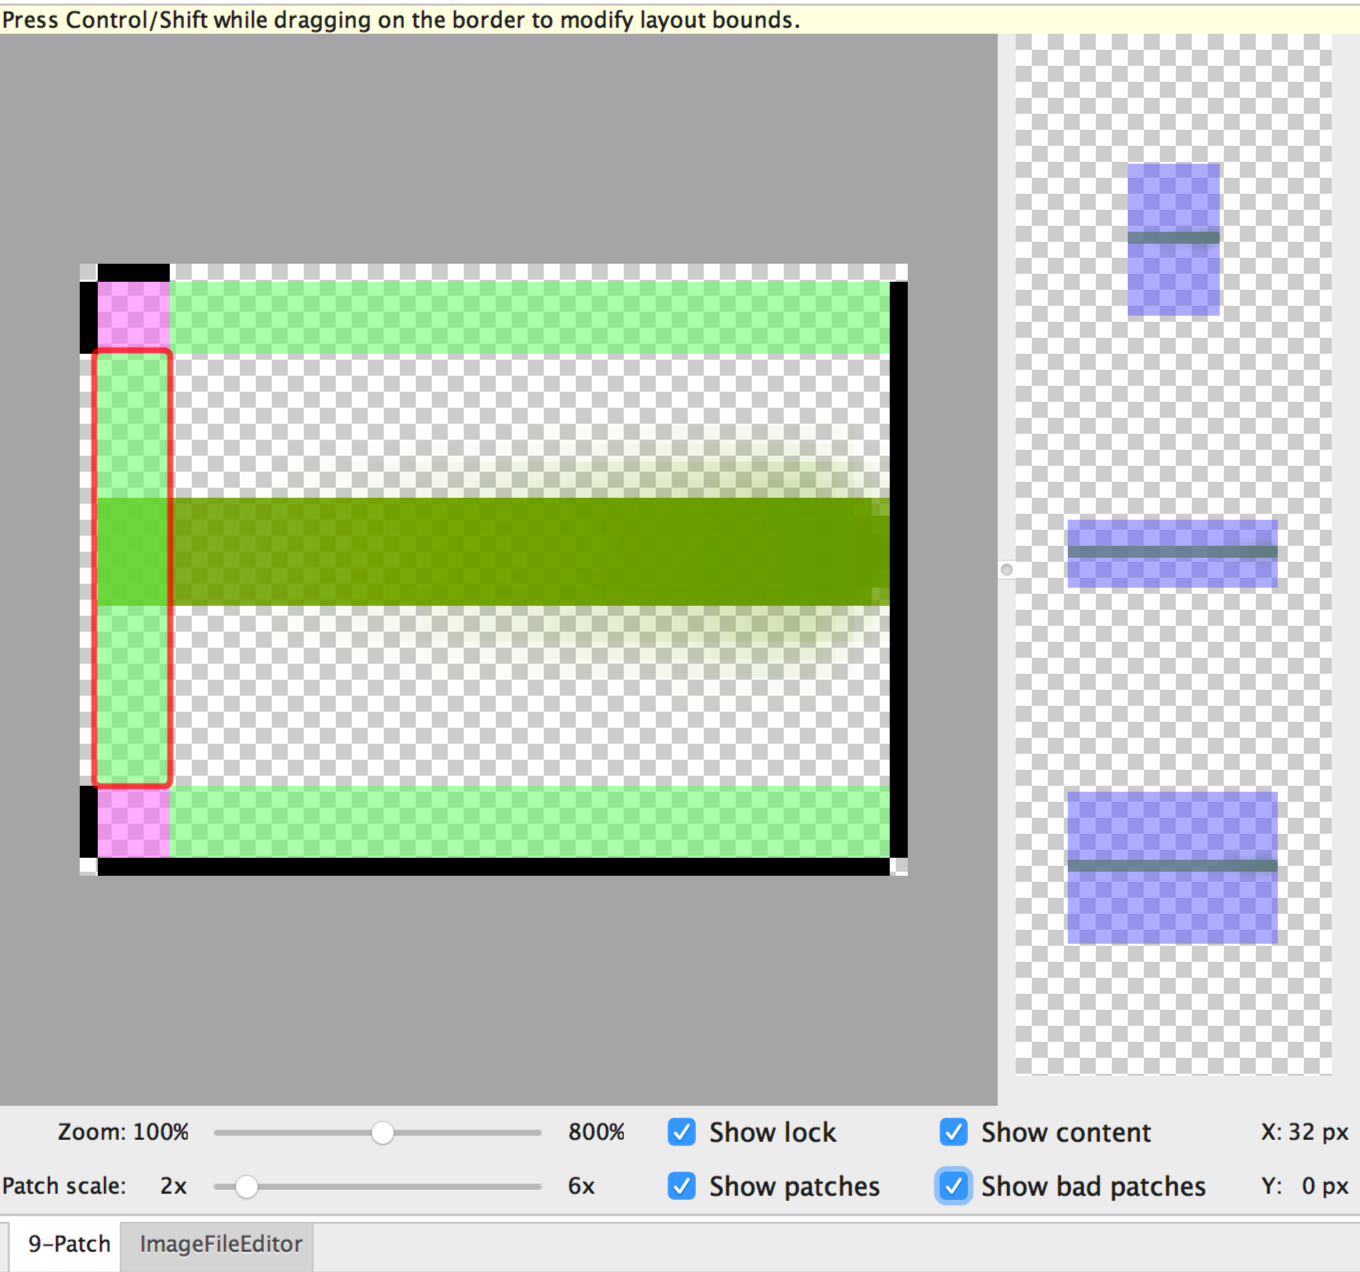
Figure 2. A NinePatch image in Android Studio
showing content, patches, and bad patches.
Optional controls include:
- Zoom: Adjust the zoom level of the graphic in the drawing area.
- Patch scale: Adjust the scale of the images in the preview area.
- Show lock: Visualize the non-drawable area of the graphic on mouse-over.
- Show patches: Preview the pink stretchable patches in the drawing area. Pink
indicates a stretchable patch, as shown in figure 2.
- Show content: Highlight the content area in the preview images. Purple indicates the
area where content is allowed, as shown in figure 2.
- Show bad patches: Adds a red border around patch areas that may
produce artifacts in the graphic when stretched, as shown in figure 2. If you eliminate all bad
patches, you will maintain the visual coherence of your stretched image.
Content and code samples on this page are subject to the licenses described in the Content License. Java and OpenJDK are trademarks or registered trademarks of Oracle and/or its affiliates.
Last updated 2023-04-12 UTC.
[[["Easy to understand","easyToUnderstand","thumb-up"],["Solved my problem","solvedMyProblem","thumb-up"],["Other","otherUp","thumb-up"]],[["Missing the information I need","missingTheInformationINeed","thumb-down"],["Too complicated / too many steps","tooComplicatedTooManySteps","thumb-down"],["Out of date","outOfDate","thumb-down"],["Samples / code issue","samplesCodeIssue","thumb-down"],["Other","otherDown","thumb-down"]],["Last updated 2023-04-12 UTC."],[],[],null,["# Create resizable bitmaps (9-patch files)\n\nThe Draw 9-patch tool is a WYSIWYG editor included in Android Studio. The tool lets you create\nbitmap images that automatically resize to accommodate the contents of the view and the size of\nthe screen. You can scale selected parts of the image horizontally or vertically based on indicators\ndrawn within the image.\n\nFor an introduction to NinePatch graphics and how they work, read\n[NinePatch drawables](/guide/topics/graphics/2d-graphics#nine-patch).\n\n**Figure 1.** Android Studio's\nDraw 9-patch tool displaying a NinePatch image.\n\nFollow these steps to create a NinePatch graphic using the Draw 9-patch tool in Android\nStudio. You'll need the PNG image that you'd like to create a NinePatch image from.\n\n1. In Android Studio, right-click the PNG image you'd like to create a NinePatch image from, then click **Create 9-patch file**.\n2. Enter a filename for your NinePatch image and click **OK** . Your image will be created with the `.9.png` file extension.\n3. Double-click your new NinePatch file to open it in Android Studio. \n\n In the workspace that opens, the left pane is your drawing area, where you can edit\n the lines for the stretchable patches and content area. The right\n pane is the preview area, where you can preview your graphic when stretched.\n4. Click within the 1-pixel perimeter to draw the lines that define the stretchable patches and (optional) the content area. \n\n Right-click to erase\n previously drawn lines (on Mac, hold Shift and click).\n5. When done, click **File** \\\u003e **Save** to save your changes.\n\nTo open an existing NinePatch file in Android\nStudio, double-click the file.\n\nTo make sure that your NinePatch graphics scale down properly, verify that any\nstretchable regions are at least 2x2 pixels in size.\nOtherwise, those regions may disappear when scaled down. To avoid interpolation during scaling\nthat may cause the color at the boundaries to change, provide 1 pixel of extra safe\nspace in the graphics before and after stretchable regions.\n\n**Note:** A normal PNG file (`*.png`) is\nloaded with an empty 1-pixel border added around the image. You can draw\nthe stretchable patches and content area within the border.\nA previously saved NinePatch file (`*.9.png`) is loaded as-is,\nwith no drawing area added because it already exists.\n\n**Figure 2.** A NinePatch image in Android Studio\nshowing content, patches, and bad patches.\n\nOptional controls include:\n\n- **Zoom**: Adjust the zoom level of the graphic in the drawing area.\n- **Patch scale**: Adjust the scale of the images in the preview area.\n- **Show lock**: Visualize the non-drawable area of the graphic on mouse-over.\n- **Show patches**: Preview the pink stretchable patches in the drawing area. Pink indicates a stretchable patch, as shown in figure 2.\n- **Show content**: Highlight the content area in the preview images. Purple indicates the area where content is allowed, as shown in figure 2.\n- **Show bad patches**: Adds a red border around patch areas that may produce artifacts in the graphic when stretched, as shown in figure 2. If you eliminate all bad patches, you will maintain the visual coherence of your stretched image."]]