
Use the extended controls on the Android Emulator to send data, change device
properties, control apps, and more. To open the Extended controls window,
click More  in the emulator panel. Note that
some of these extended control options are only available when you run the
emulator in a separate window, outside of Android Studio.
in the emulator panel. Note that
some of these extended control options are only available when you run the
emulator in a separate window, outside of Android Studio.
You can use keyboard shortcuts to perform many of these tasks. For a complete list of shortcuts in the emulator, press F1 (Command+/
on macOS) to open the Help pane.
Table 1. Extended controls details
| Feature | Description |
|---|---|
| Displays |
The emulator lets you deploy your app to multiple displays, which support customizable dimensions and can help you test apps that support multi-window and multi-display. While a virtual device is running, you can add up to two additional displays as follows:
|
| Cellular | The emulator lets you simulate various network conditions. You can approximate the network speed for different network protocols, or you can specify Full, which transfers data as quickly as your computer allows. Specifying a network protocol is always slower than Full. You can also specify the voice and data network status, such as roaming. The defaults are set in the AVD. Select a Network type:
Select a Signal strength:
Select a Voice status, Data status, or both:
|
| Battery | You can simulate the battery properties of a device to see how your app performs under different conditions. To select a Charge level, use the slider control. Select a Charger connection value:
Select a Battery health value:
Select a Battery status value:
|
| Camera | You can load pictures into the scene that is simulated when you open
the emulator camera. For more information, see
Add Augmented Images to the scene
in the ARCore documentation.
When the camera mode is set to use the environment scene defined with the AVD environment configuration file, you can reload the scene settings to change the source content dynamically at runtime. |
| Location |
The emulator lets you simulate "my location" information:
where the emulated device is located. For example, if you
click My Location Controls for the device's location information are organized under two tabs: Single points and Routes. Single points In the Single points tab, you can use the Google Maps webview to search for points of interest, just as you would when using Google Maps on a phone or in a browser. When you search for (or click) a location in the map, you can save the location by selecting Save point near the bottom of the map. All your saved locations are listed on the right side of the Extended controls window. To set the emulator's location to the location you have selected on the map, click the Set location button near the bottom right of the Extended controls window. Routes Similar to the Single points tab, the Routes tab provides a Google Maps webview that you can use to create a route between two or more locations. To create and save a route, do the following:
To simulate the emulator following the route you saved, select the route from the list of Saved routes and click Play route near the bottom right of the Extended controls window. To stop the simulation, click Stop route. To continuously simulate the emulator following the specified route, enable the switch next to Repeat playback. To change how quickly the emulator follows the specified route, select an option from the Playback speed menu. Import GPX and KML data To use geographic data from a GPS exchange format (GPX) or Keyhole Markup Language (KML) file:
The speed defaults to the Delay value (Speed 1X). You can increase the speed by double (Speed 2X), triple (Speed 3X), and so on. |
| Phone | The emulator lets you simulate incoming phone calls and text messages. To initiate a call to the emulator:
To send a text message to the emulator:
|
| Directional Pad | If the AVD has the directional pad enabled in the hardware profile, you can use the directional pad controls with the emulator. However, not all devices support the directional pad; for example, Android watches don't. The buttons simulate the following actions: 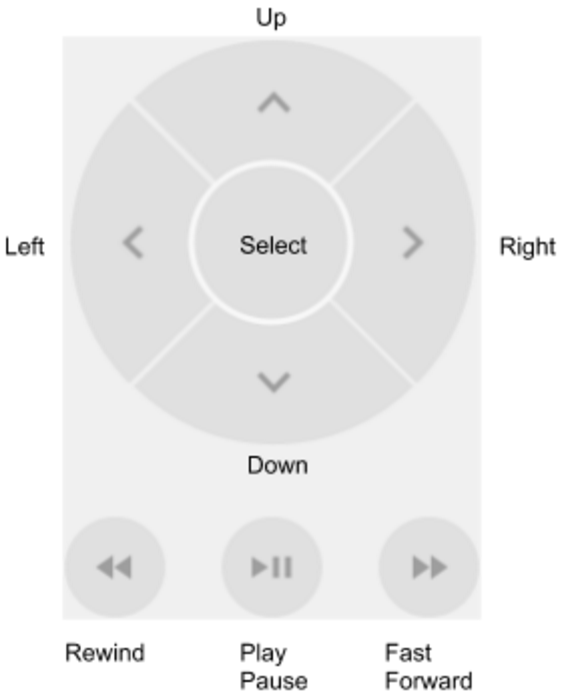
|
| Microphone | For privacy and performance reasons, microphone input is disabled by default in the Android Emulator. To enable microphone input, toggle the Virtual microphone uses host audio input option. The Android Emulator offers toggles and key events to simulate various headphone and microphone scenarios:
|
| Fingerprint | This control can simulate 10 different fingerprint scans. You can use it to test fingerprint integration in your app. This feature is disabled for Android 5.1 (API level 22) and lower and for Wear OS. To simulate a fingerprint scan on the virtual device:
|
| Virtual sensors > Device Pose |
This control lets you test your app against changes in device position, orientation, or both. For example, you can simulate gestures such as tilt and rotation. The accelerometer doesn't track the absolute position of the device: it just detects when a change is occurring. The control simulates the way accelerometer and magnetometer sensors would respond when you move or rotate a real device. You must enable the accelerometer sensor in your AVD to use this control. The control reports
The control also reports
To rotate the device around the x, y, and z axes, select Rotate and do one of the following:
See Compute the device's orientation for more information about how yaw, pitch, and roll are calculated. To move the device horizontally (x) or vertically (y), select Move and do one of the following:
To position the device at 0, 90, 180, or 270 degrees:
As you adjust the device, the Resulting values fields change accordingly. These are the values that an app can access. For more information about these sensors, see Sensors overview, Motion sensors, and Position sensors. |
| Virtual sensors > Additional sensors | The emulator can simulate various position and environment sensors. It lets you adjust the following sensors so you can test them with your app:
For more information about these sensors, see Sensors overview, Position sensors, and Environment sensors . |
| Bug report | If you're experiencing issues with the emulator, you can prepare and send a bug report. The emulator automatically collects screenshots, logs, and other data for the bug report. |
| Record and Playback | See Record the screen. |
| Google Play | When the AVD system image includes the Play Store app, this displays the Google Play services version information. |
| Settings > General |
|
| Settings > Proxy | See Using Proxies with the Android Emulator for more detail. |
| Settings > Advanced |
|
| Help > Keyboard Shortcuts (Emulator standalone) | This pane provides a complete list of keyboard shortcuts for the emulator. To open this pane while working in the emulator, press F1 (Command+/ on macOS). For the shortcuts to work, the Send keyboard shortcuts option in the General settings pane must be set to Emulator controls (default). This menu option isn't available when the emulator is running in embedded mode with Android Studio. If you're using the emulator in embedded mode, you can find the keyboard shortcuts at File (Android Studio on macOS) > Settings > Keymap under Running Devices. |
| Help > Emulator Help (Emulator standalone) | To go to the online documentation for the emulator, click Documentation. To file a bug against the emulator, click Send feedback. For more information, learn how to report emulator bugs. This menu option isn't available when the emulator is running in embedded mode with Android Studio. If you're using the emulator in embedded mode, open the bug template by clicking Help > Submit a Bug Report and manually add the details for Android Emulator bugs. |
| Help > About | See which The emulator serial number is emulator-adb_port,
which you can specify as an |
 in Google Maps and then send a location, the map shows it.
 .
.