
Test in Android Studio and Test from the command line explain how to set up and run basic test configurations. However, when your app and its test requirements get more advanced, you may need to adapt your test configurations further. For example, you might need advanced test setup when you want to do the following:
- Run instrumented tests only for a specific build variant or override its manifest settings.
- Change the build type your tests run against or configure its Gradle options.
- Extract your instrumented tests into their own test module.
- Perform more advanced testing as part of your Continuous Integration setup.
This page describes various ways to configure your tests when the default settings don't fit your needs.
Create an instrumented test for a build variant
If your project includes build variants with unique source sets, you might want to include instrumented tests that correspond to those source sets. This keeps your test code organized and lets you run only the tests that apply to a given build variant.
To link instrumented tests to a build variant, place them in their own
source set, located at
src/androidTestVariantName.
Instrumented tests in the src/androidTest/ source set are shared by all
build variants. When building a test APK for the "MyFlavor" variant of your
app, Gradle combines the src/androidTest/ and src/androidTestMyFlavor/
source sets.
To add a testing source set for your build variant in Android Studio, follow these steps:
- In the Project window, click the menu and select the Project view.
- Within the appropriate module folder, right-click the src folder and click New > Directory.
- For the directory name, enter "androidTestVariantName." For example, if
you have a build variant called "MyFlavor," use the directory name
androidTestMyFlavor. - Click OK.
- Right-click the new directory and select New > Directory.
- Enter "java" as the directory name, then click OK.
Now you can add tests to this new source set by following the steps to add a new test. When you reach the Choose Destination Directory dialog, select the new variant test source set.
The following table shows an example of how instrumentation test files could reside in source sets that correspond to the app's code source sets:
Table 1. App source code and corresponding instrumentation test files
| Path to app class | Path to matching instrumentation test class |
|---|---|
src/main/kotlin+java/Example.kt
|
src/androidTest/java/AndroidExampleTest.kt
|
src/myFlavor/kotlin+java/Example.kt
|
src/androidTestMyFlavor/java/AndroidExampleTest.kt
|
Just as it does for your app source sets, the Gradle build merges and
overrides files from different test source sets. In this case, the
AndroidExampleTest.kt file in the androidTestMyFlavor source set overrides
the version in the androidTest source set. This is because
the product flavor source set has priority over the main source set.
When you select different flavors in the build variants selector, the
appropriate androidTest folders are displayed in the Android view to
show the folders that are used:
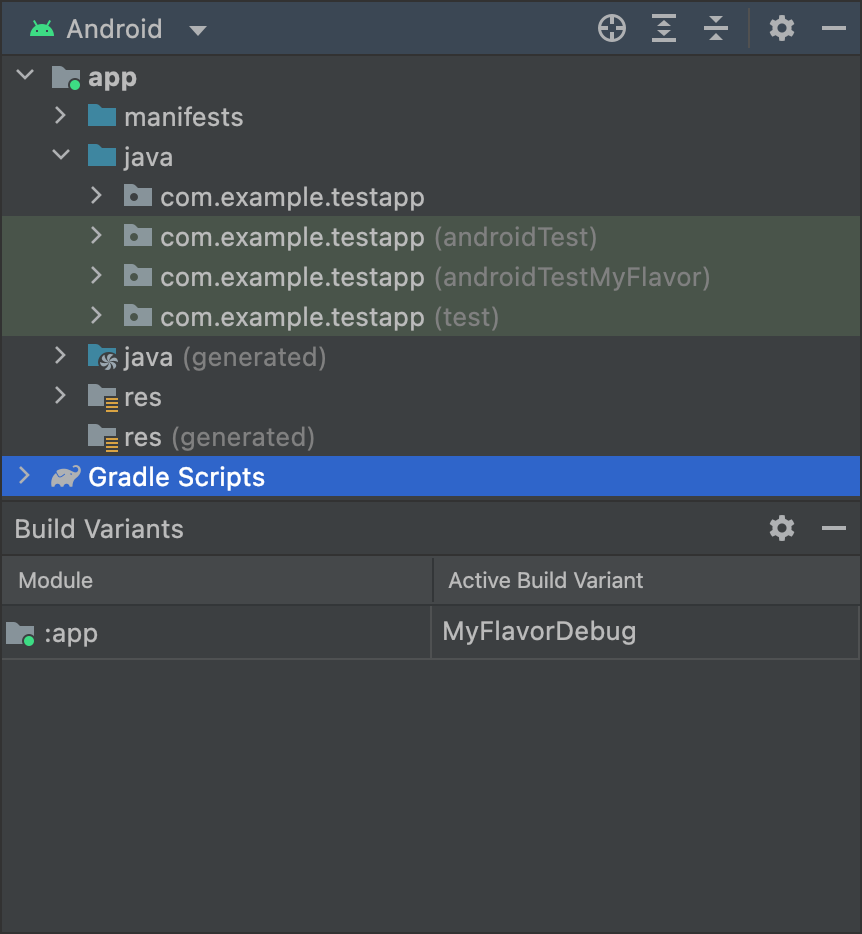
MyFlavor variant selected; the
androidTestMyFlavor folder displays in the Android view.The androidTestMyFlavor folder is not shown when a different variant is
selected:

OtherFlavor variant selected; the
androidTestMyFlavor folder does not show in the Android view.This looks slightly different if you are using the Project view, but the same principle applies:

MyFlavor variant selected; the
androidTestMyFlavor folder is active in the Project view.When a different variant is selected, the androidTestMyFlavor folder is still
visible, but it is not shown as active:
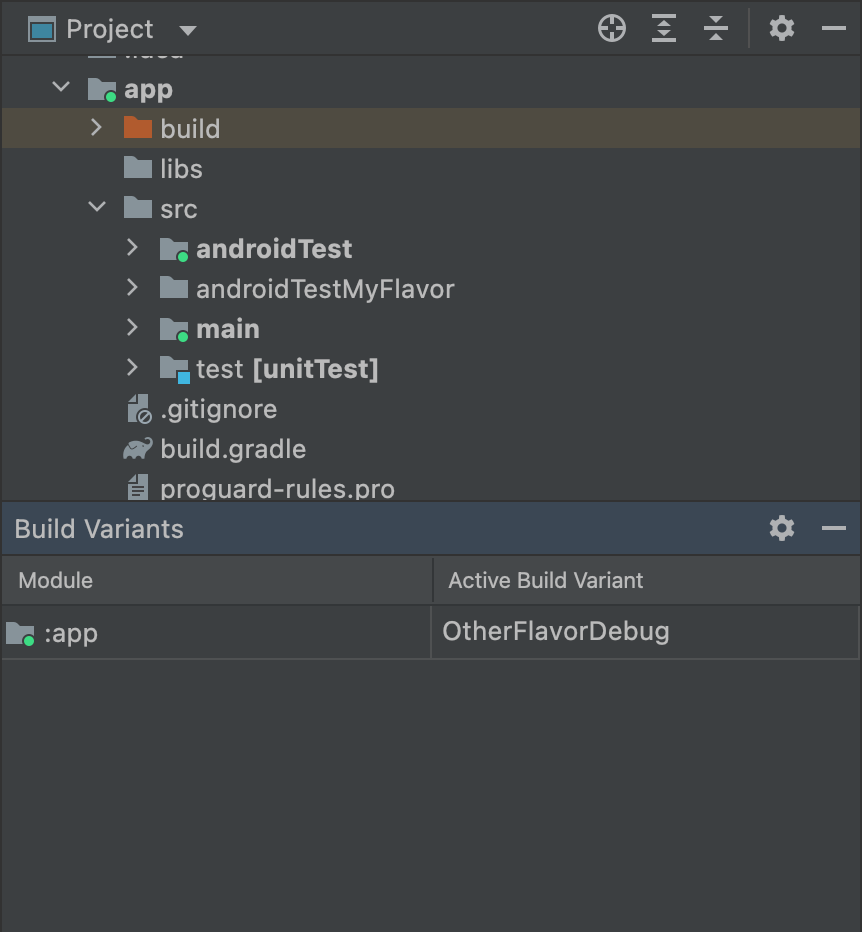
OtherFlavor variant selected; the
androidTestMyFlavor folder is not active in the Project view.For more information about how source sets are merged, see Source sets.
Configure instrumentation manifest settings
Instrumented tests are built into a separate APK with its own
AndroidManifest.xml file. When Gradle builds your test APK, it
automatically generates the AndroidManifest.xml file and configures it
with the
<instrumentation> node.
One of the reasons Gradle configures this node for you is to make sure that
the targetPackage
property specifies the correct package name of the app under test.
To change other settings for this node, either create another
manifest file in the test source set or configure your module-level
build.gradle file, as shown in
the following code sample. The full list of options can be found in the
BaseFlavor
API reference.
Kotlin
android {
    ...
    defaultConfig {
        ...
        testApplicationId = "com.example.test"
        testInstrumentationRunner = "androidx.test.runner.AndroidJUnitRunner"
        testHandleProfiling = true
        testFunctionalTest = true
    }
}
Groovy
android {
    ...
    defaultConfig {
        ...
        testApplicationId "com.example.test"
        testInstrumentationRunner "androidx.test.runner.AndroidJUnitRunner"
        testHandleProfiling true
        testFunctionalTest true
    }
}
Each product flavor you configure can override properties in the
defaultConfig {} block. To learn more, go to Configure product
flavors.
The properties in the snippet are:
| Setting | Description |
|---|---|
testApplicationId
|
Specifies the application ID for the test APK. |
testInstrumentationRunner
|
Specifies the fully qualified class name of the test instrumentation runner. |
testHandleProfiling
|
If set to true, enables the instrumentation class
to start and stop profiling.If set to false, profiling occurs the entire time
the instrumentation class is running. |
testFunctionalTest
|
If set to true, indicates that the Android system
should run the instrumentation class as a functional
test.The default value is false. |
Change the test build type
By default, all instrumentation tests run against the debug build type.
You can change this to another build type by using the testBuildType
property in your module-level build.gradle file. For example, if you want
to run your tests against your staging build type, edit the file as
shown in the following snippet:
Kotlin
android {
    ...
    testBuildType = "staging"
}
Groovy
android {
    ...
    testBuildType "staging"
}
Configure Gradle test options
The Android Gradle plugin lets you
specify certain options for all or just some of your tests. In the
module-level build.gradle file, use the
testOptions
block to specify options that change how Gradle runs all your tests:
Kotlin
android {
    ...
    // Encapsulates options for running tests.
    testOptions {
        reportDir = "$rootDir/test-reports"
        resultsDir = "$rootDir/test-results"
    }
}
Groovy
android {
    ...
    // Encapsulates options for running tests.
    testOptions {
        reportDir "$rootDir/test-reports"
        resultsDir "$rootDir/test-results"
    }
}
The reportDir property changes the directory where Gradle saves test
reports. By default, Gradle saves test reports in the
path_to_your_project/module_name
/build/outputs/reports/
directory. $rootDir sets the path relative
to the root directory of the current project.
The resultsDir property changes the directory where Gradle saves test
results. By default, Gradle saves test results in the
path_to_your_project/module_name
/build/outputs/test-results/
directory. $rootDir sets the path relative
to the root directory of the current project.
To specify options for only local unit tests, configure the
unitTests
block inside testOptions.
Kotlin
android {
    ...
    testOptions {
        ...
        // Encapsulates options for local unit tests.
        unitTests {
            returnDefaultValues = true

            all {
                jvmArgs = listOf("-XX:MaxPermSize=256m")

                 if (it.name == "testDebugUnitTest") {
                    systemProperty = mapOf("debug" to "true")
                }
                ...
            }
        }
    }
}
Groovy
android {
    ...
    testOptions {
        ...
        // Encapsulates options for local unit tests.
        unitTests {
            returnDefaultValues true

            all {
                jvmArgs '-XX:MaxPermSize=256m'

                if (it.name == 'testDebugUnitTest') {
                    systemProperty 'debug', 'true'
                }
                ...
            }
        }
    }
}
By default, local unit tests throw an exception any time the code
you are testing tries to access Android platform APIs, unless you
mock Android dependencies
yourself or with a testing framework like
Mockito. However, you can enable the returnDefaultValues property so that
the test returns either null or zero when accessing platform APIs, rather
than throwing an exception.
The all block encapsulates options for controlling how Gradle executes
local unit tests. For a list of all the options you can specify, read
Gradle's reference documentation.
The jvmArgs property sets JVM argument(s) for the test JVM(s).
You can also check the task name to apply options to only the tests you
specify. In the example snippet, the debug property is set to true but
only for the testDebugUnitTest task.
Use separate test modules for instrumented tests
If you want to have a dedicated module for instrumented tests, to isolate the rest of your code from your tests, create a separate test module and configure its build similar to that of a library module.
To create a test module, proceed as follows:
- Create a library module.
- In the module-level
build.gradlefile, apply thecom.android.testplugin instead ofcom.android.library. - Click Sync Project
 .
.
After you create your test module, you can include your test code in the
main or variant source set (for example, src/main/kotlin+java or
src/variant/kotlin+java). If your app module
defines multiple product flavors, you can re-create those flavors in your test
module. Using variant-aware dependency management,
the test module attempts to test the matching flavor in the target module.
By default, test modules contain and test only a debug variant. However,
you can create new build types to match the tested app project. To make the
test module test a different build type and not the debug one, use
VariantFilter to disable the debug variant in the test project, as shown:
Kotlin
android {
    variantFilter {
        if (buildType.name == "debug") {
            ignore = true
        }
    }
}
Groovy
android {
    variantFilter { variant ->
        if (variant.buildType.name.equals('debug')) {
            variant.setIgnore(true);
        }
    }
}
If you want a test module to target only certain flavors or build types of an
app, you can use the matchingFallbacks
property to target only the variants you want to test. This also prevents the
test module from having to configure those variants for itself.