
If you have an existing View-based app, you may not want to rewrite its entire UI all at once. This page helps you add new Compose components into your existing app. To get started with using Compose in your app, see Set up Compose for an existing app.
Jetpack Compose was designed with View interoperability right from the start. This functionality means you can migrate your existing View-based app to Compose while still being able to build new features. To migrate to Compose, we recommend an incremental migration where Compose and Views co-exist in your codebase until your app is fully in Compose.
To migrate your app to Compose, follow these steps:
- Build new screens with Compose.
- As you’re building features, identify reusable elements and start to create a library of common UI components.
- Replace existing features one screen at a time.
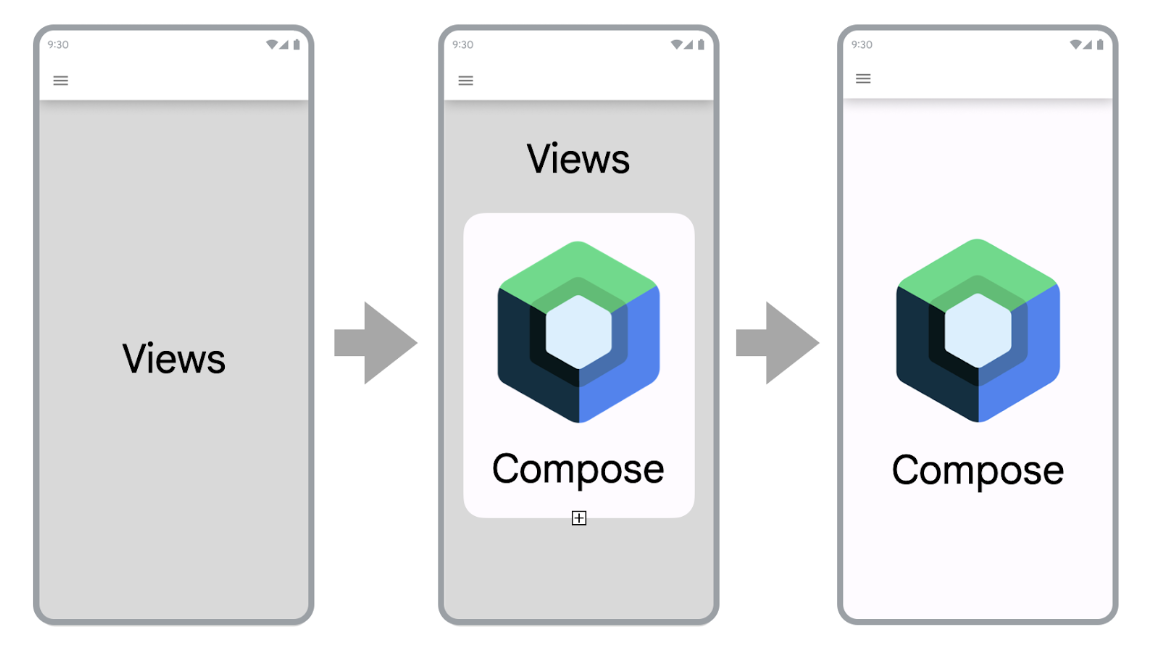
Build new screens with Compose
Using Compose to build new features that encompass an entire screen is the best way to drive your adoption of Compose. With this strategy, you can add features and take advantage of the benefits of Compose while still catering to your company’s business needs.
When you use Compose to build new screens in your existing app, you're still working under the constraints of your app’s architecture. If you are using Fragments and the Navigation component, then you would have to create a new Fragment and have its contents in Compose.
To use Compose in a Fragment, return a ComposeView in the
onCreateView() lifecycle method of your Fragment. ComposeView has a
setContent() method where you can provide a composable function.
class NewFeatureFragment : Fragment() { override fun onCreateView( inflater: LayoutInflater, container: ViewGroup?, savedInstanceState: Bundle? ): View { return ComposeView(requireContext()).apply { setViewCompositionStrategy(ViewCompositionStrategy.DisposeOnViewTreeLifecycleDestroyed) setContent { NewFeatureScreen() } } } }
See ComposeView in Fragments to learn more.
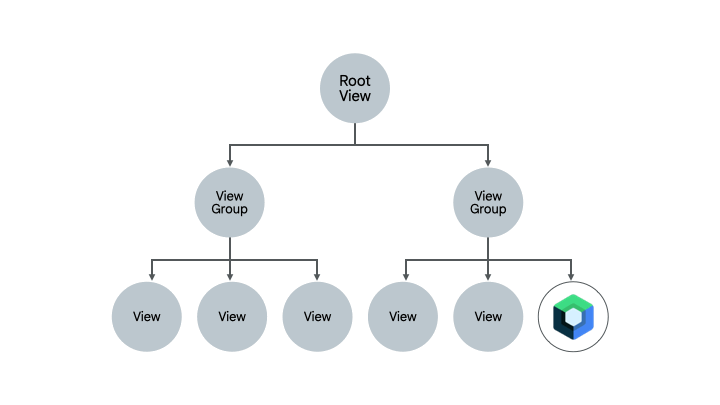
Add new features in existing screens
You can also use Compose in an existing View-based screen if the new feature you
are adding is part of an existing screen. To do so, add a ComposeView to the
View hierarchy, just like any other View.
For example, say you want to add a child view to a LinearLayout. You can do so
in XML as follows:
<LinearLayout xmlns:android="http://schemas.android.com/apk/res/android" android:orientation="vertical" android:layout_width="match_parent" android:layout_height="match_parent"> <TextView android:id="@+id/text" android:layout_width="wrap_content" android:layout_height="wrap_content" /> <androidx.compose.ui.platform.ComposeView android:id="@+id/compose_view" android:layout_width="match_parent" android:layout_height="match_parent" /> </LinearLayout>
Once the view has been inflated, you can later reference the ComposeView in
the hierarchy and call setContent().
To learn more about ComposeView, check out Interoperability APIs.
Build a library of common UI components
As you’re building features with Compose, you’ll quickly realize that you end up building a library of components. Creating a library of common UI components allows you to have a single source of truth for these components in your app and promote reusability. Features you build can then depend on this library. This technique is especially useful if you are building a custom design system in Compose.
Depending on your app’s size, this library could be a separate package, module, or library module. For more information on organizing modules in your app, check out the Guide to Android app modularization.
Replace existing features with Compose
In addition to using Compose to build new features, you’ll want to gradually migrate existing features in your app to take advantage of Compose.
Having your app be Compose-only can accelerate your development and also reduce the APK size and build times of your app. See Compare Compose and View performance to learn more.
Simple screens
The first places to look when migrating existing features to Compose are simple screens. Simple screens can be a welcome screen, a confirmation screen, or a setting screen wherein the data displayed in the UI is relatively static.
Take the following XML file:
<LinearLayout xmlns:android="http://schemas.android.com/apk/res/android" android:orientation="vertical" android:layout_width="match_parent" android:layout_height="match_parent"> <TextView android:id="@+id/title_text" android:layout_width="wrap_content" android:layout_height="wrap_content" android:text="@string/title" android:textAppearance="?attr/textAppearanceHeadline2" /> <TextView android:id="@+id/subtitle_text" android:layout_width="wrap_content" android:layout_height="wrap_content" android:text="@string/subtitle" android:textAppearance="?attr/textAppearanceHeadline6" /> <TextView android:id="@+id/body_text" android:layout_width="wrap_content" android:layout_height="0dp" android:layout_weight="1" android:text="@string/body" android:textAppearance="?attr/textAppearanceBody1" /> <Button android:id="@+id/confirm_button" android:layout_width="match_parent" android:layout_height="wrap_content" android:text="@string/confirm"/> </LinearLayout>
The XML file can be rewritten in Compose in a few lines:
@Composable fun SimpleScreen() { Column(Modifier.fillMaxSize()) { Text( text = stringResource(R.string.title), style = MaterialTheme.typography.headlineMedium ) Text( text = stringResource(R.string.subtitle), style = MaterialTheme.typography.headlineSmall ) Text( text = stringResource(R.string.body), style = MaterialTheme.typography.bodyMedium ) Spacer(modifier = Modifier.weight(1f)) Button(onClick = { /* Handle click */ }, Modifier.fillMaxWidth()) { Text(text = stringResource(R.string.confirm)) } } }
Mixed view and Compose screens
A screen that already contains a bit of Compose code is another good candidate for migrating entirely to Compose. Depending on the complexity of the screen, you can either migrate it entirely to Compose, or do it piece-by-piece. If the screen started with Compose in a subtree of the UI hierarchy, you would continue migrating UI elements until the entire screen is in Compose. This approach is also called the bottom-up approach.
Removing Fragments and Navigation component
You can migrate to Navigation Compose once you’re able to remove all of your Fragments and replace with corresponding screen-level composables. Screen-level composables can contain a mix of Compose and View content, but all navigation destinations must be composables to enable Navigation Compose migration. Until then, you should continue using Fragment-based Navigation component in your mixed View and Compose codebase. See Migrate Jetpack Navigation to Navigation Compose for more information.
Additional resources
Check out the following additional resources to learn more about migrating your existing View-based app to Compose:
- Codelab
- Migrating to Jetpack Compose: Learn how to migrate bits of the Sunflower app to Compose in this codelab.
- Blog posts
- Migrating Sunflower to Jetpack Compose: Learn how Sunflower was migrated to Compose using the strategy described on this page.
- Jetpack Compose Interop: Using Compose in a RecyclerView:
Learn how to performantly use Compose in a
RecyclerView.
Next steps
Now that you know the strategy you can take to migrate your existing View-based app, explore the Interoperability APIs to learn more.
Recommended for you
- Note: link text is displayed when JavaScript is off
- Using Compose in Views
- Scroll
- Migrate
RecyclerViewto Lazy list