
集合小工具專門用來顯示許多相同類型的元素,例如相片庫應用程式中的圖片集合、新聞應用程式中的文章,或是通訊應用程式中的訊息。集合小工具通常著重於兩種用途:瀏覽集合,以及開啟集合中的元素以查看詳細資料。集合小工具可垂直捲動。
這些小工具會使用 RemoteViewsService 顯示由遠端資料支援的集合,例如來自內容供應器的集合。小工具會使用下列其中一種檢視畫面類型 (稱為「集合檢視畫面」) 呈現資料:
ListView- 以垂直捲動清單顯示項目的檢視區塊。
GridView- 這個檢視畫面會以二維捲動格線顯示項目。
StackView- 堆疊式資訊卡檢視畫面,類似於旋轉式名片夾,使用者可以向上或向下輕拂最前面的資訊卡,分別查看前一張或下一張資訊卡。
AdapterViewFlipper- 以轉接程式為基礎的簡單
ViewAnimator,可在兩個以上的檢視區塊之間產生動畫效果。一次只會顯示一個孩子。
由於這些集合檢視區塊會顯示由遠端資料支援的集合,因此會使用 Adapter 將使用者介面繫結至資料。Adapter 會將一組資料中的個別項目繫結至個別 View 物件。
由於這些集合檢視畫面是由轉接程式支援,因此 Android 架構必須包含額外架構,才能支援在小工具中使用這些畫面。在小工具的環境中,Adapter 會由 RemoteViewsFactory 取代,這是 Adapter 介面的精簡包裝函式。如果要求集合中的特定項目,RemoteViewsFactory 會建立並傳回集合的項目,做為 RemoteViews 物件。如要在小工具中加入集合檢視區塊,請實作 RemoteViewsService 和 RemoteViewsFactory。
RemoteViewsService 服務可讓遠端轉接程式要求 RemoteViews 物件。RemoteViewsFactory 是集合檢視區塊 (例如 ListView、GridView 和 StackView) 與該檢視區塊基礎資料之間的配接器介面。以下是從 StackWidget 範例取得的樣板程式碼範例,可實作這項服務和介面:
Kotlin
class StackWidgetService : RemoteViewsService() {

    override fun onGetViewFactory(intent: Intent): RemoteViewsFactory {
        return StackRemoteViewsFactory(this.applicationContext, intent)
    }
}

class StackRemoteViewsFactory(
        private val context: Context,
        intent: Intent
) : RemoteViewsService.RemoteViewsFactory {

// See the RemoteViewsFactory API reference for the full list of methods to
// implement.

}
Java
public class StackWidgetService extends RemoteViewsService {
    @Override
    public RemoteViewsFactory onGetViewFactory(Intent intent) {
        return new StackRemoteViewsFactory(this.getApplicationContext(), intent);
    }
}

class StackRemoteViewsFactory implements RemoteViewsService.RemoteViewsFactory {

// See the RemoteViewsFactory API reference for the full list of methods to
// implement.

}
應用程式範例
本節中的程式碼摘錄內容也來自StackWidget範例:
StackWidget.這個範例包含十個檢視區塊的堆疊,顯示的值為零到九。範例小工具的主要行為如下:
使用者只要在小工具中垂直快速滑過頂端檢視畫面,即可顯示下一個或上一個檢視畫面。這是內建的
StackView行為。小工具會自動依序切換檢視畫面,就像投影片放映一樣,不需要使用者互動。這是因為
res/xml/stackwidgetinfo.xml檔案中的android:autoAdvanceViewId="@id/stack_view"設定。這項設定會套用至檢視區塊 ID,在此案例中為堆疊檢視區塊的檢視區塊 ID。如果使用者輕觸頂端檢視區塊,小工具會顯示「已輕觸檢視區塊 n」訊息,其中 n 是所輕觸檢視區塊的索引 (位置)。
Toast如要進一步瞭解如何實作行為,請參閱「為個別項目新增行為」一節。
實作小工具集合
如要實作含有集合的小工具,請按照實作任何小工具的程序操作,然後完成下列額外步驟:修改資訊清單、在小工具版面配置中新增集合檢視區塊,以及修改 AppWidgetProvider 子類別。
含集合的小工具資訊清單
除了「在資訊清單中宣告小工具」一節列出的規定外,您還必須讓含有集合的小工具能夠繫結至 RemoteViewsService。方法是在資訊清單檔案中宣告服務,並使用 BIND_REMOTEVIEWS 權限。這樣可防止其他應用程式任意存取小工具的資料。
舉例來說,建立使用 RemoteViewsService 填入集合檢視區塊的小工具時,資訊清單項目可能如下所示:
<service android:name="MyWidgetService"
    android:permission="android.permission.BIND_REMOTEVIEWS" />
在本範例中,android:name="MyWidgetService" 是指 RemoteViewsService 的子類別。
小工具集合的版面配置
小工具版面配置 XML 檔案的主要需求是包含其中一個集合檢視區塊:ListView、GridView、StackView 或 AdapterViewFlipper。以下是
StackWidget
範例的 widget_layout.xml 檔案:
<FrameLayout xmlns:android="http://schemas.android.com/apk/res/android"
    android:layout_width="match_parent"
    android:layout_height="match_parent">
    <StackView
        android:id="@+id/stack_view"
        android:layout_width="match_parent"
        android:layout_height="match_parent"
        android:gravity="center"
        android:loopViews="true" />
    <TextView
        android:id="@+id/empty_view"
        android:layout_width="match_parent"
        android:layout_height="match_parent"
        android:gravity="center"
        android:background="@drawable/widget_item_background"
        android:textColor="#ffffff"
        android:textStyle="bold"
        android:text="@string/empty_view_text"
        android:textSize="20sp" />
</FrameLayout>
請注意,空白檢視區塊必須是集合檢視區塊的同層級項目,空白檢視區塊代表空白狀態。
除了整個小工具的版面配置檔案外,請建立另一個版面配置檔案,定義集合中每個項目的版面配置,例如書籍集合中每本書的版面配置。由於所有項目都使用相同的版面配置,因此 StackWidget 範例只有一個項目版面配置檔案 widget_item.xml。
適用於含集合的小工具的 AppWidgetProvider 類別
與一般小工具一樣,AppWidgetProvider 子類別中的大部分程式碼通常會放在 onUpdate() 中。建立集合小工具時,實作方式的主要差異在於您必須呼叫 onUpdate()setRemoteAdapter()。這會告知集合檢視畫面要從何處取得資料。接著,RemoteViewsService 就能傳回 RemoteViewsFactory 的實作項目,而小工具可以提供適當的資料。呼叫這個方法時,請傳遞指向 RemoteViewsService 實作的意圖,以及指定要更新的小工具 ID。
舉例來說,StackWidget 範例會實作 onUpdate() 回呼方法,將 RemoteViewsService 設為小工具集合的遠端轉接程式:
Kotlin
override fun onUpdate(
        context: Context,
        appWidgetManager: AppWidgetManager,
        appWidgetIds: IntArray
) {
    // Update each of the widgets with the remote adapter.
    appWidgetIds.forEach { appWidgetId ->

        // Set up the intent that starts the StackViewService, which
        // provides the views for this collection.
        val intent = Intent(context, StackWidgetService::class.java).apply {
            // Add the widget ID to the intent extras.
            putExtra(AppWidgetManager.EXTRA_APPWIDGET_ID, appWidgetId)
            data = Uri.parse(toUri(Intent.URI_INTENT_SCHEME))
        }
        // Instantiate the RemoteViews object for the widget layout.
        val views = RemoteViews(context.packageName, R.layout.widget_layout).apply {
            // Set up the RemoteViews object to use a RemoteViews adapter.
            // This adapter connects to a RemoteViewsService through the
            // specified intent.
            // This is how you populate the data.
            setRemoteAdapter(R.id.stack_view, intent)

            // The empty view is displayed when the collection has no items.
            // It must be in the same layout used to instantiate the
            // RemoteViews object.
            setEmptyView(R.id.stack_view, R.id.empty_view)
        }

        // Do additional processing specific to this widget.

        appWidgetManager.updateAppWidget(appWidgetId, views)
    }
    super.onUpdate(context, appWidgetManager, appWidgetIds)
}
Java
public void onUpdate(Context context, AppWidgetManager appWidgetManager, int[] appWidgetIds) {
    // Update each of the widgets with the remote adapter.
    for (int i = 0; i < appWidgetIds.length; ++i) {

        // Set up the intent that starts the StackViewService, which
        // provides the views for this collection.
        Intent intent = new Intent(context, StackWidgetService.class);
        // Add the widget ID to the intent extras.
        intent.putExtra(AppWidgetManager.EXTRA_APPWIDGET_ID, appWidgetIds[i]);
        intent.setData(Uri.parse(intent.toUri(Intent.URI_INTENT_SCHEME)));
        // Instantiate the RemoteViews object for the widget layout.
        RemoteViews views = new RemoteViews(context.getPackageName(), R.layout.widget_layout);
        // Set up the RemoteViews object to use a RemoteViews adapter.
        // This adapter connects to a RemoteViewsService through the specified
        // intent.
        // This is how you populate the data.
        views.setRemoteAdapter(R.id.stack_view, intent);

        // The empty view is displayed when the collection has no items.
        // It must be in the same layout used to instantiate the RemoteViews
        // object.
        views.setEmptyView(R.id.stack_view, R.id.empty_view);

        // Do additional processing specific to this widget.

        appWidgetManager.updateAppWidget(appWidgetIds[i], views);
    }
    super.onUpdate(context, appWidgetManager, appWidgetIds);
}
保存資料
如本頁所述,RemoteViewsService 子類別提供用於填入遠端集合檢視區塊的 RemoteViewsFactory。
具體來說,請按照下列步驟操作:
子類別
RemoteViewsService。RemoteViewsService是遠端轉接頭可要求RemoteViews的服務。在
RemoteViewsService子類別中,加入實作RemoteViewsFactory介面的類別。RemoteViewsFactory是遠端集合檢視區塊 (例如ListView、GridView、StackView) 與該檢視區塊基礎資料之間的轉接介面。您的實作項目負責為資料集中的每個項目建立RemoteViews物件。這個介面是Adapter的精簡包裝函式。
您無法依賴單一服務執行個體或其中包含的任何資料來保存資料。除非資料是靜態,否則請勿將資料儲存在 RemoteViewsService 中。如要讓小工具的資料持續存在,最佳做法是使用 ContentProvider,讓資料在程序生命週期結束後仍可保留。舉例來說,雜貨店小工具可以將每個雜貨清單項目的狀態儲存在永久位置,例如 SQL 資料庫。
RemoteViewsService 實作項目的主要內容是 RemoteViewsFactory,詳情請見下一節。
RemoteViewsFactory 介面
實作 RemoteViewsFactory 介面的自訂類別會為小工具提供集合中項目的資料。為此,系統會將小工具項目 XML 版面配置檔案與資料來源合併。資料來源可以是資料庫,也可以是簡單的陣列。在StackWidget範例中,資料來源是 WidgetItems 的陣列。RemoteViewsFactory 函式可做為轉接器,將資料黏貼至遠端集合檢視畫面。
您需要為 RemoteViewsFactory 子類別實作的兩個最重要方法是 onCreate() 和 getViewAt()。
系統會在首次建立工廠時呼叫 onCreate()。您可以在這裡設定資料來源的任何連線或游標。舉例來說,StackWidget 範例會使用 onCreate() 初始化 WidgetItem 物件陣列。當小工具處於啟用狀態時,系統會使用陣列中的索引位置存取這些物件,並顯示其中包含的文字。
以下是 StackWidget 範例的 RemoteViewsFactory 實作方式摘錄,顯示 onCreate() 方法的部分內容:
Kotlin
private const val REMOTE_VIEW_COUNT: Int = 10

class StackRemoteViewsFactory(
        private val context: Context
) : RemoteViewsService.RemoteViewsFactory {

    private lateinit var widgetItems: List<WidgetItem>

    override fun onCreate() {
        // In onCreate(), set up any connections or cursors to your data
        // source. Heavy lifting, such as downloading or creating content,
        // must be deferred to onDataSetChanged() or getViewAt(). Taking
        // more than 20 seconds on this call results in an ANR.
        widgetItems = List(REMOTE_VIEW_COUNT) { index -> WidgetItem("$index!") }
        ...
    }
    ...
}
Java
class StackRemoteViewsFactory implements RemoteViewsService.RemoteViewsFactory {
    private static final int REMOTE_VIEW_COUNT = 10;
    private List<WidgetItem> widgetItems = new ArrayList<WidgetItem>();

    public void onCreate() {
        // In onCreate(), setup any connections or cursors to your data
        // source. Heavy lifting, such as downloading or creating content,
        // must be deferred to onDataSetChanged() or getViewAt(). Taking
        // more than 20 seconds on this call results in an ANR.
        for (int i = 0; i < REMOTE_VIEW_COUNT; i++) {
            widgetItems.add(new WidgetItem(i + "!"));
        }
        ...
    }
...
RemoteViewsFactory 方法 getViewAt() 會傳回 RemoteViews 物件,對應於資料集中指定 position 的資料。以下是 StackWidget 範例的 RemoteViewsFactory 實作摘錄:
Kotlin
override fun getViewAt(position: Int): RemoteViews {
    // Construct a remote views item based on the widget item XML file
    // and set the text based on the position.
    return RemoteViews(context.packageName, R.layout.widget_item).apply {
        setTextViewText(R.id.widget_item, widgetItems[position].text)
    }
}
Java
public RemoteViews getViewAt(int position) {
    // Construct a remote views item based on the widget item XML file
    // and set the text based on the position.
    RemoteViews views = new RemoteViews(context.getPackageName(), R.layout.widget_item);
    views.setTextViewText(R.id.widget_item, widgetItems.get(position).text);
    return views;
}
為個別項目新增行為
前幾節說明如何將資料繫結至小工具集合。但如果想為集合檢視區塊中的個別項目新增動態行為,該怎麼做?
如「使用 onUpdate() 類別處理事件」一文所述,您通常會使用 setOnClickPendingIntent() 設定物件的點擊行為,例如讓按鈕啟動 Activity。但個別集合項目中的子項檢視區塊不得採用這種做法。舉例來說,您可以使用 setOnClickPendingIntent() 在 Gmail 小工具中設定啟動應用程式的全球按鈕,但無法在個別清單項目中設定。
如要為集合中的個別項目新增點擊行為,請改用 setOnClickFillInIntent()。這包括為集合檢視區塊設定待處理意圖範本,然後透過 RemoteViewsFactory 在集合中的每個項目上設定填入意圖。
本節將使用 StackWidget 範例,說明如何為個別項目新增行為。在 StackWidget 範例中,如果使用者輕觸頂端檢視區塊,小工具會顯示「已輕觸檢視區塊 n」訊息,其中 n 是所輕觸檢視區塊的索引 (位置)。Toast這類廣告運作方式如下:
StackWidgetProvider(AppWidgetProvider子類別) 會建立待處理意圖,並使用名為TOAST_ACTION的自訂動作。使用者觸控檢視區塊時,意圖會觸發並廣播
TOAST_ACTION。這項廣播會由
StackWidgetProvider類別的onReceive()方法攔截,而小工具會顯示所觸控檢視區塊的Toast訊息。收藏項目的資料由RemoteViewsFactory透過RemoteViewsService提供。
設定待處理意圖範本
StackWidgetProvider (AppWidgetProvider 子類別) 會設定待處理意圖。集合中的個別項目無法設定自己的待處理意圖。而是由整個集合設定待處理意圖範本,個別項目則設定填入意圖,以便根據個別項目建立專屬行為。
這個類別也會接收使用者觸控檢視區塊時傳送的廣播。並在 onReceive() 方法中處理此事件。如果意圖的動作是 TOAST_ACTION,小工具會顯示目前檢視區塊的 Toast 訊息。
Kotlin
const val TOAST_ACTION = "com.example.android.stackwidget.TOAST_ACTION"
const val EXTRA_ITEM = "com.example.android.stackwidget.EXTRA_ITEM"

class StackWidgetProvider : AppWidgetProvider() {

    ...

    // Called when the BroadcastReceiver receives an Intent broadcast.
    // Checks whether the intent's action is TOAST_ACTION. If it is, the
    // widget displays a Toast message for the current item.
    override fun onReceive(context: Context, intent: Intent) {
        val mgr: AppWidgetManager = AppWidgetManager.getInstance(context)
        if (intent.action == TOAST_ACTION) {
            val appWidgetId: Int = intent.getIntExtra(
                    AppWidgetManager.EXTRA_APPWIDGET_ID,
                    AppWidgetManager.INVALID_APPWIDGET_ID
            )
            // EXTRA_ITEM represents a custom value provided by the Intent
            // passed to the setOnClickFillInIntent() method to indicate the
            // position of the clicked item. See StackRemoteViewsFactory in
            // Set the fill-in Intent for details.
            val viewIndex: Int = intent.getIntExtra(EXTRA_ITEM, 0)
            Toast.makeText(context, "Touched view $viewIndex", Toast.LENGTH_SHORT).show()
        }
        super.onReceive(context, intent)
    }

    override fun onUpdate(
            context: Context,
            appWidgetManager: AppWidgetManager,
            appWidgetIds: IntArray
    ) {
        // Update each of the widgets with the remote adapter.
        appWidgetIds.forEach { appWidgetId ->

            // Sets up the intent that points to the StackViewService that
            // provides the views for this collection.
            val intent = Intent(context, StackWidgetService::class.java).apply {
                putExtra(AppWidgetManager.EXTRA_APPWIDGET_ID, appWidgetId)
                // When intents are compared, the extras are ignored, so embed
                // the extra sinto the data so that the extras are not ignored.
                data = Uri.parse(toUri(Intent.URI_INTENT_SCHEME))
            }
            val rv = RemoteViews(context.packageName, R.layout.widget_layout).apply {
                setRemoteAdapter(R.id.stack_view, intent)

                // The empty view is displayed when the collection has no items.
                // It must be a sibling of the collection view.
                setEmptyView(R.id.stack_view, R.id.empty_view)
            }

            // This section makes it possible for items to have individualized
            // behavior. It does this by setting up a pending intent template.
            // Individuals items of a collection can't set up their own pending
            // intents. Instead, the collection as a whole sets up a pending
            // intent template, and the individual items set a fillInIntent
            // to create unique behavior on an item-by-item basis.
            val toastPendingIntent: PendingIntent = Intent(
                    context,
                    StackWidgetProvider::class.java
            ).run {
                // Set the action for the intent.
                // When the user touches a particular view, it has the effect of
                // broadcasting TOAST_ACTION.
                action = TOAST_ACTION
                putExtra(AppWidgetManager.EXTRA_APPWIDGET_ID, appWidgetId)
                data = Uri.parse(toUri(Intent.URI_INTENT_SCHEME))

                PendingIntent.getBroadcast(context, 0, this, PendingIntent.FLAG_UPDATE_CURRENT)
            }
            rv.setPendingIntentTemplate(R.id.stack_view, toastPendingIntent)

            appWidgetManager.updateAppWidget(appWidgetId, rv)
        }
        super.onUpdate(context, appWidgetManager, appWidgetIds)
    }
}
Java
public class StackWidgetProvider extends AppWidgetProvider {
    public static final String TOAST_ACTION = "com.example.android.stackwidget.TOAST_ACTION";
    public static final String EXTRA_ITEM = "com.example.android.stackwidget.EXTRA_ITEM";

    ...

    // Called when the BroadcastReceiver receives an Intent broadcast.
    // Checks whether the intent's action is TOAST_ACTION. If it is, the
    // widget displays a Toast message for the current item.
    @Override
    public void onReceive(Context context, Intent intent) {
        AppWidgetManager mgr = AppWidgetManager.getInstance(context);
        if (intent.getAction().equals(TOAST_ACTION)) {
            int appWidgetId = intent.getIntExtra(AppWidgetManager.EXTRA_APPWIDGET_ID,
                AppWidgetManager.INVALID_APPWIDGET_ID);
            // EXTRA_ITEM represents a custom value provided by the Intent
            // passed to the setOnClickFillInIntent() method to indicate the
            // position of the clicked item. See StackRemoteViewsFactory in
            // Set the fill-in Intent for details.
            int viewIndex = intent.getIntExtra(EXTRA_ITEM, 0);
            Toast.makeText(context, "Touched view " + viewIndex, Toast.LENGTH_SHORT).show();
        }
        super.onReceive(context, intent);
    }

    @Override
    public void onUpdate(Context context, AppWidgetManager appWidgetManager, int[] appWidgetIds) {
        // Update each of the widgets with the remote adapter.
        for (int i = 0; i < appWidgetIds.length; ++i) {

            // Sets up the intent that points to the StackViewService that
            // provides the views for this collection.
            Intent intent = new Intent(context, StackWidgetService.class);
            intent.putExtra(AppWidgetManager.EXTRA_APPWIDGET_ID, appWidgetIds[i]);
            // When intents are compared, the extras are ignored, so embed
            // the extras into the data so that the extras are not
            // ignored.
            intent.setData(Uri.parse(intent.toUri(Intent.URI_INTENT_SCHEME)));
            RemoteViews rv = new RemoteViews(context.getPackageName(), R.layout.widget_layout);
            rv.setRemoteAdapter(appWidgetIds[i], R.id.stack_view, intent);

            // The empty view is displayed when the collection has no items. It
            // must be a sibling of the collection view.
            rv.setEmptyView(R.id.stack_view, R.id.empty_view);

            // This section makes it possible for items to have individualized
            // behavior. It does this by setting up a pending intent template.
            // Individuals items of a collection can't set up their own pending
            // intents. Instead, the collection as a whole sets up a pending
            // intent template, and the individual items set a fillInIntent
            // to create unique behavior on an item-by-item basis.
            Intent toastIntent = new Intent(context, StackWidgetProvider.class);
            // Set the action for the intent.
            // When the user touches a particular view, it has the effect of
            // broadcasting TOAST_ACTION.
            toastIntent.setAction(StackWidgetProvider.TOAST_ACTION);
            toastIntent.putExtra(AppWidgetManager.EXTRA_APPWIDGET_ID, appWidgetIds[i]);
            intent.setData(Uri.parse(intent.toUri(Intent.URI_INTENT_SCHEME)));
            PendingIntent toastPendingIntent = PendingIntent.getBroadcast(context, 0, toastIntent,
                PendingIntent.FLAG_UPDATE_CURRENT);
            rv.setPendingIntentTemplate(R.id.stack_view, toastPendingIntent);

            appWidgetManager.updateAppWidget(appWidgetIds[i], rv);
        }
        super.onUpdate(context, appWidgetManager, appWidgetIds);
    }
}
設定填入意圖
您的 RemoteViewsFactory 必須在集合中的每個項目上設定填入意圖。這樣一來,您就能區分特定項目的個別點擊動作。然後,填入意圖會與 PendingIntent 範本合併,以判斷輕觸項目時執行的最終意圖。
Kotlin
private const val REMOTE_VIEW_COUNT: Int = 10

class StackRemoteViewsFactory(
        private val context: Context,
        intent: Intent
) : RemoteViewsService.RemoteViewsFactory {

    private lateinit var widgetItems: List<WidgetItem>
    private val appWidgetId: Int = intent.getIntExtra(
            AppWidgetManager.EXTRA_APPWIDGET_ID,
            AppWidgetManager.INVALID_APPWIDGET_ID
    )

    override fun onCreate() {
        // In onCreate(), set up any connections or cursors to your data source.
        // Heavy lifting, such as downloading or creating content, must be
        // deferred to onDataSetChanged() or getViewAt(). Taking more than 20
        // seconds on this call results in an ANR.
        widgetItems = List(REMOTE_VIEW_COUNT) { index -> WidgetItem("$index!") }
        ...
    }
    ...

    override fun getViewAt(position: Int): RemoteViews {
        // Construct a remote views item based on the widget item XML file
        // and set the text based on the position.
        return RemoteViews(context.packageName, R.layout.widget_item).apply {
            setTextViewText(R.id.widget_item, widgetItems[position].text)

            // Set a fill-intent to fill in the pending intent template.
            // that is set on the collection view in StackWidgetProvider.
            val fillInIntent = Intent().apply {
                Bundle().also { extras ->
                    extras.putInt(EXTRA_ITEM, position)
                    putExtras(extras)
                }
            }
            // Make it possible to distinguish the individual on-click
            // action of a given item.
            setOnClickFillInIntent(R.id.widget_item, fillInIntent)
            ...
        }
    }
    ...
}
Java
public class StackWidgetService extends RemoteViewsService {
    @Override
    public RemoteViewsFactory onGetViewFactory(Intent intent) {
        return new StackRemoteViewsFactory(this.getApplicationContext(), intent);
    }
}

class StackRemoteViewsFactory implements RemoteViewsService.RemoteViewsFactory {
    private static final int count = 10;
    private List<WidgetItem> widgetItems = new ArrayList<WidgetItem>();
    private Context context;
    private int appWidgetId;

    public StackRemoteViewsFactory(Context context, Intent intent) {
        this.context = context;
        appWidgetId = intent.getIntExtra(AppWidgetManager.EXTRA_APPWIDGET_ID,
                AppWidgetManager.INVALID_APPWIDGET_ID);
    }

    // Initialize the data set.
    public void onCreate() {
        // In onCreate(), set up any connections or cursors to your data
        // source. Heavy lifting, such as downloading or creating
        // content, must be deferred to onDataSetChanged() or
        // getViewAt(). Taking more than 20 seconds on this call results
        // in an ANR.
        for (int i = 0; i < count; i++) {
            widgetItems.add(new WidgetItem(i + "!"));
        }
        ...
    }

    // Given the position (index) of a WidgetItem in the array, use the
    // item's text value in combination with the widget item XML file to
    // construct a RemoteViews object.
    public RemoteViews getViewAt(int position) {
        // Position always ranges from 0 to getCount() - 1.

        // Construct a RemoteViews item based on the widget item XML
        // file and set the text based on the position.
        RemoteViews rv = new RemoteViews(context.getPackageName(), R.layout.widget_item);
        rv.setTextViewText(R.id.widget_item, widgetItems.get(position).text);

        // Set a fill-intent to fill in the pending
        // intent template that is set on the collection view in
        // StackWidgetProvider.
        Bundle extras = new Bundle();
        extras.putInt(StackWidgetProvider.EXTRA_ITEM, position);
        Intent fillInIntent = new Intent();
        fillInIntent.putExtras(extras);
        // Make it possible to distinguish the individual on-click
        // action of a given item.
        rv.setOnClickFillInIntent(R.id.widget_item, fillInIntent);

        // Return the RemoteViews object.
        return rv;
    }
    ...
}
持續更新收藏資料
圖 2 說明使用集合的小工具更新流程。這會顯示小工具程式碼如何與 RemoteViewsFactory 互動,以及如何觸發更新:
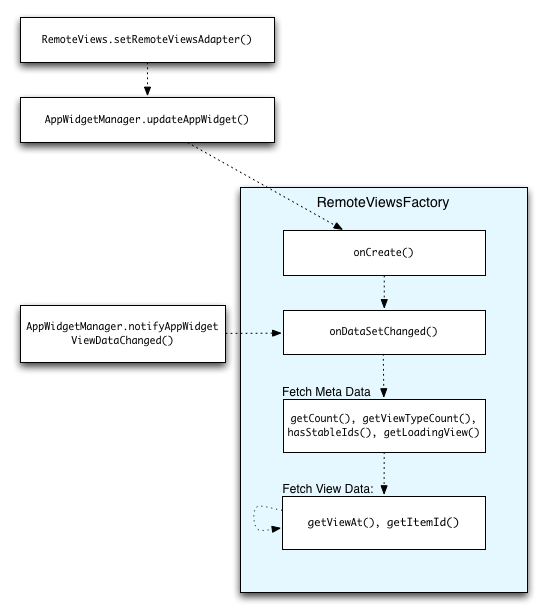
RemoteViewsFactory 互動。使用集合的動態小工具可為使用者提供最新內容。舉例來說,使用者可以透過 Gmail 小工具快速查看收件匣。如要達成這個目標,請觸發 RemoteViewsFactory 和集合檢視畫面,擷取並顯示新資料。
如要執行這項操作,請使用 AppWidgetManager 呼叫 notifyAppWidgetViewDataChanged()。這項呼叫會導致回呼至 RemoteViewsFactory 物件的 onDataSetChanged() 方法,讓您擷取任何新資料。
您可以在 onDataSetChanged() 回呼中同步執行耗用大量資源的作業。保證在從 RemoteViewsFactory 擷取中繼資料或檢視資料之前,這個呼叫會完成。您也可以在 getViewAt() 方法中執行大量處理作業。如果這個呼叫需要較長時間,系統會在集合檢視區塊的對應位置顯示載入檢視區塊 (由 RemoteViewsFactory 物件的 getLoadingView() 方法指定),直到呼叫傳回為止。
使用 RemoteCollectionItems 直接傳遞集合
Android 12 (API 級別 31) 新增了 setRemoteAdapter(int viewId,
RemoteViews.RemoteCollectionItems
items) 方法,可讓應用程式在填入集合檢視區塊時,直接傳遞集合。如果使用這個方法設定轉接器,就不必實作 RemoteViewsFactory,也不必呼叫 notifyAppWidgetViewDataChanged()。
除了更輕鬆地填入轉接器,這種做法還能移除延遲時間,讓使用者捲動清單以顯示新項目時,可立即填入新項目。只要集合項目數量相對較少,建議採用這個方法設定轉接程式。不過,舉例來說,如果集合包含大量要傳遞至 setImageViewBitmap 的 Bitmaps,這種做法就不太適用。
如果集合並非使用一組固定的版面配置 (也就是說,某些項目只會偶爾出現),請使用 setViewTypeCount 指定集合可包含的不重複版面配置數量上限。這樣一來,您就能在應用程式小工具的更新中重複使用這個轉接器。
以下範例說明如何實作簡化的 RemoteViews 集合。
Kotlin
val itemLayouts = listOf(
        R.layout.item_type_1,
        R.layout.item_type_2,
        ...
)

remoteView.setRemoteAdapter(
        R.id.list_view,
        RemoteViews.RemoteCollectionItems.Builder()
            .addItem(/* id= */ ID_1, RemoteViews(context.packageName, R.layout.item_type_1))
            .addItem(/* id= */ ID_2, RemoteViews(context.packageName, R.layout.item_type_2))
            ...
            .setViewTypeCount(itemLayouts.count())
            .build()
)
Java
List<Integer> itemLayouts = Arrays.asList(
    R.layout.item_type_1,
    R.layout.item_type_2,
    ...
);

remoteView.setRemoteAdapter(
    R.id.list_view,
    new RemoteViews.RemoteCollectionItems.Builder()
        .addItem(/* id= */ ID_1, new RemoteViews(context.getPackageName(), R.layout.item_type_1))
        .addItem(/* id= */ ID_2, new RemoteViews(context.getPackageName(), R.layout.item_type_2))
        ...
        .setViewTypeCount(itemLayouts.size())
        .build()
);