
This page describes how to set fonts in your Compose app.
Set font
Text has a fontFamily parameter to allow setting the font used in the
composable. By default, serif, sans-serif, monospace and cursive font families
are included:
@Composable fun DifferentFonts() { Column { Text("Hello World", fontFamily = FontFamily.Serif) Text("Hello World", fontFamily = FontFamily.SansSerif) } }

You can use the fontFamily attribute to work with custom fonts and typefaces
defined in the res/font folder:
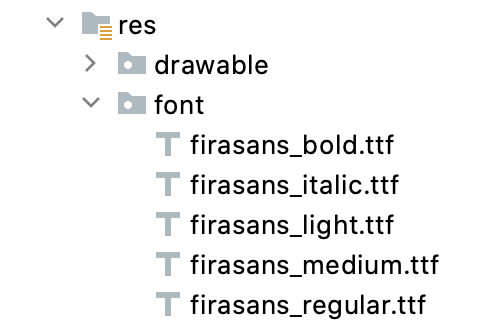
This example shows how you would define a fontFamily based on those font
files and using the Font function:
val firaSansFamily = FontFamily( Font(R.font.firasans_light, FontWeight.Light), Font(R.font.firasans_regular, FontWeight.Normal), Font(R.font.firasans_italic, FontWeight.Normal, FontStyle.Italic), Font(R.font.firasans_medium, FontWeight.Medium), Font(R.font.firasans_bold, FontWeight.Bold) )
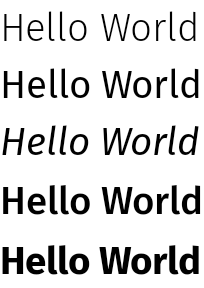
You can pass this fontFamily to your Text composable. Because a
fontFamily can include different weights, you can manually set fontWeight to
select the right weight for your text:
Column { Text(text = "text", fontFamily = firaSansFamily, fontWeight = FontWeight.Light) Text(text = "text", fontFamily = firaSansFamily, fontWeight = FontWeight.Normal) Text( text = "text", fontFamily = firaSansFamily, fontWeight = FontWeight.Normal, fontStyle = FontStyle.Italic ) Text(text = "text", fontFamily = firaSansFamily, fontWeight = FontWeight.Medium) Text(text = "text", fontFamily = firaSansFamily, fontWeight = FontWeight.Bold) }
To learn how to set the typography in your entire app, see Custom design systems in Compose.
Downloadable fonts
Starting in Compose 1.2.0, you can use the downloadable fonts API in your Compose app to download Google fonts asynchronously and use them in your app.
Support for downloadable fonts provided by custom providers is not currently available.
Use downloadable fonts programmatically
To download a font programmatically from within your app, follow these steps:
- Add the dependency:
Groovy
dependencies {
    ...
    implementation "androidx.compose.ui:ui-text-google-fonts:1.11.3"
}
Kotlin
dependencies {
    ...
    implementation("androidx.compose.ui:ui-text-google-fonts:1.11.3")
}
- Initialize the
GoogleFont.Providerwith the credentials for Google Fonts:val provider = GoogleFont.Provider( providerAuthority = "com.google.android.gms.fonts", providerPackage = "com.google.android.gms", certificates = R.array.com_google_android_gms_fonts_certs )
- The font provider authority for Google Fonts.
- The font provider package to verify the identity of the provider.
- A list of sets of hashes for the certificates to verify the identity of the
provider. You can find the hashes required for the Google Fonts provider
in the
font_certs.xmlfile in the Jetchat sample app.
- Define a
FontFamily:// ... import androidx.compose.ui.text.googlefonts.GoogleFont import androidx.compose.ui.text.font.FontFamily import androidx.compose.ui.text.googlefonts.Font // ... val fontName = GoogleFont("Lobster Two") val fontFamily = FontFamily( Font(googleFont = fontName, fontProvider = provider) )
FontWeightandFontStylerespectively:// ... import androidx.compose.ui.text.googlefonts.GoogleFont import androidx.compose.ui.text.font.FontFamily import androidx.compose.ui.text.googlefonts.Font // ... val fontName = GoogleFont("Lobster Two") val fontFamily = FontFamily( Font( googleFont = fontName, fontProvider = provider, weight = FontWeight.Bold, style = FontStyle.Italic ) )
- Configure the
FontFamilyto be used in your Text composable function:
Text( fontFamily = fontFamily, text = "Hello World!" )

You can also define
Typography to use
your FontFamily:
val MyTypography = Typography( bodyMedium = TextStyle( fontFamily = fontFamily, fontWeight = FontWeight.Normal, fontSize = 12.sp/*...*/ ), bodyLarge = TextStyle( fontFamily = fontFamily, fontWeight = FontWeight.Bold, letterSpacing = 2.sp, /*...*/ ), headlineMedium = TextStyle( fontFamily = fontFamily, fontWeight = FontWeight.SemiBold/*...*/ ), /*...*/ )
Next, set the Typography to your app’s theme:
MyAppTheme( typography = MyTypography )/*...*/
For an example of an app that’s implementing downloadable fonts in Compose together with Material3, see the Jetchat sample app.
Add fallback fonts
You can determine a chain of fallbacks for your font in case the font fails to download properly. For instance, if you have your downloadable font defined like this:
// ... import androidx.compose.ui.text.googlefonts.Font // ... val fontName = GoogleFont("Lobster Two") val fontFamily = FontFamily( Font(googleFont = fontName, fontProvider = provider), Font(googleFont = fontName, fontProvider = provider, weight = FontWeight.Bold) )
You can define the defaults for your font for both weights like this:
// ... import androidx.compose.ui.text.font.Font import androidx.compose.ui.text.googlefonts.Font // ... val fontName = GoogleFont("Lobster Two") val fontFamily = FontFamily( Font(googleFont = fontName, fontProvider = provider), Font(resId = R.font.my_font_regular), Font(googleFont = fontName, fontProvider = provider, weight = FontWeight.Bold), Font(resId = R.font.my_font_regular_bold, weight = FontWeight.Bold) )
Make sure you’re adding the correct imports.
Defining the FontFamily like this creates a FontFamily containing two chains,
one per weight. The loading mechanism will try to resolve the online font first,
and then the font located in your local R.font resource folder.
Debug your implementation
To help you verify if the font is being downloaded correctly, you can define a debug coroutine handler. Your handle provides the behavior of what to do in case the font fails to load asynchronously.
Start by creating a
CoroutineExceptionHandler:
val handler = CoroutineExceptionHandler { _, throwable -> // process the Throwable Log.e(TAG, "There has been an issue: ", throwable) }
Pass it to the
createFontFamilyResolver
method to have the resolver use the new handler:
CompositionLocalProvider( LocalFontFamilyResolver provides createFontFamilyResolver(LocalContext.current, handler) ) { Column { Text( text = "Hello World!", style = MaterialTheme.typography.bodyMedium ) } }
You can also use the
isAvailableOnDevice
API from the provider to test if the provider is available and certificates are
configured correctly. To do this, you can call the isAvailableOnDevice method
that returns false if the provider is configured incorrectly.
val context = LocalContext.current LaunchedEffect(Unit) { if (provider.isAvailableOnDevice(context)) { Log.d(TAG, "Success!") } }
Caveats
Google Fonts takes several months to make new fonts available on Android.
There's a gap in time between when a font is added in
fonts.google.com and when it's available through
the downloadable fonts API (either in the View system or in Compose). Newly
added fonts might fail to load in your app with an
IllegalStateException.
To help developers identify this error over other types of font loading errors,
we added descriptive messaging for the exception in Compose with the changes
here.
If you find any issues, report them using the issue
tracker.
Use variable fonts
A variable font is a font format that allows one font file to contain different styles. With variable fonts, you can modify axes (or parameters) to generate your preferred style. These axes can be standard, such as weight, width, slant, and italic, or custom, which differ across variable fonts.
Using variable fonts instead of regular font files allows you to only have one font file instead of multiple.
For more background about variable fonts, see Google Fonts Knowledge, the entire catalog of available variable fonts, and a table of the supported axes for each font.
This doc shows you how to implement a variable font in your Compose app.
Load a variable font
Download the variable font you want to use (for example Roboto Flex) and place it in the
app/res/fontfolder in your app. Make sure that the .ttffile you add is the variable font version of the font, and that the name of your font file is all lowercase and doesn't contain any special characters.To load a variable font, define a
FontFamilyusing the font placed in theres/font/directory:// In Typography.kt @OptIn(ExperimentalTextApi::class) val displayLargeFontFamily = FontFamily( Font( R.font.robotoflex_variable, variationSettings = FontVariation.Settings( FontVariation.weight(950), FontVariation.width(30f), FontVariation.slant(-6f), ) ) )
The
FontVariationAPI allows you to configure standard font axes such as weight, width, and slant. These are standard axes that are available with any variable font. You can create different configurations of the font based on where the font will be used.Variable fonts are only available for Android versions O and above, so add a guardrail and configure an appropriate fallback:
// In Typography.kt val default = FontFamily( /* * This can be any font that makes sense */ Font( R.font.robotoflex_static_regular ) ) @OptIn(ExperimentalTextApi::class) val displayLargeFontFamily = if (Build.VERSION.SDK_INT >= Build.VERSION_CODES.O) { FontFamily( Font( R.font.robotoflex_variable, variationSettings = FontVariation.Settings( FontVariation.weight(950), FontVariation.width(30f), FontVariation.slant(-6f), ) ) ) } else { default }
Extract the settings into a set of constants for easier reuse and replace the font settings with these constants:
// VariableFontDimension.kt object DisplayLargeVFConfig { const val WEIGHT = 950 const val WIDTH = 30f const val SLANT = -6f const val ASCENDER_HEIGHT = 800f const val COUNTER_WIDTH = 500 } @OptIn(ExperimentalTextApi::class) val displayLargeFontFamily = if (Build.VERSION.SDK_INT >= Build.VERSION_CODES.O) { FontFamily( Font( R.font.robotoflex_variable, variationSettings = FontVariation.Settings( FontVariation.weight(DisplayLargeVFConfig.WEIGHT), FontVariation.width(DisplayLargeVFConfig.WIDTH), FontVariation.slant(DisplayLargeVFConfig.SLANT), ) ) ) } else { default }
Configure the Material Design 3 typography to use the
FontFamily:// Type.kt val Typography = Typography( displayLarge = TextStyle( fontFamily = displayLargeFontFamily, fontSize = 50.sp, lineHeight = 64.sp, letterSpacing = 0.sp, /***/ ) )
This sample uses
displayLargeMaterial 3 typography, which has different default font settings and recommended uses. For example, you should usedisplayLargefor short, critical text, as it's the largest text on the screen.With Material 3, you can change the default values of
TextStyleandfontFamilyto customize your typography. In the snippet above, you configure instances ofTextStyleto customize font settings for each font family.Now that you've defined your typography, pass it to the M3
MaterialTheme:MaterialTheme( colorScheme = MaterialTheme.colorScheme, typography = Typography, content = content )
Finally, use a
Textcomposable and specify the style to one of the defined typography styles,MaterialTheme.typography.displayLarge:@Composable @Preview fun CardDetails() { MyCustomTheme { Card( shape = RoundedCornerShape(8.dp), elevation = CardDefaults.cardElevation(defaultElevation = 4.dp), modifier = Modifier .fillMaxWidth() .padding(16.dp) ) { Column( modifier = Modifier.padding(16.dp) ) { Text( text = "Compose", style = MaterialTheme.typography.displayLarge, modifier = Modifier.padding(bottom = 8.dp), maxLines = 1 ) Text( text = "Beautiful UIs on Android", style = MaterialTheme.typography.headlineMedium, modifier = Modifier.padding(bottom = 8.dp), maxLines = 2 ) Text( text = "Jetpack Compose is Android’s recommended modern toolkit for building native UI. It simplifies and accelerates UI development on Android. Quickly bring your app to life with less code, powerful tools, and intuitive Kotlin APIs.", style = MaterialTheme.typography.bodyLarge, modifier = Modifier.padding(bottom = 8.dp), maxLines = 3 ) } } } }
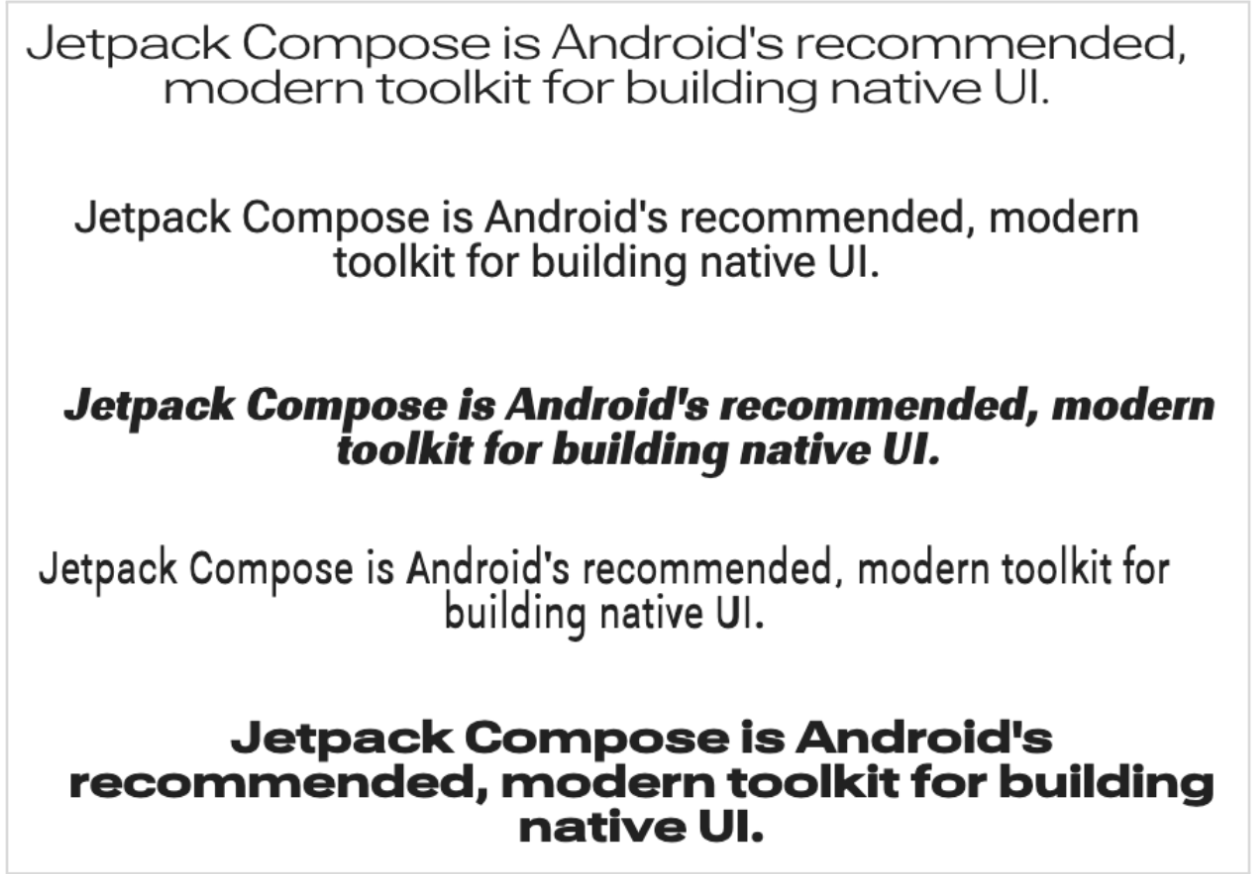
Each
Textcomposable is configured through its Material theme's style and contains a different variable font configuration. You can useMaterialTheme.typographyto retrieve the typography provided to the M3MaterialThemecomposable.

Use custom axes
Fonts can also have custom axes. These are defined within the font file itself.
For example, the Roboto Flex font has the ascender height ("YTAS") axis, which
adjusts the height of the lowercase ascenders, while counter width ("XTRA")
adjusts the width of each letter.
You can change the value of these axes with the FontVariation settings.
For more information about the custom axes you can configure for a font, see the table of the supported axes for each font.
To use custom axes, define functions for the custom
ascenderHeightandcounterWidthaxes:fun ascenderHeight(ascenderHeight: Float): FontVariation.Setting { require(ascenderHeight in 649f..854f) { "'Ascender Height' must be in 649f..854f" } return FontVariation.Setting("YTAS", ascenderHeight) } fun counterWidth(counterWidth: Int): FontVariation.Setting { require(counterWidth in 323..603) { "'Counter width' must be in 323..603" } return FontVariation.Setting("XTRA", counterWidth.toFloat()) }
These functions do the following:
- Define guardrails for the values they can accept. As you can see in the
Variable fonts catalog,
ascenderHeight (YTAS)has a minimum value of649fand a maximum of854f. - Return the font setting, so the configuration is ready to add to the font. In
the
FontVariation.Setting()method, the axis name (YTAS, XTRA) is hardcoded, and it takes the value as a parameter.
- Define guardrails for the values they can accept. As you can see in the
Variable fonts catalog,
Using the axes with the font configuration, pass additional parameters to each
Fontthat is loaded:@OptIn(ExperimentalTextApi::class) val displayLargeFontFamily = if (Build.VERSION.SDK_INT >= Build.VERSION_CODES.O) { FontFamily( Font( R.font.robotoflex_variable, variationSettings = FontVariation.Settings( FontVariation.weight(DisplayLargeVFConfig.WEIGHT), FontVariation.width(DisplayLargeVFConfig.WIDTH), FontVariation.slant(DisplayLargeVFConfig.SLANT), ascenderHeight(DisplayLargeVFConfig.ASCENDER_HEIGHT), counterWidth(DisplayLargeVFConfig.COUNTER_WIDTH) ) ) ) } else { default }
Notice that the height of the lowercase ascenders is now increased, and the other text is wider:

Additional resources
For more information, see the following blog post about variable fonts:
Recommended for you
- Note: link text is displayed when JavaScript is off
- Resources in Compose
- Style text
- Material Design 2 in Compose