
Journeys for Android Studio leverages the vision and reasoning capabilities of AI to navigate and test your app based on your natural language instructions. Your set of instructions, called a journey, are converted into actions that AI performs on your app. Additionally, you can write and describe more complex assertions, which AI evaluates based on what it sees on the device.
And because Gemini reasons about which actions to perform to satisfy the goals, journeys are more resilient to subtle changes to your app's layout or behavior, resulting in fewer flaky tests when running against different versions of your app and different device configurations.
You can write and run journeys right from Android Studio or from the command line against any local or remote Android-powered device. The IDE provides a new editor experience for crafting journeys as well as rich results that help you better follow Gemini's reasoning and execution of your journey.
Write a journey
Android Studio provides a file template and new editor experience that makes creating and editing journeys easier. Journeys are written using the XML syntax to organize your journey description and steps.

To create and start editing a journey, do the following:
- From the Project panel in Android Studio, right-click on the app module for which you want to write a journey.
- Select New > Journey Test.
In the dialog that appears, provide the name and description of your journey.
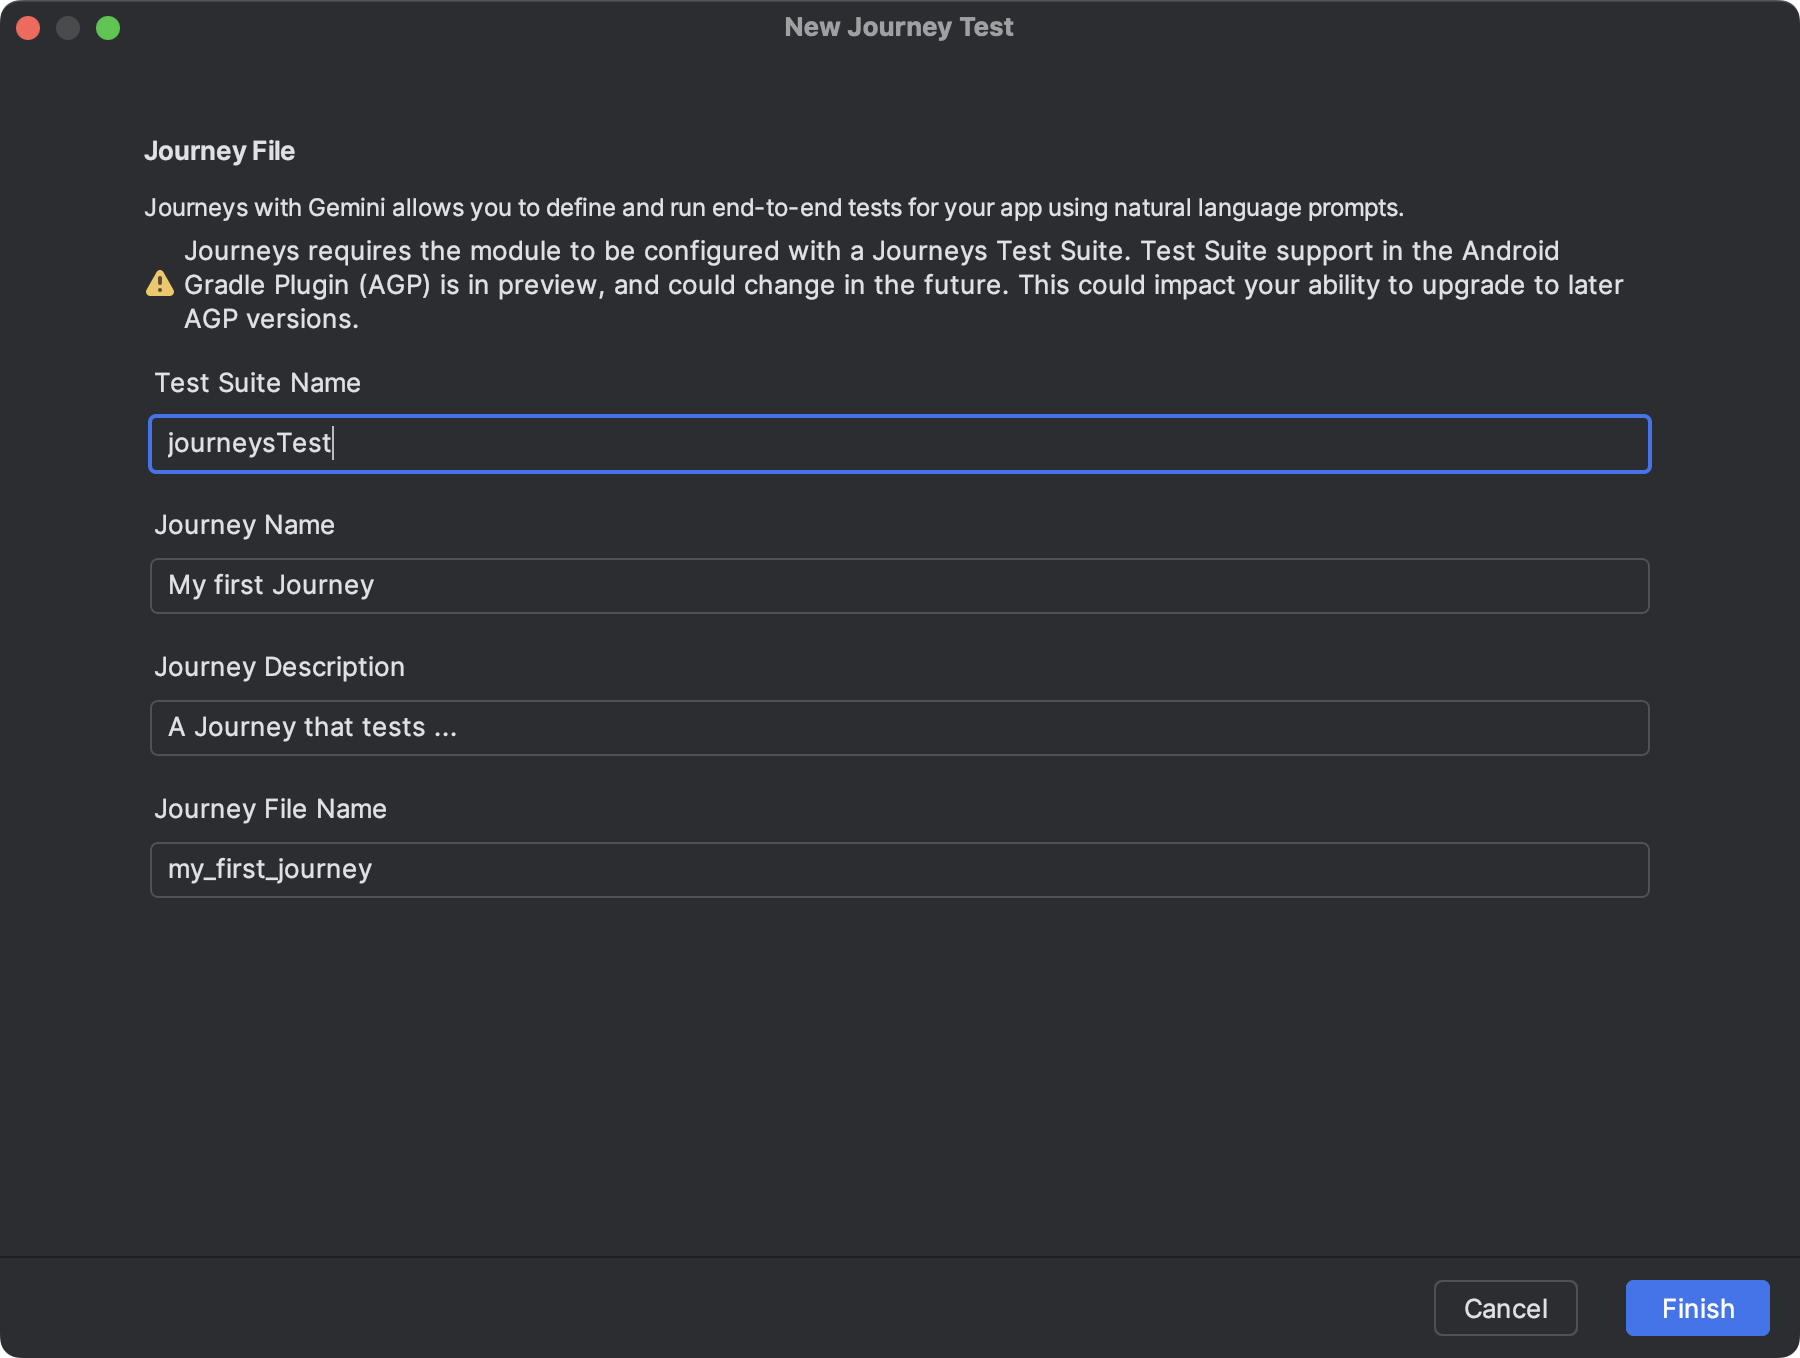
A dialog in Android Studio you use to create a journey file. Click Finish. Android Studio creates an XML file for your journey with the name you chose. You can use either the Code view to edit the XML directly, or the Design view for a simplified editing experience.
When viewing your journey in the Design view, use the text field to describe each step of your journey. Each step can include descriptive actions you want Gemini to perform or assertions that you want Gemini to evaluate.
Press Enter on your keyboard to start a new step in the same journey. You can repeat this as needed for each step of the journey you want to define.
Configure build variants
Journeys runs against specific build variants of your app. When you first create a journey using the wizard, the generated test suite is configured to run against the build variant that is active in Android Studio.
However, if you later switch the active build variant in Android Studio (for
example, to a different product flavor like demoDebug) without updating the
configuration, running the journey will fail. To fix this, you must add the new
variant to the targetVariants property in the testSuites block of your
module-level build.gradle.kts (or build.gradle) file.
For example, to configure the journeysTest suite for the demoDebug variant:
android {
    // ...
    testSuites {
        create("journeysTest") {
            // ...
            targetVariants += listOf("demoDebug")
        }
    }
}
Tips for writing journeys
Although the AI is capable of understanding most steps written in supported languages, following these tips for writing journeys can lead to more accurate and expected results:
- Assume your app is already in the foreground: Running a journey automatically launches your app. The steps of your journey should begin after the app has fully launched. That is, you don't need to include "launch app" as a step.
- Use unambiguous language: Being precise minimizes misinterpretation and improves reliability.
| Instead of | Do this |
|---|---|
| "Select the dismiss button" | "Tap 'Dismiss'" or just "Dismiss" |
| "Type 'celery'" | "Type 'celery' in the search bar at the top of the home screen" |
| "Swipe to dismiss" | "Swipe left to dismiss, the card should then no longer be visible" |
- Include the success criteria as part of the step: This helps Gemini better understand your intention and clarifies when the action is complete and the next action can start.
| Instead of | Do this |
|---|---|
| "Select the send button" | "Send the email by tapping the submit button. This should close the email and return you to the inbox." |
| "Go to the shopping cart" | "Tap on the shopping cart icon which will take you to the shopping cart page. Verify it contains zero items" |
| "Click the first video" | "Click the first video and wait for it to fully load" |
- Refine your journey: If your journey isn't executing as expected, you can view the results and inspect ‘Action Taken’ and corresponding ‘Reasoning’ to understand why Gemini might not have executed the steps as you expected. Use this information to provide additional clarity to your instructions.
- Break down your journey into more specific steps: Although the AI can
interpret multi-action steps, sometimes more granular discrete steps may
improve the accuracy and reproducibility of the journey.
- "Error: Could not successfully complete the action in max allowed attempt": If you encounter this error, try breaking up the failing steps into two or more smaller steps. That's because this error occurs if the AI is unable to complete the action after attempting a max number of interactions with your app.
Supported and unsupported capabilities
Here's an overview of the supported and not yet fully supported capabilities when writing journeys. The following lists aren't exhaustive.
The following actions are supported within journeys:
- Tap on UI elements.
- Type to input text into text fields.
- Swipe/Scroll in a certain direction to navigate the UI.
The following capabilities are not fully supported at this time or may perform inconsistently:
- Multi-finger gestures (for example, pinch to zoom) - Interactions requiring two or more points of contact on the screen simultaneously, such as pinching to zoom in or out, or swiping with two-fingers.
- Long-press - Pressing and holding a finger down for a duration longer than a standard tap.
- Double tap - Quickly tapping the same location on the screen twice in rapid succession.
- Screen rotation/folding - Handling changes in device orientation (for example, between portrait and landscape) or the physical state of foldable devices (for example, opening or closing).
- Memory - Retaining and recalling specific information, context, or user inputs across prior interactions or steps.
- Counting - Accurately tracking quantities, frequencies, or progress.
- Conditional statements - Executing actions based on whether other specified conditions are met.
Features and capabilities are constantly improving. We suggest checking this page later to learn about additional features and capabilities. To help us improve Journeys, share your feedback.
Run your journey
You can run your journey on any available local or remote device, similar to any other instrumented test, and Android Studio generates rich results that help you understand the execution of your journey.
To test a journey, do the following:
- Select a target device from the main toolbar, like you would when running an instrumented test.
- Navigate to the journey XML file that you would like to test and open it in the editor.
- In the editor, do one of the following:
- If you're in the Design view, click
 Run Journey.
 - If you're in the Code view, click
 Run 'test' in the gutter
next to where the name of the journey is defined in the XML.
Run 'test' in the gutter
next to where the name of the journey is defined in the XML.
- If you're in the Design view, click
Android Studio creates a Journeys Test configuration for you and runs it on the target device. During execution, Android Studio builds and deploys your app, and connects to Gemini to determine which actions to take for each step of your journey.
Run journeys against any pre-installed app
You can run a journey on a pre-installed app on your test device. This is useful if you want to test a production version of your app, or if you haven't yet updated your app to Android Gradle Plugin 9.0.0 or higher.
- Open or create a new project that is updated to Android Gradle Plugin 9.0.0 or higher.
- Write a journey.
- Edit the run configuration for the
journey and add the following environment variables. A run configuration is
created automatically when you attempt to run a journey from Android Studio.
- Set
JOURNEYS_CUSTOM_APP_IDto the target app's package ID.
- Set
- Run the journey that you edited. Android Studio should execute the steps of the journey on the target app you specified.
Run a journey from the command line
To run Journeys from the command line, use Android CLI.
View results
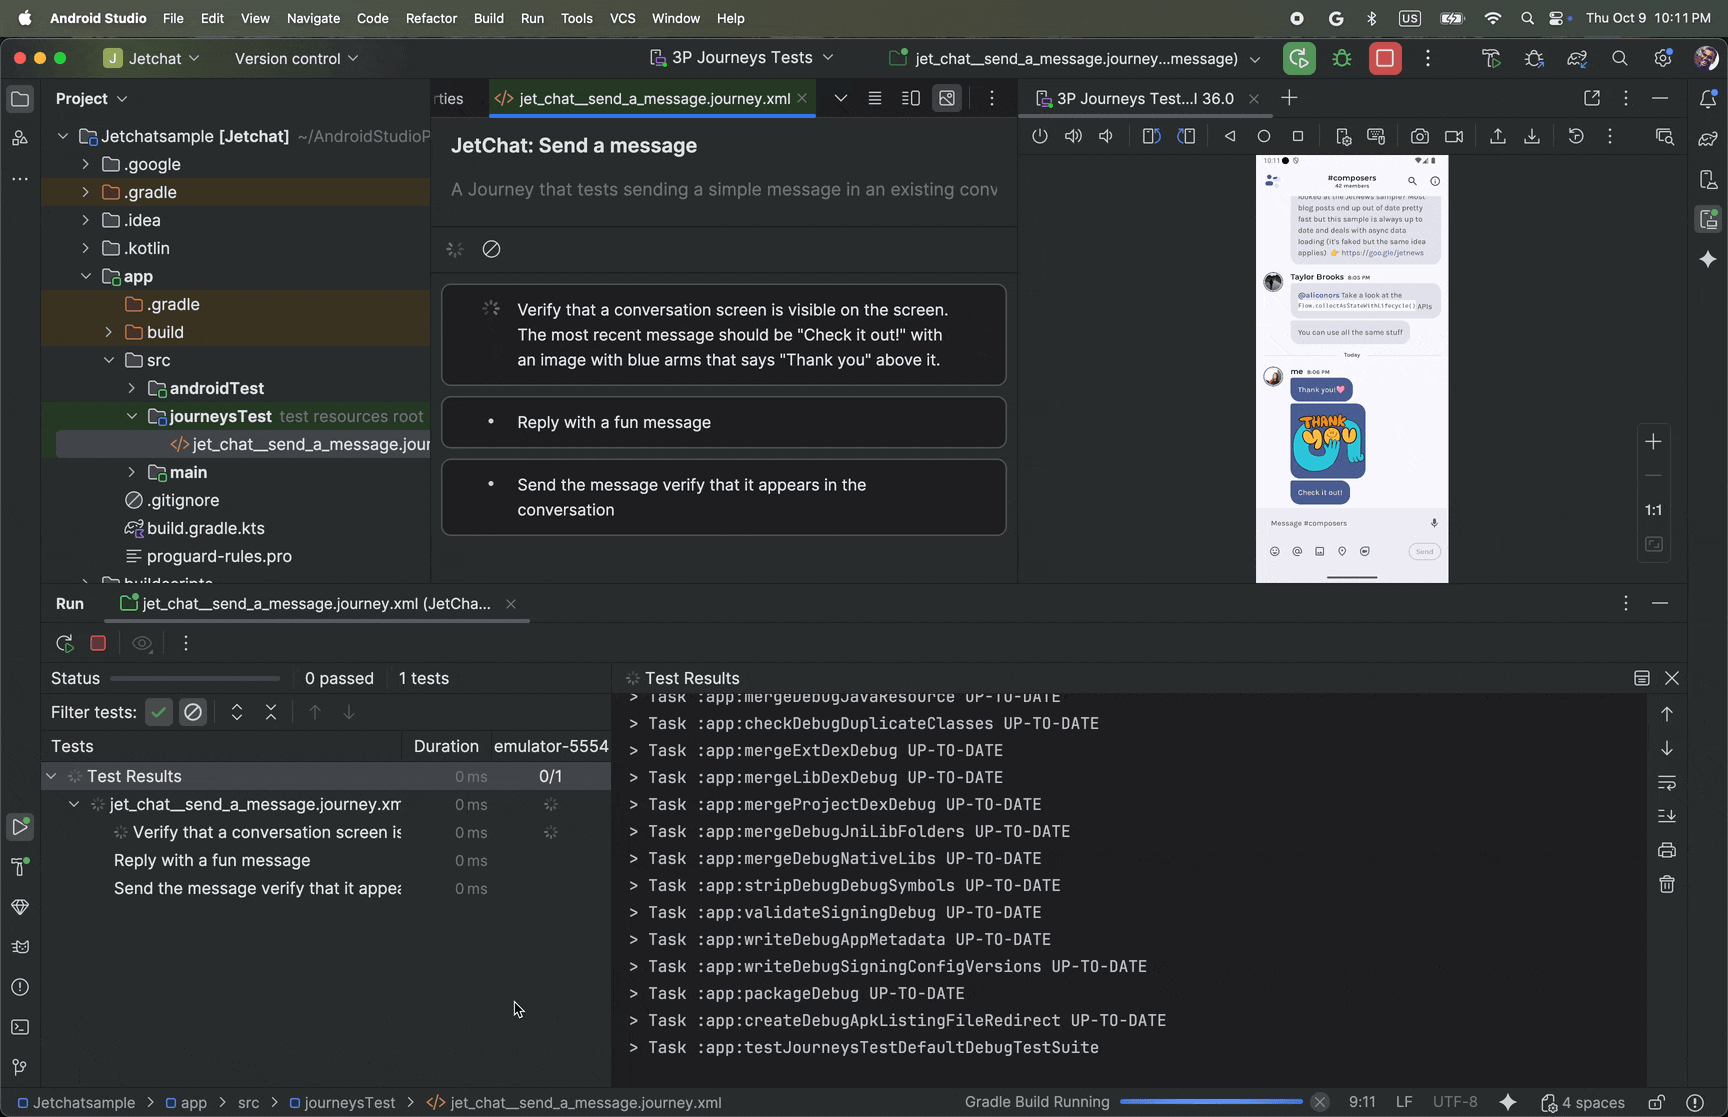
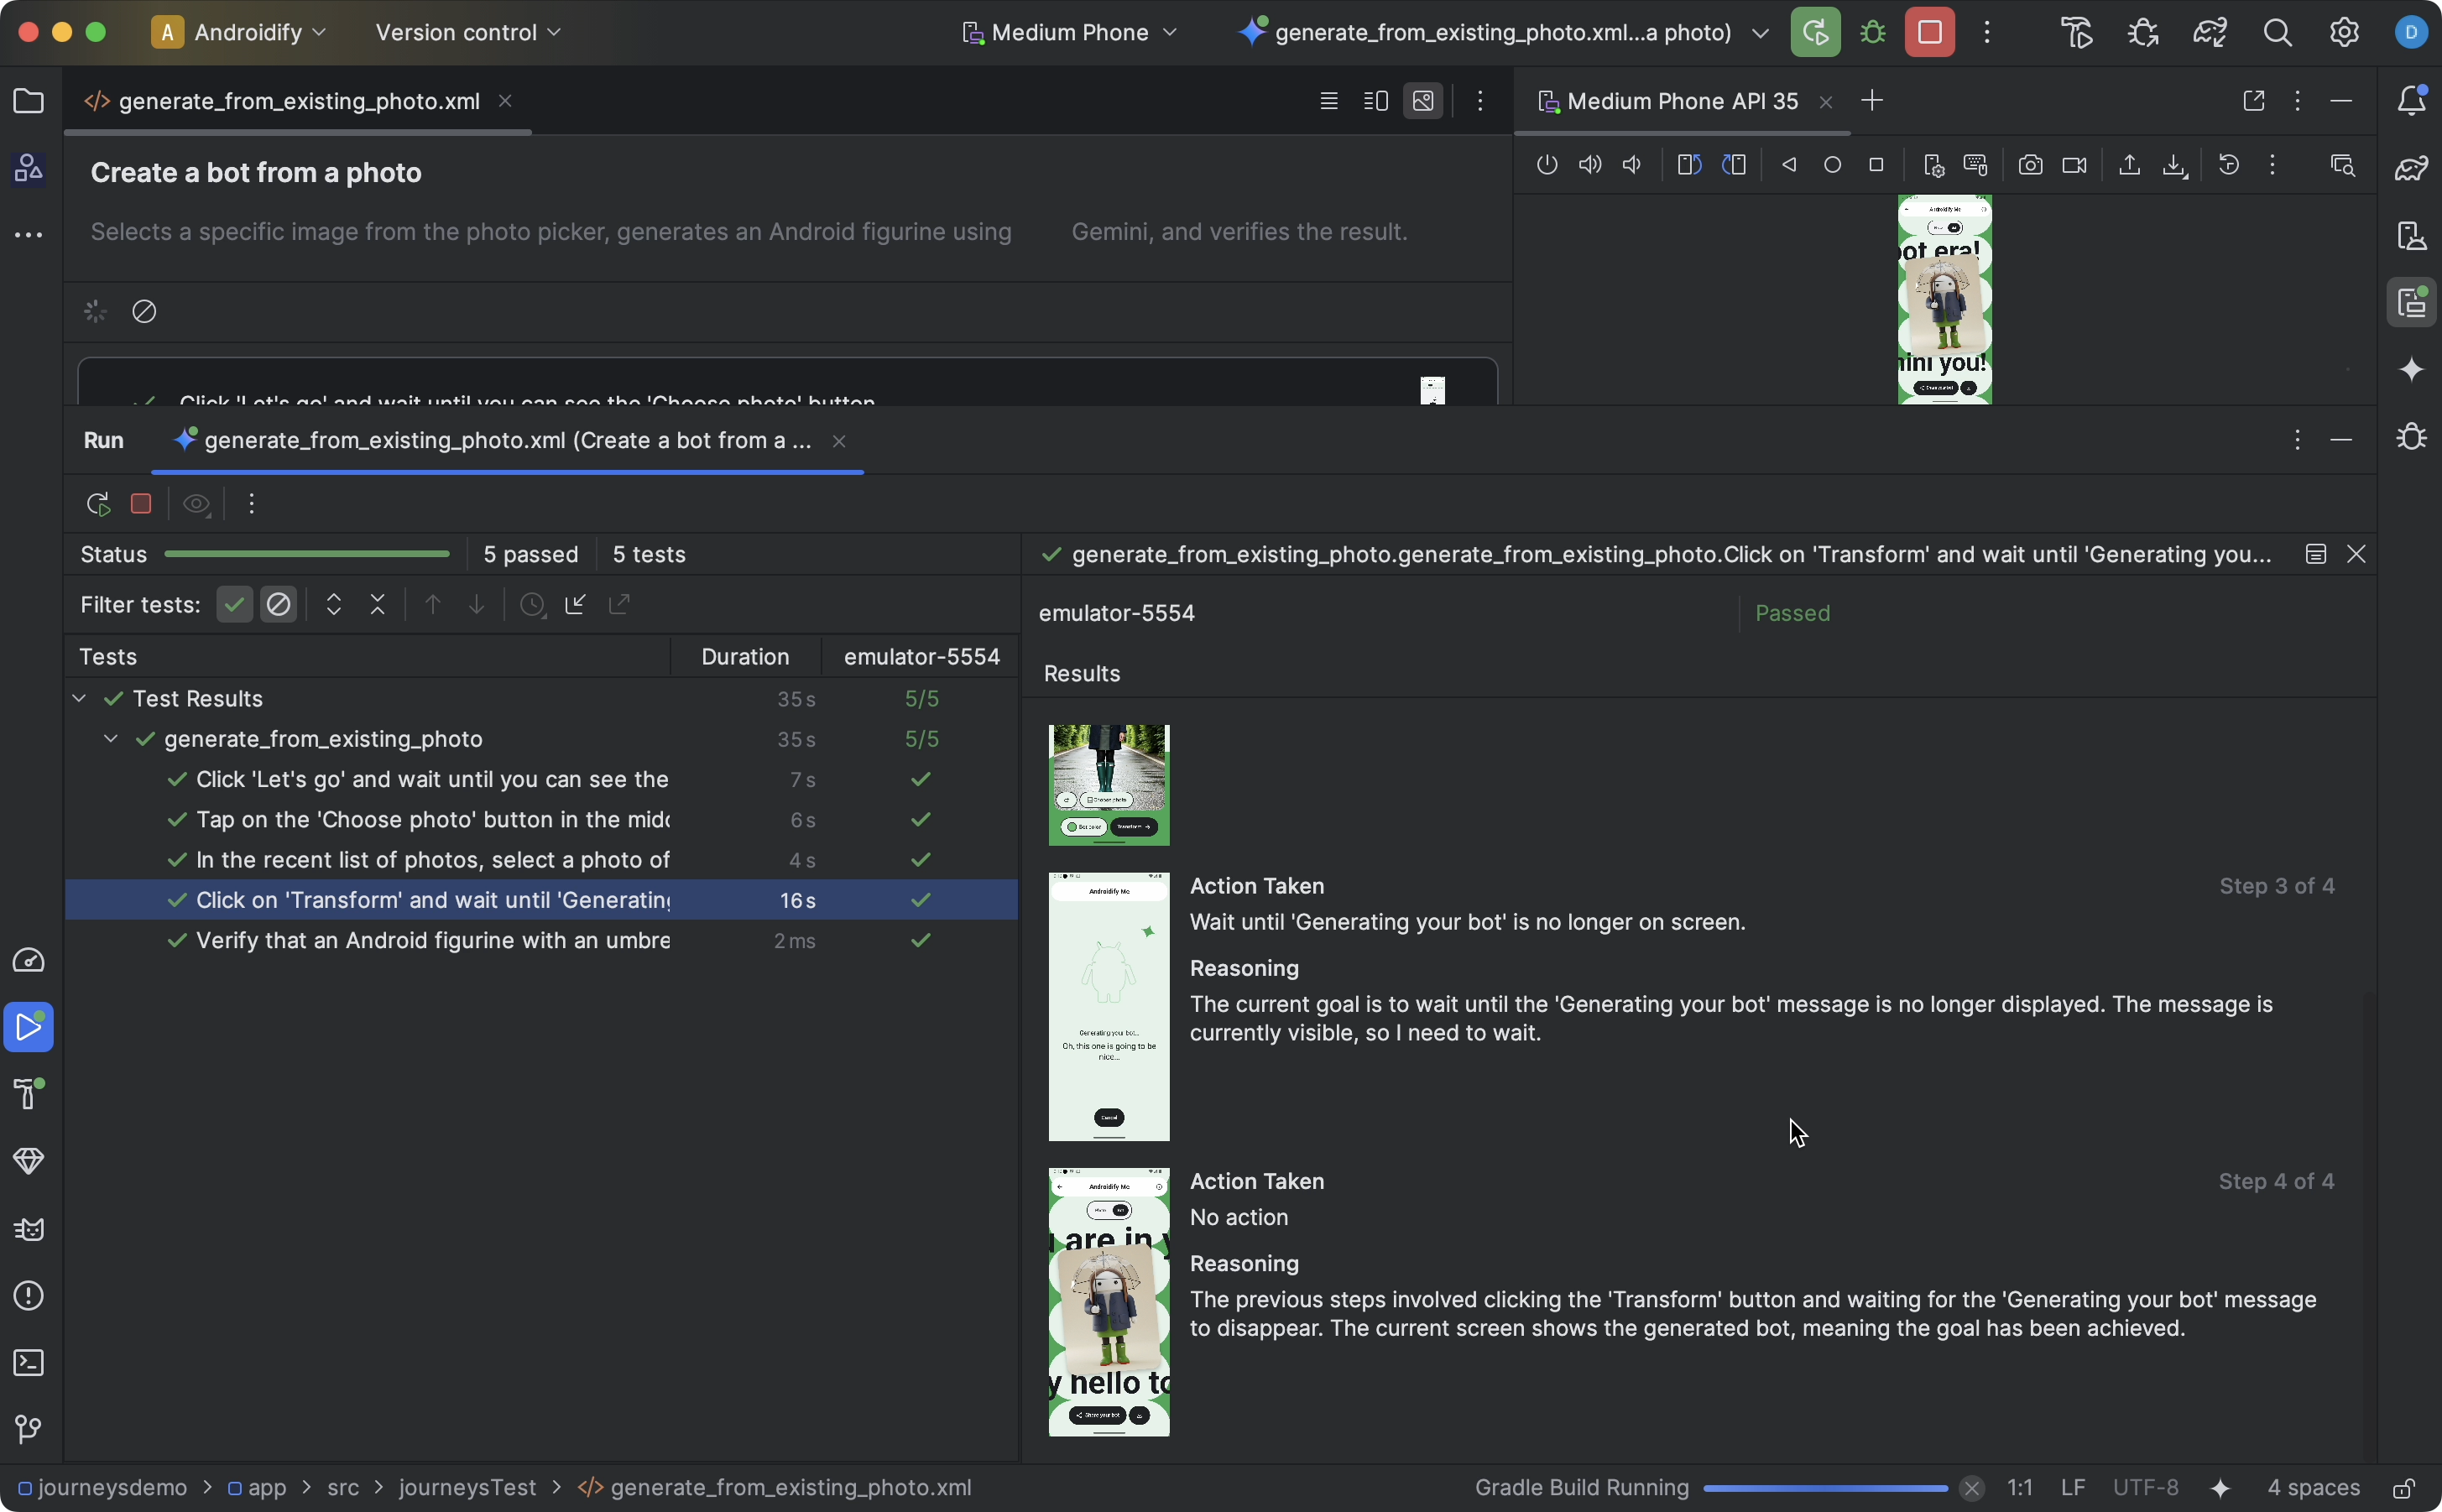
When Android Studio completes testing your journey, the test results panel appears automatically to show you the results.
Compared to other instrumented tests you might run in Android Studio, there are some differences in how results for journeys are displayed.
- The Tests panel breaks down the journey into the discrete steps. You can click each step to find out more information about how Gemini executed it.
- The Results panel shows rich information to help you understand how Gemini
understood and reasoned about your journey, and how it was executed.
- The screenshots that were sent to Gemini are shown for visual aid at each action in the step.
- Each action taken and Gemini's reasoning for why it took that action are described next to each screenshot.
- Each action in the step is numbered.
Known issues
- When testing a journey, all permissions for your app are granted by default.
- When testing a journey on a device running Android 15 (API level 35), you might see a warning on the device that says "Unsafe App Blocked" for "AndroidX Crawler". You can click Install anyway to bypass this check. Alternatively, you can Configure on-device developer options and disable the option to Verify apps over USB.