App widgets can be configurable. For example, a clock widget can let users configure which time zone to display.
If you want to let users configure your widget’s settings, create a widget
configuration Activity. This activity is
automatically launched by the app widget host either when the widget is created
or later, depending on the configuration options you
specify.
Declare the configuration activity
Declare the configuration activity as a normal activity in the Android manifest
file. The app widget host launches it with the
ACTION_APPWIDGET_CONFIGURE
action, so the activity needs to accept this intent. For example:
<activity android:name=".ExampleAppWidgetConfigurationActivity">
    <intent-filter>
        <action android:name="android.appwidget.action.APPWIDGET_CONFIGURE"/>
    </intent-filter>
</activity>
Declare the activity in the AppWidgetProviderInfo.xml file with the
android:configure attribute. See more information about
declaring this file. Here’s an example of
how to declare the configuration activity:
<appwidget-provider xmlns:android="http://schemas.android.com/apk/res/android"
    ...
    android:configure="com.example.android.ExampleAppWidgetConfigurationActivity"
    ... >
</appwidget-provider>
The activity is declared with a fully qualified namespace, because the launcher references it from outside your package scope.
That's all you need to start a configuration activity. Next, you need to implement the actual activity.
Implement the configuration activity
There are two important points to remember when you implement the activity:
- The app widget host calls the configuration activity, and the configuration
activity must always return a result. The result must include the App Widget
ID passed by the intent that launched the activity—saved in the intent
extras as
EXTRA_APPWIDGET_ID. - The system doesn't send the
ACTION_APPWIDGET_UPDATEbroadcast when a configuration activity is launched, which means it doesn't call theonUpdate()method when the widget is created. It's the responsibility of the configuration activity to request an update from theAppWidgetManagerwhen creating the widget for the first time. However,onUpdate()is called for subsequent updates—it is only skipped the first time.
See the code snippets in the following section for an example of how to return a result from the configuration and update the widget.
Update the widget from the configuration activity
When a widget uses a configuration activity, it's the responsibility of
the activity to update the widget when configuration is complete. You can do so
by requesting an update directly from the
AppWidgetManager.
Here's a summary of the procedure to properly update the widget and close the configuration activity:
Get the App Widget ID from the intent that launched the activity:
Kotlin
val appWidgetId = intent?.extras?.getInt(
        AppWidgetManager.EXTRA_APPWIDGET_ID,
        AppWidgetManager.INVALID_APPWIDGET_ID
) ?: AppWidgetManager.INVALID_APPWIDGET_ID
Java
Intent intent = getIntent();
Bundle extras = intent.getExtras();
int appWidgetId = AppWidgetManager.INVALID_APPWIDGET_ID;
if (extras != null) {
    appWidgetId = extras.getInt(
            AppWidgetManager.EXTRA_APPWIDGET_ID,
            AppWidgetManager.INVALID_APPWIDGET_ID);
}
Set the activity result to
RESULT_CANCELED.This way, if the user backs out of the activity before reaching the end, the system notifies the app widget host that the configuration is canceled and the host doesn't add the widget:
Kotlin
val resultValue = Intent().putExtra(AppWidgetManager.EXTRA_APPWIDGET_ID, appWidgetId)
setResult(Activity.RESULT_CANCELED, resultValue)
Java
int resultValue = new Intent().putExtra(AppWidgetManager.EXTRA_APPWIDGET_ID, appWidgetId);
setResult(Activity.RESULT_CANCELED, resultValue);
Configure the widget according to the user’s preferences.
When the configuration is complete, get an instance of the
AppWidgetManagerby callinggetInstance(Context):Kotlin
val appWidgetManager = AppWidgetManager.getInstance(context)
Java
AppWidgetManager appWidgetManager = AppWidgetManager.getInstance(context);
Update the widget with a
RemoteViewslayout by callingupdateAppWidget(int,RemoteViews):Kotlin
val views = RemoteViews(context.packageName, R.layout.example_appwidget)
appWidgetManager.updateAppWidget(appWidgetId, views)
Java
RemoteViews views = new RemoteViews(context.getPackageName(), R.layout.example_appwidget);
appWidgetManager.updateAppWidget(appWidgetId, views);
Create the return intent, set it with the activity result, and finish the activity:
Kotlin
val resultValue = Intent().putExtra(AppWidgetManager.EXTRA_APPWIDGET_ID, appWidgetId)
setResult(Activity.RESULT_OK, resultValue)
finish()
Java
Intent resultValue = new Intent().putExtra(AppWidgetManager.EXTRA_APPWIDGET_ID, appWidgetId);
setResult(RESULT_OK, resultValue);
finish();
See the
ListWidgetConfigureActivity.kt
sample class on GitHub for an example.
Widget configuration options
By default, the app widget host only launches the configuration activity once, immediately after the user adds the widget to their home screen. However, you can specify options that let you enable users to reconfigure existing widgets or skip initial widget configuration by providing a default widget configuration.
Enable users to reconfigure placed widgets
To let users reconfigure existing widgets, specify the
reconfigurable
flag in the
widgetFeatures
attribute of appwidget-provider. See the guide to declaring the
AppWidgetProviderInfo.xml file for more
information. For example:
<appwidget-provider
    android:configure="com.myapp.ExampleAppWidgetConfigurationActivity"
    android:widgetFeatures="reconfigurable">
</appwidget-provider>
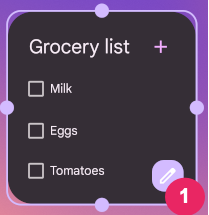
Users can reconfigure their widget by touching & holding the widget and tapping the Reconfigure button, which is labeled 1 in figure 1.

Use the widget's default configuration
You can provide a more seamless widget experience by letting users skip the
initial configuration step. To do this, specify both the
configuration_optional
and reconfigurable flags in the widgetFeatures field. This bypasses
launching the configuration activity after a user adds the widget. As mentioned
previously, the user can still reconfigure the widget
afterward. For example, a clock widget can bypass the initial configuration and
show the device time zone by default.
Here is an example of how to mark your configuration activity as both reconfigurable and optional:
<appwidget-provider
    android:configure="com.myapp.ExampleAppWidgetConfigurationActivity"
    android:widgetFeatures="reconfigurable|configuration_optional">
</appwidget-provider>
