
Navigation is user interaction with an application's UI to access content destinations. Android's principles of navigation provide guidelines that help you create consistent, intuitive app navigation.
Responsive/adaptive UIs provide responsive content destinations and often include different types of navigation elements in response to display size changes—for example, a bottom navigation bar on small displays, a navigation rail on medium‑size displays, or a persistent navigation drawer on large displays—but responsive/adaptive UIs should still conform to the principles of navigation.
The Jetpack Navigation component implements the principles of navigation and facilitates development of apps with responsive/adaptive UIs.
Responsive UI navigation
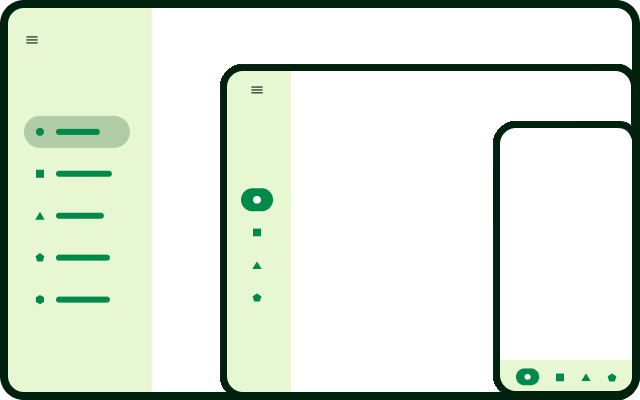
The size of the display window occupied by an app affects ergonomics and usability. Window size classes enable you to determine appropriate navigation elements (such as navigation bars, rails, or drawers) and place them where they are most accessible for the user. In the Material Design layout guidelines, navigation elements occupy a persistent space on the display's leading edge and can move to the bottom edge when the app's width is compact. Your choice of navigation elements depends largely on the size of the app window and the number of items the element must hold.
| Window size class | Few items | Many items |
|---|---|---|
| compact width | bottom navigation bar | navigation drawer (leading edge or bottom) |
| medium width | navigation rail | navigation drawer (leading edge) |
| expanded width | navigation rail | persistent navigation drawer (leading edge) |
Layout resource files can be qualified by window size class breakpoints to use different navigation elements for different display dimensions.
<!-- res/layout/main_activity.xml -->

<androidx.constraintlayout.widget.ConstraintLayout
    android:layout_width="match_parent"
    android:layout_height="match_parent">

    <com.google.android.material.bottomnavigation.BottomNavigationView
        android:layout_width="0dp"
        android:layout_height="wrap_content"
        app:layout_constraintBottom_toBottomOf="parent"
        app:layout_constraintStart_toStartOf="parent"
        app:layout_constraintEnd_toEndOf="parent"
        ... />

    <!-- Content view(s) -->
</androidx.constraintlayout.widget.ConstraintLayout>

<!-- res/layout-w600dp/main_activity.xml -->

<androidx.constraintlayout.widget.ConstraintLayout
    android:layout_width="match_parent"
    android:layout_height="match_parent">

    <com.google.android.material.navigationrail.NavigationRailView
        android:layout_width="wrap_content"
        android:layout_height="0dp"
        app:layout_constraintBottom_toBottomOf="parent"
        app:layout_constraintStart_toStartOf="parent"
        app:layout_constraintTop_toTopOf="parent"
        ... />

    <!-- Content view(s) -->
</androidx.constraintlayout.widget.ConstraintLayout>

<!-- res/layout-w1240dp/main_activity.xml -->

<androidx.constraintlayout.widget.ConstraintLayout
    android:layout_width="match_parent"
    android:layout_height="match_parent">

    <com.google.android.material.navigation.NavigationView
        android:layout_width="wrap_content"
        android:layout_height="0dp"
        app:layout_constraintBottom_toBottomOf="parent"
        app:layout_constraintStart_toStartOf="parent"
        app:layout_constraintTop_toTopOf="parent"
        ... />

    <!-- Content view(s) -->
</androidx.constraintlayout.widget.ConstraintLayout>
Responsive content destinations
In a responsive UI, the layout of each content destination adapts to changes in window size. Your app can adjust layout spacing, reposition elements, add or remove content, or change UI elements, including navigation elements.
When each individual destination handles resize events, changes are isolated to the UI. The rest of the app state, including navigation, is unaffected.
Navigation should not occur as a side-effect of window size changes. Don't create content destinations just to accommodate different window sizes. For example, don't create different content destinations for the different screens of a foldable device.
Navigating to content destinations as a side-effect of window size changes has the following problems:
- The old destination (for the previous window size) might be momentarily visible before navigating to the new destination
- To maintain reversibility (for example, when a device is folded and unfolded), navigation is required for each window size
- Maintaining application state between destinations can be difficult, since navigating can destroy state upon popping the backstack
Also, your app may not even be in the foreground when window size changes happen. Your app's layout might require more space than the foreground app, and when the user comes back to your app, the orientation and window size all could have changed.
If your app requires unique content destinations based on window size, consider combining the relevant destinations into a single destination that includes alternative, adaptive layouts.
Content destinations with alternative layouts
As part of a responsive/adaptive design, a single navigation destination can have alternative layouts depending on app window size. Each layout takes up the entire window, but different layouts are presented for different window sizes (adaptive design).
A canonical example is the list-detail view. For compact window sizes, your app displays one content layout for the list and one for the detail. Navigating to the list‑detail view destination initially displays just the list layout. When a list item is selected, your app displays the detail layout, replacing the list. When the back control is selected, the list layout is displayed, replacing the detail. However, for expanded window sizes, the list and detail layouts display side by side.
SlidingPaneLayout enables you to create a single navigation destination
that displays two content panes side by side on large screens, but only one pane
at a time on small screens such as on conventional phones.
<!-- Single destination for list and detail. -->

<navigation ...>

    <!-- Fragment that implements SlidingPaneLayout. -->
    <fragment
        android:id="@+id/article_two_pane"
        android:name="com.example.app.ListDetailTwoPaneFragment" />

    <!-- Other destinations... -->
</navigation>
See Create a two pane layout for details on implementing a list‑detail
layout using SlidingPaneLayout.
One navigation graph
To provide a consistent user experience on any device or window size, use a single navigation graph where the layout of each content destination is responsive.
If you use a different navigation graph for each window size class, whenever the app transitions from one size class to another, you have to determine the user's current destination in the other graphs, construct a back stack, and reconcile state information that differs among the graphs.
Nested navigation host
Your app might include a content destination that has content destinations of its own. For example, in a list‑detail layout, the item detail pane could include UI elements that navigate to content that replaces the item detail.
To implement this kind of subnavigation, make the detail pane a nested navigation host with its own navigation graph that specifies the destinations accessed from the detail pane:
<!-- layout/two_pane_fragment.xml -->

<androidx.slidingpanelayout.widget.SlidingPaneLayout
    xmlns:android="http://schemas.android.com/apk/res/android"
    android:id="@+id/sliding_pane_layout"
    android:layout_width="match_parent"
    android:layout_height="match_parent">

    <androidx.recyclerview.widget.RecyclerView
        android:id="@+id/list_pane"
        android:layout_width="280dp"
        android:layout_height="match_parent"
        android:layout_gravity="start"/>

    <!-- Detail pane is a nested navigation host. Its graph is not connected
         to the main graph that contains the two_pane_fragment destination. -->
    <androidx.fragment.app.FragmentContainerView
        android:id="@+id/detail_pane"
        android:layout_width="300dp"
        android:layout_weight="1"
        android:layout_height="match_parent"
        android:name="androidx.navigation.fragment.NavHostFragment"
        app:navGraph="@navigation/detail_pane_nav_graph" />
</androidx.slidingpanelayout.widget.SlidingPaneLayout>
This is different from a nested navigation graph because the navigation graph of
the nested NavHost is not connected to the main navigation graph; that is, you
cannot navigate directly from destinations in one graph to destinations in the
other.
For more information, see Nested navigation graphs.
Preserved state
To provide responsive content destinations, your app must preserve its state
when the device is rotated or folded or the app window is resized. By default,
configuration changes such as these recreate the app's activities, fragments,
and view hierarchy. The recommended way to save UI state is with a
ViewModel, which survives across configuration changes. (See Save UI
states .)
Size changes should be reversible—for example, when the user rotates the device and then rotates it back.
Responsive/adaptive layouts can display different content at different window sizes; and so, responsive layouts often need to save additional state related to content, even if the state isn't applicable to the current window size. For example, a layout might have space to show an additional scrolling widget only at larger window widths. If a resize event causes the window width to become too small, the widget is hidden. When the app resizes to its previous dimensions, the scrolling widget becomes visible again, and the original scroll position should be restored.
ViewModel scopes
The Migrate to the Navigation component developer's guide prescribes a
single‑activity architecture in which destinations are implemented as
fragments and their data models are implemented using ViewModel.
A ViewModel is always scoped to a lifecycle, and when that lifecycle ends
permanently, the ViewModel is cleared and can be discarded. The lifecycle
to which the ViewModel is scoped—and therefore how broadly the
ViewModel can be shared—depends on the property delegate used to obtain
the ViewModel.
In the simplest case, every navigation destination is a single fragment with a
completely isolated UI state; and so, each fragment can use the
viewModels() property delegate to obtain a ViewModel scoped to that
fragment.
To share UI state between fragments, scope the ViewModel to the activity by
calling activityViewModels() in the fragments (the equivalent for
Activity is just viewModels()). This allows the
activity and any fragments that attach to it to share the ViewModel instance.
However, in a single‑activity architecture, this ViewModel scope lasts
effectively as long as the app, so the ViewModel remains in memory even if no
fragments are using it.
Suppose your navigation graph has a sequence of fragment destinations
representing a checkout flow, and the current state for the entire checkout
experience is in a ViewModel that is shared among the fragments. Scoping the
ViewModel to the activity is not only too broad, but actually exposes another
problem: if the user goes through the checkout flow for one order, and then goes
through it again for a second order, both orders use the same instance of the
checkout ViewModel. Before the second order checkout, you have to manually
clear data from the first order. Any mistakes could be costly for the user.
Instead, scope the ViewModel to a navigation graph in the current
NavController. Create a nested navigation graph to encapsulate the
destinations that are part of the checkout flow. Then in each of those fragment
destinations, use the navGraphViewModels() property delegate, and pass the
ID of the navigation graph to obtain the shared ViewModel. This ensures that
once the user exits the checkout flow and the nested navigation graph is out of
scope, the corresponding instance of the ViewModel is discarded and won't be
used for the next checkout.
| Scope | Property delegate | Can share ViewModel with |
|---|---|---|
| Fragment | Fragment.viewModels() |
Fragment only |
| Activity | Activity.viewModels() or Fragment.activityViewModels() |
Activity and all fragments attached to it |
| Navigation graph | Fragment.navGraphViewModels() |
All fragments in the same navigation graph |
Note that if you are using a nested navigation host (see the Nested navigation
host section), destinations in that host cannot share
ViewModel instances with destinations outside the host when using
navGraphViewModels() because the graphs are not connected. In this case, you
can use the activity scope instead.