
A navigation graph can consist of any combination of the following:
- A singular destination, such as a
<fragment>destination. - A nested graph that encapsulates a set of related destinations.
- An
<include>element, which allows you to embed another navigation graph file as though it was nested.
This flexibility allows you to combine smaller navigation graphs together to form your app's complete navigation graph, even if those smaller navigation graphs are provided by separate modules.
For the examples in this topic, each
feature module is focused
around one feature and
provides a single navigation graph that encapsulates all of the destinations
needed to implement that feature. In a production app, you might have many
submodules at a lower level that are implementation details of this higher-level
feature module. Each of these feature modules are included, either directly or
indirectly, into your
app module. The example
multi-module application used in this doc has the
following structure:
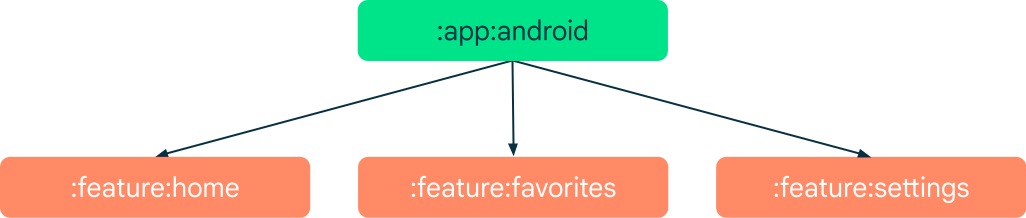
Each feature module is a self-contained unit with its own navigation graph
and destinations. The app module depends on each, adding them as
implementation details in its build.gradle file, as shown:
Groovy
dependencies {
    ...
    implementation project(":feature:home")
    implementation project(":feature:favorites")
    implementation project(":feature:settings")
Kotlin
dependencies {
    ...
    implementation(project(":feature:home"))
    implementation(project(":feature:favorites"))
    implementation(project(":feature:settings"))
The role of the app module
The app module is responsible for providing the complete graph for your
app and adding the NavHost to your UI. Within the app module's
navigation graph, you can reference the library graphs by using
<include>. While
using <include> is functionally the same as using a nested graph,
<include> supports graphs from other project modules or from library
projects, as shown in the following example:
<?xml version="1.0" encoding="utf-8"?>
<navigation xmlns:android="http://schemas.android.com/apk/res/android"
    xmlns:app="http://schemas.android.com/apk/res-auto"
    xmlns:tools="http://schemas.android.com/tools"
    android:id="@+id/nav_graph"
    app:startDestination="@id/home_nav_graph">

    <include app:graph="@navigation/home_navigation" />
    <include app:graph="@navigation/favorites_navigation" />
    <include app:graph="@navigation/settings_navigation" />
</navigation>
Once a library is included in the top-level navigation graph, you can navigate to the library graphs as needed. For example, you could create an action to navigate to the settings graph from a fragment in your navigation graph, as shown:
<?xml version="1.0" encoding="utf-8"?>
<navigation xmlns:android="http://schemas.android.com/apk/res/android"
    xmlns:app="http://schemas.android.com/apk/res-auto"
    xmlns:tools="http://schemas.android.com/tools"
    android:id="@+id/nav_graph"
    app:startDestination="@id/home_nav_graph">

    <include app:graph="@navigation/home_navigation" />
    <include app:graph="@navigation/favorites_navigation" />
    <include app:graph="@navigation/settings_navigation" />

    <fragment
        android:id="@+id/random_fragment"
        android:name="com.example.android.RandomFragment"
        android:label="@string/fragment_random" >
        <!-- Launch into Settings Navigation Graph -->
        <action
            android:id="@+id/action_random_fragment_to_settings_nav_graph"
            app:destination="@id/settings_nav_graph" />
    </fragment>
</navigation>
When multiple feature modules need to reference a common set of
destinations, such as a login graph, you should not include those
common destinations into each feature module's navigation graph. Instead,
add those common destinations to your app module's navigation graph.
Each feature module can then navigate across feature modules
to navigate to those common destinations.
In the previous example, the action specifies a navigation destination
of @id/settings_nav_graph. This ID refers to a destination that is
defined within the included graph @navigation/settings_navigation.
Top-level navigation in app module
The Navigation component includes a
NavigationUI class.
This class contains static methods that manage navigation with the top
app bar, the navigation drawer, and bottom navigation. If your app's
top-level destinations are composed of UI elements provided by feature
modules, the app module is a natural place to put the top-level
navigation and UI elements. Since the app module depends on the
collaborating feature modules, all of their destinations are accessible
from code defined within your app module. This means that you can use
NavigationUI to
tie destinations to menu items
if the ID of the item matches the ID of a destination.
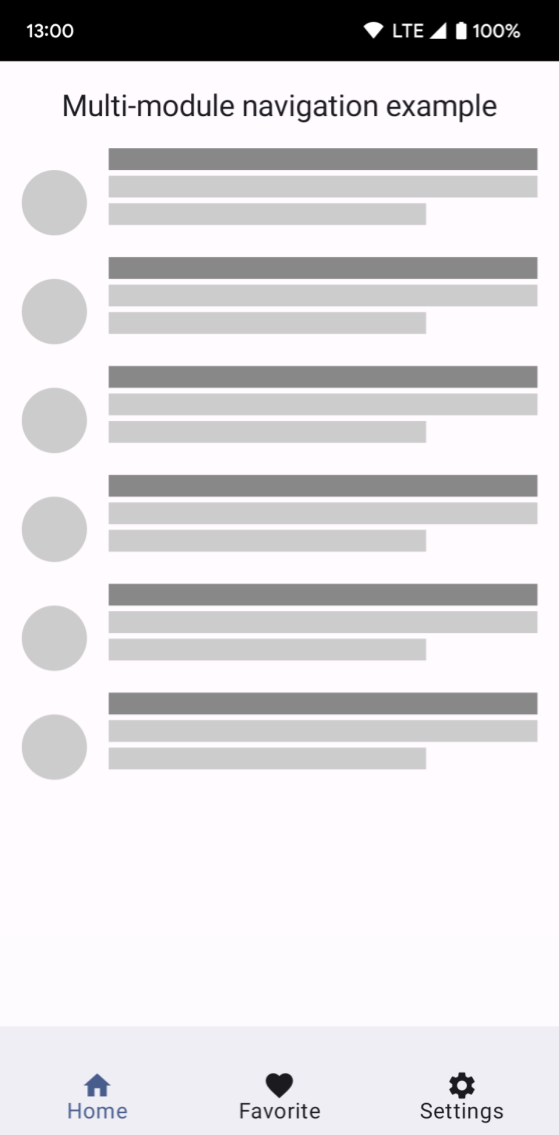
In figure 2, the example app module defines a
BottomNavigationView
in its main activity. The menu item IDs in the menu match the navigation
graph IDs of the library graphs:
<?xml version="1.0" encoding="utf-8"?>
<menu xmlns:android="http://schemas.android.com/apk/res/android"
    xmlns:app="http://schemas.android.com/apk/res-auto">

    <item
        android:id="@id/home_nav_graph"
        android:icon="@drawable/ic_home"
        android:title="Home"
        app:showAsAction="ifRoom"/>

    <item
        android:id="@id/favorites_nav_graph"
        android:icon="@drawable/ic_favorite"
        android:title="Favorites"
        app:showAsAction="ifRoom"/>

    <item
        android:id="@id/settings_nav_graph"
        android:icon="@drawable/ic_settings"
        android:title="Settings"
        app:showAsAction="ifRoom" />
</menu>
To let NavigationUI handle the
bottom navigation, call
setupWithNavController()
from onCreate() in your main activity class, as shown in the following
example:
Kotlin
override fun onCreate(savedInstanceState: Bundle?) {
    super.onCreate(savedInstanceState)
    setContentView(R.layout.activity_main)
    val navHostFragment =
        supportFragmentManager.findFragmentById(R.id.nav_host_fragment) as NavHostFragment
    val navController = navHostFragment.navController

    findViewById<BottomNavigationView>(R.id.bottom_nav)
            .setupWithNavController(navController)
}
Java
@Override
protected void onCreate(Bundle savedInstanceState) {
    super.onCreate(savedInstanceState);
    setContentView(R.layout.activity_main);
    NavHostFragment navHostFragment =
            (NavHostFragment) supportFragmentManager.findFragmentById(R.id.nav_host_fragment);
    NavController navController = navHostFragment.getNavController();
    BottomNavigationView bottomNav = findViewById(R.id.bottom_nav);

    NavigationUI.setupWithNavController(bottomNav, navController);
}
With this code in place, NavigationUI navigates to the appropriate
library graph when the user clicks on a bottom navigation item.
Keep in mind that it's generally bad practice for your app module to have a hard dependency on a specific destination embedded deeply within your feature modules' navigation graph. In most cases, you want your app module to know only about the entry point to any embedded or included navigation graphs (this applies outside of feature modules too). If you need to link to a destination deep within your library's navigation graph, the preferred way to do this is by using a deep link. Deep linking is also the only way for a library to navigate to a destination in another library's navigation graph.
Navigating across feature modules
At compile time, independent feature modules cannot see each other, so you can't use IDs to navigate to destinations in other modules. Instead, use a deep link to navigate directly to a destination that is associated with an implicit deep link.
Continuing the previous example, imagine you need to navigate from a button in
the :feature:home module to a destination nested in the :feature:settings
module. You can do this by adding a deep link to the destination in the settings
navigation graph, as shown:
<?xml version="1.0" encoding="utf-8"?>
<navigation xmlns:android="http://schemas.android.com/apk/res/android"
    xmlns:app="http://schemas.android.com/apk/res-auto"
    xmlns:tools="http://schemas.android.com/tools"
    android:id="@+id/settings_nav_graph"
    app:startDestination="@id/settings_fragment_one">

    ...

    <fragment
        android:id="@+id/settings_fragment_two"
        android:name="com.example.google.login.SettingsFragmentTwo"
        android:label="@string/settings_fragment_two" >

        <deepLink
            app:uri="android-app://example.google.app/settings_fragment_two" />
    </fragment>
</navigation>
Then add the following code to the button's onClickListener in the home
fragment:
Kotlin
button.setOnClickListener {
    val request = NavDeepLinkRequest.Builder
        .fromUri("android-app://example.google.app/settings_fragment_two".toUri())
        .build()
    findNavController().navigate(request)
}
Java
button.setOnClickListener(new View.OnClickListener() {
    @Override
    public void onClick(View view) {
        NavDeepLinkRequest request = NavDeepLinkRequest.Builder
            .fromUri(Uri.parse("android-app://example.google.app/settings_fragment_two"))
            .build();
        NavHostFragment.findNavController(this).navigate(request);
    }
});
Unlike navigating using action or destination IDs, you can navigate to any URI in any graph, even across modules.
When navigating using URI, the back stack is not reset. This behavior is unlike explicit deep link navigation, where the back stack is replaced when navigating.