
FragmentManager is
the class responsible for performing actions on your app's fragments, such
as adding, removing, or replacing them and adding them to the back stack.
You might never interact with FragmentManager directly if you're using
the Jetpack Navigation library, as it works with the
FragmentManager on your behalf. However, any app using fragments is
using FragmentManager at some level, so it's important to understand what
it is and how it works.
This page covers:
- How to access the
FragmentManager. - The role of
FragmentManagerin relation to your activities and fragments. - How to manage the back stack with
FragmentManager. - How to provide data and dependencies to your fragments.
Access the FragmentManager
You can access the FragmentManager from an activity or from a fragment.
FragmentActivity
and its subclasses, such as
AppCompatActivity,
have access to the FragmentManager through the
getSupportFragmentManager()
method.
Fragments can host one or more child fragments. Inside
a fragment, you can get a reference to the FragmentManager that manages
the fragment's children through
getChildFragmentManager().
If you need to access its host FragmentManager, you can use
getParentFragmentManager().
Here are a couple of examples to see the relationships between
fragments, their hosts, and the FragmentManager instances associated
with each.
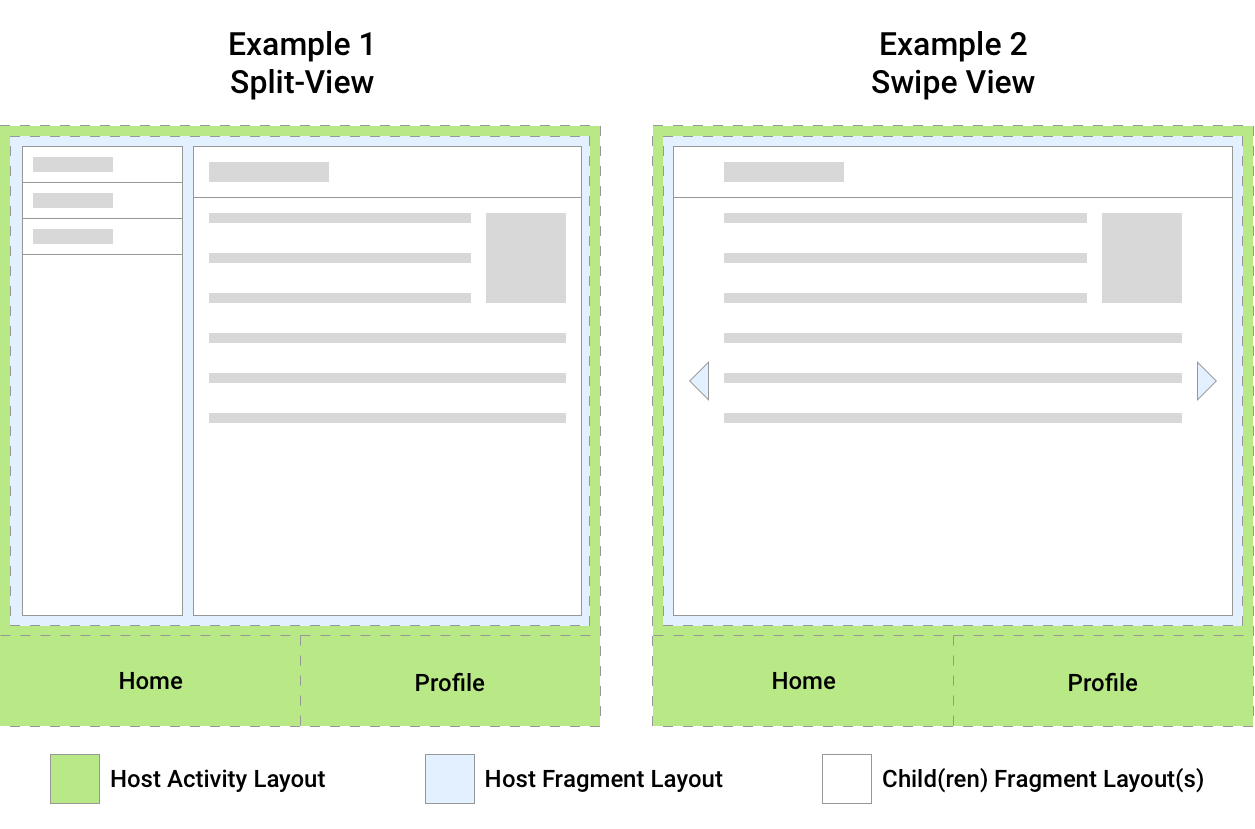
Figure 1 shows two examples, each of which has a single activity host. The
host activity in both of these examples displays top-level navigation to
the user as a
BottomNavigationView
that is responsible for swapping out the host fragment with different
screens in the app. Each screen is implemented as a separate fragment.
The host fragment in Example 1 hosts two child fragments that make up a split-view screen. The host fragment in Example 2 hosts a single child fragment that makes up the display fragment of a swipe view.
Given this setup, you can think about each host as having a FragmentManager
associated with it that manages its child fragments. This is illustrated in
figure 2 along with property mappings between supportFragmentManager,
parentFragmentManager, and childFragmentManager.
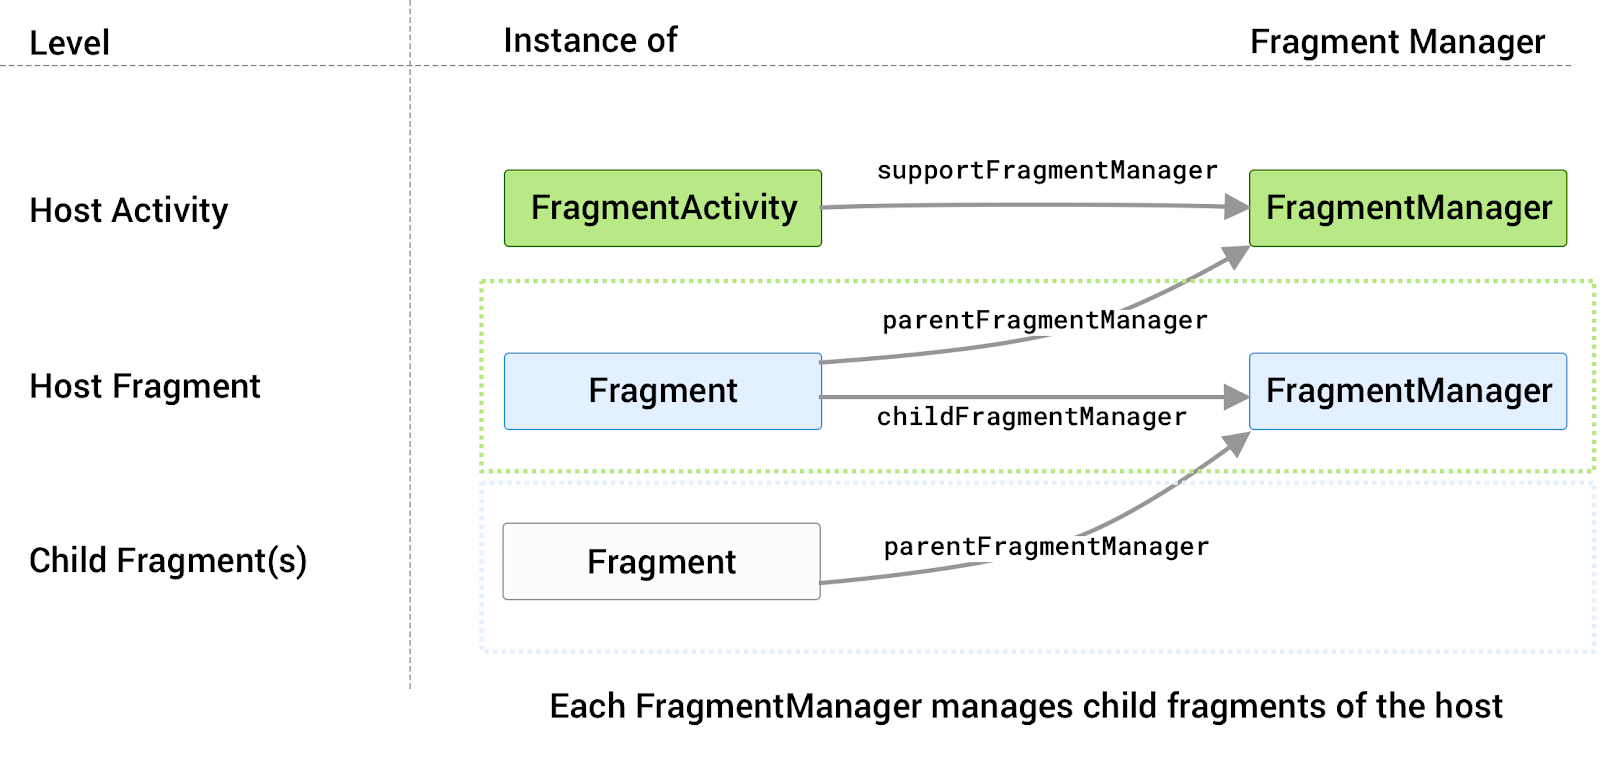
FragmentManager associated with it that manages
its child fragments.The appropriate FragmentManager property to reference depends on where
the callsite is in the fragment hierarchy along with which fragment manager
you are trying to access.
Once you have a reference to the FragmentManager, you can use it to
manipulate the fragments being displayed to the user.
Child fragments
Generally speaking, your app consists of a single or small number
of activities in your application project, with each activity representing
a group of related screens. The activity might provide a point to place
top-level navigation and a place to scope ViewModel objects and other view-state
between fragments. A fragment represents an individual destination in your
app.
If you want to show multiple fragments at once, such as in a split-view or a dashboard, you can use child fragments that are managed by your destination fragment and its child fragment manager.
Other use cases for child fragments are the following:
- Screen slides,
using a
ViewPager2in a parent fragment to manage a series of child fragment views. - Sub-navigation within a set of related screens.
- Jetpack Navigation uses child fragments as individual destinations. An
activity hosts a single parent
NavHostFragmentand fills its space with different child destination fragments as users navigate through your app.
Use the FragmentManager
The FragmentManager manages the fragment back stack. At runtime, the
FragmentManager can perform back stack operations like adding or removing
fragments in response to user interactions. Each set of changes is
committed together as a single unit called a
FragmentTransaction.
For a more in-depth discussion about fragment transactions, see the
fragment transactions guide.
When the user taps the Back button on their device, or when you call
FragmentManager.popBackStack(),
the top-most fragment transaction pops off of the stack. If there are no more fragment
transactions on the stack, and if you aren't using child fragments, the Back
event bubbles up to the activity. If you are using child fragments, see
special considerations for child and sibling fragments.
When you call
addToBackStack()
on a transaction, the transaction can include any number of
operations, such as adding multiple fragments or replacing fragments in multiple
containers.
When the back stack is popped, all these
operations reverse as a single atomic action. However, if you committed
additional transactions prior to the popBackStack() call, and if you
didn't use addToBackStack() for the transaction, these operations
don't reverse. Therefore, within a single FragmentTransaction, avoid
interleaving transactions that affect the back stack with those that don't.
Perform a transaction
To display a fragment within a layout container, use the FragmentManager
to create a FragmentTransaction. Within the transaction, you can then
perform an
add()
or replace()
operation on the container.
For example, a simple FragmentTransaction might look like this:
Kotlin
supportFragmentManager.commit {
   replace<ExampleFragment>(R.id.fragment_container)
   setReorderingAllowed(true)
   addToBackStack("name") // Name can be null
}
Java
FragmentManager fragmentManager = getSupportFragmentManager();
fragmentManager.beginTransaction()
    .replace(R.id.fragment_container, ExampleFragment.class, null)
    .setReorderingAllowed(true)
    .addToBackStack("name") // Name can be null
    .commit();
In this example, ExampleFragment replaces the fragment, if any, that is
currently in the layout container identified by the
R.id.fragment_container ID. Providing the fragment's class to the
replace()
method lets the FragmentManager handle instantiation using its
FragmentFactory.
For more information, see the Provide dependencies to your fragments
section.
setReorderingAllowed(true)
optimizes the state changes of the fragments involved in the transaction
so that animations and transitions work correctly. For more information on
navigating with animations and transitions, see
Fragment transactions and
Navigate between fragments using animations.
Calling
addToBackStack()
commits the transaction to the back stack. The user can later reverse the
transaction and bring back the previous fragment by tapping the Back
button. If you added or removed multiple fragments within a single
transaction, all those operations are undone when the back stack
is popped. The optional name provided in the addToBackStack() call gives
you the ability to pop back to a specific transaction using
popBackStack().
If you don't call addToBackStack() when you perform a transaction that
removes a fragment, then the removed fragment is destroyed when the
transaction is committed, and the user cannot navigate back to it. If you
do call addToBackStack() when removing a fragment, then the fragment is
only STOPPED and is later RESUMED when the user navigates back. Its view
is destroyed in this case. For more information, see
Fragment lifecycle.
Find an existing fragment
You can get a reference to the current fragment within a layout container
by using
findFragmentById().
Use findFragmentById() to look up a fragment either by the given ID when
inflated from XML or by the container ID when added in a
FragmentTransaction. Here's an example:
Kotlin
supportFragmentManager.commit {
   replace<ExampleFragment>(R.id.fragment_container)
   setReorderingAllowed(true)
   addToBackStack(null)
}
...
val fragment: ExampleFragment =
        supportFragmentManager.findFragmentById(R.id.fragment_container) as ExampleFragment
Java
FragmentManager fragmentManager = getSupportFragmentManager();
fragmentManager.beginTransaction()
    .replace(R.id.fragment_container, ExampleFragment.class, null)
    .setReorderingAllowed(true)
    .addToBackStack(null)
    .commit();
...
ExampleFragment fragment =
        (ExampleFragment) fragmentManager.findFragmentById(R.id.fragment_container);
Alternatively, you can assign a unique tag to a fragment and get a
reference using
findFragmentByTag().
You can assign a tag using the android:tag XML attribute on fragments that
are defined within your layout or during an add() or replace()
operation within a FragmentTransaction.
Kotlin
supportFragmentManager.commit {
   replace<ExampleFragment>(R.id.fragment_container, "tag")
   setReorderingAllowed(true)
   addToBackStack(null)
}
...
val fragment: ExampleFragment =
        supportFragmentManager.findFragmentByTag("tag") as ExampleFragment
Java
FragmentManager fragmentManager = getSupportFragmentManager();
fragmentManager.beginTransaction()
    .replace(R.id.fragment_container, ExampleFragment.class, null, "tag")
    .setReorderingAllowed(true)
    .addToBackStack(null)
    .commit();
...
ExampleFragment fragment = (ExampleFragment) fragmentManager.findFragmentByTag("tag");
Special considerations for child and sibling fragments
Only one FragmentManager can control the fragment back stack
at any given time. If your app shows multiple sibling fragments on the
screen at the same time, or if your app uses child fragments, then one
FragmentManager is designated to handle your app's primary navigation.
To define the primary navigation fragment inside of a fragment transaction,
call the
setPrimaryNavigationFragment()
method on the transaction, passing in the instance of the fragment whose
childFragmentManager has primary control.
Consider the navigation structure as a series of layers, with the activity as the outermost layer, wrapping each layer of child fragments underneath. Each layer has a single primary navigation fragment.
When the Back event occurs, the innermost layer controls navigation behavior. Once the innermost layer has no more fragment transactions from which to pop back, control returns to the next layer out, and this process repeats until you reach the activity.
When two or more fragments are displayed at the same time, only one of them is the primary navigation fragment. Setting a fragment as the primary navigation fragment removes the designation from the previous fragment. Using the preceding example, if you set the detail fragment as the primary navigation fragment, the main fragment's designation is removed.
Support multiple back stacks
In some cases, your app might need to support multiple back stacks. A common
example is if your app uses a bottom navigation bar. FragmentManager lets
you support multiple back stacks with the saveBackStack() and
restoreBackStack() methods. These methods let you swap between back
stacks by saving one back stack and restoring a different one.
saveBackStack() works similarly to calling popBackStack() with the optional
name parameter: the specified transaction and all transactions after it on the
stack are popped. The difference is that saveBackStack() saves the
state of all fragments in the popped
transactions.
For example, suppose you previously added a fragment to the back stack by
committing a FragmentTransaction using addToBackStack(), as shown in the
following example:
Kotlin
supportFragmentManager.commit {
  replace<ExampleFragment>(R.id.fragment_container)
  setReorderingAllowed(true)
  addToBackStack("replacement")
}
Java
supportFragmentManager.beginTransaction()
  .replace(R.id.fragment_container, ExampleFragment.class, null)
  // setReorderingAllowed(true) and the optional string argument for
  // addToBackStack() are both required if you want to use saveBackStack()
  .setReorderingAllowed(true)
  .addToBackStack("replacement")
  .commit();
In that case, you can save this fragment transaction and the state of
ExampleFragment by calling saveBackStack():
Kotlin
supportFragmentManager.saveBackStack("replacement")
Java
supportFragmentManager.saveBackStack("replacement");
You can call restoreBackStack() with the same name parameter to restore all of
the popped transactions and all of the saved fragment states:
Kotlin
supportFragmentManager.restoreBackStack("replacement")
Java
supportFragmentManager.restoreBackStack("replacement");
Provide dependencies to your fragments
When adding a fragment, you can instantiate the fragment manually and
add it to the FragmentTransaction.
Kotlin
fragmentManager.commit {
    // Instantiate a new instance before adding
    val myFragment = ExampleFragment()
    add(R.id.fragment_view_container, myFragment)
    setReorderingAllowed(true)
}
Java
// Instantiate a new instance before adding
ExampleFragment myFragment = new ExampleFragment();
fragmentManager.beginTransaction()
    .add(R.id.fragment_view_container, myFragment)
    .setReorderingAllowed(true)
    .commit();
When you commit the fragment transaction, the instance of the fragment
you created is the instance used. However, during a
configuration change, your
activity and all of its fragments are destroyed and then recreated with
the most applicable
Android resources.
The FragmentManager handles all of this for you: it recreates instances
of your fragments, attaches them to the host, and recreates the back stack
state.
By default, the FragmentManager uses a
FragmentFactory that
the framework provides to instantiate a new instance of your fragment. This
default factory uses reflection to find and invoke a no-argument constructor
for your fragment. This means that you can't use this default factory to
provide dependencies to your fragment. It also means that any custom
constructor you used to create your fragment the first time is not used
during recreation by default.
To provide dependencies to your fragment, or to use any custom
constructor, instead create a custom FragmentFactory subclass
and then override
FragmentFactory.instantiate.
You can then override the default factory of the FragmentManager with
your custom factory, which is then used to instantiate your fragments.
Suppose you have a DessertsFragment that is responsible for displaying
popular desserts in your hometown, and that DessertsFragment
has a dependency on a DessertsRepository class that provides it with
the information it needs to display the correct UI to your user.
You might define your DessertsFragment to require a DessertsRepository
instance in its constructor.
Kotlin
class DessertsFragment(val dessertsRepository: DessertsRepository) : Fragment() {
    ...
}
Java
public class DessertsFragment extends Fragment {
    private DessertsRepository dessertsRepository;

    public DessertsFragment(DessertsRepository dessertsRepository) {
        super();
        this.dessertsRepository = dessertsRepository;
    }

    // Getter omitted.

    ...
}
A simple implementation of your FragmentFactory might look similar to
the following.
Kotlin
class MyFragmentFactory(val repository: DessertsRepository) : FragmentFactory() {
    override fun instantiate(classLoader: ClassLoader, className: String): Fragment =
            when (loadFragmentClass(classLoader, className)) {
                DessertsFragment::class.java -> DessertsFragment(repository)
                else -> super.instantiate(classLoader, className)
            }
}
Java
public class MyFragmentFactory extends FragmentFactory {
    private DessertsRepository repository;

    public MyFragmentFactory(DessertsRepository repository) {
        super();
        this.repository = repository;
    }

    @NonNull
    @Override
    public Fragment instantiate(@NonNull ClassLoader classLoader, @NonNull String className) {
        Class<? extends Fragment> fragmentClass = loadFragmentClass(classLoader, className);
        if (fragmentClass == DessertsFragment.class) {
            return new DessertsFragment(repository);
        } else {
            return super.instantiate(classLoader, className);
        }
    }
}
This example subclasses FragmentFactory, overriding the instantiate()
method to provide custom fragment creation logic for a DessertsFragment.
Other fragment classes are handled by the default behavior of
FragmentFactory through super.instantiate().
You can then designate MyFragmentFactory as the factory to use when
constructing your app's fragments by setting a property on the
FragmentManager. You must set this property prior to your activity's
super.onCreate() to ensure that MyFragmentFactory is used when
recreating your fragments.
Kotlin
class MealActivity : AppCompatActivity() {
    override fun onCreate(savedInstanceState: Bundle?) {
        supportFragmentManager.fragmentFactory = MyFragmentFactory(DessertsRepository.getInstance())
        super.onCreate(savedInstanceState)
    }
}
Java
public class MealActivity extends AppCompatActivity {
    @Override
    protected void onCreate(@Nullable Bundle savedInstanceState) {
        DessertsRepository repository = DessertsRepository.getInstance();
        getSupportFragmentManager().setFragmentFactory(new MyFragmentFactory(repository));
        super.onCreate(savedInstanceState);
    }
}
Setting the FragmentFactory in the activity overrides fragment
creation throughout the activity's fragment hierarchy. In other words,
the childFragmentManager of any child fragments you add uses the custom
fragment factory set here unless overridden at a lower level.
Test with FragmentFactory
In a single activity architecture, test your fragments in
isolation using the
FragmentScenario
class. Since you can't rely on the custom onCreate logic of your
activity, you can instead pass the FragmentFactory in as an argument
to your fragments test, as shown in the following example:
// Inside your test
val dessertRepository = mock(DessertsRepository::class.java)
launchFragment<DessertsFragment>(factory = MyFragmentFactory(dessertRepository)).onFragment {
    // Test Fragment logic
}
For detailed information about this testing process and for full examples, see Test your fragments.