
There is no single modularization strategy that fits all projects. Due to the flexible nature of Gradle there are few constraints as to how you can organize a project. This page gives an overview of some general rules and common patterns that you can employ when developing multi module Android apps.
High cohesion and low coupling principle
One way of characterizing a modular codebase would be to use the coupling and cohesion properties. Coupling measures the degree to which modules depend on each other. Cohesion, in this context, measures how the elements of a single module are functionally related. As a general rule, you should strive for low coupling and high cohesion:
- Low coupling means that modules should be as independent as possible from one another, so that changes to one module have zero or minimal impact on other modules. Modules shouldn't have knowledge of the inner workings of other modules.
- High cohesion means that modules should comprise a collection of code that acts as a system. They should have clearly defined responsibilities and stay within boundaries of certain domain knowledge. Consider a sample ebook application. It might be inappropriate to mix book and payment related code together in the same module as they are two different functional domains.
Types of modules
The way you organize your modules mainly depends on your app architecture. Below are some common types of modules you could introduce in your app while following our recommended app architecture.
Data modules
A data module usually contains a repository, data sources and model classes. The three primary responsibilities of a data module are:
- Encapsulate all data and business logic of a certain domain: Each data module should be responsible for handling data that represents a certain domain. It can handle many types of data as long as they are related.
- Expose the repository as an external API: The public API of a data module should be a repository as they are responsible for exposing the data to the rest of the app.
- Hide all implementation details and data sources from the outside:
Data sources should only be accessible by repositories from the same module.
They remain hidden to the outside. You can enforce this by using Kotlin’s
privateorinternalvisibility keyword.

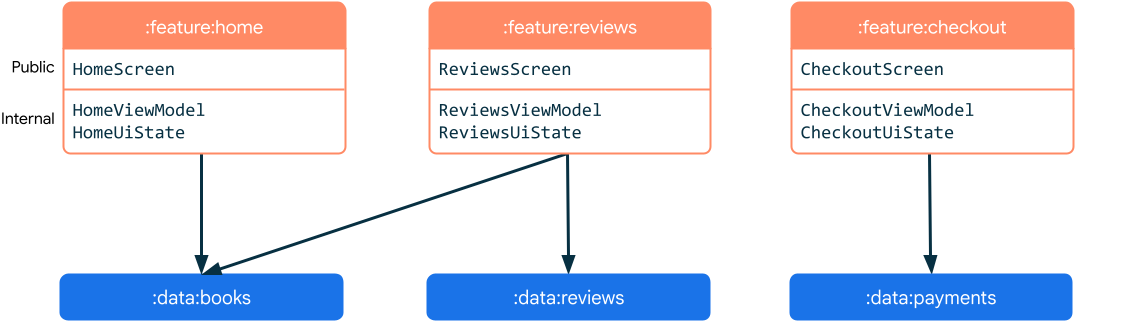
Feature modules
A feature is an isolated part of an app's functionality that usually corresponds to a screen or series of closely related screens, like a sign up or checkout flow. If your app has a bottom bar navigation, it’s likely that each destination is a feature.

Features are associated with screens or destinations in your app. Therefore,
they're likely to have an associated UI and ViewModel to handle their logic
and state. A single feature doesn't have to be limited to a single view or
navigation destination. Feature modules depend on data modules.
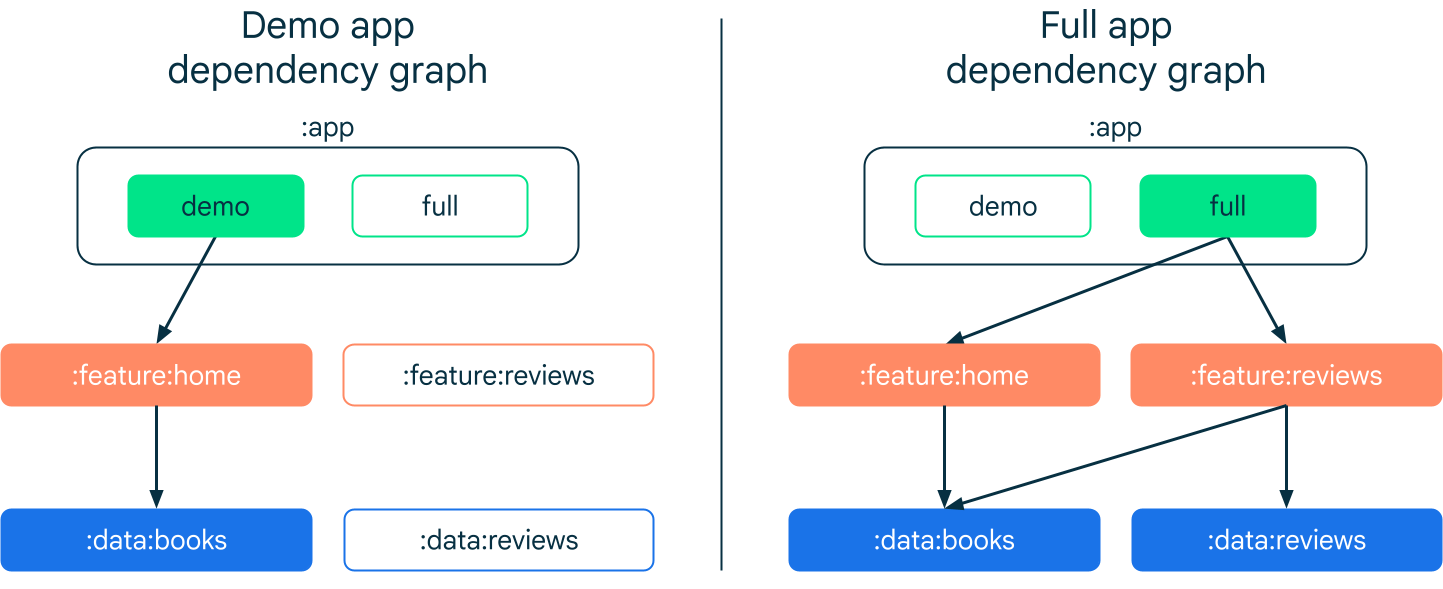
App modules
App modules are an entry point to the application. They depend on feature modules and usually provide root navigation. A single app module can be compiled to a number of different binaries thanks to build variants.
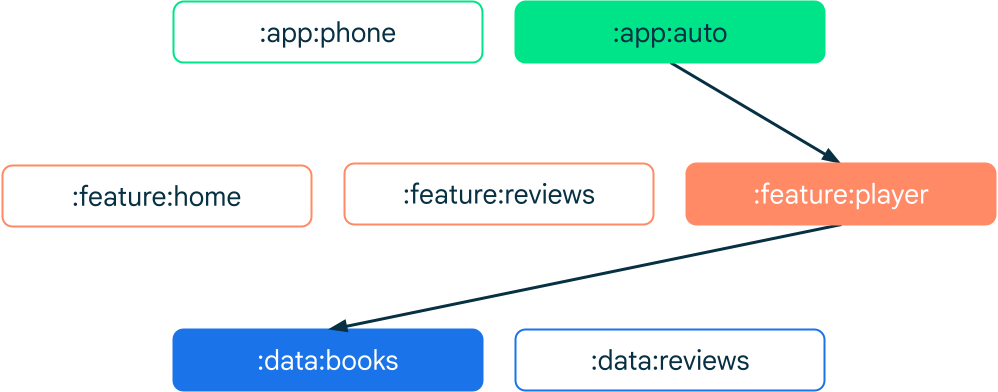
If your app targets multiple device types, such as Android Auto, Wear or TV, define an app module for each one. This helps separate platform-specific dependencies.
Common modules
Common modules, also known as core modules, contain code that other modules frequently use. They reduce redundancy and don't represent any specific layer in an app's architecture. The following are examples of common modules:
- UI module: If you use custom UI elements or elaborate branding in your app, you should consider encapsulating your widget collection into a module for all the features to reuse. This could help make your UI consistent across different features. For example, if your theming is centralized, you can avoid a painful refactor when a rebrand happens.
- Analytics module: Tracking is often dictated by business requirements with little consideration to the software architecture. Analytics trackers are often used in many unrelated components. If that's the case for you, it might be a good idea to have a dedicated analytics module.
- Network module: When many modules require a network connection, you might consider having a module dedicated to providing a http client. It is especially useful when your client requires custom configuration.
- Utility module: Utilities, also known as helpers, are usually small pieces of code that are reused across the application. Examples of utilities include testing helpers, a currency formatting function, email validator or a custom operator.
Test modules
Test modules are Android modules that are used for testing purposes only. The modules contain test code, test resources, and test dependencies that are only required for running tests and are not needed during the application's runtime. Test modules are created to separate test-specific code from the main application, making the module code easier to manage and maintain.
Use cases for test modules
The following examples showcase situations where implementing test modules can be particularly beneficial:
Shared test code: If you have multiple modules in your project and some of the test code is applicable to more than one module, you can create a test module to share the code. This can help reduce duplication and make your test code easier to maintain. Shared test code can include utility classes or functions, such as custom assertions or matchers, as well as test data, such as simulated JSON responses.
Cleaner Build Configurations: Test modules allow you to have cleaner build configurations, as they can have their own
build.gradlefile. You don't have to clutter your app module'sbuild.gradlefile with configurations that are only relevant for tests.Integration Tests: Test modules can be used to store integration tests that are used to test interactions between different parts of your app, including user interface, business logic, network requests, and database queries.
Large-scale applications: Test modules are particularly useful for large-scale applications with complex codebases and multiple modules. In such cases, test modules can help improve code organization and maintainability.

Module to module communication
Modules rarely exist in total separation and often rely on other modules and communicate with them. It’s important to keep the coupling low even when modules work together and exchange information frequently. Sometimes direct communication between two modules is either not desirable as in the case of architecture constraints. It may also be impossible, such as with cyclic dependencies.
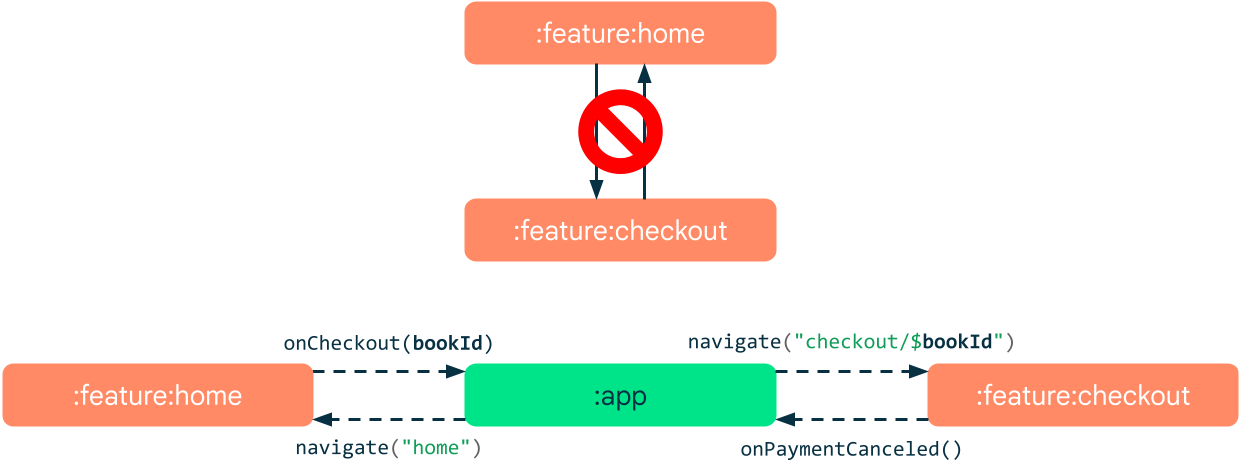
To overcome this problem you can have a third module mediating between two other modules. The mediator module can listen for messages from both of the modules and forward them as needed. In our sample app, the checkout screen needs to know which book to purchase even though the event originated in a separate screen that is part of a different feature. In this case, the mediator is the module that owns the navigation graph (usually an app module). In the example, we use navigation to pass the data from the home feature to the checkout feature using the Navigation component.
navController.navigate("checkout/$bookId")
The checkout destination receives a book id as an argument which it uses to
fetch information about the book. You can use the saved state handle to
retrieve navigation arguments inside a destination feature’s ViewModel.
class CheckoutViewModel(savedStateHandle: SavedStateHandle, …) : ViewModel() {

   val uiState: StateFlow<CheckoutUiState> =
      savedStateHandle.getStateFlow<String>("bookId", "").map { bookId ->
          // produce UI state calling bookRepository.getBook(bookId)
      }
      …
}
You shouldn't pass objects as navigation arguments. Instead, use simple ids that features can use to access and load desired resources from the data layer. This way, you keep the coupling low and don't violate the single source of truth principle.
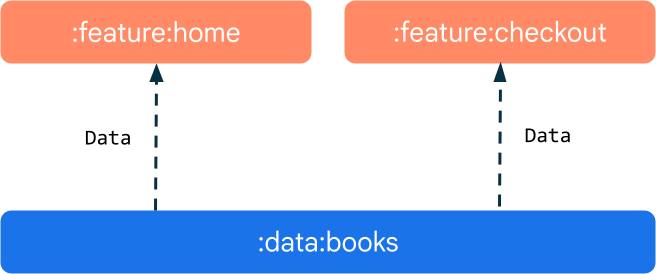
In the example below, both feature modules depend on the same data module. This makes it possible to minimize the amount of data that the mediator module needs to forward and keeps the coupling between the modules low. Instead of passing objects, modules should exchange primitive IDs and load the resources from a shared data module.
Dependency inversion
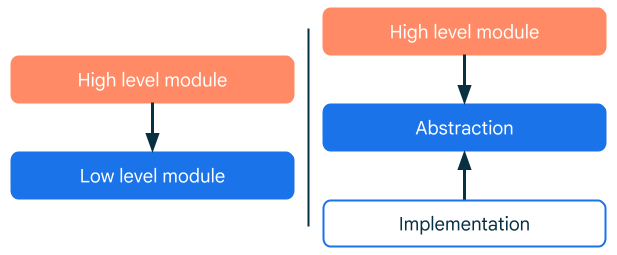
Dependency inversion is when you organize your code such that the abstraction is separate from a concrete implementation.
- Abstraction: A contract that defines how components or modules in your application interact with each other. Abstraction modules define the API of your system and contain interfaces and models.
- Concrete implementation: Modules that depend on the abstraction module and implement the behavior of an abstraction.
Modules that rely on the behavior defined in the abstraction module should only depend on the abstraction itself, rather than the specific implementations.
Example
Imagine a feature module that needs a database to work. The feature module isn't concerned with how the database is implemented, be it a local Room database or a remote Firestore instance. It only needs to store and read the application data.
To achieve this, the feature module depends on the abstraction module rather than on a specific database implementation. This abstraction defines the app's database API. In other words, it sets the rules for how to interact with the database. This allows the feature module to use any database without needing to know its underlying implementation details.
The concrete implementation module provides the actual implementation of the APIs defined in the abstraction module. In order to do that, the implementation module also depends on the abstraction module.
Dependency injection
By now you might be wondering how the feature module is connected with the implementation module. The answer is Dependency Injection. The feature module doesn't directly create the required database instance. Instead, it specifies what dependencies it needs. These dependencies are then supplied externally, usually in the app module.
releaseImplementation(project(":database:impl:firestore"))

debugImplementation(project(":database:impl:room"))

androidTestImplementation(project(":database:impl:mock"))
Benefits
The benefits of separating your APIs and their implementations are as follows:
- Interchangeability: With a clear separation of API and implementation modules, you can develop multiple implementations for the same API, and switch between them without changing the code that uses the API. This could be particularly beneficial in scenarios where you want to provide different capabilities or behavior in different contexts. For example, a mock implementation for testing versus a real implementation for production.
- Decoupling: The separation means that modules using abstractions don't depend on any specific technology. If you choose to change your database from Room to Firestore later on, it would be easier because the changes would only happen in the specific module doing the job (implementation module) and wouldn't affect other modules using your database's API.
- Testability: Separating APIs from their implementations can greatly facilitate testing. You can write test cases against the API contracts. You can also use different implementations to test various scenarios and edge cases, including mock implementations.
- Improved build performance: When you separate an API and its implementation into different modules, changes in the implementation module don't force the build system to recompile the modules depending on the API module. This leads to faster build times and increased productivity, particularly in large projects where build times can be significant.
When to separate
It is beneficial to separate your APIs from their implementations in the following cases:
- Diverse capabilities: If you can implement parts of your system in multiple ways, a clear API allows interchangeability of different implementations. For example, you may have a rendering system that uses OpenGL or Vulkan, or a billing system that works with Play or your in-house billing API.
- Multiple applications: If you're developing multiple applications with shared capabilities for different platforms, you can define common APIs and develop specific implementations per platform.
- Independent teams: The separation allows different developers or teams to work on different parts of the codebase simultaneously. Developers should focus on understanding the API contracts and using them correctly. They don't need to worry about the implementation details of other modules.
- Large codebase: When the codebase is large or complex, separating the API from the implementation makes the code more manageable. It lets you break the codebase down into more granular, understandable, and maintainable units.
How to implement?
To implement dependency inversion, follow these steps:
- Create an abstraction module: This module should contain APIs (interfaces and models) that defines the behavior of your feature.
- Create implementation modules: Implementation modules should rely on the
API module and implement the behavior of an abstraction.
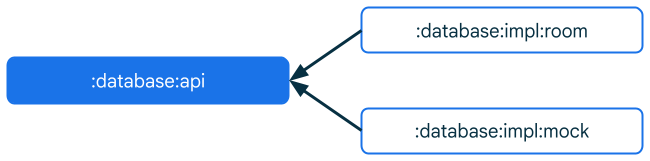
Figure 10. Implementation modules depend on abstraction module. - Make high level modules dependent on abstraction modules: Instead of
directly depending on a specific implementation, make your modules dependent on
abstraction modules. High level modules don't need to know implementation
details, they only need the contract (API).
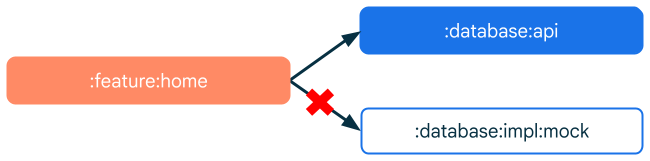
Figure 11. High level modules depend on abstractions, not implementation. - Provide implementation module: Finally, you need to provide the actual
implementation for your dependencies. The specific implementation depends on
your project setup, but the app module is usually a good place to do this.
To provide the implementation specify it as a dependency for your selected
build variant or a testing source set.
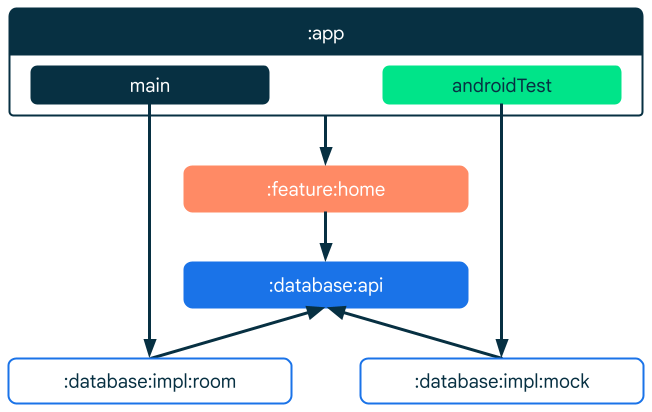
Figure 12. App module provides actual implementation.
General best practices
As mentioned in the beginning there is no single right way of developing a multi-module app. Just like there are many software architectures, there exist numerous ways to modularize an app. Nevertheless, the following general recommendations can help you make your code more readable, maintainable and testable.
Keep your configuration consistent
Every module introduces configuration overhead. If the number of your modules reaches a certain threshold, managing consistent configuration becomes a challenge. For example, it’s important that modules use dependencies of the same version. If you need to update a large number of modules just to bump a dependency version, it is not only an effort but also a room for potential mistakes. To solve this problem, you can use one of the gradle’s tools to centralize your configuration:
- Version catalogs are a type safe list of dependencies generated by Gradle during sync. It’s a central place to declare all your dependencies and is available to all the modules in a project.
- Use convention plugins to share build logic between modules.
Expose as little as possible
The public interface of a module should be minimal and expose only the
essentials. It shouldn't leak any implementation details outside. Scope
everything to the smallest extent possible. Use Kotlin’s private or internal
visibility scope to make the declarations module-private. When declaring
dependencies in your module, prefer implementation over api. The latter
exposes transitive dependencies to the consumers of your module. Using
implementation may improve build time since it reduces the number of modules
that need to be rebuilt.
Prefer Kotlin & Java modules
There are three essential types of modules that Android studio supports:
- App modules are an entry point to your application. They can contain
source code, resources, assets and an
AndroidManifest.xml. The output of an app module is an Android App Bundle (AAB) or an Android Application Package (APK). - Library modules have the same content as the app modules. They are used by other Android modules as a dependency. The output of a library module is an Android Archive (AAR) are structurally identical to app modules but they are compiled to an Android Archive (AAR) file which can later be used by other modules as a dependency. A library module makes it possible to encapsulate and reuse the same logic and resources across many app modules.
- Kotlin and Java libraries don't contain any Android resources, assets, or manifest files.
Since Android modules come with overhead, preferably, you'd want to use the Kotlin or Java kind as much as possible.