
As a user navigates through, out of, and back to your app, the Activity
instances in your app transition through different states in their lifecycle.
The Activity class provides a number of callbacks that let the activity know
when a state changes or that the system is creating, stopping, or resuming an
activity or destroying the process the activity resides in.
Within the lifecycle callback methods, you can declare how your activity behaves when the user leaves and re-enters the activity. For example, if you're building a streaming video player, you might pause the video and terminate the network connection when the user switches to another app. When the user returns, you can reconnect to the network and let the user resume the video from the same spot.
Each callback lets you perform specific work that's appropriate to a given change of state. Doing the right work at the right time and handling transitions properly make your app more robust and performant. For example, good implementation of the lifecycle callbacks can help your app avoid the following:
- Crashing if the user receives a phone call or switches to another app while using your app.
- Consuming valuable system resources when the user is not actively using it.
- Losing the user's progress if they leave your app and return to it at a later time.
- Crashing or losing the user's progress when the screen rotates between landscape and portrait orientation.
This document explains the activity lifecycle in detail. The document begins by describing the lifecycle paradigm. Next, it explains each of the callbacks: what happens internally while they execute and what you need to implement during them.
It then briefly introduces the relationship between activity state and a process's vulnerability to being killed by the system. Finally, it discusses several topics related to transitions between activity states.
For information about handling lifecycles, including guidance about best practices, see Lifecycle in Jetpack Compose and Save UI states. To learn how to architect a robust, production-quality app using activities in combination with architecture components, see Guide to app architecture.
Activity-lifecycle concepts
To navigate transitions between stages of the activity lifecycle, the Activity
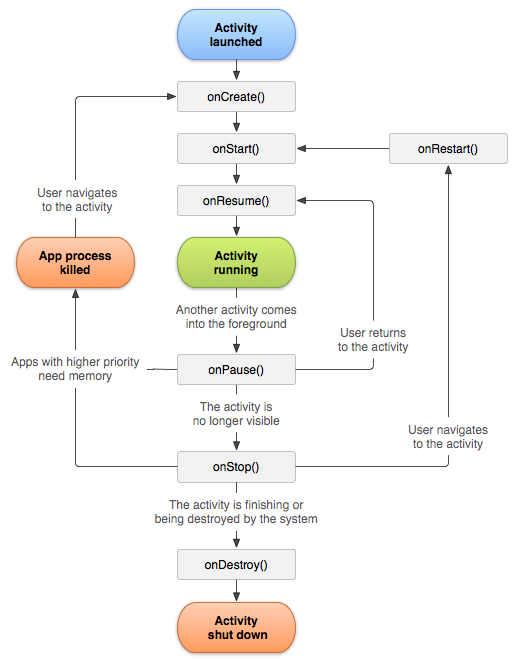
class provides a core set of six callbacks: onCreate, onStart,
onResume, onPause, onStop, and onDestroy. The
system invokes each of these callbacks as the activity enters a new state.
Figure 1 presents a visual representation of this paradigm.
As the user begins to leave the activity, the system calls methods to dismantle the activity. In some cases, the activity is only partially dismantled and still resides in memory, such as when the user switches to another app. In these cases, the activity can still come back to the foreground.
If the user returns to the activity, it resumes from where the user left off. With a few exceptions, apps are restricted from starting activities when running in the background.
The system's likelihood of killing a given process, along with the activities in it, depends on the state of the activity at the time. For more information on the relationship between state and vulnerability to ejection, see the section about activity state and ejection from memory.
Depending on the complexity of your activity, you probably don't need to implement all the lifecycle methods. However, it's important that you understand each one and implement those that make your app behave the way users expect.
Compose and the Lifecycle
In Compose, avoid placing business logic or manual observer setup directly
within activity callbacks like onStart or onResume. Instead, use
Lifecycle-aware effects and state-aware observers that automatically align
with the UI's presence on screen.
- Lifecycle-aware collection: Use
collectAsStateWithLifecycleto consume flows from yourViewModel. This API automatically starts collecting when the UI enters the Started state and stops when it goes to the background, preventing unnecessary resource consumption. After collecting flow as state, you can useLifecycleEffectsto run code when a Lifecycle event occurs. - Flow of logic: By using these APIs, the UI reacts to the lifecycle state naturally through the composition tree, ensuring that business logic only executes when the user is actively interacting with the component.
For more about Compose and the lifecycle, see Lifecycle in Jetpack Compose.
Lifecycle callbacks
This section provides conceptual and implementation information about the callback methods used during the activity lifecycle.
Some actions belong in the activity lifecycle methods. However, place code that implements the actions of a dependent component in the component, rather than the activity lifecycle method. To achieve this, you need to make the dependent component lifecycle-aware. To learn how to make your dependent components lifecycle-aware, see Lifecycle in Jetpack Compose.
onCreate
You must implement this callback, which fires when the system first creates the
activity. On activity creation, the activity enters the Created state. In the
onCreate method, perform basic application startup logic that happens
only once for the entire life of the activity.
For example, your implementation of onCreate might bind data to lists,
associate the activity with a ViewModel, and instantiate some
class-scope variables. This method receives the parameter savedInstanceState,
which is a Bundle object containing the activity's previously saved
state. If the activity has never existed before, the value of the Bundle
object is null.
If you have a lifecycle-aware component that is hooked up to the lifecycle of
your activity, it receives the ON_CREATE event. The method annotated
with @OnLifecycleEvent is called so your lifecycle-aware component can perform
any setup code it needs for the created state.
The following example shows how to integrate a Text composable in a bare
minimum activity:
class ExampleActivity : ComponentActivity() { override fun onCreate(savedInstanceState: Bundle?) { super.onCreate(savedInstanceState) setContent { // In here, we can call composables! MaterialTheme { Greeting(name = "compose") } } } } @Composable fun Greeting(name: String) { Text(text = "Hello $name!") }
Your activity does not remain in the Created state. After the onCreate method
finishes execution, the activity enters the Started state and the system calls
the onStart and onResume methods in quick succession.
onStart
When the activity enters the Started state, the system invokes onStart.
This call makes the activity visible to the user as the app prepares for the
activity to enter the foreground and become interactive. For example, this
method is where the code that maintains the UI is initialized.
When the activity moves to the Started state, any lifecycle-aware component tied
to the activity's lifecycle receives the ON_START event.
The onStart method completes quickly and, as with the Created state, the
activity does not remain in the Started state. Once this callback finishes, the
activity enters the Resumed state and the system invokes the onResume
method.
onResume
When the activity enters the Resumed state, it comes to the foreground, and the
system invokes the onResume callback. This is the state in which the app
interacts with the user. The app stays in this state until something happens to
take focus away from the app, such as the device receiving a phone call, the
user navigating to another activity, or the device screen turning off.
When the activity moves to the Resumed state, any lifecycle-aware component tied
to the activity's lifecycle receives the ON_RESUME event. This is where
the lifecycle components can enable any functionality that needs to run while
the component is visible and in the foreground, such as starting a camera
preview.
When an interruptive event occurs, the activity enters the Paused state and
the system invokes the onPause callback.
If the activity returns to the Resumed state from the Paused state, the system
once again calls the onResume method. For this reason, implement onResume to
initialize components that you release during onPause and to perform any other
initializations that must occur each time the activity enters the Resumed state.
Here is an example of a lifecycle-aware component that accesses the camera when
the component receives the ON_RESUME event:
class CameraComponent : LifecycleObserver {
    ...
    @OnLifecycleEvent(Lifecycle.Event.ON_RESUME)
    fun initializeCamera() {
        if (camera == null) {
            getCamera()
        }
    }
    ...
}
The preceding code initializes the camera once the LifecycleObserver
receives the ON_RESUME event. In multi-window mode, however, your activity
might be fully visible even when it is in the Paused state. For example, when
the app is in multi-window mode and the user taps the window that does not
contain your activity, your activity moves to the Paused state.
If you want the camera active only when the app is Resumed (visible and active
in the foreground), then initialize the camera after the ON_RESUME event
demonstrated previously. If you want to keep the camera active while the
activity is Paused but visible, such as in multi-window mode, then initialize
the camera after the ON_START event.
However, having the camera active while your activity is Paused might deny access to the camera to another Resumed app in multi-window mode. Sometimes it is necessary to keep the camera active while your activity is Paused, but it might actually degrade the overall user experience if you do.
For this reason, think carefully about where in the lifecycle it is most appropriate to take control of shared system resources in the context of multi-window mode. To learn more about supporting multi-window mode, see Support multi-window mode.
Regardless of which build-up event you choose to perform an initialization
operation in, make sure to use the corresponding lifecycle event to release the
resource. If you initialize something after the ON_START event, release or
terminate it after the ON_STOP event. If you initialize after the ON_RESUME
event, release after the ON_PAUSE event.
The preceding code snippet places camera initialization code in a
lifecycle-aware component. You can instead put this code directly into the
activity lifecycle callbacks, such as onStart and onStop, but we don't
recommend this. Adding this logic to an independent, lifecycle-aware component
lets you reuse the component across multiple activities without having to
duplicate code. To learn how to create a lifecycle-aware component, see
Lifecycle in Jetpack Compose.
onPause
The system calls this method as the first indication that the user is leaving your activity, though it does not always mean the activity is being destroyed. It indicates that the activity is no longer in the foreground, but it is still visible if the user is in multi-window mode. There are several reasons why an activity might enter this state:
- An event that interrupts app execution, as described in the section about
the
onResumecallback, pauses the current activity. This is the most common case. - In multi-window mode, only one app has focus at any time, and the system pauses all the other apps.
- The opening of a new, semi-transparent activity, such as a dialog, pauses the activity it covers. As long as the activity is partially visible but not in focus, it remains paused.
When an activity moves to the Paused state, any lifecycle-aware component tied
to the activity's lifecycle receives the ON_PAUSE event. This is where
the lifecycle components can stop any functionality that does not need to run
while the component is not in the foreground, such as stopping a camera preview.
Use the onPause method to pause or adjust operations that can't continue,
or might continue in moderation, while the Activity is in the Paused state,
and that you expect to resume shortly.
You can also use the onPause method to release system resources, handles to
sensors (like GPS), or any resources that affect battery life while your
activity is Paused and the user does not need them.
However, as mentioned in the section about onResume, a Paused activity might
still be fully visible if the app is in multi-window mode. Consider using
onStop instead of onPause to fully release or adjust UI-related resources
and operations to better support multi-window mode.
The following example of a LifecycleObserver reacting to the ON_PAUSE
event is the counterpart to the preceding ON_RESUME event example, releasing
the camera that initializes after the ON_RESUME event is received:
class CameraComponent : LifecycleObserver {
    ...
    @OnLifecycleEvent(Lifecycle.Event.ON_PAUSE)
    fun releaseCamera() {
        camera?.release()
        camera = null
    }
    ...
}
This example places the camera release code after the ON_PAUSE event is
received by the LifecycleObserver.
onPause execution is very brief and does not necessarily offer enough time to
perform save operations. For this reason, don't use onPause to save
application or user data, make network calls, or execute database transactions.
Such work might not complete before the method completes.
Instead, perform heavy-load shutdown operations during onStop. For more
information about suitable operations to perform during onStop, see the next
section. For more information about saving data, see the section about saving
and restoring state.
Completion of the onPause method does not mean that the activity leaves the
Paused state. Rather, the activity remains in this state until either the
activity resumes or it becomes completely invisible to the user. If the activity
resumes, the system once again invokes the onResume callback.
If the activity returns from the Paused state to the Resumed state, the system
keeps the Activity instance resident in memory, recalling that instance when
the system invokes onResume. In this scenario, you don't need to re-initialize
components created during any of the callback methods leading up to the Resumed
state. If the activity becomes completely invisible, the system calls onStop.
onStop
When your activity is no longer visible to the user, it enters the Stopped
state, and the system invokes the onStop callback. This can occur when a
newly launched activity covers the entire screen. The system also calls onStop
when the activity finishes running and is about to be terminated.
When the activity moves to the Stopped state, any lifecycle-aware component tied
to the activity's lifecycle receives the ON_STOP event. This is where
the lifecycle components can stop any functionality that does not need to run
while the component is not visible on the screen.
In the onStop method, release or adjust resources that are not needed while
the app is not visible to the user. For example, your app might pause animations
or switch from fine-grained to coarse-grained location updates. Using onStop
instead of onPause means that UI-related work continues, even when the
user is viewing your activity in multi-window mode.
Also, use onStop to perform relatively CPU-intensive shutdown operations. For
example, if you can't find a better time to save information to a database, you
might do so during onStop. The following example shows an implementation of
onStop that saves the contents of a draft note to persistent storage:
override fun onStop() {
    super.onStop()

    // Delegate the save operation to the ViewModel, which handles the
    // background thread operations (e.g., using Kotlin Coroutines and Room).
    noteViewModel.saveDraft()
}
When your activity enters the Stopped state, the Activity object is kept
resident in memory: it maintains all state and member information, but is not
attached to the window manager. When the activity resumes, it recalls this
information.
From the Stopped state, the activity either comes back to interact with the
user, or the activity is finished running and goes away. If the activity comes
back, the system invokes onRestart. If the Activity is finished
running, the system calls onDestroy.
onDestroy
onDestroy is called before the activity is destroyed. The system invokes
this callback for one of two reasons:
- The activity is finishing, due to the user completely dismissing the
activity or due to
finishbeing called on the activity. - The system is temporarily destroying the activity due to a configuration change, such as device rotation or entering multi-window mode.
When the activity moves to the destroyed state, any lifecycle-aware component
tied to the activity's lifecycle receives the ON_DESTROY event. This is
where the lifecycle components can clean up anything they need to before the
Activity is destroyed.
Instead of putting logic in your Activity to determine why it is being
destroyed, use a ViewModel object to contain the relevant view data for
your Activity. If the Activity is recreated due to a configuration change,
the ViewModel does not have to do anything, since it is preserved and given to
the next Activity instance.
If the Activity isn't recreated, then the ViewModel has the
onCleared method called, where it can clean up any data it needs to
before being destroyed. You can distinguish between these two scenarios with the
isFinishing method.
If the activity is finishing, onDestroy is the final lifecycle callback the
activity receives. If onDestroy is called as the result of a configuration
change, the system immediately creates a new activity instance and then calls
onCreate on that new instance in the new configuration.
The onDestroy callback releases all resources not released by earlier
callbacks, such as onStop.
Activity state and ejection from memory
The system kills processes when it needs to free up RAM. The likelihood of the system killing a given process depends on the state of the process at the time. Process state, in turn, depends on the state of the activity running in the process. Table 1 shows the correlations among process state, activity state, and the likelihood of the system killing the process. This table only applies if a process is not running other types of application components.
Likelihood of being killed |
Process state |
Final activity state |
Lowest |
Foreground (having or about to get focus) |
Resumed |
Low |
Visible (no focus) |
Started/Paused |
Higher |
Background (invisible) |
Stopped |
Highest |
Empty |
Destroyed |
Table 1. Relationship between process lifecycle and activity state.
The system never kills an activity directly to free up memory. Instead, it kills the process the activity runs in, destroying not only the activity but everything else running in the process as well. To learn how to preserve and restore your activity's UI state when system-initiated process death occurs, see the section about saving and restoring state.
The user can also kill a process by using the Application Manager, under Settings, to kill the corresponding app.
For more information about processes, see Processes and threads overview.
Saving and restoring transient UI state
A user expects an activity's UI state to remain the same throughout a configuration change, such as rotation or switching into multi-window mode. However, the system destroys the activity by default when such a configuration change occurs, wiping away any UI state stored in the activity instance.
Similarly, a user expects UI state to remain the same if they temporarily switch away from your app to a different app and then come back to your app later. However, the system can destroy your application's process while the user is away and your activity is stopped.
When system constraints destroy the activity, preserve the user's transient UI
state using a combination of ViewModel (for complex business logic and
screen state), the Jetpack Compose rememberSaveable API (for lightweight
UI state), and/or local storage. To learn more about user expectations compared
to system behavior and how to best preserve complex UI state data across
system-initiated activity and process death, see Save UI states.
rememberSaveable automatically survives both configuration changes and
system-initiated process death by bundling the state under the hood, providing a
seamless experience without the need for activity-level boilerplate.
Instance state
There are a few scenarios in which your activity is destroyed due to normal app
behavior, such as when the user presses the Back button or your activity signals
its own destruction by calling the finish method.
When your activity is destroyed because the user presses Back or the activity
finishes itself, both the system's and the user's concept of that
Activity instance is gone forever. In these scenarios, the user's
expectation matches the system's behavior, and you don't have any extra work to
do.
However, if the system destroys the activity due to system constraints (such as
a configuration change or memory pressure), then although the actual Activity
instance is gone, the system remembers that it existed. If the user attempts to
navigate back to the activity, the system creates a new instance of that
activity using a set of saved data that describes the state of the activity when
it was destroyed.
The saved data that the system uses to restore the previous state is called the instance state. Under the hood, it's a collection of key-value pairs. By default, the system uses the instance state to save basic information about your UI layout, such as user text input or scroll positions.
You hook into this system behavior using rememberSaveable. If your
activity instance is destroyed and recreated, any UI state wrapped in
rememberSaveable is automatically restored, with no additional activity-level
code required by you.
However, your activity will likely have more complex state information that
you'd like to restore, such as user data, network responses, or member variables
that track the user's progress. The instance state mechanism (and, by extension,
rememberSaveable) isn't appropriate for preserving more than a trivial amount
of data, because it requires serialization on the main thread and consumes
system-process memory.
To preserve more than a very small amount of data, take a combined approach
using persistent local storage, the ViewModel class, and Compose state
hoisting, as outlined in Save UI states.
Save simple, lightweight UI state using rememberSaveable
As your activity begins to stop, the system prepares to save state information
to an instance state bundle. To hook into this system behavior, you use
rememberSaveable directly within your composable functions.
rememberSaveable automatically saves and restores transient UI state, such as
user text input or scroll positions, across activity recreation.
To save custom, lightweight state information (like a user's progress in a
game), declare your state using rememberSaveable. The Compose framework
handles the serialization to the instance state bundle under the hood:
var userTypedQuery by rememberSaveable(typedQuery, stateSaver = TextFieldValue.Saver) { mutableStateOf( TextFieldValue(text = typedQuery, selection = TextRange(typedQuery.length)) ) }
To save persistent data, such as user preferences or data for a database, take
appropriate opportunities when your activity is in the foreground. If no such
opportunity arises, save persistent data during the onStop method.
Restore activity UI state using saved instance state
When your activity is recreated after it was previously destroyed, state
restoration is automatic. When you use rememberSaveable, you don't need
to write any explicit restoration logic, check for null bundles, or override
activity callbacks. The code that initializes and saves your state also
seamlessly restores it when the activity comes back:
var userTypedQuery by rememberSaveable(typedQuery, stateSaver = TextFieldValue.Saver) { mutableStateOf( TextFieldValue(text = typedQuery, selection = TextRange(typedQuery.length)) ) }
Activities and navigation
An app is likely to transition between screens many times during its lifetime,
such as when the user taps the device's Back button or selects a new
destination. Modern Android apps typically use a single-activity architecture.
Instead of starting a new Activity for every screen, your app hosts a
single Activity and uses the Navigation component to swap out
composable screens within that activity.
To learn how to implement modern, Compose-first navigation, see the guide to the Jetpack Compose Navigation 3 library.
Starting one activity from another
An activity might need to start another activity at some point. This need arises, for instance, when an app needs to move from the current screen to a new one.
Depending on whether your activity wants a result back from the new activity
it's about to start, you start the new activity using either the
startActivity method or the startActivityForResult method. In
either case, you pass in an Intent object.
The Intent object specifies either the exact activity you want to start or
describes the type of action you want to perform. The system selects the
appropriate activity for you, which can even be from a different application. An
Intent object can also carry small amounts of data to be used by the activity
that is started. For more information about the Intent class, see Intents and
Intent Filters.
startActivity
If the newly started activity does not need to return a result, the current
activity can start it by calling the startActivity method.
When working within your own application, you often need to simply launch a
known activity. For example, the following code snippet shows how to launch an
activity called SignInActivity.
val context = LocalContext.current

Button(onClick = {
    val intent = Intent(context, SignInActivity::class.java)
    context.startActivity(intent)
}) {
    Text("Sign In")
}
Starting external activities
While internal app navigation is handled by Navigation, your
Activity will occasionally need to start other activities. This usually
happens when you want to leverage an external app to perform a specific action,
such as opening a web browser, sending an email, or taking a photo.
To achieve this, you use an Intent object to describe the type of action
you want to perform, and the system launches the appropriate activity from
another application.
For example, if you want to let the user send an email message, you can create the following intent:
val intent = Intent(Intent.ACTION_SEND).apply {
    putExtra(Intent.EXTRA_EMAIL, recipientArray)
}
startActivity(intent)
If you need to launch an external activity and get a result back (such as asking
the camera app to take a photo and return the image), use the modern
Activity result APIs rather than the deprecated
startActivityForResult callback.
Coordinating activities
When one activity starts another, they both experience lifecycle transitions. The first activity stops operating and enters the Paused or Stopped state, while the other activity is created. In case these activities share data saved to disc or elsewhere, it's important to understand that the first activity is not completely stopped before the second one is created. Rather, the process of starting the second one overlaps with the process of stopping the first one.
The order of lifecycle callbacks is well defined, particularly when the two activities are in the same process—in other words, the same app—and one is starting the other. Here's the order of operations that occur when Activity A starts Activity B:
- Activity A's
onPausemethod executes. - Activity B's
onCreate,onStart, andonResumemethods execute in sequence. Activity B now has user focus. - If Activity A is no longer visible on screen, its
onStopmethod executes.
This sequence of lifecycle callbacks lets you manage the transition of information from one activity to another.
Additional resources
To learn more about the activity lifecycle, see the following additional resources: