
The Navigation component lets you add both property and view animations to actions. To create your own animations, check out Animation resources.
Navigation also includes several default animations to get you started. To add animations to an action, do the following:
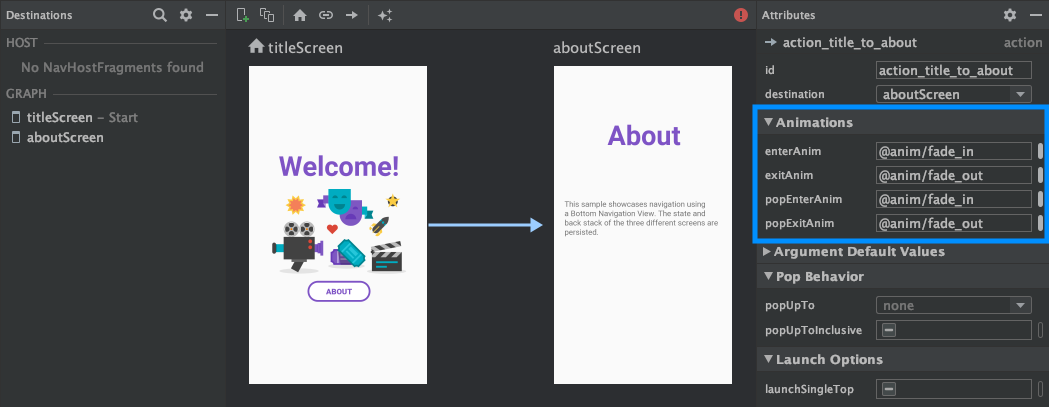
- In the Navigation editor, click on the action where the animation should occur.
- In the Animations section of the Attributes panel, click the dropdown
arrow next to the animation you'd like to add. You can choose between the
following types:
- Entering a destination
- Exiting a destination
- Entering a destination via a pop action, an action that pops additional destinations off of the back stack when navigating.
- Exiting a destination via a pop action
- Choose an animation from the list of project animations that appears.
Once you've added animations, click the Text tab to toggle to the XML text
view. The XML for the animations now appears in the corresponding
<action> element. In the following example, specifyAmountFragment is the
source destination for the confirmationAction action:
<fragment
    android:id="@+id/specifyAmountFragment"
    android:name="com.example.buybuddy.buybuddy.SpecifyAmountFragment"
    android:label="fragment_specify_amount"
    tools:layout="@layout/fragment_specify_amount">
    <action
        android:id="@+id/confirmationAction"
        app:destination="@id/confirmationFragment"
        app:enterAnim="@anim/slide_in_right"
        app:exitAnim="@anim/slide_out_left"
        app:popEnterAnim="@anim/slide_in_left"
        app:popExitAnim="@anim/slide_out_right" />
</fragment>
Add shared element transitions between destinations
When a view is shared between two destinations, you can use a shared element transition to define how the view transitions when navigating from one destination to the other. Shared element transitions are part of the Transition Framework.
Shared elements are supplied programmatically rather than through your
navigation XML file. Activity and fragment destinations each have a subclass
of the Navigator.Extras
interface that accepts additional options for navigation, including shared
elements. You can pass these Extras when calling
navigate().
Shared element transitions to a fragment destination
The FragmentNavigator.Extras
class allows you to map shared elements from one destination to the next
by their transition name, similar to using
FragmentTransaction.addSharedElement().
You can then pass the extras to navigate(), as shown in the following
example:
Kotlin
val extras = FragmentNavigatorExtras(view1 to "hero_image")

view.findNavController().navigate(
    R.id.confirmationAction,
    null, // Bundle of args
    null, // NavOptions
    extras)
Java
FragmentNavigator.Extras extras = new FragmentNavigator.Extras.Builder()
    .addSharedElement(view1, "hero_image")
    .build();

Navigation.findNavController(view).navigate(
    R.id.details,
    null, // Bundle of args
    null, // NavOptions
    extras);
Shared element transitions to an activity destination
Activities rely on ActivityOptionsCompat to control Shared Element Transitions as detailed in the Start an activity with a shared element documentation and as shown in the example below:
Kotlin
// Rename the Pair class from the Android framework to avoid a name clash
import android.util.Pair as UtilPair
...
val options = ActivityOptionsCompat.makeSceneTransitionAnimation(activity,
        UtilPair.create(view1, "hero_image"))
val extras = ActivityNavigatorExtras(options)
view.findNavController().navigate(
    R.id.details,
    null, // Bundle of args
    null, // NavOptions
    extras)
Java
ActivityOptions options = ActivityOptions.makeSceneTransitionAnimation(this,
        Pair.create(view1, "hero_image"));

ActivityNavigatorExtras extras = new ActivityNavigatorExtras.Builder()
    .setActivityOptions(options)
    .build();


Navigation.findNavController(view).navigate(
    R.id.details,
    null, // Bundle of args
    null, // NavOptions
    extras);
Apply pop animations to activity transitions
When you navigate to or from an Activity, pop animations are not applied
automatically. Instead, you must call
ActivityNavigator.applyPopAnimationsToPendingTransition()
from the target Activity destination where the animation should occur:
Kotlin
override fun finish() {
    super.finish()
    ActivityNavigator.applyPopAnimationsToPendingTransition(this)
}
Java
@Override
public void finish() {
    super.finish();
    ActivityNavigator.applyPopAnimationsToPendingTransition(this);
}