
Desktop windowing enables users to run multiple apps simultaneously in resizable app windows for a versatile, desktop-like experience.
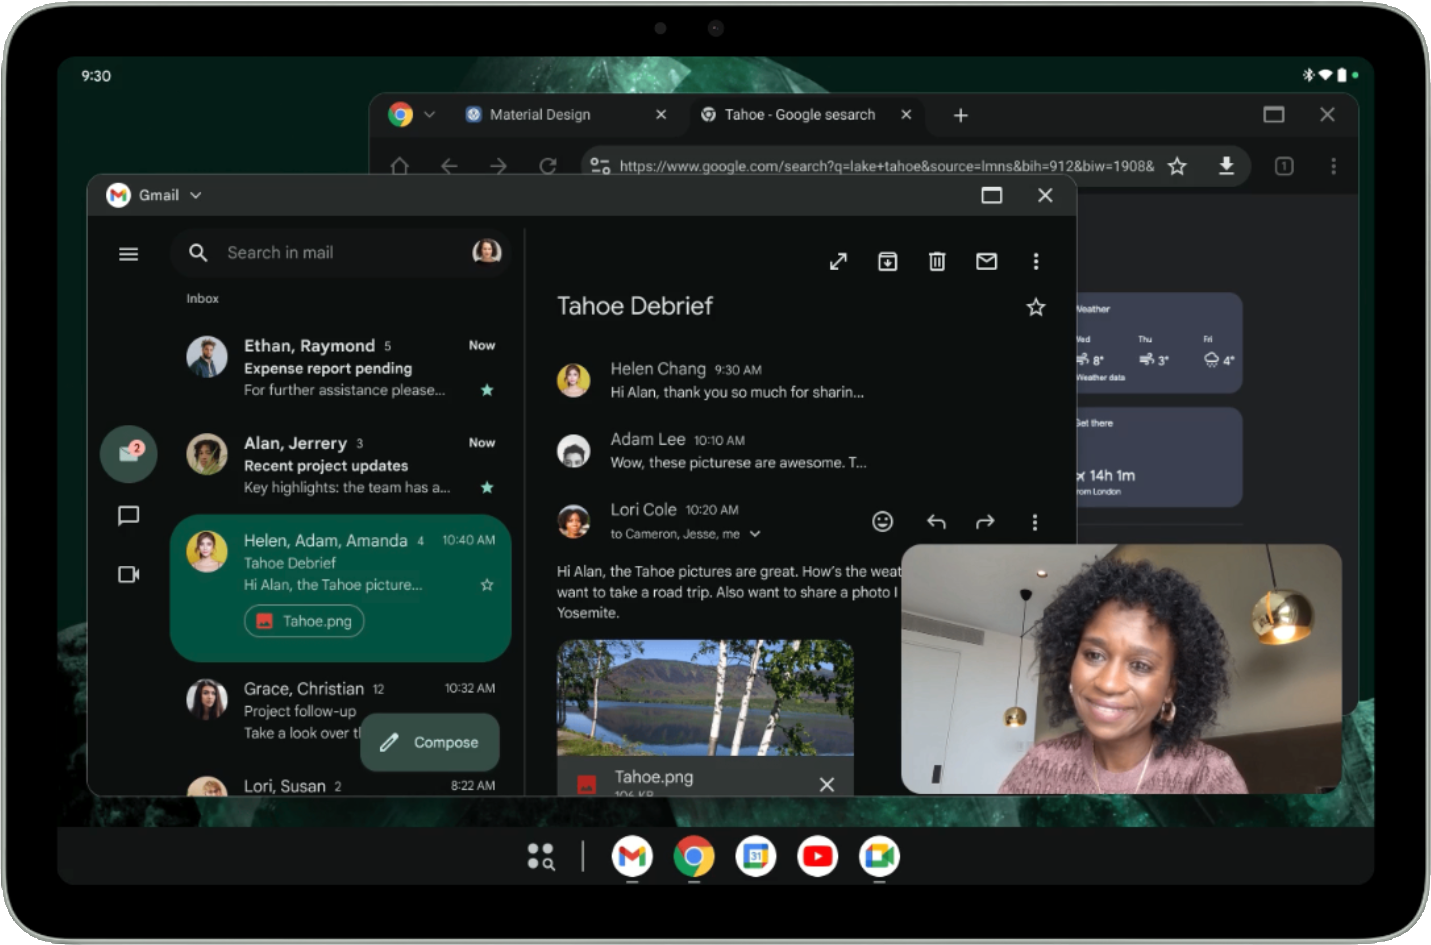
In figure 1, you can see the organization of the screen with desktop windowing enabled. Things to note:
- Users can run multiple apps side by side simultaneously.
- Taskbar is in a fixed position at the bottom of the display showing the running apps. Users can pin apps for quick access.
- New customizable header bar decorates the top of each window with controls such as minimize and maximize.
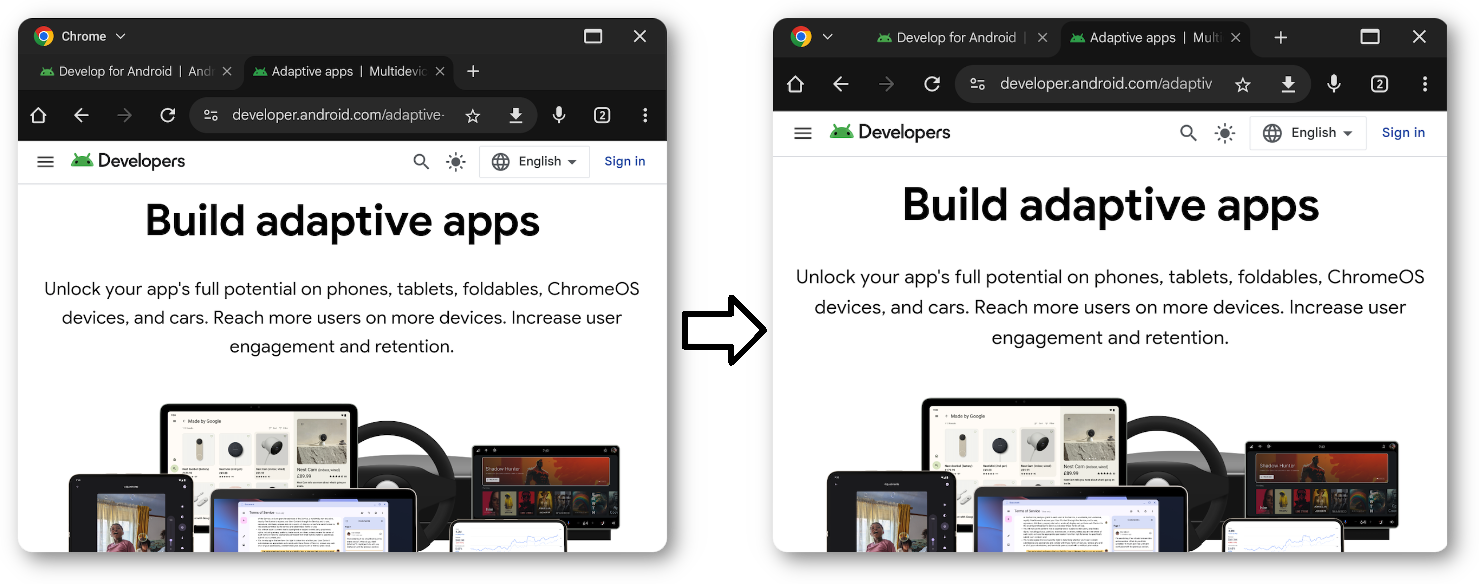
By default, apps open full screen on Android tablets. To launch an app in desktop windowing, press and hold the window handle at the top of the screen and drag the handle within the UI, as seen in figure 2.
When an app is open in desktop windowing, other apps open in desktop windows as well.
Users can also invoke desktop windowing from the menu that shows up below the window handle when you tap or click the handle or use the keyboard shortcut Meta key (Windows, Command, or Search) + Ctrl + Down.
Users exit desktop windowing by closing all active windows or by grabbing the window handle at the top of a desktop window and dragging the app to the top of the screen. The Meta + H keyboard shortcut also exits desktop windowing and runs apps full screen again.
To return to desktop windowing, tap or click the desktop space tile in the Recents screen.
Resizability and compatibility mode
In desktop windowing, apps with locked orientation are freely resizable. That means even if an activity is locked to portrait orientation, users can still resize the app to a landscape orientation window.
Apps declared as nonresizable (that is, resizeableActivity = false) have
their UI scaled while keeping the same aspect ratio.
Camera apps that lock the orientation or are declared as nonresizable have a special treatment for their camera viewfinders: the window is fully resizable, but the viewfinder keeps the same aspect ratio. By assuming apps always run in portrait or landscape, the apps hardcode or otherwise make assumptions that lead to miscalculations of the preview or captured image orientation or aspect ratio resulting in stretched, sideways, or upside-down images.
Until apps are ready to implement fully responsive camera viewfinders, the special treatment provides a more basic user experience that mitigates the effects wrong assumptions may cause.
To learn more about compatibility mode for camera apps, see Device compatibility mode.
Customizable header insets
All apps running in desktop windowing have a header bar, even in immersive mode. You can customize this bar to prevent your app's content from being obscured and to draw custom UI elements directly into the header space.
Implementation
To draw custom content in the header bar, the first step is to make the header
bar background transparent. You can achieve this by using the
APPEARANCE_TRANSPARENT_CAPTION_BAR_BACKGROUND flag with the
WindowInsetsController.
window.insetsController?.setSystemBarsAppearance( WindowInsetsController.APPEARANCE_TRANSPARENT_CAPTION_BAR_BACKGROUND, WindowInsetsController.APPEARANCE_TRANSPARENT_CAPTION_BAR_BACKGROUND )
Once the header bar is transparent, you can style the header area to match your
app's design. Use WindowInsets.isCaptionBarVisible to detect if the bar is
present and apply the appropriate height or padding to your layout.
@OptIn(ExperimentalLayoutApi::class) @Composable fun CaptionBar() { if (WindowInsets.isCaptionBarVisible) { Row( modifier = Modifier .windowInsetsTopHeight(WindowInsets.captionBar) .fillMaxWidth() .background(if (isSystemInDarkTheme()) Color.White else Color.Black), horizontalArrangement = Arrangement.Center, verticalAlignment = Alignment.CenterVertically ) { Text( text = "Caption Bar Title", style = MaterialTheme.typography.titleMedium, modifier = Modifier.padding(4.dp) ) } } }
setSystemBarsAppearance(appearance,mask): Configures the visual style of system bars. The first parameter defines the target appearance flags, while the second acts as a mask to control which specific flags are modified.windowInsetsTopHeight(): Automatically sets the height of your Composable to match the system's header bar, helping your custom background fill the caption area without hardcoding pixel values.WindowInsets.captionBar: Provides the dimensions for the desktop windowing controls (Close, Maximize, etc.), allowing your UI to scale or hide automatically when entering or leaving desktop windowing.
For more information, see About window insets. In addition to a title, you can display other UI elements in the caption bar, such as tabs—like in Google Chrome—search bars, or profile avatars.
User interface
To avoid overlapping your UI with system buttons, Android 15 provides the
WindowInsets#getBoundingRects() method. The method returns a list of
Rect objects representing areas occupied by system elements. Any remaining
space in the caption bar is a safe zone where you can safely place custom
content.
Toggle the appearance of system caption elements for light and dark themes using
APPEARANCE_LIGHT_CAPTION_BARS. Access insets using
WindowInsets.Companion.captionBar() in Compose, or
WindowInsets.Type.captionBar() in Views.
For more information, see About window insets.
Multitasking and multi-instance support
Multitasking is at the core of desktop windowing, and allowing multiple instances of your app can highly increase users' productivity.
Starting from Android 15, you can use
PROPERTY_SUPPORTS_MULTI_INSTANCE_SYSTEM_UI. By setting this property in your
AndroidManifest.xml, you specify that the system UI should provide options
(like a "New Window" button) for the app to be launched in multiple instances.
<application>
    <property
        android:name="android.window.PROPERTY_SUPPORTS_MULTI_INSTANCE_SYSTEM_UI"
        android:value="true" />
</application>
Note: In desktop windowing and other multi-window environments, new tasks open in a new window, so double-check the user journey any time your app starts multiple tasks.
Manage app instances with dragging gestures
In multi-window mode, users can start a new app instance by dragging a UI element (like a tab or a document) out of the app's window. Users can also move elements between different instances of the same app.
Transfer data with drag and drop
To configure a composable as a drag source for multi-instance drag-and-drop
allowing users to drag content to another instance of your app, or create a
new instance by dropping content onto an empty area of the screen—use the
dragAndDropSource modifier. In its lambda, return
DragAndDropTransferData, passing the ClipData that contains the data to
transfer, and flags to configure multi-instance behavior.
Android 15 introduces two key flags for desktop-style windowing and multi-instance interactions:
DRAG_FLAG_GLOBAL_SAME_APPLICATION: Indicates that a drag operation can cross window boundaries (for multiple instances of the same application). WhenstartDragAndDrop()is called with this flag set, only visible windows belonging to the same application are able to participate in the drag operation and receive the dragged content.
Modifier.dragAndDropSource { _ -> DragAndDropTransferData( clipData = ClipData.newPlainText("label", "Your data"), flags = View.DRAG_FLAG_GLOBAL_SAME_APPLICATION ) }
DRAG_FLAG_START_INTENT_SENDER_ON_UNHANDLED_DRAG: Allows users to start a new instance of your app by dropping the dragged content onto an empty area of the screen, if no other window handles the drop.- When using this flag, you must provide an
IntentSenderusingClipData.Item.Builder#setIntentSender(), which the system uses to launch the new activity if an unhandled drop occurs.
- When using this flag, you must provide an
Modifier.dragAndDropSource { _ -> val intent = Intent.makeMainActivity(activity.componentName).apply { putExtra("EXTRA_ITEM_ID", itemId) flags = Intent.FLAG_ACTIVITY_NEW_TASK or Intent.FLAG_ACTIVITY_MULTIPLE_TASK or Intent.FLAG_ACTIVITY_LAUNCH_ADJACENT } val pendingIntent = PendingIntent.getActivity( activity, 0, intent, PendingIntent.FLAG_IMMUTABLE ) val data = ClipData( "Item $itemId", arrayOf(ClipDescription.MIMETYPE_TEXT_INTENT), ClipData.Item.Builder().setIntentSender(pendingIntent.intentSender).build() ) DragAndDropTransferData( clipData = data, flags = View.DRAG_FLAG_GLOBAL_SAME_APPLICATION or View.DRAG_FLAG_START_INTENT_SENDER_ON_UNHANDLED_DRAG, ) }
Receive transferred data
To accept data from another instance, use the dragAndDropTarget modifier.
You must explicitly request permissions if the data is coming from a different
instance or app.
Modifier.dragAndDropTarget( shouldStartDragAndDrop = { event -> event.toAndroidDragEvent().clipDescription.hasMimeType(ClipDescription.MIMETYPE_TEXT_PLAIN) }, target = object : DragAndDropTarget { override fun onDrop(event: DragAndDropEvent): Boolean { requestDragAndDropPermissions(activity, event.toAndroidDragEvent()) val clipData = event.toAndroidDragEvent().clipData val item = clipData?.getItemAt(0)?.text if (item != null) { // Process the dropped text item here } return item != null } } )
Key steps:
- Filter: Use
shouldStartDragAndDropto check if the incoming data (MIME type) is supported. - Permissions: Call
requestDragAndDropPermissions(event)to access the data. - Handle: Extract the data in the
onDropcallback.
Additional optimizations
Customize app launches and transition apps from desktop windowing to full screen.
Specify default size and position
Not all apps, even if resizable, need a large window to offer user value. You
can use the ActivityOptions#setLaunchBounds() method to specify a default
size and position when an activity is launched.
Enter full-screen from the desktop space
Apps can go full-screen by calling Activity#requestFullScreenMode(). The
method displays the app full screen directly from desktop windowing.