
3D Games that run well on the largest number of devices begin with 3D art that has been designed to best take advantage of graphics processors. This guide highlights optimizations and best practices for 3D assets on mobile to make your game perform better and minimize power consumption.
Portions of this article are based on work contributed and copyrighted by Arm Limited.
Definition of geometry
Geometry, or polygon mesh, is a collection of vertices, edges, and faces that make up the shape of a 3D object. This can be a car, weapon, environment, character, or any sort of visual asset in a game.
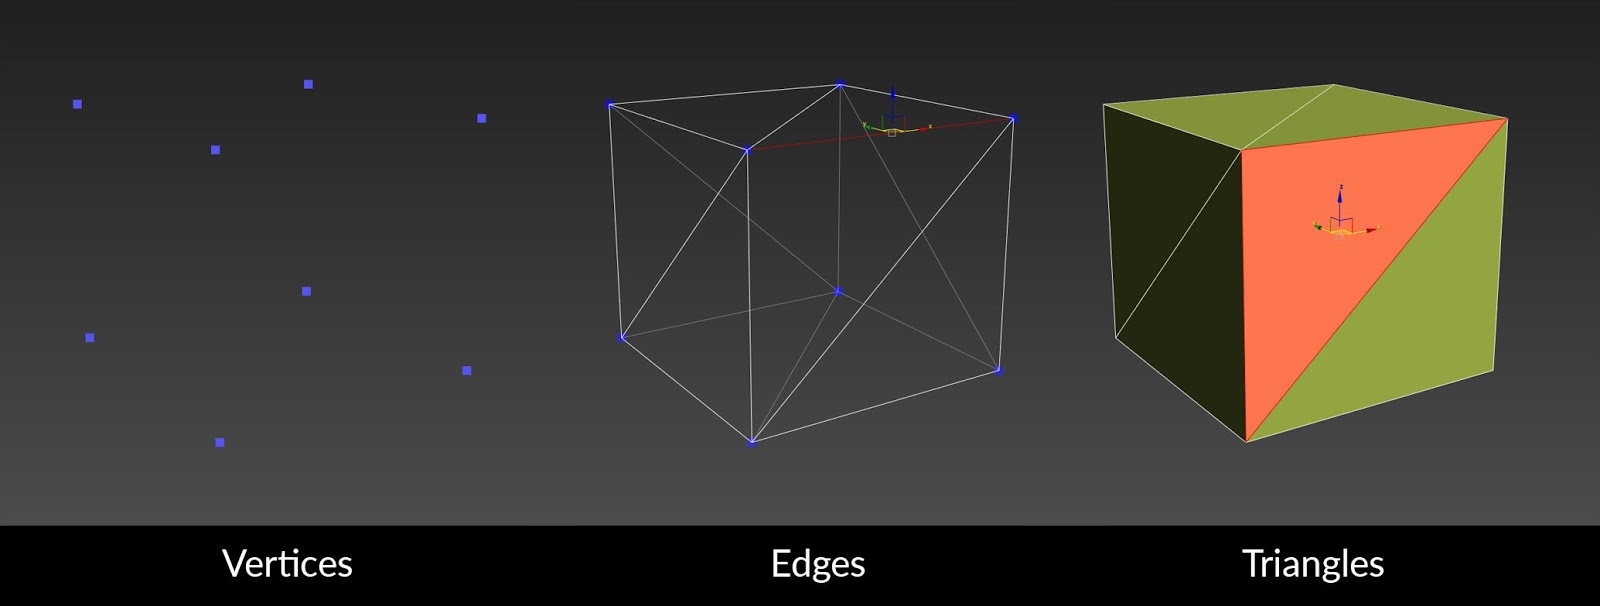
Figure 1. The vertices, edges, and triangles of a cube.
Geometry is made of the following parts:
Vertices: The plural noun for vertex. These points define the structure of an object in 3D space.
Edges: Two vertices connected with a straight line.
Triangle: Three vertices connected to each other by three edges creates a triangle. This is sometimes referred to as a polygon or face. Within 3D software such as 3ds Max, Maya, or Blender, you usually work with quads. Quads are a four-sided polygon and are easier to modify and work with. When rendered, these polygons are displayed on screen as triangles.
Use the following sections to learn more about geometry:
Triangle and polygon usage
The section outlines the best practices for when you use triangles and polygons. This includes the following recommendations:
- Reduce the number of triangles
- Use triangles in important areas
- Remove micro triangles
- Avoid long, thin triangles
Reduce the number of triangles
If you include too many triangles, the game's performance suffers.
Use the fewest number of triangles as possible. We recommend you use just enough to get the quality you want. Consider the impact on performance when you create content for a mobile game. It’s expensive to process vertices. The fewer vertices, the better the overall performance of the game. Also, the fewer triangles you use the more devices the game can be run on without a powerful GPU.
The following image shows that you can maintain quality with fewer triangles:
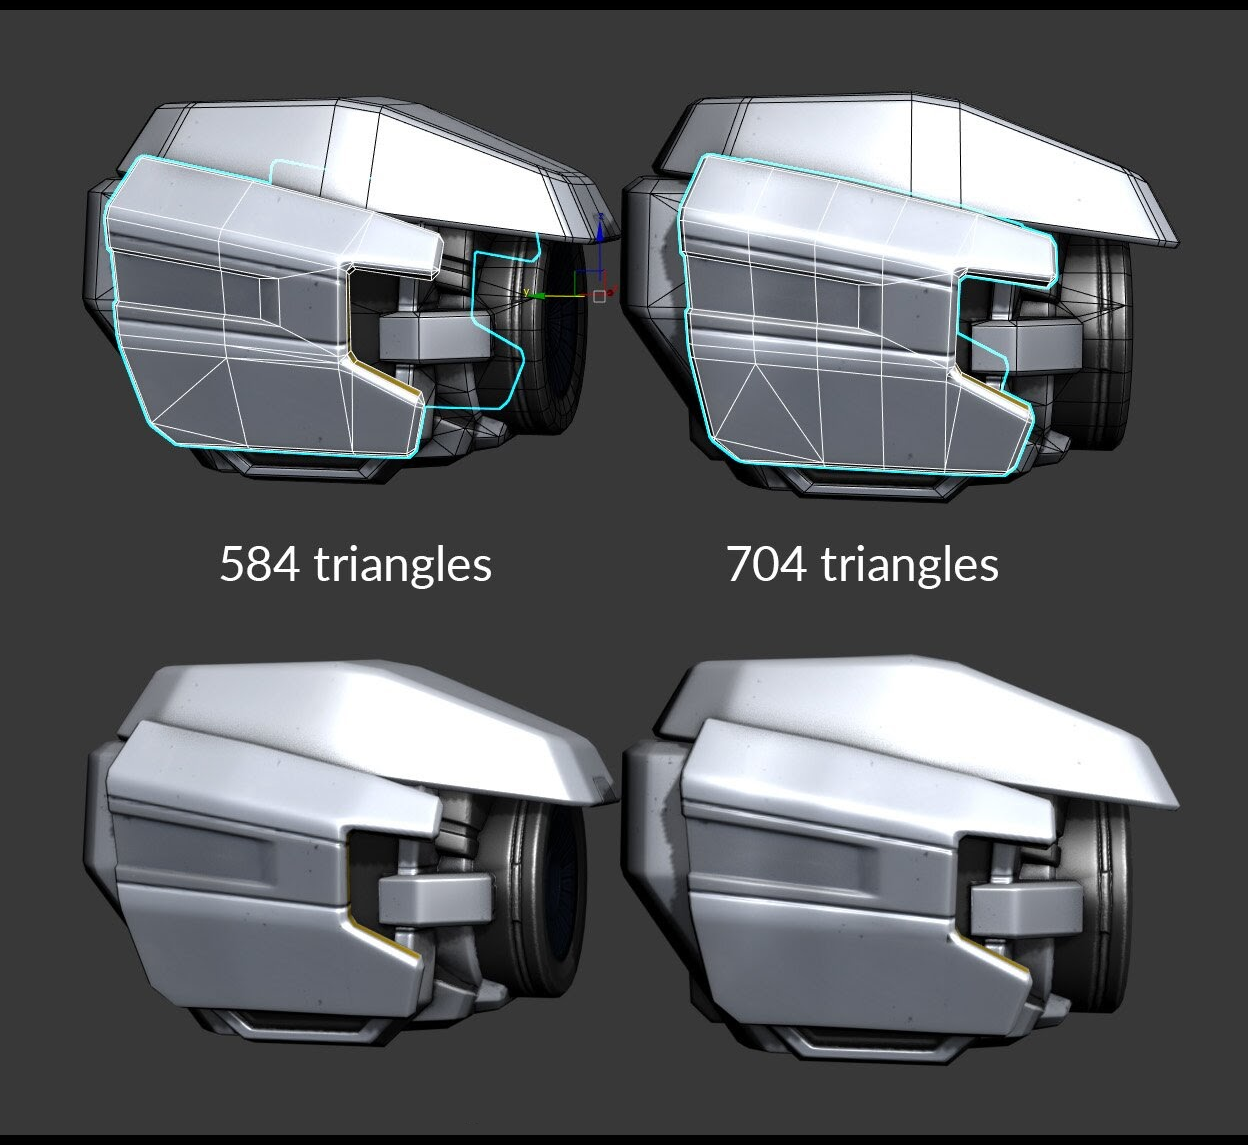
Figure 2. Comparison of two objects with different triangle counts that look the same in shaded mode. In the object on the left, edges were removed that don't contribute to the silhouette.
On mobile platforms, a common maximum number of vertices for an individual mesh is 65,535. To ensure maximum compatibility you must stay below this number.
The reason for this limit is that all GPUs only guarantee support for 16-bit indices, which can represent a range from 0 to 65,535 vertices. Most, but not all, modern GPUs support 32-bit indices, that represent a range from 0 to 4,294,967,295 vertices. If you exceed the supported range when you use 16-bit indices it results in missing or incorrectly rendered geometry.
Always view and test the game on any devices you intend to release on instead of a PC monitor. Some models with a high level of detail might not render correctly or even be visible on a mobile device.
We recommend using more triangles on foreground objects and fewer on background objects. This is more beneficial for games with a static camera point of view (POV). The following example shows an appropriate use of detail on different objects.
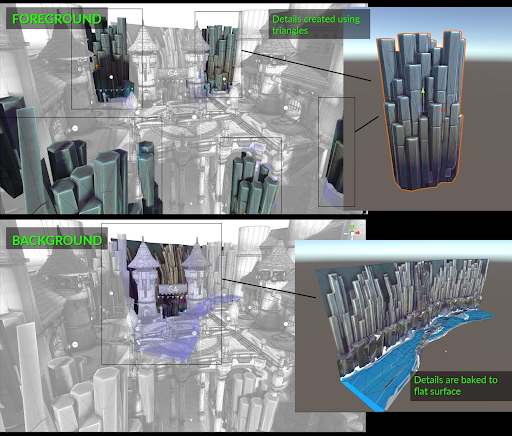
Figure 3. This example shows the high level of detail on foreground objects compared to background objects.
The maximum number of triangles you should use for a model varies based on the device and content. If there are more objects on the screen, use fewer triangles for each model. If only two or three objects are displayed, they can include more triangles.
The following example shows two models from different demos. The Circuit VR demo only has one robot character. Because there's only a single object, the robot model has a higher triangle count. The other model is from the Armies demo. This demo has hundreds of soldiers in each frame, so each soldier has fewer triangles.
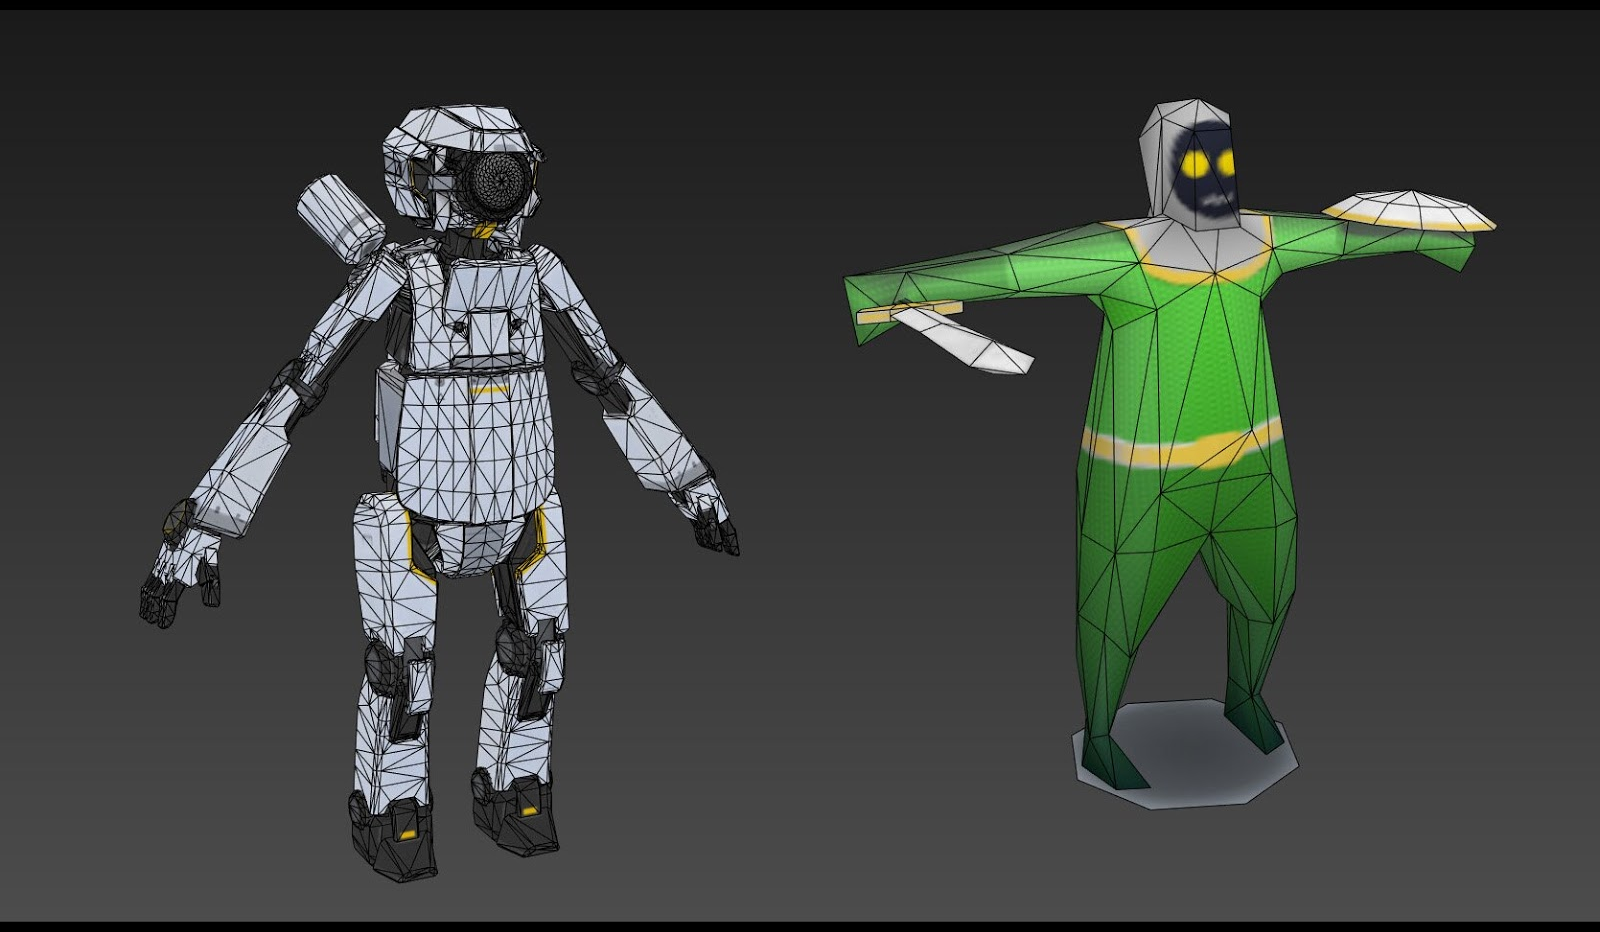
Figure 4. Triangle count comparison for two different use cases. On the left, the CircuitVR Robot has 11,000 triangles. On the right, the Armies Soldier has 360 triangles.
Example of triangle usage
The following figure is an example number of triangles used in the Armies tech demo.
In the Armies demo, which is a 64-bit mobile tech demo built in Unity, the camera is static with many animated characters. In total, each frame renders about 210,000 triangles. This triangle count enables the demo to run stably at approximately 30 frames per second (FPS).
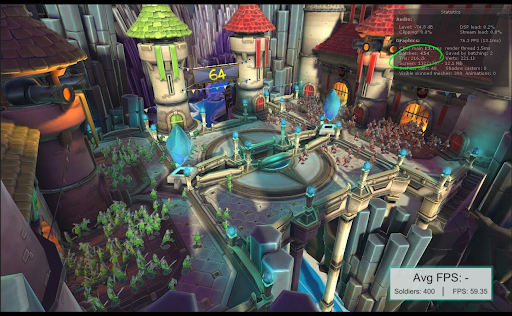
Figure 5. An example render from The Armies tech demo that shows the number of triangles used.
The largest objects in the scene, the cannon towers, are approximately 3,000 triangles because they occupy a large portion of the screen.
The characters use approximately 360 triangles each. Because there are so many of them and they are only seen from a distance, they don’t use many triangles. From the camera POV, they look suitable.
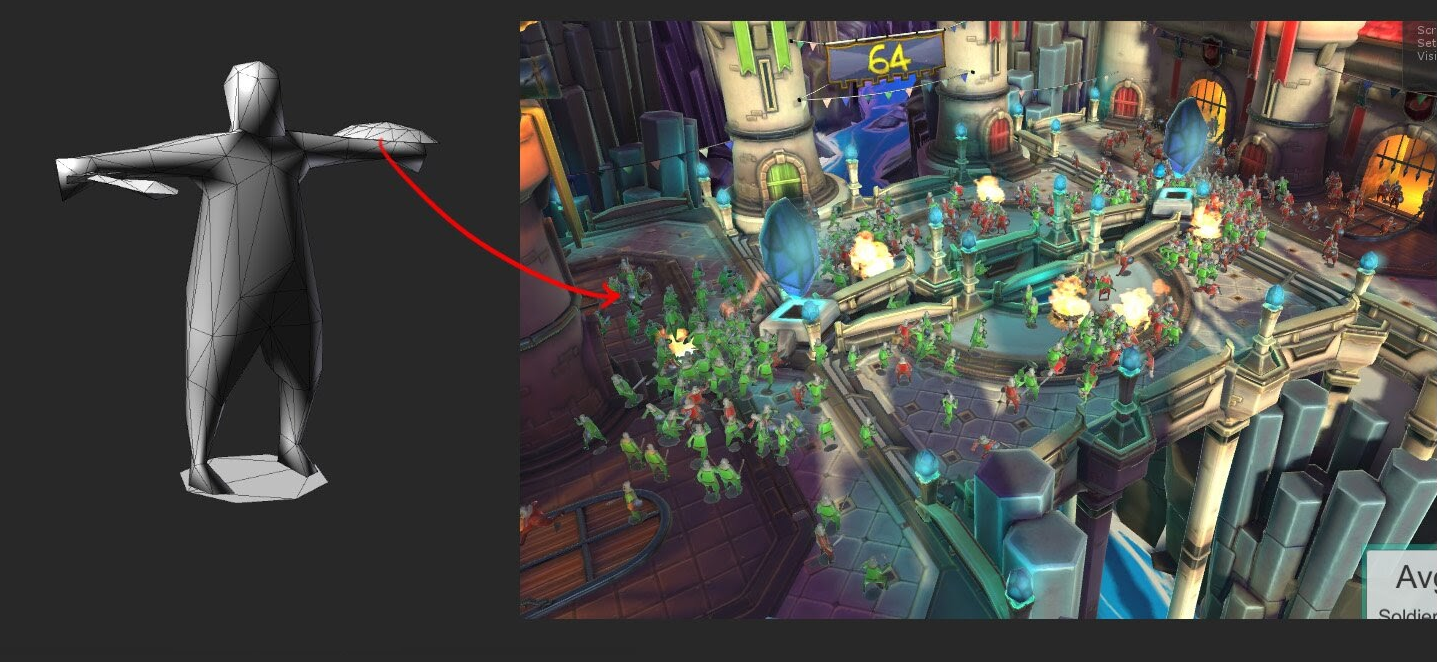
Figure 6. A view of the low-triangle soldiers in the Armies tech demo.
Use triangles in important areas
Vertices are very expensive on mobile platforms. To prevent any waste of your processing budget, place vertices in areas that contribute to the visual quality of the game. Small details on a 3D object might not be visible on the game’s final screen. Tiny details might be impossible to see because of the small screen size and placement of 3D objects.
Instead of fine details, focus on large shapes that contribute to the silhouette. The following image is an example of focus on the silhouette:
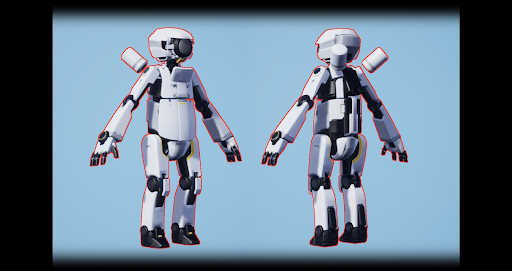
Figure 7. The red line around the robot represents their silhouette.
We recommend you use fewer triangles on areas that aren’t seen very often from the camera POV. For example, the bottom of a car or the back of a wardrobe. If a part of an object will never be seen, delete that part of the object.
Deletion of part of an object must be done carefully and might limit re-usability of the object. For example, if you delete the bottom part of a table mesh, the user will notice the deleted section if the table is placed upside down.
Don’t model small details with high-density triangle meshes. Use textures and normal maps for fine detail. The following example shows the same mesh with and without a normal map.
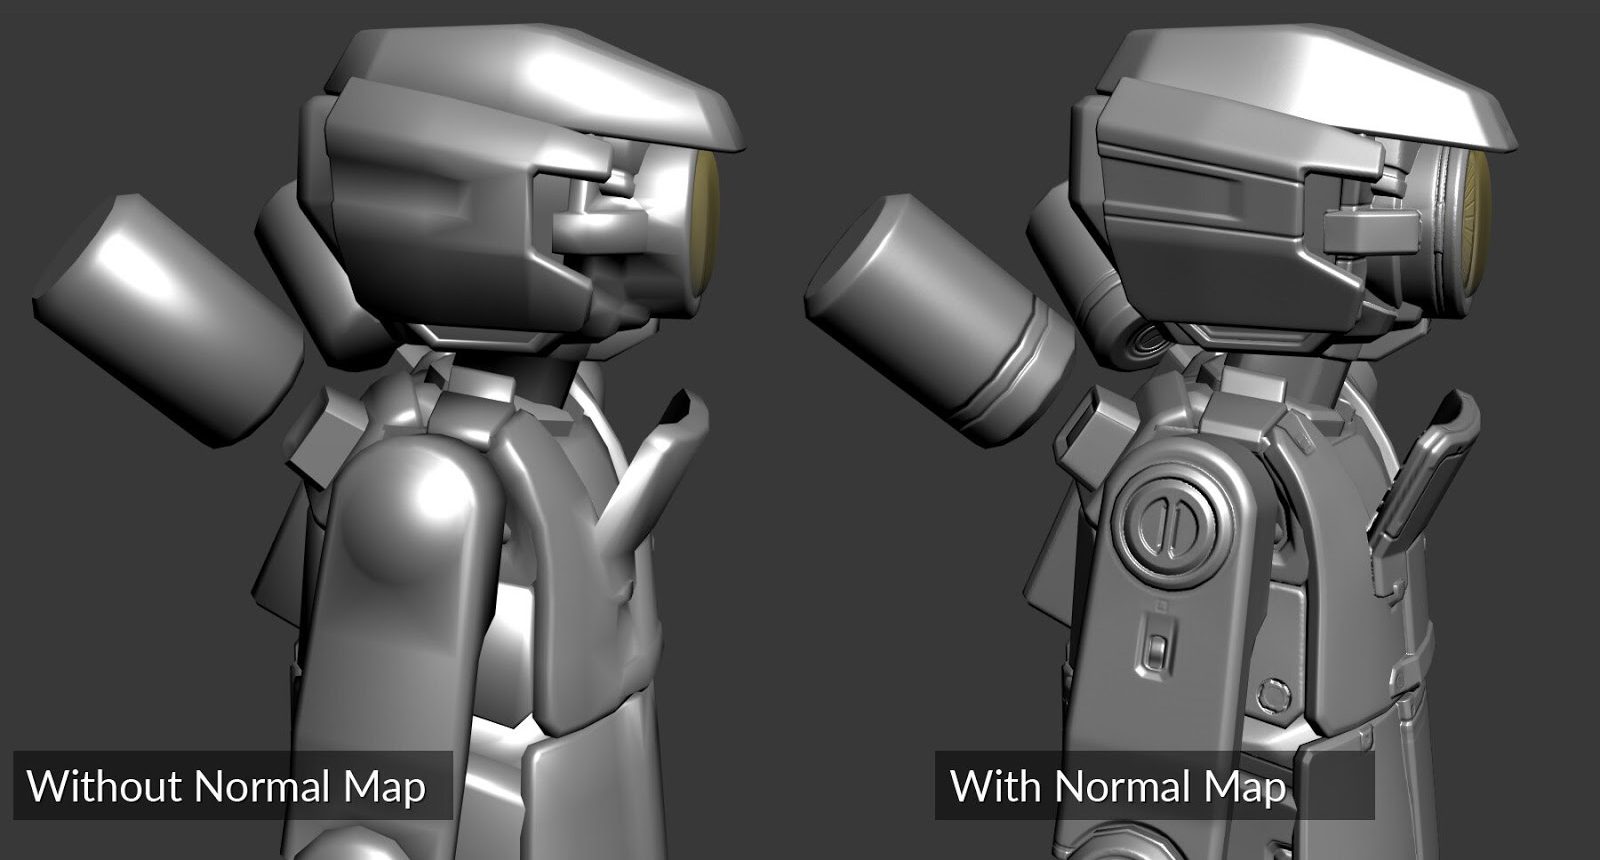
Figure 8. Comparison of a model with and without a normal map applied.
Remove micro triangles
Micro triangles are very small triangles that don’t contribute to the final visuals of a scene.
All high polygon count 3D objects have micro triangle problems when they’re moved away from the camera. There’s no industry standard definition for micro triangles, but micro triangles are usually understood as triangles smaller than 1 to 10 pixels in the final image. Micro triangles are bad because the GPU needs to do all of the processing on all these triangles even though they don’t contribute to the final image.
Micro triangles are caused by two things:
- Details that are too small and consist of many triangles.
- Objects further from the camera with lots of triangles.
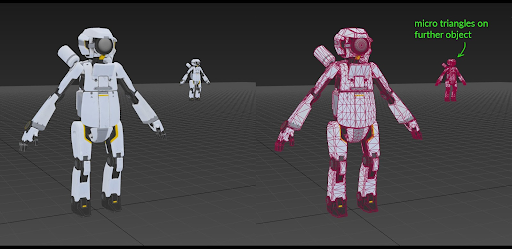
Figure 9. Effect of distance on micro triangles.
In Figure 9, the foreground robot does not have micro triangles. The background robot does because each triangle is only 1 to 10 pixels in size.
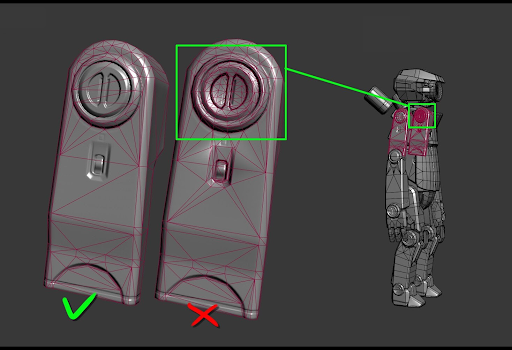
Figure 10. Comparison of micro triangles on highly detailed models. Most of the triangles in the highlighted area are too small to see on phone screens.
For an object that's further from the camera, use level of detail (LOD). This reduces the complexity of an object and makes it simpler. The result is an object less dense with triangles.
Don’t model details with many triangles. Use textures and normal maps for this type of fine detail. You can merge vertices and triangle details that are too small and don’t contribute to the final image.
It's important to reduce the number of micro triangles as they can affect memory bandwidth. More triangles results in more data sent to the GPU. On a mobile device, this can affect battery life. Increased power consumption can cause thermal throttling, which limits the maximum performance of the GPU.
Avoid long, thin triangles
These are triangles that, when rendered in the final image, are smaller than 10 pixels in one dimension and span far across the screen. Long, thin triangles are generally more expensive to process than other triangles.
In the following image, the bevel on the pillar has a long, thin triangle when viewed from a distance. These bevels are not a problem if seen close up.
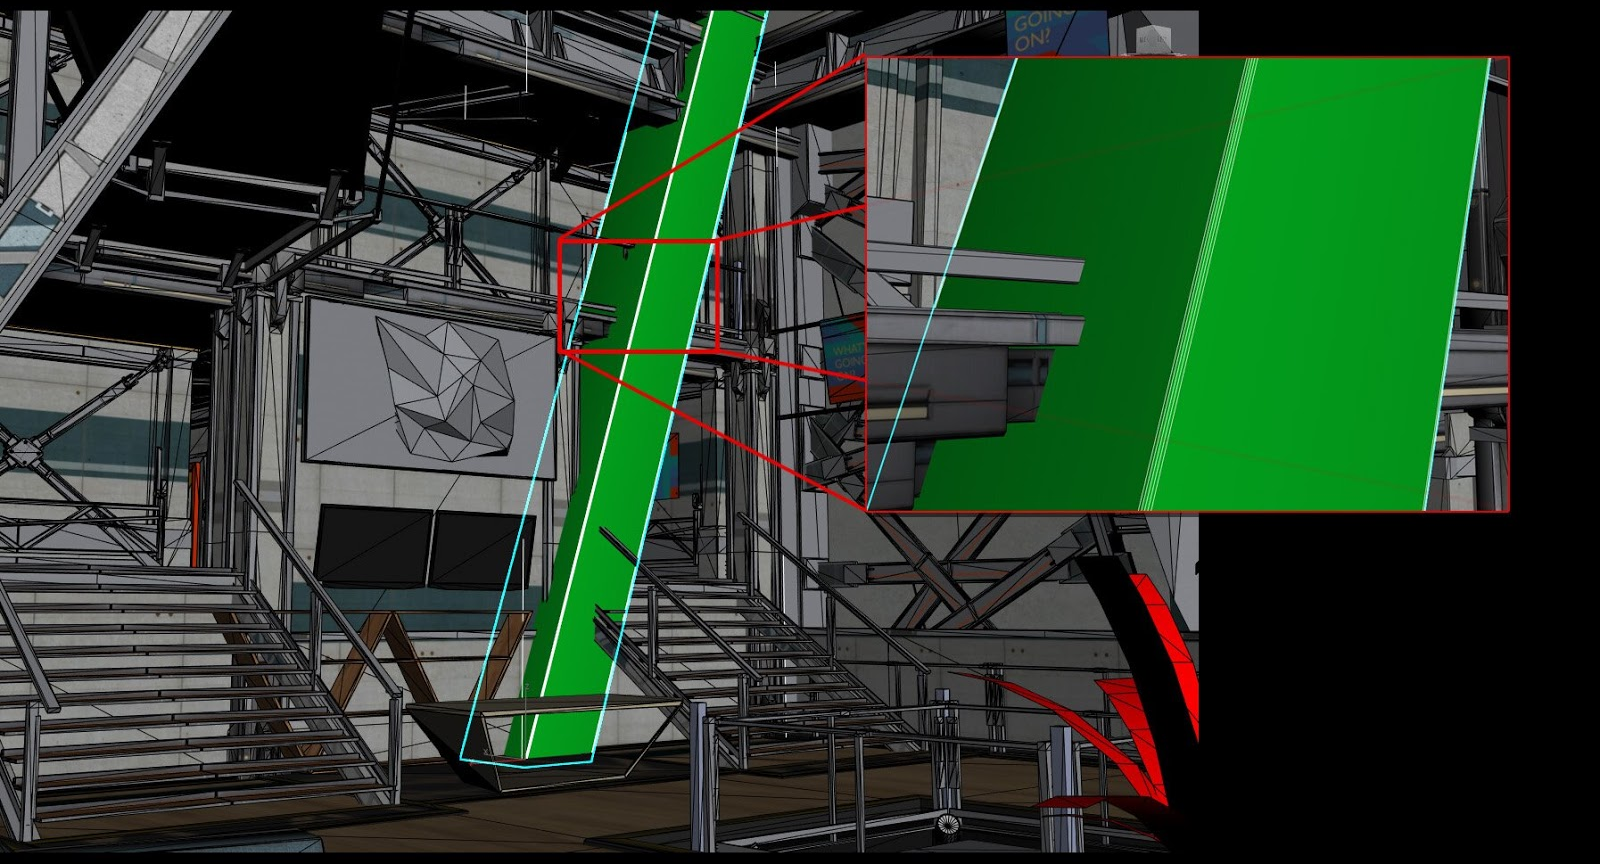
Figure 11. The bevel on the pillar is a long, thin triangle.
We recommend that you remove long thin triangles from all objects if possible.
For shiny objects, long and thin triangles might cause a flicker of light as the camera moves. LOD can help remove long, thin triangles when an object is far away from the camera.
If possible, try to keep all triangles close to equilateral. This gives the triangles more area and less edge. Long, thin triangles perform worse compared to bigger triangles in general. For more information on triangle area, read Triangulation.
Level of detail
The level of detail (LOD) refers to a technique that reduces complexity as objects become more distant from the viewer. The most common form of LOD involves multiple versions of a mesh, with progressively fewer vertices. LOD not only reduces the number of vertices to be processed, it also avoids the problem of micro triangles. It also looks better for objects placed further away in the scene.
We recommend that you use LOD whenever possible. Focus on the silhouette of the object. It’s best to focus on flat areas to target for vertex reduction. The following image shows use of LOD, applied to the robot model.
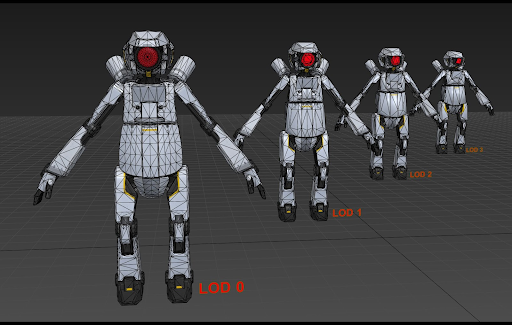
Figure 12. Comparison of the number of vertices used as the LOD changes.
In Figure 12, it’s hard to see the difference between the same object that consists of 200 triangles or 2,000 triangles at a distance. An object with more triangles adds a high resource cost but doesn't improve the appearance when viewed at a distance.
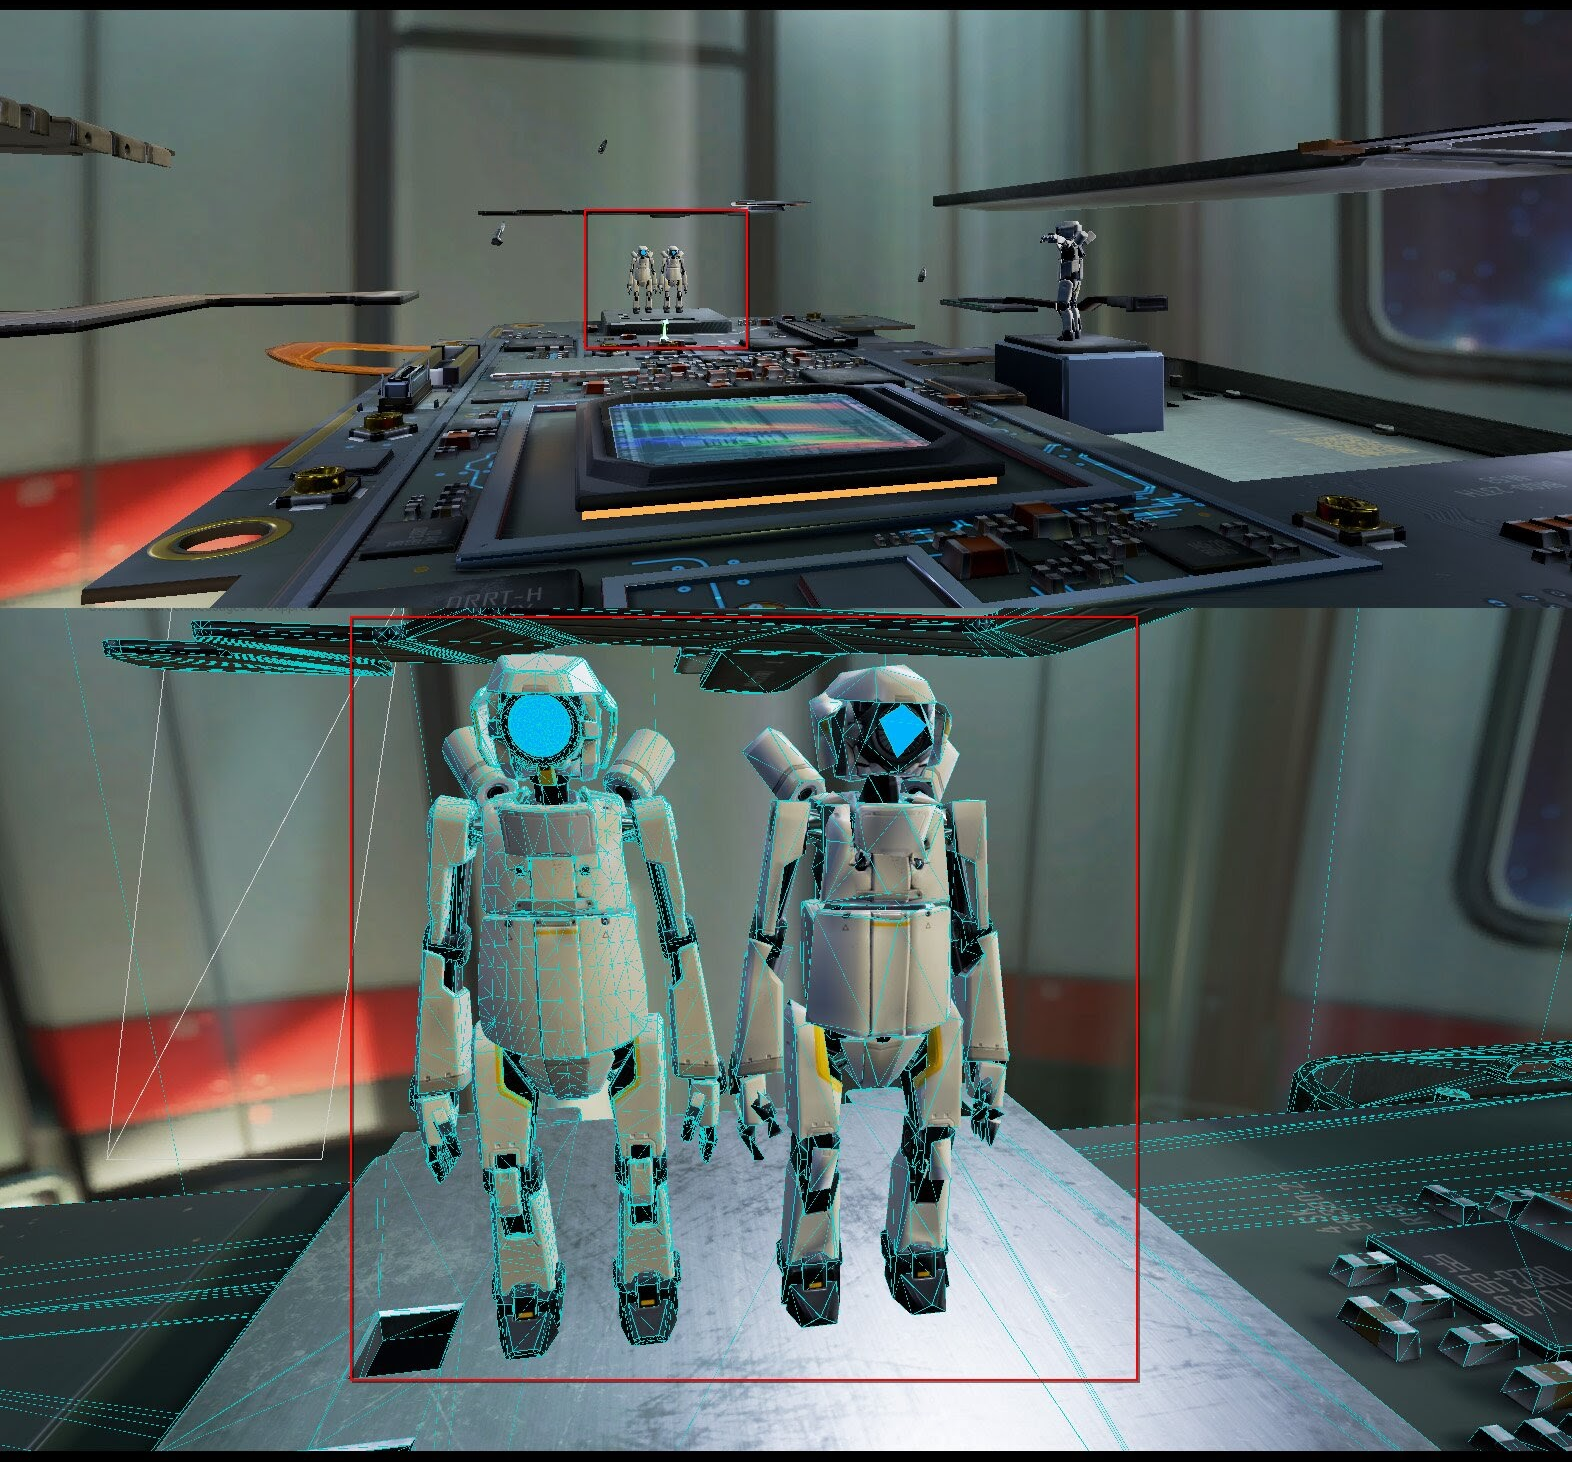
Figure 13. Comparison of distant models with different triangle counts.
LOD as a concept can also apply to shader complexity and texture resolution. At a lower LOD, different materials may be used with simpler shaders and fewer textures. You should also ensure textures have mipmaps, so that lower resolution texture levels are applied to distant objects. These measures will boost performance, with a tradeoff of increasing the size of your data.
We don’t recommend LOD for any game where the camera and objects are static. The greatest benefit of LOD is for objects that move toward and away from the camera. Static objects don’t move, so there's no benefit for LOD.
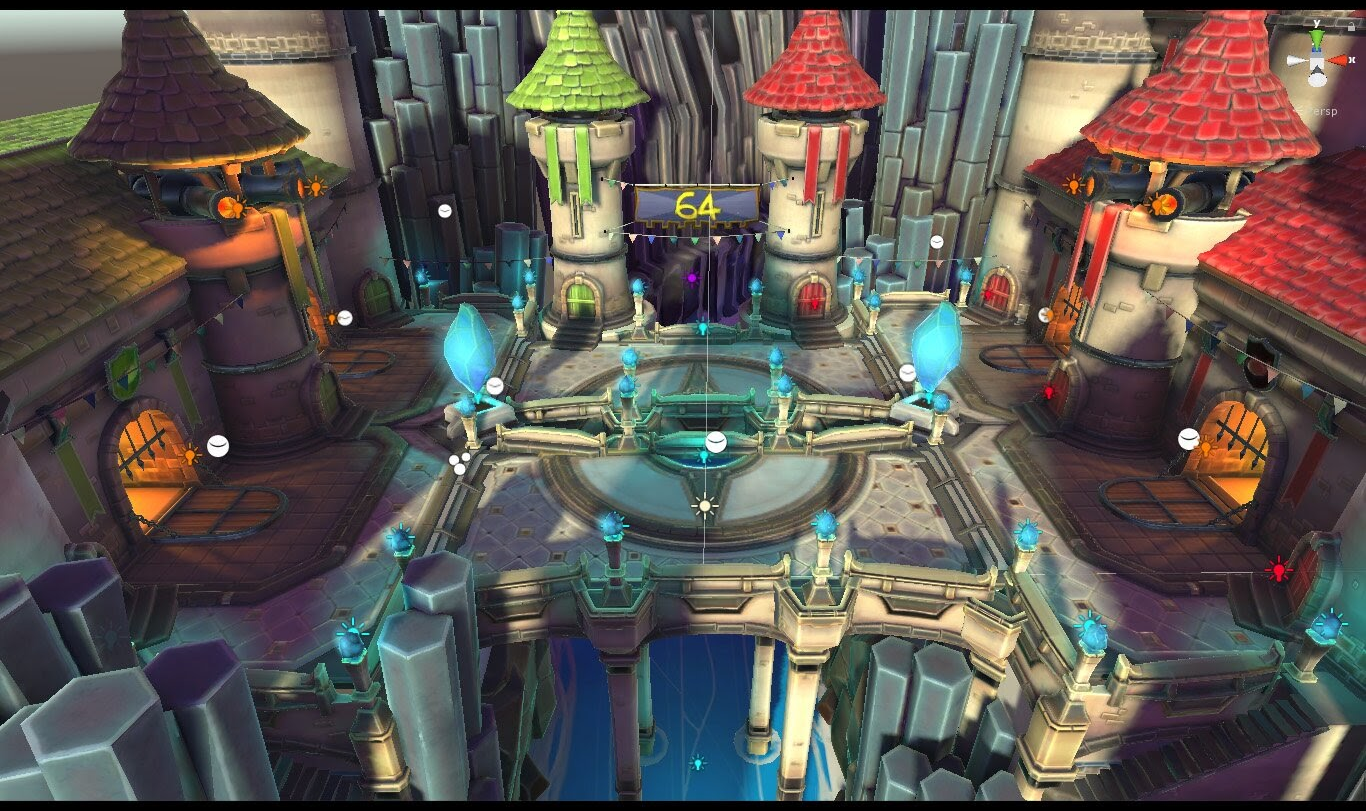
Figure 14. A static-camera scene from the Armies tech demo that doesn’t use LOD.
LOD ratios
Use a consistent ratio when you reduce the number of triangles for LOD. We recommend you reduce the triangles by 50% for each level.
Don’t use LOD on simple objects. Objects that already have a low triangle count don’t benefit from LOD. The following example from The Armies tech demo shows what the game looks like with a static image and low triangle objects.
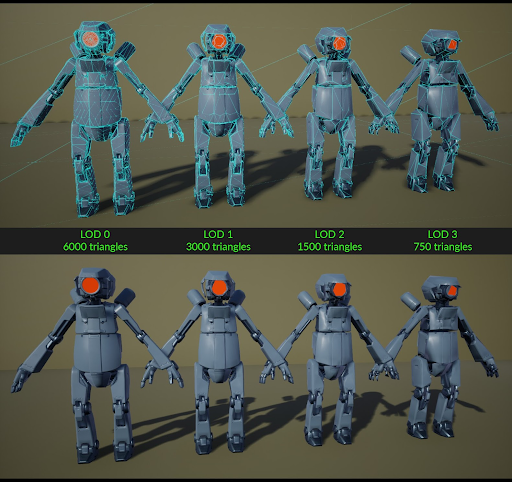
Figure 15. A comparison between models as the LOD decreases.
Verify the LOD levels change at the proper distances from the camera. Base your analysis on how they're used in the game.
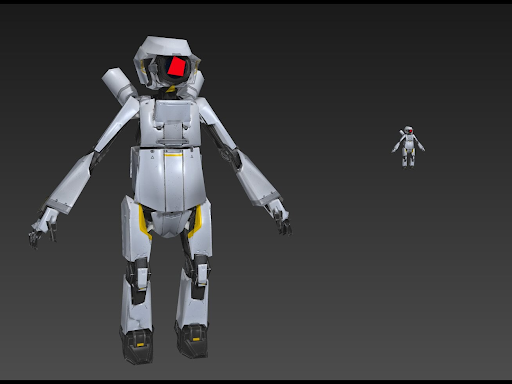
Figure 16. Comparison of a LOD 3 model's appearance close up and at its intended distance.
There isn’t a hard number for how much LOD is reasonable for an object to have. It depends on the size of the object and how important the object is. For example, a character in an action game or a car in a racing game might have more LOD levels than small background objects like a tree.
Keep in mind that too much LOD costs CPU resources. More processing power is required for the CPU to decide which LOD to display. LODs also cost memory, which increases the file size and VRAM usage. It also takes additional time to create and verify the LOD models.
There are two ways to create LOD meshes: manually and automatically.
- You can manually create LOD meshes with any 3D software.
- To do this, remove edge loops or reduce the number of vertices on the 3D object.
- This gives the artist the most control over the final product but might take longer.
- LOD meshes can be created automatically.
- You can use a modifier inside a 3D package such as ProOptimizer within 3ds Max or Generate LOD Meshes within Maya.
- You can use LOD generation software such as Simplygon or InstaLOD.
- Some game engines have an automatic LOD generation feature that allows you to create and apply LOD meshes.
Best practices
There are additional techniques to reduce the resources required for your game that also maintain the graphical fidelity.
Smoothing groups or custom vertex normals
Use smoothing groups or custom vertex normals to define the hardness of an edge and alter the look of a model. A smoothing group helps create better shading on low poly art direction. A smoothing group also affects the UV islands splitting and quality of normal maps when you bake.
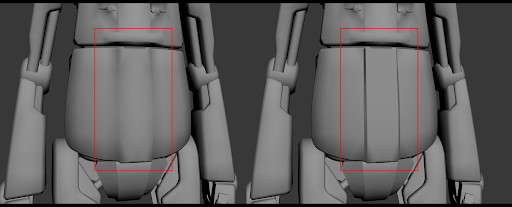
Figure 17. Comparison of a model with and without a smoothing group.
If you implement a smoothing group on a 3D model, it must be exported from the 3D software and imported into the engine.
Mesh topology
When you create a new 3D asset, make sure it has a tidy topology. Clean topology is essential for characters and other objects that animate and change. The topology doesn’t need to be perfect. Keep in mind that end users won’t see the wireframe and that textures and materials will have a larger impact on the look of the model.
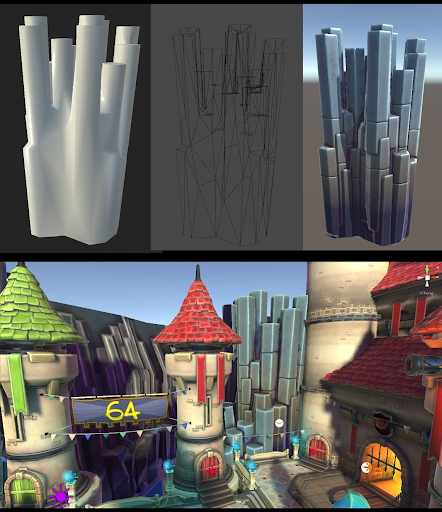
Figure 18. The topology, wireframe, and final version of a rock from the Armies tech demo.
Shape exaggeration
You can exaggerate some shapes to make your models easier to interpret. This depends heavily on the type and style of your game. Because mobile device screens are small, it can be hard to capture certain shapes that are very small. Exaggeration of these shapes can help users see the shape even at a distance.
For example, you can make characters with bigger hands so they're easier to see.
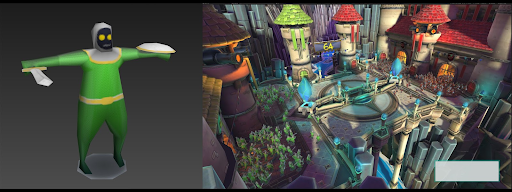
Figure 19. Example model that shows exaggerated proportions for better visibility.