
This document describes how to migrate existing games from the games v1 SDK to the games v2 SDK. The Play Games plugin for Unity, versions 10 and earlier, uses the games v1 SDK.
Before you begin
- Make sure that you have already set up Play Console and installed the Unity Editor.
Download the Google Play Games plugin for Unity
To benefit from the latest features in the Play Games Services, download and install the latest plugin version. Download it from the gitHub repository.
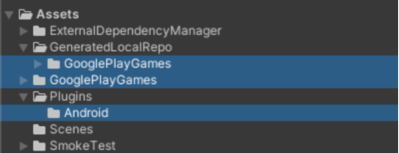
Remove the old plugin
In the Unity Editor, remove the following folders or files.
Assets/GooglePlayGames

Assets/GeneratedLocalRepo/GooglePlayGames

Assets/Plugins/Android/GooglePlayGamesManifest.androidlib

Assets/Plugins/Android
Import the new plugin to your Unity project
To import the plugin to your Unity project, follow these steps:
- Open your game project.
- In the Unity Editor, click Assets > Import Package > Custom Package
to import the downloaded
unitypackagefile into your project's assets. Make sure that your current build platform is set to Android.
In the main menu, click File > Build Settings.
Select Android and click Switch Platform.
There should be a new menu item under Window > Google Play Games. If there isn't, refresh the assets by clicking Assets > Refresh and then try setting the build platform again.
In the Unity Editor, click File > Build Settings > Player Settings > Other Settings.
In the Target API level box, select a version.
In the Scripting backend box, enter
IL2CPP.In the Target architectures box, select a value.
Note the package name package_name.You can use this information later.
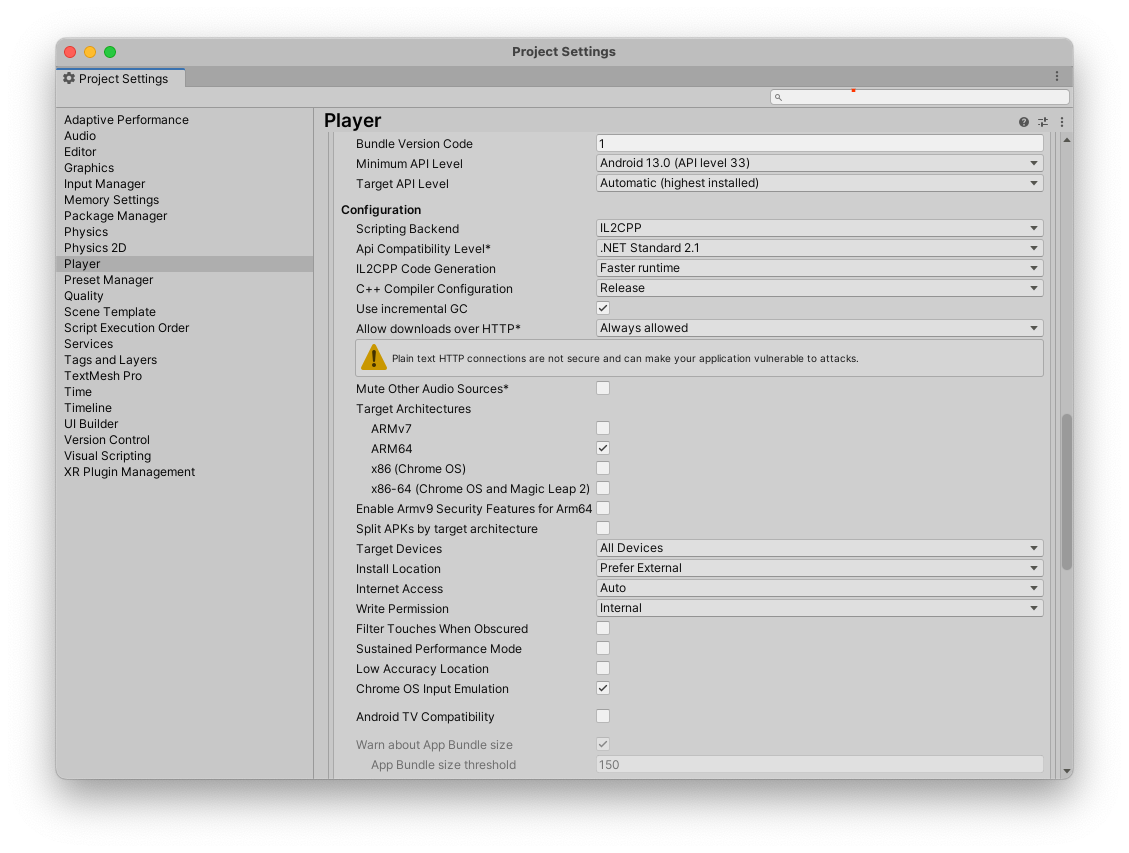
The player settings in your Unity project.
Migration paths
The correct migration path for your game depends on how it implements Play Games Services v1 and handles player identity. To ensure a smooth transition and prevent player data loss, identify the scenario that best matches your existing setup and follow the corresponding steps.
Option 1: For Games where IGA is bound to Play Games Services Player ID
This scenario applies to games that have used the Play Games Services Player ID as the only
identifier for a player's In-Game Account (IGA) and have not previously
requested or stored an OpenID. The central challenge is to link the existing
IGA to a primary identifier (the OpenID) without losing the connection to the
player's progress.
The migration flow includes the following steps:
- When the game launches, the Play Games Services v2 SDK automatically and silently authenticates the platform.
The game presents its login screen. This screen must feature a Sign in with Google (SiWG) button, replacing the Google Play button. To integrate:
Download CredManBridge.java to your folder. This Java class acts as a bridge between Unity and the
androidx.credentialslibrary.CredManBridge.java
package com.wickedcube.trivialkart; import android.accounts.Account; import android.content.Context; import android.util.Log; import android.os.CancellationSignal; import androidx.credentials.CredentialManager; import androidx.credentials.GetCredentialRequest; import androidx.credentials.GetCredentialResponse; import androidx.credentials.exceptions.GetCredentialException; import androidx.credentials.exceptions.NoCredentialException; import com.google.android.libraries.identity.googleid.GetGoogleIdOption; import com.google.android.libraries.identity.googleid.GoogleIdTokenCredential; import com.google.android.gms.auth.api.identity.AuthorizationClient; import com.google.android.gms.auth.api.identity.AuthorizationRequest; import com.google.android.gms.auth.api.identity.AuthorizationResult; import com.google.android.gms.common.api.ApiException; import com.google.android.gms.auth.api.identity.Identity; import com.google.android.gms.common.api.Scope; import com.unity3d.player.UnityPlayer; import java.util.Collections; import java.util.List; import java.util.concurrent.Executor; import java.util.concurrent.Executors;public class CredManBridge {
// --- MODE 1: SILENT SIGN-IN (Called on Awake) --- // Tries to auto-select an authorized account. If it fails, it does NOT show UI. public static void signInSilent(Context context, String webClientId) { CredentialManager credentialManager = CredentialManager.create(context); CancellationSignal cancellationSignal = new CancellationSignal(); Executor executor = Executors.newSingleThreadExecutor();
Log.d("CredMan", "Attempting Silent Sign-In...");
GetGoogleIdOption silentOption = new GetGoogleIdOption.Builder() .setFilterByAuthorizedAccounts(true) // Strict: Only authorized accounts .setServerClientId(webClientId) .setAutoSelectEnabled(true) // Auto-select if possible .build();
GetCredentialRequest silentRequest = new GetCredentialRequest.Builder() .addCredentialOption(silentOption) .build();
credentialManager.getCredentialAsync( context, silentRequest, cancellationSignal, executor, new androidx.credentials.CredentialManagerCallback<GetCredentialResponse, GetCredentialException>() { @Override public void onResult(GetCredentialResponse result) { Log.d("CredMan", "Silent Sign-In Successful!"); handleSignInResult(context, result, webClientId); }
@Override public void onError(GetCredentialException e) { // Send a specific error code so Unity knows to just stay on the Start Screen Log.d("CredMan", "Silent sign-in failed. Keeping UI hidden."); UnityPlayer.UnitySendMessage("AuthManager", "OnSignInError", "SilentFailed"); } }); }
// --- MODE 2: INTERACTIVE SIGN-IN (Called on Button Click) --- // Forces the Account Selection / "Add Account" sheet to appear. public static void signInInteractive(Context context, String webClientId) { CredentialManager credentialManager = CredentialManager.create(context); CancellationSignal cancellationSignal = new CancellationSignal(); Executor executor = Executors.newSingleThreadExecutor();
Log.d("CredMan", "Starting Interactive Sign-In...");
GetGoogleIdOption interactiveOption = new GetGoogleIdOption.Builder() .setFilterByAuthorizedAccounts(false) // Show ALL accounts (and "Add Account") .setServerClientId(webClientId) .setAutoSelectEnabled(false) // Force the UI to show .build();
GetCredentialRequest interactiveRequest = new GetCredentialRequest.Builder() .addCredentialOption(interactiveOption) .build();
credentialManager.getCredentialAsync( context, interactiveRequest, cancellationSignal, executor, new androidx.credentials.CredentialManagerCallback
    @Override
    public void onError(GetCredentialException e) {
        Log.e("CredMan", "Interactive Sign-In Canceled or Failed", e);
        UnityPlayer.UnitySendMessage("AuthManager", "OnSignInError", "Canceled");
    }
}
); }
private static void handleSignInResult(Context context, GetCredentialResponse result, String webClientId) { try { GoogleIdTokenCredential credential = GoogleIdTokenCredential.createFrom(result.getCredential().getData()); String email = credential.getId();
Account account = new Account(email, "com.google");
// Requesting GAMES_LITE scope to check for pre-existing V1 grants
List<Scope> requestedScopes = Collections.singletonList(new Scope("https://www.googleapis.com/auth/games_lite"));

AuthorizationRequest authRequest = new AuthorizationRequest.Builder()
    .setRequestedScopes(requestedScopes)
    .setAccount(account)
    .requestOfflineAccess(webClientId)
    .build();

AuthorizationClient authClient = Identity.getAuthorizationClient(context);

authClient.authorize(authRequest)
    .addOnSuccessListener(authorizationResult -> {
        if (authorizationResult.getServerAuthCode() != null) {
            // CASE 1: RETURNING USER (Success)
            // The user has already granted GAMES_LITE in the past.
            // We got the code directly without showing UI.
            Log.i("CredMan", "PGS v1: Existing grant found. Returning user detected. Auth Code retrieved.");
            UnityPlayer.UnitySendMessage("AuthManager", "OnSignInSuccess", authorizationResult.getServerAuthCode());
        }
        else if (authorizationResult.hasResolution()) {
            // CASE 2: NEW USER (PendingIntent)
            // The user has NOT granted GAMES_LITE before. The API returned a PendingIntent
            // (authorizationResult.getPendingIntent()) to show the consent screen.
            // As per your flow, we DISCARD this intent and do not show UI.
            Log.i("CredMan", "PGS v1: No existing grant (PendingIntent returned). This is a NEW user or they revoked access.");
            Log.i("CredMan", "PGS v1: Discarding PendingIntent. Proceeding as New User.");

            // Notify Unity that this is a "New User" so it can trigger V2 logic instead of failing
            UnityPlayer.UnitySendMessage("AuthManager", "OnSignInError", "NewUser_NoGrant");
        }
        else {
            // Edge Case: No code and no resolution?
            Log.e("CredMan", "PGS v1: Authorization success but no Auth Code or Resolution returned.");
            UnityPlayer.UnitySendMessage("AuthManager", "OnSignInError", "No Auth Code returned");
        }
    })
    .addOnFailureListener(e -> {
        // CASE 3: GENERIC FAILURE
        Log.e("CredMan", "PGS v1: Authorization failed completely.", e);
        UnityPlayer.UnitySendMessage("AuthManager", "OnSignInError", "Authorization Failed: " + e.getMessage());
    });
} catch (Exception e) { UnityPlayer.UnitySendMessage("AuthManager", "OnSignInError", "Parsing Error: " + e.getMessage()); } } }
Credential Manager Integration:
- Use
GetGoogleIdOptionwithsetFilterByAuthorizedAccounts(true)for silent sign-ins to only sign in users who have previously authorized the app. - Use
setFilterByAuthorizedAccounts(false)for interactive sign-ins to allow users to select an account or add a new one.
- Use
Scope Request:
- After obtaining the base Google credential, it creates an
AuthorizationRequestrequesting the specific legacy scope: https://www.googleapis.com/auth/games_lite. - This scope is critical as it grants the server permission to look up the user's legacy PlayerID.
- After obtaining the base Google credential, it creates an
Result Handling:
- If the user grants permission (or has previously granted it), the
bridge returns the
ServerAuthCodeto Unity. - If the user has not granted permission (New User scenario), the API
returns a
PendingIntent. In this sample, the intent is discarded, and the user is treated as a new user to simplify the flow.
- If the user grants permission (or has previously granted it), the
bridge returns the
To support the Credential Manager and Google Identity services, ensure the following dependencies are added to your
mainTemplate.gradlegradle configuration.dependencies { // Standard Unity dependencies implementation fileTree(dir: 'libs', include: ['*.jar']) // Credential Manager and Identity Libraries implementation 'androidx.credentials:credentials:1.3.0' implementation 'androidx.credentials:credentials-play-services-auth:1.3.0' implementation 'com.google.android.libraries.identity.googleid:googleid:1.1.1' // Play Services Auth for legacy scope handling implementation 'com.google.android.gms:play-services-auth:21.2.0' }
- Credential Manager: Handles the core identity orchestration and UI for account selection.
- GoogleID Library: Specifically provides
GetGoogleIdOptionfor retrievingOpenIDConnect tokens. - Play Services Auth: Required to maintain compatibility and request
the
GAMES_LITEscope for legacyPlayer IDretrieval.
When the player taps the SiWG button and selects a Google Account, the game must retrieve two distinct identifiers:
- The
OpenID, the primary identifier for binding the IGA. - The Play Games Services
Player ID, retrieved by using theGAMES_LITEscope, to look up the player's IGA in your backend system and perform the binding.
- The
In subsequent game launches, players can access their IGA by the SiWG flow, without requiring games to use
Player IDas a primary identifier.
You can perform step 4 using a game client-side implementation.
- The developer calls Android Credential Manager API to sign the user in with a Google Account.
- After the user completes SiwG and selects a Google Account, the developer receives a result object, containing the ID token, the email address.
- The developer constructs an Account object from the email address.
- The developer calls the Authorization API with the
GAMES_LITEscope and the Account. - If the account has a pre-existing grant on the
GAMES_LITEscope, the Authorization API returns a token directly in the response object.- Use the response token to call Play Games Services servers and retrieve Play Games Services
Player ID. - The developer verifies if the Play Games Services
Player IDwas linked with an in-game account.- The developer knows this is a returning user from Play Games Services v1.
- The developer can link the new gaia ID with the previous Play Games Services v1 account.
- Use the response token to call Play Games Services servers and retrieve Play Games Services
- Or, if the account doesn't have a pre-existing grant on the
GAMES_LITEscope, the Authorization API returns a PendingIntent.- The developer knows the user doesn't have an existing account from Play Games Services v1.
- The developer can safely discard the PendingIntent without showing any UI.
Option 2: For Games already binding IGA to OpenID
Developers in this group have the most straightforward migration path. If your game's in-game account is already primarily bound to the OpenID, you only need to perform the standard technical SDK migration from v1 to v2 as outlined in the steps.
Update automatic sign-in code
Replace the PlayGamesClientConfiguration initialization class with the
PlayGamesPlatform.Instance.Authenticate() class.
The initialization and activation of
PlayGamesPlatform
is not required. Calling PlayGamesPlatform.Instance.Authenticate() fetches the
result of automatic sign-in.
For more information about the recommended authentication flow with Play Games Services v2
integration, see User experience guideline for ideal authentication flow.
C#
In the Unity Editor, locate the files with
PlayGamesClientConfiguration class.
using GooglePlayGames;
using GooglePlayGames.BasicApi;
using UnityEngine.SocialPlatforms;

public void Start() {
    PlayGamesClientConfiguration config =
        new PlayGamesClientConfiguration.Builder()
    // Enables saving game progress
    .EnableSavedGames()
    // Requests the email address of the player be available
    // will bring up a prompt for consent
    .RequestEmail()
    // Requests a server auth code be generated so it can be passed to an
    // associated backend server application and exchanged for an OAuth token
    .RequestServerAuthCode(false)
    // Requests an ID token be generated. This OAuth token can be used to
    // identify the player to other services such as Firebase.
    .RequestIdToken()
    .Build();

    PlayGamesPlatform.InitializeInstance(config);
    // recommended for debugging:
    PlayGamesPlatform.DebugLogEnabled = true;
    // Activate the Google Play Games platform
    PlayGamesPlatform.Activate();
}
And update it to this:
using GooglePlayGames;

public void Start() {
    PlayGamesPlatform.Instance.Authenticate(ProcessAuthentication);
}

internal void ProcessAuthentication(SignInStatus status) {
    if (status == SignInStatus.Success) {
        // Continue with Play Games Services
    } else {
        // Disable your integration with Play Games Services or show a login
        // button to ask users to sign-in. Clicking it should call
        // PlayGamesPlatform.Instance.ManuallyAuthenticate(ProcessAuthentication).
    }
}
Choose a social platform
To choose a social platform, see choose a social platform.
Retrieve server authentication codes
To get server side access codes, see retrieve server authentication codes.
Remove sign-out code
Remove the code for sign-out. Play Games Services no longer requires an in-game sign-out button.
Remove the code shown in the following example:
C#
// sign out
PlayGamesPlatform.Instance.SignOut();
Test your game
Ensure your game functions as designed by testing it. The tests you perform depend on your game's features.
The following is a list of common tests to run.
Successful sign-in.
Automatic sign-in works. The user should be signed in to Play Games Services upon launching the game.
The welcome popup is displayed.

Sample welcome popup (click to enlarge). Successful log messages are displayed. Run the following command in the terminal:
adb logcat | grep com.google.android.
A successful log message is shown in the following example:
[
Ensure UI component consistency.
Pop ups, leaderboards, and achievements display correctly and consistently on various screen sizes and orientations in the Play Games Services user interface (UI).
Sign-out option is not visible in the Play Games Services UI.
Make sure you can successfully retrieve Player ID, and if applicable, server-side capabilities work as expected.
If the game uses server-side authentication, thoroughly test the
requestServerSideAccessflow. Ensure the server receives the auth code and can exchange it for an access token. Test both success and failure scenarios for network errors, invalidclient IDscenarios.
If your game was using any of the following features, test them to ensure that they work the same as before the migration:
- Leaderboards: Submit scores and view leaderboards. Check for the correct ranking and display of player names and scores.
- Achievements: Unlock achievements and verify they are correctly recorded and displayed in the Play Games UI.
- Saved Games: If the game uses saved games, ensure that saving and loading the game progress works flawlessly. This is particularly critical to test across multiple devices and after app updates.
Post migration tasks
Complete the following steps after you have migrated to games v2 SDK.