
Lighting is one of the most important aspects of a game. It can set the mood, lead the player, identify threats or objectives, and more. Lighting can make or break the visuals of a game. For example, good lighting can make a bad model look better in-game, while bad light can make a great model look worse.
This guide provides information for better lighting performance in a mobile game. How you decide to use lighting affects the performance of your mobile game. It's important to use lighting efficiently to ensure your game performs as smoothly as possible.
Portions of this article are based on work contributed and copyrighted by Arm Limited.
Render pipeline options
Unity’s Legacy Render Pipeline includes the following render paths:
- Forward rendering
- Deferred shading
Forward rendering
With forward rendering, real-time lights are very expensive. If you reduce the number of lights present per pixel, you can offset this cost.
Deferred shading
Deferred shading requires GPU support. On compatible hardware, deferred shading can render a large number of real-time lights with a high level of lighting fidelity. Unfortunately, deferred shading doesn’t perform well on mobile GPUs because they have lower bandwidth.
When you make a mobile title, it's important that your game runs smoothly on as many devices as possible.
Universal Render Pipeline
Unity has developed the Universal Render Pipeline (URP). We highly recommend that you use URP for your mobile games.
Light modes
Different light modes are used based on how a light moves or is used in a Scene. Light mode types have different performance characteristics. When you implement lights, consider the following:
- Use baked for static lighting. This is best for objects that don't change
their lighting during runtime. Baking lights is the process of pre-computing
and storing lighting data in texture maps referred to as
lightmaps.
- Baked lighting can't be modified at runtime. The light and shadows in the lightmaps are static. Since all of the lighting was pre-processed in Unity, there aren’t any runtime lighting calculations impacting performance.
- Dynamic shadows can’t be created with baked light. This might look odd with dynamic or moving objects.
- Use mixed for stationary lights you intend to interact with moving objects.
For example, a torch that casts light on a player and generates a shadow as
the player moves by.
- Mixed lighting creates dynamic direct light and shadow.
- You can include mixed lighting in lightmap calculations for static objects.
- You can change the intensity at runtime. Only direct light is updated.
- Expensive.
- Use real time for dynamic or movable lights, such as light cast from a
fireball that rises from the ground and explodes.
- Dynamic light and shadow properties can be modified at runtime.
- Real-time lights are not baked into lightmaps.
- Very expensive.
For more information, read Unity's Lighting Pipeline.
When possible, use static light and avoid dynamic light
Dynamic, or real-time, lighting is calculated and updated every frame. This is great for moving objects, interactivity, and to create emotion.
In contrast, static light information is baked into lightmaps. Lightmap texture usage enables an object to avoid expensive per-vertex or per-pixel lighting calculations. The rendering cost of a lightmap texture is always much cheaper than dynamic lighting. We recommend that baked lighting be your first choice for implementation into a mobile game.
Lightmap baking
The pre-calculation of the effects of light is known as lightmap baking. The effect of the light is stored in a separate texture, called a lightmap. The lightmap can be used to augment the appearance of objects. Lightmap baking only needs to be done once per iteration of your Scene. If you change the geometry of your Scene, or change the parameters of the baked lights, you will need to rebake the lightmaps. Except for the overhead of the lightmap texture, there aren’t any extra performance costs at runtime. This is the best initial approach to lighting on a mobile platform.
Baked light isn’t affected by any dynamic, or moving, aspects of your Scene. Baked lighting does include Baked Global Illumination for all of the static elements. This means lightmap calculations include indirect light that has bounced off other static objects as well as the baked lights that strike the object directly.
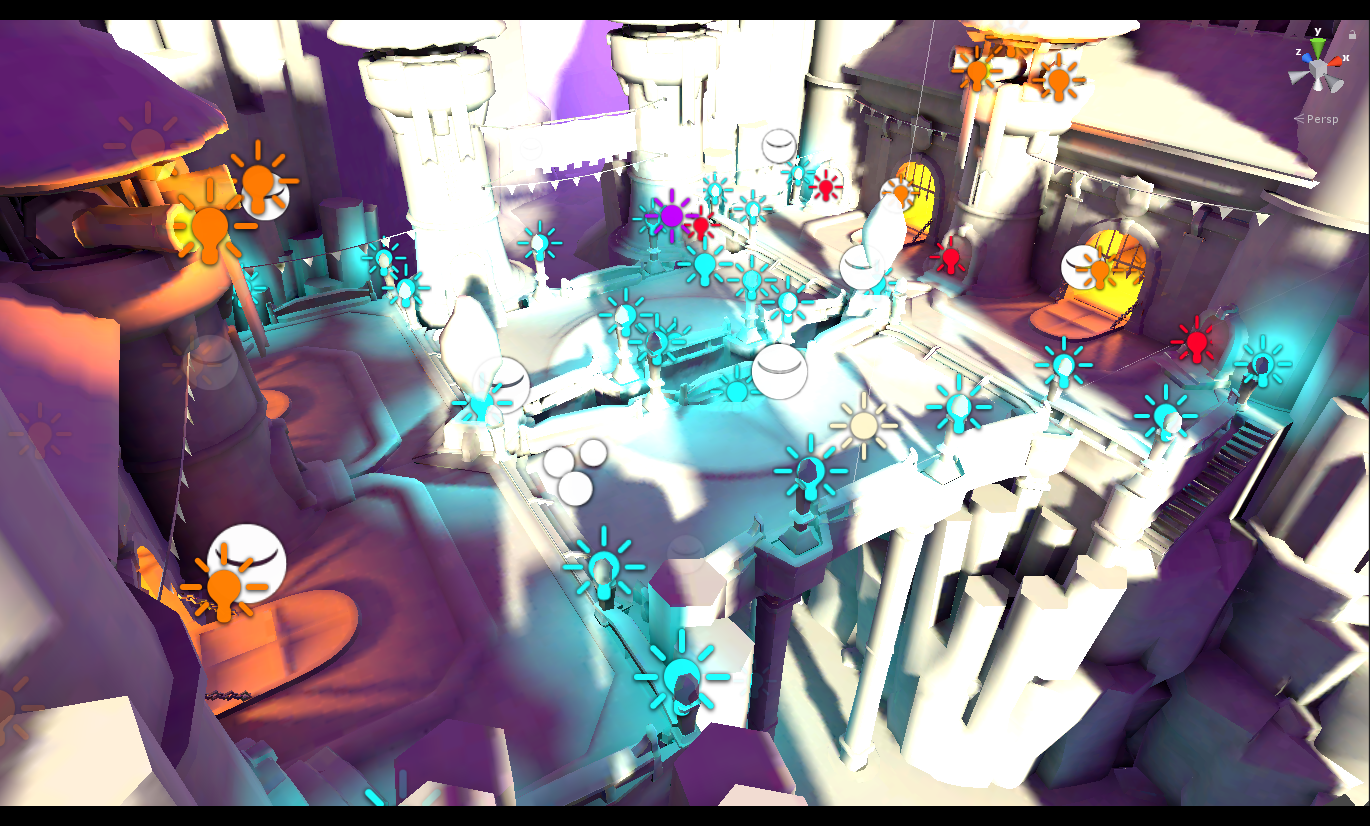
Figure 1. The all-baked lighting setup used in the Armies tech demo.
To bake your lights, perform the following three steps.
Step 1: Set the lights to Mixed or Baked
Set the lights' Mode to either Mixed or Baked. For mobile titles, it’s best to use Baked lights over Mixed. Baked is the least expensive way to render light.
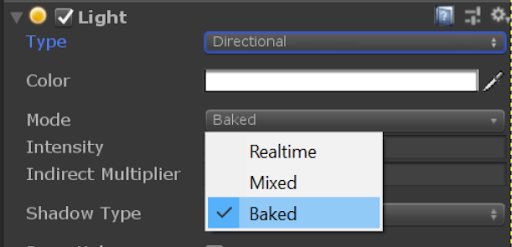
Figure 2. The light’s Mode setting in Unity.
Step 2. Make objects static
Make any objects that are affected by the baked lights Static. There are many optimizations for an object marked as static, but usually it's best to select Everything in the Static drop-down list. With the object marked as Static, Unity knows to include it in the light baking.
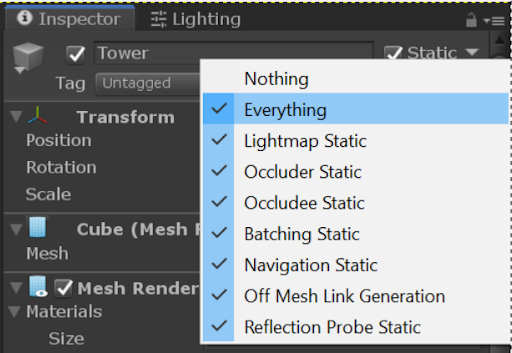
Figure 3. An example static menu.
Step 3. Baking your lights
You can bake your lights with the Lighting menu found in Window > Rendering > Lighting Settings.
When you bake lights, the data saved is based on whatever Scene was active when you started the bake. A folder is generated with the same name as the baked Scene. This folder stores all of the components for the lighting data. If your project loads multiple Scenes at one time, you must bake the lights for each Scene. If you adjust your Scene, you must re-bake the lights.
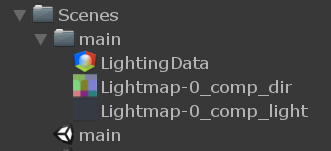
Figure 4. An example of baked lightmaps.
Optimize lightmaps
After lights are set up to be baked, make sure that the baked maps are optimized. Lightmaps vary in size based on their settings when they're baked. You must keep memory usage down on mobile, so lightmap size must be monitored.
In the following example from the Armies demo, there are seven 1024x1024 pixel lightmaps. In the preview of the map, you can see meshes laid on the lightmap. Selected meshes are highlighted.
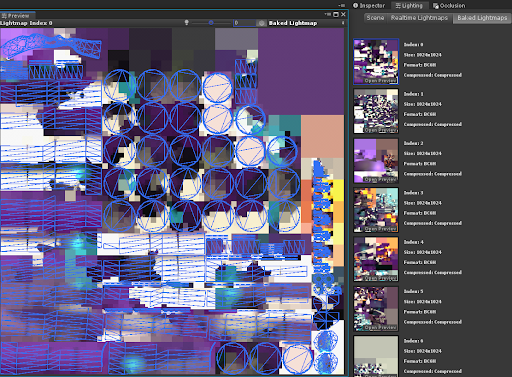
Figure 5. This is an example of a lightmap. The blue sections are selected meshes.
There are many settings in the Lightmapping Settings, along with the size of the maps, that determine how much memory and storage space each map uses. The following sections highlight a few important settings.
Lightmappers
Unity offers the following three methods to bake the lights in your Scene:
- Enlighten: Only supported until the 2020 long term support (LTS) release. Don’t use this for new projects.
- Progressive CPU: Saves a lot of time because it incrementally creates light maps. If Prioritize View is selected, areas in the Scene view are prioritized. This can decrease the iteration time to set up your Scene’s light.
- Progressive GPU: This works the same as Progressive CPU, but generates the lightmap on the GPU instead of the CPU. On supported hardware, this method can greatly reduce baking time compared to using the CPU. There are additional requirements to set up Progressive GPU. Learn more about the requirements on The Progressive GPU Lightmapper page.
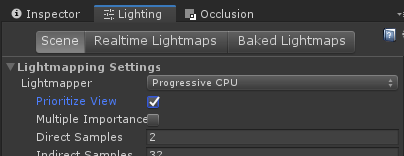
Figure 6. The Lightmapper Settings let you change the bake method for your Scene.
Texels
A texel, or texture pixel, is an individual pixel in a texture map. Texels store light information in a lightmap for each point of light that hits an object. The more texels used per unit of space influences the quality of your lighting, the computation time to bake, disk storage costs, and the VRAM cost of your lightmaps.
To reduce the amount of lightmap data required, adjust the number of texels per unit of the bake in Lightmapping Settings.
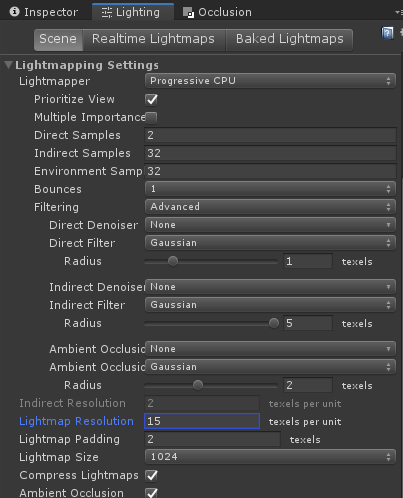
Figure 7. Available settings for lightmaps.
In Lightmapping Settings, the Lightmap Resolution parameter controls how many texels are used per unit in the lightmap. The following is an example of a cube with different Lightmap Resolution settings. You can see how a higher resolution rapidly increases the amount of work needed.
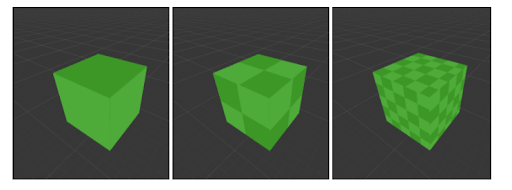
Figure 8. The first cube has a Lightmap Resolution of 1. The second
cube has a Lightmap Resolution of 2. The third cube has a Lightmap
Resolution of 5.
To view how texels are laid out in your Scene, select the Draw Mode dropdown list on the Scene view and choose Baked Lightmap.
Baked objects are covered in a checkerboard overlay. The checkerboard pattern shows how your texels are distributed when you bake the lights.
In the following example, a reduction of the Lightmap Resolution from 15
to 12 in the Armies demo reduces the number of lightmaps needed from seven to
four.
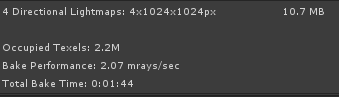
Figure 9. The Armies demo with a Lightmap Resolution of 12.
Texel usage
While you can set the number of texels per unit in an entire Scene, there are often some objects that don't need that many texels.
Unity lets you control how many texels each object uses. In the Inspector > Mesh Renderer for an object, the Scale In Lightmap parameter value controls the number of texels the object uses in the lightmap.
In the following example, the cube on the left has five texels of light information per baking unit. The box on the right has its Scale In Lightmap set to 0.5. That setting scales the texels of light to 2.5, which requires less space in the lightmap than the box on the left.
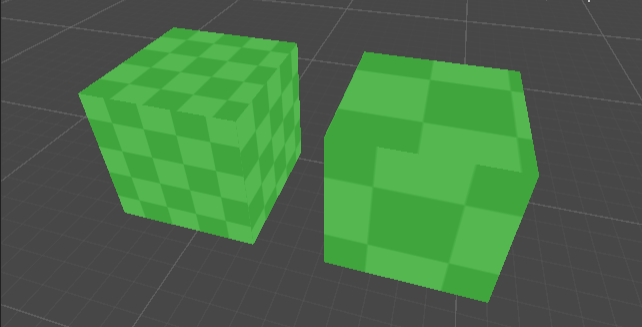
Figure 10. Two cubes with different lightmap resolutions.
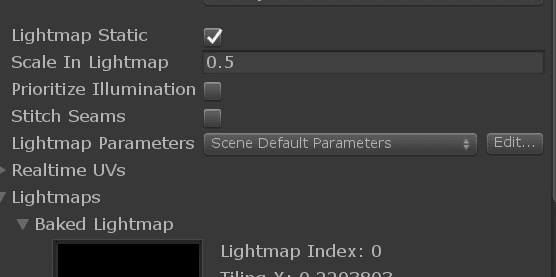
Figure 11. You can change the Scale In Lightmap setting so that an object has fewer texels.
Try to avoid spending texels on the following:
- Surfaces and objects that a player won’t see. This prevents wasted memory on lightmaps for details that aren’t on the screen.
- Surfaces with little light variation on them. For example, objects in a shadow or touched by a single light source.
- Small or thin objects. The amount of lighting these receive won’t add much to the Scene's final render.
Fake lighting as much as possible
To reduce processing requirements, you can fake some elements. This can make your content appear to use light, but actually use more efficient methods.
Fake shadows
Real-time shadows are expensive. They are generated with a technique called shadow mapping. The cost to render a Scene's geometry to the shadow map is proportional to the number of vertices drawn with shadows enabled. We recommend that you limit the amount of geometry that casts shadows and the number of real-time shadow casting lights.
You can implement fake shadows for shadows on dynamic objects without dynamic lights. This keeps rendering costs low and can achieve a similar effect to dynamic shadows. The following are some ways to implement fake shadows:
- Use a 3D mesh, such as a plane or quad, placed under the character, and apply a blurry texture to it.
- You can write your own custom shader for more sophisticated blob shadows.
The following example shows the result if you use a 3D mesh for a shadow:
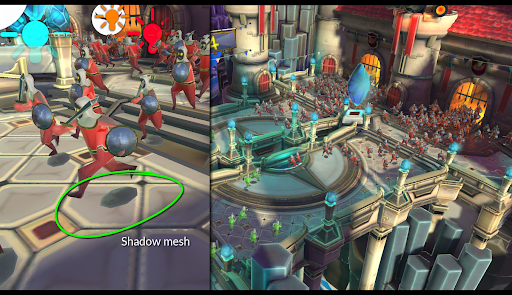
Figure 12. Shadow implementation in the Armies tech demo.
Paint light information directly on textures
If you paint some of the shade into textures, you reduce the computation required for extra lights. This saves memory when you bake your Scene's lights, as it requires less lightmap data.
Light Probes
When you use dynamic objects with baked lighting, they won’t be affected by the lightmaps. This might cause them to feel like they aren’t part of the Scene.
You can solve this with Light Probes. Light Probes have similar benefits to lightmaps. They store light data that can be calculated ahead of time and saved for use at runtime. This moves much of the computational costs to edit time.
While a lightmap encodes light received in a texel for surfaces, a Light Probe stores the light that passes through empty space. You can use this data to light objects that move. Light Probes help integrate dynamic objects visually with lightmapped objects throughout your Scene.
Light Probes are best used to light objects that move in your Scene. The probes take advantage of your baked lights, which lets your moving objects have the same light as the Scene. Lighting dynamic objects with Light Probes is less expensive than real-time lights.
You can learn more about Static Lighting with Light Probes and Light Probes pages.
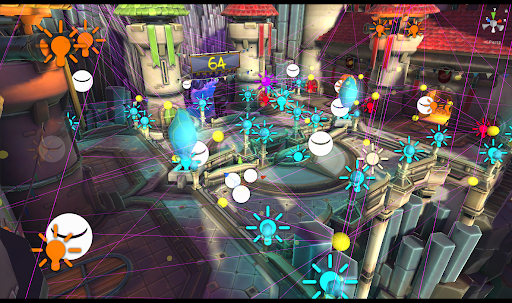
Figure 13. Light probes placed to light the dynamic crowd in the Armies tech demo.
Mesh Renderer settings
Regardless of the type of light your Scene uses, it's important your Mesh Renderer settings are correct.
Turn off anything you don’t use. Settings like Cast Shadows add cost when you render the Scene even if the object isn't lit. The following example of the Mesh Renderer settings is for a character shown in Figure 13. The character uses light probe data, but not reflection probes.
The Blend Probes setting for the Light Probes blends light information from the nearest Light Probes to the character. As the character moves around the Scene, the Light Probes affecting the character will change. Cast Shadows is turned off because the render uses the blob method. Receive Shadows is also turned off because the Scene is baked and there are no real-time shadows.
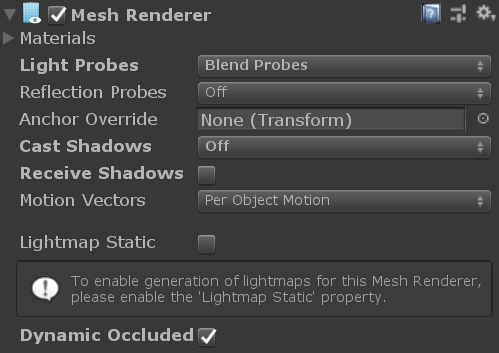
Figure 14. Mesh Renderer settings for the Figure 13 render.
Real-time lights and light types
We recommend handling your light with baked lighting, Light Probes, and fake-lighting techniques such as painted lighting textures or shader material effects. However, if you need real-time light, you must consider the light type to use.
Each light type has a different cost to calculate the lighting. The following list details each light type:
- Directional: This light has a uniform direction and no falloff. Directional light is the cheapest real-time light. You often only need one directional light per Scene. With forward rendering, the suggested rendering path for mobile, Unity will include a default directional light if there's no directional lights in the Scene.
- Spot: Spot lights cull objects outside their cone and won’t light them. This makes spot lights less computationally expensive than spherical point lights. To get the best performance, keep the cone width tight and only hit intended objects.
- Point: These cast light in all directions. Light cast in every direction is helpful but very expensive. Point lights are expensive across a wide region. In addition, shadow calculation can be the most expensive part of lighting. If you cast light in all directions there are more shadows and more calculations.