
The samples for the Android Game Development Extension demonstrate how to use key features of the extension. This topic describes the samples and the settings needed to run them.
The following samples are available on the downloads page:
- HelloJNI: an introductory project.
- Endless-Tunnel: an Android only project.
- Teapot: a cross-platform project for Windows and Android.
- AssemblyCode-Link-Objects: a template project that has assembly source code.
Before you start
Install the Android Game Development Extension and the samples. See the quickstart for details. The topic also describes how to build and run a sample and uses the Android version of the Teapot sample as an example.
The project configuration guide describes how to configure settings for a project that uses the extension, such as adding an Android platform and APK.
HelloJNI
The HelloJNI sample is a simple project that displays a “Hello From JNI” message in an app window. The project use a different set of source code for Windows and Android.
- Android source code and gradle build scripts directory: HelloJNI\AndroidPackaging
- Windows source code and Visual Studio project directory: HelloJNI
When you build the project, Visual Studio passes the following
settings to the app-level build.gradle file. You can change these settings by
modifying your Gradle build scripts.
MSBUILD_NDK_VERSIONMSBUILD_MIN_SDK_VERSIONMSBUILD_JNI_LIBS_SRC_DIRMSBUILD_ANDROID_OUTPUT_APK_NAMEMSBUILD_ANDROID_GRADLE_BUILD_OUTPUT_DIR
To set up and run the sample:
- In Visual Studio, open and build the HelloJNI sample.
- Add an Android arm64-v8a platform. For more information, see Adding an Android Platform.
- Add an Android APK item to the new platform.
- Compile the project.
- Add the following Android platforms and then add an Android APK item to each of them: Android-armeabi-v7a, Android-x86, and Android-x86_64.
- Build and run the sample.
Endless-Tunnel
The Endless-Tunnel sample is an Android game where the player collects white cubes while trying to reach the end of a tunnel. It was ported from an OpenGL sample in the Android NDK repo on Github. The sample does not provide a Windows version of the game.
The sample already has its settings and Android plaforms configured, so you can build and run the project in Visual Studio without any modifications. When you open the solution, Solution Explorer displays these modules:
- endless-tunnel: the application module that displays the game logic.
- glm: a snapshot of the OpenGL Math repo that is built as a static library.
- native_app_glue: an NDK wrapper that communicates with the NativeActivity object.
Teapot
The Teapot sample displays a classic teapot that is rendered with OpenGL ES and ported to the Android Game Development Extension to demonstrate the following features:
- Cross platform project development: you can build the Teapot sample for Windows and Android.
- Custom Android packaging usage: the Gradle build scripts were moved to the
sample’s root directory, where the
Teapot.slnfile is located. - Custom Android configurations that demonstrate how to use Address Sanitizer (ASan) and Hardware Address Sanitizer (HWASan).
The implementation of the Teapot sample is split into multiple parts, which is typical for large cross platform applications and games:
GameApplicationmodule: defines user actions and application states, such as a user rotating the teapot or updating application statistics.GameEnginemodule: implements the core rendering module.
To set up the sample and run it on Android, see the quickstart. To set up the sample and run it on Windows:
- Install GLEW:
- Download and unzip GLEW.
- Copy the binary files from
$your-glew-directory\bin\Release\x64to%SystemRoot%\system32.
- Install freeglut:
- Download and unzip freeglut.
- Copy
$your-freeglut-directory\bin\x86\freeglut.dllto%SystemRoot%\system32.
- Add the freeglut project dependencies:
- Open
Teapot.slnin Visual Studio. - In the menu, click Debug > x64 > Local Windows Debugger.
- In Solution Explorer, right click GameApplication and choose Properties > C/C++ > General > Additional Include Directories.
- Add
$your-freeglut-dir\includeto the path.
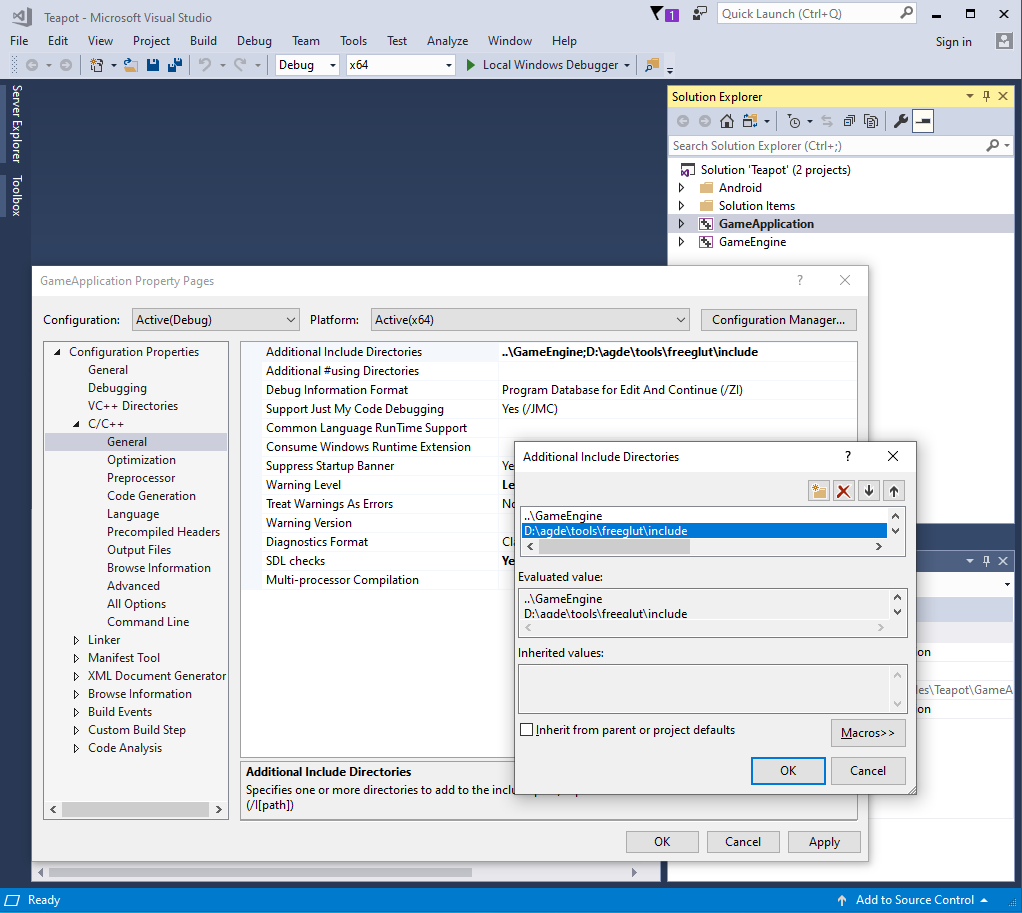
- Click Ok.
- Choose Linker > General > Additional Library Directories.
- Add
$your-freeglut-dir\lib\x64to the path.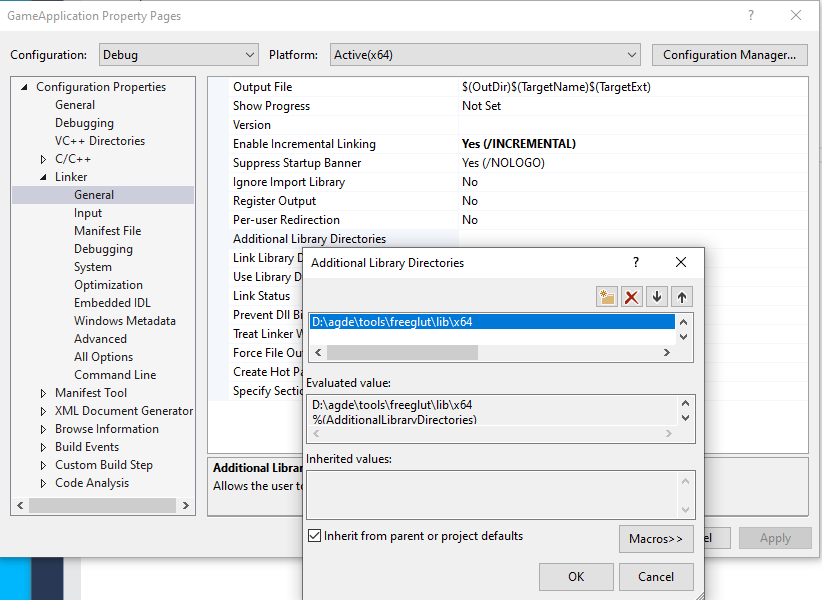
- Click Ok.
- Choose Linker > General > Additional Library Directories.
- Add
freeglut.libto the path. - Click Ok.
- Open
- Add the GLEW project dependencies:
- In the Solution Explorer pane, right click GameApplication and choose Properties > C/C++ > General > Additional Include Directories.
- Add
$your-glew-dir\includeto the path. - Click Ok.
- Choose Linker > General > Additional Library Directories.
- Add
$your-glew-dir\lib\Release\x86to the path. - Click Ok.
- Choose Linker > General > Additional Library Directories.
- Add
glew32.libto the path. - Click Ok.
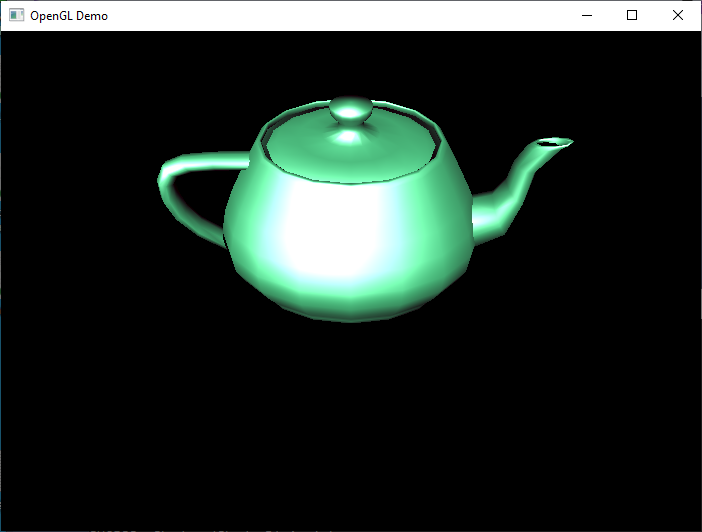
- Run the sample on Windows:
- On the Visual Studio toolbar, click the Local Windows Debugger run button.
- The sample should look as follows:
AssemblyCode-Link-Objects
This is a template project that demonstrates how to generate an Android native library from assembly and C/C++ source code. These are the main components:
AssemblyCode-Link-Objects: the main Android native library built from C++ and assembly source code.StaticLib: a helper static library that exports thefrom_static_lib_assembly_code_asfunction.
The project supports multiple architectures. Each supported architecture has its
own source files that implement functions that are exported from StaticLib.
You should only include the assembly source files for the platforms you are
building. This project includes assembly files in builds by using
custom build tools.
To set up and build the sample:
- In Visual Studio, verify that custom build tools are configured for
the assembly files:
- In Solution Explorer, right click the assembly file and click Properties. This opens the Properties Pages dialog for the file.
- Select the configuration and platform, such as All configurations for Android-arm64-v8a.
- Ensure that General > Exclude from Build is set to No.
- Ensure that General > Item Type is set to Custom Build Tool.
- Click Apply if there are changes to apply.
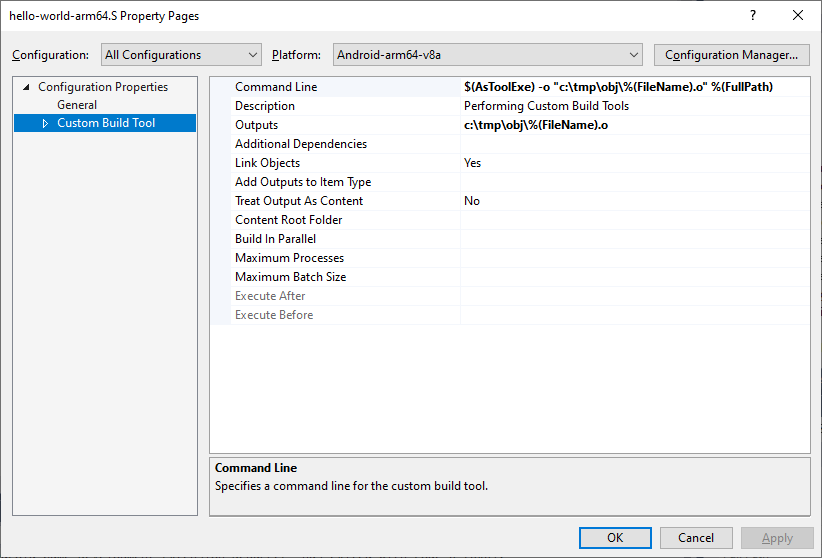
- Ensure that
Configuration Properties > Custom Build Tools > Command Line:
is set to
$(AsToolExe) -o "$(IntDir)%(FileName).o" %(FullPath). The NDK includes a separate assembler for each CPU architecture and$(AsToolExe)maps to the correct assembler. This sample uses the NDK toolchain to build both x86 and x86_64 Android projects. If you want to use yasm for the x86_64 Android platform, use$(YasmToolExe)instead. - Ensure that
Configuration Properties > Custom Build Tools > Outputs:
is set to
$(IntDir)%(FileName).o. This string must be included in the Command Line setting. - Ensure that
Configuration Properties > Custom Build Tools > Link Objects:
is set to
Yes.
For example, the Android-arm64-v8a settings should look similar to the following screenshot:
- Build the project. This builds the
libAssmeblyCodeLinkObjects.sofile:- Open the
AssemblyCode-Link-Objects.slnfile. - In the menu, click Build > Build Solution.
- Open the
- To confirm the functions are exported correctly to the Android
library, use the nm.exe NDK tool:
- In the command line, go to the sample directory.
- Go to the Android library location that was generated by your
build. The default location is similar to
$sample_dir\$solution_configuration\$solution_platform\$platformand$sample_dir\Debug\Android-arm64-v8a\arm64-v8afor the arm64-v8a platform. - Verify that the exported symbol section contains the functions by
running the following command:
…\ndk\toolschains\llvm\prebuilt\windows-x86_64\aarch64-linux-android\bin\nm.exe --defined-only …\Debug\Android-arm64-v8a\arm64-v8a\libAssmeblyCodeLinkObjects.soIn the output, you should see a list of symbols that include the following:
T from_shared_object_assembly_code_asT from_static_lib_assembly_code_as
PoolAllocator
The PoolAllocator sample is an Android app that has a pool-based memory allocator that provides blocks of fixed size very efficiently.
The allocator preallocates the entire memory at initialization time using
mmap. Free blocks are tracked using a linked list. Then, a memory
allocation is a fast O(1) operation that returns the head of the linked list,
and deallocation is also O(1) operation as it adds the block to the
back of the linked list.
The sample has two solution configurations for using HWASan.
HWASan: This configuration demonstrates the simplest approach to using HWASan with custom memory allocators. The internal implementation of the memory allocator is replaced withmalloc/freecalls which are automatically tracked by HWASan. While the memory allocator no longer functions as a pool-based allocator, HWASan can still help you identify important memory bugs, such as use-after-free.HWASan-Advanced: This configuration demonstrates how to fully integrate HWASan into a custom memory allocator without changing the original allocation mechanism used by the allocator. It uses HWASan tagging methods to tag the memory blocks in the preallocated pool, rounds the block size up to a minimum block size required by HWASan, and resets the tags when blocks are returned back to the pool.
Use the HWASan configuration as it is simpler and can help you identify
common memory bugs. Explore the implementation of the HWASan-Advanced
configuration if you want to understand how HWASan works or want to preserve the
internal semantics of your memory allocator while using HWASan.