
Set up the Android Game Development Extension on a Windows computer and run a sample Visual Studio C++ project on an Android device or emulator.
Prerequisites
Follow the steps in this section to prepare your Windows computer for installation of the extension:
Download and install one of the supported versions of Visual Studio:
Android Studio 3.5 or higher is optional, but can be used instead of the Android Game Development Extension to install the Android SDK and NDK.
Download and install JDK 17 for AGDE 23.1.82 or newer, or JDK 11 for up to AGDE 22.2.71, and set your
JAVA_HOMEenvironment variable.
Install the extension
Follow the steps in this section to download and install the Android Game Development Extension:
Close all instances of Visual Studio.
Download the latest extension installer and samples from the Downloads page.
From your download location, double-click the installer. The installer takes several minutes to complete.
If you have more than one version of Visual Studio installed, select the versions that you would like the extension to be installed for.
Click Finish to complete the installation.
Install the Android SDK and NDK
You can install the Android SDK and the Android Native Development Kit (NDK) with Android Studio or the Android Game Development Extension. To install the SDK and NDK from the extension, use the SDK Manager, which is located in the extension toolbar of Visual Studio.
When installing the NDK, make sure to use the NDK (Side by side) checkbox so that the extension can locate it. You must install an NDK version that is supported by the extension (see NDK revision history).
To install the SDK to a different location than the default, set the
ANDROID_SDK_ROOT environment variable on your computer:
- Ensure that Visual Studio is closed.
- In Windows Search, search for
Environment Variables. - Select Edit the system environment variables.
- Click Environment Variables.
- Under User Variables, click New.
- In the Variable Name box, type
ANDROID_SDK_ROOT. - In the Variable Value box, enter the path to the Android SDK.
- Reboot your computer.
The location of the SDK cannot be modified using the SDK Manager window as this environment variable is the only source-of-truth for the SDK location.
Run the sample
Follow the steps in this section to run a provided sample on an emulator and then on a physical Android device.
Configure the platform
Unzip the samples zip file into a directory of your choice. The following samples are included:
- endless-tunnel
- HelloJNI
- Teapot
Start Visual Studio if it is not already running.
Open the samples directory. Select File > Open > Project/Solution and navigate to the
.slnfile.Select an Android platform:
- Select Build > Configuration Manager.
- Under Active solution platform, select Android-x86_64.
Android platforms are already configured in the samples (see add more Android platforms for adding platforms).
Make sure the sample project has the Android SDK and NDK properties configured:

Figure 1. Android platform properties In the Solution Explorer, right-click the project and select Properties.
Select the General properties tab and find the Platform properties for Android.
Select the Android Packaging properties tab.
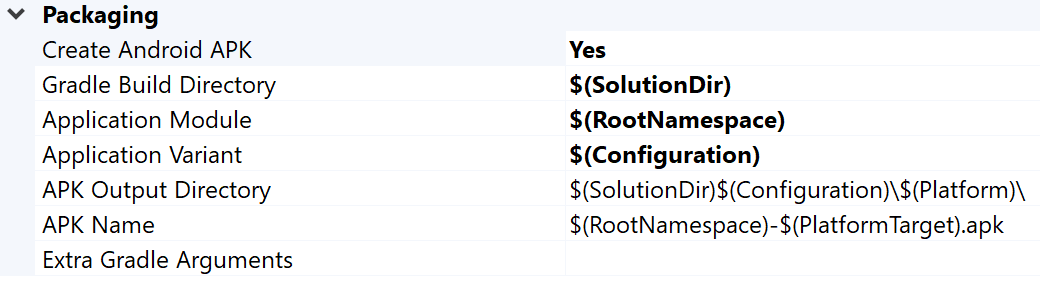
Figure 2. Android packaging properties You can change the output APK name and directory from this tab. Note that some of the Android configuration properties are defined in the property pages and are passed to Gradle. For example, the APK name property
MSBUILD_ANDROID_OUTPUT_APK_NAMEpasses this name to the appbuild.gradlefile.
Set up the emulator
Start AVD Manager from the extension toolbar in Visual Studio. Configure a virtual device and then run it in the Android emulator.
- In the Android Virtual Device Manager, click Create Virtual Device.
- Choose a device definition (for example, Pixel 2).
- Select a system image. You should select an x86_64 ABI because this architecture performs faster in the emulator.
- Verify the configuration and click Finish.
Start the virtual device by clicking the Run
 button in the Android
Virtual Device Manager.
button in the Android
Virtual Device Manager.In Visual Studio, the virtual device should appear next to the Start Debugging toolbar button. Click Start Debugging to launch the sample app on the device. It may take a few moments for the debugger to attach to the app. If you are running the Teapot sample, you can rotate the teapot by dragging your mouse cursor across it.

Figure 3. Teapot sample running on an Android emulator
Set up the device
To run the sample on a physical Android device, you may need to create a new Android platform in the project. This platform must match the architecture of the device. To create a new platform, do the following in Visual Studio:
- Select Build > Configuration Manager.
- Under Active solution platform, select <New>.
Type one of the following for the new platform:
- Android-armeabi-v7a
- Android-arm64-v8a
- Android-x86
- Android-x86_64
In the Copy settings from box, select another existing Android platform (or None if you do not have any Android platforms yet). Make sure you enabled Create new project platforms.
Connect an Android device to your computer using a USB cable. The device type should be shown next to the Start Debugging toolbar button.

Figure 4. Connected Android device shown next to the Start Debugging toolbar buttonIf the device is not shown, check the following:
- The platform selection matches the ABI of your device.
- Developer options and USB debugging are enabled on the device.
- The USB cable is connected from the device to the computer.
- The USB cable supports a data connection (and not just power).
Click the Start Debugging toolbar button to launch the sample app on the device. It may take a few moments for the debugger to attach to the app. Once it is attached, you can interact with the app on your device.
FAQ
The following are some frequently asked questions about the Android Game Development Extension.
Where are the logs for the plugin located?
You can open the log file for the plugin using the Open Logs icon in the Android Game Development Extension toolbar.
What environment variables does the plugin use?
The plugin uses the following environment variables:
ANDROID_SDK_ROOTANDROID_SDK_HOMETEMPGOOGLE_ANDROID_LOG_DIR
What's next
To use your own project with the extension, you must configure it according to the project configuration guide.