
Questo documento descrive come eseguire la migrazione dei giochi esistenti dall'SDK games v1 all'SDK games v2.
Prima di iniziare
Puoi utilizzare qualsiasi IDE preferito, ad esempio Android Studio, per eseguire la migrazione del gioco. Completa i seguenti passaggi prima di eseguire la migrazione a games v2:
- Scaricare e installare Android Studio
- Il gioco deve utilizzare l'SDK v1 per i giochi.
- Puoi eseguire l'upgrade del tuo gioco per utilizzare l'SDK v1 per i giochi per
com.google.android.gms:play-services-games:24.0.0. Non devi eseguire l'upgrade acom.google.android.gms:play-services-games:25.0.0perché l'API games v1 è stata rimossa.
Aggiorna le dipendenze
Nel file
build.gradledel modulo, trova questa riga nelle dipendenze a livello di modulo.implementation "com.google.android.gms:play-services-games:+"Sostituiscilo con il seguente codice:
implementation "com.google.android.gms:play-services-games-v2:version"Sostituisci version con l'ultima versione dell'SDK per i giochi.
Dopo aver aggiornato le dipendenze, assicurati di completare tutti i passaggi descritti in questo documento.
Definisci l'ID progetto
Per aggiungere l'ID progetto dell'SDK Play Game Services alla tua app, completa i seguenti passaggi:
Nel file
AndroidManifest.xml, aggiungi l'elemento e gli attributi<meta-data>seguenti all'elemento<application>:<manifest> <application> <meta-data android:name="com.google.android.gms.games.APP_ID" android:value="@string/game_services_project_id"/> </application> </manifest>Definisci il riferimento alla risorsa stringa
@string/game_services_project_idutilizzando l'ID progetto dei servizi per i giochi del tuo gioco come valore. L'ID progetto dei servizi per i giochi si trova sotto il nome del gioco nella pagina Configurazione di Google Play Console.Nel file
res/values/strings.xml, aggiungi un riferimento alla risorsa stringa e imposta l'ID progetto come valore. Ad esempio:<!-- res/values/strings.xml --> <resources> <!-- Replace 0000000000 with your game’s project id. Example value shown above. --> <string translatable="false" name="game_services_project_id"> 0000000000 </string> </resources>
Percorsi di migrazione
Il percorso di migrazione corretto per il tuo gioco dipende da come implementa Play Games Services v1 e gestisce l'identità del giocatore. Per garantire una transizione senza problemi ed evitare la perdita di dati dei giocatori, identifica lo scenario che corrisponde meglio alla tua configurazione esistente e segui i passaggi corrispondenti.
Opzione 1: per i giochi in cui l'IGA è associato all'ID giocatore di Play Games Services
Questo scenario si applica ai giochi che hanno utilizzato i servizi Google Play Giochi Player ID come unico
identificatore per l'account in-game (IGA) di un giocatore e non hanno precedentemente
richiesto o memorizzato un OpenID. La sfida principale è collegare l'IGA esistente a un identificatore principale (OpenID) senza perdere la connessione ai progressi del giocatore.
Il flusso di migrazione include i seguenti passaggi:
- All'avvio del gioco, la v2 dell'SDK di Play Games Services autentica automaticamente e in modo silenzioso la piattaforma.
Presenta una schermata di accesso con un pulsante Accedi con Google, che sostituisce il pulsante Google Play. Ad esempio, vedi CredManBridge.java.
CredManBridge.java
package com.wickedcube.trivialkart; import android.accounts.Account; import android.content.Context; import android.util.Log; import android.os.CancellationSignal; import androidx.credentials.CredentialManager; import androidx.credentials.GetCredentialRequest; import androidx.credentials.GetCredentialResponse; import androidx.credentials.exceptions.GetCredentialException; import androidx.credentials.exceptions.NoCredentialException; import com.google.android.libraries.identity.googleid.GetGoogleIdOption; import com.google.android.libraries.identity.googleid.GoogleIdTokenCredential; import com.google.android.gms.auth.api.identity.AuthorizationClient; import com.google.android.gms.auth.api.identity.AuthorizationRequest; import com.google.android.gms.auth.api.identity.AuthorizationResult; import com.google.android.gms.common.api.ApiException; import com.google.android.gms.auth.api.identity.Identity; import com.google.android.gms.common.api.Scope; import com.unity3d.player.UnityPlayer; import java.util.Collections; import java.util.List; import java.util.concurrent.Executor; import java.util.concurrent.Executors;public class CredManBridge {
// --- MODE 1: SILENT SIGN-IN (Called on Awake) --- // Tries to auto-select an authorized account. If it fails, it does NOT show UI. public static void signInSilent(Context context, String webClientId) { CredentialManager credentialManager = CredentialManager.create(context); CancellationSignal cancellationSignal = new CancellationSignal(); Executor executor = Executors.newSingleThreadExecutor();
Log.d("CredMan", "Attempting Silent Sign-In..."); GetGoogleIdOption silentOption = new GetGoogleIdOption.Builder() .setFilterByAuthorizedAccounts(true) // Strict: Only authorized accounts .setServerClientId(webClientId) .setAutoSelectEnabled(true) // Auto-select if possible .build(); GetCredentialRequest silentRequest = new GetCredentialRequest.Builder() .addCredentialOption(silentOption) .build(); credentialManager.getCredentialAsync( context, silentRequest, cancellationSignal, executor, new androidx.credentials.CredentialManagerCallback<GetCredentialResponse, GetCredentialException>() { @Override public void onResult(GetCredentialResponse result) { Log.d("CredMan", "Silent Sign-In Successful!"); handleSignInResult(context, result, webClientId); } @Override public void onError(GetCredentialException e) { // Send a specific error code so Unity knows to just stay on the Start Screen Log.d("CredMan", "Silent sign-in failed. Keeping UI hidden."); UnityPlayer.UnitySendMessage("AuthManager", "OnSignInError", "SilentFailed"); } } );}
// --- MODE 2: INTERACTIVE SIGN-IN (Called on Button Click) --- // Forces the Account Selection / "Add Account" sheet to appear. public static void signInInteractive(Context context, String webClientId) { CredentialManager credentialManager = CredentialManager.create(context); CancellationSignal cancellationSignal = new CancellationSignal(); Executor executor = Executors.newSingleThreadExecutor();
Log.d("CredMan", "Starting Interactive Sign-In...");

GetGoogleIdOption interactiveOption = new GetGoogleIdOption.Builder()
    .setFilterByAuthorizedAccounts(false) // Show ALL accounts (and "Add Account")
    .setServerClientId(webClientId)
    .setAutoSelectEnabled(false)          // Force the UI to show
    .build();

GetCredentialRequest interactiveRequest = new GetCredentialRequest.Builder()
    .addCredentialOption(interactiveOption)
    .build();

credentialManager.getCredentialAsync(
    context,
    interactiveRequest,
    cancellationSignal,
    executor,
    new androidx.credentials.CredentialManagerCallback<GetCredentialResponse, GetCredentialException>() {
        @Override
        public void onResult(GetCredentialResponse result) {
            Log.d("CredMan", "Interactive Sign-In Successful!");
            handleSignInResult(context, result, webClientId);
        }

        @Override
        public void onError(GetCredentialException e) {
            Log.e("CredMan", "Interactive Sign-In Canceled or Failed", e);
            UnityPlayer.UnitySendMessage("AuthManager", "OnSignInError", "Canceled");
        }
    }
);
}
private static void handleSignInResult(Context context, GetCredentialResponse result, String webClientId) { try { GoogleIdTokenCredential credential = GoogleIdTokenCredential.createFrom(result.getCredential().getData()); String email = credential.getId();
    Account account = new Account(email, "com.google");
    // Requesting GAMES_LITE scope to check for pre-existing V1 grants
    List<Scope> requestedScopes = Collections.singletonList(new Scope("https://www.googleapis.com/auth/games_lite"));

    AuthorizationRequest authRequest = new AuthorizationRequest.Builder()
        .setRequestedScopes(requestedScopes)
        .setAccount(account)
        .requestOfflineAccess(webClientId)
        .build();

    AuthorizationClient authClient = Identity.getAuthorizationClient(context);

    authClient.authorize(authRequest)
        .addOnSuccessListener(authorizationResult -> {
            if (authorizationResult.getServerAuthCode() != null) {
                // CASE 1: RETURNING USER (Success)
                // The user has already granted GAMES_LITE in the past.
                // We got the code directly without showing UI.
                Log.i("CredMan", "PGS v1: Existing grant found. Returning user detected. Auth Code retrieved.");
                UnityPlayer.UnitySendMessage("AuthManager", "OnSignInSuccess", authorizationResult.getServerAuthCode());
            }
            else if (authorizationResult.hasResolution()) {
                // CASE 2: NEW USER (PendingIntent)
                // The user has NOT granted GAMES_LITE before. The API returned a PendingIntent
                // (authorizationResult.getPendingIntent()) to show the consent screen.
                // As per your flow, we DISCARD this intent and do not show UI.
                Log.i("CredMan", "PGS v1: No existing grant (PendingIntent returned). This is a NEW user or they revoked access.");
                Log.i("CredMan", "PGS v1: Discarding PendingIntent. Proceeding as New User.");

                // Notify Unity that this is a "New User" so it can trigger V2 logic instead of failing
                UnityPlayer.UnitySendMessage("AuthManager", "OnSignInError", "NewUser_NoGrant");
            }
            else {
                // Edge Case: No code and no resolution?
                Log.e("CredMan", "PGS v1: Authorization success but no Auth Code or Resolution returned.");
                UnityPlayer.UnitySendMessage("AuthManager", "OnSignInError", "No Auth Code returned");
            }
        })
        .addOnFailureListener(e -> {
            // CASE 3: GENERIC FAILURE
            Log.e("CredMan", "PGS v1: Authorization failed completely.", e);
            UnityPlayer.UnitySendMessage("AuthManager", "OnSignInError", "Authorization Failed: " + e.getMessage());
        });

} catch (Exception e) {
    UnityPlayer.UnitySendMessage("AuthManager", "OnSignInError", "Parsing Error: " + e.getMessage());
}
} }
Recupera due identificatori distinti quando il giocatore tocca il pulsante Accedi con Google e seleziona un Account Google:
OpenID, che è l'identificatore principale per l'associazione dell'IGA.Player IDdei servizi per i giochi di Play, recuperato utilizzando l'ambitoGAMES_LITE, per cercare l'IGA del giocatore nel tuo sistema di backend ed eseguire il binding. Per ulteriori informazioni, vedi RecuperarePlayer ID.
Accedi all'IGA tramite il flusso Accedi con Google nei lanci successivi del gioco, senza richiedere ai giochi di utilizzare
Player IDcome identificatore principale.
Recupera Player ID
Puoi eseguire il passaggio 3 utilizzando un'implementazione lato client del gioco.
- Chiama l'API Android Credential Manager per consentire all'utente di accedere con un Account Google.
- Dopo che l'utente completa il flusso di accesso con Google e seleziona un Account Google, ricevi un oggetto risultato contenente il token ID e l'indirizzo email.
- Costruisci un oggetto Account dall'indirizzo email.
- Chiama l'API Authorization con l'ambito
GAMES_LITEe l'account. - Se l'account dispone di una concessione preesistente nell'ambito
GAMES_LITE, l'API Authorization restituisce un token direttamente nell'oggetto di risposta:- Utilizza il token di risposta per chiamare i server di Play Games Services e recuperare l'
Player IDdi Play Games Services. - Verifica se i servizi per i giochi di Play
Player IDsono collegati a un account in-game.- Indica un utente di ritorno da Play Games Services v1.
- Collega il nuovo ID GAIA all'account Play Games Services v1 precedente.
- Utilizza il token di risposta per chiamare i server di Play Games Services e recuperare l'
- Se l'account non dispone di una concessione preesistente nell'ambito
GAMES_LITE, l'API Authorization restituisce unPendingIntent:- Ciò indica che l'utente non ha un account esistente di Play Games Services v1.
- Elimina in modo sicuro
PendingIntentsenza mostrare alcuna UI.
Opzione 2: per i giochi che eseguono già il binding di IGA a OpenID
Gli sviluppatori di questo gruppo hanno il percorso di migrazione più semplice. Se l'account in-game del tuo gioco è già associato principalmente a OpenID, devi solo eseguire la migrazione tecnica standard dell'SDK dalla versione 1 alla versione 2, come descritto nei passaggi.
Eseguire la migrazione da Accedi con Google deprecato
Sostituisci la classe GoogleSignInClient
con la classe GamesSignInClient.
Java
Individua i file del corso GoogleSignInClient.
import com.google.android.gms.auth.api.signin.GoogleSignIn;
import com.google.android.gms.auth.api.signin.GoogleSignInClient;
import com.google.android.gms.auth.api.signin.GoogleSignInOptions;

// ... existing code

@Override
public void onCreate(@Nullable Bundle bundle) {
    super.onCreate(bundle);

    // ... existing code

    GoogleSignInOptions signInOption =
        new GoogleSignInOptions.Builder(GoogleSignInOptions.DEFAULT_GAMES_SIGN_IN).build();

    // Client used to sign in to Google services
    GoogleSignInClient googleSignInClient =
        GoogleSignIn.getClient(this, signInOptions);
}
e aggiornalo in questo modo:
import com.google.android.gms.games.PlayGamesSdk;
import com.google.android.gms.games.PlayGames;
import com.google.android.gms.games.GamesSignInClient;

// ... existing code

@Override
public void onCreate(){
    super.onCreate();
    PlayGamesSdk.initialize(this);
    // Client used to sign in to Google services
    GamesSignInClient gamesSignInClient =
        PlayGames.getGamesSignInClient(getActivity());
}
Kotlin
Individua i file del corso GoogleSignInClient.
import com.google.android.gms.auth.api.signin.GoogleSignIn
import com.google.android.gms.auth.api.signin.GoogleSignInClient
import com.google.android.gms.auth.api.signin.GoogleSignInOptions

// ... existing code

val signInOptions = GoogleSignInOptions.DEFAULT_GAMES_SIGN_IN

// ... existing code

override fun onCreate(savedInstanceState: Bundle?) {
    super.onCreate(savedInstanceState)
    val googleSignInClient: GoogleSignInClient =
        GoogleSignIn.getClient(this, signInOptions)
}
e aggiornalo in questo modo:
import com.google.android.gms.games.PlayGames
import com.google.android.gms.games.PlayGamesSdk
import com.google.android.gms.games.GamesSignInClient

// ... existing code

override fun onCreate(savedInstanceState: Bundle?) {
    super.onCreate(savedInstanceState)
    PlayGamesSdk.initialize(this)
    // client used to sign in to Google services
    val gamesSignInClient: GamesSignInClient =
        PlayGames.getGamesSignInClient(this)
}
Aggiorna il codice GoogleSignIn
L'API GoogleSignIn non è supportata nell'SDK v2 per i giochi. Sostituisci il codice dell'API GoogleSignIn con l'API GamesSignInClient come mostrato nell'esempio seguente.
Per richiedere un token di accesso lato server, utilizza il metodo
GamesSignInClient.requestServerSideAccess().
Per saperne di più, consulta
Aggiornare le classi di accesso lato server.
Java
Individua i file del corso GoogleSignIn.
// Request code used when invoking an external activity.
private static final int RC_SIGN_IN = 9001;

private boolean isSignedIn() {
    GoogleSignInAccount account = GoogleSignIn.getLastSignedInAccount(this);
    GoogleSignInOptions signInOptions =
    GoogleSignInOptions.DEFAULT_GAMES_SIGN_IN;
    return GoogleSignIn.hasPermissions(account, signInOptions.getScopeArray());
}

private void signInSilently() {
    GoogleSignInOptions signInOptions =
        GoogleSignInOptions.DEFAULT_GAMES_SIGN_IN;
    GoogleSignInClient signInClient = GoogleSignIn.getClient(this, signInOptions);
    signInClient
        .silentSignIn()
        .addOnCompleteListener(
            this,
            task -> {
            if (task.isSuccessful()) {
                // The signed-in account is stored in the task's result.
                GoogleSignInAccount signedInAccount = task.getResult();
                showSignInPopup();
            } else {
                // Perform interactive sign in.
                startSignInIntent();
            }
        });
}

private void startSignInIntent() {
    GoogleSignInClient signInClient = GoogleSignIn.getClient(this,
        GoogleSignInOptions.DEFAULT_GAMES_SIGN_IN);
    Intent intent = signInClient.getSignInIntent();
    startActivityForResult(intent, RC_SIGN_IN);
}

@Override
protected void onActivityResult(int requestCode, int resultCode, Intent data) {
    super.onActivityResult(requestCode, resultCode, data);
    if (requestCode == RC_SIGN_IN) {
        GoogleSignInResult result =
        Auth.GoogleSignInApi.getSignInResultFromIntent(data);
        if (result.isSuccess()) {
            // The signed-in account is stored in the result.
            GoogleSignInAccount signedInAccount = result.getSignInAccount();
            showSignInPopup();
        } else {
            String message = result.getStatus().getStatusMessage();
            if (message == null || message.isEmpty()) {
                message = getString(R.string.signin_other_error);
        }
        new AlertDialog.Builder(this).setMessage(message)
            .setNeutralButton(android.R.string.ok, null).show();
        }
    }
}

private void showSignInPopup() {
Games.getGamesClient(requireContext(), signedInAccount)
    .setViewForPopups(contentView)
    .addOnCompleteListener(
        task -> {
            if (task.isSuccessful()) {
                logger.atInfo().log("SignIn successful");
            } else {
                logger.atInfo().log("SignIn failed");
            }
        });
  }
e aggiornalo in questo modo:
private void signInSilently() {
    gamesSignInClient.isAuthenticated().addOnCompleteListener(isAuthenticatedTask -> {
    boolean isAuthenticated =
        (isAuthenticatedTask.isSuccessful() &&
            isAuthenticatedTask.getResult().isAuthenticated());
        if (isAuthenticated) {
            // Continue with Play Games Services
        } else {
            // If authentication fails, either disable Play Games Services
            // integration or
            // display a login button to prompt players to sign in.
            // Use`gamesSignInClient.signIn()` when the login button is clicked.
        }
    });
}

@Override
protected void onResume() {
    super.onResume();
    // When the activity is inactive, the signed-in user's state can change;
    // therefore, silently sign in when the app resumes.
    signInSilently();
}
Kotlin
Individua i file del corso GoogleSignIn.
// Request codes we use when invoking an external activity.
private val RC_SIGN_IN = 9001

// ... existing code

private fun isSignedIn(): Boolean {
    val account = GoogleSignIn.getLastSignedInAccount(this)
    val signInOptions = GoogleSignInOptions.DEFAULT_GAMES_SIGN_IN
    return GoogleSignIn.hasPermissions(account, *signInOptions.scopeArray)
}

private fun signInSilently() {
    val signInOptions = GoogleSignInOptions.DEFAULT_GAMES_SIGN_IN
    val signInClient = GoogleSignIn.getClient(this, signInOptions)
    signInClient.silentSignIn().addOnCompleteListener(this) { task ->
        if (task.isSuccessful) {
            // The signed-in account is stored in the task's result.
            val signedInAccount = task.result
            // Pass the account to showSignInPopup.
            showSignInPopup(signedInAccount)
        } else {
            // Perform interactive sign in.
            startSignInIntent()
        }
    }
}

private fun startSignInIntent() {
    val signInClient = GoogleSignIn.getClient(this, GoogleSignInOptions.DEFAULT_GAMES_SIGN_IN)
    val intent = signInClient.signInIntent
    startActivityForResult(intent, RC_SIGN_IN)
}

override fun onActivityResult(requestCode: Int, resultCode: Int, data: Intent?) {
    super.onActivityResult(requestCode, resultCode, data)
    if (requestCode == RC_SIGN_IN) {
        val result = Auth.GoogleSignInApi.getSignInResultFromIntent(data)
        if (result.isSuccess) {
            // The signed-in account is stored in the result.
            val signedInAccount = result.signInAccount
            showSignInPopup(signedInAccount) // Pass the account to showSignInPopup.
        } else {
            var message = result.status.statusMessage
            if (message == null || message.isEmpty()) {
                message = getString(R.string.signin_other_error)
        }
        AlertDialog.Builder(this)
            .setMessage(message)
            .setNeutralButton(android.R.string.ok, null)
            .show()
        }
    }
}

private fun showSignInPopup(signedInAccount: GoogleSignInAccount) {
    // Add signedInAccount parameter.
    Games.getGamesClient(this, signedInAccount)
        .setViewForPopups(contentView) // Assuming contentView is defined.
        .addOnCompleteListener { task ->
        if (task.isSuccessful) {
            logger.atInfo().log("SignIn successful")
        } else {
            logger.atInfo().log("SignIn failed")
        }
    }
}
e aggiornalo in questo modo:
private fun signInSilently() {
    gamesSignInClient.isAuthenticated.addOnCompleteListener { isAuthenticatedTask ->
        val isAuthenticated = isAuthenticatedTask.isSuccessful &&
        isAuthenticatedTask.result.isAuthenticated
        if (isAuthenticated) {
            // Continue with Play Games Services
        } else {
            // To handle a user who is not signed in, either disable Play Games Services integration
            // or display a login button. Selecting this button calls `gamesSignInClient.signIn()`.
        }
    }
}

override fun onResume() {
    super.onResume()
    // Since the state of the signed in user can change when the activity is
    // not active it is recommended to try and sign in silently from when the
    // app resumes.
    signInSilently()
}
Aggiungere il codice GamesSignInClient
Se l'autenticazione del giocatore è riuscita, rimuovi il pulsante di accesso a Play Games Services dal gioco. Se l'utente sceglie di non autenticarsi all'avvio del gioco,
continua a mostrare un pulsante con l'icona di Play Games Services
e avvia la procedura di accesso con
GamesSignInClient.signIn().
Java
private void startSignInIntent() {
    gamesSignInClient
        .signIn()
        .addOnCompleteListener( task -> {
            if (task.isSuccessful() && task.getResult().isAuthenticated()) {
                // sign in successful
            } else {
                // sign in failed
            }
        });
  }
Kotlin
private fun startSignInIntent() {
    gamesSignInClient
        .signIn()
        .addOnCompleteListener { task ->
            if (task.isSuccessful && task.result.isAuthenticated) {
                // sign in successful
            } else {
                // sign in failed
            }
        }
  }
Rimuovere il codice di disconnessione
Rimuovi il codice per GoogleSignInClient.signOut.
Rimuovi il codice mostrato nell'esempio seguente:
Java
// ... existing code

private void signOut() {
    GoogleSignInClient signInClient = GoogleSignIn.getClient(this,
    GoogleSignInOptions.DEFAULT_GAMES_SIGN_IN);
    signInClient.signOut().addOnCompleteListener(this,
    new OnCompleteListener() {
        @Override
        public void onComplete(@NonNull Task task) {
           // At this point, the user is signed out.
        }
    });
}
Kotlin
// ... existing code

private fun signOut() {
    val signInClient = GoogleSignIn.getClient(this, GoogleSignInOptions.DEFAULT_GAMES_SIGN_IN)
    signInClient.signOut().addOnCompleteListener(this) {
    // At this point, the user is signed out.
    }
}
Verificare l'autenticazione riuscita
Includi il seguente codice per verificare se l'autenticazione è stata eseguita automaticamente e aggiungi la logica personalizzata, se disponibile.
Java
private void checkIfAutomaticallySignedIn() {
gamesSignInClient.isAuthenticated().addOnCompleteListener(isAuthenticatedTask -> {
boolean isAuthenticated =
    (isAuthenticatedTask.isSuccessful() &&
    isAuthenticatedTask.getResult().isAuthenticated());

    if (isAuthenticated) {
        // Continue with Play Games Services
        // If your game requires specific actions upon successful sign-in,
        // you can add your custom logic here.
        // For example, fetching player data or updating UI elements.
    } else {
        // Show a login button to ask  players to sign-in. Clicking it should
        // call GamesSignInClient.signIn().
        }
    });
}
Kotlin
private void checkIfAutomaticallySignedIn() {
gamesSignInClient.isAuthenticated()
    .addOnCompleteListener { task ->
    val isAuthenticated = task.isSuccessful && task.result?.isAuthenticated ?: false

        if (isAuthenticated) {
            // Continue with Play Games Services
        } else {
            // Disable your integration or show a login button
        }
    }
}
Aggiorna i nomi e i metodi delle classi client
Quando esegui la migrazione a games v2, i metodi utilizzati per ottenere i nomi delle classi client
sono diversi.
Utilizza i metodi
PlayGames.getxxxClient()
corrispondenti anziché
i metodi
Games.getxxxClient().
Ad esempio, per
LeaderboardsClient
utilizza PlayGames.getLeaderboardsClient() anziché il
metodo Games.getLeaderboardsClient().
Rimuovi qualsiasi codice correlato alle classi GamesClient e GamesMetadataClient,
in quanto non abbiamo classi sostitutive in games v2.
Java
Individua il codice per LeaderboardsClient.
import com.google.android.gms.games.LeaderboardsClient;
import com.google.android.gms.games.Games;

@Override
public void onCreate(@Nullable Bundle bundle) {
    super.onCreate(bundle);
        // Get the leaderboards client using Play Games services.
    LeaderboardsClient leaderboardsClient = Games.getLeaderboardsClient(this,
        GoogleSignIn.getLastSignedInAccount(this));
}
e aggiornalo in questo modo:
import com.google.android.gms.games.LeaderboardsClient;
import com.google.android.gms.games.PlayGames;

 @Override
public void onCreate(@Nullable Bundle bundle) {
    super.onCreate(bundle);
        // Get the leaderboards client using Play Games services.
        LeaderboardsClient leaderboardsClient = PlayGames.getLeaderboardsClient(getActivity());
}
Kotlin
Individua il codice per LeaderboardsClient.
import com.google.android.gms.games.LeaderboardsClient
import com.google.android.gms.games.Games
// Initialize the variables.
private lateinit var leaderboardsClient: LeaderboardsClient

override fun onCreate(savedInstanceState: Bundle?) {
    super.onCreate(savedInstanceState)
    leaderboardsClient = Games.getLeaderboardsClient(this,
        GoogleSignIn.getLastSignedInAccount(this))
}
e aggiornalo in questo modo:
import com.google.android.gms.games.LeaderboardsClient
import com.google.android.gms.games.PlayGames
    // Initialize the variables.
private lateinit var leaderboardsClient: LeaderboardsClient

override fun onCreate(savedInstanceState: Bundle?) {
    super.onCreate(savedInstanceState)
    leaderboardsClient = PlayGames.getLeaderboardsClient(this)
}
Allo stesso modo, utilizza i metodi corrispondenti per i seguenti client:
AchievementsClient, EventsClient, GamesSignInClient,
PlayerStatsClient, RecallClient, SnapshotsClient o PlayersClient.
Aggiornare le classi di accesso lato server
Per richiedere un token di accesso lato server, utilizza il metodo
GamesSignInClient.requestServerSideAccess() anziché il metodo
GoogleSignInAccount.getServerAuthCode().
Per saperne di più, consulta Invia il codice di autorizzazione server.
L'esempio seguente mostra come richiedere un token di accesso lato server.
Java
Individua il codice del corso GoogleSignInOptions.
    private static final int RC_SIGN_IN = 9001;
    private GoogleSignInClient googleSignInClient;

    private void startSignInForAuthCode() {
        /** Client ID for your backend server. */
        String webClientId = getString(R.string.webclient_id);
        GoogleSignInOptions signInOption = new GoogleSignInOptions.Builder(GoogleSignInOptions.DEFAULT_GAMES_SIGN_IN)
            .requestServerAuthCode(webClientId)
            .build();

        GoogleSignInClient signInClient = GoogleSignIn.getClient(this, signInOption);
        Intent intent = signInClient.getSignInIntent();
        startActivityForResult(intent, RC_SIGN_IN);
    }

    /** Auth code to send to backend server */
    private String mServerAuthCode;

    @Override
    protected void onActivityResult(int requestCode, int resultCode, Intent data) {
        super.onActivityResult(requestCode, resultCode, data);
        if (requestCode == RC_SIGN_IN) {
            GoogleSignInResult result = Auth.GoogleSignInApi.getSignInResultFromIntent(data);
        if (result.isSuccess()) {
            mServerAuthCode = result.getSignInAccount().getServerAuthCode();
        } else {
            String message = result.getStatus().getStatusMessage();
            if (message == null || message.isEmpty()) {
                message = getString(R.string.signin_other_error);
            }
            new AlertDialog.Builder(this).setMessage(message)
                .setNeutralButton(android.R.string.ok, null).show();
        }
      }
    }
e aggiornalo in questo modo:
  private void startRequestServerSideAccess() {
      GamesSignInClient gamesSignInClient = PlayGames.getGamesSignInClient(this);
      gamesSignInClient
          .requestServerSideAccess(OAUTH_2_WEB_CLIENT_ID,
           /* forceRefreshToken= */ false, /* additional AuthScope */ scopes)
          .addOnCompleteListener(task -> {
              if (task.isSuccessful()) {
                  AuthResponse authresp = task.getResult();
                  // Send the authorization code as a string and a
                  // list of the granted AuthScopes that were granted by the
                  // user. Exchange for an access token.
                  // Verify the player with Play Games Services REST APIs.
              } else {
                // Authentication code retrieval failed.
              }
        });
  }
Kotlin
Individua il codice del corso GoogleSignInOptions.
  // ... existing code

  private val RC_SIGN_IN = 9001
  private lateinit var googleSignInClient: GoogleSignInClient

  // Auth code to send to backend server.
  private var mServerAuthCode: String? = null

  private fun startSignInForAuthCode() {
      // Client ID for your backend server.
      val webClientId = getString(R.string.webclient_id)

      val signInOption = GoogleSignInOptions.Builder(GoogleSignInOptions.DEFAULT_GAMES_SIGN_IN)
          .requestServerAuthCode(webClientId)
          .build()

      googleSignInClient = GoogleSignIn.getClient(this, signInOption)
      val intent = googleSignInClient.signInIntent
      startActivityForResult(intent, RC_SIGN_IN)
  }

  override fun onActivityResult(requestCode: Int, resultCode: Int, data: Intent?) {
      super.onActivityResult(requestCode, resultCode, data)
      if (requestCode == RC_SIGN_IN) {
          val result = Auth.GoogleSignInApi.getSignInResultFromIntent(data)
          if (result.isSuccess) {
              mServerAuthCode = result.signInAccount.serverAuthCode
          } else {
              var message = result.status.statusMessage
              if (message == null || message.isEmpty()) {
                  message = getString(R.string.signin_other_error)
              }
              AlertDialog.Builder(this).setMessage(message)
                  .setNeutralButton(android.R.string.ok, null).show()
            }
        }
  }
e aggiornalo in questo modo:
  private void startRequestServerSideAccess() {
  GamesSignInClient gamesSignInClient = PlayGames.getGamesSignInClient(this);
      gamesSignInClient
          .requestServerSideAccess(OAUTH_2_WEB_CLIENT_ID, /* forceRefreshToken= */ false,
          /* additional AuthScope */ scopes)
          .addOnCompleteListener(task -> {
              if (task.isSuccessful()) {
                  AuthResponse authresp = task.getResult();
                  // Send the authorization code as a string and a
                  // list of the granted AuthScopes that were granted by the
                  // user. Exchange for an access token.
                  // Verify the player with Play Games Services REST APIs.
              } else {
                // Authentication code retrieval failed.
              }
        });
  }
Eseguire la migrazione da GoogleApiClient
Per le integrazioni esistenti meno recenti, il tuo gioco potrebbe dipendere dalla variante dell'API GoogleApiClient dell'SDK Play Games Services. È stato
ritirato alla fine del 2017
e sostituito da client "senza connessione".
Per eseguire la migrazione, puoi sostituire la classe GoogleApiClient con un equivalente "senza connessione".
La tabella seguente elenca le mappature delle classi comuni dai giochi v1 ai giochi v2:
| games v2 (attuale) | games v1 (legacy) |
|---|---|
| com.google.android.gms.games.AchievementsClient | com.google.android.gms.games.achievement.Achievements |
| com.google.android.gms.games.LeaderboardsClient | com.google.android.gms.games.leaderboard.Leaderboard |
| com.google.android.gms.games.SnapshotsClient | com.google.android.gms.games.snapshot.Snapshots |
| com.google.android.gms.games.PlayerStatsClient | com.google.android.gms.games.stats.PlayerStats |
| com.google.android.gms.games.PlayersClient | com.google.android.gms.games.Players |
| com.google.android.gms.games.GamesClientStatusCodes | com.google.android.gms.games.GamesStatusCodes |
Crea ed esegui il gioco
Per creare ed eseguire su Android Studio, consulta Crea ed esegui la tua app.
Testare il gioco
Assicurati che il gioco funzioni come previsto testandolo. I test che esegui dipendono dalle funzionalità del gioco.
Di seguito è riportato un elenco di test comuni da eseguire.
Accesso riuscito.
L'accesso automatico funziona. L'utente deve aver eseguito l'accesso a Play Games Services all'avvio del gioco.
Viene visualizzato il popup di benvenuto.
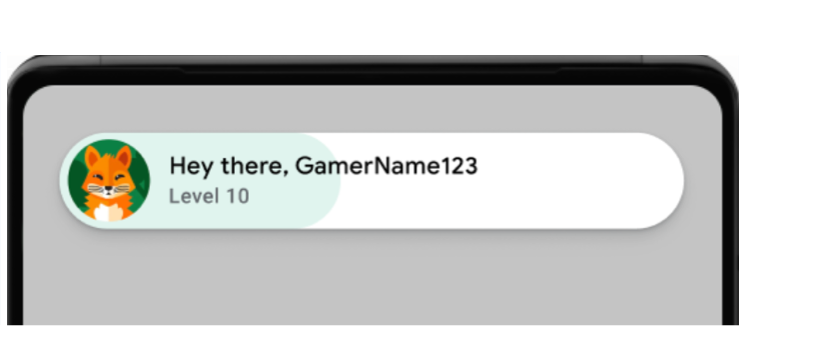
Esempio di popup di benvenuto (fai clic per ingrandire). Vengono visualizzati i messaggi di log riusciti. Esegui questo comando nel terminale:
adb logcat | grep com.google.android.
Un messaggio di log riuscito è mostrato nell'esempio seguente:
[
Garantire la coerenza dei componenti UI.
Popup, classifiche e obiettivi vengono visualizzati correttamente e in modo coerente su varie dimensioni e orientamenti dello schermo nell'interfaccia utente di Play Games Services.
L'opzione di disconnessione non è visibile nell'interfaccia utente di Play Games Services.
Assicurati di poter recuperare correttamente l'ID giocatore e, se applicabile, che le funzionalità lato server funzionino come previsto.
Se il gioco utilizza l'autenticazione lato server, testa a fondo il flusso
requestServerSideAccess. Assicurati che il server riceva il codice di autorizzazione e possa scambiarlo con un token di accesso. Testa gli scenari di successo e di errore per errori di rete e scenariclient IDnon validi.
Se il tuo gioco utilizzava una delle seguenti funzionalità, testale per assicurarti che funzionino come prima della migrazione:
- Classifiche: invia i punteggi e visualizza le classifiche. Controlla il ranking e la visualizzazione corretti dei nomi e dei punteggi dei giocatori.
- Obiettivi: sblocca gli obiettivi e verifica che vengano registrati e visualizzati correttamente nell'interfaccia utente di Play Giochi.
- Partite salvate: se il gioco utilizza le partite salvate, assicurati che il salvataggio e il caricamento dei progressi di gioco funzionino perfettamente. Ciò è particolarmente importante per i test su più dispositivi e dopo gli aggiornamenti delle app.
Attività post-migrazione
Completa i seguenti passaggi dopo aver eseguito la migrazione a games v2.
Pubblica il gioco
Crea gli APK e pubblica il gioco in Play Console.
- Nel menu di Android Studio, seleziona Build > Build Bundles(s) / APK(s) > Build APK(s).
- Pubblica il gioco. Per maggiori informazioni, vedi Pubblicare app private da Play Console.