Instalar o Godot e configurar projetos para Android
Mantenha tudo organizado com as coleções
Salve e categorize o conteúdo com base nas suas preferências.
Este guia inclui as seguintes etapas:
Como selecionar uma versão do Godot
Como fazer o download e a instalação do Godot
Como configurar o Godot para desenvolvimento no Android
Como configurar o sistema para desenvolvimento e exportação em C# (versão Mono do Godot apenas)
Selecionar uma versão
Use a versão estável mais recente do Godot quando possível. Para desenvolvimento em Android,
use a versão 3.3 ou mais recente.
Fazer o download do Godot e executá-lo
Acesse a
página de download do Godot
para fazer o download do mecanismo do jogo para seu ambiente preferido.
O Godot oferece duas versões na página de download: padrão e Mono. As duas podem ser
usadas no desenvolvimento para Android. A versão Mono é necessária para o desenvolvimento em C#.
O Godot é distribuído como um aplicativo independente. Não é necessário um
processo de instalação. Depois de extrair o arquivo de download, execute-o sem mudar nada.
Configurar a compatibilidade com o Android
Definir as configurações do SDK do Android Studio
Faça o download da versão estável mais recente do Android Studio e instale-a, caso ainda não tenha feito isso.
Inicie o Android Studio.
Na janela de boas-vindas do Android Studio, abra o menu suspenso Configure e selecione SDK Manager.
Na parte superior da janela, anote o Android SDK Location no
seu computador. Você precisará especificar esse local no editor do Godot.
Na guia SDK Platforms, localize a entrada da lista para Android 11.0 R.
Se o item estiver desmarcado, marque-o.
Na guia SDK Tools, localize os itens da lista para NDK (Side by side),
Android SDK Command-line Tools e CMake. Marque-os se não estiverem
marcados.
Se o status de qualquer item da lista estiver definido como Update Available, ative
a caixa de seleção para atualizar para a versão mais recente.
Clique no botão OK. Confirme o download e aceite os termos de
licença para concluir a instalação.
Criar um keystore de depuração
Os apps Android precisam ser assinados digitalmente
para serem executados em um dispositivo. Em testes locais, um arquivo keystore de depuração pode ser usado para assinar
apps. O Android Studio criará automaticamente um keystore de depuração padrão. Se você
já tiver criado apps usando uma configuração de depuração com o Android Studio, um
arquivo debug.keystore estará localizado no seguinte diretório:
Microsoft Windows: C:\Users\$username\.android\debug.keystore
Linux/macOS: ~\.android\debug.keystore
Se o arquivo debug.keystore não existir, crie um executando as
seguintes etapas:
Inicie o Android Studio.
Na janela "Welcome to Android Studio", selecione a opção Import an Android Code Sample.
Selecione o exemplo Ndk -> Hello GL2 na lista e clique no botão Next.
Escolha um local para o projeto e clique no botão Finish.
Aguarde o carregamento e a sincronização do projeto com o Gradle e selecione
Build -> Make Project na barra de menus do Android Studio.
Aguarde a conclusão do build e verifique se um arquivo debug.keystore foi
criado no diretório adequado.
Definir o SDK do Android e depurar o local do keystore no editor do Godot
Inicie o editor do Godot.
Crie ou abra um projeto.
Selecione Editor -> Editor Settings... na barra de menus do Editor.
Na janela Editor Settings, selecione o item Export -> Android
no painel à esquerda.
No painel à direita, vá para a caixa de texto de Android Sdk Path e insira
o caminho para o Android SDK.
Na caixa de texto de Debug Keystore, digite o caminho para o arquivo debug.keystore.
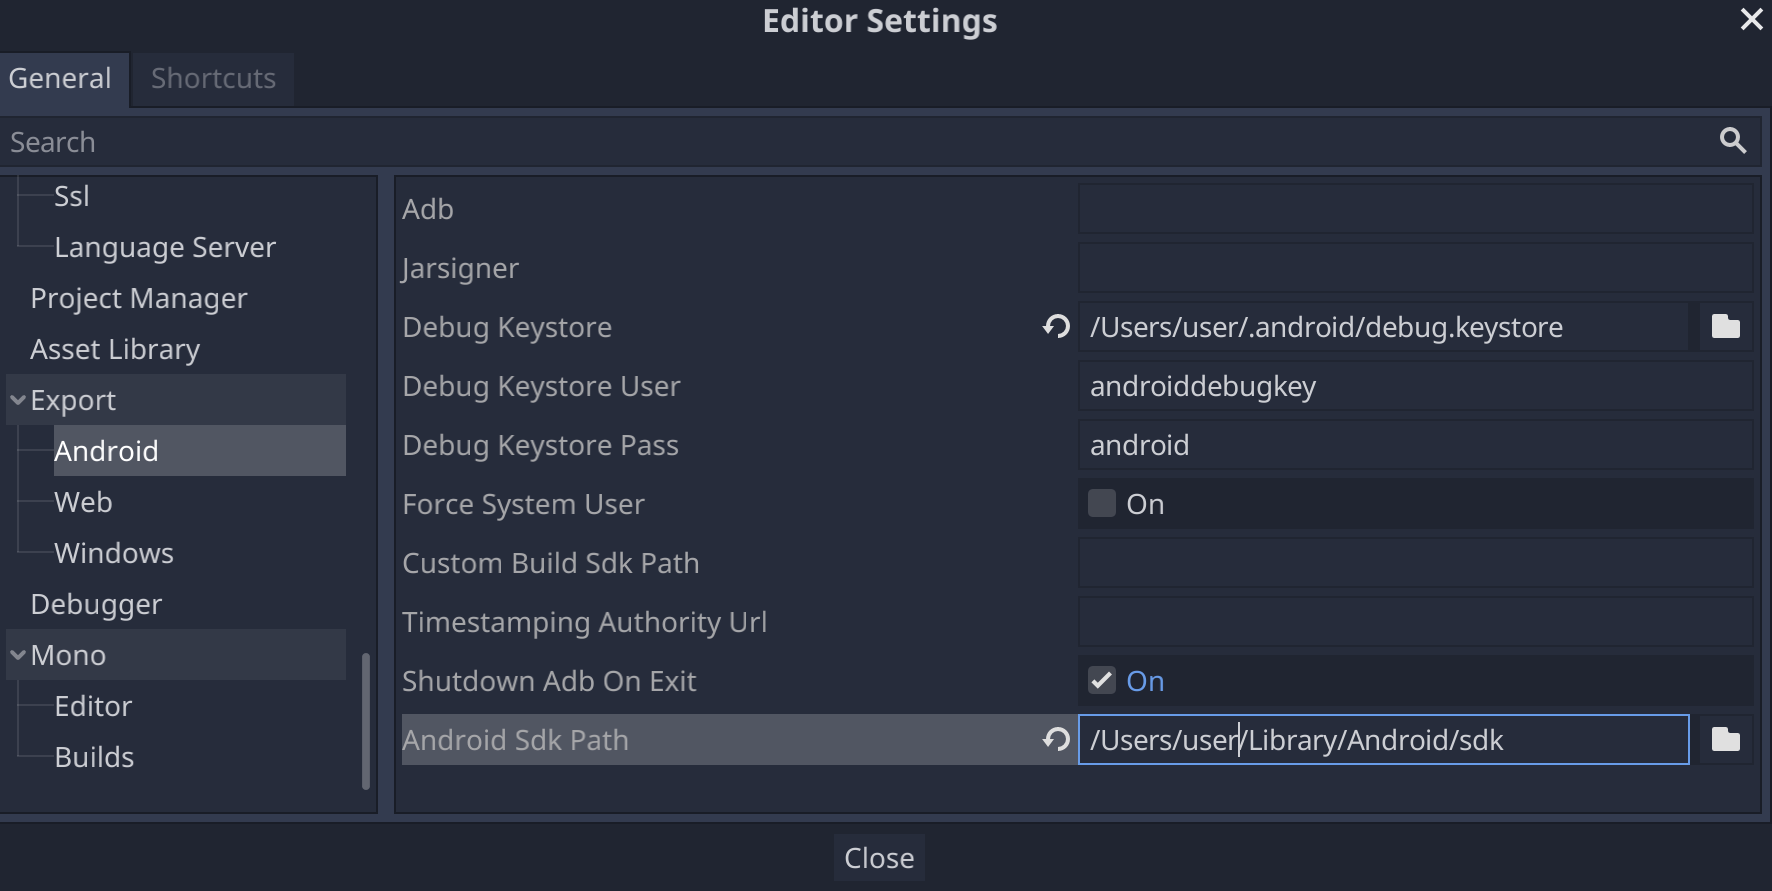
Figura 1. O campo Android Sdk Path em Editor Settings
Configurar Mono
Instalar o MSBuild
A versão Mono do Godot requer que o MSBuild crie e exporte projetos que usam
C#. Para instalar o MSBuild:
O Godot tem compatibilidade muito limitada para edição de código C#. É altamente recomendável usar
um editor externo para arquivos C#. O Godot é compatível com os seguintes editores em C#:
Microsoft Visual Studio/Visual Studio para Mac
Microsoft Visual Studio Code
JetBrains Rider
MonoDevelop
Para configurar um editor externo em C#, abra um projeto no editor do Godot e
execute as seguintes etapas:
Selecione Editor -> Editor Settings… na barra de menus do editor.
Na janela Editor Settings, selecione o item Mono -> Editor no painel à esquerda.
Escolha o editor no menu suspenso External Editor.
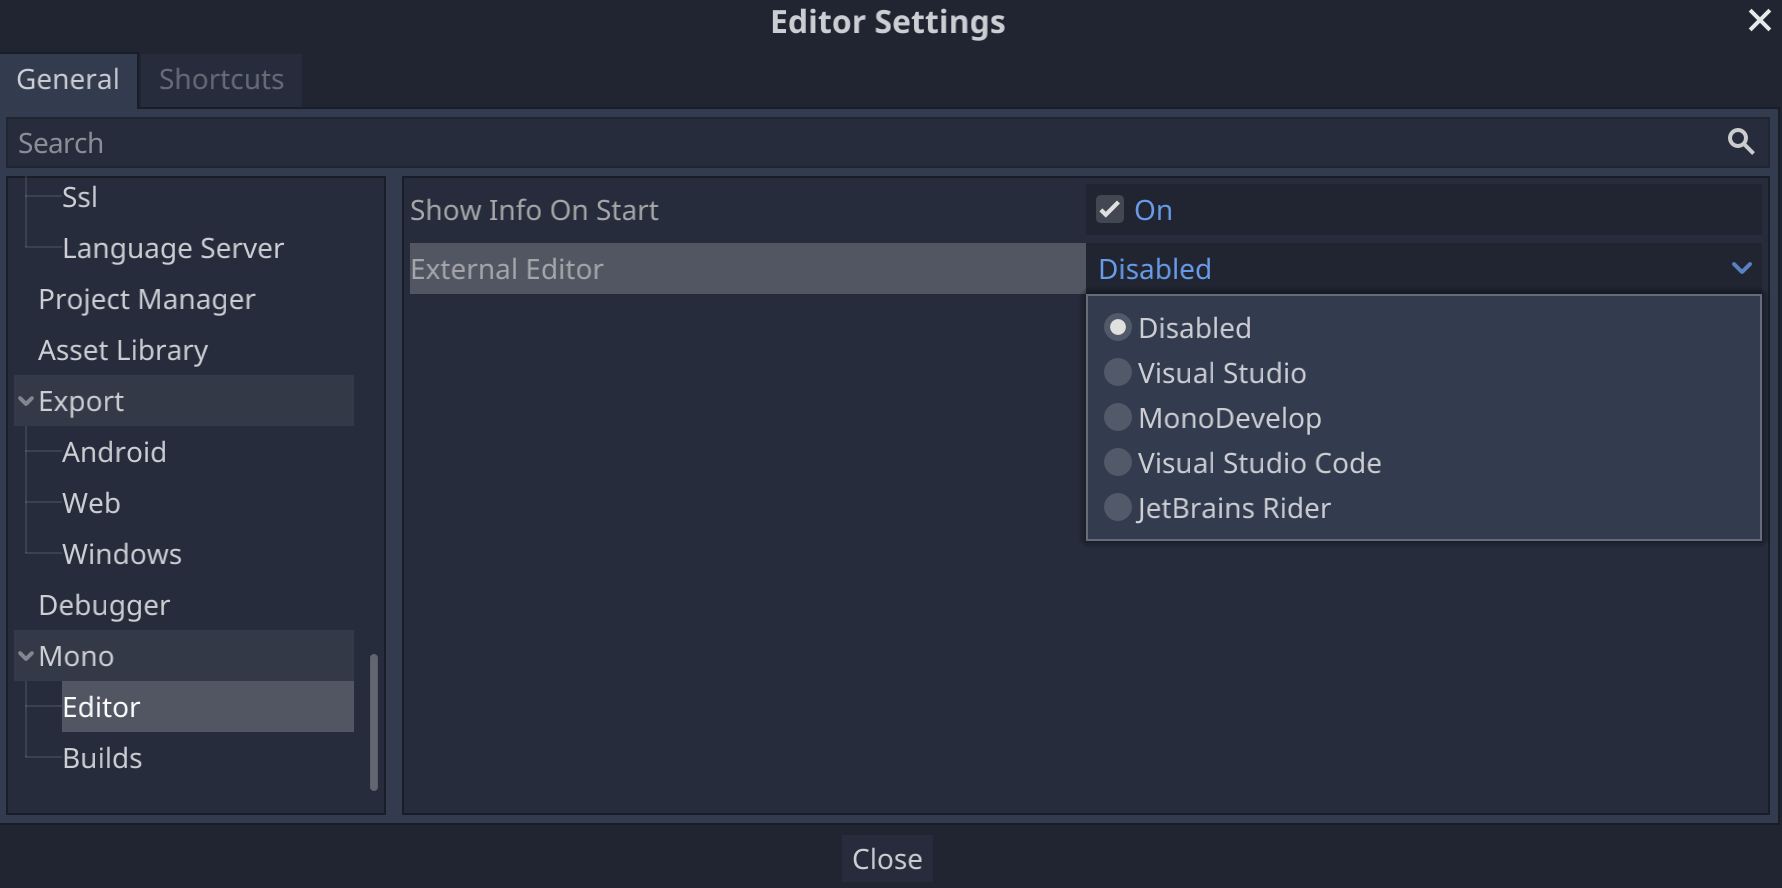
Figura 2: o campo External Editor em Editor Settings
Plug-ins do editor de C# para Godot
Ferramentas C# para Godot (link em inglês):
um plug-in para o Microsoft Visual Studio Code que inclui compatibilidade com depuração de C# e
recursos de conclusão de código parcial.
O conteúdo e os exemplos de código nesta página estão sujeitos às licenças descritas na Licença de conteúdo. Java e OpenJDK são marcas registradas da Oracle e/ou suas afiliadas.
Última atualização 2025-07-27 UTC.
[[["Fácil de entender","easyToUnderstand","thumb-up"],["Meu problema foi resolvido","solvedMyProblem","thumb-up"],["Outro","otherUp","thumb-up"]],[["Não contém as informações de que eu preciso","missingTheInformationINeed","thumb-down"],["Muito complicado / etapas demais","tooComplicatedTooManySteps","thumb-down"],["Desatualizado","outOfDate","thumb-down"],["Problema na tradução","translationIssue","thumb-down"],["Problema com as amostras / o código","samplesCodeIssue","thumb-down"],["Outro","otherDown","thumb-down"]],["Última atualização 2025-07-27 UTC."],[],[],null,["# Install Godot and configure projects for Android\n\nThis guide will cover the following steps:\n\n- Selecting a version and release of Godot.\n- Downloading and installing Godot.\n- Configuring Godot for Android development.\n- Configuring your system for C# development and export (Mono release of Godot only).\n\nSelect a version\n----------------\n\nUse the latest stable release of Godot when possible. For Android development,\nuse version 3.3 or higher.\n| **Note:** Starting in August 2021, Google Play will require all Android apps to be submitted as Android App Bundles. Versions of Godot lower than 3.3 don't meet this requirement. For more information, see the [Target API Level](/distribute/best-practices/develop/target-sdk) page.\n\nDownload and run Godot\n----------------------\n\nVisit the\n[Godot download page](https://godotengine.org/download)\nto download the game engine for your preferred environment.\n\nGodot offers two releases on its download page: standard and Mono. Either may be\nused to develop for Android. The Mono release is required for C# development.\n\nGodot is distributed as a standalone application. It does not require an\ninstallation process; after extracting the download archive, you can run it as-is.\n\nConfigure Android support\n-------------------------\n\n### Configure the Android Studio SDK settings\n\n1. If you haven't already done so, [download](/studio) and [install](/studio/install) the latest stable release of Android Studio.\n2. Launch Android Studio.\n3. In the Welcome to Android Studio window, open the **Configure** dropdown menu and select **SDK Manager**.\n4. At the top of the window, make a note of the **Android SDK Location** on your computer. You will need to specify that location in Godot editor.\n5. In the **SDK Platforms** tab, find the list entry for **Android 11.0 R**. Check the item if it is unchecked.\n6. In the **SDK Tools** tab, find the list items for **NDK (Side by side)** , **Android SDK Command-line Tools** , and **CMake**. Check them if they are unchecked.\n7. If any list items have their status set to **Update Available**, enable their check box to update to the latest version.\n8. Click the **OK** button. Confirm the download and accept the license agreements to complete the installation.\n\n### Create a debug keystore\n\nAndroid apps must be [digitally signed](/studio/publish/app-signing#certificates-keystores)\nto run on a device. For local testing, a debug keystore file may be used to sign\napps. Android Studio will automatically create a default debug keystore. If you\nhave previously built apps using a debug configuration with Android Studio, a\n`debug.keystore` file should be located in the following directory:\n\n- **Microsoft Windows** : `C:\\Users\\$username\\.android\\debug.keystore`\n- **Linux/macOS** : `~\\.android\\debug.keystore`\n\nIf the `debug.keystore` file does not exist, create one by performing the\nfollowing steps:\n\n1. Launch Android Studio.\n2. In the Welcome to Android Studio window, select the **Import an Android Code Sample** option.\n3. Select the **Ndk -\\\u003e Hello GL2** sample from the list and click the **Next** button.\n4. Choose a location for the project and click the **Finish** button.\n5. Wait for the project to load and sync with Gradle, then select **Build -\\\u003e Make Project** from the Android Studio menu bar.\n6. Wait for the build to finish, then verify a `debug.keystore` file was created in the appropriate directory.\n\n### Set the Android SDK and debug keystore location in Godot editor\n\n1. Launch the Godot editor.\n2. Create or open a project.\n3. Select **Editor -\\\u003e Editor Settings...** from the **Editor** menu bar.\n4. In the **Editor Settings** window, select the **Export -\\\u003e Android** item in the left panel.\n5. In the right panel, go to the text box for **Android Sdk Path** and enter the path to the Android SDK.\n6. In the text box for **Debug Keystore** enter the path to the `debug.keystore` file.\n\n**Figure 1.** The **Android Sdk Path** field in **Editor Settings**\n\nSet up Mono\n-----------\n\n### Install MSBuild\n\nThe Mono release of Godot requires MSBuild to build and export projects that use\nC#. To install MSBuild:\n\n**Linux and macOS**\n\n- [Download](https://www.mono-project.com/download/stable/) and [install](https://www.mono-project.com/docs/) the latest version of the Mono SDK.\n\n**Microsoft Windows**\n\n- Install [Microsoft Visual Studio](https://visualstudio.microsoft.com/downloads/) or [Microsoft Visual Studio Build Tools](https://visualstudio.microsoft.com/thank-you-downloading-visual-studio/?sku=BuildTools&rel=15). When you run the installer, ensure you have the **.NET Framework 4.5** targeting pack selected for installation.\n\n### Configure a C# editor\n\nGodot has very limited support for editing C# code. Using an external editor for\nC# files is strongly recommended. Godot supports the following C# editors:\n\n- Microsoft Visual Studio/Visual Studio for Mac\n- Microsoft Visual Studio Code\n- JetBrains Rider\n- MonoDevelop\n\nTo configure an external C# editor, open a project in the Godot editor and\nperform the following steps:\n\n1. Select **Editor -\\\u003e Editor Settings...** from the editor menu bar.\n2. In the **Editor Settings** window, select the **Mono -\\\u003e Editor** item in the left panel.\n3. Choose the desired editor from the **External Editor** dropdown menu.\n\n**Figure 2:** The **External Editor** field in **Editor Settings**\n\n### C# editor plugins for Godot\n\n- [C# Tools for Godot](https://marketplace.visualstudio.com/items?itemName=neikeq.godot-csharp-vscode): A plugin for Microsoft Visual Studio Code that adds C# debugging support and partial code completion features.\n- [JetBrains Rider plugin](https://plugins.jetbrains.com/plugin/13882-godot-support): Adds C# debugging support."]]